

@RefreshScope实现动态刷新配置原理
1 @RefreshScope介绍
在介绍@RefreshScope之前,先简单介绍一下作用域的概念:在Spring IOC中存在5种BeanScope,即:
| 作用域 | 描述 |
|---|---|
| singleton | 每一个Spring IoC容器都拥有唯一的一个实例对象(默认作用域) |
| prototype | 一个BeanDefinition对应多个对象实例,每次取出的都是不同的对象 |
| request | 每一个HTTP请求都有自己的Bean实例 |
| session | 一个Bean的作用域为HTTPsession的生命周期 |
| global session | 一个Bean的作用域为全局HTTPSession的生命周期 |
除此之外,SpringCloud新增了一个名为“refresh”的作用域,目的在于可以在不重启应用的情况下热加载外部配置(yml或properties)。
@RefreshScope注解包含一个枚举类型ScopedProxyMode的属性,默认为TARGET_CLASS即基于类的代理,其定义如下:
@Target({ ElementType.TYPE, ElementType.METHOD })
@Retention(RetentionPolicy.RUNTIME)
@Scope("refresh")
@Documented
public @interface RefreshScope {
	@AliasFor(annotation = Scope.class)
	ScopedProxyMode proxyMode() default ScopedProxyMode.TARGET_CLASS;

}
public enum ScopedProxyMode {
    DEFAULT,					//不使用代理。(默认)
    NO,								// 不使用代理,等价于DEFAULT。
    INTERFACES,				// 使用基于接口的代理
    TARGET_CLASS;			// 使用基于类的代理(cglib)

    private ScopedProxyMode() {
    }
}
2 @RefreshScope原理
@RefreshScope的实现依赖@Scope注解,其中包含两个属性value 和 proxyMode:
@Target({ElementType.TYPE, ElementType.METHOD})
@Retention(RetentionPolicy.RUNTIME)
@Documented
public @interface Scope {
    @AliasFor("scopeName")
    String value() default "";

    @AliasFor("value")
    String scopeName() default "";

    ScopedProxyMode proxyMode() default ScopedProxyMode.DEFAULT;
}
反过头来看@RefreshScope就是一个scopeName="refresh"的@Scope注解,
这个代理模式,则是会在生成bean时同时生成名为scopedTarget.beanName的bean,之后的访问通过代理对象来访问,每次访问都会创建一个新的对象。
接着来在介绍RefreshScope类前,先看下其顶级接口Scope接口,其中重点看get方法,get方法在其抽象实现类GenericScope中实现(如下图),实现方式是由GenericScope内部对加了@RefreshScope注解的对象wrapper进行缓存。
public interface Scope {
    Object get(String name, ObjectFactory<?> objectFactory);

    @Nullable
    Object remove(String name);

    void registerDestructionCallback(String name, Runnable callback);

    @Nullable
    Object resolveContextualObject(String key);

    @Nullable
    String getConversationId();
}
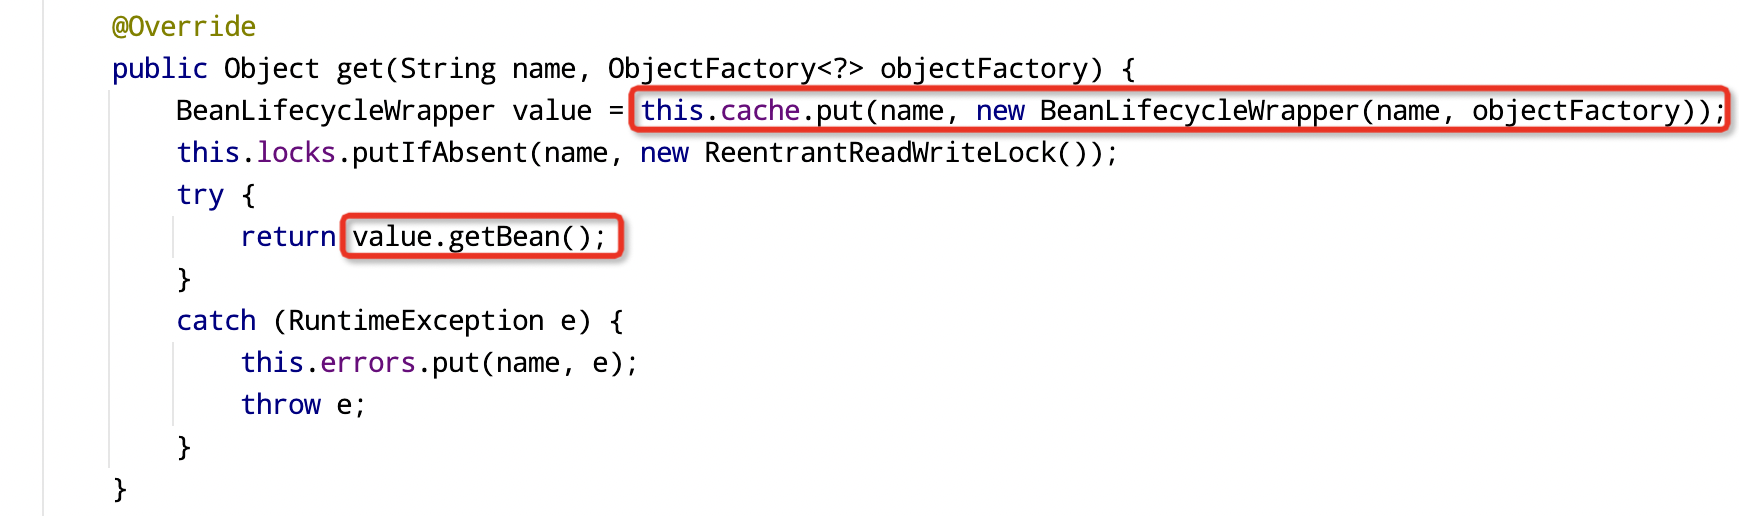
首先看GenericScope#get方法:
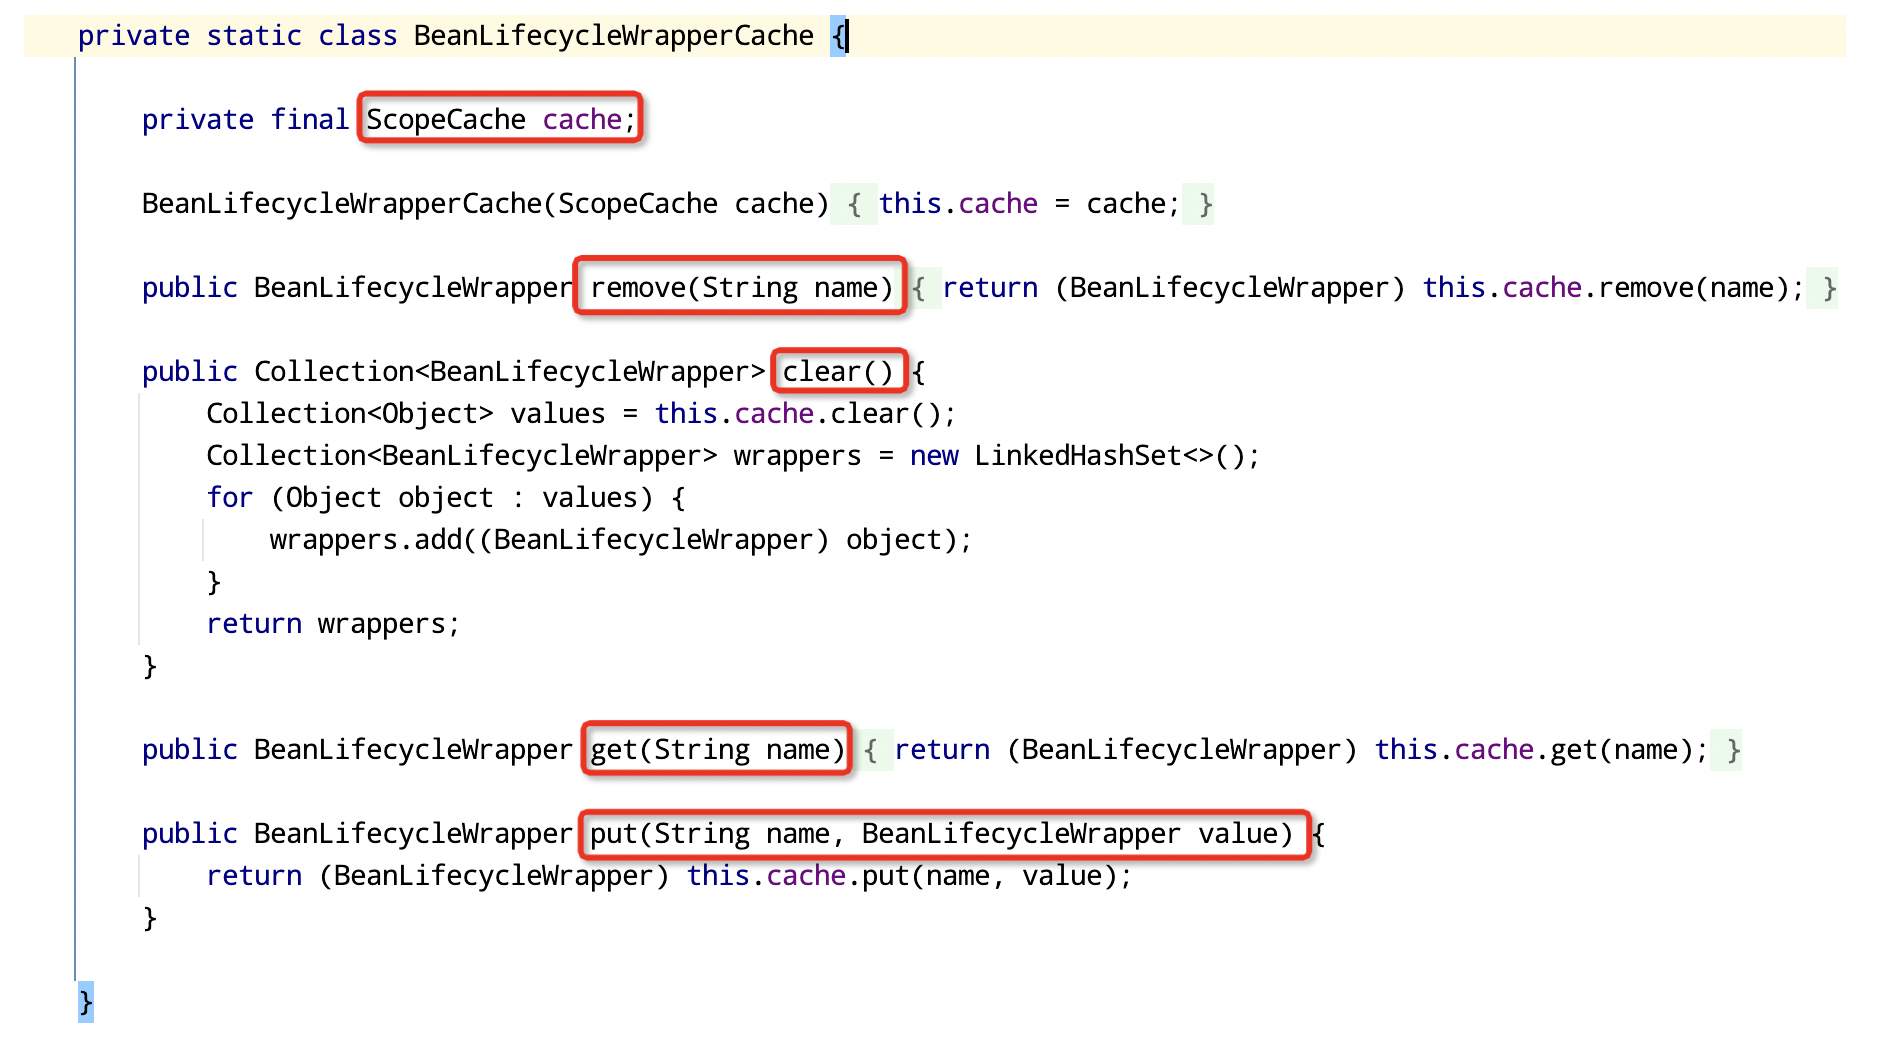
GenericScope.BeanLifecycleWrapperCache中cache由ScopeCache实现,具体实现细节不深究,缓存中key为beanName,value为bean的生命周期wrapper
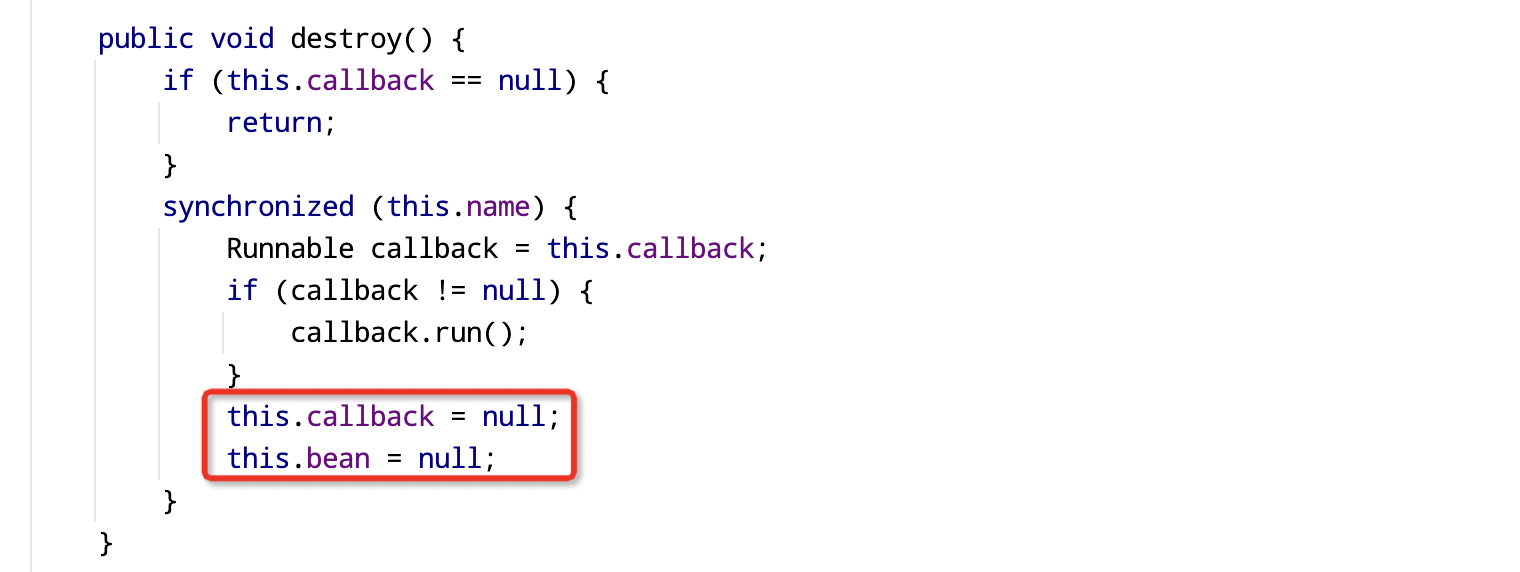
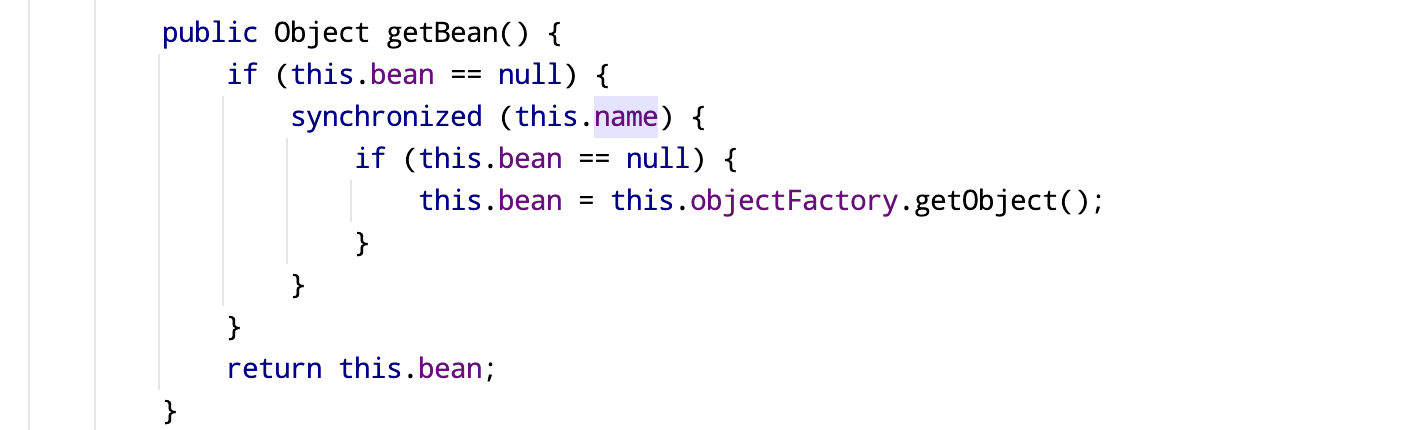
重点看GenericScope.BeanLifecycleWrapper#getBean方法,因为调用此方法时,已经将锁存入内部的锁缓存,判断wrapper中是否持有bean,没有的话创建新的bean并存入wrap再返回。从这里的逻辑不难看出,wrapperCache的作用就在于getBean时先从缓存里获取,如果不存在再创建新的bean并放入缓存中。

所以动态刷新就是在配置发生变化时,清除缓存,再重新创建的过程。
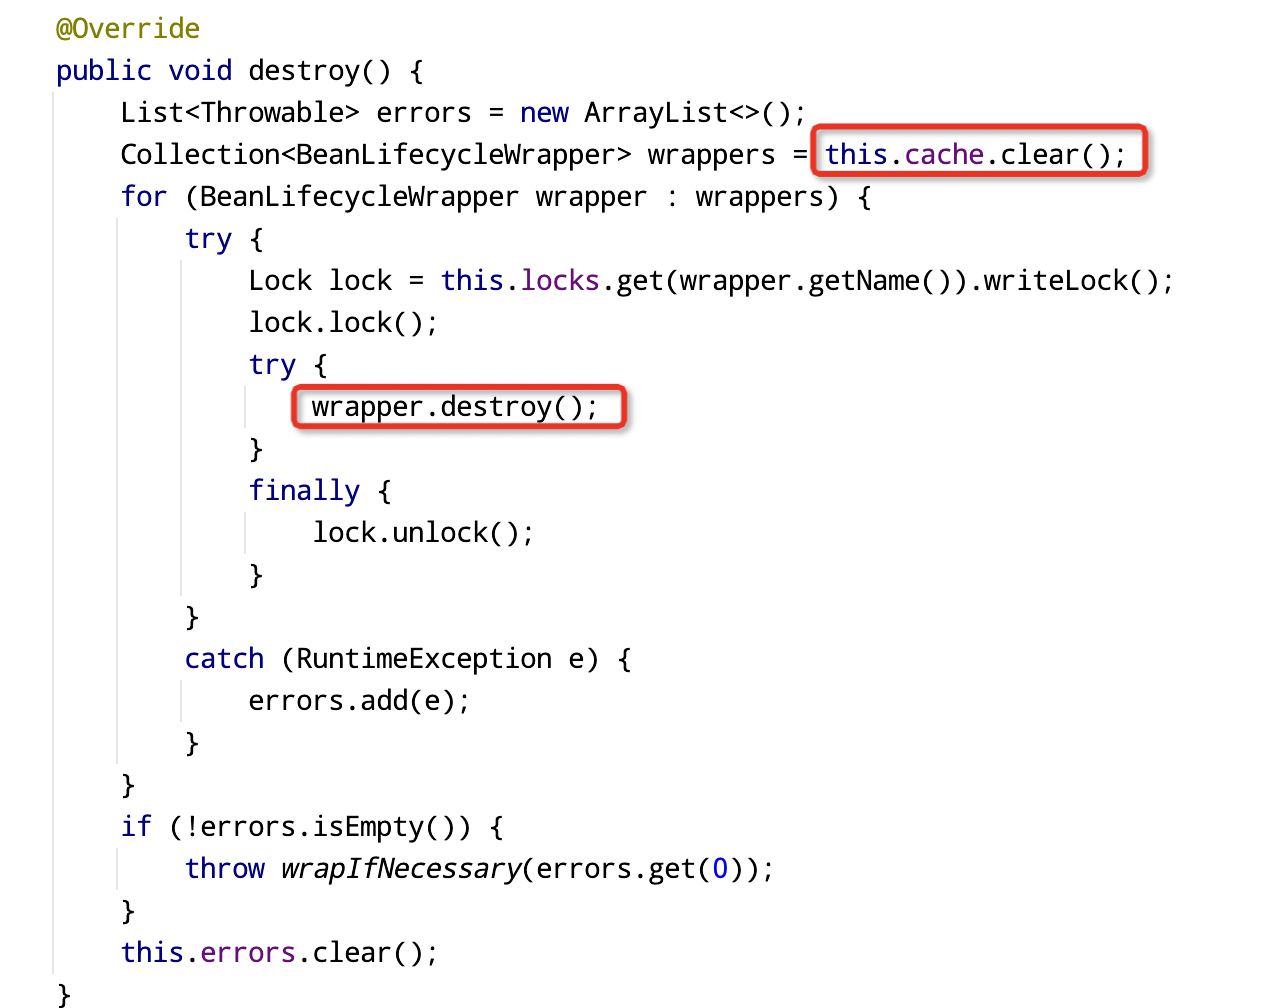
再看GenericScope.destroy
接着看GenericScope.get方法中的value.getBean方法,调用wrapper的getBean,而objectFactory.getObject最终调用的是beanFactory.getBean()
ok,看下AbstractBeanFactory#doGetBean中的scope处理逻辑:
protected <T> T doGetBean(String name, @Nullable Class<T> requiredType, @Nullable Object[] args, boolean typeCheckOnly) throws BeansException {
       // 省略....
                if (mbd.isSingleton()) {
                    // 省略....
                } else if (mbd.isPrototype()) {
                   // 省略....
                } else {
                    String scopeName = mbd.getScope();
                    if (!StringUtils.hasLength(scopeName)) {
                        throw new IllegalStateException("No scope name defined for bean '" + beanName + "'");
                    }

                    Scope scope = (Scope)this.scopes.get(scopeName);
                    if (scope == null) {
                        throw new IllegalStateException("No Scope registered for scope name '" + scopeName + "'");
                    }

                    try {
                        Object scopedInstance = scope.get(beanName, () -> {
                            this.beforePrototypeCreation(beanName);
                            Object var4;
                            try {
                                var4 = this.createBean(beanName, mbd, args);
                            } finally {
                                this.afterPrototypeCreation(beanName);
                            }
                            return var4;
                        });
                        beanInstance = this.getObjectForBeanInstance(scopedInstance, name, beanName, mbd);
                    } catch (IllegalStateException var30) {
                        throw new ScopeNotActiveException(beanName, scopeName, var30);
                    }
                }
            } catch (BeansException var32) {
                beanCreation.tag("exception", var32.getClass().toString());
                beanCreation.tag("message", String.valueOf(var32.getMessage()));
                this.cleanupAfterBeanCreationFailure(beanName);
                throw var32;
            } finally {
                beanCreation.end();
            }
        }

        return this.adaptBeanInstance(name, beanInstance, requiredType);
}
else逻辑就是对应refresh作用域的逻辑,重点看scope.get方法(就是GenericScope实现的scope.get,思考1:这里的genericScope从何而来),逻辑是如果缓存中没有,就创建新的bean。此时大家应该对@RefreshScope的实现逻辑有了一定的认知。
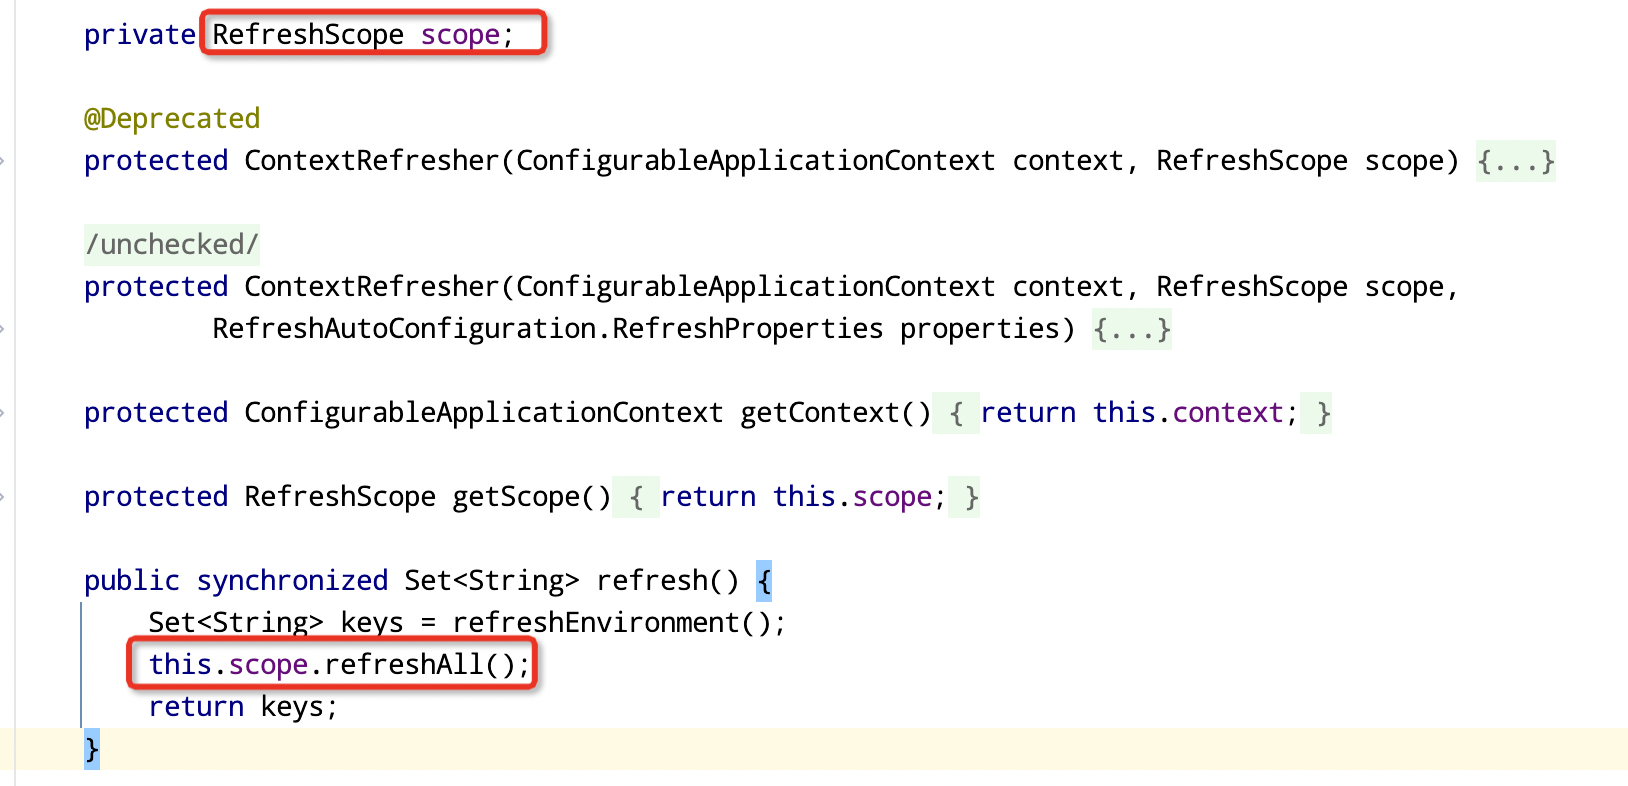
ok,接下来看RefreshScope,他是GenericScope的继承类,这个类中暴露出一个比较重要的方法:refreshAll
@ManagedOperation(description = "Dispose of the current instance of all beans "
			+ "in this scope and force a refresh on next method execution.")
public void refreshAll() {
	super.destroy();
	this.context.publishEvent(new RefreshScopeRefreshedEvent());
}
可以看到代码先去调用父类destroy方法清除缓存,接着发布RefreshScopeRefreshedEvent事件,因为getBean时是先从缓存中获取,如果没有再去创建新的Bean,所以这里清除缓存,就能做到下次获取Bean时拿到到新的Bean,实现刷新。
RefreshScope#refreshAll 方法又被ContextRefresher#refresh方法调用:
ContextRefresher是spring中专门用来刷新RefreshScope的类,至此Springboot提供了用于刷新外部配置类的方法ContextRefresher#refresh,那么如何实现动态刷新呢?先来看下这个方法被谁调用:
- SpringBoot Actuator:
RefreshEndpoint#refresh - RefreshEventListener:
RefreshEventListener#handle(RefreshEvent event)
其调用源码分别如下:
@Endpoint(id = "refresh")
public class RefreshEndpoint {

   private ContextRefresher contextRefresher;

   public RefreshEndpoint(ContextRefresher contextRefresher) {
      this.contextRefresher = contextRefresher;
   }

   @WriteOperation
   public Collection<String> refresh() {
      Set<String> keys = this.contextRefresher.refresh();
      return keys;
   }
}
public class RefreshEventListener implements SmartApplicationListener {

	private static Log log = LogFactory.getLog(RefreshEventListener.class);

	private ContextRefresher refresh;

	private AtomicBoolean ready = new AtomicBoolean(false);

	public RefreshEventListener(ContextRefresher refresh) {
		this.refresh = refresh;
	}
	// 省略其他方法...
	public void handle(ApplicationReadyEvent event) {
		this.ready.compareAndSet(false, true);
	}

	public void handle(RefreshEvent event) {
		if (this.ready.get()) { // don't handle events before app is ready
			log.debug("Event received " + event.getEventDesc());
			Set<String> keys = this.refresh.refresh();
			log.info("Refresh keys changed: " + keys);
		}
	}

}
所以我们可以在引入actuator后手动刷新:通过发起请求http://localhost:8080/actuator/refresh主动刷新,或者publish一个RefreshEvent事件,接下来会分别用Apollo和Nacos说明。
至此,我们可以得出调用链(用actuator举例):RefreshEndpoint#refresh -> ContextRefresher#refresh -> RefreshScope#refreshAll -> GenericScope.destroy
3 配置动态刷新应用举例
3.2 Nacos中
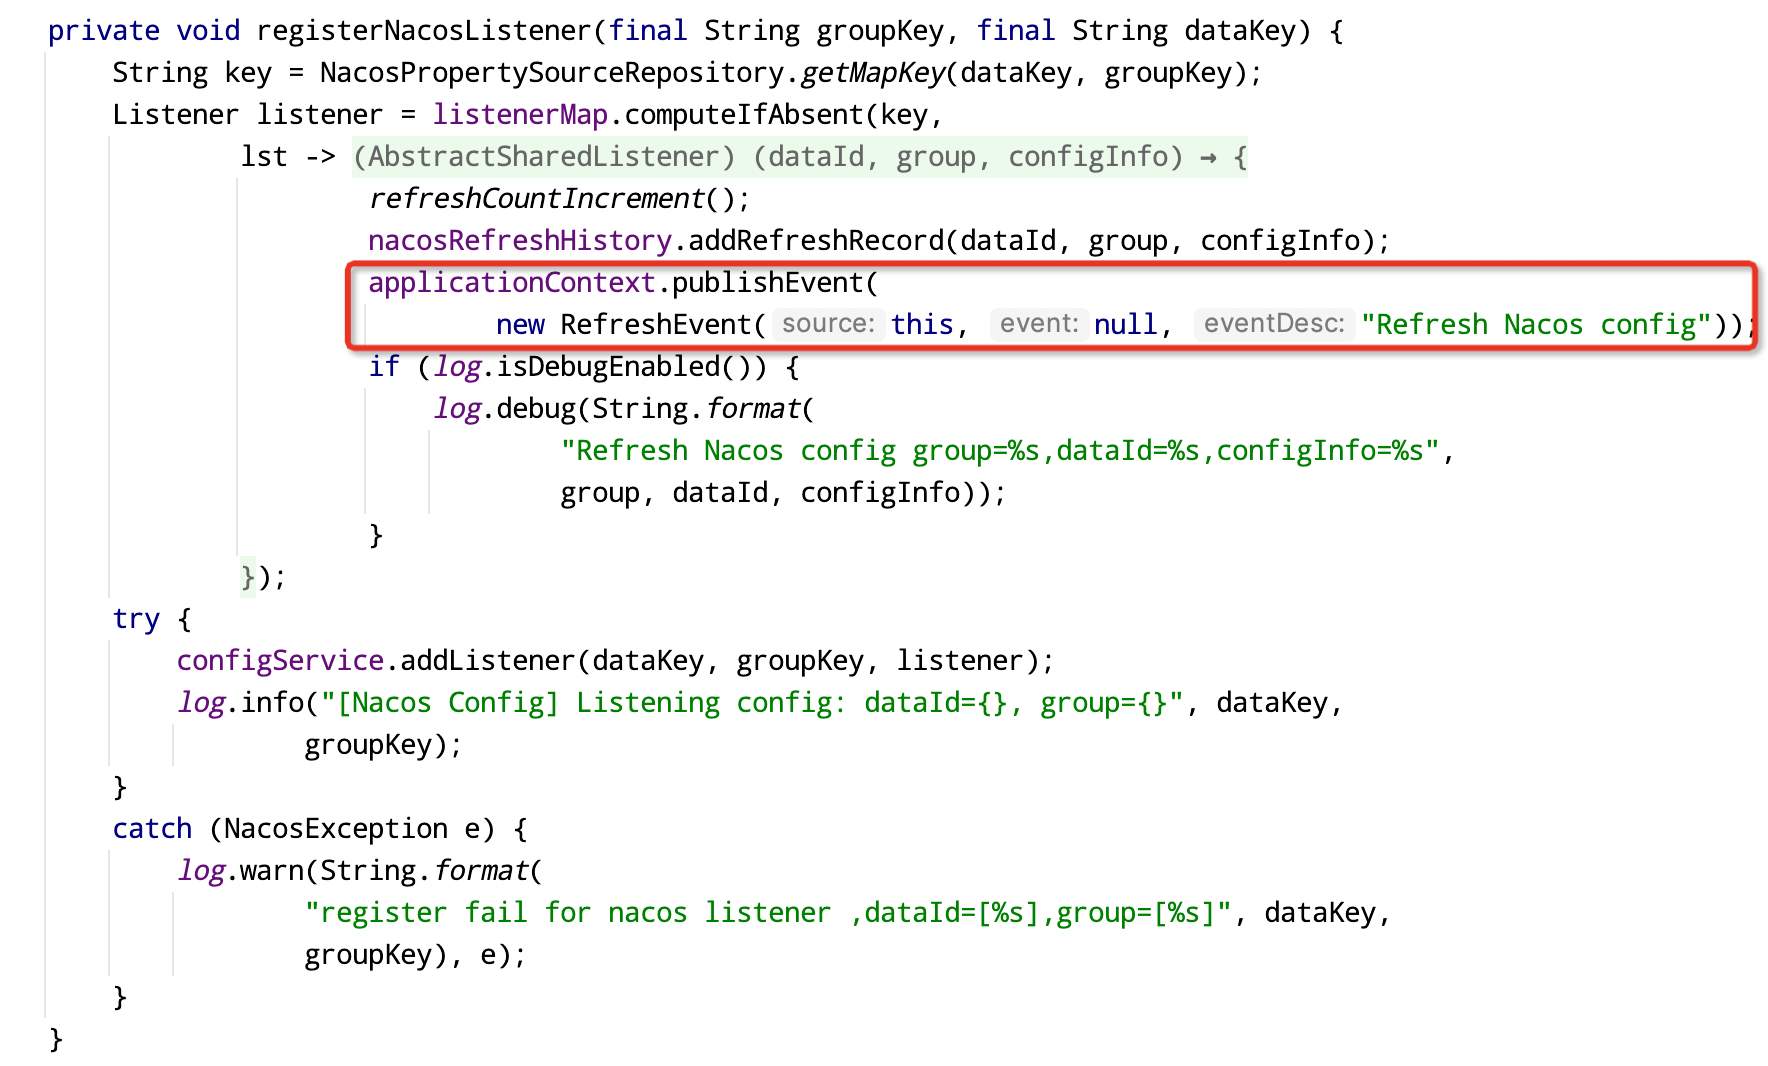
Nacos里定义了NacosContextRefresher,在其registerNacosListener方法中publish了RefreshEvent事件。
3.2 Apollo中
apollo中的配置监听器注解:@ApolloConfigChangeListener,我们可以在用注解修饰的方法中刷新配置。思考2:这里的RefreshScope从何而来。
@Slf4j
@Configuration
public class ApolloChangeListener {
    @Autowired
    private RefreshScope refreshScope;

    @ApolloConfigChangeListener(value = "application.yml", interestedKeyPrefixes = "my.config.")
    public void refresh(ConfigChangeEvent changeEvent) {
        log.info("Changes for namespace " + changeEvent.getNamespace());
        for(String key : changeEvent.changedKeys()) {
            ConfigChange change = changeEvent.getChange(key);
            log.info(String.format("Found change - key: %s, oldValue: %s, newValue: %s, changeType: %s", change.getPropertyName(), change.getOldValue(), change.getNewValue(), change.getChangeType()));
        }
        // 刷新所有的bean
        refreshScope.refreshAll();
        // 刷新指定的bean
//        refreshScope.refresh("myConfigProperties");
    }
}
@ApolloConfigChangeListener注解的处理是通过拦截器拦截,并且创建配置监听,当配置发生变化时反射调用refreshAll方法刷新外部配置类。
/***
 * 方法处理
 * @param bean
 * @param beanName
 * @param method
 */
@Override
protected void processMethod(final Object bean, String beanName, final Method method) {
  //检查该方法是否有@ApolloConfigChangeListener注解
  ApolloConfigChangeListener annotation = AnnotationUtils
      .findAnnotation(method, ApolloConfigChangeListener.class);
  //没有就直接返回
  if (annotation == null) {
    return;
  }
  //获取参数类型集合
  Class<?>[] parameterTypes = method.getParameterTypes();
  Preconditions.checkArgument(parameterTypes.length == 1,
      "Invalid number of parameters: %s for method: %s, should be 1", parameterTypes.length,
      method);
  Preconditions.checkArgument(ConfigChangeEvent.class.isAssignableFrom(parameterTypes[0]),
      "Invalid parameter type: %s for method: %s, should be ConfigChangeEvent", parameterTypes[0],
      method);
  ReflectionUtils.makeAccessible(method);
  //获取命名空间
  String[] namespaces = annotation.value();
  //获取要监听的key
  String[] annotatedInterestedKeys = annotation.interestedKeys();
  //获取要监听的key的前缀集合
  String[] annotatedInterestedKeyPrefixes = annotation.interestedKeyPrefixes();
  //创建监听
  ConfigChangeListener configChangeListener = new ConfigChangeListener() {
    @Override
    public void onChange(ConfigChangeEvent changeEvent) {
      //执行方法调用
      ReflectionUtils.invokeMethod(method, bean, changeEvent);
    }
  };

  Set<String> interestedKeys = annotatedInterestedKeys.length > 0 ? Sets.newHashSet(annotatedInterestedKeys) : null;
  Set<String> interestedKeyPrefixes = annotatedInterestedKeyPrefixes.length > 0 ? Sets.newHashSet(annotatedInterestedKeyPrefixes) : null;

  // 给config设置listener
  for (String namespace : namespaces) {
    Config config = ConfigService.getConfig(namespace);
    //为每个命名空间添加configChangeListener,当每个命名空间发生变化的时候,都会触发该configChangeListener执行
    if (interestedKeys == null && interestedKeyPrefixes == null) {
      config.addChangeListener(configChangeListener);
    } else {
      config.addChangeListener(configChangeListener, interestedKeys, interestedKeyPrefixes);
    }
  }
}
4 思考与补充
思考:RefreshScope和GenericScope以及被@RefreshScope修饰的类是什么时候注册到容器的?
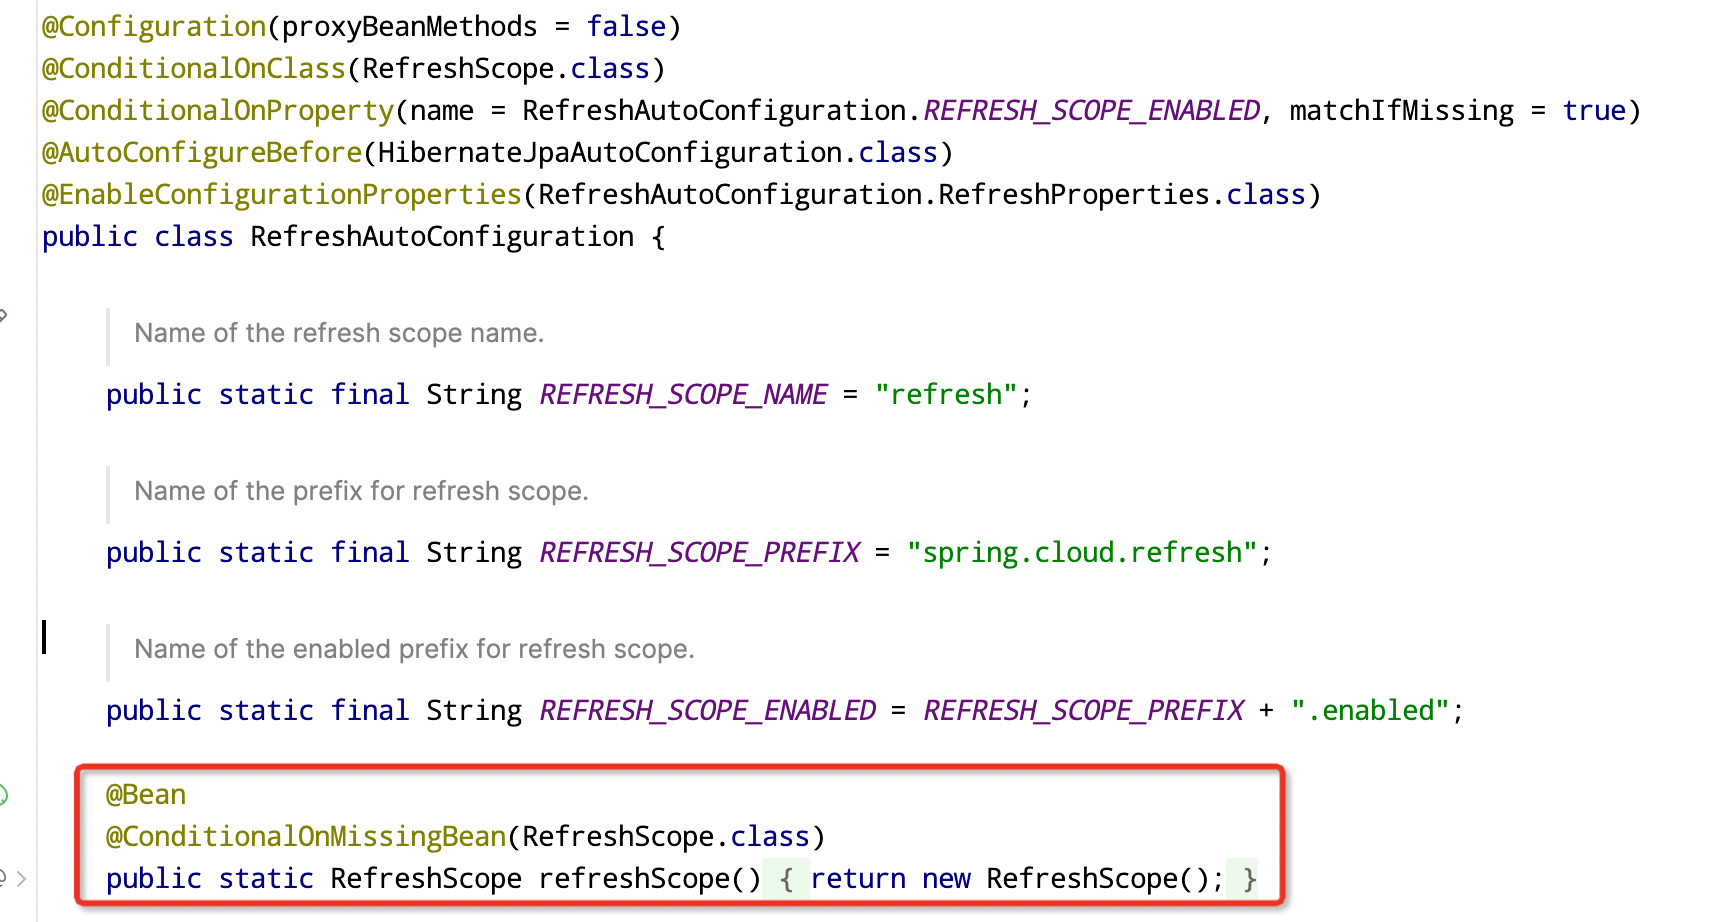
1.RefreshScope通过RefreshAutoConfiguration这个类自动装配到容器:
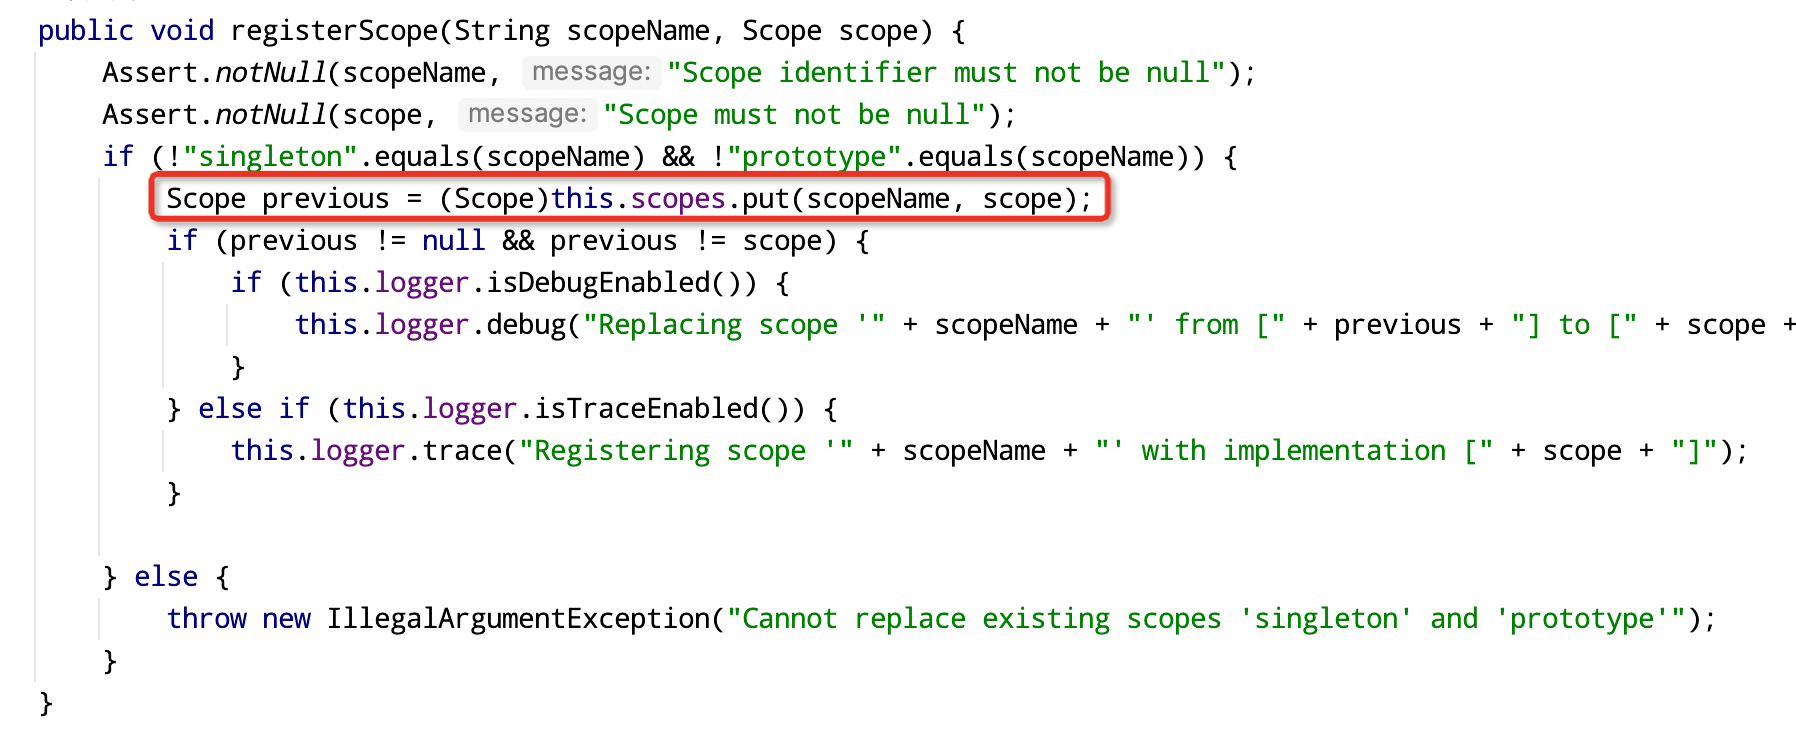
2.GenericScope通过BPP扩展点在容器启动后调用ConfigurableBeanFactory.registerScope注册到容器:

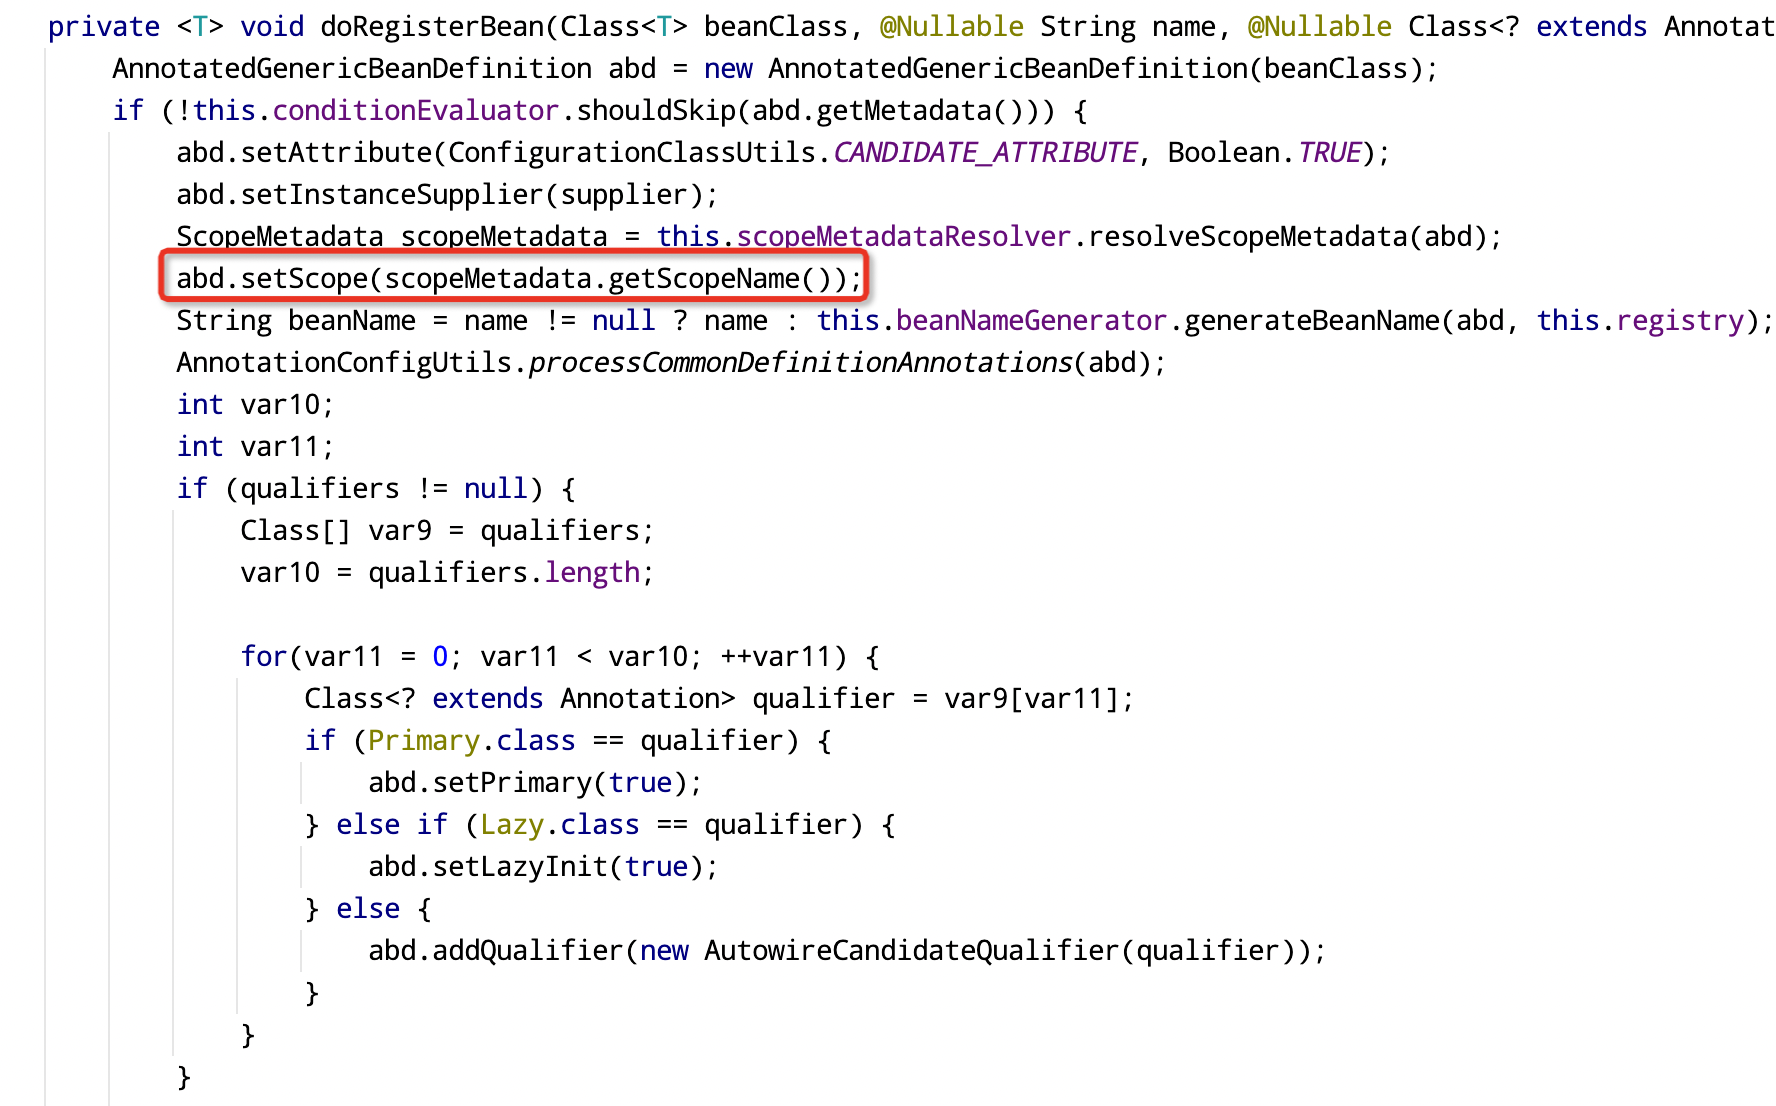
3.被@RefreshScope修饰的Bean,在容器启动时通过AnnotatedBeanDefinitionReader#doRegisterBean注册到IOC容器中,并设置其作用域为refresh。
本博客内容仅供个人学习使用,禁止用于商业用途。转载需注明出处并链接至原文。


【推荐】国内首个AI IDE,深度理解中文开发场景,立即下载体验Trae
【推荐】编程新体验,更懂你的AI,立即体验豆包MarsCode编程助手
【推荐】抖音旗下AI助手豆包,你的智能百科全书,全免费不限次数
【推荐】轻量又高性能的 SSH 工具 IShell:AI 加持,快人一步
· DeepSeek 开源周回顾「GitHub 热点速览」
· 物流快递公司核心技术能力-地址解析分单基础技术分享
· .NET 10首个预览版发布:重大改进与新特性概览!
· AI与.NET技术实操系列(二):开始使用ML.NET
· 单线程的Redis速度为什么快?