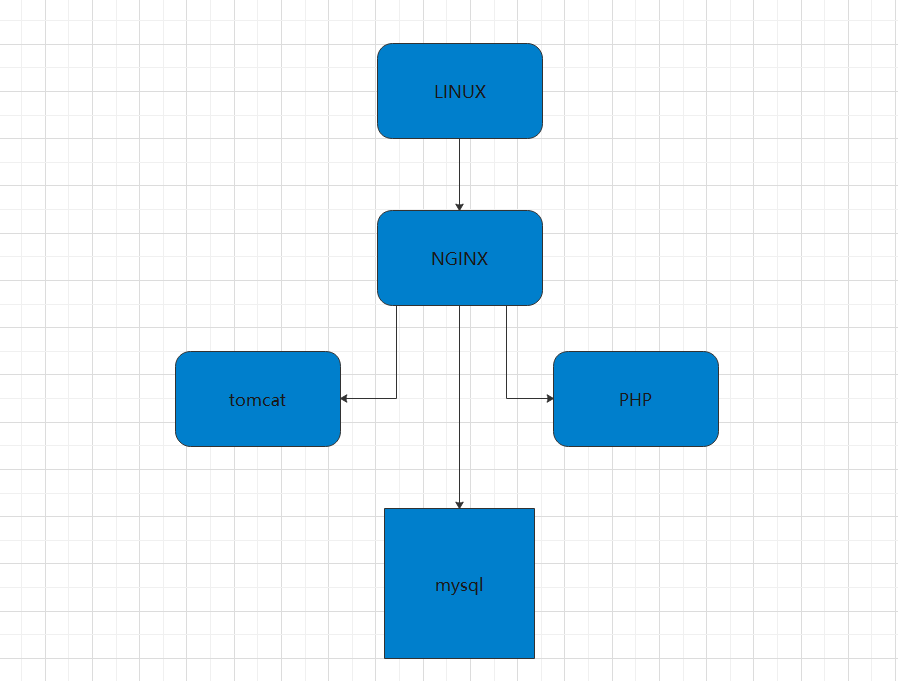
LNMP架构
一. LNMP组成
二. 下载源码包
1 2 3 4 5 6 7 8 9 10 11 12 13 14 15 16 17 18 19 | wget http://nginx.org/download/nginx-1.17.2.tar.gz wget https://www.php.net/distributions/php-7.3.7.tar.gzwget https://dev.mysql.com/get/Downloads/MySQL-8.0/mysql-8.0.16-2.el7.x86_64.rpm-bundle.tar解压:tar zxvf mysql-8.0.16-2.el7.x86_64.rpm-bundle.tartar zxvf php-7.3.7.tar.gztar zxvf nginx-1.17.2.tar.gz# 安装cmakeyum install -y gcc gcc-c++ make automakewget https://github.com/Kitware/CMake/releases/download/v3.15.1/cmake-3.15.1.tar.gztar zxvf cmake-3.15.1.tar.gzcd cmake-3.15.1./configure --prefix=/usr/local/cmakemake && make install创建 cmake的软连接ln -s /usr/local/cmake/bin/cmake /usr/bin/cmake |
三. 安装MYSQL流程
1 2 3 4 5 6 7 8 9 10 11 12 13 14 15 16 17 18 19 20 21 22 23 24 25 | # 创建用户组groupadd mysql# 创建mysql用户,属于mysql组useradd -g mysql mysql#安装# 安装依赖yum install -y libaio rpm -ivh mysql-community-common-8.0.16-2.el7.x86_64.rpm --nodeps --force # 安装commonrpm -ivh mysql-community-libs-8.0.16-2.el7.x86_64.rpm --nodeps --force # 安装libsrpm -ivh mysql-community-client-8.0.16-2.el7.x86_64.rpm --nodeps --force # 安装clientrpm -ivh mysql-community-server-8.0.16-2.el7.x86_64.rpm --nodeps --force #安装server # 修改组chown mysql:mysql /var/lib/mysql -R# 启动systemctl start mysqld.service# 开机自启systemctl enable mysqld<br># 查看默认密码<br>cat /var/log/mysqld.log | grep password # 修改密码alter user 'root'@'localhost' identified by '123456'; |
四. 安装PHP
1 2 3 4 5 6 7 8 9 10 11 12 13 14 15 16 17 18 19 20 21 22 23 24 25 26 27 28 29 30 31 32 33 34 35 36 37 38 39 40 41 42 43 44 45 | #安装依赖 yum install screen gcc git openssl curl -yyum install gmp-devel libc-client-devel bzip2-devel enchant-devel libwebp-devel libXpm-devel openldap openldap-devel php-pspell aspell-devel readline-devel libtidy-devel libxslt-devel libxml2-devel openssl-devel curl-devel libjpeg-devel libpng-devel freetype-devel autoconfyum install epel-release yum -y install libc-client-devel libtidy yum install libtidy-devel -y#######################################如果 提示Please reinstall the libzip distribution # 先卸载原先的 libzip yum remove libzip # 下载 libzip 源码(去网站选择合适的版本)curl-O https://libzip.org/download/libzip-1.5.1.tar.gztar -zxvf libzip-1.5.1.tar.gzcd libzip-1.5.1mkdir buildcd buildcmake ..make && make install#######################################编译PHP时出现的提示,报错信息为: configure: error: off_t undefined; check your library configuration 。解决方案:(1)输入以下命令,添加搜索路径到配置文件: echo '/usr/local/lib64 /usr/local/lib /usr/lib /usr/lib64'>>/etc/ld.so.conf(2)更新配置 ldconfig -v####################################### # 编译安装./configure --prefix=/usr/local/php --with-config-file-path=/usr/local/php/etc --with-config-file-scan-dir=/usr/local/php/conf.d --with-sqlite3 --with-pdo-sqlite --with-mysqli=mysqlnd --with-pdo-mysql=mysqlnd --enable-posix --enable-pcntl --enable-shmop --enable-sysvshm --enable-sysvsem --enable-sysvmsg --enable-phar --enable-zip --with-zlib --with-zlib-dir --with-bz2 --with-gd --enable-gd-jis-conv --with-webp-dir --with-jpeg-dir --with-png-dir --with-xpm-dir --with-freetype-dir --enable-exif --enable-json --enable-libxml --with-libxml-dir --enable-xml --enable-xmlreader --enable-xmlwriter --enable-simplexml --with-pear --with-xsl --enable-dom --enable-soap --enable-wddx --with-xmlrpc --enable-ctype --enable-filter --with-pcre-regex --with-pcre-jit --with-enchant --with-pspell --enable-fileinfo --enable-mbstring --with-iconv --enable-hash --with-openssl --enable-bcmath --with-gmp --enable-session --enable-sockets --enable-ftp --with-curl --with-ldap --with-ldap-sasl --with-imap --with-kerberos --with-imap-ssl --enable-calendar --with-gettext --with-tidy --with-readline --enable-tokenizer --enable-opcache --enable-cli --enable-cgi --enable-fpm --enable-phpdbgmake make install# 提示 libc-client 和 libldap 问题 重新./configureln -s /usr/lib64/libc-client.so /usr/lib/libc-client.socp -frp /usr/lib64/libldap* /usr/lib/# 编译 collect2: error: ld returned 1 exit status 在PHP源码目录下 vi Makefile 找到 EXTRA_LIBS 行,在行末添加 ‘ -llber ‘ 保存退出再次make即可 # 安装make -j `grep processor /proc/cpuinfo | wc -l` && make install# 拷贝配置文件 |
五.nginx安装配置
1 2 3 4 5 6 7 8 9 10 11 12 13 14 15 16 17 18 19 20 21 22 23 | cd ~/nginx-1.17.2./configure --prefix=/usr/local/nginxmake && make installcurl 127.0.0.1 出现welcome to nginx 则成功# 修改配置<br>vim ./conf/nginx.conf # 修改如下 location ~ \.php$ { root html; fastcgi_pass 127.0.0.1:9000; fastcgi_index index.php; fastcgi_param SCRIPT_FILENAME /$document_root$fastcgi_script_name; include fastcgi_params;}# 重启/usr/local/sbin/nginx安装完毕! 2进制安装比较恶心,缺什么安什么 |


【推荐】国内首个AI IDE,深度理解中文开发场景,立即下载体验Trae
【推荐】编程新体验,更懂你的AI,立即体验豆包MarsCode编程助手
【推荐】抖音旗下AI助手豆包,你的智能百科全书,全免费不限次数
【推荐】轻量又高性能的 SSH 工具 IShell:AI 加持,快人一步
· 10年+ .NET Coder 心语,封装的思维:从隐藏、稳定开始理解其本质意义
· .NET Core 中如何实现缓存的预热?
· 从 HTTP 原因短语缺失研究 HTTP/2 和 HTTP/3 的设计差异
· AI与.NET技术实操系列:向量存储与相似性搜索在 .NET 中的实现
· 基于Microsoft.Extensions.AI核心库实现RAG应用
· TypeScript + Deepseek 打造卜卦网站:技术与玄学的结合
· 阿里巴巴 QwQ-32B真的超越了 DeepSeek R-1吗?
· 【译】Visual Studio 中新的强大生产力特性
· 10年+ .NET Coder 心语 ── 封装的思维:从隐藏、稳定开始理解其本质意义
· 【设计模式】告别冗长if-else语句:使用策略模式优化代码结构