

SpringBoot
SpringBoot
Spring的缺点
Spring是一个非常优秀的轻量级框架,以IOC(控制反转)和AOP(面向切面)为思想内核,极大简化了JAVA企业级项目的开发。
虽然Spring的组件代码是轻量级的,但它的配置却是重量级的。使用Spring进行项目开发需要在配置文件中写很多代码,所有这些配置都代表了开发时的损耗。
除此之外,Spring项目的依赖管理也是一件耗时耗力的事情。在环境搭建时,需要分析要导入哪些库的坐标,而且还需要分析导入与之有依赖关系的其他库的坐标,一旦选错了依赖的版本,随之而来的不兼容问题就会严重阻碍项目的开发进度。比如Spring5.0以上只能使用Junit4.12以上的版本。
总结起来,Spring的缺点就是:
- 配置过于繁琐。
- 引入的依赖过多,版本控制复杂。
1,什么是SpringBoot?
- SpringBoot对Spring的缺点进行改善和优化,基于约定大于配置的思想,简化了Spring的开发,所谓简化是指简化了Spring中大量的配置文件和繁琐的依赖引入。
- 所以SpringBoot是一个服务于框架的框架,它不是对Spring功能的增强,而是提供了一种快速使用Spring框架的方式
SpringBoot的优点:
- 配置简单
- 依赖引入简单
- 提供了一些大型项目的非功能特性,如嵌入式服务器,安全指标,健康监测等
自动配置
SpringBoot项目自动提供最优配置,同时可以修改默认值满足特定的要求
起步依赖
SpringBoot的依赖是基于功能的,而不是普通项目的依赖是基于JAR包的。SpringBoot将完成一个功能所需要的所有坐标打包到一起,并完成了版本适配,我们在使用某功能时只需要引入一个依赖即可。
Springboot3 版本要求
然使用SpringBoot是需要一定版本要求的:
| 工具 | 版本要求 |
|---|---|
| IDEA | 2021.2.1+ |
| Java | 17+ |
| Maven | 3.5+ |
| Tomcat | 10.0+ |
| Servlet | 5.0+ |
| GraalVM | (原生镜像功能) Community 22.3+ |
| Native Build Tools(原生镜像功能) | 0.9.19+ |
2,Springboot的三种构建方式
2.1官网搭建(不建议使用)
接下来我们搭建一个SpringBoot项目,并引入SpringMVC的功能,首先我们可以通过官网搭建项目:
1.访问start.spring.io
2.生成SpringBoot项目
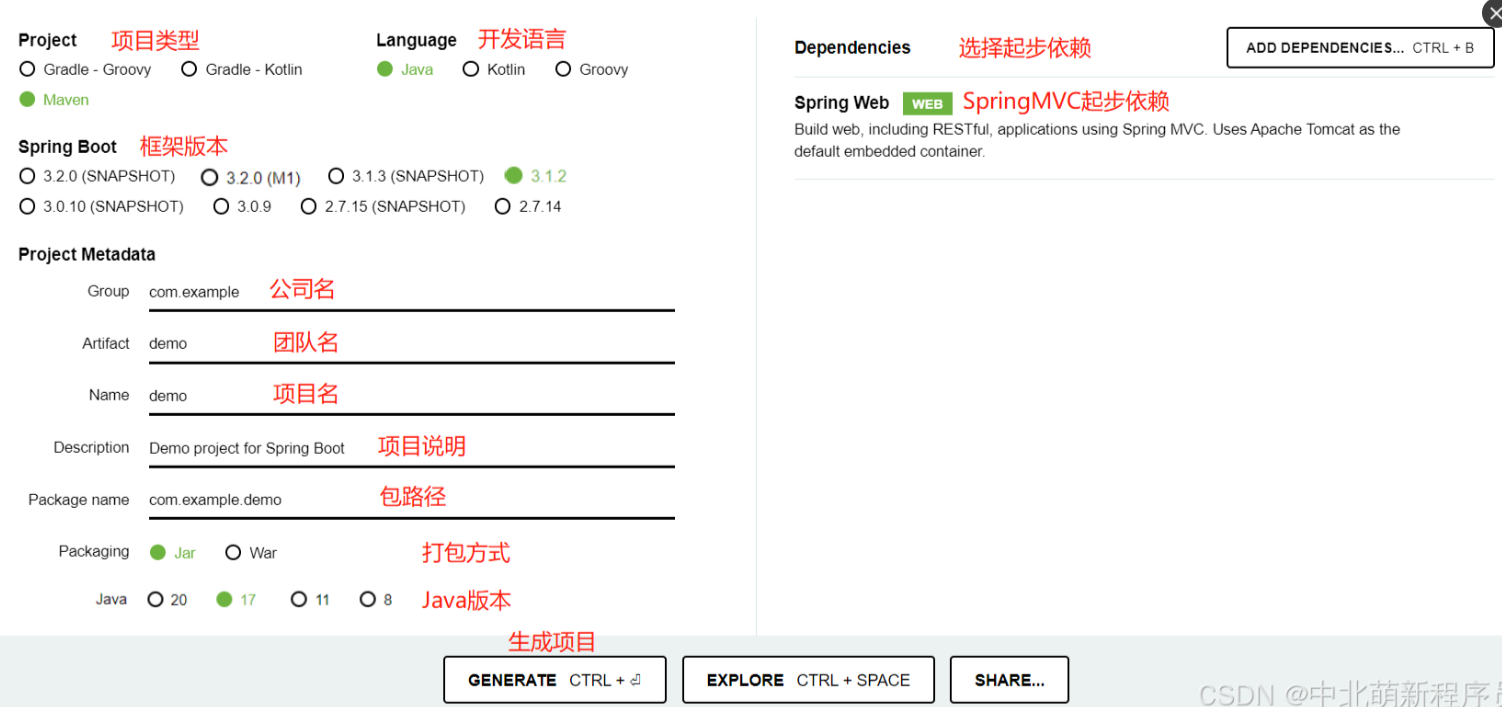
SpringBoot版本说明:
- SNAPSHOT:快照版,表示开发版本,随时可能修改;
- M1(Mn):M1是milestone的缩写,也就是里程碑版本;
- RC1(RCn):RC1是release candidates的缩写,也就是发布预览版;
- Release:正式版,也可能没有任何后缀也表示正式版
SpringBoot打包类型说明:
使用SpringMVC开发的是一个web项目,但由于在SpringBoot中直接嵌入了Tomcat等Web容器,所以在使用SpringBoot做Web开发时不需要部署War文件,只需要打成Jar包即可。
3.解压生成的SpringBoot项目
4.在Idea中打开解压的SpringBoot项目即可
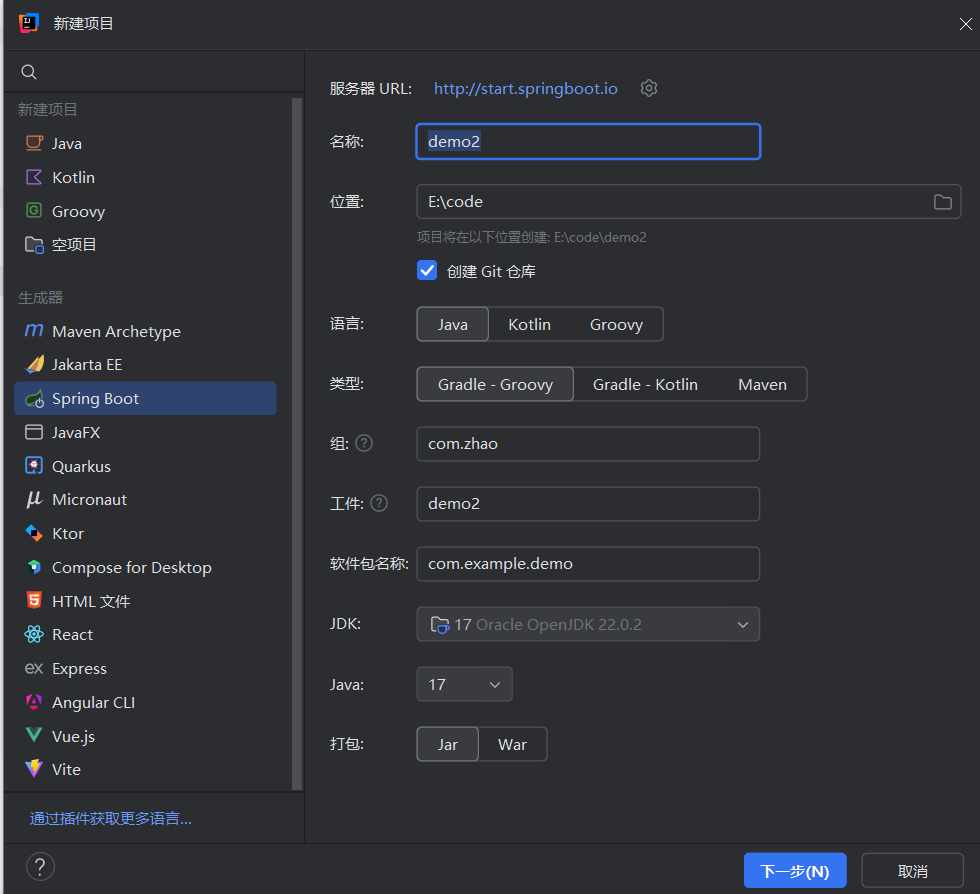
2.2,通过IDEA脚手架搭建
我们也可以在IDEA中利用脚手架工具搭建项目:
1.在IDEA中新建项目,项目类型为Spring Initializr,写项目名、存放位置、语言类型、项目类型、JDK版本等。点击下一步。
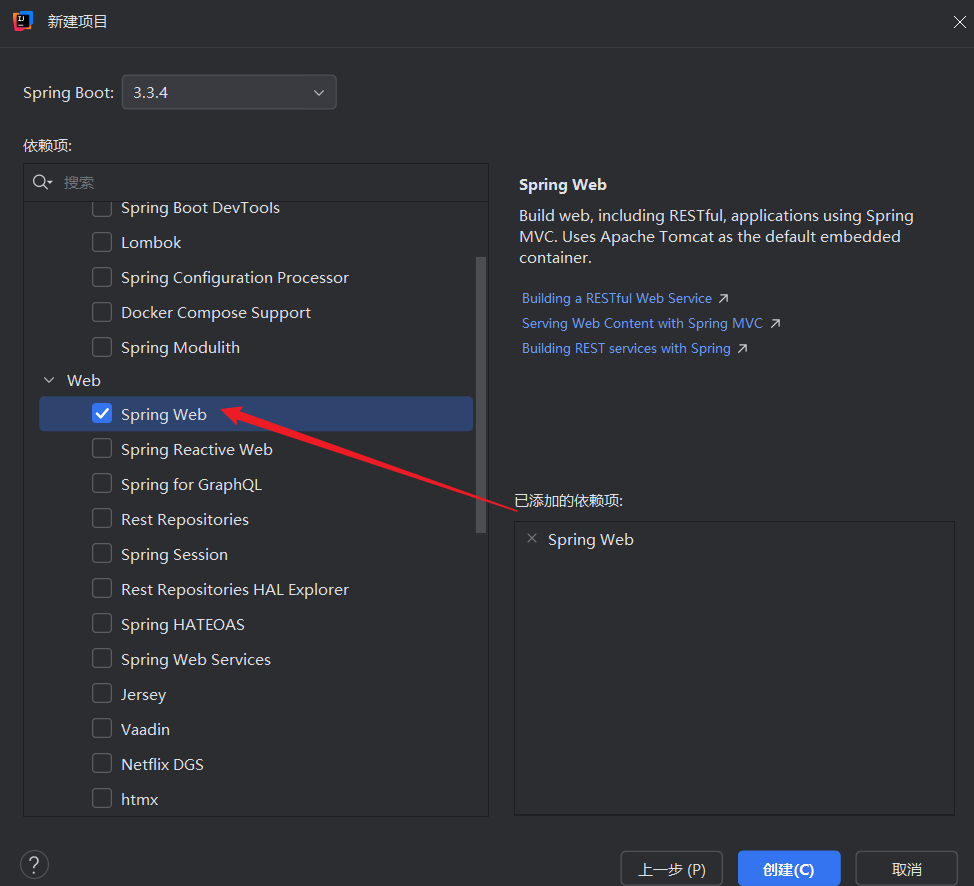
2. 选择SpringBoot版本和需要的起步依赖,创建。
3.完成项目搭建
2.3,通过Maven搭建项目
不管是通过官网,还是通过脚手架搭建项目,都需要连接SpringBoot官网,但国内与SpringBoot官网连接并不稳定,此时我们也可以使用Maven手动搭建SpringBoot项目:
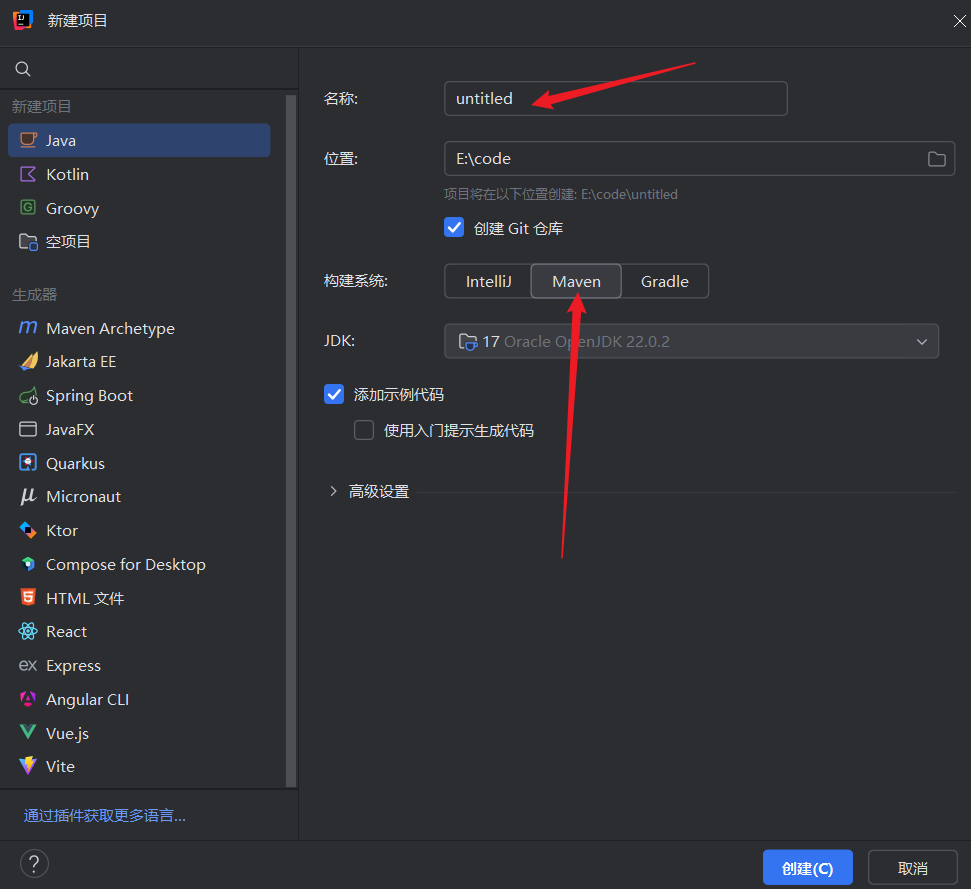
1.创建新项目
2.在pom中添加项目的父工程、起步依赖、插件、依赖和插件的下载地址

<!-- 父工程 -->
<parent>
  <groupId>org.springframework.boot</groupId>
  <artifactId>spring-boot-starter-parent</artifactId>
  <version>3.1.2</version>
</parent>
<!-- 起步依赖 -->
<dependencies>
  <dependency>
    <groupId>org.springframework.boot</groupId>
    <artifactId>spring-boot-starter-web</artifactId>
  </dependency>


  <dependency>
    <groupId>org.springframework.boot</groupId>
    <artifactId>spring-boot-starter-test</artifactId>
    <scope>test</scope>
  </dependency>
</dependencies>


<!-- 插件 -->
<build>
  <plugins>
    <plugin>
      <groupId>org.springframework.boot</groupId>
      <artifactId>spring-boot-maven-plugin</artifactId>
    </plugin>
  </plugins>
</build>
3.编写启动类
@SpringBootApplication
public class SpringBootApp {
  public static void main(String[] args) {
    SpringApplication.run(SpringBootApp.class, args);
   }
}
4.编写配置文件application.properties
#日志格式
logging.pattern.console=%d{MM/dd HH:mm:ss.SSS} %clr(%-5level) ---  [%-15thread] %cyan(%-50logger{50}):%msg%n
#端口号
server.port=8889
5.运行启动类主方法,启动项目
SpringBoot的项目结构
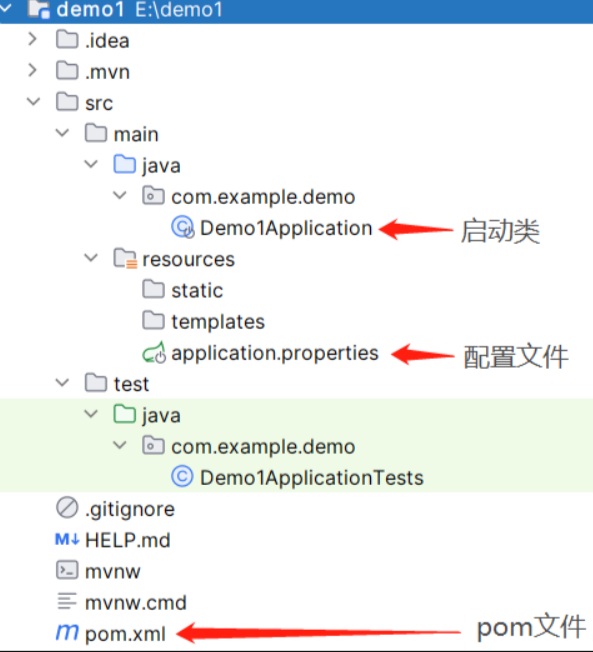
src.main.java
这个目录下存放的是Java代码,在我们写好的包名下,SprinBoot生成了一个启动类,启动类的作用是启动SpringBoot项目,运行启动类的main方法即可启动SpringBoot项目。
src.main.resources
这个目录下存放的是配置文件和页面相关的代码,SpringBoot默认在static目录中存放静态资源,如css、js、图片等等。而templates中存放模板引擎,如jsp、thymeleaf等。
由于SpringBoot极大简化了Spring配置,所以只有一个application.properties配置文件,Spring的自动配置功能使得大部分的配置都有默认配置,该文件的功能是覆盖默认配置信息,该文件不写任何信息都可以启动项目。
启动后默认端口号为8080,我们可以覆盖该配置:
server.port=8888
src.test.java
这个目录下编写的是测试代码
1.SpringBoot项目必须继承spring-boot-starter-parent,即所有的SpringBoot项目都是spring-boot-starter-parent的子项目。spring-boot-starter-parent中定义了常用配置、依赖、插件等信息,供SpringBoot项目继承使用
<parent>
  <groupId>org.springframework.boot</groupId>
  <artifactId>spring-boot-starter-parent</artifactId>
  <version>3.1.2</version>
  <relativePath/> <!-- lookup parent from repository -->
</parent>
2.SpringBoot项目中可以定义起步依赖,起步依赖不是以jar包为单位,而是以功能为单位
<dependencies>
  <dependency>
    <groupId>org.springframework.boot</groupId>
    <artifactId>spring-boot-starter-web</artifactId>
  </dependency>
  <dependency>
    <groupId>org.springframework.boot</groupId>
    <artifactId>spring-boot-starter-test</artifactId>
    <scope>test</scope>
  </dependency>
</dependencies>
3.spring-boot-maven-plugin插件是将项目打包成jar包的插件。该插件打包后的SpringBoot项目无需依赖web容器,可以直接使用JDK运行
<build>
  <plugins>
    <plugin>
      <groupId>org.springframework.boot</groupId>
      <artifactId>spring-boot-maven-plugin</artifactId>
    </plugin>
  </plugins>
</build>
编写一个测试代码
之前搭建的SpringBoot项目已经都整合了SpringMVC,我们编写一个控制器进行测试:
@Controller
public class MyController {
  @RequestMapping("/hello")
  @ResponseBody
  public String hello(){
    System.out.println("hello springboot!");
    return "hello springboot!";
   }
}
启动类在启动时会做注解扫描(@Controller、@Service、@Repository…),扫描位置为同包或者同级包下的注解,所以我们要在启动类同级或同级包下编写代码。
启动项目,访问http://localhost:8889/hello
3,YAML文件
SpringBoot项目中,大部分配置都有默认值,但如果想替换默认配置的话,可以使用application.properties文件进行配置。properties文件是键值对类型的文件,之前一直在使用,所以我们不再对properties文件进行阐述。
https://docs.spring.io/spring-boot/docs/3.1.2/reference/htmlsingle/#appendix.application-properties
可以查找配置文件如何覆盖SpringBoot项目的默认配置。
除了properties文件外,SpringBoot还支持YAML文件进行配置。YAML文件的扩展名为.yml或.yaml。SpringBoot默认会从resources目录下加载application.properties或application.yml文件。
YAML文件的基本要求如下:
- 大小写敏感
- 使用缩进代表层级关系
- 同级配置必须对齐,上下级配置必须缩进,但缩进的空格数不限。
- 相同的部分只出现一次
- 冒号和值之间必须要有空格
比如使用properties文件配置tomcat端口以及项目路径
server.port=8888
server.servlet.context-path=/jjy
而使用YAML文件配置tomcat端口:
server:
  servlet:
   context-path: /jjy
  port: 8888
3.1,自定义配置文件
配置简单数据
语法: 数据名: 值
示例代码: email: jjy@qq.com
配置对象数据
语法:
对象:
    属性名1: 属性值
    属性名2: 属性值
# 或者
对象: {属性名1: 属性值,属性名2: 属性值}
示例代码:
# 邮箱1
my1:
  email: jjy@qq.com
  password: jjy

# 邮箱2
my2: {email: jjyss@qq.com,password: jjyss}
配置集合数据
语法:
集合:
    - 值1
    - 值2

# 或者
集合: [值1,值2]
示例代码:
# 城市
city1:
  - beijing
  - shanghai
  - tianjin
  - chongqing


city2: [beijing,tianjin,shanghai,chongqing]


# 集合中的元素是对象
sxt:
  - address: beijing
   mobile: 13888888888
   email: jjy@qq.com
  - address: shanghai
   mobile: 13777777777
   email: jjyss@qq.com
  - address: guangzhou
   mobile: 13666666666
   email: jjyaa@qq.com
3.2,@Value读取配置文件
读取自定义配置时,我们可以通过@Value注解将配置文件中的值映射到一个Spring管理的Bean的字段上,用法如下:
配置文件
email: jjy@qq.com


my1:
  email: jjy@qq.com
  password: ijjy


city1:
  - beijing
  - shanghai
  - tianjin
  - chongqing


sxt:
  - address: beijing
   mobile: 13888888888
   email: jjy@qq.com
  - address: shanghai
   mobile: 13777777777
   email: jjysss@qq.com
  - address: guangzhou
   mobile: 13666666666
   email: jjyaaa@qq.com
读取配置文件数据
@Controller
public class YmlController1 {
  @Value("${email}")
  private String email;


  @Value("${my1.password}")
  private String password;


  @Value("${city1[0]}")
  private String city1;


  @Value("${sxt[1].mobile}")
  private String mobile;


  @RequestMapping("/yml1")
  @ResponseBody
  public String yml1(){
    return email+":"+password+":"+city1+":"+mobile;
   }
}
@Value只能映射简单数据类型,不能将yaml文件中的对象、集合映射到属性中。
3.3,@ConfigurationProperties读取配置文件
通过@ConfigurationProperties(prefifix="对象")可以将配置文件中的配置自动与实体进行映射,这样可以将yml文件中配置的对象属性直接映射到Bean当中。
配置文件
user:
  id: 10001
  username: shangxuetang
  address:
   - beijing
   - tianjin
   - shanghai
   - chongqing
  grades:
   - subject: math
    score: 100
   - subject: english
    score: 90
实体类
public class Grade {
  private String subject;
  private double score;
  // 省略getter/setter/tostring
}
读取配置文件
@Controller
@ConfigurationProperties(prefix = "user")
public class YmlController2 {
  private int id;
  private String username;
  private List<String> address;
  private List<Grade> grades;


  @RequestMapping("/yml2")
  @ResponseBody
  public String yml2(){
    System.out.println(id);
    System.out.println(username);
    System.out.println(address);
    System.out.println(grades);
    return "hello springboot!";
   }


  public int getId() {
    return id;
   }


  public void setId(int id) {
    this.id = id;
   }


  public String getUsername() {
    return username;
   }


  public void setUsername(String username) {
    this.username = username;
   }


  public List<String> getAddress() {
    return address;
   }


  public void setAddress(List<String> address) {
    this.address = address;
   }


  public List<Grade> getGrades() {
    return grades;
   }


  public void setGrades(List<Grade> grades) {
    this.grades = grades;
   }
}
4,SpringBoot整合Web开发
由于SpringBoot项目没有web.xml文件,所以无法在web.xml中注册web组件,SpringBoot有自己的方式注册web组件。
注册方式一
1.编写servlet
@WebServlet("/first")
public class FirstServlet extends HttpServlet {
  public void doGet(HttpServletRequest request, HttpServletResponse response){
    System.out.println("First Servlet........");
   }
}
2.启动类扫描web组件
@SpringBootApplication
//SpringBoot启动时扫描注册注解标注的Web组件
@ServletComponentScan
public class Springbootdemo2Application {
  public static void main(String[] args) {
    SpringApplication.run(Springbootdemo2Application.class, args);
   }
}
注册方式二
编写servlet
public class SecondServlet extends HttpServlet {
  public void doGet(HttpServletRequest request, HttpServletResponse response){
    System.out.println("Second Servlet........");
   }
}
使用配置类注册servlet
@Configuration
public class ServletConfig {
  //ServletRegistrationBean可以注册Servlet组件,将其放入Spring容器中即可注册Servlet
  @Bean
  public ServletRegistrationBean getServletRegistrationBean(){
    // 注册Servlet组件
    ServletRegistrationBean bean = new ServletRegistrationBean(new SecondServlet());
    // 添加Servlet组件访问路径
    bean.addUrlMappings("/second");
    return bean;
   }
}
5,SpringBoot整合Web开发_Filter
注册方式一
编写filter
@WebFilter(urlPatterns = "/first")
public class FirstFilter implements Filter {
  @Override
  public void init(FilterConfig filterConfig) throws ServletException { }
  @Override
  public void doFilter(ServletRequest servletRequest, ServletResponse servletResponse, FilterChain filterChain) throws IOException, ServletException {
    System.out.println("进入First Filter");
    filterChain.doFilter(servletRequest,servletResponse);
    System.out.println("离开First Filter");
   }
  @Override
  public void destroy() { }
}
启动类扫描web组件
@SpringBootApplication
//SpringBoot启动时扫描注册注解标注的Web组件
@ServletComponentScan
public class Springbootdemo2Application {
  public static void main(String[] args) {
    SpringApplication.run(Springbootdemo2Application.class, args);
   }
}
注册方式二
编写filter
public class SecondFilter implements Filter {
  @Override
  public void init(FilterConfig filterConfig) throws ServletException { }

  @Override
  public void doFilter(ServletRequest servletRequest, ServletResponse servletResponse, FilterChain filterChain) throws IOException, ServletException {
    System.out.println("进入Second Filter");
    filterChain.doFilter(servletRequest,servletResponse);
    System.out.println("离开Second Filter");
   }


  @Override
  public void destroy() { }
}
使用配置类注册filter
@Configuration
public class FilterConfig {
  @Bean
  public FilterRegistrationBean getFilterRegistrationBean(){
    // 注册filter组件
    FilterRegistrationBean bean = new FilterRegistrationBean(new SecondFilter());
    // 添加过滤路径
    bean.addUrlPatterns("/second");
    return bean;
   }
}
6,SpringBoot整合Web开发_Listener
注册方式一
编写Listener
@WebListener
public class FirstListener implements ServletContextListener {
  @Override
  public void contextInitialized(ServletContextEvent sce) {
    System.out.println("First Listener Init......");
   }


  @Override
  public void contextDestroyed(ServletContextEvent sce) {


   }
}
启动类扫描web组件
@SpringBootApplication
//SpringBoot启动时扫描注册注解标注的Web组件
@ServletComponentScan
public class Springbootdemo2Application {
  public static void main(String[] args) {
    SpringApplication.run(Springbootdemo2Application.class, args);
   }
}
注册方式二
编写Listener
public class SecondListener implements ServletContextListener {
  @Override
  public void contextInitialized(ServletContextEvent sce) {
    System.out.println("Second Listener Init......");
   }

  @Override
  public void contextDestroyed(ServletContextEvent sce) {

   }
}
使用配置类注册Listener
@Configuration
public class ListenerConfig {
  @Bean
  public ServletListenerRegistrationBean getServletListenerRegistrationBean(){
    ServletListenerRegistrationBean bean = new ServletListenerRegistrationBean(new SecondListener());
    return bean;
   }
}
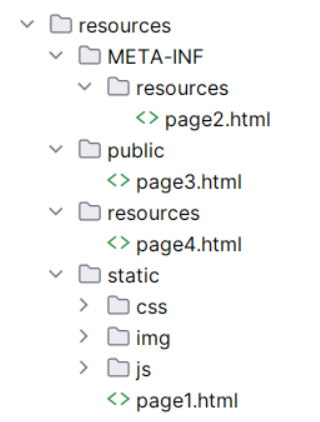
7,SpringBoot整合Web开发_静态资源
SpringBoot项目中没有WebApp目录,只有src目录。在src/main/resources下面有static和templates两个文件夹。SpringBoot默认在static目录中存放静态资源,而在templates中放动态页面。
SpringBoot不推荐JSP作为动态页面,推荐使用Thymeleaf技术编写动态页面。templates目录是存放Thymeleaf页面的目录,稍后我们讲解Thymeleaf技术。
接下来我们在resources/static中编写html静态页面:
<!DOCTYPE html>
<html lang="en">
<head>
  <meta charset="UTF-8">
  <title>测试HTML</title>
  <script src="/js/page1.js"></script>
  <link rel="stylesheet" href="/css/page1.css" />
</head>
<body>
<p>我的HTML</p>
<img src="/img/img.png">
</body>
</html>

8,springBoot整合Web开发_静态资源其他存放位置
除了/resources/static目录,SpringBoot还会扫描以下位置的静态资源:
- /resources/META‐INF/resources/
- /resources/resources/
- /resources/public/
我们还可以在配置文件自定义静态资源位置
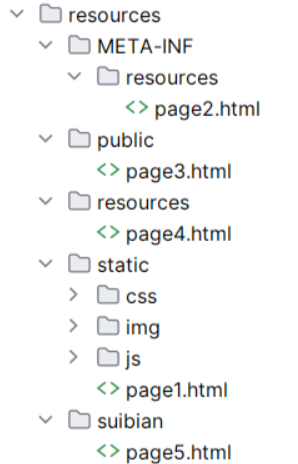
在SpringBoot配置文件进行自定义静态资源位置配置
spring:
  web:
   resources:
    static-locations: classpath:/suibian/,classpath:/static/
注意:
- 该配置会覆盖默认静态资源位置,如果还想使用之前的静态资源位置,还需要配置在后面。
- SpringBoot2.5之前的配置方式为:spring.resources.static-locations
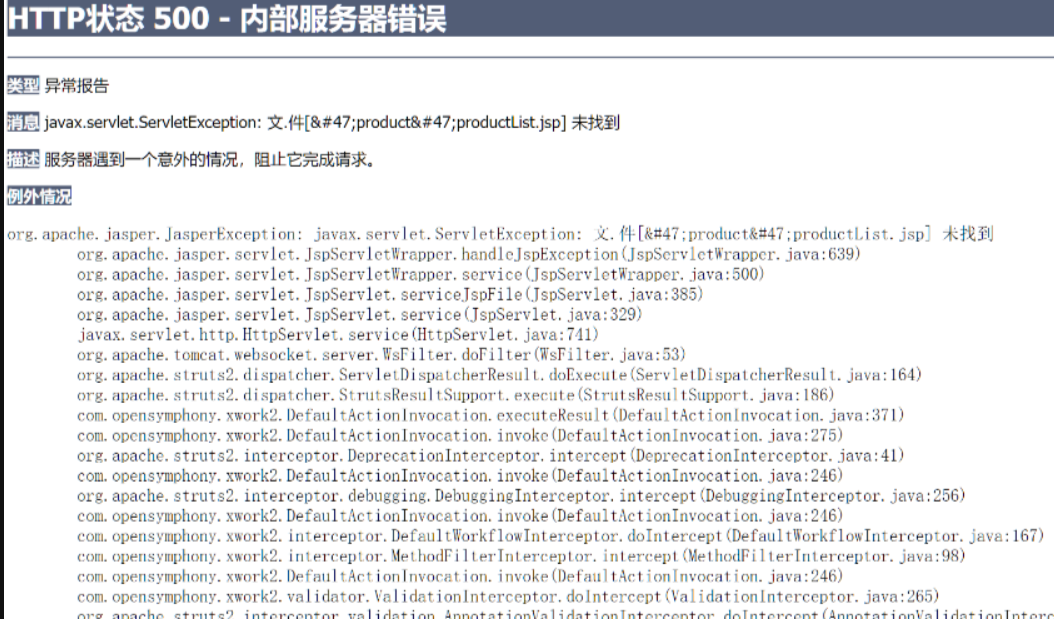
9,SpringBoot整合Web开发_JSP
在SpringBoot中不推荐使用JSP作为动态页面,如果我们要想使用JSP编写动态页面,需要手动添加webapp目录。
- 由于SpringBoot自带tomcat无法解析JSP,需要在pom文件添加JSP引擎
<!--添加jsp引擎,SpringBoot内置的Tomcat不能解析JSP-->
<dependency>
  <groupId>org.apache.tomcat.embed</groupId>
  <artifactId>tomcat-embed-jasper</artifactId>
</dependency>
- 将webapp标记为web目录
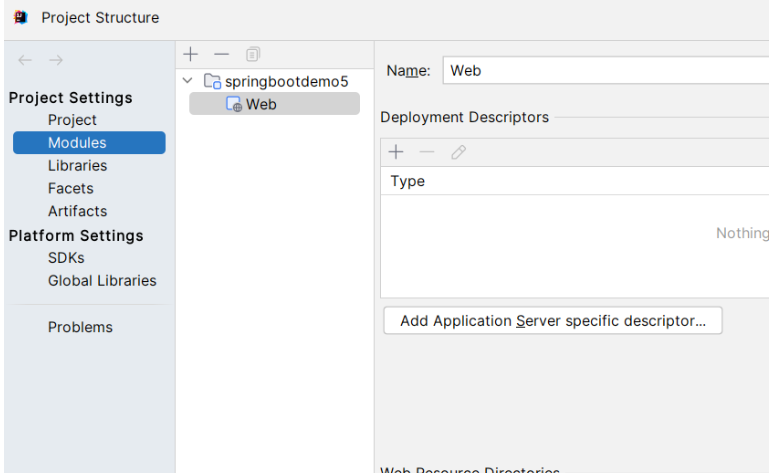
- 创建webapp目录,编写JSP文件
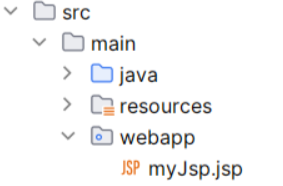
<%@ page contentType="text/html;charset=UTF-8" language="java" %>
<html>
<head>
  <title>MYJSP</title>
</head>
<body>
MYJSP
</body>
</html>
- 启动项目,访问http://localhost:8080/myJsp.jsp
10,SpringBoot整合MyBatis(重点)
Spring整合MyBatis时需要进行大量配置,而SpringBoot整合MyBatis则可以简化很多配置:
1.准备数据库
CREATE DATABASE `student`;
USE `student`;
DROP TABLE IF EXISTS `student`;
CREATE TABLE `student` (
 `id` int(11) NOT NULL AUTO_INCREMENT,
 `name` varchar(255) DEFAULT NULL,
 `sex` varchar(10) DEFAULT NULL,
 `address` varchar(255) DEFAULT NULL,
 PRIMARY KEY (`id`)
) ENGINE=InnoDB AUTO_INCREMENT=3 DEFAULT CHARSET=utf8;


insert into `student`(`id`,`name`,`sex`,`address`) values (1,'百战程序员','男','北京'),(2,'北京尚学堂','女','北京');
2.在pom中添加MyBatis起步依赖和Mysql驱动依赖
<dependencies>
  <dependency>
    <groupId>org.springframework.boot</groupId>
    <artifactId>spring-boot-starter-web</artifactId>
  </dependency>
  <!-- mybatis起步依赖 -->
  <dependency>
    <groupId>org.mybatis.spring.boot</groupId>
    <artifactId>mybatis-spring-boot-starter</artifactId>
    <version>3.0.2</version>
  </dependency>
  <!-- mysql依赖 -->
  <dependency>
    <groupId>com.mysql</groupId>
    <artifactId>mysql-connector-j</artifactId>
    <scope>runtime</scope>
  </dependency>
  <dependency>
    <groupId>org.springframework.boot</groupId>
    <artifactId>spring-boot-starter-test</artifactId>
    <scope>test</scope>
  </dependency>
  <!-- mybatis测试起步依赖 -->
  <dependency>
    <groupId>org.mybatis.spring.boot</groupId>
    <artifactId>mybatis-spring-boot-starter-test</artifactId>
    <version>3.0.2</version>
    <scope>test</scope>
  </dependency>
</dependencies>
3.编写实体类
public class Student {
  private int id;
  private String name;
  private String sex;
  private String address;

  // 省略构造方法/getter/setter/tostring
}
4.编写Mapper
@Mapper
public interface StudentMapper {
  List<Student> findAll();

  @Select("select * from student where id = #{id}")
  Student findById(int id);
}
5.编写Mapper映射文件
<?xml version="1.0" encoding="UTF-8"?>
<!DOCTYPE mapper
    PUBLIC "-//mybatis.org//DTD Mapper 3.0//EN"
    "http://mybatis.org/dtd/mybatis-3-mapper.dtd">
<mapper namespace="com.jjy.springbootmybatis.mapper.StudentMapper">
  <select id="findAll" resultType="student">
     select * from student
  </select>
</mapper>
6.编写配置文件 (application.properties)
# 配置数据源
spring:
  datasource:
   driver-class-name: com.mysql.cj.jdbc.Driver
   url: jdbc:mysql:///student?serverTimezone=UTC
   username: root
   password: root

#mybatis配置
mybatis:
 # 映射文件位置
  mapper-locations: com/jjy/springbootdemo7/mapper/*Mapper.xml
 # 别名
  type-aliases-package: com.jjy.springbootdemo7.pojo

logging:
  pattern:
   console: '%d{HH:mm:ss.SSS} %clr(%-5level) ---  [%-15thread] %cyan(%-50logger{50}):%msg%n'
11,SpringBoot单元测试
写了MyBatis相关代码后,我们要测试MyBatis代码是否正确。需要进行单元测试。SpringBoot单元测试要比Spring更简单。
1.SpringBoot项目在构建时,默认引入单元测试的起步依赖
<dependency>
  <groupId>org.springframework.boot</groupId>
  <artifactId>spring-boot-starter-test</artifactId>
  <scope>test</scope>
</dependency>
2.在src.test.java下创建测试类,也可以让idea自动创建测试类,打开要测试的类:
ctrl+shift+t --> create new test
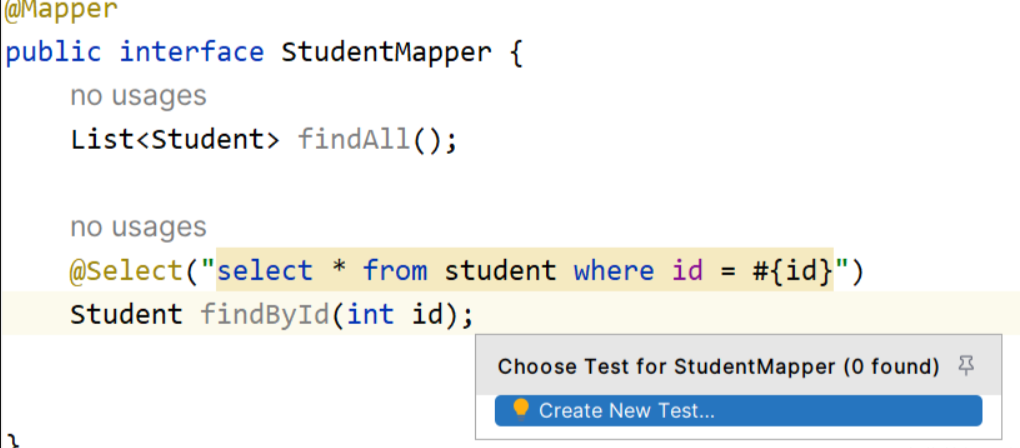
3.编写测试类
// 测试类注解,可以在运行测试代码时加载容器
@SpringBootTest
class StudentMapperTest {
  @Autowired
  private StudentMapper studentMapper;


  @Test
  void findAll() {
    List<Student> all = studentMapper.findAll();
    all.forEach(System.out::println);
   }


  @Test
  void findById() {
    Student student = studentMapper.findById(1);
    System.out.println(student);
   }
}
12,SpringBoot热部署
热部署,就是在应用正在运行的时候升级软件,却不需要重新启动应用。即修改完代码后不需要重启项目即可生效。在SpringBoot中,可以使用DevTools工具实现热部署
1.添加DevTools依赖
<!-- 热部署工具 -->
<dependency>
  <groupId>org.springframework.boot</groupId>
  <artifactId>spring-boot-devtools</artifactId>
  <optional>true</optional>
</dependency>
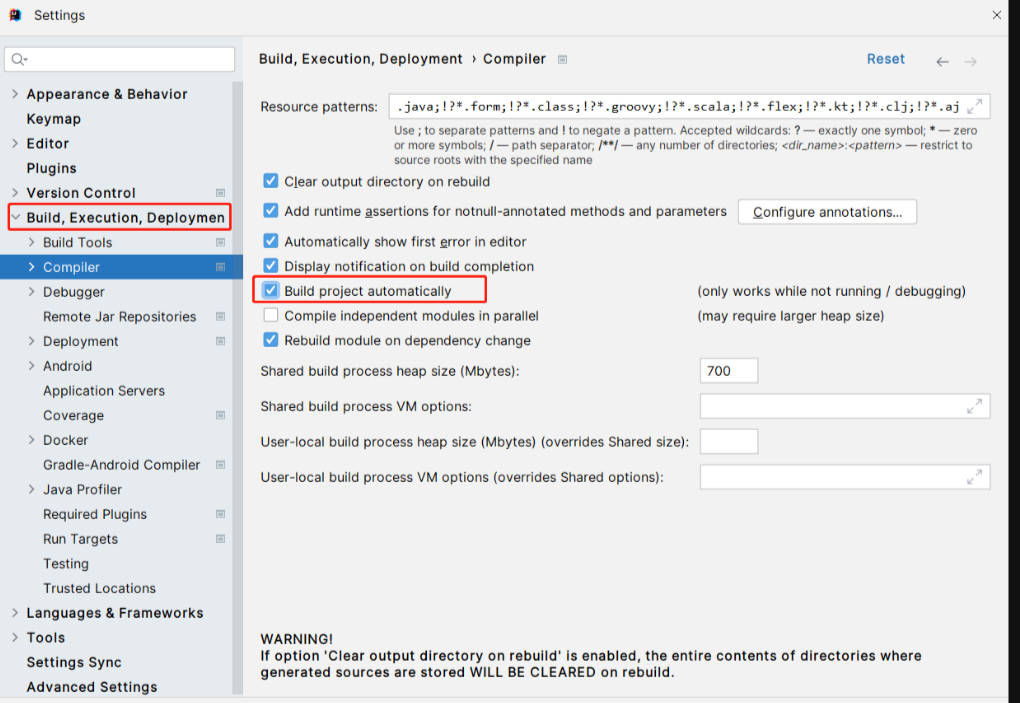
2.在idea中设置自动编译
点击File–>Settings–>Compiler
3.开启允许在运行中修改文件
点击File–>Settings–>Advanced Settings,勾选Allow auto-make to start even if developed application is currently running
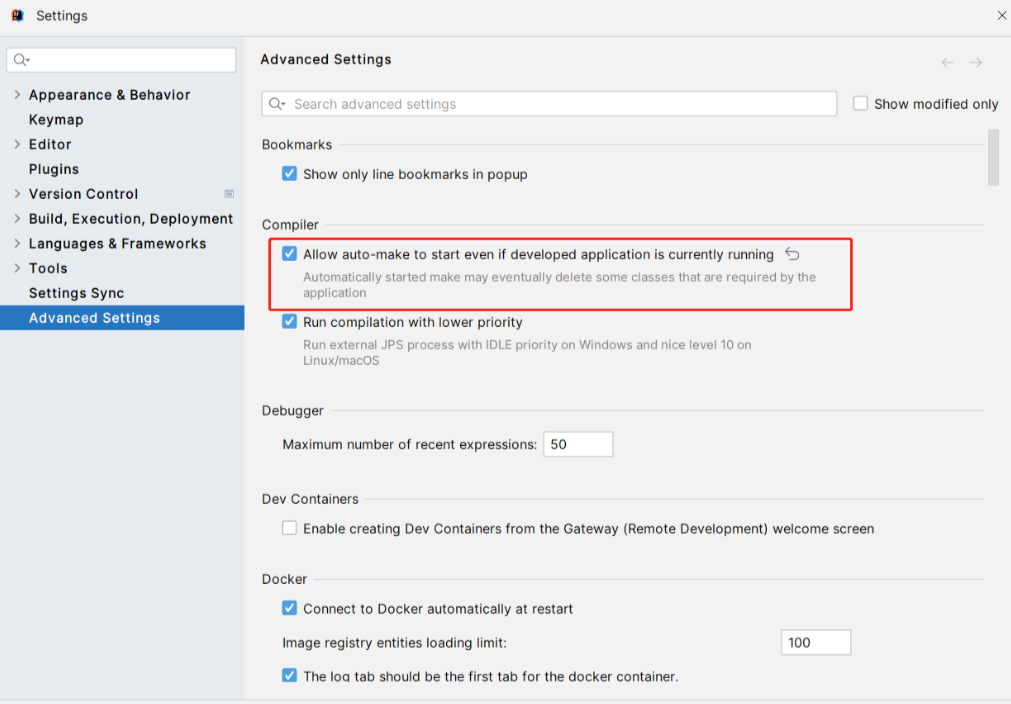
此时热部署即可生效
13,SpringBoot定时任务
定时任务即系统在特定时间执行一段代码。Spring Boot默认已经整合了Spring Task定时任务,只需要添加相应的注解即可完成。
1.在启动类中加入@EnableScheduling注解即可开启定时任务
@SpringBootApplication
@EnableScheduling
public class Demo1Application {
  public static void main(String[] args) {
    SpringApplication.run(Demo1Application.class, args);
   }
}
2.编写定时任务
@Component
public class MyTask {
  // 定时任务方法,每秒执行一次
  @Scheduled(cron="* * * * * *")
  public void task1() {
    SimpleDateFormat sdf = new SimpleDateFormat("HH:mm:ss");
    System.out.println(sdf.format(new Date()));
   }
}
@Scheduled 是 Spring Framework 中的一个注解,它用于标记一个方法,使其成为一个定时任务,按照一定的时间间隔或特定的时间点执行。cron 参数是一个字符串,用于定义任务执行的计划。Cron 表达式由六或七个字段组成,每个字段代表不同的时间单位:
秒 (0 - 59)
分钟 (0 - 59)
小时 (0 - 23,24小时制)
日期 (1 - 31)
月份 (1 - 12 或 JAN-DEC)
星期几 (0 - 7,7 或 0 表示星期天,或者使用 SUN-SAT)
年份(可选字段)
cron="* * * * * " 表示:
秒: 表示每秒钟都会触发一次。
分钟:* 表示每分钟的每秒钟都会触发。
小时:* 表示每小时的每分钟都会触发。
日期:* 表示每月的每天都会触发。
月份:* 表示每年的每个月都会触发。
星期几:* 表示每周的每一天都会触发。
这意味着任务将每秒钟执行一次,这通常是不必要的,除非有特定的需求需要如此高频率的执行。通常,我们会根据实际需要来调整这个表达式,以避免过度执行任务。
3.启动项目,定时任务方法按照配置定时执行。
14,SpringBoot内容协商机制
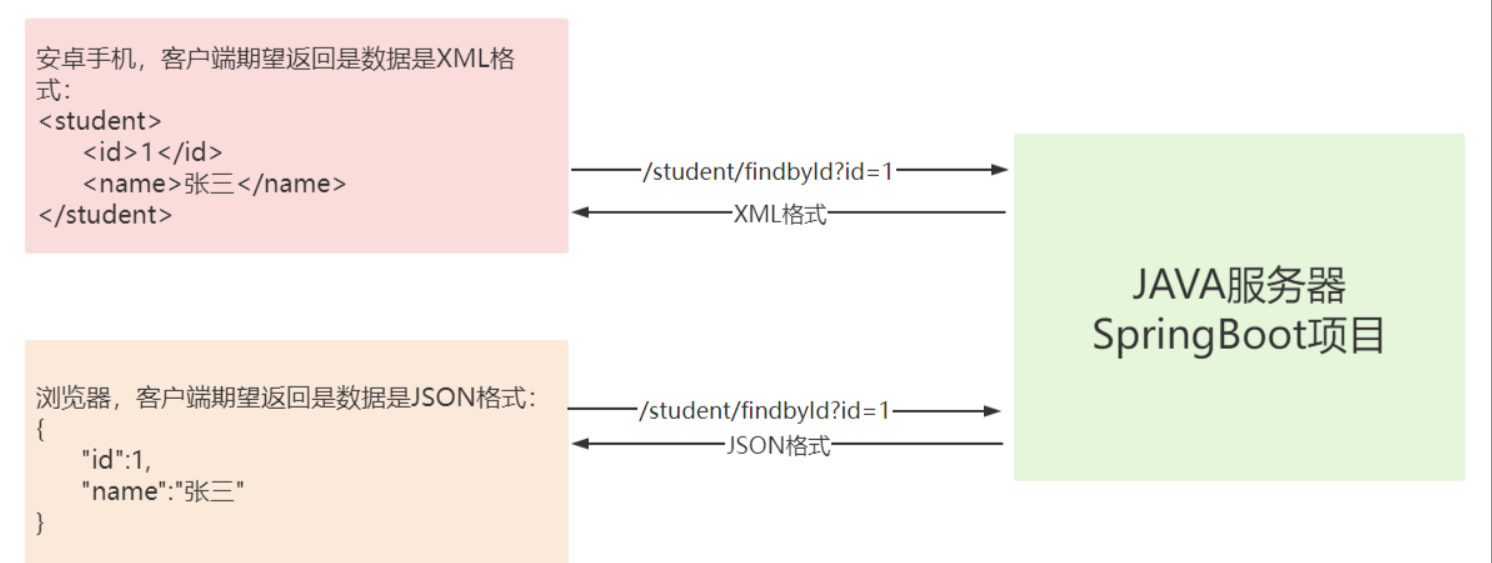
如果我们的Java服务为浏览器和安卓手机同时提供服务,浏览器期望接受的请求是JSON格式,安卓客户端期望接收的请求是XML格式,这个时候是否需要写两个方法?
不需要!SpringBoot的内容协商机制可以解决这个问题。
内容协商机制:根据客户端接收能力不同,SpringBoot 返回不同媒体类型的数据。
Spring默认支持内容协商机制,但SpringBoot默认只支持返回Json数据,所以需要导入jackson-dataformat-xml让SpringBoot支持返回xml数据
1.引入依赖
<!-- 引入支持返回 xml 数据格式 -->
<dependency>
  <groupId>com.fasterxml.jackson.dataformat</groupId>
  <artifactId>jackson-dataformat-xml</artifactId>
</dependency>
2.编写控制器
@Controller
public class ConsultController {
  @Autowired
  private StudentMapper studentMapper;

  @RequestMapping("/student/findById")
  @ResponseBody
  public Student findById(Integer id){
    Student student = studentMapper.findById(id);
    return student;
   }
}
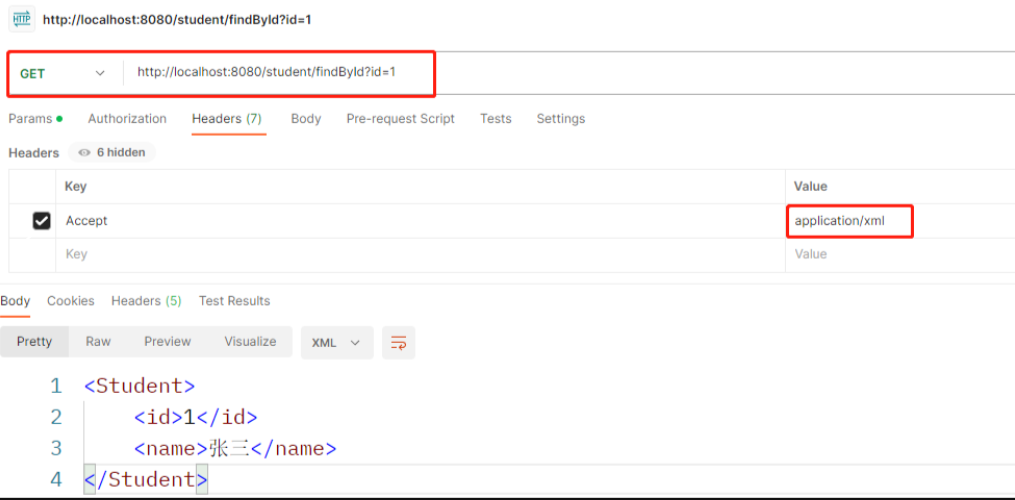
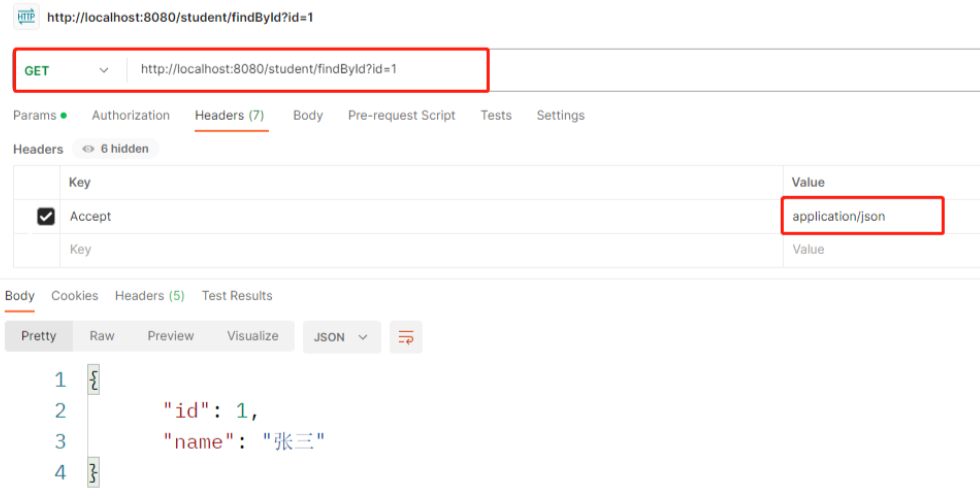
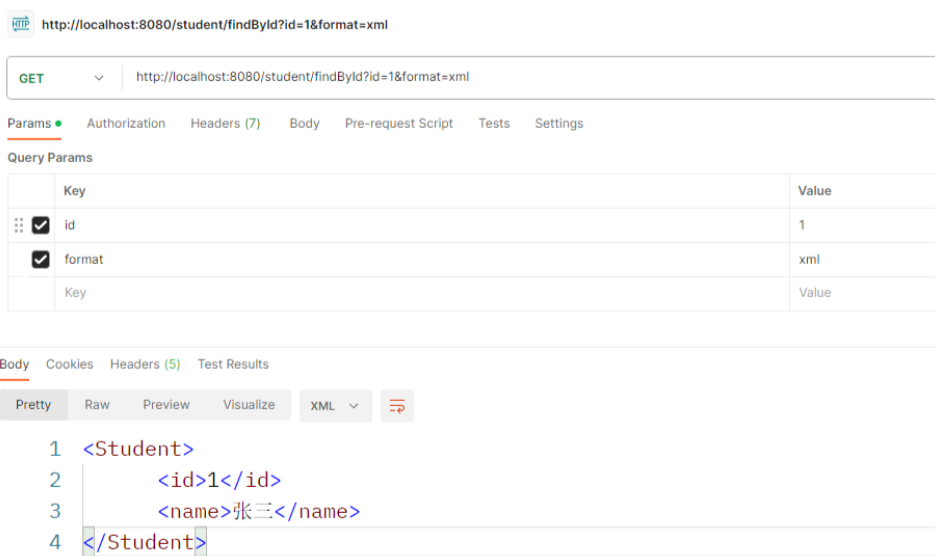
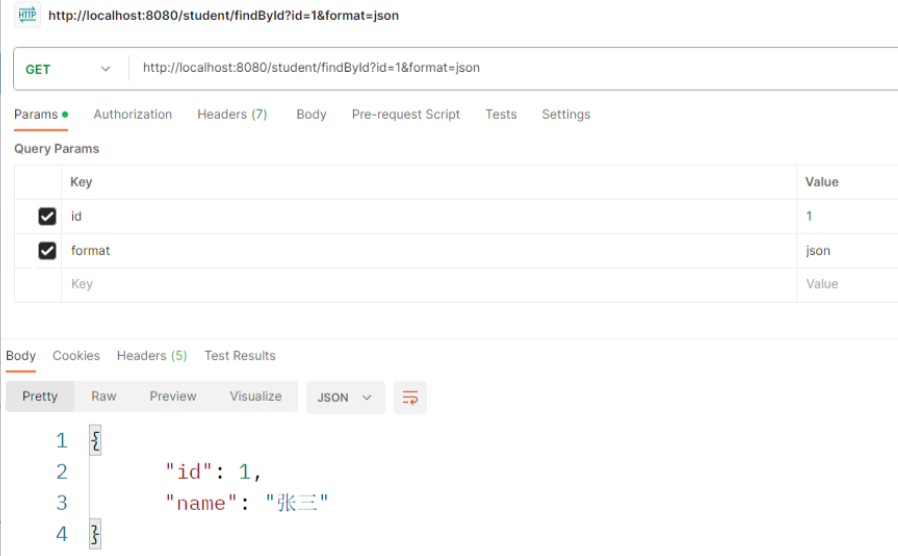
3.进行测试,SpringBoot的内容协商机制是根据请求头不同,返回不同格式的数据,所以需要我们能够修改请求头,我们使用postman进行测试:
15,SpringBoot内容协商机制_基于请求参数
SpringBoot默认根据请求头不同,返回不同的数据格式。我们还可以配置基于请求参数的内容协商,也就是请求参数值不同,返回不同的数据:
1.配置SpringBoot基于请求参数的内容协商
#开启请求参数内容协商模式
spring.mvc.contentnegotiation.favor-parameter=true
#请求参数内容协商模式的参数名
spring.mvc.contentnegotiation.parameter-name=format
2.在postman进行测试:
16,SpringBoot国际化
国际化:(Internationalization 简称 I18n,其中“I”和“n”分别为首末字符,18 则为中间的字符数)。
- 是指软件能同时应对不同国家和地区的用户访问,并根据用户地区和语言习惯,提供相应的、符合用具阅读习惯的页面和数据,
- 例如,为中国用户提供汉语界面显示,为美国用户提供英语界面显示。接下来我们来说一下在SpringBoot项目中,如何进行国际化配置:
1、编写国际化资源文件
SpringBoot国际化资源文件的文件名规范为:基本名_语言代码_国家或地区代码。例如:
- 美国英语:messages_en_US.properties:
- 中国汉语:messages_zh_CN.properties。
- 我们在 src/main/resources中,按照国际化资源文件命名格式分别创建以下三个文件:
- messages.properties:无语言设置时生效
- messages_en_US.properties:美国英语时生效
- messages_zh_CN.properties:中文时生效
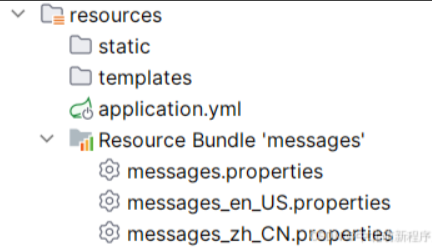
编写三个文件:
# messages.properties
welcome=欢迎使用{0}(默认)


# messages_en_US.properties
welcome=welcome to {0}


# messages_zh_CN.properties
welcome=欢迎使用{0}(中文)
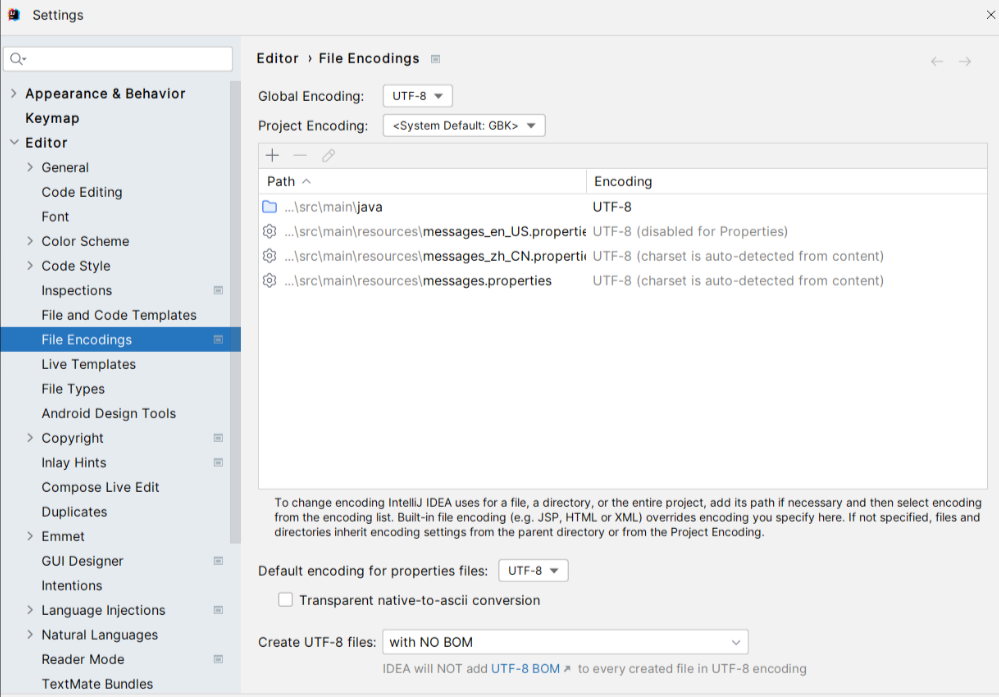
注意,这里要将项目配置文件的编码方式改成UTF-8,否则会出现乱码
2、在配置文件指定国际资源文件的基本名
spring:
  messages:
   basename: messages
3、编写控制器
@Controller
public class I18nController {
  @Autowired
  private MessageSource messageSource;

  @RequestMapping("/welcome")
  @ResponseBody
  public String welcome(HttpServletRequest request) {
    // 获取请求来源的地区
    Locale locale = request.getLocale();
    /**
     * 使用国际化
     * 第一个参数是国际化文件的key,
     * 第二个参数value中的占位符数据
     * 第三个是区域
     */
    String welcome = messageSource.getMessage("welcome", new Object[]{"springboot"}, locale);
    return welcome;
   }
}
4、在浏览器测试国际化
先在默认情况下访问/welcome,之后切换浏览器环境,再次访问/welcome
SpringBoot国际化_在Thymeleaf中进行国际化
在Thymeleaf页面中获取国际化资源数据的方式如下:
<!DOCTYPE html>
<html xmlns:th="http://www.thymeleaf.org">
<head>
  <meta charset="UTF-8"/>
  <title>Title</title>
</head>
<body>
<h1 th:text="#{welcome('springboot')}">欢迎</h1>
<h1>[[#{welcome('springboot')}]]</h1>
</body>
</html>
17,SpringBoot参数校验
简单数据类型
SpringBoot自带了validation工具可以从后端对前端传来的参数进行校验,用法如下:
1.引入validation起步依赖
<!-- 参数校验 -->
<dependency>
  <groupId>org.springframework.boot</groupId>
  <artifactId>spring-boot-starter-validation</artifactId>
</dependency>
2.编写Controller
// 该控制器开启参数校验
@Validated
@Controller
public class TestController {
  @RequestMapping("/t1")
  @ResponseBody
  // 在参数前加校验注解,该注解的意思是字符串参数不能为null
  public String t1(@NotBlank String username){
    System.out.println(username);
    return "请求成功!";
   }
}
3.访问http://localhost:8080/t1,发现当没有传来参数时,会抛出ConstraintViolationException异常。
4.在校验参数的注解中添加message属性,可以替换异常信息。
// 该控制器开启参数校验
@Validated
@Controller
public class TestController {
  @RequestMapping("/t1")
  @ResponseBody
  // 在参数前加校验注解,该注解的意思是字符串参数不能为null
  public String t1(@NotBlank(message = "用户名不能为空") String username){
    System.out.println(username);
    return "请求成功!";
   }
}
异常处理
当抛出ConstraintViolationException异常后,我们可以使用SpringMVC的异常处理器,也可以使用SpringBoot自带的异常处理机制。
当程序出现了异常,SpringBoot会使用自带的BasicErrorController对象处理异常。
该处理器会默认跳转到/resources/templates/error.html页面。
编写异常页面:
<!DOCTYPE html>
<html lang="en">
<head>
  <meta charset="UTF-8">
  <title>错误页面</title>
</head>
<body>
<h1>服务器开小差了!</h1>
</body>
</html>
参数校验_校验相关注解
| 注解 | 作用 |
|---|---|
| @NotNull | 判断包装类是否为null |
| @NotBlank | 判断字符串是否为null或者是空串(去掉首尾空格) |
| @NotEmpty | 判断集合是否为空 |
| @Length | 判断字符的长度(最大或者最小) |
| @Min | 判断数值最小值 |
| @Max | 判断数值最大值 |
| 判断邮箱是否合法 |
@RequestMapping("/t2")
@ResponseBody
public String t2(
    @NotBlank @Length(min = 1, max = 5) String username,
    @NotNull @Min(0) @Max(150) Integer age,
    @NotEmpty @RequestParam List<String> address,
    @NotBlank @Email String email) {
  System.out.println(username);
  System.out.println(age);
  System.out.println(address);
  System.out.println(email);
  return "请求成功!";
}
参数校验_对象类型
SpringBoot也可以校验对象参数中的每个属性,用法如下:
1.添加实体类
public class Student {
  @NotNull(message = "id不能为空")
  private Integer id;
  @NotBlank(message = "姓名不能为空")
  private String name;
  // 省略getter/setter/tostring
}
2.编写控制器
@Controller
public class TestController2 {
  @RequestMapping("/t3")
  @ResponseBody
  // 校验的对象参数前添加@Validated,并将异常信息封装到BindingResult对象中
  public String t3(@Validated Student student,BindingResult result) {
    // 判断是否有参数异常
    if (result.hasErrors()) {
      // 所有参数异常
      List<ObjectError> list = result.getAllErrors();
      // 遍历参数异常,输出异常信息
      for (ObjectError err : list) {
        FieldError fieldError = (FieldError) err;
        System.out.println(fieldError.getDefaultMessage());
       }
      return "参数异常";
     }
    System.out.println(student);
    return "请求成功!";
   }
}
18,SpringBoot指标监控
添加Actuator功能
- Spring Boot Actuator可以帮助程序员监控和管理SpringBoot应用,比如健康检查、内存使用情况统计、线程使用情况统计等。
- 我们在SpringBoot项目中添加Actuator功能,即可使用Actuator监控项目,用法如下:
1.在被监控的项目中添加Actuator起步依赖
<dependency>
  <groupId>org.springframework.boot</groupId>
  <artifactId>spring-boot-starter-actuator</artifactId>
</dependency>
2.编写配置文件
#开启所有监控端点
management:
  endpoints:
   web:
    exposure:
     include: '*'
3.访问项目:http://localhost:8080/actuator
通过URL可以调用actuator的功能:
| URL | 查看的数据 |
|---|---|
| /env | 环境属性 |
| /health | 健康检查 |
| /mappings | 显示所有的@RequestMapping路径 |
| /loggers | 日志 |
| /info | 定制信息 |
| /metrics | 查看内存、CPU核心等系统参数 |
| /trace | 用户请求信息 |
例如查询健康数据,访问http://localhost:8080/actuator/health
Spring Boot Admin
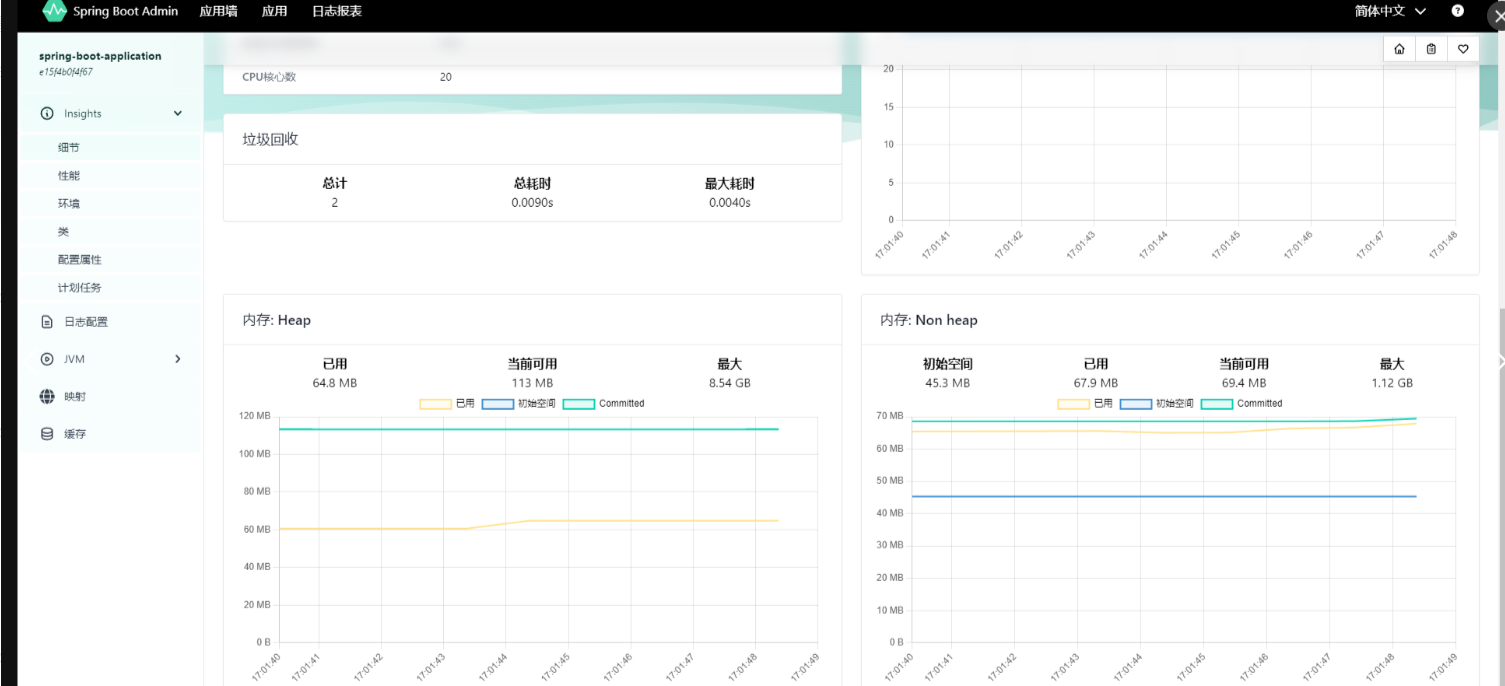
Actuator使用JSON格式展示了大量指标数据,不利于我们查看,我们可以使用可视化工具Spring Boot Admin查看actuator生成指标数据。
Spring Boot Admin是一个独立的项目,我们需要创建并运行该项目。
创建Spring Boot Admin服务端项目
1.创建SpringBoot项目,添加SpringMVC和Spring Boot Admin服务端起步依赖
<dependency>
  <groupId>org.springframework.boot</groupId>
  <artifactId>spring-boot-starter-web</artifactId>
</dependency>
<dependency>
  <groupId>de.codecentric</groupId>
  <artifactId>spring-boot-admin-starter-server</artifactId>
  <version>3.1.3</version>
</dependency>
2.修改配置文件
# 端口号
server.port=9090
# 日志格式
logging.pattern.console=%d{HH:mm:ss.SSS} %clr(%-5level) ---  [%-15thread] %cyan(%-50logger{50}):%msg%n
3.修改启动类
@SpringBootApplication
@EnableAdminServer //开启Spring Boot Admin服务端
public class MyadminApplication {
  public static void main(String[] args) {
    SpringApplication.run(MyadminApplication.class, args);
   }
}
连接Spring Boot Admin项目
在被监控的项目中连接Spring Boot Admin项目,才能使用Spring Boot Admin查看指标数据。
被监控项目添加Spring Boot Admin客户端起步依赖
<dependency>
  <groupId>de.codecentric</groupId>
  <artifactId>spring-boot-admin-starter-client</artifactId>
  <version>3.1.3</version>
</dependency>
修改配置文件
#Spring boot admin访问地址
spring.boot.admin.client.url=http://localhost:9090
此时Spring Boot Admin即可连接被监控的项目
19,SpringBoot日志管理
Logback
- SpringBoot默认使用Logback组件作为日志管理。
- Logback是log4j创始人设计的一个开源日志组件。
- 在SpringBoot中已经整合了Logback的依赖,所以我们不需要额外的添加其他依赖:
Logback配置用法如下
1.在/resources下添加Logback配置文件logback.xml
<?xml version="1.0" encoding="UTF-8" ?>
<configuration>
  <!--定义日志文件的存储地址-->
  <property name="LOG_HOME" value="${catalina.base}/logs/"/>

  <!-- 控制台输出 -->
  <appender name="Stdout" class="ch.qos.logback.core.ConsoleAppender">
    <!-- 日志输出编码 -->
    <layout class="ch.qos.logback.classic.PatternLayout">
      <!--格式化输出:%d表示日期,%thread表示线程名,%-5level:级别从左显示5个字符宽度%msg:日志消息,%n是换行符-->
      <pattern>%d{MM-dd HH:mm:ss.SSS} [%thread] %-5level %logger{50} - %msg%n
      </pattern>
    </layout>
  </appender>

  <!-- 按照每天生成日志文件 -->
  <appender name="RollingFile" class="ch.qos.logback.core.rolling.RollingFileAppender">
    <rollingPolicy class="ch.qos.logback.core.rolling.TimeBasedRollingPolicy">
      <!--日志文件输出的文件名-->
      <FileNamePattern>${LOG_HOME}/server.%d{yy99-MM-dd}.log</FileNamePattern>
      <MaxHistory>30</MaxHistory>
    </rollingPolicy>
    <layout class="ch.qos.logback.classic.PatternLayout">
      <!--格式化输出:%d表示时间,%thread表示线程名,%-5level:级别从左显示5个字符宽度%msg:日志消息,%n是换行符-->
      <pattern>%d{HH:mm:ss.SSS} [%thread] %-5level %logger{50} - %msg%n
      </pattern>
    </layout>
    <!--日志文件最大的大小-->
    <triggeringPolicy class="ch.qos.logback.core.rolling.SizeBasedTriggeringPolicy">
      <MaxFileSize>10MB</MaxFileSize>
    </triggeringPolicy>
  </appender>


  <!-- 日志输出级别 -->
  <root level="info">
    <appender-ref ref="Stdout"/>
    <appender-ref ref="RollingFile"/>
  </root>
</configuration>
打印自定义日志
如果想在运行时打印自定义日志,只需要引入Logger对象即可:
@Controller
public class LogbackController {
  private final static Logger logger = LoggerFactory.getLogger(LogbackController.class);

  @RequestMapping("/printLog")
  @ResponseBody
  public String showInfo(){
    logger.info("记录日志");
    return "Hello Logback";
   }
}
如果日志过多,可以屏蔽一些包的日志,在配置文件中配置
#屏蔽org包中的日志输出
logging.level.org=off
20,SpringBoot项目部署
项目打包
- SpringBoot项目是依赖于Maven构建的,但打包时如果只依赖Maven打包工具则会打包不完整,
- 我们还需要在SpringBoot项目中引入SpringBoot打包插件 :
<build>
  <plugins>
    <plugin>
      <groupId>org.springframework.boot</groupId>
      <artifactId>spring-boot-maven-plugin</artifactId>
    </plugin>
  </plugins>
</build>
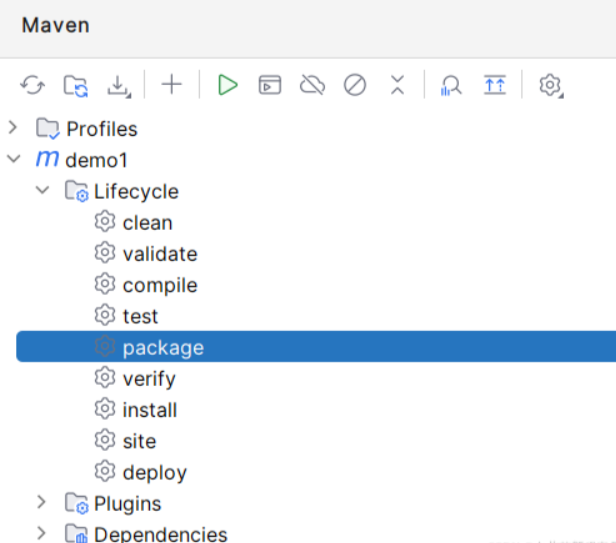
此时再使用Maven插件打包:
运行jar包:
1.进入jar包所在目录,使用cmd打开命令行窗口
2.输入命令: java -jar jar包名
多环境配置
在真实开发中,在不同环境下运行项目往往会进行不同的配置,比如开发环境使用的是开发数据库,测试环境使用的是测试数据库,生产环境使用的是生产数据库。
SpringBoot支持不同环境下使用不同的配置文件,用法如下:
配置文件名:
application-环境名.properties/yml
如:
application-dev.properties/yml 开发环境配置文件
# 开发环境端口号为8080
server:
  port: 8080
application-test.properties/yml 测试环境配置文件
# 测试环境端口号为8081
server:
  port: 8081
application-prod.properties/yml 生产环境配置文件
# 生产环境端口号为80
server:
  port: 80
运行jar包时选择环境:
java -jar jar包名 --spring.profiles.active=环境名
Dockerfile制作镜像
为了节约资源,在生产环境中我们更多的是使用Docker容器部署SpringBoot应用,首先我们准备Docker环境:
1.准备一台centos7系统的虚拟机,连接虚拟机。
2.关闭虚拟机防火墙
# 关闭运行的防火墙
systemctl stop firewalld.service

# 禁止防火墙自启动
systemctl disable firewalld.service
3.安装Docker
# 安装Docker
yum -y install docker

# 启动docker
systemctl start docker
4.由于SpringBoot中嵌入了Web容器,所以在制作SpringBoot项目的镜像时无需依赖Web容器,基于JDK制作镜像即可,接下来我们使用Dockerfile制作镜像:
5.进入opt目录 cd /opt
6.使用rz命令将项目Jar包上传至虚拟机
7.编写DockerFile
cat <<EOF > Dockerfile
# 基于JDK17
FROM openjdk:17
# 作者
MAINTAINER itbaizhan
# 拷贝到容器opt目录
ADD springbootdemo9-0.0.1-SNAPSHOT.jar /opt
#保留端口
EXPOSE 8080
# 启动容器后执行的命令
CMD java -jar /opt/springbootdemo9-0.0.1-SNAPSHOT.jar --spring.profiles.active=dev
EOF
8.构建镜像
docker build -t springbootdocker .
9.查看所有的镜像,出现springbootdocker代表镜像构建成功
docker images
10.使用镜像启动容器
docker run -d -p 8080:8080 springbootdocker
11.访问项目
Maven插件制作镜像
除了DockerFile,我们还可以使用Maven插件制作镜像。使用方法如下:
1.开启远程docker服务
# 修改docker配置文件
vim /lib/systemd/system/docker.service


# 在ExecStart=后添加配置,远程访问docker的端口为2375
ExecStart=/usr/bin/dockerd-current -H tcp://0.0.0.0:2375 -H unix://var/run/docker.sock \
     --add-runtime docker-runc=/usr/libexec/docker/docker-runc-current \
     --default-runtime=docker-runc \
     --exec-opt native.cgroupdriver=systemd \
     --userland-proxy-path=/usr/libexec/docker/docker-proxy-current \
     --init-path=/usr/libexec/docker/docker-init-current \
     --seccomp-profile=/etc/docker/seccomp.json \
     $OPTIONS \
     $DOCKER_STORAGE_OPTIONS \
     $DOCKER_NETWORK_OPTIONS \
     $ADD_REGISTRY \
     $BLOCK_REGISTRY \
     $INSECURE_REGISTRY \
     $REGISTRIES


# 重启docker
systemctl daemon-reload
systemctl restart docker
2.在项目的pom文件中添加docker-maven-plugin插件
<!-- docker-maven-plugin-->
<plugin>
  <groupId>com.spotify</groupId>
  <artifactId>docker-maven-plugin</artifactId>
  <version>1.2.2</version>
  <configuration>
    <!-- Docker路径 -->
    <dockerHost>http://192.168.1.25:2375</dockerHost>
    <!-- Dockerfile定义 -->
    <baseImage>openjdk:17</baseImage>
    <!-- 作者 -->
    <maintainer>itbaizhan</maintainer>
    <resources>
      <resource>
        <!-- 复制jar包到docker容器指定目录 -->
        <targetPath>/</targetPath>
        <!-- 从哪个包拷贝文件,target包 -->
        <directory>${project.build.directory}</directory>
        <!-- 拷贝哪个文件 -->
        <include>${project.build.finalName}.jar</include>
      </resource>
    </resources>
    <workdir>/</workdir>
    <entryPoint>["java", "-jar", "${project.build.finalName}.jar","--spring.profiles.active=dev"]</entryPoint>
    <forceTags>true</forceTags>
    <!-- 镜像名 -->
    <imageName>${project.artifactId}</imageName>
    <!-- 镜像版本 -->
    <imageTags>
      <imageTag>${project.version}</imageTag>
    </imageTags>
  </configuration>
</plugin>
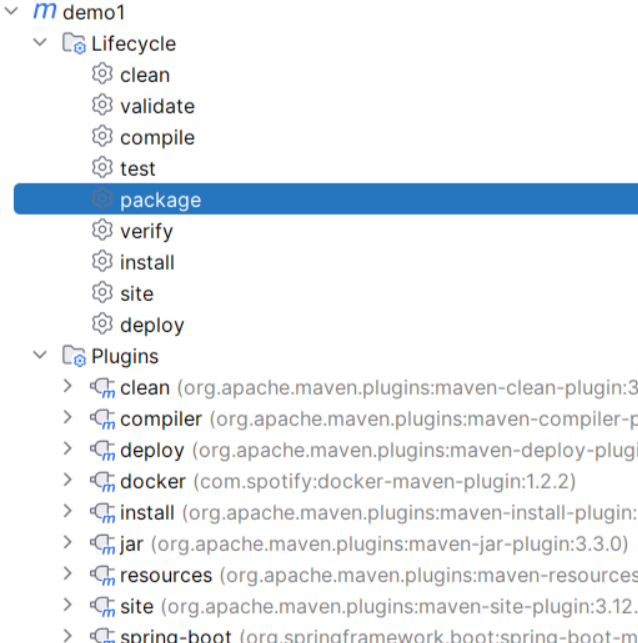
3.使用maven的package命令给项目打包
4.用maven的docker插件制作镜像
5.查看镜像是否构建成功
docker images
6.使用镜像启动容器
docker run -d -p 8081:8080 demo1:0.0.1-SNAPSHOT
7.访问项目
20,SpringBoot3新特性
与之前版本的改动
我们在使用SpringBoot3的时候,一定要注意以下几个方面的改动:
-
JDK要求最低版本Java17
-
SpringBoot3底层默认的Spring版本是Spring6
-
新增了一些起步依赖,有一些起步依赖进行了调整,但改动不大。
-
自动配置包位置发生了变化
SpringBoot2.x
SpringBoot3.x
- jakarta api迁移
由于JavaEE已经变更为Jakarta EE,包名以 javax开头的需要相应地变更为jakarta
SpringBoot2.x
SpringBoot3.x
ProblemDetails
RFC 7807
之前的项目如果出现异常,默认跳转到error页面。或者是抛出500异常。

但是对于前后端分离的项目,Java程序员不负责页面跳转,只需要把错误信息交给前端程序员处理即可。
而RFC 7807规范就是将异常信息转为JSON格式的数据。
这个JSON数据包含五个部分
-
type: 问题描述文档地址,如果不存在,则"about:blank"
-
title: 简短的描述问题
-
status: http 状态码,比如400、401、500等
-
detail: 详细说明发生问题的原因
-
instance: 问题发生的URL地址
{
  "type": "https://pack.com/probs/out-of-credit",
  "title": "你没有足够的信用。",
  "status": 601,
  "detail": "你现在的余额是30,但是要花50。",
  "instance": "/account/12345/msgs/abc"
}
前端程序员拿到这串JSON数据进行处理就可以了。
ProblemDetails
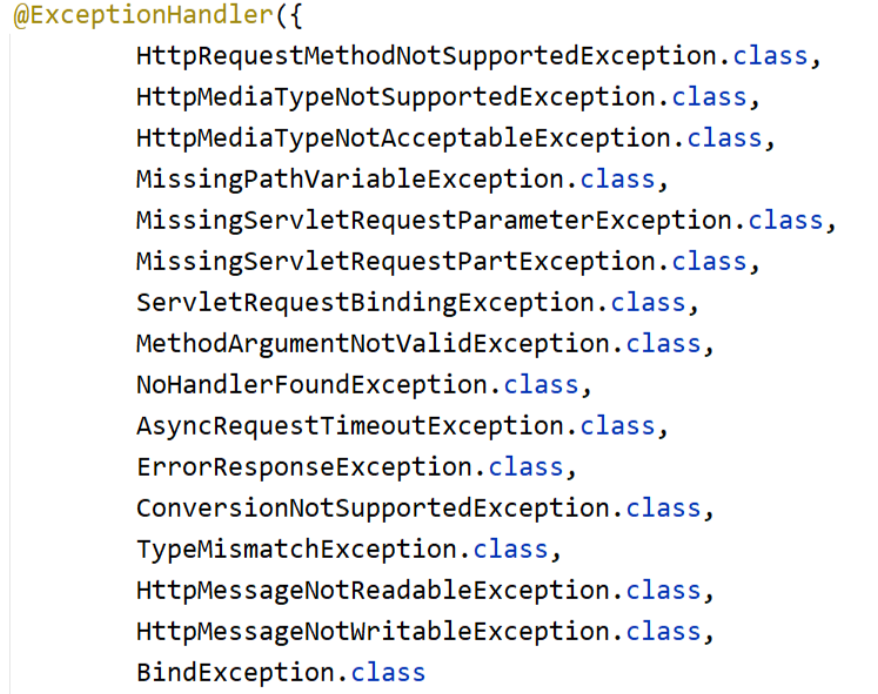
SpringBoot中提供了一个类ProblemDetailsExceptionHandler,他会把错误信息转为RFC 7807规范并返回。
可以看到ProblemDetailsExceptionHandler是一个异常处理器

它会处理以下异常
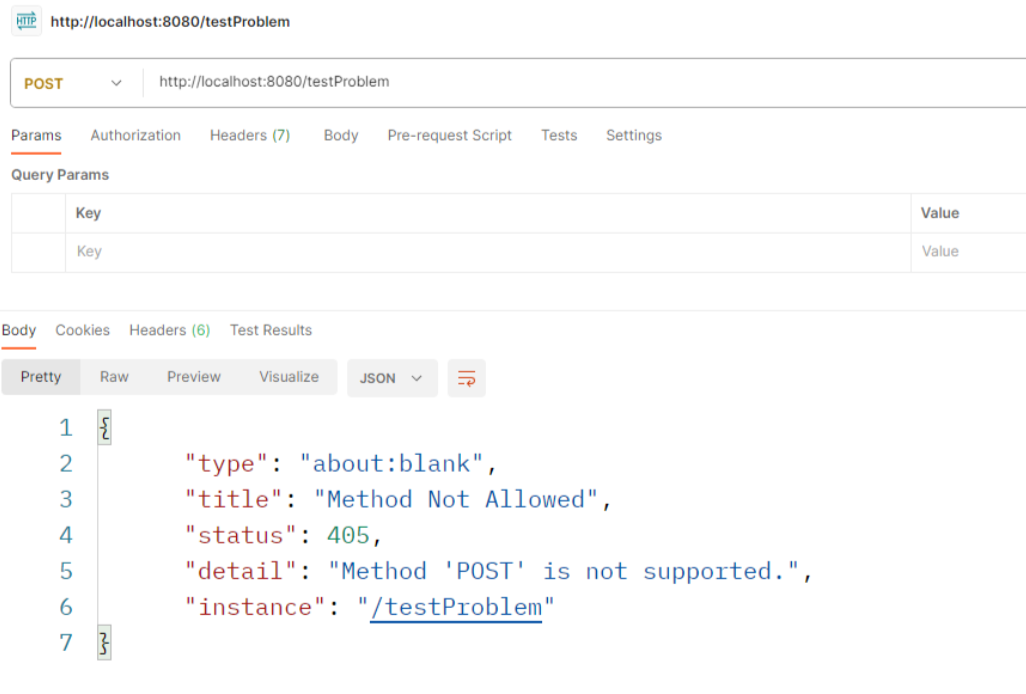
接下来我们就使用ProblemDetails处理异常,请求方式异常也属于ProblemDetails处理的异常,我们就模拟改异常的发生
ProblemDetails默认是不开启的,要想开启需要进行如下配置:
spring.mvc.problemdetails.enabled=true
编写一个控制器方法
@Controller
public class ProblemDetailsController {
  @GetMapping("/testProblem")
  @ResponseBody
  public String testProblem(){
    return "hello";
   }
}
用POST方式访问该方法:
原生镜像
JAVA语言的执行原理
-
计算机语言:
计算机能够直接执行的指令。这种指令和系统及硬件有关。 -
计算机高级语言:
在遵循语法的前提下,写一个文本文件,之后利用某种方式,把文本转换为计算机指令执行。
我们编写的都是计算机高级语言,而将计算机高级语言转为计算机语言运行,有两种方式:
- 动态解释(JIT):解释执行,运行时翻译为机器码。(比如Python,也称为解释型语言)

- 静态编译(AOT):程序在执行前全部被翻译为机器码,可以直接运行二进制文件。(比如C++,也称为解释型语言)
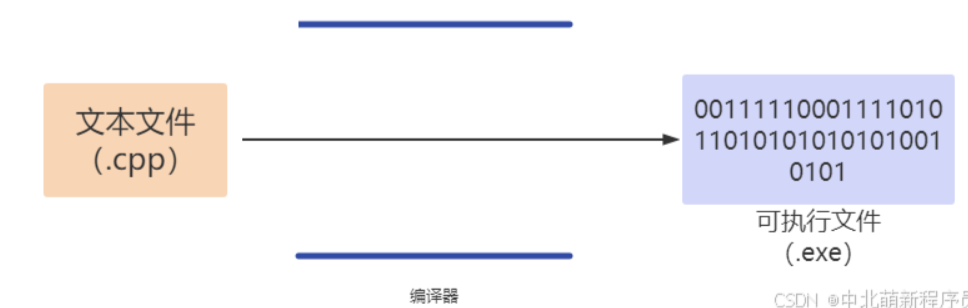
这两种方式各有优缺点,动态解释代码运行效率较低,但可以跨平台运行。
静态编译代码运行效率较高,但不能跨平台运行,而且编译代码比较浪费时间,调试成本高。
JAVA语言:先编译,后解释执行
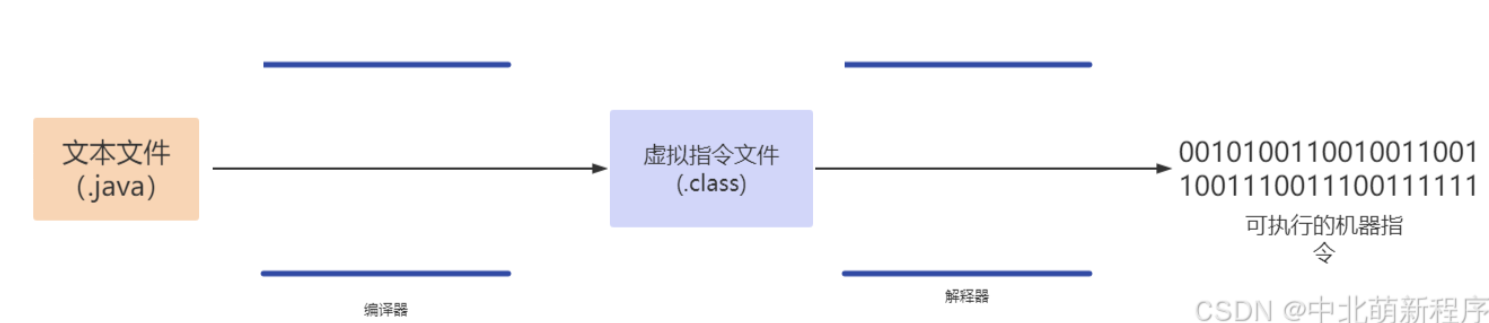
注意,JVM并不是单纯依靠解释器解释虚拟指令,JVM中既有解释器,还有即时编译器。

解释器可以将字节码文件解释为机器指令,立即执行。

即时编译器可以将字节码文件编译为机器指令,存在内存中,编译完成后直接执行本地机器指令即可。
当Java虚拟器启动后,解释器首先发挥作用,不必等待即时编译器全部编译完成后再执行。随着时间的推移,编译器把越来越多的代码编译成本地代码,此时运行本地机器指令,获得更高的执行效率。

虽然这种启动方式很优秀,但他的启动还是比AOT方式慢。在当前微服务、云原生盛行的时代,JAVA 程序显得越来越臃肿,虽然使用AOT也有诸多缺点,比如打包时间长、舍弃平台无关性、反射、动态代理的分析能力有限。但是JAVA必定会向AOT发展,否则在云原生时代,可以能被其他后起之秀慢慢蚕食市场。
Native Image 和 GraalVM
Native Image
Native Image(原生镜像)是一种将Java代码提前编译为二进制文件的技术,即本机可执行文件。在Windows中就是.exe文件,它脱离了Java程序员运行时对JVM的依赖,运行时效率极高。
Spring推荐使用SpringBoot3+GraalVM官方构建工具实现原生镜像构建。
GraalVM
GraalVM是一个高性能跨语言虚拟机,其目的是提升Java和其他使用JVM语言编写程序的执行速度,同时也为JavaScript、Python和许多其他流行语言提供运行时环境。起始于2011年Oracle实验室的一个研究项目。
GraalVM可以直接当做JVM使用,也可以对Java等多种语言实现静态编译,生成Java项目的原生镜像。
生成原生镜像
接下来我们就生成SpringBoot3项目的原生镜像:
1.安装GraalVM
- 解压windows版的GraalVM
- 配置环境变量JAVA_HOME和Path
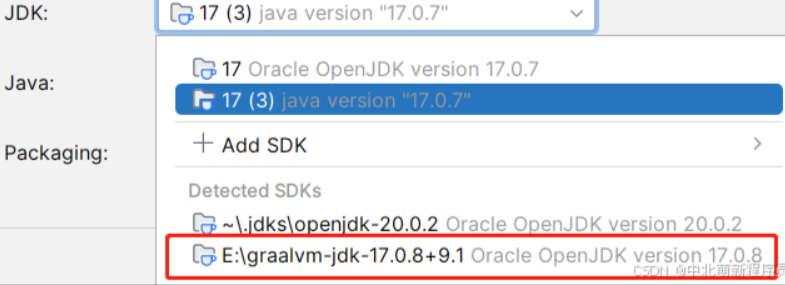
2.创建SpringBoot项目
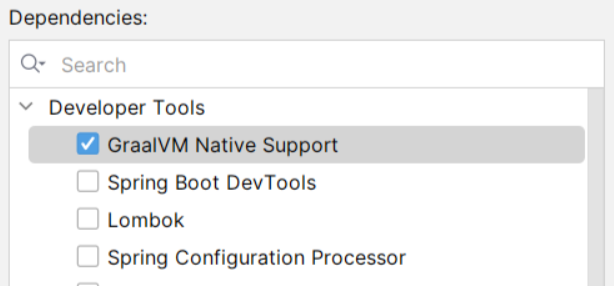
创建时的JDK一定要选择GraalVM
添加依赖时一定要选择GraalVM
编写控制器
@Controller
public class HelloController {
  @ResponseBody
  @RequestMapping("/hello")
  public String hello(){
    return "Hello Native Image";
   }
}
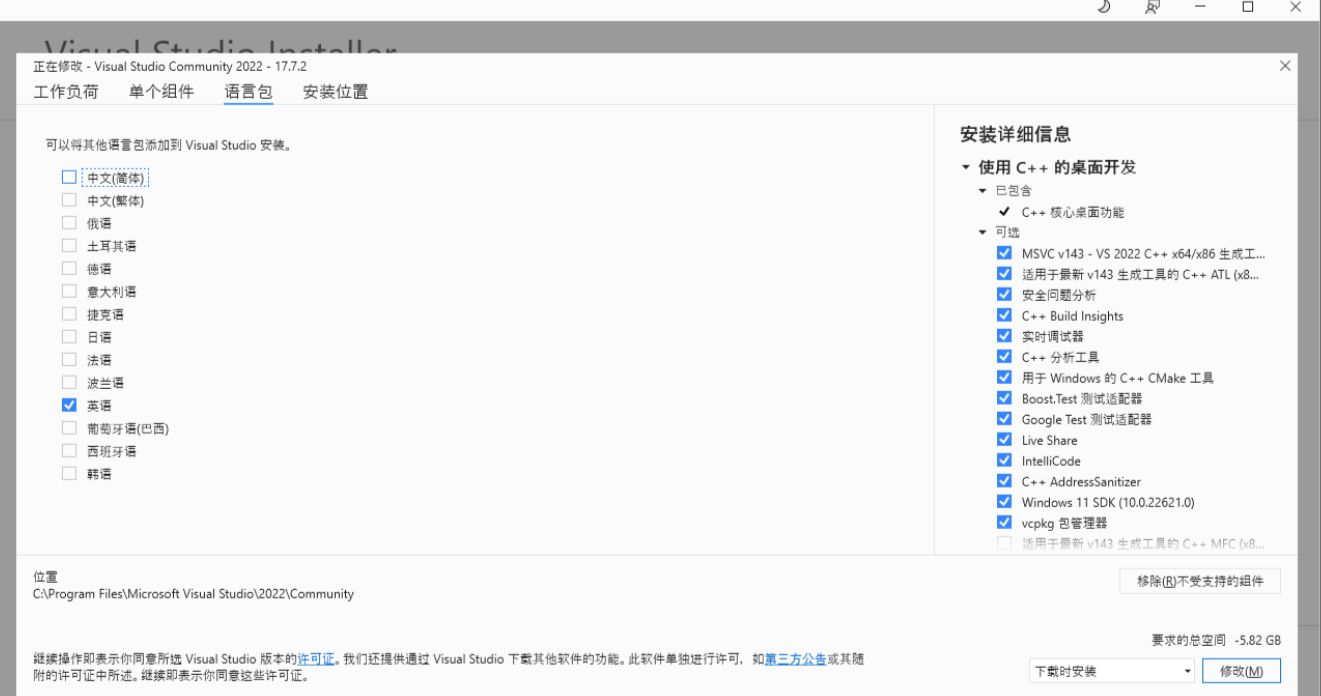
3.通过安装VisualStudio安装C++开发环境,虽然GraalVM可以生成原生镜像,但底层是调用C++的方式生成的.exe可执行文件。

4.使用maven将SpringBoot项目打包成可执行文件
生成Linux原生镜像
1.准备Linux虚拟机,连接虚拟机
2.安装C++开发环境
yum install -y gcc glibc-devel zlib-devel
3.安装GraalVM
# 创建空文件夹
mkdir -p /usr/local/java

# 进入文件夹
cd /usr/local/java

# 上传GraalVM到Linux虚拟机

# 解压GraalVM
tar -zxvf graalvm-jdk-17_linux-x64_bin.tar.gz
4.配置GraalVM环境变量
# 打开环境变量配置文件
vim  /etc/profile

# 添加如下内容
export JAVA_HOME=/usr/local/java/graalvm-jdk-17.0.8+9.1
export PATH=$PATH:$JAVA_HOME/bin

# 使环境变量生效
source /etc/profile

# 查看Java版本
java -version
如果Java版本没有改动,卸载掉Linux系统自带的JDK即可:
# 查看系统自带的Java
rpm -qa|grep java

# 卸载JAVA
rpm -e --nodeps java版本
5.安装Maven
# 创建空文件夹
mkdir -p /usr/local/maven

# 进入文件夹
cd /usr/local/maven

# 上传Maven到Linux虚拟机

# 解压Maven
tar -xvf apache-maven-3.8.8-bin.tar.gz
6.配置Maven环境变量
# 打开环境变量配置文件
vim  /etc/profile

# 添加如下内容
export M2_HOME=/usr/local/maven/apache-maven-3.8.8
export PATH=$PATH:$M2_HOME/bin

# 使环境变量生效
source /etc/profile

# 查看Maven版本
mvn -version
7.修改SpringBoot项目pom文件
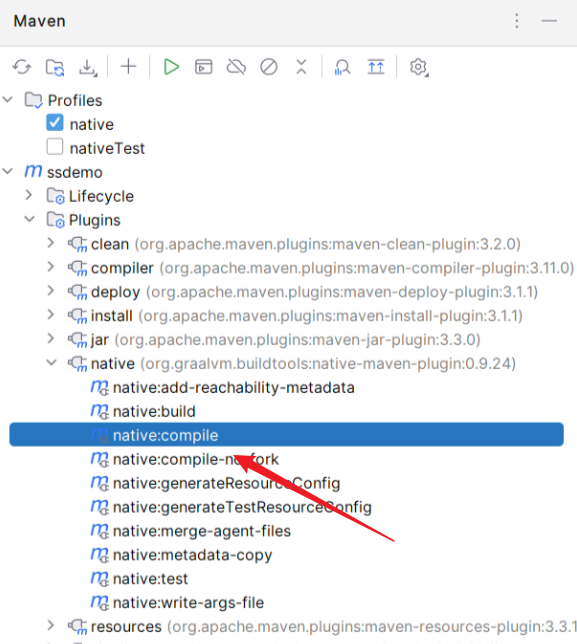
<!-- 添加如下内容,使maven给项目打包时生成原生镜像 -->
<profiles>
  <profile>
    <id>native</id>
    <properties>
      <repackage.classifier>exec</repackage.classifier>
      <native-buildtools.version>0.9.13</native-buildtools.version>
    </properties>
    <build>
      <plugins>
        <plugin>
          <groupId>org.graalvm.buildtools</groupId>
          <artifactId>native-maven-plugin</artifactId>
          <extensions>true</extensions>
          <executions>
            <execution>
              <id>build-native</id>
              <phase>package</phase>
              <goals>
                <goal>build</goal>
              </goals>
            </execution>
          </executions>
        </plugin>
      </plugins>
    </build>
  </profile>
</profiles>
8.把项目压缩成zip文件
9.把项目的压缩文件上传到虚拟机上
10解压项目
# 安装unzip
yum install unzip
# 解压项目
upzip springbootdemo10.zip
11.进入项目,执行mvn clean package -DskipTests -Pnative,生成原生镜像


【推荐】国内首个AI IDE,深度理解中文开发场景,立即下载体验Trae
【推荐】编程新体验,更懂你的AI,立即体验豆包MarsCode编程助手
【推荐】抖音旗下AI助手豆包,你的智能百科全书,全免费不限次数
【推荐】轻量又高性能的 SSH 工具 IShell:AI 加持,快人一步
· 无需6万激活码!GitHub神秘组织3小时极速复刻Manus,手把手教你使用OpenManus搭建本
· Manus爆火,是硬核还是营销?
· 终于写完轮子一部分:tcp代理 了,记录一下
· 别再用vector<bool>了!Google高级工程师:这可能是STL最大的设计失误
· 单元测试从入门到精通