CTR预估模型2021
- LR
- FM: Factorization Machines, 2010
- FNN: Factorisation Machine supported Neural Network, 2016
- FFM: Field-aware Factorization Machine, 2016
- FwFM: Field-weighted Factorization Machines, 2018
- FNFM/NFFM: Field-aware Neural Factorization Machine, 2018
- ONN: Operation-aware Neural Network, 2019
- PNN: Product-based Neural Network, 2016
- NFM: Neural Factorization Machines, 2017
- WDL: Wide and Deep Learning, 2016
- DeepFM: Deep Factorization Machines, 2017
- DCN: Deep and Cross Network, 2017
- DCN-v2
- xDeepFM: eXtreme Deep Factorization Machine, 2018
- AFM: Attention Factorization Machines, 2017
- AutoInt: Automatic Feature Interaction Learning
- InterHAt: Interpretable CTR through Hierarchical Attention,2020
- FiBiNET: Combining Feature Importance and Bilinear feature Interaction, 2019
- FGCNN: Feature Generation by Convolutional Neural Network, 2019
- Reference
本文主要是为了将ctr模型的历程整理分类,并记录各模型的重点部分。所示代码几乎都不能直接运行,而是力求将模型核心部分体现出来。这和我自己的定位有关,自己在学习看代码的时候我只是想知道模型干了什么怎么实现的,至于数据处理部分我并不关心,不同场景有不同的处理脚本。因此只想记录下各个模型的核心实现。
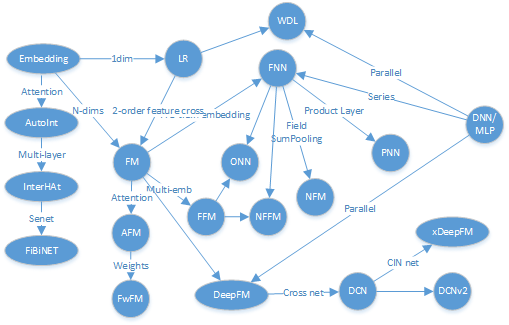
下边这种图连接线会五花八门的,不同人会有不同的理解角度,随便看看就好。

LR
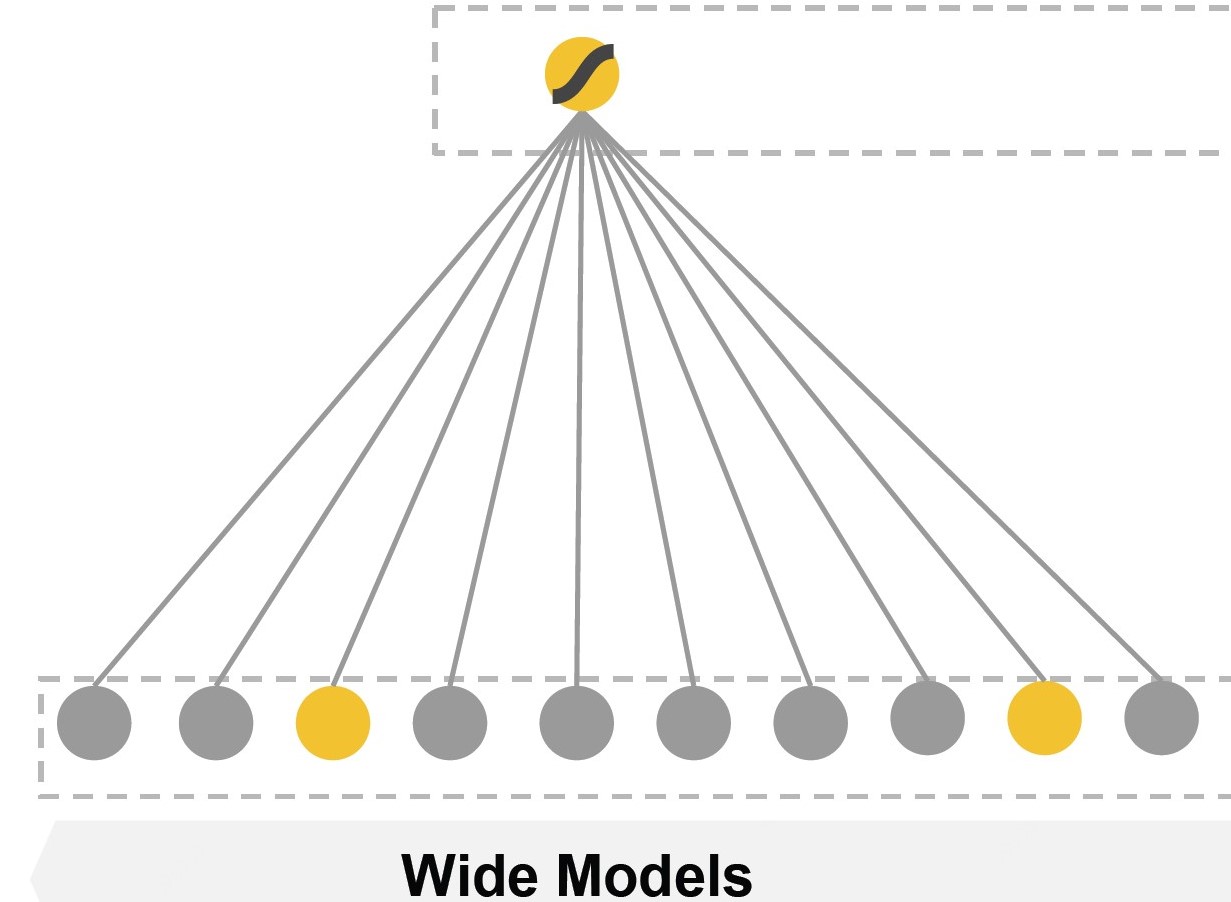
优点:模型简单;时间复杂度低;可大规模并行化;具备一定可解释性;
缺点:依赖大量特征工程;特征交叉困难;未CIN结构出现的数据泛化性差;

公式:
def lr1(x_id, feature_size):
    """
    x_id: input, feature id;
    feature_size: feature variable space
    """
    embeddings = tf.Variable(tf.random_uniform([feature_size,], -0.1, 0.1))
    b = tf.Variable(tf.random_uniform([1], -1.0, 1.0))

    preds = b
    preds += tf.reduce_sum(tf.nn.embedding_lookup(embeddings, x_id))

    preds = tf.clip_by_value(tf.sigmoid(preds), 1e-5, 1.0 - (1e-5), name='preds')
    loss = tf.reduce_mean(tf.losses.log_loss(predictions=preds, labels=_Y))

def lr2(x_onehot, feature_size):
    """
    x_onehot: input, onehot(feature_id), size=feature_size;
    feature_size: feature variable space
    """
    embeddings = tf.Variable(tf.random_uniform([feature_size,], -0.1, 0.1))
    b = tf.Variable(tf.random_uniform([1], -1.0, 1.0))

    preds = b
    # tf.sparse_tensor_dense_matmul if x_onehot is sparse tensor
    preds += tf.reduce_sum(tf.multiply(embeddings, x_onehot))
    return preds
say something:
公式是按照onehot的输入形式给出的,将特征进行onehot展开,输入长度与特征空间长度相同,输入与embedding词表相乘得到对应行的映射权重,即代码 lr2 中实现方式;
但在实际工程中,考虑到输入维度较高、内存以及sparse2dense实现效率的问题,通常是采用代码 lr1 中实现方式,输入为原始id特征,采用embedding_lookup查询到对应行的映射权重。
对于dense feature的处理,先进行embedding_lookup得到embedding,再用dense feature原始数据进行scale, 即\(v_ix_i\)
embedding dict
标准写法是为每一个field创建一个对应的embedding dict,[emb_dict(space) for space in fieldspacelist],好处是能隔离开不同field,缺点就是需要维护的向量词表较多;
另一种实现形式就是开辟一个超大的embedding映射空间,将feature_id+namespace组合hash到映射空间内,好处是减少词表维护量,缺点就是耦合了所有field会存在hash冲突导致映射向量的不准;
从经验来看,如果hash方法合适的话,产生hash冲突的概率很小。因此,本文默认采用后者,即模型中只存在一个embedding dict,所有的输入都是经过hash编码后的。
FM: Factorization Machines, 2010
paper link: https://www.csie.ntu.edu.tw/~b97053/paper/Rendle2010FM.pdf
出发点:LR需要手动构造交叉特征;\(x_i\)=(gender='man' & city='Beijing'),只有两个特征均为 1 时才能更新训练对应的权重;学习不到训练集中未出现的交叉特征,泛化性不好。
优点:可有效处理稀疏场景下的特征学习;具有线行时间复杂度;对训练集中未出现的交叉特征也可进行泛化;
缺点:仅枚举了所有二阶交叉特征,没有考虑高阶;
公式:
D: embedding dim
def fm(x_id, feature_size, dim):
    """
    x_id: input, feature id, tensor_shape=[Batch, field];
    feature_size: feature variable space
    dim: embedding size
    """
    embemdding_matrix = tf.Variable(tf.random_uniform([feature_size, dim], -0.1, 0.1), dtype=tf.float32)
    emb_vec = tf.nn.embedding_lookup(embemdding_matrix, x_id) # Batch*field*Dim (B,F,D)

    square_of_sum = tf.square(tf.reduce_sum(emb_vec, 1))
    sum_of_square = tf.reduce_sum(tf.square(emb_vec), 1)

    cross_term = square_of_sum - sum_of_square
    preds = 0.5 * tf.reduce_sum(cross_term, 2)
    return preds
say something:
强制要求所有field的embedding向量的维数,增加了网络复杂度;对连续值特征不友好。
FNN: Factorisation Machine supported Neural Network, 2016
paper link: https://arxiv.org/pdf/1601.02376.pdf
出发点:FM没有考虑高阶交叉特征,DNN具备高阶特征交叉能力。
优点:离线训练FM得到embedding再输入NN,相当于引入先验经验;加速模型的训练和收敛;NN模型节省了学习特征向量的步骤,训练开销低;
缺点:两阶段模型,非endtoend,不利于online learning;预训练embedding受FM模型的限制;只考虑了特征的高阶交叉,没有保留低阶特征信息;

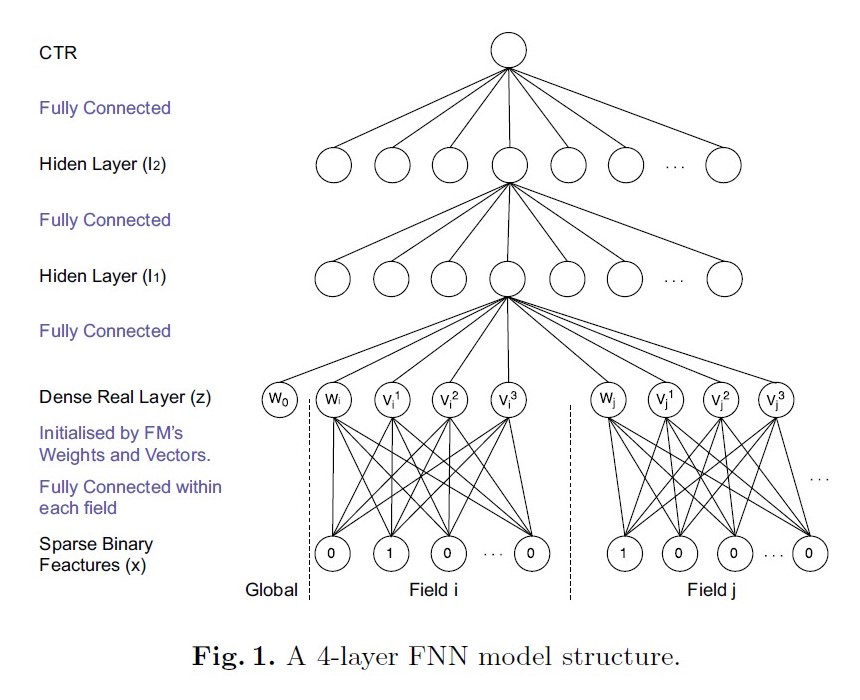
模型:
将FM预训练好的embedding向量直接输入下游DNN
def FNN(x_id, embemdding_matrix, layer_size):
    """
    x_id: input, feature id, shape=[Batch, field]
    embedding_matrix: pretrain FM model embedding vector
    layer_size: a list of DNN layer size, [200,80,1]
    """
    emb_vec = tf.nn.embedding_lookup(embemdding_matrix, x_id) # Batch*field*Dim (B,F,D)
    enc = emb_vec
    for i in layer_size:
        enc = tf.layers.dense(enc, i, activation=tf.nn.leaky_relu)
    return enc
FFM: Field-aware Factorization Machine, 2016
paper link: https://www.csie.ntu.edu.tw/~cjlin/papers/ffm.pdf
出发点:每个特征xi的隐向量应该有多个,当该特征与不同类型(域field)的特征做交叉时,应该使用对应的隐向量,这样可以做到更精细地刻画交叉特征的权重。所以每个特征应该有和field数量相同的隐向量个数。
优点:引入不同field交叉向量,增加了模型表达能力;
缺点:浅层模型,没有学到高阶交叉特征;
公式:
fj是第j个特征所属的field。
def ffm(x_id, feature_space_list, dim):
    """
    x_id: input, feature_id, tensor_shape=[Batch, field]
    feature_space_list: a list of feature variable space
    dim: embedding size
    """
    def gen_emb_dict(space_size, dim_size):
        return tf.Variable(tf.random_uniform([space_size, dim_size], -0.1, 0.1), dtype=tf.float32)
    embemdding_matrix = [[gen_emb_dict(i, dim) for j in feature_space_list] for i in feature_space_list]

    def feature_embedding(fc_i, fc_j, embedding_dict, input_feature):
        fc_i_embedding = tf.nn.embedding_lookup(embedding_dict[fc_i][fc_j], input_feature) #shape=(B,D)
        return fc_i_embedding

    embed_list = []
    for fc_i, fc_j in itertools.combinations(range(len(feature_space_list))):
        i_input = x_id[:,fc_i]
        j_input = x_id[:,fc_j]

        fc_i_embedding = feature_embedding(fc_i, fc_j, embemdding_matrix, i_input)
        fc_j_embedding = feature_embedding(fc_j, fc_i, embemdding_matrix, j_input)

        element_wise_prod = tf.reduce_sum(fc_i_embedding * fc_j_embedding, -1)
        embed_list.append(element_wise_prod)

    ffm_cross = tf.concat(embed_list, axis=1)
    ffm_out = tf.reduce_sum(ffm_cross, -1)
say something:
收益更多的来自扩展了模型参数空间,简单粗暴但有收益,在工业场景落地则对计算资源要求极高。
FwFM: Field-weighted Factorization Machines, 2018
paper link: https://arxiv.org/pdf/1806.03514.pdf
出发点:FM解决了特征交叉的问题,FFM解决了不同field间交叉强度不同的问题,但FFM的参数量巨大,线上性能压力过大。
优点:相比于FFM,减少了大量参数;
缺点:与AFM相比,增加了F*(F-1)/2个参数;
公式:
r为field间的强度参数。
say something:
思想很朴素,既然需要区分不同交叉强度,那就增加个可训练的权重参数。相比于AFM通过attention的方式个性化的决策当前样本哪个field贡献更大的方式,此方法为field固定了重要程度,孰优孰劣未曾可知,而且文中实验并未提及AFM,时间晚于AFM且避而不提,很是怀疑是有意为之;
不过换个角度来说,文章能中WWW,说明故事切入点很好,只argue了FM和FFM,没有提及AFM, 这种对于问题的论述角度的选取技巧,还是值得学习的。
FNFM/NFFM: Field-aware Neural Factorization Machine, 2018
paper link: https://arxiv.org/pdf/1902.09096.pdf
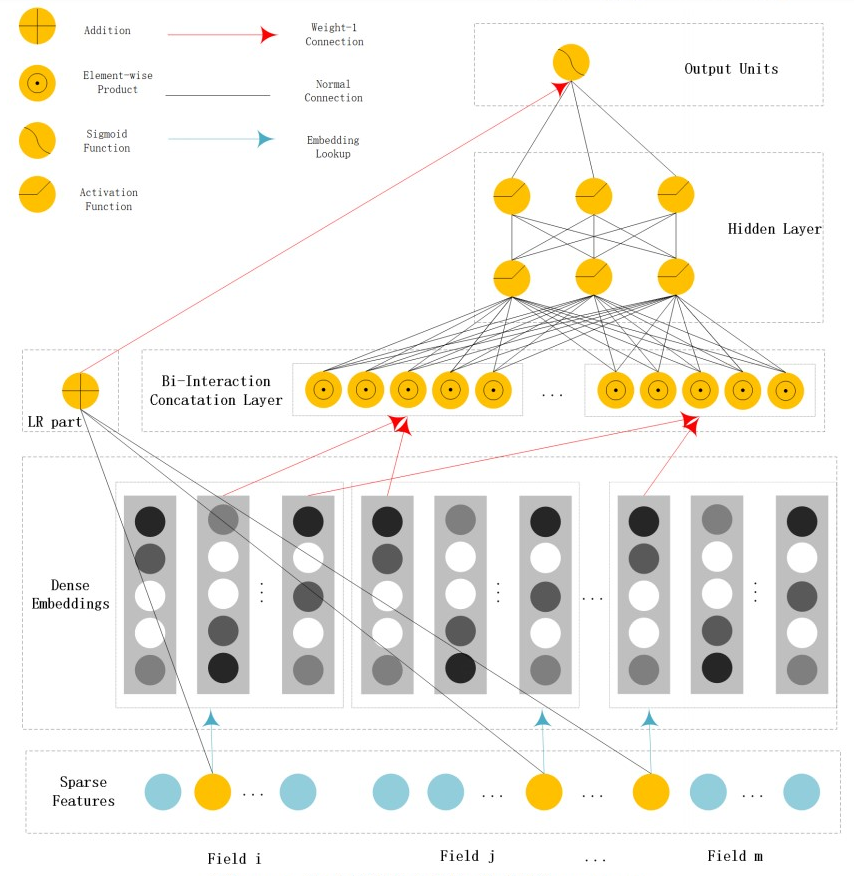
出发点:这是17年腾讯广告大赛top1的解决方案,但并非单模型的贡献,8个模型的ensemble;名字缩写有两种叫法,比赛技术分享使用NFFM,19年整理成paper后改叫FNFM;本质是在FFM后增加DNN部分(串联,并联的叫DeepFFM);
公式:

ONN: Operation-aware Neural Network, 2019
paper link: https://arxiv.org/pdf/1904.12579.pdf
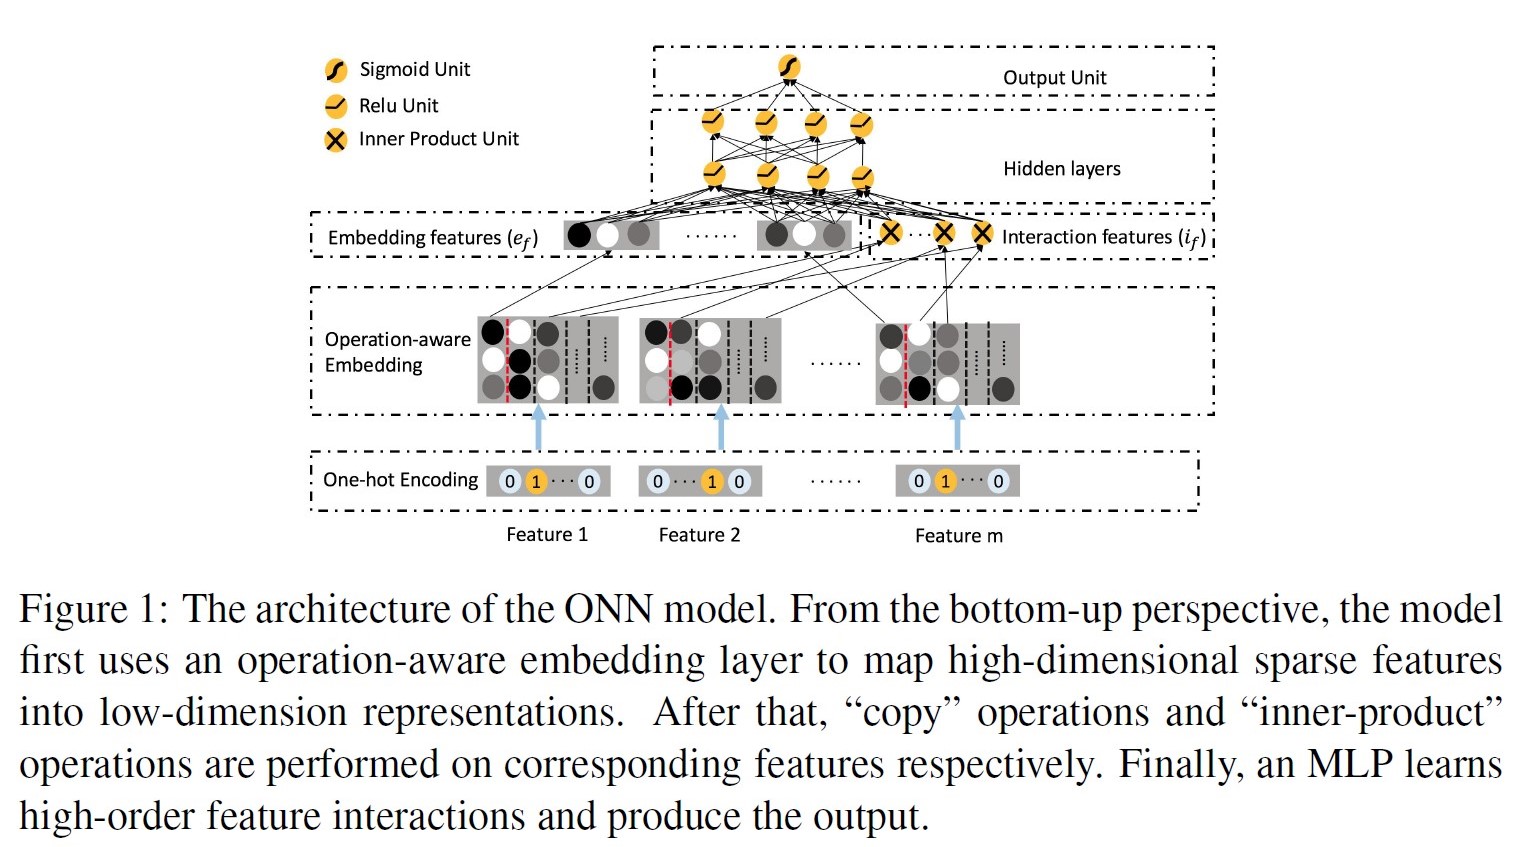
出发点:不同的特征交叉操作,应该使用不同的embedding,相同的embedding在不同操作间会相互影响而最终限制了模型的表达。
优点:引入Operation-aware,增加了模型表达能力;同时包含了特征一阶信息和高阶交叉信息;
缺点:模型复杂度高;每个feature对应多个embedding结果;

模型:
一个feature对应多个embedding,第一列的embedding是feature本身的信息,从第二列开始往后是当前特征与第n个特征交叉所使用的embedding。
def ONN(x_id, feature_space_list, dim):
    """
    x_id: input, feature_id, tensor_shape=[Batch, field]
    feature_space_list: a list of feature variable space
    dim: embedding size
    """
    def gen_emb_dict(space_size, dim_size):
        return tf.Variable(tf.random_uniform([space_size, dim_size], -0.1, 0.1), dtype=tf.float32)
    embemdding_matrix = [[gen_emb_dict(i, dim) for j in feature_space_list] for i in feature_space_list]

    def feature_embedding(fc_i, fc_j, embedding_dict, input_feature):
        fc_i_embedding = tf.nn.embedding_lookup(embedding_dict[fc_i][fc_j], input_feature) #shape=(B,D)
        return fc_i_embedding

    embed_list = []
    for fc_i, fc_j in itertools.combinations(range(len(feature_space_list))):
        i_input = x_id[:,fc_i]
        j_input = x_id[:,fc_j]

        fc_i_embedding = feature_embedding(fc_i, fc_j, embemdding_matrix, i_input)
        fc_j_embedding = feature_embedding(fc_j, fc_i, embemdding_matrix, j_input)

        element_wise_prod = tf.reduce_sum(fc_i_embedding * fc_j_embedding, -1)
        embed_list.append(element_wise_prod)

    onn_cross = tf.concat(embed_list, axis=1)
    onn_out = DNN(onn_cross)
say something:
模型结构并没有太惊艳,积木拼接FFM+NN=ONN。
FFM/AFM/ONN通过引入额外的信息来区分不同field间的交叉应该具备不同的信息表达和重要性。
PNN: Product-based Neural Network, 2016
paper link: https://arxiv.org/pdf/1611.00144.pdf https://arxiv.org/pdf/1807.00311.pdf
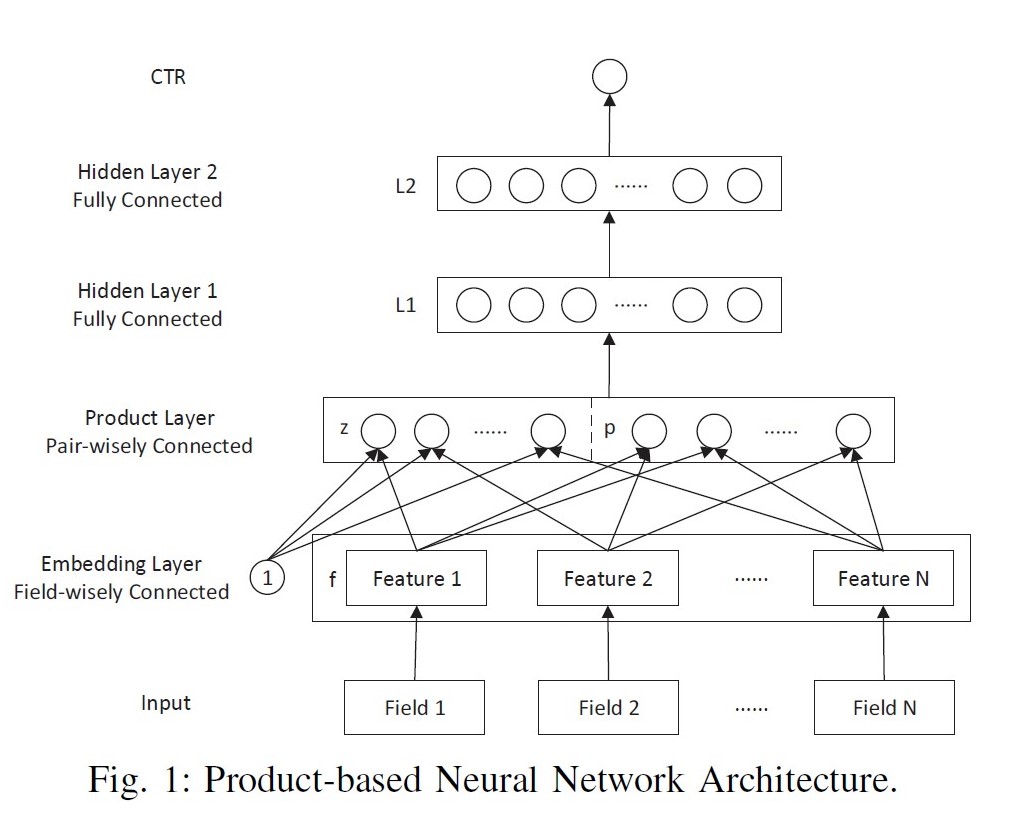
出发点:DNN中特征向量通过简单concat or add都不足以学习到特征之间的依赖关系,因此需要引入更复杂和充分的特征交叉关系的学习。
优点:通过z部分保留了低阶embedding特征信息;通过product layer引入更复杂的特征交叉方式;
缺点:计算时间复杂度相对较高;product函数的实现直接决定了落地可行性;

模型:
将每个field的embedding向量输入product layer,在product layer中包含了两部分,一部分是左边的z 直接保留了embedding向量,另一部分右边的p (pair-wise特征交叉)是对应特征之间的product操作。
Product layer:inner product, outer product, kernel product;
对于内积形式的PNN, 两向量相乘的结果为标量,可以直接把各个标量concat拼接成一个大向量,作为MLP的输入。
对于外积形式的PNN, 两向量相乘相当于列向量与行向量进行矩阵相乘,得到结果为一个矩阵。论文简化方案是将各个矩阵进行加和,得到新矩阵拉长成向量后输入MLP。
公式:D is embedding dim; \(D_{L1}\) is L1 layer size;
IPNN:
P矩阵flatten后就是全连接操作,\(W_p=shape[(F\*F),D_{L1}]\)
OPNN:
def PNN(x_id, feature_size, dim)
    """
    x_id: input, feature id, shape=[Batch, field]
    feature_size: feature variable space
    dim: embedding size
    """
    field_size = x_id.get_shape().as_list()[1]
    embemdding_matrix = tf.Variable(tf.random_uniform([feature_size, dim], -0.1, 0.1), dtype=tf.float32)
    emb_vec = tf.nn.embedding_lookup(embemdding_matrix, x_id) # Batch*field*Dim (B,F,D)


    # inner_product
    embeds_vec_list = tf.split(emb_vec, field_size, 1) # [(B,1,D)]*F
    row = []; col = []
    import itertools
    for r, c in itertools.combinations(embeds_vec_list, 2):
        row.append(r)
        col.append(c)
    p = tf.concat(row, axis=1)  #pair = (F*F-F)/2, shape(B, pair, D)
    q = tf.concat(col, axis=1)
    inner_product = p * q   #shape(B, pair, D)
    inner_product = tf.reduce_sum(inner_product, axis=2)

    # outer product
    embedding_sum = tf.reduce_sum(emb_vec,axis=1)
    p = tf.matmul(tf.expand_dims(embedding_sum,2),tf.expand_dims(embedding_sum,1)) # shape=[B,D,D]
    outer_product = tf.layers.flatten(p)


    # kernel product
    row = []; col = []
    for i in range(field_size - 1):
        for j in range(i + 1, field_size):
            row.append(i)
            col.append(j)
    # shape=[B,pair,D]
    p = tf.transpose(
        # shape=[pair,B,D]
        tf.gather(
            # shape=[F,B,D]
            tf.transpose(emb_vec, [1, 0, 2]),
            row),
        [1, 0, 2])
    q = tf.transpose(
        tf.gather(
            tf.transpose(emb_vec, [1, 0, 2]),
            col),
        [1, 0, 2])
    num_pairs = len(row)
    p = tf.reshape(p, [-1, num_pairs, dim])
    q = tf.reshape(q, [-1, num_pairs, dim])
    kernel = tf.Variable(tf.random_uniform([dim, num_pairs, dim], -0.1, 0.1), dtype=tf.float32)
    p = tf.expand_dims(p, 1)
    # shape=[B,pair,D]
    kp = tf.multiply(
            # shape=[B,pair,D]
            tf.transpose(
                # shape=[B,D,pair]
                tf.reduce_sum(
                    # shape=[B,D,pair,D]
                    tf.multiply(p, self.kernel),
                    -1),
                [0, 2, 1]),
            q)
    # shape=[B,pair]
    kernel_product = tf.reduce_sum(kp, -1)
公式优化:IPNN通过矩阵分解跳过显示productlayer,通过代数转换直接从embedding到了L1隐层;OPNN直接在productlayer进行优化;
IPNN:
L1层空间复杂度\(O(D_{L1}FD+D_{L1}F^2)->O(D_{L1}FD)\);时间复杂度\(O(D_{L1}FD+D_{L1}F^2)->O(D_{L1}FD+D_{L1}D^2)\)
OPNN:
L1层时间空间复杂度\(O(D_{L1}D^2F^2)->O(D_{L1}DF+D_{L1}D^2)\),信息同样损失严重。
def PNN():
    quadratic_output = []

    if use_inner:
        weights['inner'] = tf.Variable(tf.random_normal([L1_size,field_size],0.0,0.01))
        for i in range(L1_size):
            theta = tf.multiply(emb_vec,tf.reshape(weights['inner'][i],(1,-1,1))) # shape=(B,F,D)
            quadratic_output.append(tf.reshape(tf.norm(tf.reduce_sum(theta,axis=1),axis=1),shape=(-1,1))) # shape=(B,1)
    elif use_outer:
        weights['outer'] = tf.Variable(tf.random_normal([L1_size, field_size,field_size], 0.0, 0.01))
        embedding_sum = tf.reduce_sum(emb_vec,axis=1)
        p = tf.matmul(tf.expand_dims(embedding_sum,2),tf.expand_dims(embedding_sum,1)) # shape=(B,D,D)
        for i in range(L1_size):
            theta = tf.multiply(p,tf.expand_dims(self.weights['outer'][i],0)) # shape=(B,D,D)
            quadratic_output.append(tf.reshape(tf.reduce_sum(theta,axis=[1,2]),shape=(-1,1))) # shape=(B,1)

    lp = tf.concat(quadratic_output,axis=1)
say something:
这实际是一篇会转刊的文章,网上能搜到两个版本,一个是2016年的ICDM,一个是2018年的TOIS,在转刊时不能完全相同,因此文章把outer product部分替换成了kernel product;kernel的设计更复杂了,但还是outer的泛化,把kernel看成tf.ones()就会退化到outer,
NFM: Neural Factorization Machines, 2017
paper link: https://arxiv.org/pdf/1708.05027.pdf
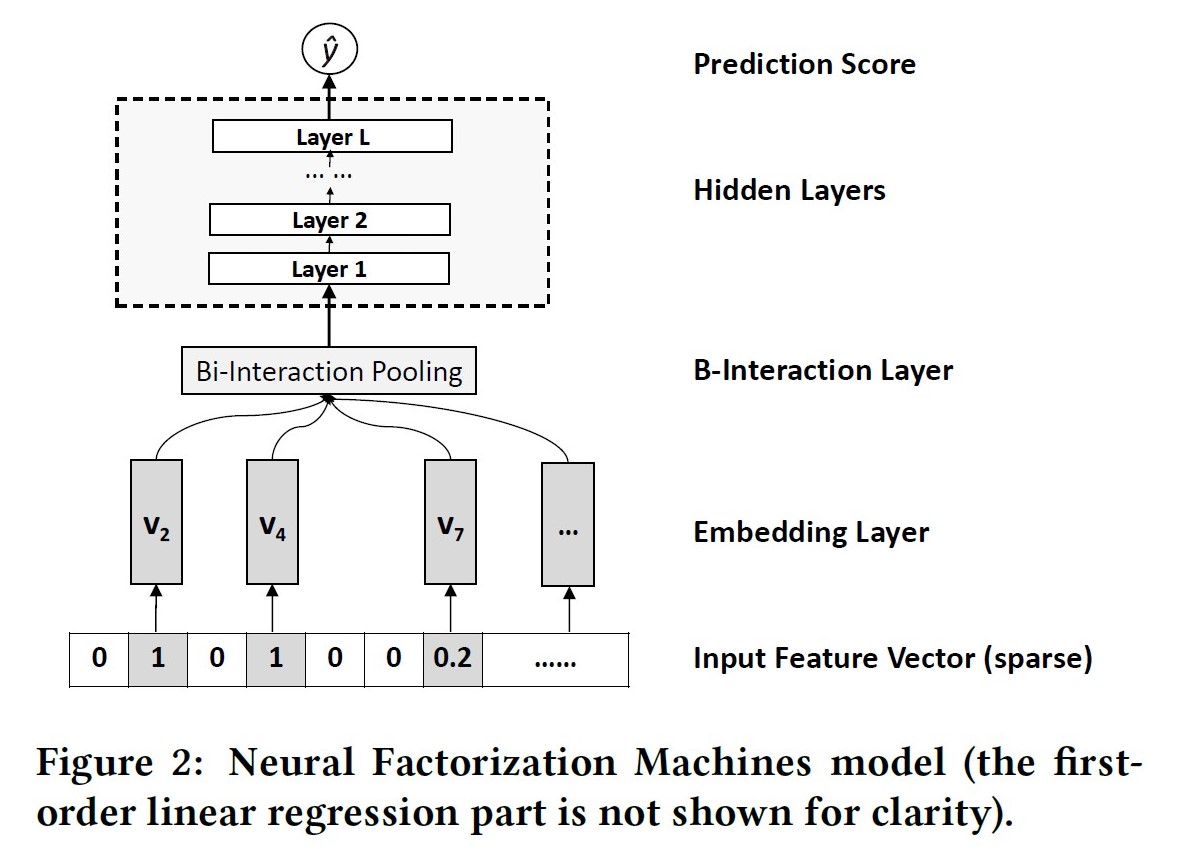
出发点:FM枚举所有二阶交叉特征,没有高阶交叉特征
优点:相比于concat操作,NFM在low level进行interaction可以提高模型的表达能力;具备一定高阶特征交叉能力;Bi-Interaction Pooling的交叉具备线性复杂度;
缺点:直接进行sum pooling操作会损失信息,可参考AFM的操作;

公式:
Bi-Interaction操作,名字挺高大上,其实就是一个计算FM的过程,将所有二阶交叉结果向量在field维度进行sum pooling后再送入NN进行训练。
def bi_interaction(x_id, feature_size, dim):
    """
    x_id: input, feature id, tensor_shape=[Batch, field];
    feature_size: feature variable space
    dim: embedding size
    """
    embemdding_matrix = tf.Variable(tf.random_uniform([feature_size, dim], -0.1, 0.1), dtype=tf.float32)
    emb_vec = tf.nn.embedding_lookup(embemdding_matrix, x_id) # Batch*field*Dim (B,F,D)

    square_of_sum = tf.square(tf.reduce_sum(emb_vec, 1))
    sum_of_square = tf.reduce_sum(tf.square(emb_vec), 1)

    cross_term = 0.5 * (square_of_sum - sum_of_square)
    return cross_term
say something:
当NN的全连接都是恒等变换且最后一层参数全为1, NFM就退化为FM。NFM是FM的推广,延迟了FM的实现过程,在其中加入更多非线形运算。
WDL: Wide and Deep Learning, 2016
paper link: https://arxiv.org/pdf/1606.07792.pdf
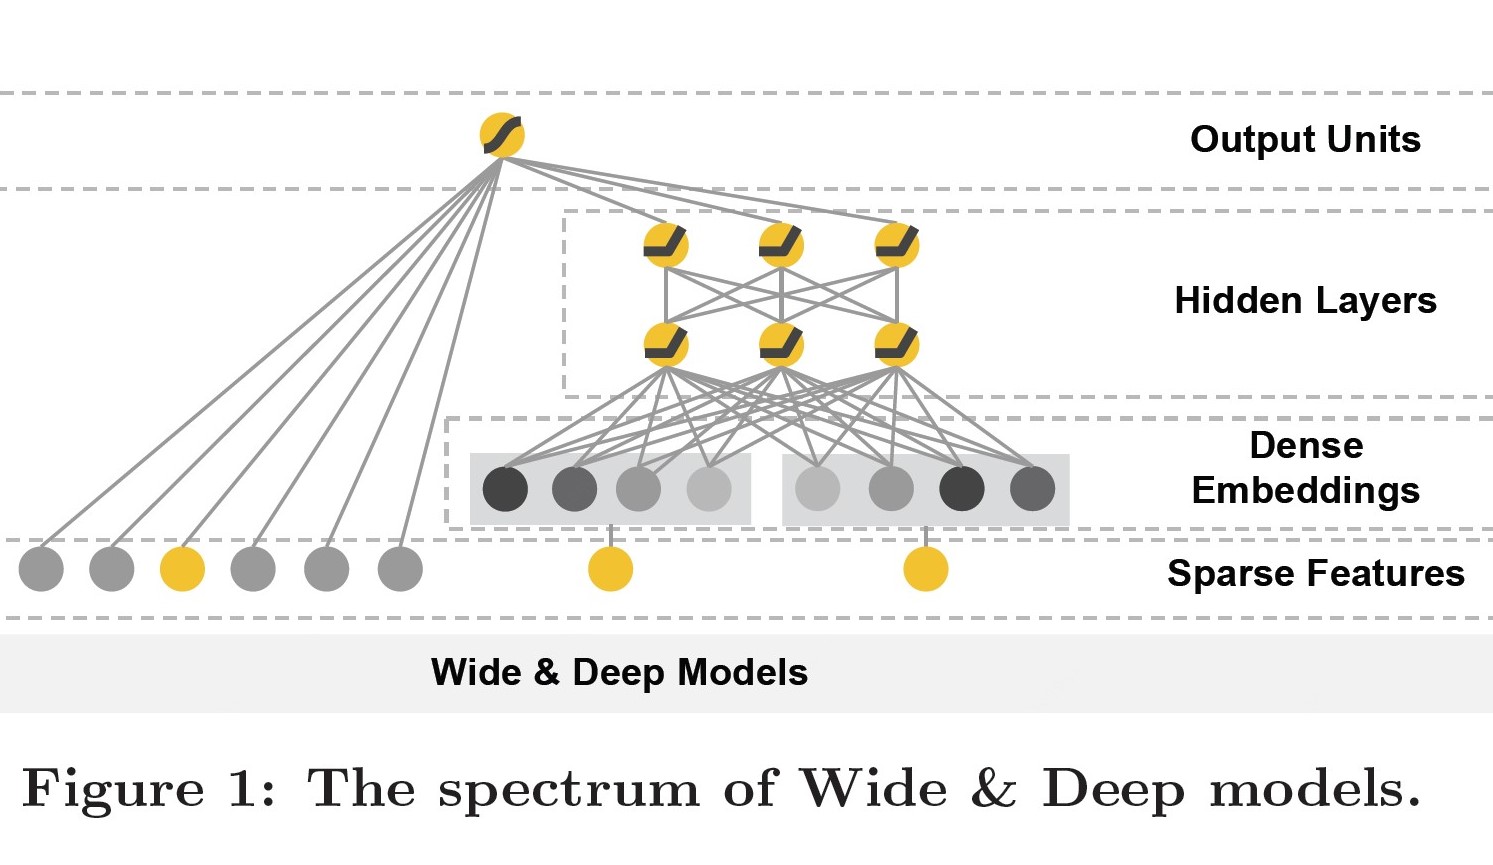
出发点:首次使用双路并行的结构,结合Wide线行模型的记忆性(memorization)和Deep深度模型的泛化性(generalization)来对用户行为信息进行学习建模。
优点:Wide&Deep互补,Deep弥补Memorization层泛化性不足的问题;wide&deep joint training可减少wide部分的model size(即只需要少数的交叉特征);可以同时学习低阶特征交叉wide和高阶特征交叉deep;
缺点:仍需要手动设计交叉特征;

公式:
def wdl(x_id, feature_size):
    embeddings = tf.Variable(tf.random_uniform([feature_size,], -0.1, 0.1))
    b = tf.Variable(tf.random_uniform([1], -1.0, 1.0))
    inp = tf.nn.embedding_lookup(embeddings, x_id)

    lr = tf.reduce_sum(inp)
    nn = DNN(inp)
    preds = b+lr+nn
DeepFM: Deep Factorization Machines, 2017
paper link: https://www.ijcai.org/proceedings/2017/0239.pdf
出发点:FM基础上引入NN隐式高阶交叉信息;
优点:模型同时学习低阶和高阶特征能力;共享embedding,共享参数信息表达;
缺点:DNN部分对于高阶特征的学习仍然是隐式的;

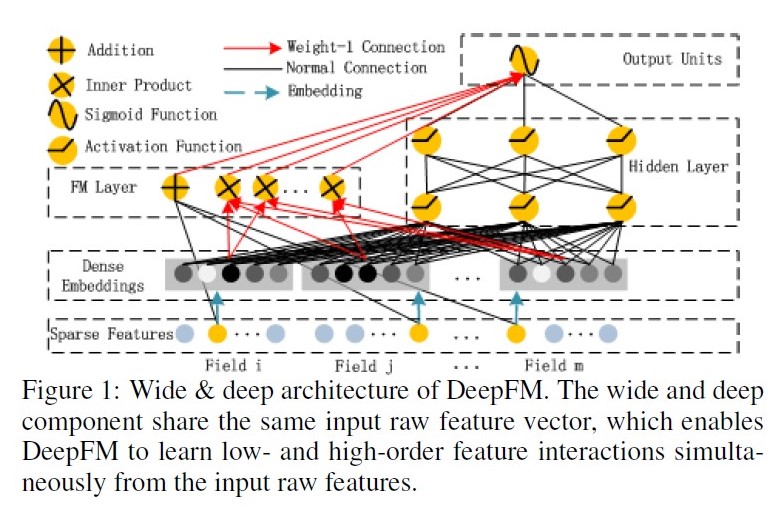
公式:
DCN: Deep and Cross Network, 2017
paper link: https://arxiv.org/pdf/1708.05123.pdf
出发点:DNN的高阶交叉学习能力是隐式的,wide侧的交叉组合特征主要是人工特征工程或暴力搜索(exhaustive searching),因此提出cross net可以显示的学习有限阶(bounded degrees)的特征交叉;
优点:具备显示高阶特征交叉能力;结合ResNet思想,将原始信息在crossnet中跳跃传递;crossNet结构简单,节省内存计算高效;
缺点:CrossNet在进行交叉时采用bit-wise方式,直接concat淹没了field的概念;每层的输出都是输入向量\(x_0\)的标量倍(不是线行倍),这种形式在一定程度上限制了模型的表达能力;

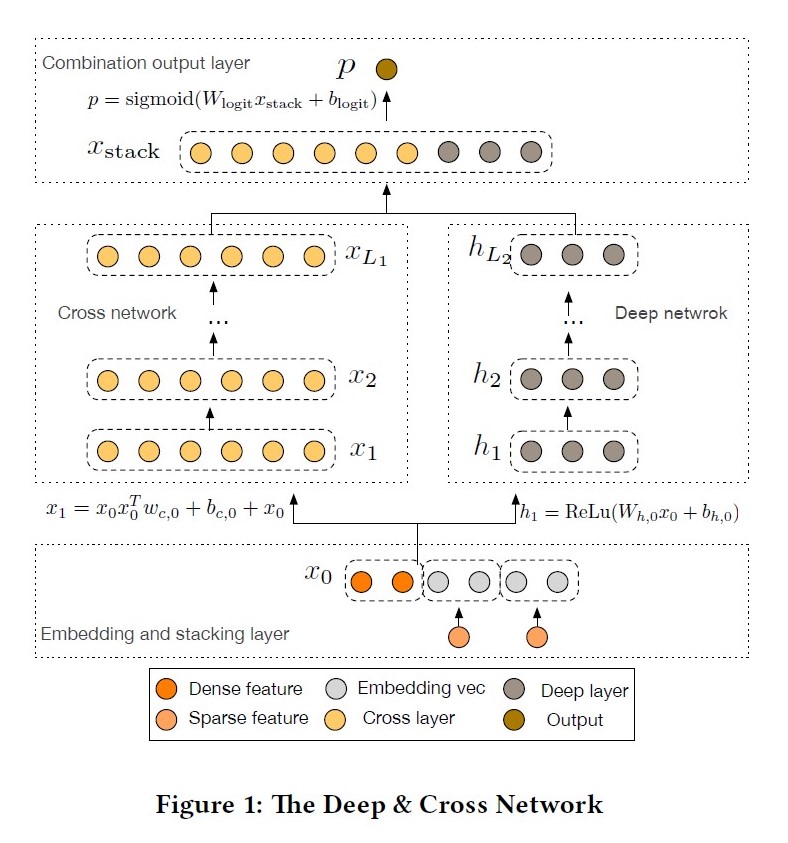
公式:
证明:输出都是输入向量\(x_0\)的标量倍(忽略偏置项)
def cross_layer(x0, x, name):
    """
    x0,x: input tensor, shape=(B,N)
    """
    with tf.variable_scope(name):
        input_dim = x0.get_shape().as_list()[1]
        w = tf.get_variable("weight", [input_dim], initializer=tf.truncated_normal_initializer(stddev=0.01))
        b = tf.get_variable("bias", [input_dim], initializer=tf.truncated_normal_initializer(stddev=0.01))
        xb = tf.tensordot(tf.reshape(x, [-1, 1, input_dim]), w, 1)
        return x0 * xb + b + x

def build_cross_layers(x_id, feature_size, dim, num_cross_layers, hidden_size_lst):
    embemdding_matrix = tf.Variable(tf.random_uniform([feature_size, dim], -0.1, 0.1), dtype=tf.float32)
    emb_vec = tf.nn.embedding_lookup(embemdding_matrix, x_id) # Batch*field*Dim (B,F,D)
    B = emb_vec.get_shape().as_list()[0]
    x0 = tf.reshape(emb_vec, [B,-1]) # shape=(B,N), N=F*D

    ## cross layer
    x = x0
    for i in range(num_cross_layers):
        x = cross_layer(x0, x, 'cross_{}'.format(i))
    cross_layer = x

    ## deep layer
    net = x0
    for units in hidden_size_lst:
        net = tf.layers.dense(net, units=units, activation=tf.nn.relu)
    deep_layer = net

    out = tf.concat([cross_layer, deep_layer], 1)
say something:
在cross_layer实现的时候,先计算了结果为标量的\(x_l^Tw\),而非按照公式从左到右计算,主要是考虑到临时存储内存空间的大小,\(x_0x_l^T\)这一个操作需要的内存就是\(batch\_size*(filed*dim)*(filed*dim)*(4or8)\),这仅仅是一层的操作,矩阵与向量相乘也是非常消耗计算资源的,在企业场景中这是难以接受的(\(if\quad filed*dim=1k, batch=1k, float, one\_layer\_memory=4G\)),因此利用矩阵乘法的结合律,先计算\(x_l^Tw\)得到标量,几乎不占存储空间,再与权重向量相乘。
这多说一句性能,可能在离线实验时并没有关注模型性能问题,主要以实现功能为主,但后期有效果需要上线时就要考虑代码实现方式的问题了,曾经有一次架构人员忙了半个月才优化下去20%的耗时,我从模型代码实现方式这块优化50%的耗时,并不是后者多牛逼(毕竟最初版本的烂代码也是自己写的),只是大家站在不同的角度去解决问题,很多时候性能问题在离线验证中是最容易被忽略的。
DCN-v2
paper link: https://arxiv.org/pdf/2008.13535.pdf
出发点:这篇文章从题目上就能看出来是DCN的延续,时间上晚于xDeepFM,所以就是为了修复DCN的问题。
优点:引入混合低秩矩阵后效果更好,结构简单易于加入模型;

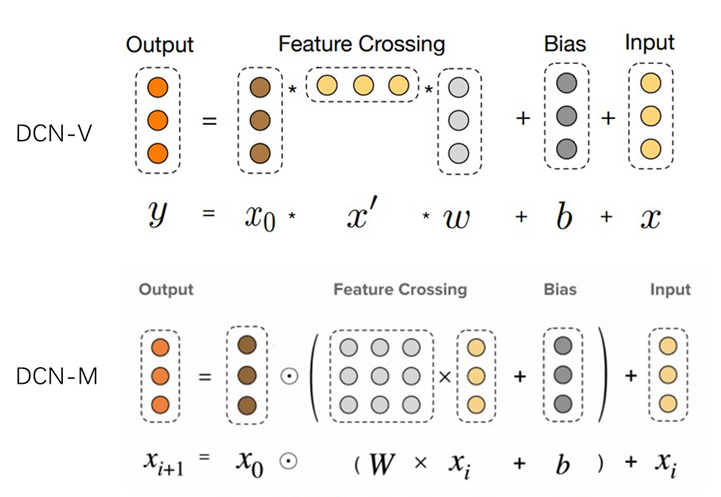
DCN-v2又叫DCN-M(atrix),DCN又叫DCN-V(ector),从图中能看到两个版本的核心区别,将权重w由单维的向量改为矩阵。代码相对于上一版,只需要改动两行,参数W和xb的计算;
def cross_layer_v2(x0, x, name):
    """
    x0,x: input tensor, shape=(B,N)
    """
    with tf.variable_scope(name):
        input_dim = x0.get_shape().as_list()[1]
        W = tf.get_variable("weight", [input_dim,input_dim], initializer=tf.truncated_normal_initializer(stddev=0.01))
        b = tf.get_variable("bias", [input_dim], initializer=tf.truncated_normal_initializer(stddev=0.01))
		xb = tf.matmul(x, W) + b
        return x0 * xb + x
作者在实验后,对权重矩阵W进行奇异值分析,与初始化相比训练后的奇异值衰减迅速,因此可将矩阵W分解为两个瘦高型矩阵(计算资源和成本降低)。
公式可以从两个角度去解释,也就对应两个思路改进:
-
子空间中学习特征交叉;结合MoE的思想在多个子空间学习后进行融合;
专家网络\(E:R^d->R^d\) 和门控单元\(G:R^d->R\) ,通过门控G聚合K 个专家网络的输出结果:
\[x_{l+1}=\sum_{i=1}^K G_i(x_l)E_i(x_l)+x_l \]\[E_i(x_l)=x_0 \bigodot U_l^i(V_l^{iT}x_l)+b_l \] -
输入特征X映射到低维r 空间再映射回原空间;g是非线性函数;
\[E_i(x_l)=x_0 \bigodot U_l^ig(C_l^ig(V_l^{iT}x_l)+b_l) \]
say something:
这篇文章更像是对DCN质疑的回应,文中的公式符号并不统一,两种低秩的解释只是给了思路没有过多讨论;实验环节中,RQ4与RQ1联立来看能够发现,在理想状态下的数据集中DCN-M效果明显优于DNN,在Criteo数据集中DCN-M稍优于DNN,但我们实际面临的场景是比Criteo更复杂、更多噪声的,所以实际效果如何有待验证;RQ5的这种图,是个矩阵都这个状态,信息量不大;
xDeepFM: eXtreme Deep Factorization Machine, 2018
paper link: https://www.microsoft.com/en-us/research/uploads/prod/2019/07/ACM_Proceding_p1754-lian.pdf
出发点:解决DCN的输出被限制在特征形式上,与DeepFM相比和DCN是近亲;
优点:同时学习到显示的高阶特征交叉(CIN)与隐式的高阶特征交叉(DNN);在交叉特征CIN的学习上采用vector-wise的交叉;
缺点:CIN的时间复杂度较高;CIN的sum pooling会损失信息;

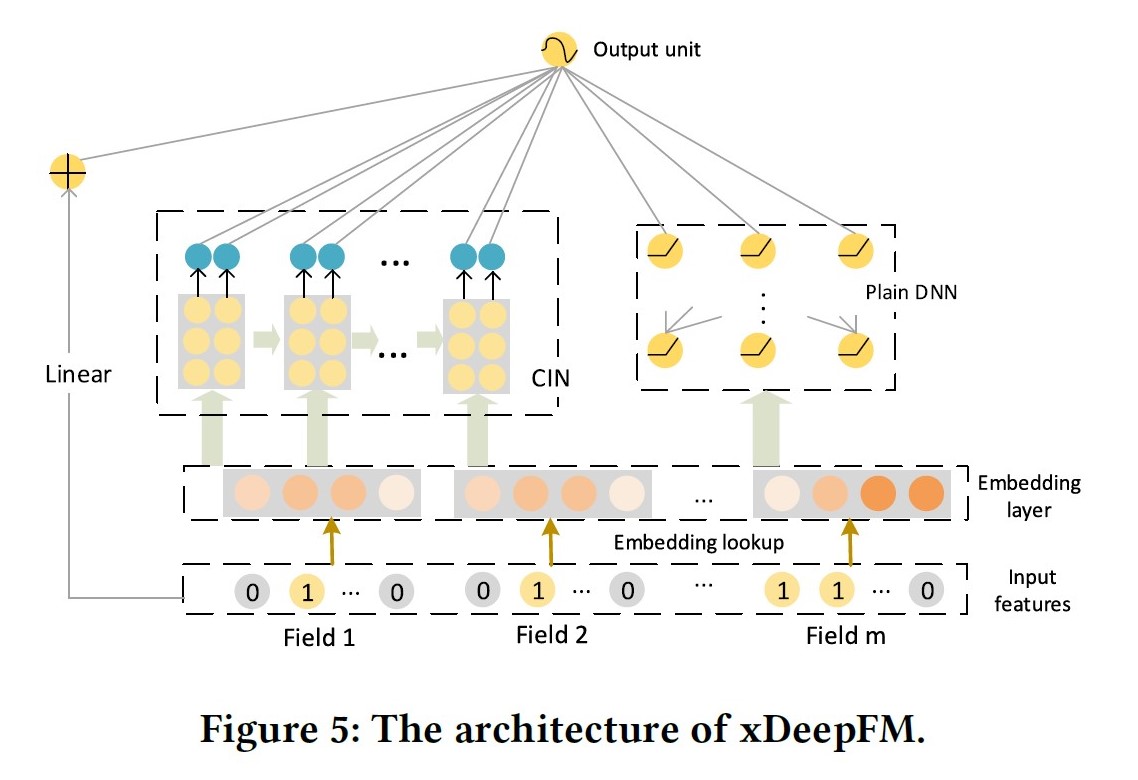
模型分为三部分:
- Linear Part: 捕获线性特征;
- DNN Part: 隐式的、bit-wise的学习高阶交叉特征;
- CIN Part: 压缩交互网络,显示的、vector-wise的学习高阶交叉特征;

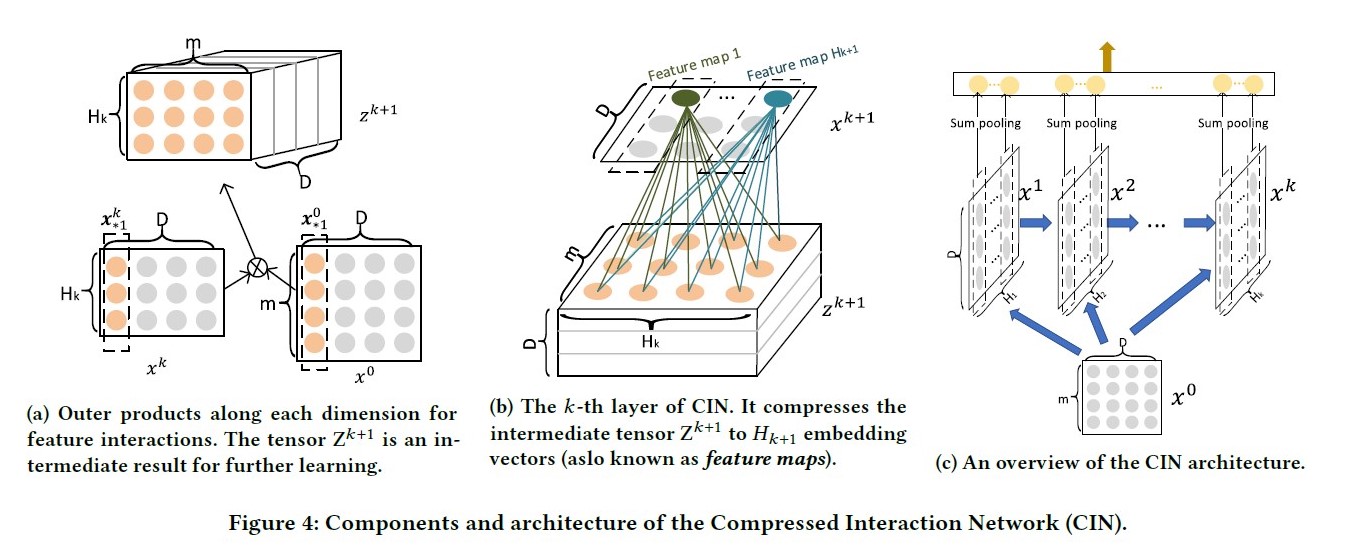
CIN结构:
令\(X^k\in R^{H_k\*D}\)表示第\(k\)层的输出,其中\(H_k\)表示第\(k\)层的vector个数,vecor维度始终为\(D\) ,保持和输入层一致。具体地,第\(k\)层每个vector的计算方式为:
其中W^{k,h}表示第\(k\)层的第\(h\)个vector的权重矩阵, \(\circ\)表示Hadamard乘积,即逐元素乘,例如\(<a1,b1,c1>\circ <a2,b2,c2>=<a1*a2,b1*b2,c1*c2>\)。
取前一层\(X^{k-1}\in R^{H_{k-1}*D}\)中的\(H_{k-1}\)个vector,与输入层\(X^0\in R^{m*D}\)中的m个vector,进行两两Hadamard乘积(外积)运算,得到\(H_{k-1}*m\)个vector,然后加权求和。
第k层的不同vector区别在于,对这\(H_{k-1}*m\)个vector求和的权重矩阵不同。权重\(W^{k,i}\in R^{H_{k-1}*m}顺着tensor维度D逐层相乘相加,得到k层第i个向量,\)H_k\(即对应有多少个不同的权重矩阵\)W^k$ , 是一个可以调整的超参。
将外积结果看成是三维矩阵\(m*H_k*D\),不同权重在维度D方向上加权求和,可看作是在\(m*H_k\)整个平面上的卷积操作。
def _build_extreme_FM(hparams, nn_input, field_num, dim, cross_layer_sizes):
    hidden_nn_layers = []
    field_nums = []
    final_len = 0
    nn_input = tf.reshape(nn_input, shape=[-1, field_num, dim])  # shape=(B F0 D)
    field_nums.append(field_num)
    hidden_nn_layers.append(nn_input)
    final_result = []

    split_tensor0 = tf.split(hidden_nn_layers[0], dim * [1], 2) # [shape=(B F0 1)]*D
    with tf.variable_scope("exfm_part", initializer=self.initializer) as scope:
        for idx, layer_size in enumerate(cross_layer_sizes):

            split_tensor = tf.split(hidden_nn_layers[-1], dim * [1], 2) # [shape=(B Fi 1)]*D
            dot_result_m = tf.matmul(split_tensor0, split_tensor, transpose_b=True) # shape=(D B F0 Fi)
            dot_result_o = tf.reshape(dot_result_m, shape=[dim, -1, field_nums[0]*field_nums[-1]])
            dot_result = tf.transpose(dot_result_o, perm=[1, 0, 2]) # shape=(B D F0*Fi)

            filters = tf.get_variable(name="f_"+str(idx),
                                 shape=[1, field_nums[-1]*field_nums[0], layer_size], # shape=(1 F0*Fi F{i+1})
                                 dtype=tf.float32)

            curr_out = tf.nn.conv1d(dot_result, filters=filters, stride=1, padding='VALID') # shape=(B D F{i+1})
            curr_out = tf.nn.relu(curr_out)
            curr_out = tf.transpose(curr_out, perm=[0, 2, 1]) # shape=(B Fi+1 D)

            direct_connect = curr_out
            next_hidden = curr_out
            final_len += layer_size
            field_nums.append(int(layer_size))

            final_result.append(direct_connect)
            hidden_nn_layers.append(next_hidden)

        result = tf.concat(final_result, axis=1)
        result = tf.reduce_sum(result, -1)

        w_nn_output = tf.get_variable(name='w_nn_output',
                                      shape=[final_len, 1],
                                      dtype=tf.float32)
        b_nn_output = tf.get_variable(name='b_nn_output',
                                      shape=[1],
                                      dtype=tf.float32,
                                      initializer=tf.zeros_initializer())

        exFM_out = tf.nn.xw_plus_b(result, w_nn_output, b_nn_output)

        return exFM_out
say something:
如果CIN只有一层,\(H_1=m, W^1=1\),则sum pooling的输出结果就是一系列两两向量内积之和,是标准FM。
复杂度分析,假设CIN和DNN每层向量/神经元个数都为H,网络深度为T。CIN的参数空间复杂度为\(O(mTH^2)\) ,普通的DNN为\(O(mDH+TH^2)\),CIN的空间复杂度与输入维度D无关。CIN的时间复杂度为\(O(mH^2DT)\) ,而DNN为\(O(mDH+TH^2)\),时间复杂度会是CIN的一个主要痛点。
DCN的残差项保证了特征的1~l+1特征都有,而CIN中去除了残差项,虽然更快了,但是相当于丢弃了1~l阶特征的组合结果。
AFM: Attention Factorization Machines, 2017
paper link: https://www.ijcai.org/proceedings/2017/0435.pdf
出发点:FM枚举所有二阶交叉特征,但部分交叉特征与预估目标关联性不大(如广告位尺寸与性别的交叉)。
优点:在FM基础上引入Attention机制,赋予不同交叉特征不同的重要程度;一定程度上增加了模型的可解释性;
缺点:仍是一种浅层模型,没有学到高阶交叉特征

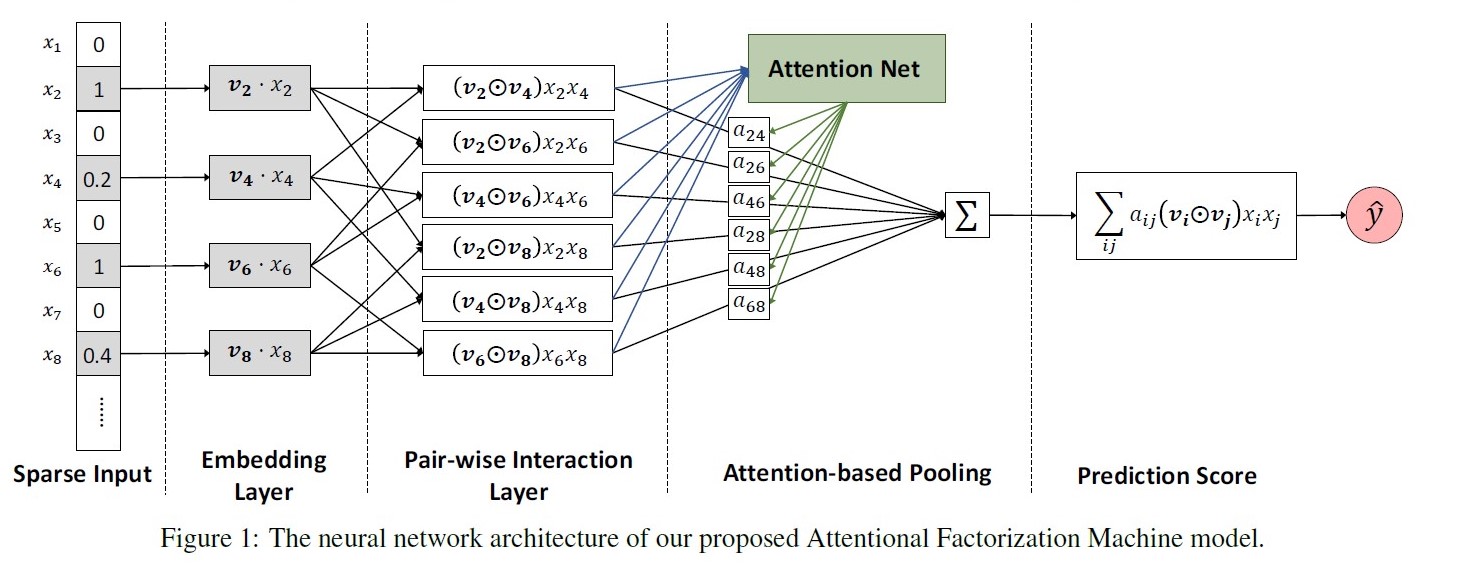
公式:
\(\bigodot\) : element-wise
def AFM(x_id, feature_size, dim, attention_factor)
    """
    x_id: input, feature id, shape=[Batch, field]
    feature_size: feature variable space
    dim: embedding size
    attention_factor: dimensionality of the attention network output space.
    """
    field_size = x_id.get_shape().as_list()[1]
    embemdding_matrix = tf.Variable(tf.random_uniform([feature_size, dim], -0.1, 0.1), dtype=tf.float32)
    attention_W = tf.Variable(tf.random_uniform([dim, attention_factor], -0.1, 0.1), dtype=tf.float32)
    attention_b = tf.Variable(tf.random_uniform([attention_factor,], -0.1, 0.1), dtype=tf.float32)
    projection_h = tf.Variable(tf.random_uniform([attention_factor, 1], -0.1, 0.1), dtype=tf.float32)
    projection_p = tf.Variable(tf.random_uniform([embedding_size, 1], -0.1, 0.1), dtype=tf.float32)

    emb_vec = tf.nn.embedding_lookup(embemdding_matrix, x_id) # Batch*field*Dim (B,F,D)

    # element_wise, inner_product
    embeds_vec_list = tf.split(emb_vec, field_size, 1) # [(B,1,D)]*F
    row = []; col = []
    import itertools
    for r, c in itertools.combinations(embeds_vec_list, 2):
        row.append(r)
        col.append(c)
    p = tf.concat(row, axis=1)  #pair = (F*F-F)/2, shape(B, pair, D)
    q = tf.concat(col, axis=1)
    inner_product = p * q

    # ###another: element_wise, inner_product
    # inner_product_list = []
    # for i in range(field_size):
    #     for j in range(i+1, field_size):
    #         tmp = tf.multiply(emb_vec[:,i,:], emb_vec[:,j,:])
    #         inner_product_list.append(tmp) # shape=[B,D]
    # inner_product = tf.stack(inner_product_list) # shape=[pair,B,D]
    # inner_product = tf.transpose(inner_product, perm=[1,0,2]) # shape=[B,pair,D]


    attention_temp = tf.nn.relu(tf.tensordot(inner_product, attention_W, axes=(-1, 0)) + attention_b)
    normalized_att_score = tf.nn.softmax(tf.tensordot(attention_temp, projection_h, axes=(-1, 0)), dim=1)  # shape=[B,pair,1]
    attention_output = tf.reduce_sum(normalized_att_score * inner_product, axis=1)  # shape=[B,D]

    afm_out = tf.tensordot([attention_output, projection_p])    # shape=[B,1]
    return afm_out
say something:
AFM是FM的泛化形式,当\(p=[1,1,...,1]^T \quad and \quad \alpha_{ij}=1\)时,AFM退化成FM模型。
AutoInt: Automatic Feature Interaction Learning
paper link: https://arxiv.org/pdf/1810.11921.pdf
出发点:使用multi-head self attention(Transformer里的那个) 机制来进行自动特征交叉学习,以提升CTR预测任务的精度;
优点:可显示的以vector-wise的方式学习有限阶特征交叉信息;

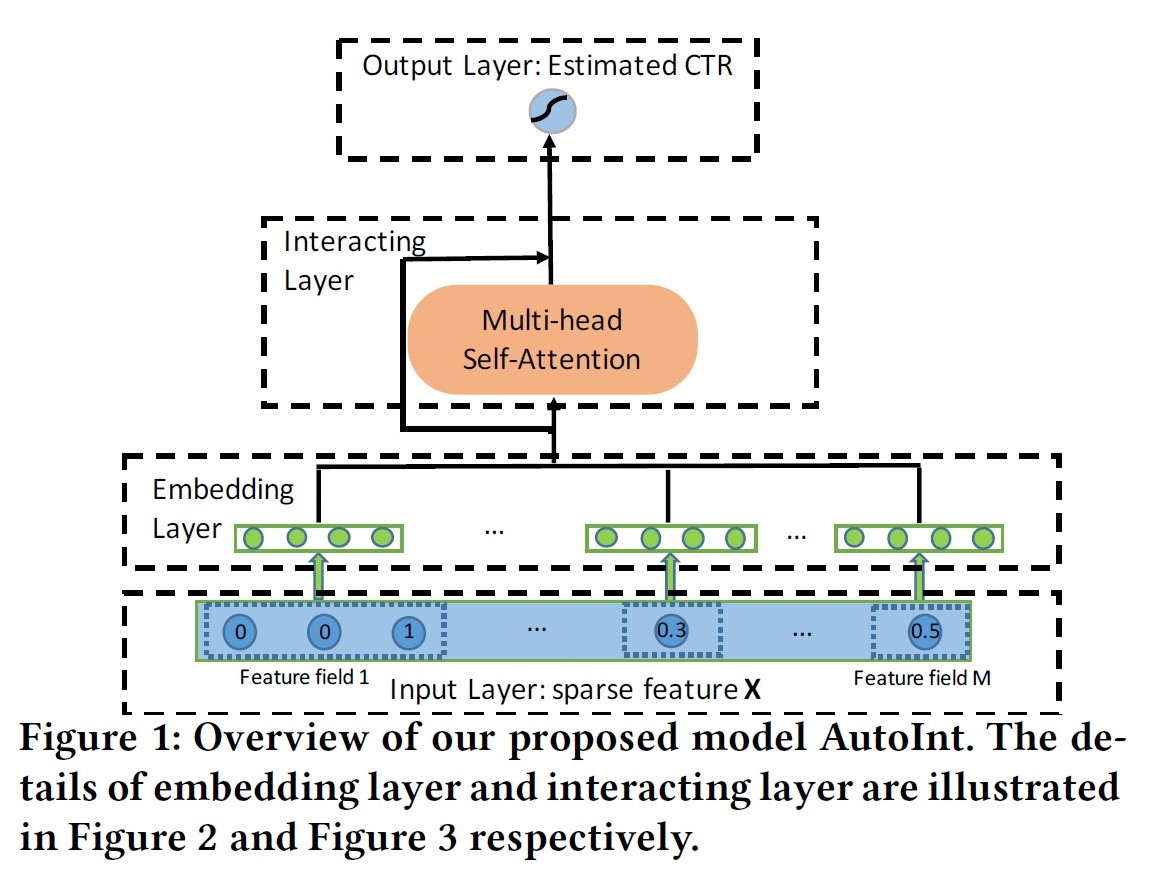
模型:
AutoInt直接采用了单路的模型结构,将原始特征embedding后直接进行Self-attention操作,将输入与输出连接做残差ResNet,多层堆叠后输出。论文中给出了AutoInt+DNN的双路模型实验AutoInt+。
文章里拆分的公式看着太费劲,还是Transformer里的刚易懂。
def multihead_attention(queries, keys, values,
                        num_units=None,
                        num_heads=1,
                        dropout_keep_prob=1,
                        is_training=True,
                        has_residual=True):
    if num_units is None:
        num_units = queries.get_shape().as_list[-1]

    # Linear projections
    Q = tf.layers.dense(queries, num_units, activation=tf.nn.relu)
    K = tf.layers.dense(keys, num_units, activation=tf.nn.relu)
    V = tf.layers.dense(values, num_units, activation=tf.nn.relu)

    Q_ = tf.concat(tf.split(Q, num_heads, axis=2), axis=0)
    K_ = tf.concat(tf.split(K, num_heads, axis=2), axis=0)
    V_ = tf.concat(tf.split(V, num_heads, axis=2), axis=0)

    QK = tf.matmul(Q_, tf.transpose(K_, [0, 2, 1]))
    weights = QK / (K_.get_shape().as_list()[-1] ** 0.5)
    weights = tf.nn.softmax(weights)
    weights = tf.layers.dropout(weights, rate=1-dropout_keep_prob,
                                        training=tf.convert_to_tensor(is_training))

    # Weighted sum
    outputs = tf.matmul(weights, V_)

    # Restore shape
    outputs = tf.concat(tf.split(outputs, num_heads, axis=0), axis=2)

    # Residual connection
    if has_residual:
        V_res = tf.layers.dense(values, num_units, activation=tf.nn.relu)
        outputs += V_res

    outputs = tf.nn.relu(outputs)
    # Normalize
    outputs = normalize(outputs)

    return outputs

def AutoInt(x_id, feature_size, dim, blocks):
    field_size = x_id.get_shape().as_list()[1]
    embemdding_matrix = tf.Variable(tf.random_uniform([feature_size, dim], -0.1, 0.1), dtype=tf.float32)
    emb_vec = tf.nn.embedding_lookup(embemdding_matrix, x_id) # Batch*field*Dim (B,F,D)

    for i in range(blocks):
        emb_vec = multihead_attention(queries=emb_vec, keys=emb_vec, values=emb_vec)
    flat = tf.reshape(emb_vec, shape=[-1, dim * field_size])
    out = tf.layers.dense(flat, 1, activation=None)
say something:
如果看过"Attenion is all you need"论文的话,这个工作很快就能看完并理解,连作者开源的代码都是直接从Transformer的gitcode中扒下来的。工作虽然是已有知识迁移到ctr领域,但仍是很好的创新,模型结构清晰简洁。
墙裂案例https://www.github.com/kyubyong/transformer 这个代码。
InterHAt: Interpretable CTR through Hierarchical Attention,2020
paper link: https://dl.acm.org/doi/pdf/10.1145/3336191.3371785
出发点:论文中提到的点,FM推广到高阶的计算复杂度指数上升,FFM参数量和复杂度增加明显容易发生过拟合,AFM只能学习到二阶注意力的显著性,其他DNN/MLP网络变换时在单元级并非特征级使得单个单元值没有完整特征语义信息导致不具有可解释性;
优点:使用attention机制能够做到特征级别的可解释性;

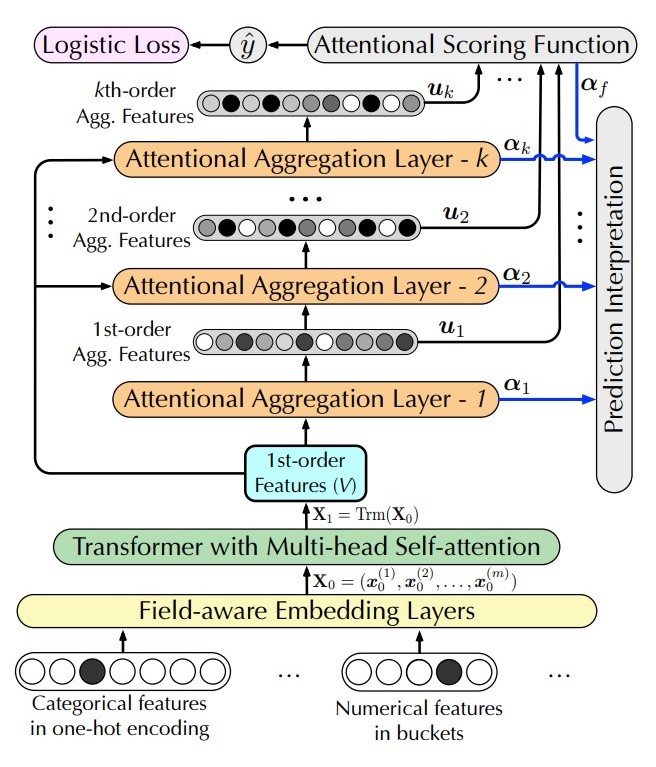
模型:
InterHAt 将原始特征embedding后直接进行Self-attention操作,输出作为后续堆叠block的原始输入X1,堆叠block为agg_attention,在常规attention操作之后增加了field纬度的sum pooling 即得到u_i.
公式:
def agg_attention(inp, attention_size, layer_id):

    with tf.name_scope("Agg_%dst_order"%(layer_id)) as scope:
      c = tf.get_variable(shape=(attention_size), dtype=tf.float32)

      query = c #[s]
      keys = inp; values = inp  #[B,F,D]

      query_ = tf.reshape(query, [1, 1, -1])
      projected_keys = tf.layers.dense(keys, attention_size,
                            activation=tf.nn.relu)  # [B, F, s]

      attention_energy = tf.reduce_sum(
                    tf.multiply(projected_keys, query_),  # [B,F,s]
                    axis=2)  # [B,F]

      attentions = tf.nn.softmax(logits=attention_energy)  # [B,F]

      results = tf.einsum('ijk,ij->ik', values, attentions) #[B,D]

      return results, attentions

def interHAt(input_emb, attention_size):
    X1 = multihead_attention(input_emb)
    X1 = feedforward(X1)  #[B,F,D]

    agg_feature1, a1 = agg_attention(X1, attention_size, 1) #[B,D]

    X2 = tf.multiply(X1, tf.expand_dims(agg_feature1, axis=1))
    X2 += X1
    agg_feature2, a2 = agg_attention(X2, attention_size, 2) #[B,D]

    X3 = tf.multiply(X1, tf.expand_dims(agg_feature2, axis=1))
    X3 += X2
    agg_feature3, a3 = agg_attention(X3, attention_size, 3) #[B,D]

    all_features = tf.stack([agg_feature1, agg_feature2, agg_feature3],
                              axis=1) #[B,Layer,D]

    feature_weights = tf.nn.softmax(tf.squeeze(tf.layers.dense(
                          all_features, units=1, use_bias=False), #[B,Layer,1]
                          [2])) #[B,Layer]

    weighted_sum_feat = tf.reduce_sum(tf.multiply(
                all_features, tf.expand_dims(feature_weights, axis=2)), #[B,Layer,D]
                axis=1)  # [B,D]

    pred = MLP(weighted_sum_feat)
say something:
文章本质上就是把attention做的更加复杂炫酷,没有太惊艳的点,甚至从实验结果来看没有其他方法效果好。文中一直在说可解释性,这在DL领域本来就是个玄学,所以个人认为,这篇的参考意义并不大,看看就好。
FiBiNET: Combining Feature Importance and Bilinear feature Interaction, 2019
paper link: https://arxiv.org/pdf/1905.09433.pdf
出发点:当前的许多通过特征组合进行CTR预估的工作主要使用特征向量的内积或哈达玛积来计算交叉特征,这种方法忽略了特征本身的重要程度。提出通过使用Squeeze-Excitation network (SENET) 结构动态学习特征的重要性以及使用一个双线性函数来更好的建模交叉特征。
优点:引入了SENET,自动提取特征重要性;引入了双线性作为特征交互,也是用户提取特征交互的重要性;
缺点:耗时,双线性的耗时不是说说的,性能优化不好线上就是炸;

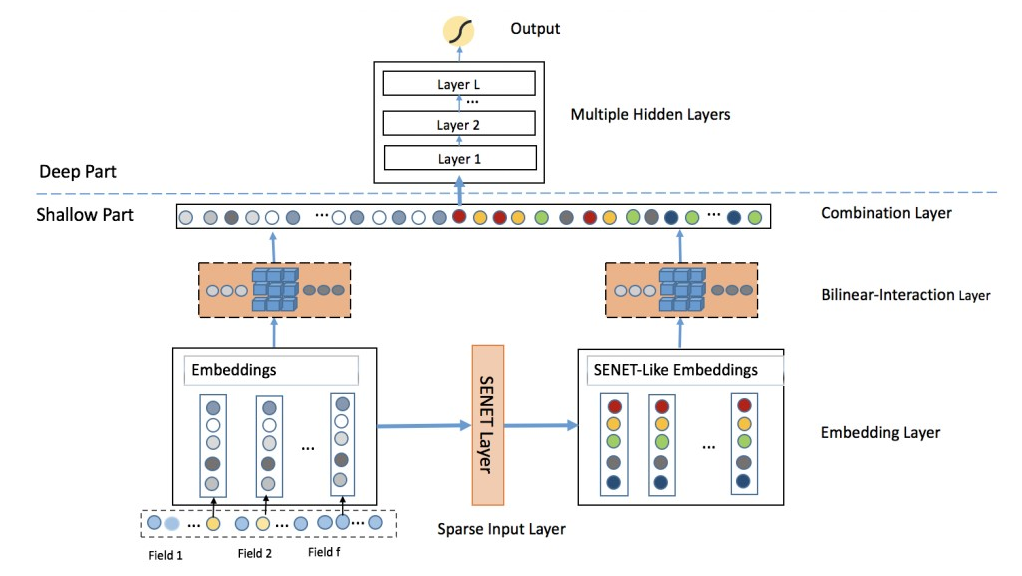
模型:
原始特征经过embedding后,一路保持原始值,一路经过SENET,两路分别过双线性层后输出concat在一起,经过MLP层;
SENET: https://arxiv.org/pdf/1709.01507.pdf

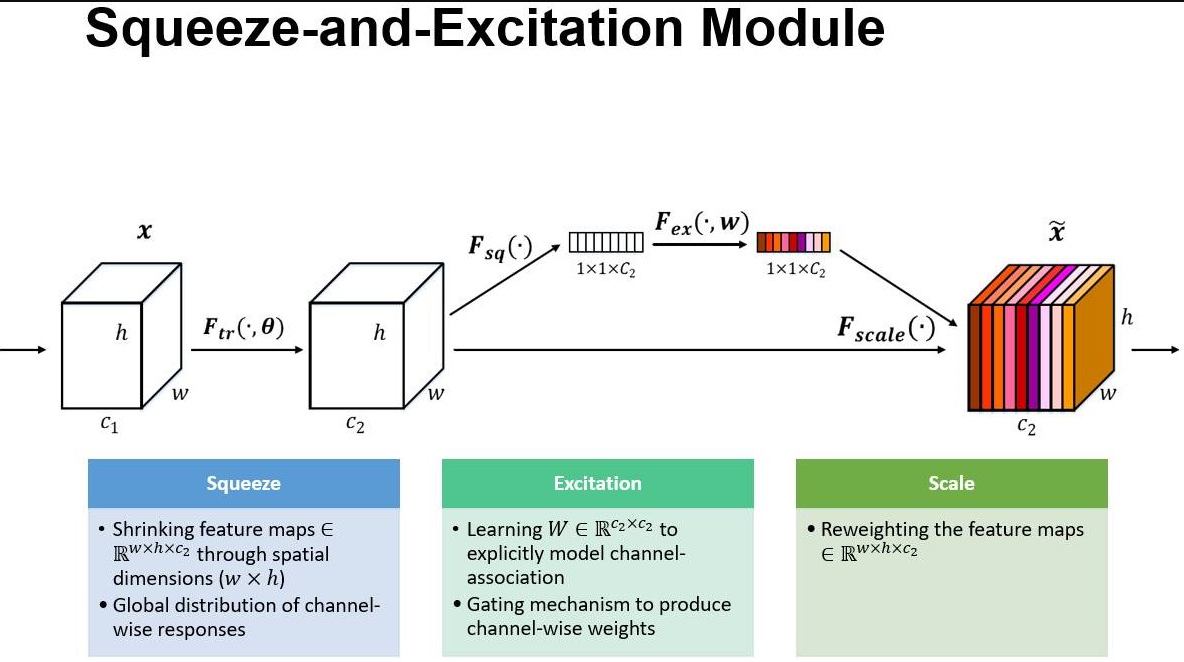
Bilinear

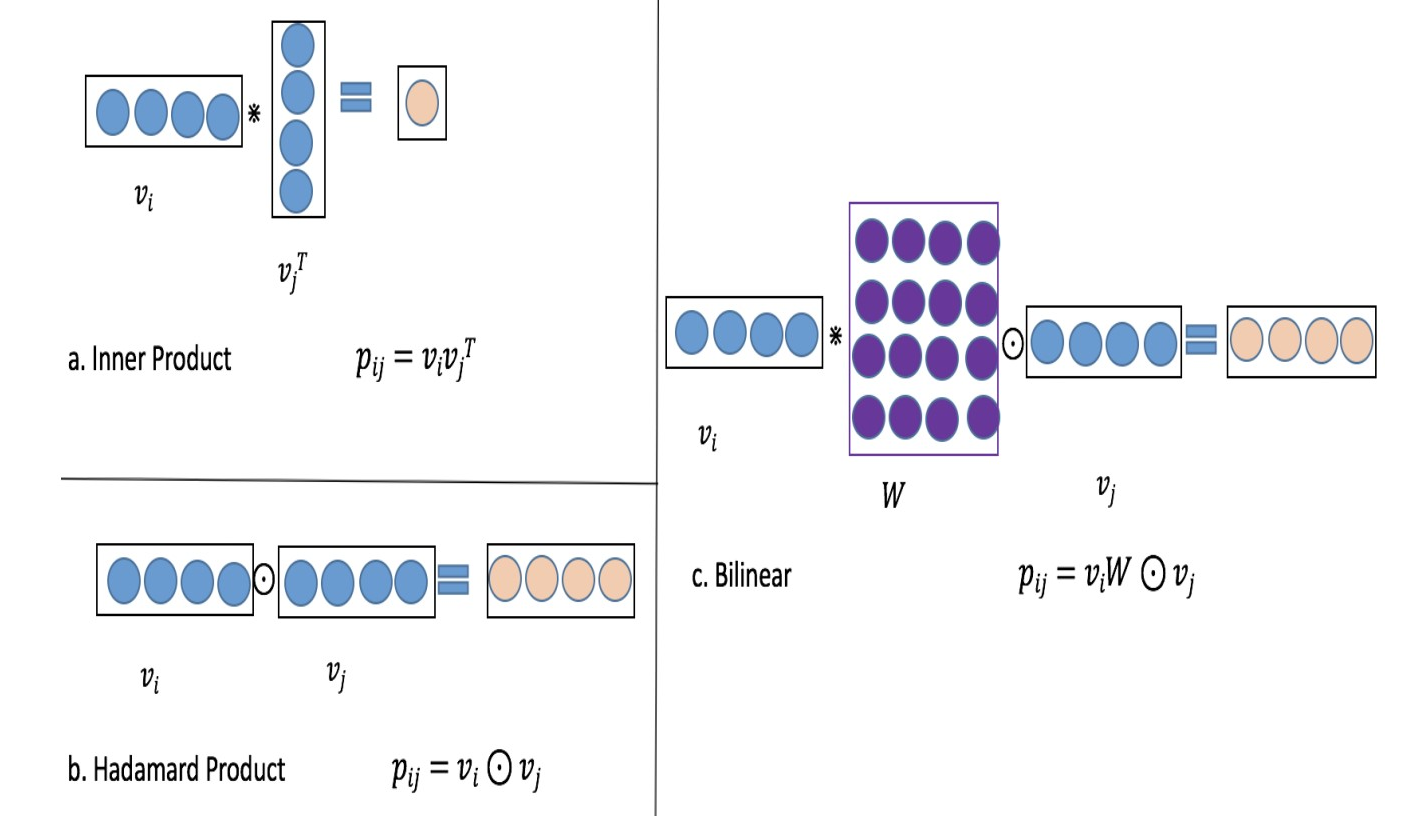
论文中提出了三种方式,
- Field-All模式:全局使用一个权重参数W,$$p_{ij}=v_i Wv_j$$;
- Field-Each模式:每个特征组使用一个权重参数Wi,$$p_{ij}=v_i W_iv_j$$;
- Filed-Interaction模式,每对特征单独使用一个权重参数Wij,$$p_{ij}=v_i W_{ij}v_j$$;
FGCNN: Feature Generation by Convolutional Neural Network, 2019
paper link: https://arxiv.org/pdf/1904.04447.pdf
出发点:理论上DNN可以拟合任意曲线,学习到任意特征交叉;但实际数据中有用的特征交互很稀疏,用大量参数从原始的特征中学习到任意的特征交互就变得相对困难。
优点:利用CNN+MLP提出了特征生成模块,用于提取DNN难以提取到的交叉特征,可以作为插件加入到其他模型中;
缺点:CNN用于提取特征,会受到原始特征顺序的影响,论文虽证实MLP的加入会提升稳定性,但从不同数据集对比来看随着任务场景/数据的复杂,稳定性还是有待考证;

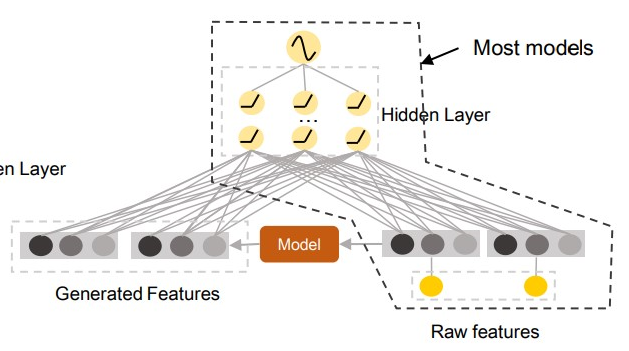
模型:
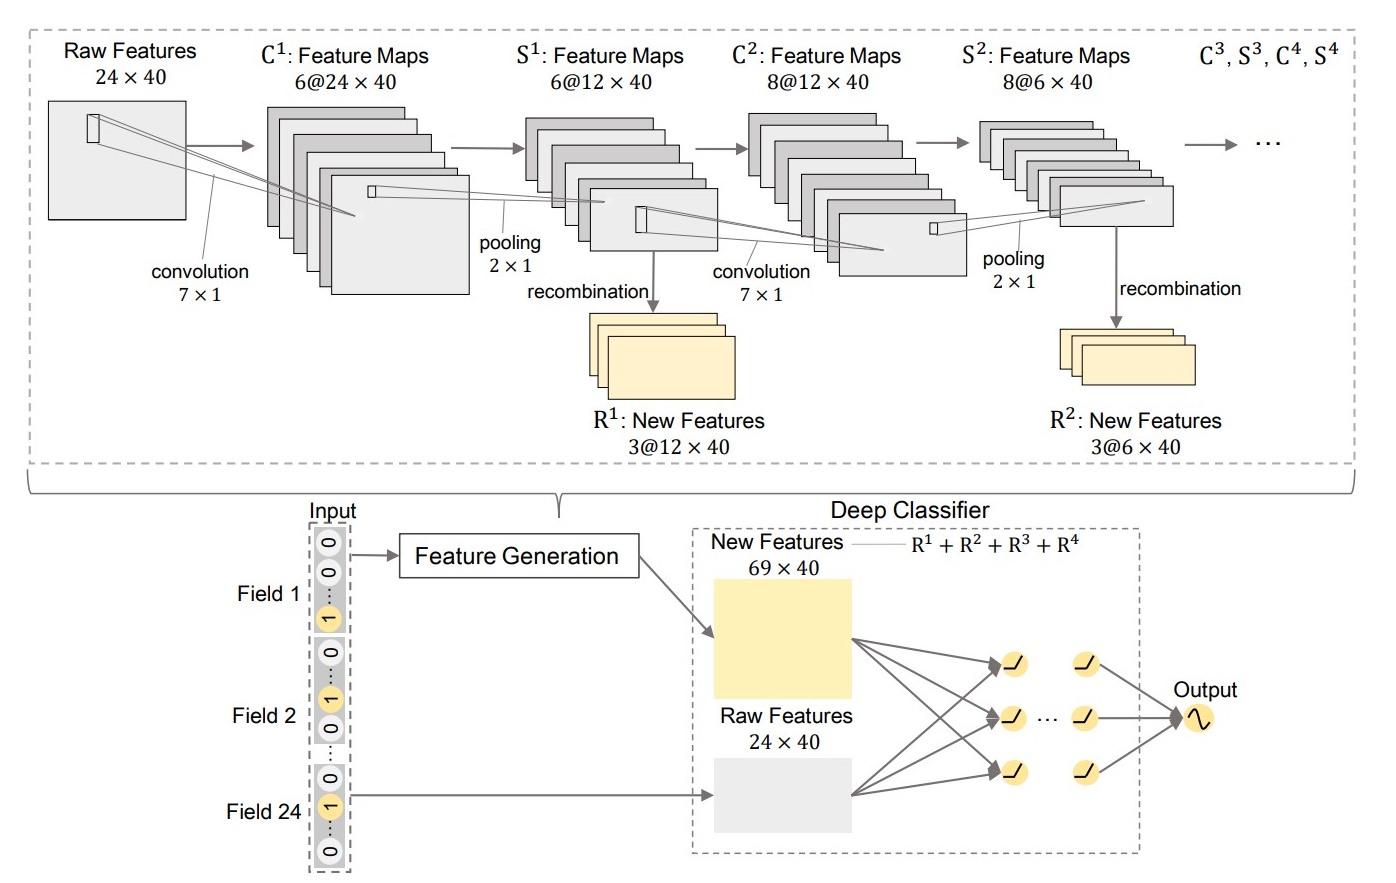
原始特征经过两个不同的embedding字典后分别输入到raw features& generated features;Feature-Feneration部分使用CNN(典型的卷积+池化)+Recombination(MLP)得到new features,与raw features合并进入deep classfier(任意advanced network),paper选用IPNN;

Reference
overview:
https://blog.csdn.net/han_xiaoyang/article/details/81031961
https://zhuanlan.zhihu.com/p/104307718
PNN: https://zhuanlan.zhihu.com/p/56651241
ONN: https://cloud.tencent.com/developer/news/456076
DCN: http://xudongyang.coding.me/dcn/
DCNv2: https://blog.csdn.net/qq_37640597/article/details/109196949
ffm: https://tech.meituan.com/2016/03/03/deep-understanding-of-ffm-principles-and-practices.html
autoint: https://zhuanlan.zhihu.com/p/60185134
xdeepFM:
https://www.jianshu.com/p/b4128bc79df0
http://www.shataowei.com/2019/12/17/xDeepFM架构理解及实现/
http://xudongyang.coding.me/xdeepfm/
https://zhuanlan.zhihu.com/p/57162373
https://blog.csdn.net/DaVinciL/article/details/81359245
InterHAt: https://github.com/zyli93/InterHAt

