JavaSpring学习笔记
一、IOC容器
1.IOC底层原理
概念:控制反转,把对象创建和对象之间的调用过程,交给Spring进行管理。
目的:降低耦合度
为什么使用IOC?
原始new创建对象的方式耦合性太高了 修改一处就要整个修改
解决方案就是引入工厂模式
底层原理:XML解析,工厂模式,反射
IOC思想基于IOC容器完成 IOC容器底层就是对象工厂
Spring提供IOC容器实现的两种方式(两个接口)
(1)BeanFactory:IOC容器基本实现,是Spring内部的使用接口,不提供开发人员进行使用
加载配置文件时不会创建对象,在获取对象时才回去创建对象
(2)ApplicationContext:BeanFactory接口的子接口,提供更多更强大的功能,一般由开发人员进行使用
ApplicationContext context = new ClassPathXmlApplicationContext("bean1.xml");
加载配置文件时候就会把在配置文件对象进行创建
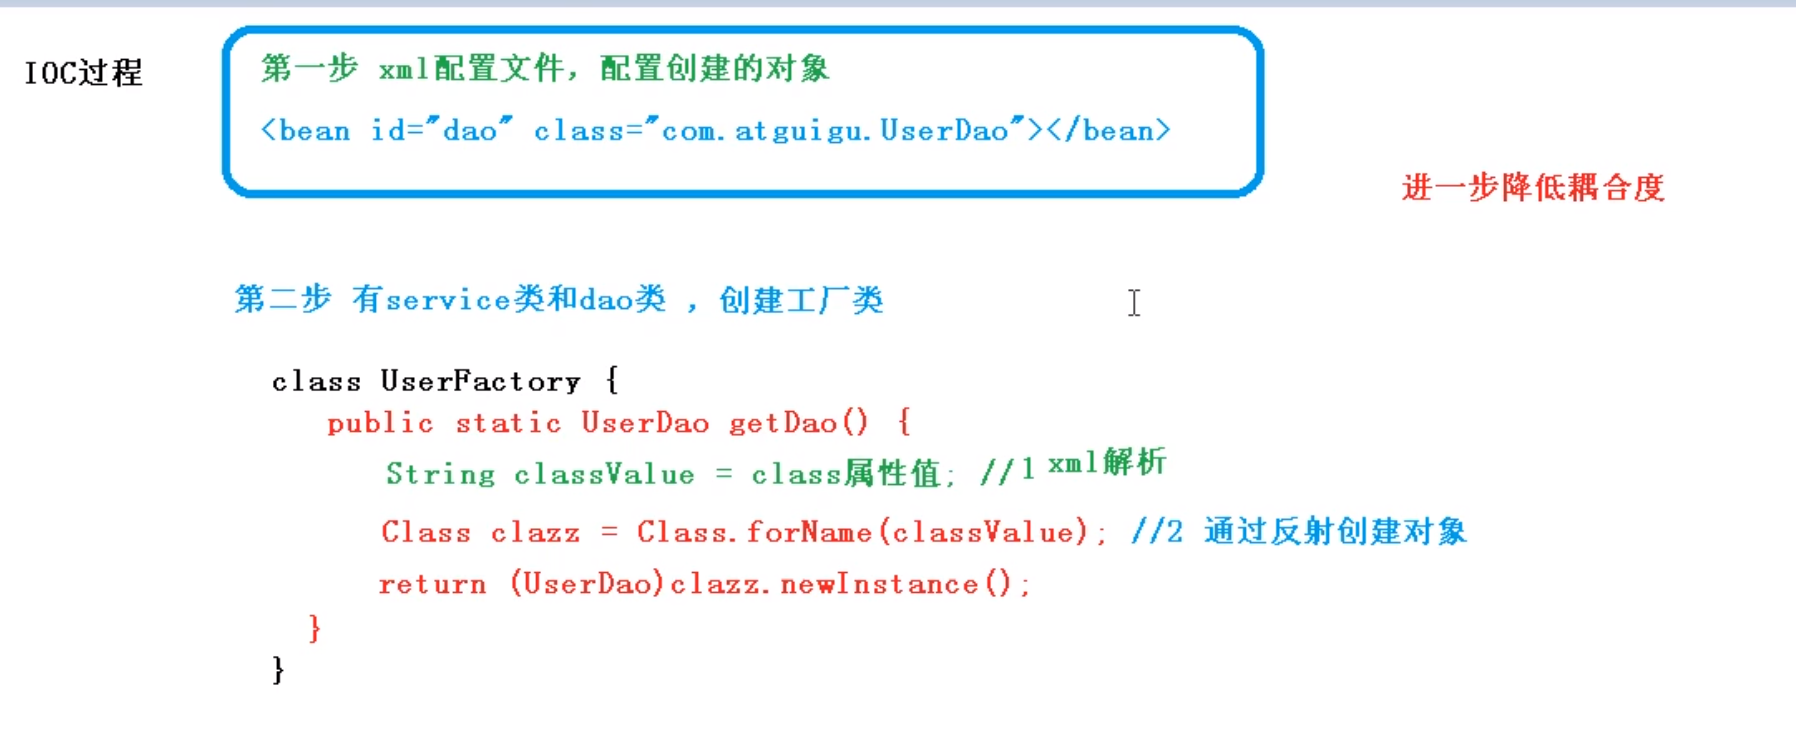
IOC过程:
2.IOC接口(BeanFactory)
IOC操作Bean管理:
1.什么是Bean管理:指的是两个操作
(1)Spring创建对象
(2)Spring注入属性
2.Bean管理操作的两种方式
(1)基于XML配置文件方式实现
1.在spring配置文件中使用bean标签 标签中添加对应属性 就可以实现创建对象。
2.在bean标签中有很多常用属性:
id属性:唯一标识(不能使用特殊符号)
class属性:类全路径(包类路径)
<bean id="user" class="com.zzm.spring.User"></bean>
3.创建对象时,默认也是执行无参数构造方法完成对象创建。
(2)基于xml方式注入属性
1.DI:依赖注入,就是注入属性。
第一种注入方式:使用set方法注入
//创建Book类
public class Booke {
    private String bname;
    private String bauthor;

    public void setBname(String bname) {
        this.bname = bname;
    }

    public void setBauthor(String bauthor) {
        this.bauthor = bauthor;
    }

    public void show(){
        System.out.println(bname+":::"+bauthor);
    }
}

//编写配置文件注入属性
<?xml version="1.0" encoding="UTF-8"?>
<beans xmlns="http://www.springframework.org/schema/beans"
       xmlns:xsi="http://www.w3.org/2001/XMLSchema-instance"
       xsi:schemaLocation="http://www.springframework.org/schema/beans http://www.springframework.org/schema/beans/spring-beans.xsd">
    <bean id="book" class="com.zzm.Book">
        <property name="bname" value="语文"></property>
        <property name="bauthor" value="小明"></property>
    </bean>
</beans>

//测试类查看结果
public class testbook {

    @Test
    public void testbook(){
        ApplicationContext context1 = new ClassPathXmlApplicationContext("bean1.xml");

        Booke book = context1.getBean("book", Book.class);
        book.show();
    }
}

//运行结果:语文:::小明
第二种注入方式:使用有参构造注入
(2)基于注解方式实现
//创建Orders类
public class Orders {
    private String oname;
    private String oaddress;

    public Orders(String oname, String oaddress) {
        this.oname = oname;
        this.oaddress = oaddress;
    }

    public void show(){
        System.out.println(oname+":"+oaddress);
    }
}

//编辑xml配置文件
<beans xmlns="http://www.springframework.org/schema/beans"
       xmlns:xsi="http://www.w3.org/2001/XMLSchema-instance"
       xsi:schemaLocation="http://www.springframework.org/schema/beans http://www.springframework.org/schema/beans/spring-beans.xsd">
    <bean id="orders" class="com.zzm.Orders">
        <constructor-arg name="oname" value="小明"></constructor-arg>
        <constructor-arg name="oaddress" value="xx"></constructor-arg>
    </bean>
</beans>

//测试类查看结果
public class testuser {
    @Test
    public void testOrders(){
        ApplicationContext context = new ClassPathXmlApplicationContext("bean1.xml");

        Orders orders = context.getBean("orders",Orders.class);
        orders.show();
    }
}

//运行结果:小明:xx
注入空值和特殊符号
//注入空值
        <constructor-arg name="oname">
            <null/>
        </constructor-arg>
//注入特殊符号
        <constructor-arg name="oname">
            <value>
                <![CDATA[<<特殊>>]]>
            </value>
        </constructor-arg>
注入属性-外部bean
//service类
public class UserService {

    private UserDao userDao;
    public void setUserDao(UserDao userDao) {
        this.userDao = userDao;
    }

    public void add(){
        System.out.println("userservice方法被调用");
        userDao.update();
    }
}
配置文件
<?xml version="1.0" encoding="UTF-8"?>
<beans xmlns="http://www.springframework.org/schema/beans"
       xmlns:xsi="http://www.w3.org/2001/XMLSchema-instance"
       xsi:schemaLocation="http://www.springframework.org/schema/beans http://www.springframework.org/schema/beans/spring-beans.xsd">

    <bean id="userService" class="com.zzm.services.UserService">
        <property name="userDao" ref="userDao"></property>
    </bean>

    <bean id="userDao" class="com.zzm.dao.UserDaoImpl"></bean>
</beans>
注入属性-内部Bean
创建部门类
public class DeptDao {
    private String dname;

    public void setDname(String dname) {
        this.dname = dname;
    }

    @Override
    public String toString() {
        return "DeptDao{" +
                "dname='" + dname + '\'' +
                '}';
    }
}
创建员工类
public class ErpDao {
    private String name;
    private String gender;
    private DeptDao dept;

    public void setName(String name) {
        this.name = name;
    }

    public void setGender(String gender) {
        this.gender = gender;
    }

    public void setDept(DeptDao dept) {
        this.dept = dept;
    }

    public void show(){
        System.out.println(name+gender+dept);
    }
}
编辑bean
<?xml version="1.0" encoding="UTF-8"?>
<beans xmlns="http://www.springframework.org/schema/beans"
       xmlns:xsi="http://www.w3.org/2001/XMLSchema-instance"
       xsi:schemaLocation="http://www.springframework.org/schema/beans http://www.springframework.org/schema/beans/spring-beans.xsd">

    <bean id="erp" class="com.zzm.dao.ErpDao">
        <property name="name" value="zhangsan//"></property>
        <property name="gender" value="man//"></property>
        <property name="dept">
            <bean id="dept" class="com.zzm.dao.DeptDao">
                <property name="dname" value="anbao"></property>
            </bean>
        </property>
    </bean>
</beans>
测试方法
    @Test
    public void testErp(){
        ClassPathXmlApplicationContext context = new ClassPathXmlApplicationContext("bean1.xml");
        ErpDao erp = context.getBean("erp",ErpDao.class);
        erp.show();
    }
3.IOC操作Bean管理(基于XML)
1)自动装配:根据指定装配规则(属性名称或属性类型),Sring自动将匹配的属性值进行注入
4.IOC操作Bean管理(基于注解)
1)注解:注解是代码特殊标记,格式:@注解名称(属性名称=属性值,属性名称=属性值......)
2)使用注解:注解可以作用在类上面 方法上 属性上
3)使用注解的目的:简化代码
Spring针对Bean管理中创建对象提供注解
1)@Component:泛指组件,当组件不好归类的时候,我们可以使用这个注解进行标注。
2)@Service:用于标注业务层组件
3)@Controller:用于标注控制层组件(如struts中的action)
4)@Repository:用于标注数据访问组件,即DAO组件.
上面四个注解功能是一样的 都可以用来创建bean实例(若不添加Value属性则被扫描的默认值为对象名的首字母小写)
基于注解方式实现对象创建
1)@Autowired:根据属性类型进行自动装配
2)@Qualifier:根据属性名称进行注入(若接口的实现类有多个 则无法使用Autowired进行注入 所有需要使用@Qualifier加创建对象时的Value属性)
3)@Resource:可以根据类型注入,也可以根据名称注入
4)@Value:注入普通类型属性
注解方式实现对象创建的步骤
1.修改XML配置文件(开启组件扫描)
<context:component-scan base-package="com.zzm.spring.dao"></context:component-scan>
2.创建Dao类并提添加注解
public interface UserDao {
    public void add();
}


@Component
public class UserDaoImpl implements UserDao{
    @Override
    public void add() {
        System.out.println("add...");
    }
}
3.创建Service类并添加注解(开启被扫描、自动装配)
@Service(value = "xx")
public class UserService {

    @Autowired
    private UserDao userDao;

    public void show(){
        System.out.println("sss");
        userDao.add();
    }
}
4.测试代码
public class Tset {
    @Test
    public void testUserService(){
            ApplicationContext context = new ClassPathXmlApplicationContext("bean.xml");
        UserService userService = context.getBean("xx", UserService.class);
        userService.show();
    }
}
全注解开发
配置文件类:
@Configuration
@ComponentScan(basePackages = "com.zzm.spring")
public class ConfigSpring {
}
UserDao接口和实现类
public interface UserDao {
    public void add();
}

@Component
public class UserDaoImpl implements UserDao{


    @Override
    public void add() {
        System.out.println("add方法被调用");
    }
}
UserService类
@Service(value = "aa")
public class UserService {
    @Autowired
    private UserDao userDao;
    public void show(){
        System.out.println("show方法被调用");
        userDao.add();
    }
}
单元测试类
public class TestUser {
    @Test
    public void testUserDemo(){
        AnnotationConfigApplicationContext context = new AnnotationConfigApplicationContext("com.zzm.spring");
        UserService aa = context.getBean("aa",UserService.class);
        aa.show();
    }
}
AOP操作术语
1.连接点:类里面哪些方法可以被增强 这些方法称为连接点
2.切入点:实际被增强的方法叫切入点
3.通知(增强):实际增强的逻辑部分称为通知(增强)
4.切面:把通知应用到切入点的过程