


🛸设计模式-Study
实现课程地址:https://www.bilibili.com/video/BV1G4411c7N4
课件资料地址:https://pan.baidu.com/s/1a-cOqagjI9-5rBwb3pFNOA?pwd=pn1e
一、设计模式七大原则
编写软件过程中,程序员面临着来自耦合性,内聚性以及可维护性,可扩展性,重用性,灵活性等多方面的挑战,设计模式就是对软件设计中普遍存在(反复出现)的问题提出的解决方案。
设计模式是为了让程序具有更好:
- 代码重用性(即:相同功能的代码,不用多次编写)
- 可读性(即:编程规范性,便于其他程序员的阅读和理解)
- 可扩展性(即:当需要增加新的功能时,非常的方便,称为可维护)
- 可靠性 (即:当我们增加新的功能后,对原来的功能没有影响)
- 使程序呈现高内聚,低耦合的特性
设计模式七大原则:
- 1)单一职责原则
- 2)接口隔离原则
- 3)依赖倒转原则
- 4)里氏替换原则
- 5)开闭原则
- 6)迪米特法则
- 7)合成复用原则
二十三种设计模式
- 1)创建型模式:单例模式、抽象工厂模式、原型模式、建造者模式、工厂模式。
- 2)结构型模式:适配器模式、桥接模式、装饰模式、组合模式、外观模式、享元模式、代理模式。
- 3)行为型模式:模版方法模式、命令模式、访问者模式、迭代器模式、观察者模式、中介者模式、备忘录模式、 解释器模式(Interpreter 模式)、状态模式、策略模式、职责链模式(责任链模式)。
1.1、单一职责原则
对类来说,即一个类只能负责一项职责;
如类 A 负责两个不同职责:职责 1,职责 2;
当职责 1 需求变更而改变 A 时,可能造成职责 2 执行错误,所以需要将类 A 的粒度分解为 A1,A2。
方式一
1 2 3 4 5 6 7 8 9 10 11 12 13 14 | public class SingleResponsibility1 { public static void main(String[] args) { Vehicle vehicle = new Vehicle(); vehicle.run("摩托车"); vehicle.run("汽车"); vehicle.run("飞机"); }} class Vehicle{ public void run(String vehicle){ System.out.println(vehicle+"在公路上跑"); }} |
问题分析
1)运行结果中不管是摩托车,飞机还是汽车,都是在公路上运行,违反了单一职责原则
2)解决办法,我们应该将Vehicle 分解成不同的类
方式二
1 2 3 4 5 6 7 8 9 10 11 12 13 14 15 16 17 18 19 20 21 22 23 24 25 26 27 28 29 | public class SingleResponsibility2 { public static void main(String[] args) { RoadVehicle roadVehicle = new RoadVehicle(); roadVehicle.run("汽车"); AirVehicle airVehicle = new AirVehicle(); airVehicle.run("飞机"); WaterVehicle waterVehicle = new WaterVehicle(); waterVehicle.run("轮船"); }} class RoadVehicle { public void run(String verhicle) { System.out.println(verhicle + "公路上"); } } class AirVehicle{ public void run(String verhicle) { System.out.println(verhicle + "在天空"); }} class WaterVehicle{ public void run(String verhicle){ System.out.println(verhicle + "在水里"); }} |
问题分析
1) 遵守单一职责原则,但是这样做的改动很大,即将类分解,同时修改客户端
2)改进:直接修改 Vehicle 类,改动的代码会比较少=>方案 3
方式三
1 2 3 4 5 6 7 8 9 10 11 12 13 14 15 16 17 18 19 20 | public class SingleResponsibility3 { public static void main(String[] args) { Vehicle2 vehicle2 = new Vehicle2(); vehicle2.run("摩托"); vehicle2.runAir("船"); vehicle2.runWater("飞机"); }} class Vehicle2{ public void run(String vehicle){ System.out.println(vehicle + "在公路上运行"); } public void runAir(String vehicle){ System.out.println(vehicle + "在天空运行"); } public void runWater(String verhicle){ System.out.println(verhicle + "在水里"); }} |
分析
1)这种修改方法没有对原来的类做大的修改,只是增加方法
2)这里虽然没有在类这个级别上遵守单一职责原则,但是在方法级别上,仍然是遵守单一职责
注意事项和细节
- 1)降低类的复杂度,一个类只负责一个职责
- 2)提高类的可读性,可维护性
- 3)降低变更引起的风险
- 4)通常情况下,我们应当遵守单一职责原则,只有逻辑足够简单,才可以在代码级违反单一职责原则;只有类中方法数量足够少,可以在方法级别保持单一职责原则
1.2、接口隔离原则
客户端不应该依赖它不需要的接口,即一个类对另一个的依赖应该建立在最小接口上。
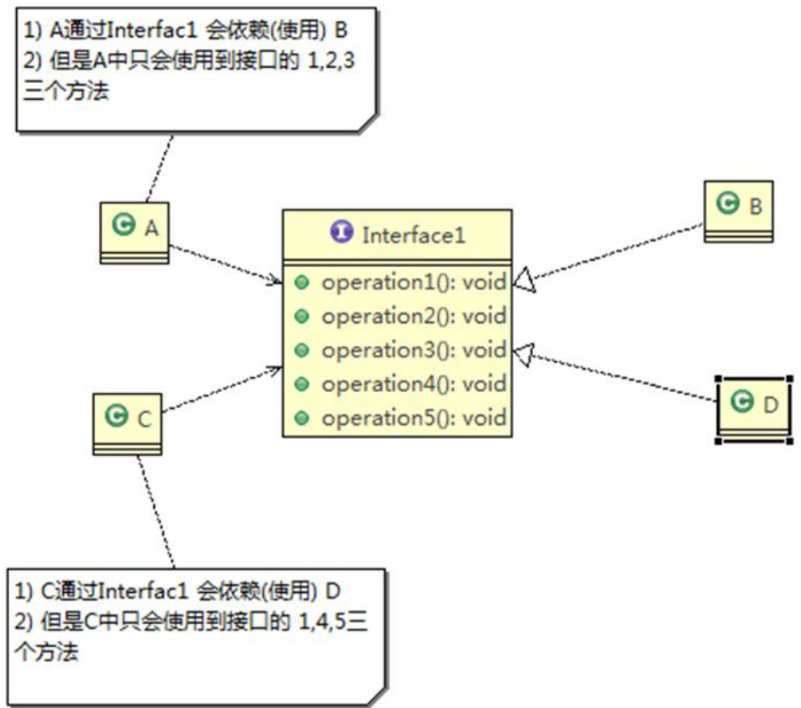
类 A 通过接口 Interface1 依赖类 B,类 C 通过接口 Interface1 依赖类 D;
如果接口 Interface1 对于类 A 和类 C来说不是最小接口,那么类 B 和类 D 必须去实现他们不需要的方法。
按隔离原则应当这样处理:
将接口 Interface1 拆分为独立的几个接口(这里我们拆分成 3 个接口),类 A 和类 C 分别与他们需要的接口建立依赖关系。也就是采用接口隔离原则
方式一
1 2 3 4 5 6 7 8 9 10 11 12 13 14 15 16 17 18 19 20 21 22 23 24 25 26 27 28 29 30 31 32 33 34 35 36 37 38 39 40 41 42 43 44 45 46 47 48 49 50 51 52 53 54 55 56 57 58 59 60 61 62 63 64 65 66 67 68 69 70 71 72 73 74 75 76 77 78 79 80 81 82 83 84 85 86 87 88 89 90 91 92 93 94 | /** * 接口隔离原则 */public class Segreation1 {}interface Interface1 { void operation1(); void operation2(); void operation3(); void operation4(); void operation5();}class B implements Interface1 { public void operation1() { System.out.println("B实现了operation1"); } public void operation2() { System.out.println("B实现了operation2"); } public void operation3() { System.out.println("B实现了operation3"); } public void operation4() { System.out.println("B实现了operation4"); } public void operation5() { System.out.println("B实现了operation5"); }}lass D implements Interface1 { public void operation1() { System.out.println("D实现了operation1"); } public void operation2() { System.out.println("D实现了operation2"); } public void operation3() { System.out.println("D实现了operation3"); } public void operation4() { System.out.println("D实现了operation4"); } public void operation5() { System.out.println("D实现了operation5"); }}class A { //A类通过依赖接口Interface1依赖使用B类,但只会使用1,2,3方法 public void depend1(Interface1 i) { i.operation1(); } public void depend2(Interface1 i) { i.operation2(); } public void depend3(Interface1 i) { i.operation3(); }}class C { //C类通过依赖接口Interface1依赖使用B类,但只会使用1,4,5方法 public void depend1(Interface1 i) { i.operation1(); } public void depend4(Interface1 i) { i.operation4(); } public void depend5(Interface1 i) { i.operation5(); }} |
改进

1 2 3 4 5 6 7 8 9 10 11 12 13 14 15 16 17 18 19 20 21 22 23 24 25 26 27 28 29 30 31 32 33 34 35 36 37 38 39 40 41 42 43 44 45 46 47 48 49 50 51 52 53 54 55 56 57 58 59 60 61 62 63 64 65 66 67 68 69 70 71 72 73 | public class Segreation2 { } interface Interface2{ void operation1();} interface Interface3{ void operation2(); void operation3();} interface Interface4{ void operation4(); void operation5();} class E implements Interface2, Interface3 { public void operation1() { System.out.println("B实现了operation1"); } public void operation2() { System.out.println("B实现了operation2"); } public void operation3() { System.out.println("B实现了operation3"); }} class F implements Interface2, Interface4 { public void operation1() { System.out.println("D实现了operation1"); } public void operation4() { System.out.println("D实现了operation4"); } public void operation5() { System.out.println("D实现了operation5"); }} class G{ //A类通过依赖接口Interface1依赖使用B类,但只会使用1,2,3方法 public void depend1(Interface2 i){ i.operation1(); } public void depend2(Interface3 i){ i.operation2(); } public void depend3(Interface3 i){ i.operation3(); }} class H { //C类通过依赖接口Interface1依赖使用B类,但只会使用1,4,5方法 public void depend1(Interface2 i){ i.operation1(); } public void depend4(Interface4 i){ i.operation4(); } public void depend5(Interface4 i){ i.operation5(); }} |
1.3、依赖倒转(倒置)原则
依赖倒转原则是指:
- 1)高层模块不应依赖低层模块,二者都应该依赖其抽象(比如抽象类,接口)
- 2)抽象不应该依赖细节,细节应该依赖抽象
- 3)依赖倒转(倒置)中心思想就是面向接口编程
- 4)依赖倒转原则是基于这样的设计理念:相对于细节的多变性,抽象的东西要稳定的多。以抽象为基础搭建的架构比以细节为基础的架构要稳定的多。在 java 中,抽象指的是接口或抽象类,细节就是具体的实现类
- 5) 使用接口或抽象类的目的是制定好规范,而不涉及任何具体的操作,把展现细节的任务交给他们的实现类去完成。
应用实例
编程完成 Person 接收消息的功能
1 2 3 4 5 6 7 8 9 10 11 12 13 14 15 16 17 18 | public class DependecyInversion { public static void main(String[] args) { person person = new person(); person.receive(new Email()); }} class Email{ public String getInfo(){ return "邮箱:hello,world"; }} class person{ public void receive(Email email){ System.out.println("收到:"+email.getInfo()); }} |
问题分析
- 1)如果我们获取的对象是微信,短信等等,则新增类,同时Perons也要增加相应的接收方法
- 2)解决思路:引入一个抽象的接口IReceiver,表示接收者,这样Person类与IReceiver发生依赖,因为Email, WeiXin等等属于接收的范围,他们各自实现IReceiver接口就ok,这样我们就符号依赖倒转原则
改进
1 2 3 4 5 6 7 8 9 10 11 12 13 14 15 16 17 18 19 20 21 22 23 24 25 26 27 28 29 30 31 | public class DependecyInversion { public static void main(String[] args) { person person = new person(); person.receive(new Email()); person.receive(new weixin()); }}interface IReceive { String getInfo();}class Email implements IReceive { public String getInfo() { return "邮箱:hello,world"; }}class weixin implements IReceive { public String getInfo() { return "微信:hello,world"; }}class person { //对接口的依赖 public void receive(IReceive iReceive) { System.out.println("收到:" + iReceive.getInfo()); }} |
依赖传递的三种方式
接口传递
1 2 3 4 5 6 7 8 9 10 11 12 13 14 15 16 17 18 19 20 21 22 23 24 25 26 | public class DependecyPass { public static void main(String[] args) { OpenAndClose openAndClose = new OpenAndClose(); openAndClose.open(new changhong()); openAndClose.open(new xiaomi()); }} interface Itv{ public void play();}class changhong implements Itv{ public void play() { System.out.println("长虹电视机打开"); }}class xiaomi implements Itv{ public void play() { System.out.println("小米电视机打开"); }}class OpenAndClose{ public void open(Itv itv) { itv.play(); }} |
构造方法传递
1 2 3 4 5 6 7 8 9 10 11 12 13 14 15 16 17 18 19 20 21 22 23 24 25 26 27 28 29 30 | public class DependecyPass { public static void main(String[] args) { OpenAndClose openAndClose1 = new OpenAndClose(new changhong()); openAndClose1.open(); OpenAndClose openAndClose2 = new OpenAndClose(new xiaomi()); openAndClose2.open(); }}interface Itv{ public void play();}class changhong implements Itv{ public void play() { System.out.println("长虹电视机打开"); }}class xiaomi implements Itv{ public void play() { System.out.println("小米电视机打开"); }}class OpenAndClose{ private Itv itv; public OpenAndClose(Itv itv){ this.itv=itv; } public void open() { this.itv.play(); }} |
setter方法传递
1 2 3 4 5 6 7 8 9 10 11 12 13 14 15 16 17 18 19 20 21 22 23 24 25 26 27 28 29 30 31 | public class DependecyPass { public static void main(String[] args) { OpenAndClose openAndClose = new OpenAndClose(); openAndClose.settle(new changhong()); openAndClose.open(); openAndClose.settle(new xiaomi()); openAndClose.open(); }}interface Itv{ public void play();}class changhong implements Itv{ public void play() { System.out.println("长虹电视机打开"); }}class xiaomi implements Itv{ public void play() { System.out.println("小米电视机打开"); }}class OpenAndClose{ private Itv itv; public void settle(Itv itv){ this.itv=itv; } public void open() { this.itv.play(); }} |
依赖倒转原则的注意事项和细节
- 1)低层模块尽量都要有抽象类或接口,或者两者都有,程序稳定性更好.
- 2)变量的声明类型尽量是抽象类或接口, 这样我们的变量引用和实际对象间,就存在一个缓冲层,利于程序扩展和优化
- 3)继承时遵循里氏替换原则
1.4、里氏替换原则
OO(面向对象)中的继承性的思考和说明:
- 1)继承包含这样一层含义:父类中凡是已经实现好的方法,实际上是在设定规范和契约,虽然它不强制要求所有的子类必须遵循这些契约,但是如果子类对这些已经实现的方法任意修改,就会对整个继承体系造成破坏。
- 2)继承在给程序设计带来便利的同时,也带来了弊端。比如使用继承会给程序带来侵入性,程序的可移植性降低, 增加对象间的耦合性,如果一个类被其他的类所继承,则当这个类需要修改时,必须考虑到所有的子类,并且父类修改后,所有涉及到子类的功能都有可能产生故障
- 3)问题提出:在编程中,如何正确的使用继承? => 里氏替换原则
基本介绍
- 1)里氏替换原则(Liskov Substitution Principle)在 1988 年,由麻省理工学院的以为姓里的女士提出的。
- 2)如果对每个类型为 T1 的对象 o1,都有类型为 T2 的对象 o2,使得以 T1 定义的所有程序 P 在所有的对象 o1 都代换成 o2 时,程序 P 的行为没有发生变化,那么类型 T2 是类型 T1 的子类型。换句话说,所有引用基类的地方必须能透明地使用其子类的对象。
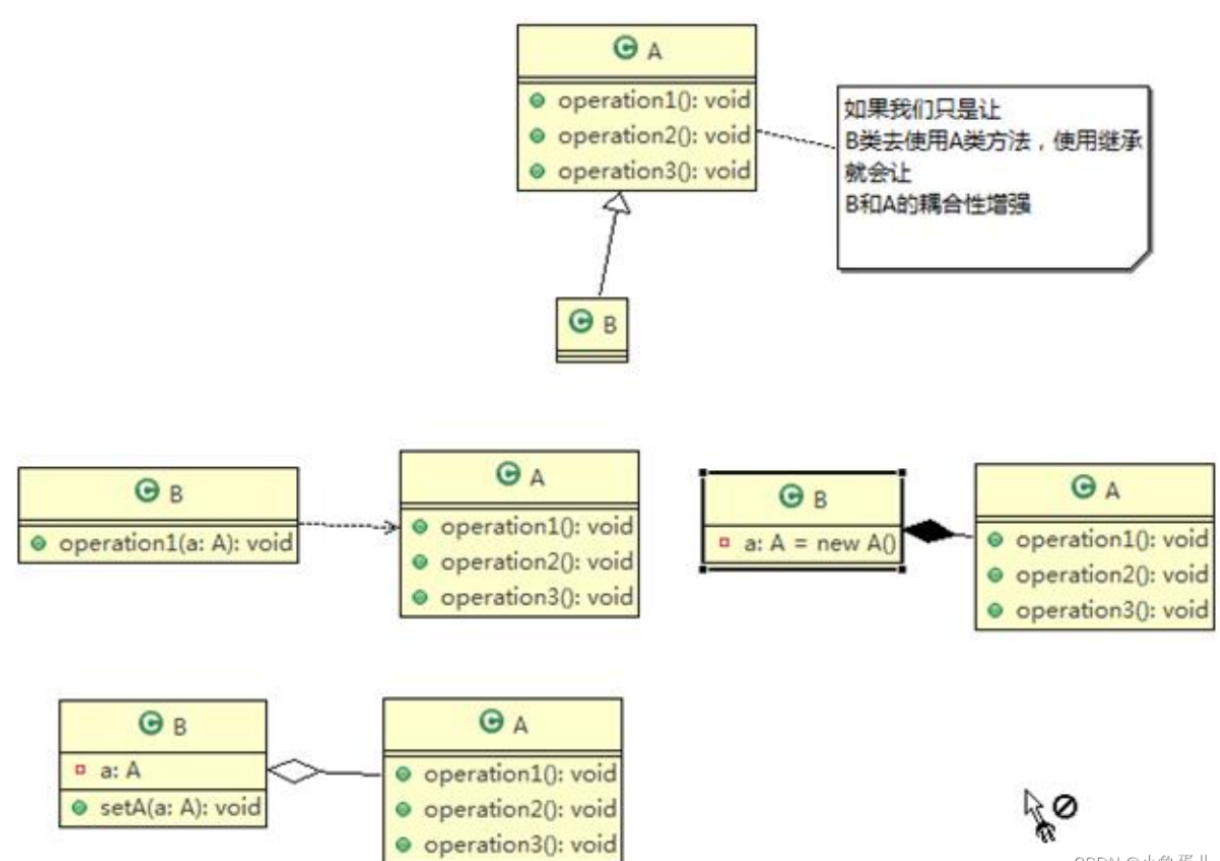
- 3)在使用继承时,遵循里氏替换原则,在子类中尽量不要重写父类的方法
- 4)里氏替换原则告诉我们,继承实际上让两个类耦合性增强了,在适当的情况下,可以通过聚合,组合,依赖来解决问题。
应用实例
1 2 3 4 5 6 7 8 9 10 11 12 13 14 15 16 17 18 19 20 21 22 23 24 25 26 27 28 29 30 31 | public class Liskov { public static void main(String[] args) { A a = new A(); System.out.println("1 - 2 = " + a.func1(1, 2)); System.out.println("---------------------"); B b = new B(); System.out.println("1 - 2 = " + b.func1(1,2));//这里本意是求出 1-2 System.out.println("1 - 2 + 9 = " + b.func2(1,2)); }} class A{ //返回两个数的差 public int func1(int a, int b){ return a - b; }} class B extends A { @Override //这里重写了A类的方法,可能是无意识 public int func1(int a, int b){ return a + b; } //增加了一个新功能,完成两个数相加,然后和9求和 public int func2(int a, int b){ return func1(a,b) + 9; }} |
问题分析
- 1)我们发现原来运行正常的相减功能发生了错误。原因就是类 B 无意中重写了父类的方法,造成原有功能出现错误。在实际编程中,我们常常会通过重写父类的方法完成新的功能,这样写起来虽然简单,但整个继承体系的尚硅谷 Java 设计模式复用性会比较差。特别是运行多态比较频繁的时候
- 2)通用的做法是:原来的父类和子类都继承一个更通俗的基类,原有的继承关系去掉,采用依赖,聚合,组合等关系代替。
- 3)改进方案
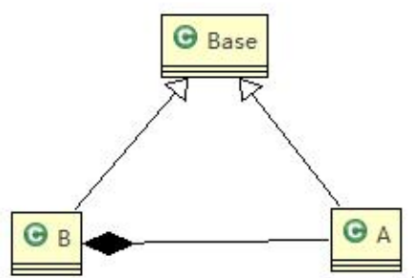
改进
1 2 3 4 5 6 7 8 9 10 11 12 13 14 15 16 17 18 19 20 21 22 23 24 25 26 27 28 29 30 31 32 33 34 35 36 37 38 39 40 41 42 43 44 45 | public class Liskov { public static void main(String[] args) { A a = new A(); System.out.println("1 - 2 = " + a.func1(1, 2)); System.out.println("---------------------"); B b = new B(); System.out.println("1 + 2 = " + b.func1(1, 2)); System.out.println("1 + 2 + 9 = " + b.func2(1, 2)); System.out.println("1 - 2 = " + b.func3(1, 2)); }}//创建一个更加基础的基类class Base { //把更加基础的方法和成员写到 Base 类}class A extends Base { //返回两个数的差 public int func1(int a, int b) { return a - b; }}class B extends Base { //如果 B 需要使用 A 类的方法,使用组合关系 private A a = new A(); //这里,重写了 A 类的方法,可能是无意识 public int func1(int a, int b) { return a + b; } public int func2(int a, int b) { return func1(a, b) + 9; } //我们仍然想使用 A 的方法 public int func3(int a, int b) { return this.a.func1(a, b); }} |
1.5、开闭原则
- 1)开闭原则是编程中最基础、最重要的设计原则
- 2) 一个软件实体如类,模块和函数应该对扩展开放(对提供方),对修改关闭(对使用方)。用抽象构建框架,用实现扩展细节。
- 3)当软件需要变化时,尽量通过扩展软件实体的行为来实现变化,而不是通过修改已有的代码来实现变化。
- 4)编程中遵循其它原则,以及使用设计模式的目的就是遵循开闭原则。
应用实例
看一个画图形的功能
1 2 3 4 5 6 7 8 9 10 11 12 13 14 15 16 17 18 19 20 21 22 23 24 25 26 27 28 29 30 31 32 33 34 35 36 37 38 39 40 41 42 43 44 45 46 47 48 49 50 51 52 53 | public class OCP { public static void main(String[] args) { //使用看看存在的问题 GraphicEditor graphicEditor = new GraphicEditor(); graphicEditor.drawShape(new Rectangle()); }}//这是一个用于绘图的类 【使用方】class GraphicEditor{ public void drawShape(Shape shape){ if(shape.my_tape == 1){ drawRectangle(shape); }else if(shape.my_tape == 2){ drawCircle(shape); }else if(shape.my_tape == 3){ drawTriangle(shape); } } //绘制矩形 public void drawRectangle(Shape r){ System.out.println("矩形"); } //绘制圆 public void drawCircle(Shape r){ System.out.println("圆"); } //绘制三角形 public void drawTriangle(Shape r){ System.out.println("三角形"); }} class Shape{ int my_tape;} class Rectangle extends Shape { Rectangle(){ super.my_tape = 1; }} class Circle extends Shape { Circle(){ super.my_tape = 2; }}//新增画三角形class Triangle extends Shape { Triangle(){ super.my_tape = 3; }} |
问题分析
- 1)优点是比较好理解,简单易操作。
- 2)缺点是违反了设计模式的 ocp 原则,即对扩展开放(提供方),对修改关闭(使用方)。即当我们给类增加新功能的 时候,尽量不修改代码,或者尽可能少修改代码。
- 3)比如我们这时要新增加一个图形种类三角形,我们需要修改的地方较多
改进
思路:把创建 Shape 类做成抽象类,并提供一个抽象的 draw 方法,让子类去实现即可,这样我们有新的图形种类时,只需要让新的图形类继承 Shape,并实现 draw 方法即可,使用方的代码就不需要修改 ---> 满足了开闭原则
PS:(这里将Shape修改为接口也是可以的)
1 2 3 4 5 6 7 8 9 10 11 12 13 14 15 16 17 18 19 20 21 22 23 24 25 26 27 28 29 30 31 32 33 34 35 36 37 38 39 40 41 42 43 44 45 46 47 48 49 50 51 52 | public class OCP { public static void main(String[] args) { GraphicEditor graphicEditor = new GraphicEditor(); graphicEditor.drawShape(new Rectangle()); graphicEditor.drawShape(new Circle()); }} class GraphicEditor{ public void drawShape(Shape shape){ shape.show(); }}//Shape 类,基类abstract class Shape{ int my_tape; public abstract void show();} class Rectangle extends Shape { Rectangle(){ super.my_tape = 1; } @Override public void show() { System.out.println("矩形"); }} class Circle extends Shape { Circle(){ super.my_tape = 2; } @Override public void show() { System.out.println("圆"); }}//新增三角形class Triangle extends Shape { Triangle(){ super.my_tape = 3; } @Override public void show() { System.out.println("三角形"); }} |
1.6、迪米特法则
- 1)一个对象应该对其他对象保持最少的了解
- 2)类与类关系越密切,耦合度越大
- 3)迪米特法则(Demeter Principle)又叫最少知道原则,即一个类对自己依赖的类知道的越少越好。也就是说,对于 被依赖的类不管多么复杂,都尽量将逻辑封装在类的内部。对外除了提供的 public 方法,不对外泄露任何信息
- 4)迪米特法则还有个更简单的定义:只与直接的朋友通信
- 5)直接的朋友:每个对象都会与其他对象有耦合关系,只要两个对象之间有耦合关系,我们就说这两个对象之间是朋友关系。耦合的方式很多,依赖,关联,组合,聚合等。其中,我们称出现成员变量,方法参数,方法返回值中的类为直接的朋友,而出现在局部变量中的类不是直接的朋友。也就是说,陌生的类最好不要以局部变量的形式出现在类的内部。
应用实例
有一个学校,下属有各个学院和总部,现要求打印出学校总部员工 ID 和学院员工的 id
1 2 3 4 5 6 7 8 9 10 11 12 13 14 15 16 17 18 19 20 21 22 23 24 25 26 27 28 29 30 31 32 33 34 35 36 37 38 39 40 41 42 43 44 45 46 47 48 49 50 51 52 53 54 55 56 57 58 59 60 61 62 63 64 65 66 67 68 69 70 71 72 73 74 75 76 77 78 79 80 81 82 83 84 | public class Demeter1 { public static void main(String[] args) { //创建了一个 SchoolManager 对象 SchoolManager schoolManager = new SchoolManager(); //输出学院的员工id 和 学校总部的员工信息 schoolManager.printAllEmployee(new CollegeManager()); }} //学校总部员工类class Employee { private String id; public void setId(String id) { this.id = id; } public String getId() { return id; }} //学院员工类class CollegeEmployee { private String id; public void setId(String id) { this.id = id; } public String getId() { return id; }} //学院员工的管理类class CollegeManager { //返回学院的所有员工 public List<CollegeEmployee> getAllEmployee() { List<CollegeEmployee> list = new ArrayList(); for (int i = 0; i < 10; i++) { //这里我们增加了10个员工到 list CollegeEmployee emp = new CollegeEmployee(); emp.setId("学院员工id = " + i); list.add(emp); } return list; }} //学校员工管理类,包括学院员工和学校总部员工 //分析 SchoolManager 类的直接朋友类有哪些 Employee、CollegeManager//CollegeEmployee 不是 直接朋友 而是一个陌生类,这样违背了 迪米特法则class SchoolManager { //返回学校总部的员工 public List<Employee> getAllEmployee() { List<Employee> list = new ArrayList(); for (int i = 0; i < 5; i++) { //这里我们增加了5个员工到 list Employee emp = new Employee(); emp.setId("学校总部员工id = " + i); list.add(emp); } return list; } //该方法完成输出学校总部和学院员工信息(id) void printAllEmployee(CollegeManager sub) { //获取到学院员工 List<CollegeEmployee> list1 = sub.getAllEmployee(); System.out.println("------------学院员工------------"); for (CollegeEmployee e : list1) { System.out.println(e.getId()); } //获取到学校总部员工 List<Employee> list2 = this.getAllEmployee(); System.out.println("------------学校总部员工------------"); for (Employee e : list2) { System.out.println(e.getId()); } }} |
问题分析
这里的 CollegeEmployee 不是 SchoolManager的直接朋友,CollegeEmployee 以局部变量方式出现在 SchoolManager中,违反了 迪米特法则。
1 2 3 4 5 6 7 8 9 10 11 12 13 14 15 16 17 18 19 20 21 22 23 24 25 26 27 28 29 30 31 32 33 34 35 36 37 38 39 40 41 42 43 44 45 46 47 48 49 50 51 52 53 54 55 56 57 58 59 60 61 62 63 64 65 66 67 68 69 70 71 72 73 74 75 76 77 78 79 80 81 82 83 84 85 | public class Demeter1 { public static void main(String[] args) { //创建了一个 SchoolManager 对象 SchoolManager schoolManager = new SchoolManager(); //输出学院的员工id 和 学校总部的员工信息 schoolManager.printAllEmployee(new CollegeManager()); }} //学校总部员工类class Employee { private String id; public void setId(String id) { this.id = id; } public String getId() { return id; }} //学院员工类class CollegeEmployee { private String id; public void setId(String id) { this.id = id; } public String getId() { return id; }}//管理学院员工的管理类class CollegeManager { //返回学院的所有员工 public List<CollegeEmployee> getAllEmployee() { List<CollegeEmployee> list = new ArrayList<>(); for (int i = 0; i < 10; i++) { //这里我们增加了10个员工到 list CollegeEmployee emp = new CollegeEmployee(); emp.setId("学院员工id= " + i); list.add(emp); } return list; } public void print(){ List<CollegeEmployee> list1 = getAllEmployee(); System.out.println("------------学院员工------------"); for (CollegeEmployee e : list1) { System.out.println(e.getId()); } }}//学校员工管理类,包括学院员工和学校总部员工class SchoolManager { //返回学校总部的员工 public List<Employee> getAllEmployee() { List<Employee> list = new ArrayList<Employee>(); for (int i = 0; i < 5; i++) { //这里我们增加了5个员工到 list Employee emp = new Employee(); emp.setId("学校总部员工id= " + i); list.add(emp); } return list; } //该方法完成输出学校总部和学院员工信息(id) void printAllEmployee(CollegeManager sub) { //打印学院员工 sub.print(); //获取到学校总部员工 List<Employee> list2 = this.getAllEmployee(); System.out.println("------------学校总部员工------------"); for (Employee e : list2) { System.out.println(e.getId()); } }} |
1.7、合成复用原则
原则是尽量使用合成/聚合的方式,而不是使用继承。
设计原则核心思想
1)找出应用中可能需要变化之处,把它们独立出来,不要和那些不需要变化的代码混在一起。
2)针对接口编程,而不是针对实现编程。
3)为了交互对象之间的松耦合设计而努力
二、UML类图
2.1、基本介绍
- 1)UML——Unified modeling language UML (统一建模语言),是一种用于软件系统分析和设计的语言工具,它用 于帮助软件开发人员进行思考和记录思路的结果。
- 2)UML 本身是一套符号的规定,就像数学符号和化学符号一样,这些符号用于描述软件模型中的各个元素和他们之间的关系,比如类、接口、实现、泛化、依赖、组合、聚合等。
UML图
画 UML 图与写文章差不多,都是把自己的思想描述给别人看,关键在于思路和条理,UML 图分类:
- 1)用例图(use case)
- 2)静态结构图:类图、对象图、包图、组件图、部署图
- 3)动态行为图:交互图(时序图与协作图)、状态图、活动图
类图是描述类与类之间的关系的,是 UML 图中最核心的。
- 1)用于描述系统中的类(对象)本身的组成和类(对象)之间的各种静态关系。
- 2)类之间的关系:依赖、泛化(继承)、实现、关联、聚合与组合。
- 关于类图具体的语法,这里不再赘述,可参考官方文档
IDEA安装UML插件:PlantUML Integration (6.1.0-IJ2022.2)
2.2、依赖关系(Dependence)
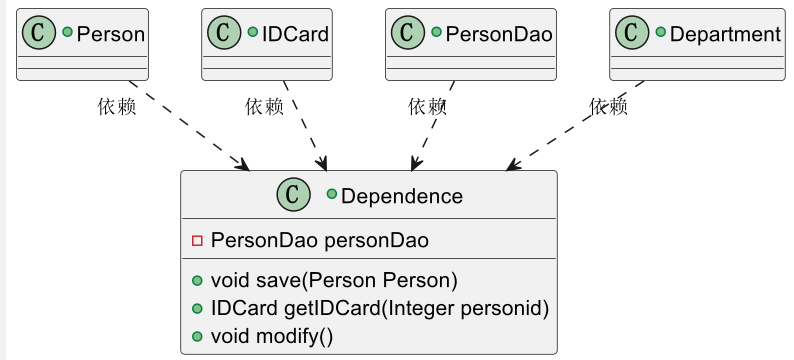
只要是在类中用到了对方,那么他们之间就存在依赖关系。如果没有对方,连编绎都通过不了。
具体:
- 1)类中用到了对方
- 2)如果是类的成员属性
- 3)如果是方法的返回类型
- 4)是方法接收的参数类型
- 5)方法中使用到
1 2 3 4 5 6 7 8 9 10 11 12 13 14 | public class Dependence { private PersonDao personDao;//类 public void save(Person person){} public IDCard getIDCard(Integer personid){ return new IDCard(); } public void modify(){ Department department = new Department(); }}class PersonDao{}class IDCard{}class Person{}class Department{} |
UML:
1 2 3 4 5 6 7 8 9 10 11 12 13 14 15 16 17 18 19 20 21 22 | @startumlPerson "依赖" ..> DependenceIDCard "依赖" ..> DependencePersonDao "依赖" ..> DependenceDepartment "依赖" ..> Dependence+class Person{}+class IDCard{}+class PersonDao{}+class Department{}+class Dependence{ - PersonDao personDao + void save(Person Person) + IDCard getIDCard(Integer personid) + void modify()}@enduml |
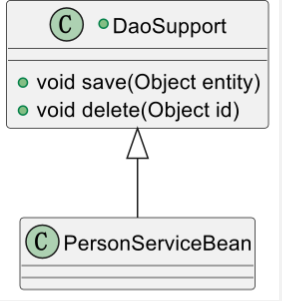
2.3、泛化关系(generalization)
泛化关系实际上就是继承关系,他是依赖关系的特例。
具体:
- 1) 泛化关系实际上就是继承关系
- 2) 如果A类继承了B类,我们就说A和B存在泛化关系
1 2 3 4 5 6 7 8 9 | public abstract class DaoSupport{ public void save(Object entity){ } public void delete(Object id){ }}class PersonServiceBean extends DaoSupport{ } |
UML:
1 2 3 4 5 6 7 8 | @startumlabstract class DaoSupportDaoSupport<|-- PersonServiceBean+class DaoSupport{ +void save(Object entity) +void delete(Object id)}@enduml |
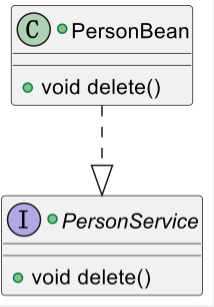
2.4、实现关系(Implementation)
实现关系实际上就是A类实现B接口,他是依赖关系的特例
1 2 3 4 5 6 7 | interface PersonService{ public void delete();}public class PersonBean implements PersonService{ public void delete() { }} |
UML:
1 2 3 4 5 6 7 8 9 | @startuml+interface PersonService{ +void delete()}PersonBean ..|> PersonService+class PersonBean{ +void delete()}@enduml |
2.5、关联关系(Association)
关联关系实际上就是类与类之间的联系,他是依赖关系的特例
关联具有导航性:即双向关系或单向关系
关系具有多重性:如“1”(表示有且仅有一个),“0...”(表示0个或者多个), “0,1”(表示0个或者一个),“n...m”(表示n到 m个都可以),“m...*”(表示至少m 个)。
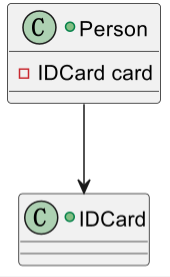
单向一对一
1 2 3 4 5 | public class Person { private IDCard card;} class IDCard{} |
UML
1 2 3 4 5 6 7 8 | @startuml+class Person{ -IDCard card}+class IDCard{}Person-->IDCard@enduml |
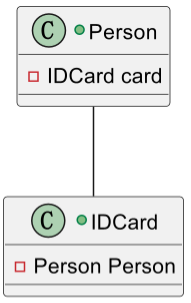
双向一对一
1 2 3 4 5 6 7 | public class Person { private IDCard card;}class IDCard{ private Person person;} |
UML
1 2 3 4 5 6 7 8 9 | @startuml+class Person{ -IDCard card}+class IDCard{ -Person Person}Person--IDCard@enduml |
2.6、聚合关系(Aggregation)
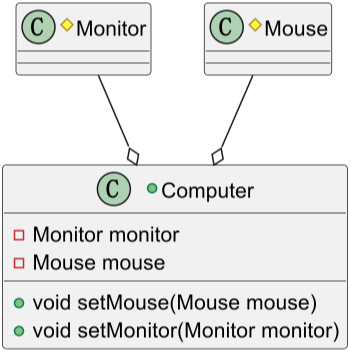
聚合关系(Aggregation)表示的是整体和部分的关系,整体与部分可以分开。聚合关系是关联关系的特例,所以他具有关联的导航性与多重性。
如:一台电脑由键盘(keyboard)、显示器(monitor),鼠标等组成;组成电脑的各个 配件是可以从电脑上分离出来的,使用带空心菱形的实线来表示:
1 2 3 4 5 6 7 8 9 10 11 12 13 14 15 16 | public class Computer { private Mouse mouse; private Monitor monitor; public void setMouse(Mouse mouse){ this.mouse=mouse; } public void setMonitor(Monitor monitor){ this.monitor=monitor; }} class Mouse{} class Monitor{} |
UML
1 2 3 4 5 6 7 8 9 10 11 12 13 14 15 | @startuml#class Monitor{}#class Mouse{}+class Computer{ - Monitor monitor - Mouse mouse + void setMouse(Mouse mouse) + void setMonitor(Monitor monitor)}Mouse --o ComputerMonitor --o Computer@enduml |
2.7、组合关系(Composition)
组合关系:也是整体与部分的关系,但是整体与部分不可以分开。
再看一个案例:在程序中我们定义实体:Person 与 IDCard、Head, 那么 Head 和 Person 就是组合,IDCard 和 Person 就是聚合。
但是如果在程序中 Person 实体中定义了对 IDCard 进行级联删除,即删除 Person 时连同 IDCard 一起删除,那么 DCard和 Person 就是组合了。
1 2 3 4 5 6 | public class Person{ private IDCard card; private Head head = new Head();}class IDCard{}class Head{} |
UML
1 2 3 4 5 6 7 8 9 10 11 12 | @startuml+class Person{ -IDCard card -Head head = new Head()}#class IDCard{}#class Head{}Head --* PersonIDCard --o Person@enduml |

2.8、总结
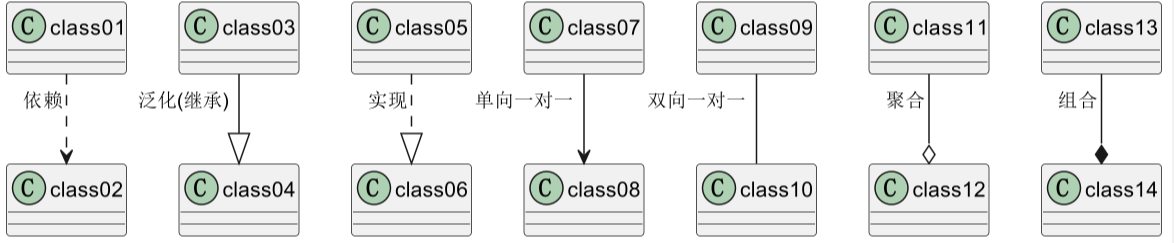
1 2 3 4 5 6 7 8 9 | @startumlclass01 "依赖"..> class02class03 "泛化(继承)"--|> class04class05 "实现" ..|> class06class07 "单向一对一"--> class08class09 "双向一对一" -- class10class11 "聚合" --o class12class13 "组合" --* class14@enduml |
三、设计模式
3.1、单例模式(Singleton Pattern)
单例模式(Singleton Pattern)是 Java 中最简单的设计模式之一。这种类型的设计模式属于创建型模式,它提供了一种创建对象的最佳方式。
这种模式涉及到一个单一的类,该类负责创建自己的对象,同时确保只有单个对象被创建。这个类提供了一种访问其唯一的对象的方式,可以直接访问,不需要实例化该类的对象。
注意:
- 1、单例类只能有一个实例。
- 2、单例类必须自己创建自己的唯一实例。
- 3、单例类必须给所有其他对象提供这一实例。
1、饿汉式
是否 Lazy 初始化:否
是否多线程安全:是
实现难度:易
描述:这种方式比较常用,但容易产生垃圾对象。
优点:没有加锁,执行效率会提高。
缺点:类加载时就初始化,浪费内存。
它基于 classloader 机制避免了多线程的同步问题,不过,instance 在类装载时就实例化,虽然导致类装载的原因有很多种,在单例模式中大多数都是调用 getInstance 方法, 但是也不能确定有其他的方式(或者其他的静态方法)导致类装载,这时候初始化 instance 显然没有达到 lazy loading 的效果。
1 2 3 4 5 6 7 8 9 10 11 12 13 14 15 16 17 18 | class Singleton { /** * 构造器私有,这样该类就不会被实例化 */ private Singleton() { } private static final Singleton INSTANCE = new Singleton(); /** * 获取唯一可用的对象 * * @return 单例对象 */ public static Singleton getInstance() { return INSTANCE; }} |
2、懒汉式(线程不安全)
是否 Lazy 初始化:是
是否多线程安全:否
实现难度:易
描述:这种方式是最基本的实现方式,这种实现最大的问题就是不支持多线程。因为没有加锁 synchronized,所以严格意义上它并不算单例模式。
这种方式 lazy loading 很明显,不要求线程安全,在多线程不能正常工作。
1 2 3 4 5 6 7 8 9 10 11 12 13 | class Singleton { private static Singleton instance; private Singleton() { } public static Singleton getInstance() { if (instance == null) { instance = new Singleton(); } return instance; }} |
3、懒汉式(线程安全)
是否 Lazy 初始化:是
是否多线程安全:是
实现难度:易
描述:这种方式具备很好的 lazy loading,能够在多线程中很好的工作,但是,效率很低,99% 情况下不需要同步。
优点:第一次调用才初始化,避免内存浪费。
缺点:必须加锁 synchronized 才能保证单例,但加锁会影响效率。
getInstance() 的性能对应用程序不是很关键(该方法使用不太频繁)。
1 2 3 4 5 6 7 8 9 10 11 12 13 | class Singleton { private static Singleton instance; private Singleton() { } public static synchronized Singleton getInstance() { if (instance == null) { instance = new Singleton(); } return instance; }} |
4、DCL双重校验锁
JDK 版本:JDK1.5 起
是否 Lazy 初始化:是
是否多线程安全:是
实现难度:较复杂
描述:这种方式采用双锁机制,安全且在多线程情况下能保持高性能。
getInstance() 的性能对应用程序很关键。
1 2 3 4 5 6 7 8 9 10 11 12 13 14 15 16 17 | class Singleton { private static volatile Singleton instance; private Singleton() { } public static Singleton getInstance() { if (instance == null) { synchronized (Singleton.class){ if (instance == null){ instance = new Singleton(); } } } return instance; }} |
5、静态内部类
是否 Lazy 初始化:是
是否多线程安全:是
实现难度:一般
描述:这种方式能达到双检锁方式一样的功效,但实现更简单。对静态域使用延迟初始化,应使用这种方式而不是双检锁方式。这种方式只适用于静态域的情况,双检锁方式可在实例域需要延迟初始化时使用。
1 2 3 4 5 6 7 8 9 10 11 12 13 14 15 16 | class Singleton { /** * 静态内部类在 Singleton 类被装载时并不会立即实例化,而是在需要实例化时,调用 getInstance 方法,才会被实例化; */ public static class SingletonHolder { // 静态内部类-饿汉式 private static final Singleton INSTANCE = new Singleton(); } private Singleton() { } public static Singleton getInstance() { return SingletonHolder.INSTANCE; }} |
6、枚举
JDK 版本:JDK1.5 起
是否 Lazy 初始化:否
是否多线程安全:是
实现难度:易
描述:这种实现方式还没有被广泛采用,但这是实现单例模式的最佳方法。它更简洁,自动支持序列化机制,绝对防止多次实例化。
这种方式是 Effective Java 作者 Josh Bloch 提倡的方式,它不仅能避免多线程同步问题,而且还自动支持序列化机制,防止反序列化重新创建新的对象,绝对防止多次实例化。
不过,由于 JDK1.5 之后才加入 enum 特性,用这种方式写不免让人感觉生疏,在实际工作中,也很少用。
不能通过 reflection attack 来调用私有构造方法。
1 2 3 4 5 6 | enum Singleton { INSTANCE; public void whateverMethod() { }} |
----------------------------------通过枚举创建单例模式----------------------------
1 2 3 4 5 6 7 8 9 10 11 12 13 14 15 16 17 18 19 20 21 22 23 24 25 26 27 28 29 30 31 32 33 | public class User { //私有化构造函数 private User() { } //定义一个静态枚举类 enum SingletonEnum { //创建一个枚举对象,该对象天生为单例 INSTANCE; private User user; //私有化枚举的构造函数 SingletonEnum() { user = new User(); } public User getInstnce() { return user; } } //对外暴露一个获取User对象的静态方法 public static User getInstance() { return SingletonEnum.INSTANCE.getInstnce(); } public static void main(String[] args) { System.out.println(User.getInstance()); System.out.println(User.getInstance()); // true System.out.println(User.getInstance() == User.getInstance()); }} |
7、通过反射破坏单例(枚举除外)
1 2 3 4 5 6 7 8 9 10 11 12 13 14 15 16 17 18 19 20 21 22 23 24 25 26 27 28 29 30 31 32 33 | public class Singleton01 { public static void main(String[] args) throws ClassNotFoundException, NoSuchMethodException, InvocationTargetException, InstantiationException, IllegalAccessException { // 1、获取字节码文件对象 Class<?> clazz = Class.forName("com.zhixi.title_03_designPattern.demo_01_singleton.Singleton"); // 2、获取无参构造器 Constructor<?> c = clazz.getDeclaredConstructor(null); // 3、跳过权限检查 c.setAccessible(true); // 4、创建两个对象 Singleton s1 = (Singleton) c.newInstance(); Singleton s2 = (Singleton) c.newInstance(); // 5、通过反射,得到的两个不同对象 System.out.println(s1); System.out.println(s2); }}class Singleton { /** * 静态内部类在 Singleton 类被装载时并不会立即实例化,而是在需要实例化时,调用 getInstance 方法,才会被实例化; */ public static class SingletonHolder { // 静态内部类-饿汉式 private static final Singleton INSTANCE = new Singleton(); } private Singleton() { } public static Singleton getInstance() { return SingletonHolder.INSTANCE; }} |
如何防止反射创建对象:
1 2 3 4 5 6 7 8 9 10 11 12 13 14 15 16 17 | class Singleton { /** * 静态内部类在 Singleton 类被装载时并不会立即实例化,而是在需要实例化时,调用 getInstance 方法,才会被实例化; */ public static class SingletonHolder { // 静态内部类-饿汉式 private static final Singleton INSTANCE = new Singleton(); } private Singleton() { throw new RuntimeException("单例模式禁止反射调用"); } public static Singleton getInstance() { return SingletonHolder.INSTANCE; }} |
3.2、工厂模式(Factory Pattern)
工厂模式(Factory Pattern)是 Java 中最常用的设计模式之一。这种类型的设计模式属于创建型模式,它提供了一种创建对象的最佳方式。
在工厂模式中,我们在创建对象时不会对客户端暴露创建逻辑,并且是通过使用一个共同的接口来指向新创建的对象。
介绍
意图:定义一个创建对象的接口,让其子类自己决定实例化哪一个工厂类,工厂模式使其创建过程延迟到子类进行。
主要解决:主要解决接口选择的问题。
何时使用:我们明确地计划不同条件下创建不同实例时。
如何解决:让其子类实现工厂接口,返回的也是一个抽象的产品。
关键代码:创建过程在其子类执行。
应用实例:
1、您需要一辆汽车,可以直接从工厂里面提货,而不用去管这辆汽车是怎么做出来的,以及这个汽车里面的具体实现。
2、Hibernate 换数据库只需换方言和驱动就可以。
优点:
1、一个调用者想创建一个对象,只要知道其名称就可以了。
2、扩展性高,如果想增加一个产品,只要扩展一个工厂类就可以。
3、屏蔽产品的具体实现,调用者只关心产品的接口。
缺点:
每次增加一个产品时,都需要增加一个具体类和对象实现工厂,使得系统中类的个数成倍增加;
在一定程度上增加了系统的复杂度,同时也增加了系统具体类的依赖。这并不是什么好事。
使用场景:
1、日志记录器:记录可能记录到本地硬盘、系统事件、远程服务器等,用户可以选择记录日志到什么地方。
2、数据库访问,当用户不知道最后系统采用哪一类数据库,以及数据库可能有变化时。
3、设计一个连接服务器的框架,需要三个协议,"POP3"、"IMAP"、"HTTP",可以把这三个作为产品类,共同实现一个接口。
注意事项:
作为一种创建类模式,在任何需要生成复杂对象的地方,都可以使用工厂方法模式。
有一点需要注意的地方就是复杂对象适合使用工厂模式,而简单对象,特别是只需要通过 new 就可以完成创建的对象,无需使用工厂模式。如果使用工厂模式,就需要引入一个工厂类,会增加系统的复杂度。
实现
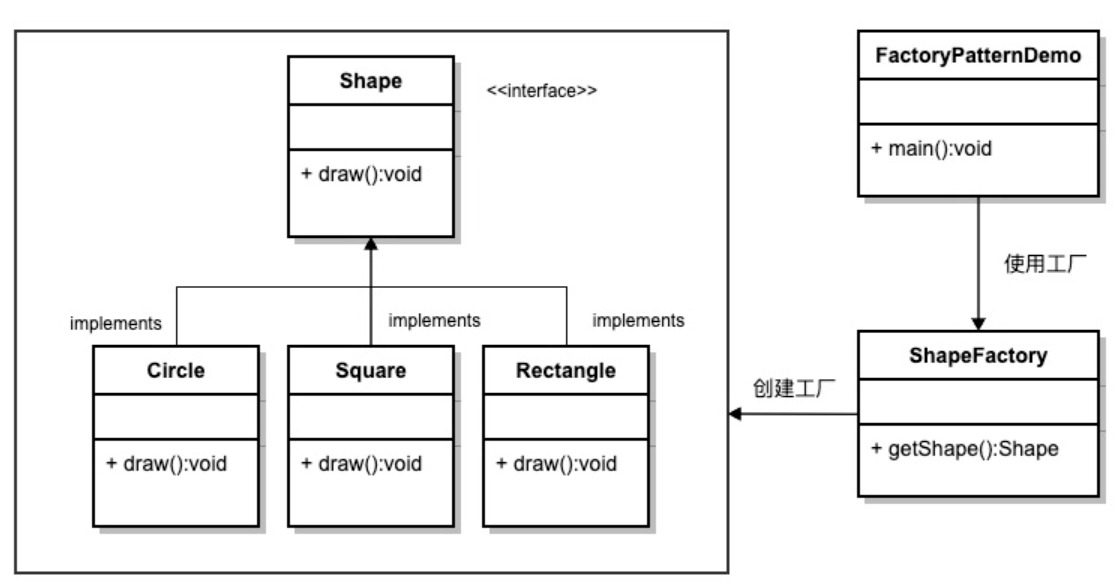
我们将创建一个 Shape 接口和实现 Shape 接口的实体类。下一步是定义工厂类 ShapeFactory。
FactoryPatternDemo 类使用 ShapeFactory 来获取 Shape 对象。它将向 ShapeFactory 传递信息(CIRCLE / RECTANGLE / SQUARE),以便获取它所需对象的类型。
1 2 3 4 5 6 7 8 9 10 | /** * @author zhixi * @description : 形状接口 */public interface Shape { /** * 画图方法 */ void draw();} |
2、创建接口实现类-具体的画图种类
1 2 3 4 5 6 7 8 9 10 11 12 13 14 15 16 17 18 19 20 21 22 23 | class Rectangle implements Shape { @Override public void draw() { System.out.println("矩形画图方法"); }}class Square implements Shape { @Override public void draw() { System.out.println("正方形画图方法"); }}class Circle implements Shape { @Override public void draw() { System.out.println("圆形画图方法"); }} |
3、创建一个工厂,生成基于给定信息的实体类的对象
1 2 3 4 5 6 7 8 9 10 11 12 13 14 15 16 17 18 19 20 21 22 23 24 25 26 | /** * 创建一个工厂,生成基于给定信息的实体类的对象。 */class ShapeFactory { /** * 使用 getShape 方法获取形状类型的对象 * @param shapeType 形状类型 * @return 形状对象 */ public Shape getShape(String shapeType) { if (shapeType == null) { return null; } if ("CIRCLE".equalsIgnoreCase(shapeType)) { return new Circle(); } else if ("RECTANGLE".equalsIgnoreCase(shapeType)) { return new Rectangle(); } else if ("SQUARE".equalsIgnoreCase(shapeType)) { return new Square(); } else { System.out.println("没有该类型的形状"); } return null; }} |
4、测试
1 2 3 4 5 6 7 8 9 10 11 12 13 14 15 16 17 | class FactoryPatternDemo { public static void main(String[] args) { ShapeFactory shapeFactory = new ShapeFactory(); //获取 Circle 的对象,并调用它的 draw 方法 Shape shape1 = shapeFactory.getShape("CIRCLE"); shape1.draw(); //获取 Rectangle 的对象,并调用它的 draw 方法 Shape shape2 = shapeFactory.getShape("RECTANGLE"); shape2.draw(); //获取 Square 的对象,并调用它的 draw 方法 Shape shape3 = shapeFactory.getShape("SQUARE"); shape3.draw(); }} |
1 2 3 | 圆形画图方法矩形画图方法正方形画图方法 |
5、优化:使用反射机制作为工厂模式的实现,解决每次增加一个产品时,都需要增加一个对象实现工厂的缺点
1 2 3 4 5 6 7 8 9 10 11 12 13 14 | /** * 使用反射机制实现工厂模式,解决每次增加一个产品时,都需要增加一个对象实现工厂的缺点 */class ShapeFactoryReflection { public static <T> T getClass(Class<? super T> clazz) { T obj = null; try { obj = (T) Class.forName(clazz.getName()).newInstance(); } catch (ClassNotFoundException | InstantiationException | IllegalAccessException e) { e.printStackTrace(); } return obj; }} |
测试:
1 2 3 | ShapeFactoryReflection.getClass(Circle.class).draw();ShapeFactoryReflection.getClass(Rectangle.class).draw();ShapeFactoryReflection.getClass(Square.class).draw(); |
3.3、原型模式(Prototype Pattern)
原型模式(Prototype Pattern)是用于创建重复的对象,同时又能保证性能。这种类型的设计模式属于创建型模式,它提供了一种创建对象的最佳方式之一。
使用场景: 1、资源优化场景。 2、类初始化需要消化非常多的资源,这个资源包括数据、硬件资源等。 3、性能和安全要求的场景。 4、通过 new 产生一个对象需要非常繁琐的数据准备或访问权限,则可以使用原型模式。 5、一个对象多个修改者的场景。 6、一个对象需要提供给其他对象访问,而且各个调用者可能都需要修改其值时,可以考虑使用原型模式拷贝多个对象供调用者使用。 7、在实际项目中,原型模式很少单独出现,一般是和工厂方法模式一起出现,通过 clone 的方法创建一个对象,然后由工厂方法提供给调用者。原型模式已经与 Java 融为浑然一体,大家可以随手拿来使用。
注意事项:与通过对一个类进行实例化来构造新对象不同的是,原型模式是通过拷贝一个现有对象生成新对象的。浅拷贝实现 Cloneable,重写,深拷贝是通过实现 Serializable 读取二进制流。
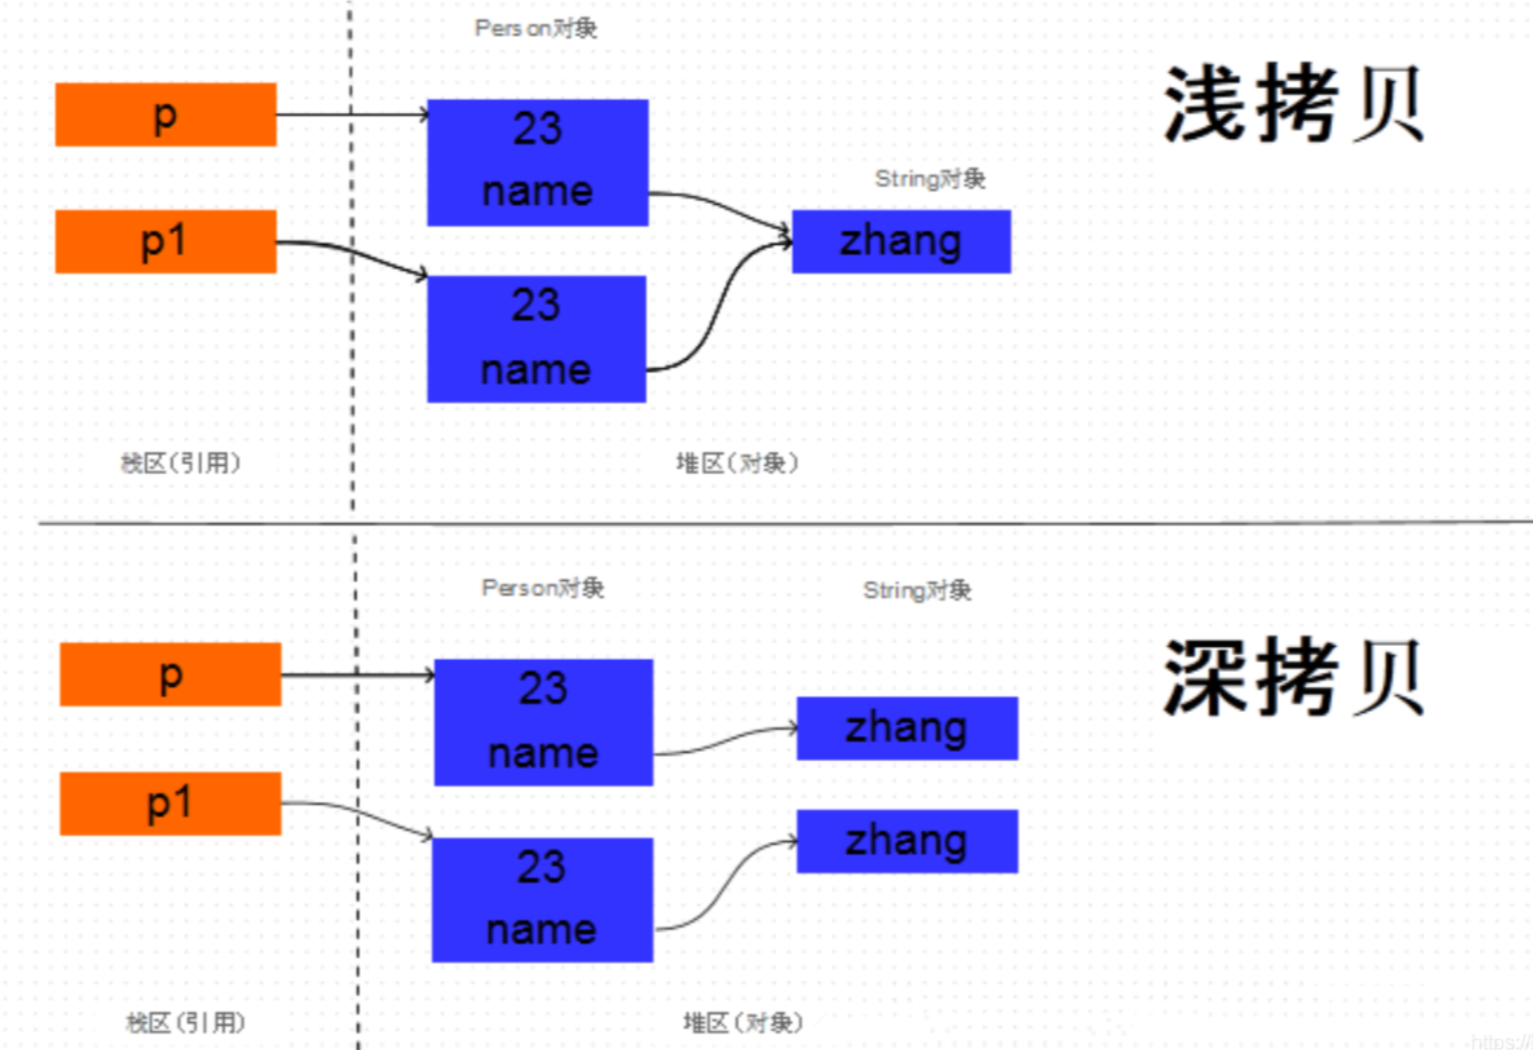
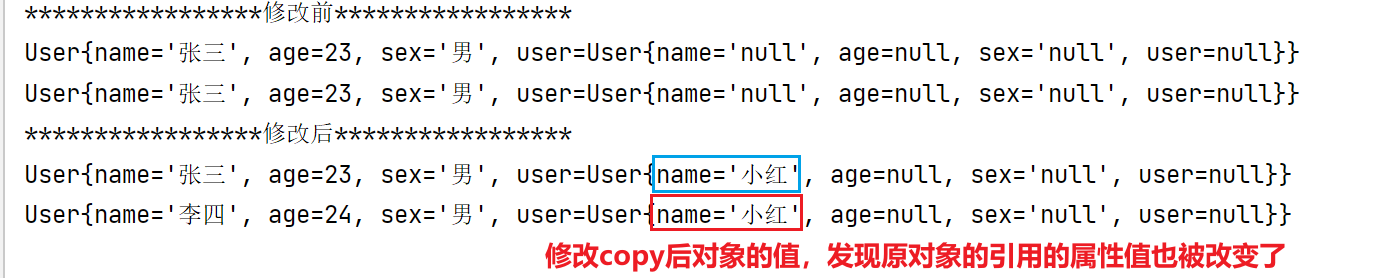
1、浅拷贝
浅拷贝:对基本类型数据进行值传递,对引用类型数据进行引用传递的拷贝
1 2 3 4 5 6 7 8 9 10 11 12 13 14 15 16 17 18 19 20 21 22 23 24 25 26 27 28 29 30 31 32 33 34 35 36 37 38 39 40 41 42 43 44 45 46 47 48 49 50 51 52 53 54 55 56 57 58 59 60 61 62 63 64 65 66 67 68 69 70 71 72 73 74 75 76 77 78 79 80 81 82 83 84 85 86 87 88 | public class PrototypeDemo { public static void main(String[] args) throws CloneNotSupportedException { // 1、创建一个对象 User user = new User(); user.setName("张三"); user.setAge(23); user.setSex("男"); user.setUser(new User()); // 2、拷贝 User userCopy = (User) user.clone(); System.out.println("*****************修改前*****************"); System.out.println(user); System.out.println(userCopy); System.out.println("*****************修改后*****************"); // 3、修改克隆后属性对象的值,会影响克隆前对象的属性值 userCopy.setName("李四"); userCopy.setAge(24); userCopy.getUser().setName("小红"); System.out.println(user); System.out.println(userCopy); }}class User implements Cloneable { private String name; private Integer age; private String sex; /** * 好友 */ private User user; public User getUser() { return user; } public void setUser(User user) { this.user = user; } @Override public String toString() { return "User{" + "name='" + name + '\'' + ", age=" + age + ", sex='" + sex + '\'' + ", user=" + user + '}'; } /** * 克隆该实例,使用默认的clone方法来完成 * * @return 对象克隆 */ @Override protected Object clone() throws CloneNotSupportedException { return super.clone(); } public String getName() { return name; } public void setName(String name) { this.name = name; } public Integer getAge() { return age; } public void setAge(Integer age) { this.age = age; } public String getSex() { return sex; } public void setSex(String sex) { this.sex = sex; }} |
输出:
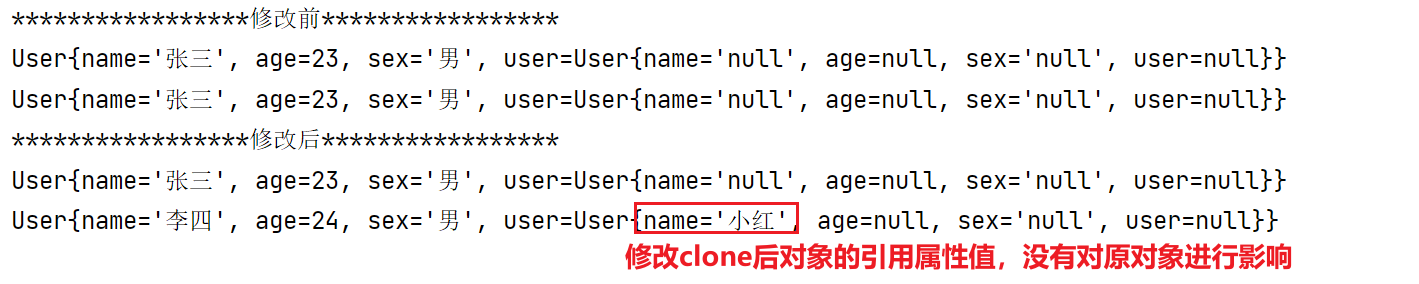
2、深拷贝实现方法1:实现Cloneable
修改clone方法,对已有的类进行改造时,需要修改其源代码,违背了ocp原则,这点需要注意;
1 2 3 4 5 6 7 8 9 10 11 12 13 14 | /** * 克隆该实例 * * @return 对象克隆 */@Overrideprotected Object clone() throws CloneNotSupportedException { User clone = (User) super.clone(); if (this.user != null) { // 对属性进行二次clone clone.user = (User) this.user.clone(); } return clone;} |
测试:
3、深拷贝实现方法2:编写自定义方法,使用流
1 2 3 4 5 6 7 8 9 10 11 12 13 14 15 16 17 18 19 20 21 22 23 24 25 26 27 28 29 30 31 32 33 34 35 36 37 38 39 40 41 42 43 44 45 46 47 48 49 50 51 52 53 54 55 56 57 58 59 60 61 62 63 64 65 66 67 68 69 70 71 72 73 74 75 76 77 78 79 80 81 82 83 84 85 86 87 88 89 90 91 92 93 94 95 96 97 98 99 100 101 102 103 104 105 106 107 108 109 110 111 112 113 114 115 116 117 118 119 120 121 122 123 124 125 126 127 | public class PrototypeDemo { public static void main(String[] args) throws CloneNotSupportedException, IOException { // 1、创建一个对象 User user = new User(); user.setName("张三"); user.setAge(23); user.setSex("男"); user.setUser(new User()); // 2、拷贝 User userCopy = (User) user.deepClone(); System.out.println("*****************修改前*****************"); System.out.println(user); System.out.println(userCopy); System.out.println("*****************修改后*****************"); // 3、修改克隆后属性对象的值,会影响克隆前对象的属性值 userCopy.setName("李四"); userCopy.setAge(24); userCopy.getUser().setName("小红"); System.out.println(user); System.out.println(userCopy); }}class User implements Cloneable, Serializable { private static final long serialVersionUID = 2L; private String name; private Integer age; private String sex; /** * 好友 */ private User user; public User getUser() { return user; } public void setUser(User user) { this.user = user; } @Override public String toString() { return "User{" + "name='" + name + '\'' + ", age=" + age + ", sex='" + sex + '\'' + ", user=" + user + '}'; } /** * 克隆该实例 * * @return 对象克隆 */ @Override protected Object clone() throws CloneNotSupportedException { User clone = (User) super.clone(); if (this.user != null) { // 对属性进行二次clone clone.user = (User) this.user.clone(); } return clone; } public String getName() { return name; } public void setName(String name) { this.name = name; } public Integer getAge() { return age; } public void setAge(Integer age) { this.age = age; } public String getSex() { return sex; } public void setSex(String sex) { this.sex = sex; } //方式二 public Object deepClone() { //创建流对象 ByteArrayOutputStream bos = null; ByteArrayInputStream bis = null; ObjectOutputStream oos = null; ObjectInputStream ois = null; try { //序列化 bos = new ByteArrayOutputStream(); oos = new ObjectOutputStream(bos); oos.writeObject(this);//当前这个对象以对象流的方式输出 //反序列化 bis = new ByteArrayInputStream(bos.toByteArray()); ois = new ObjectInputStream(bis); return (User) ois.readObject(); } catch (Exception e) { e.printStackTrace(); return null; } finally { try { bos.close(); oos.close(); bis.close(); ois.close(); } catch (IOException e) { e.printStackTrace(); } } }} |
输出结果:

原型模式的注意事项和细节
- 1)创建新的对象比较复杂时,可以利用原型模式简化对象的创建过程,同时也能够提高效率
- 2)不用重新初始化对象,而是动态地获得对象运行时的状态
- 3)如果原始对象发生变化(增加或者减少属性),其它克隆对象也会发生相应的变化,无需修改代码
- 4)在实现深克隆的时候可能需要比较复杂的代码
- 缺点:需要为每一个类配备一个克隆方法,这对全新的类来说不是很难,但对已有的类进行改造时,需要修改其源代码,违背了 ocp 原则,这点需要注意。
3.4、建造者模式(Builder Pattern)
https://www.cnblogs.com/zhangzhixi/p/16405436.html
3.5、适配器模式(AdaPter Pattern)
适配器模式(Adapter Pattern)是作为两个不兼容的接口之间的桥梁。这种类型的设计模式属于结构型模式,它结合了两个独立接口的功能。
通过下面的实例来演示适配器模式的使用。其中,音频播放器设备只能播放 mp3 文件,通过使用一个更高级的音频播放器来播放 vlc 和 mp4 文件。
介绍
意图:将一个类的接口转换成客户希望的另外一个接口。适配器模式使得原本由于接口不兼容而不能一起工作的那些类可以一起工作。
应用实例:
1、美国电器 110V,中国 220V,就要有一个适配器将 110V 转化为 220V。
2、JAVA JDK 1.1 提供了 Enumeration 接口,而在 1.2 中提供了 Iterator 接口,想要使用 1.2 的 JDK,则要将以前系统的 Enumeration 接口转化为 Iterator 接口,这时就需要适配器模式。
3、在 LINUX 上运行 WINDOWS 程序。
4、JAVA 中的 jdbc
优点: 1、可以让任何两个没有关联的类一起运行。 2、提高了类的复用。 3、增加了类的透明度。 4、灵活性好。
缺点:
1、过多地使用适配器,会让系统非常零乱,不易整体进行把握。比如,明明看到调用的是 A 接口,其实内部被适配成了 B 接口的实现,一个系统如果太多出现这种情况,无异于一场灾难。因此如果不是很有必要,可以不使用适配器,而是直接对系统进行重构。
2.由于 JAVA 至多继承一个类,所以至多只能适配一个适配者类,而且目标类必须是抽象类。
使用场景:有动机地修改一个正常运行的系统的接口,这时应该考虑使用适配器模式。
注意事项:适配器不是在详细设计时添加的,而是解决正在服役的项目的问题。
实现
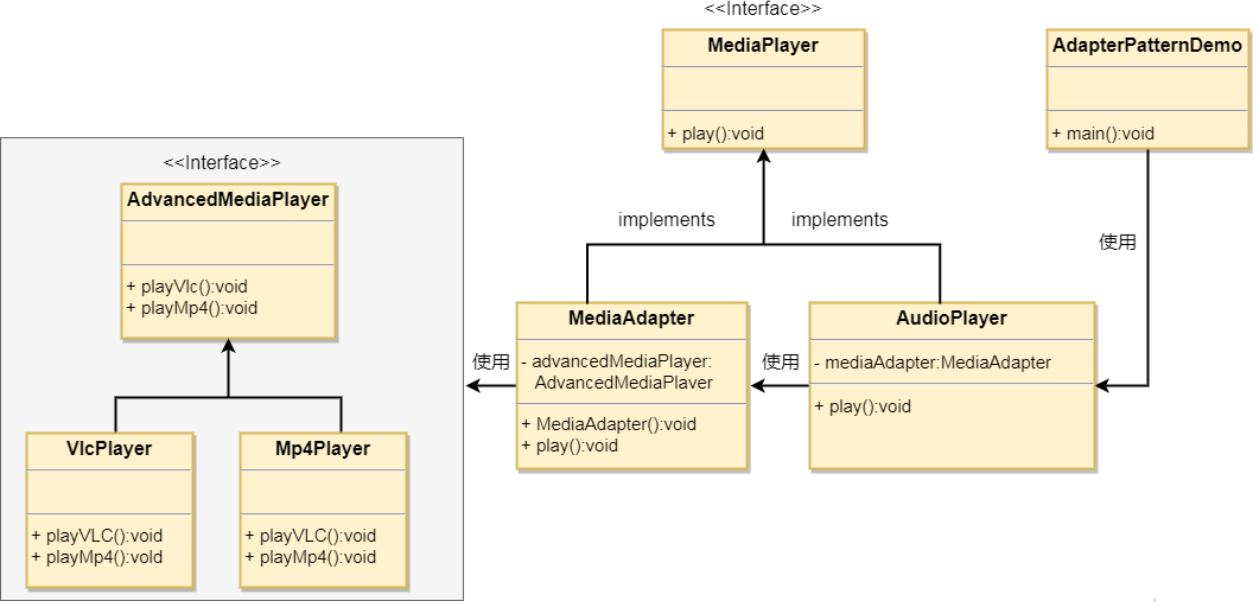
我们有一个 MediaPlayer (媒体播放器)接口和一个实现了 MediaPlayer 接口的实体类 AudioPlayer(音频播放器)。默认情况下,AudioPlayer 可以播放 mp3 格式的音频文件。
我们还有另一个接口 AdvancedMediaPlayer (高级播放器)和实现了 AdvancedMediaPlayer 接口的实体类。该类可以播放 vlc 和 mp4 格式的文件。
我们想要让 AudioPlayer 播放其他格式的音频文件。为了实现这个功能,我们需要创建一个实现了 MediaPlayer 接口的适配器类 MediaAdapter(播放器适配器),并使用 AdvancedMediaPlayer对象来播放所需的格式。
AudioPlayer使用适配器类 MediaAdapter传递所需的音频类型,不需要知道能播放所需格式音频的实际类。AdapterPatternDemo 类使用 AudioPlayer 类来播放各种格式。
步骤
1、媒体播放器和更高级的媒体播放器接口
1 2 3 4 5 6 7 8 9 10 11 12 13 | /** * 媒体播放器接口,可以播放媒体文件 * @author zhixi */public interface IMediaPlayer { /** * 播放音视频的方法 * @param audioType 音频类型:mp3、mp4、avl…… * @param fileName 媒体文件名 */ void play(String audioType, String fileName);} |
1 2 3 4 5 6 7 8 9 10 11 12 13 14 15 16 17 18 19 20 | /** * 高级播放器扩展接口,支持vlc、mp4格式 * * @author zhixi */public interface IAdvancedMediaPlayer { /** * 播放vlc格式的内容 * * @param fileName 文件名 */ void playVlc(String fileName); /** * 播放mp4格式的内容 * * @param fileName 文件名 */ void playMp4(String fileName);} |
2、高级媒体播放器接口实现类
1 2 3 4 5 6 7 8 9 10 11 12 13 14 15 16 17 | /** * vlc播放器类 * * @author zhixi */public class VlcPlayer implements IAdvancedMediaPlayer { @Override public void playVlc(String fileName) { System.out.println("Playing vlc file. Name: " + fileName); } @Override public void playMp4(String fileName) { //什么也不做 }} |
1 2 3 4 5 6 7 8 9 10 11 12 13 14 15 16 17 | /** * mp4播放器类 * * @author zhixi */public class Mp4Player implements IAdvancedMediaPlayer { @Override public void playVlc(String fileName) { //什么也不做 } @Override public void playMp4(String fileName) { System.out.println("Playing mp4 file. Name: " + fileName); }} |
3、适配器类
1 2 3 4 5 6 7 8 9 10 11 12 13 14 15 16 17 18 19 20 21 22 23 24 25 26 27 28 29 | /** * 媒体文件播放,适配器类 * @author zhixi */public class MediaAdapter implements IMediaPlayer { IAdvancedMediaPlayer advancedMusicPlayer; /** * 构造器,传入具体的播放器类型 * @param audioType 播放器类型 */ public MediaAdapter(String audioType) { if ("vlc".equalsIgnoreCase(audioType)) { advancedMusicPlayer = new VlcPlayer(); } else if ("mp4".equalsIgnoreCase(audioType)) { advancedMusicPlayer = new Mp4Player(); } } @Override public void play(String audioType, String fileName) { if ("vlc".equalsIgnoreCase(audioType)) { advancedMusicPlayer.playVlc(fileName); } else if ("mp4".equalsIgnoreCase(audioType)) { advancedMusicPlayer.playMp4(fileName); } }} |
4、播放器类
1 2 3 4 5 6 7 8 9 10 11 12 13 14 15 16 17 18 19 20 21 22 23 24 25 26 | /** * 播放器类 * * @author zhixi */public class AudioPlayer implements IMediaPlayer { MediaAdapter mediaAdapter; @Override public void play(String audioType, String fileName) { //播放 mp3 音乐文件的内置支持 if ("mp3".equalsIgnoreCase(audioType)) { System.out.println("Playing mp3 file. Name: " + fileName); } //mediaAdapter 提供了播放其他文件格式的支持 else if ("vlc".equalsIgnoreCase(audioType) || "mp4".equalsIgnoreCase(audioType)) { mediaAdapter = new MediaAdapter(audioType); mediaAdapter.play(audioType, fileName); } else { System.out.println("Invalid media. " + audioType + " format not supported"); } }} |
5、测试
1 2 3 4 5 6 7 8 9 10 11 | public class AdapterPatternDemo { public static void main(String[] args) { // 1、创建播放器 AudioPlayer audioPlayer = new AudioPlayer(); // 2、传入具体的播放器类型和文件名称 audioPlayer.play("mp3", "beyond the horizon.mp3"); audioPlayer.play("mp4", "alone.mp4"); audioPlayer.play("vlc", "far far away.vlc"); audioPlayer.play("avi", "mind me.avi"); }} |

3.6、桥接模式(BridgePattern)
桥接(Bridge)是用于把抽象化与实现化解耦,使得二者可以独立变化。
这种类型的设计模式属于结构型模式,它通过提供抽象化和实现化之间的桥接结构,来实现二者的解耦。
这种模式涉及到一个作为桥接的接口,使得实体类的功能独立于接口实现类。这两种类型的类可被结构化改变而互不影响。
我们通过下面的实例来演示桥接模式(Bridge Pattern)的用法。其中,可以使用相同的抽象类方法但是不同的桥接实现类,来画出不同颜色的圆。
实现
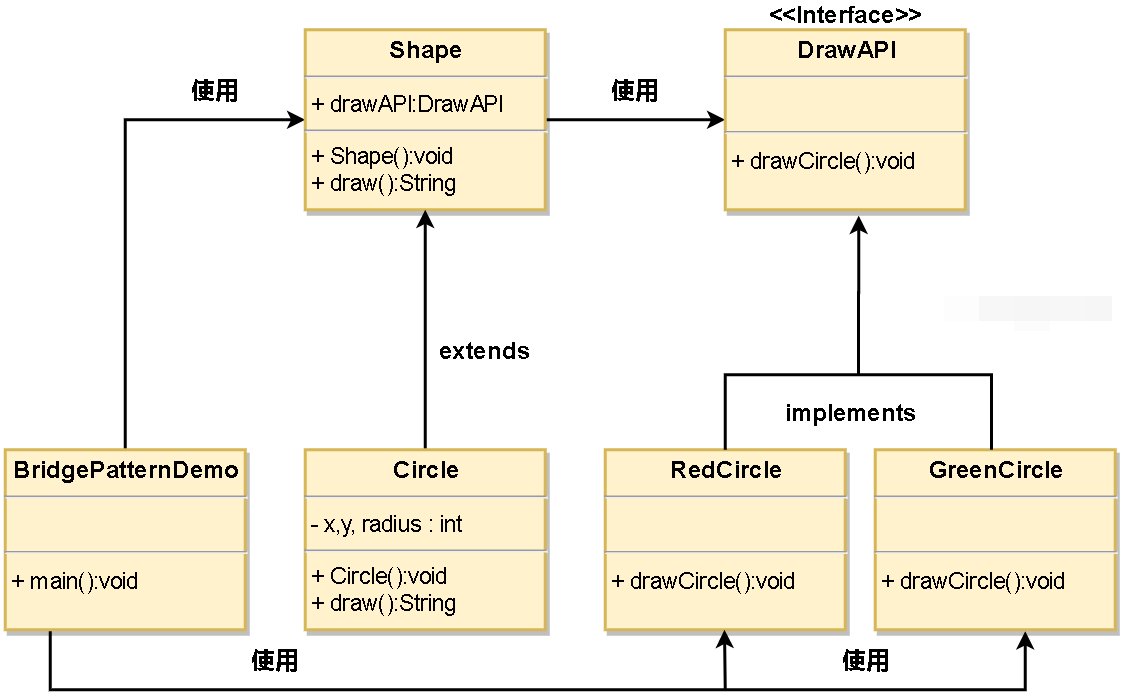
我们有一个作为桥接实现的 DrawAPI 接口和实现了 DrawAPI 接口的实体类 RedCircle、GreenCircle。
Shape 是一个抽象类,将使用 DrawAPI 的对象。BridgePatternDemo 类使用 Shape 类来画出不同颜色的圆。
实现步骤
1、创建桥接接口
1 2 3 4 5 6 7 8 9 10 11 12 13 | /** * 画图API */public interface DrawAPI { /** * 绘制圆形的API * @param radius 半径 * @param x x * @param y y */ void drawCircle(int radius, int x, int y);} |
2、实现接口的实现类:画什么颜色的圆
1 2 3 4 5 6 7 8 9 10 11 12 | /** * 画红色的圆 * * @author zhixi */public class RedCircle implements DrawAPI { @Override public void drawCircle(int radius, int x, int y) { System.out.println("画圈[ 颜色: 红色, 半径: " + radius + ", x: " + x + ", " + y + "]"); }} |
1 2 3 4 5 6 7 8 9 10 11 | /** * 画绿色的圆 * * @author zhixi */public class GreenCircle implements DrawAPI { @Override public void drawCircle(int radius, int x, int y) { System.out.println("画圈[ 颜色: 绿色, 半径: " + radius + ", x: " + x + ", " + y + "]"); }} |
3、创建抽象类:聚合画图API接口
1 2 3 4 5 6 7 8 9 10 11 12 13 14 15 16 17 18 19 20 21 | /** * 形状抽象类 * * @author zhixi */public abstract class Shape { /** * 画图抽象类 */ protected DrawAPI drawApi; public Shape(DrawAPI drawApi) { this.drawApi = drawApi; } /** * 画画的方法 */ public abstract void draw();} |
4、抽象类的实现类:画圈类
1 2 3 4 5 6 7 8 9 10 11 12 13 14 15 16 17 18 19 20 | /** * 圆圈方法,给属性初始化赋值 */public class Circle extends Shape { private int x; private int y; private int radius; public Circle(int x, int y, int radius, DrawAPI drawApi) { super(drawApi); this.x = x; this.y = y; this.radius = radius; } public void draw() { drawApi.drawCircle(radius, x, y); }} |
5、测试
1 2 3 4 5 6 7 8 9 | public class BridgePatternDemo { public static void main(String[] args) { Shape redCircle = new Circle(100, 100, 10, new RedCircle()); Shape greenCircle = new Circle(100, 100, 10, new GreenCircle()); redCircle.draw(); greenCircle.draw(); }} |

3.7、装饰者模式(Decorator Pattern)
装饰器模式(Decorator Pattern)允许向一个现有的对象添加新的功能,同时又不改变其结构。这种类型的设计模式属于结构型模式,它是作为现有的类的一个包装。
这种模式创建了一个装饰类,用来包装原有的类,并在保持类方法签名完整性的前提下,提供了额外的功能。
https://www.cnblogs.com/zhangzhixi/p/13879391.html
3.8、组合模式(Composite Pattern)
组合模式(Composite Pattern),又叫部分整体模式,是用于把一组相似的对象当作一个单一的对象。
组合模式依据树形结构来组合对象,用来表示部分以及整体层次。这种类型的设计模式属于结构型模式,它创建了对象组的树形结构。
这种模式创建了一个包含自己对象组的类。该类提供了修改相同对象组的方式。
以下实例演示了一个组织中员工的层次结构。
介绍
意图:将对象组合成树形结构以表示"部分-整体"的层次结构。组合模式使得用户对单个对象和组合对象的使用具有一致性。
主要解决:它在我们树型结构的问题中,模糊了简单元素和复杂元素的概念,客户程序可以像处理简单元素一样来处理复杂元素,从而使得客户程序与复杂元素的内部结构解耦。
何时使用: 1、您想表示对象的部分-整体层次结构(树形结构)。 2、您希望用户忽略组合对象与单个对象的不同,用户将统一地使用组合结构中的所有对象。
如何解决:树枝和叶子实现统一接口,树枝内部组合该接口。
关键代码:树枝内部组合该接口,并且含有内部属性 List,里面放 Component。
应用实例: 1、算术表达式包括操作数、操作符和另一个操作数,其中,另一个操作数也可以是操作数、操作符和另一个操作数。
优点: 1、高层模块调用简单。 2、节点自由增加。
缺点:在使用组合模式时,其叶子和树枝的声明都是实现类,而不是接口,违反了依赖倒置原则。
使用场景:部分、整体场景,如树形菜单,文件、文件夹的管理。
注意事项:定义时为具体类。

实现
1、 创建 Employee(雇员) 类,该类带有 Employee 对象的列表。
1 2 3 4 5 6 7 8 9 10 11 12 13 14 15 16 17 18 19 20 21 22 23 24 25 26 27 28 29 30 31 32 33 34 35 36 37 38 39 40 41 42 43 44 45 46 47 48 49 50 51 52 53 54 55 56 57 58 59 60 61 62 63 64 65 66 67 68 69 70 71 72 73 74 75 76 77 78 79 80 81 82 83 84 85 86 87 88 89 90 91 | import java.util.ArrayList;import java.util.List;/** * @author zhixi */public class Employee { /** * 雇员姓名 */ private final String name; /** * 雇员部门 */ private final String dept; /** * 雇员薪水 */ private final int salary; /** * 雇员下属集合 */ private final List<Employee> subordinates; public Employee(String name, String dept, int salary) { this.name = name; this.dept = dept; this.salary = salary; subordinates = new ArrayList<>(); } /** * 添加下属 * * @param e 雇员 */ public void add(Employee e) { subordinates.add(e); } /** * 移除下属 * * @param e 雇员 */ public void remove(Employee e) { subordinates.remove(e); } /** * 获取所有下属雇员信息 * * @return 雇员集合 */ public List<Employee> getSubordinates() { return subordinates; } /** * 打印下面所有雇员信息 */ public void printComposite() { printComposite(0); } /** * 打印下面所有雇员信息,并根据层级添加缩进 * * @param level 缩进层级 */ private void printComposite(int level) { StringBuilder indent = new StringBuilder(); for (int i = 0; i < level; i++) { indent.append("\t"); } System.out.println(indent.toString() + this); for (Employee subordinate : subordinates) { subordinate.printComposite(level + 1); } } public String toString() { return ("Employee :[ Name : " + name + ", dept : " + dept + ", salary :" + salary + " ]"); }} |
2、使用 Employee 类来创建和打印员工的层次结构。
1 2 3 4 5 6 7 8 9 10 11 12 13 14 15 16 17 18 19 20 21 22 23 24 25 26 27 | public class CompositePatternDemo { public static void main(String[] args) { Employee ceo = new Employee("李强", "CEO", 30000); Employee headSales = new Employee("张三", "销售主管", 20000); Employee headMarketing = new Employee("李四", "人事主管", 20000); Employee salesExecutive1 = new Employee("田七", "销售", 10000); Employee salesExecutive2 = new Employee("孙八", "销售", 10000); Employee clerk1 = new Employee("王五", "招聘客服", 10000); Employee clerk2 = new Employee("赵六", "招聘客服", 10000); ceo.add(headSales); ceo.add(headMarketing); headSales.add(salesExecutive1); headSales.add(salesExecutive2); headMarketing.add(clerk1); headMarketing.add(clerk2); System.out.println("-------------------"); // 按照层级打印组织下的所有员工 ceo.printComposite(); }} |
3、输出
1 2 3 4 5 6 7 | Employee :[ Name : 李强, dept : CEO, salary :30000 ] Employee :[ Name : 张三, dept : 销售主管, salary :20000 ] Employee :[ Name : 田七, dept : 销售, salary :10000 ] Employee :[ Name : 孙八, dept : 销售, salary :10000 ] Employee :[ Name : 李四, dept : 人事主管, salary :20000 ] Employee :[ Name : 王五, dept : 招聘客服, salary :10000 ] Employee :[ Name : 赵六, dept : 招聘客服, salary :10000 ] |
3.9、外观模式(Facade Pattern)
外观模式(Facade Pattern)隐藏系统的复杂性,并向客户端提供了一个客户端可以访问系统的接口。
这种类型的设计模式属于结构型模式,它向现有的系统添加一个接口,来隐藏系统的复杂性。
这种模式涉及到一个单一的类,该类提供了客户端请求的简化方法和对现有系统类方法的委托调用。
介绍
意图:为子系统中的一组接口提供一个一致的界面,外观模式定义了一个高层接口,这个接口使得这一子系统更加容易使用。
主要解决:降低访问复杂系统的内部子系统时的复杂度,简化客户端之间的接口。
何时使用: 1、客户端不需要知道系统内部的复杂联系,整个系统只需提供一个"接待员"即可。 2、定义系统的入口。
如何解决:客户端不与系统耦合,外观类与系统耦合。
关键代码:在客户端和复杂系统之间再加一层,这一层将调用顺序、依赖关系等处理好。
应用实例: 1、去医院看病,可能要去挂号、门诊、划价、取药,让患者或患者家属觉得很复杂,如果有提供接待人员,只让接待人员来处理,就很方便。 2、JAVA 的三层开发模式。
优点: 1、减少系统相互依赖。 2、提高灵活性。 3、提高了安全性。
缺点:不符合开闭原则,如果要改东西很麻烦,继承重写都不合适。
使用场景: 1、为复杂的模块或子系统提供外界访问的模块。 2、子系统相对独立。 3、预防低水平人员带来的风险。
注意事项:在层次化结构中,可以使用外观模式定义系统中每一层的入口。
案例
电脑整机是 CPU、内存、硬盘的外观。有了外观以后,启动电脑和关闭电脑都简化了。
直接 new 一个电脑。
在 new 电脑的同时把 cpu、内存、硬盘都初始化好并且接好线。
对外暴露方法(启动电脑,关闭电脑)。
启动电脑(按一下电源键):启动CPU、启动内存、启动硬盘
关闭电脑(按一下电源键):关闭硬盘、关闭内存、关闭CPU
1 2 3 4 5 6 7 8 9 10 11 12 13 14 15 16 17 18 19 20 21 22 23 24 25 26 27 28 29 30 31 32 33 34 35 36 37 38 39 40 41 42 43 44 45 46 47 48 49 50 51 52 53 54 55 56 57 58 59 60 61 62 63 64 65 66 67 68 69 70 71 72 73 74 75 76 77 78 79 80 81 82 83 84 85 86 87 88 89 90 91 92 93 94 95 96 97 98 99 100 101 102 103 104 105 106 107 108 109 110 111 112 113 114 115 116 117 118 119 120 121 122 123 124 125 126 127 128 129 130 131 132 133 134 135 136 137 138 139 140 141 142 | /** * 电脑接口 */public interface Computer { /** * 启动电脑 */ void open(); /** * 关闭电脑 */ void close();}/** * CPU类 */class Cpu implements Computer { @Override public void open() { System.out.println("启动CPU"); } @Override public void close() { System.out.println("关闭CPU"); }}/** * 内存类 */class Ddr implements Computer { @Override public void open() { System.out.println("启动内存"); } @Override public void close() { System.out.println("关闭内存"); }}/** * 硬盘类 */class Ssd implements Computer { @Override public void open() { System.out.println("启动硬盘"); } @Override public void close() { System.out.println("关闭硬盘"); }}/** * 外观类 */class Facade { private Computer cpu; private Computer ddr; private Computer ssd; /** * 启动电脑 */ public void onComputer() { onCPU(); onDDR(); onSSD(); } /** * 关闭电脑 */ public void offComputer() { offCPU(); offDDR(); offSSD(); } /** * 启动cpu */ public void onCPU() { cpu = new Cpu(); cpu.open(); } /** * 启动内存 */ public void onDDR() { ddr = new Ddr(); ddr.open(); } /** * 启动硬盘 */ public void onSSD() { ssd = new Ssd(); ssd.open(); } /** * 关闭硬盘 */ private void offSSD() { ssd.close(); } /** * 关闭内存 */ private void offDDR() { ddr.close(); } /** * 关闭cpu */ private void offCPU() { cpu.close(); }}class FacadeTest34 { public static void main(String[] args) { Facade facade = new Facade(); facade.onComputer(); System.out.println("电脑正在使用中..."); facade.offComputer(); System.out.println("电脑已关闭"); }} |
输出结果:
1 2 3 4 5 6 7 8 | 启动CPU启动内存启动硬盘电脑正在使用中...关闭CPU关闭内存关闭硬盘电脑已关闭 |
3.10、 享元模式(Flyweight Pattern)
主要用于减少创建对象的数量,以减少内存占用和提高性能。这种类型的设计模式属于结构型模式,它提供了减少对象数量从而改善应用所需的对象结构的方式。
以展示网站项目引入享元模式
小型的外包项目,给客户A做一个产品展示网站,客户A的朋友感觉效果不错,也希望做这样的产品展示网站,但是要求都有些不同:
- 有客户要求以新闻的形式发布
- 有客户人要求以博客的形式发布
- 有客户希望以微信公众号的形式发布
传统思路
直接复制粘贴一份,然后根据客户不同要求,进行定制修改
给每个网站租用一个空间
问题分析
需要的网站结构相似度很高,而且都不是高访问量网站,如果分成多个虚拟空间来处理,相当于一个相同网站的实例对象很多,造成服务器的资源浪费。
解决思路
整合到一个网站中,共享其相关的代码和数据,对于硬盘、内存、CPU、数据库空间等服务器资源都可以达成共享,减少服务器资源。
对于代码来说,由于是一份实例,维护和扩展都更加容易。
上面的解决思路就可以使用 享元模式 来解决。
介绍
- 1)享元模式(Flyweight Pattern)也叫蝇量模式:运用共享技术有效地支持大量细粒度的对象
- 2)常用于系统底层开发,解决系统的性能问题。像数据库连接池,里面都是创建好的连接对象,在这些连接对象中有我们需要的则直接拿来用,避免重新创建,如果没有我们需要的,则创建一个。
- 3)享元模式能够解决重复对象的内存浪费的问题,当系统中有大量相似对象,需要缓冲池时。不需总是创建新对象,可以从缓冲池里拿。这样可以降低系统内存,同时提高效率
- 4)享元模式经典的应用场景就是池技术了,String 常量池、数据库连接池、缓冲池等等都是享元模式的应用。
先来认识两个概念:
- 内部状态:在享元对象内部不随外界环境改变而改变的共享部分。
- 外部状态:随着环境的改变而改变,不能够共享的状态就是外部状态。
涉及到的角色:
- 抽象享元(Flyweight):抽象的享元角色,它是产品的抽象类,同时定义出对象的外部状态和内部状态的接口或实现
- 具体享元(ConcreteFlyweight):实现抽象享元角色所规定出的接口。
- 复合享元(ConcreteCompositeFlyweight) :不可共享的角色,一般不会出现在享元工厂
- 享元工厂(FlyweightFactory)角色 :负责创建和管理享元角色。必须保证享元对象可以被系统适当地共享,当一个客户端对象调用一个享元对象的时候,享元工厂角色会检查系统中是否已经有一个符合要求的享元对象。如果已经有了,享元工厂角色就应当提供这个已有的享元对象,如果系统中没有一个适当的享元对象的话,享元工厂角色就应当创建一个合适的享元对象。
实现
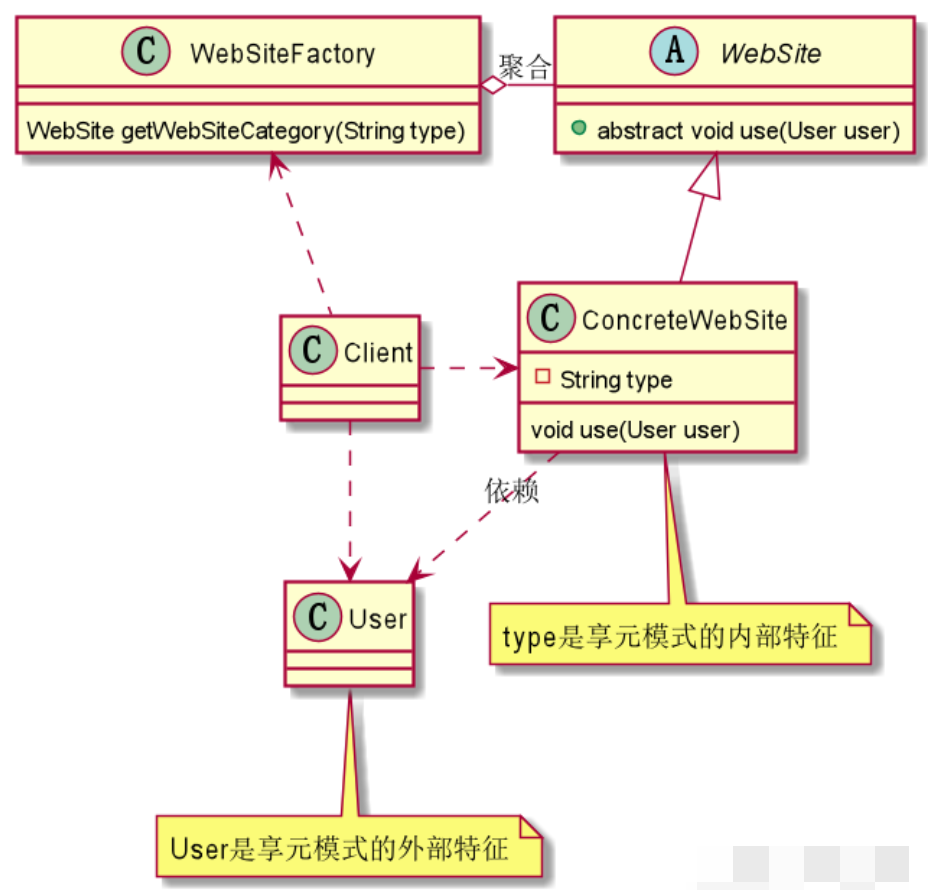
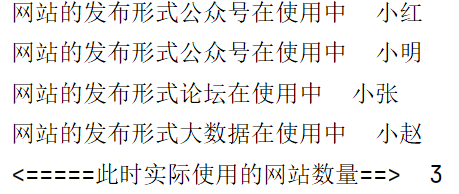
1 2 3 4 5 6 7 8 9 10 11 12 13 14 15 16 17 18 19 20 21 22 23 24 25 26 27 28 29 30 31 32 33 34 35 36 37 38 39 40 41 42 43 44 45 46 47 48 49 50 51 52 53 54 55 56 57 58 59 60 61 62 63 64 65 66 67 68 69 70 71 72 73 74 75 76 77 78 79 80 81 82 83 84 85 86 87 88 89 90 91 92 93 94 95 96 97 98 99 100 101 102 103 104 105 106 107 108 109 | import java.util.HashMap;/** * 网站抽象类 */public abstract class WebSite { /** * 使用网站的方法 * * @param user 使用的用户 */ public abstract void use(User user);}/** * 使用网站的用户 */class User { private String name; public User(String name) { this.name = name; } public String getName() { return name; } public void setName(String name) { this.name = name; }}/** * 抽象类的实现:具体的网站 */class ConcreteWebSite extends WebSite { /** * 共享的部分:网站的发布形式 */ private String type = ""; public ConcreteWebSite(String type) { this.type = type; } @Override public void use(User user) { System.out.println("网站的发布形式" + type + "在使用中" + " " + user.getName()); }}/** * 网站工厂类 */class WebsiteFactory { /** * 将享元抽象类聚合过来; */ private final HashMap<String, ConcreteWebSite> pool = new HashMap<>(); /** * 用户使用时,缓冲池若没有就创建; * * @param type 网站的发布形式 * @return {@link WebSite} */ public WebSite getWebSiteCategory(String type) { if (!pool.containsKey(type)) { pool.put(type, new ConcreteWebSite(type)); } return pool.get(type); } /** * 统计缓冲池的对象数量; * * @return 缓冲池的对象数量; */ public int getWebsiteCount() { return pool.size(); }}class Client { public static void main(String[] args) { WebsiteFactory factory = new WebsiteFactory(); //用户1需要公众号网站 WebSite webSite1 = factory.getWebSiteCategory("公众号"); webSite1.use(new User("小红")); //用户2需要公众号网站; WebSite webSite2 = factory.getWebSiteCategory("公众号"); webSite2.use(new User("小明")); //用户3需要论坛网站; WebSite webSite3 = factory.getWebSiteCategory("论坛"); webSite3.use(new User("小张")); //用户4需要大数据网站; WebSite webSite4 = factory.getWebSiteCategory("大数据"); webSite4.use(new User("小赵")); System.out.println("<=====此时实际使用的网站数量==> " + factory.getWebsiteCount()); }} |
Integer中使用享元模式示例
Integer类加载的时候创建了一个Integer类型的缓存数组。
这个缓存在一定范围内(-128至127或更高,可根据系统属性"java.lang.Integer.IntegerCache.high"配置)的整数都有缓存)
在创建或查找这些整数的Integer对象时可以直接从缓存中获取,避免了频繁的对象创建和销毁,从而提高性能。最后,它添加了一个断言,保证缓存范围至少达到了-128至127。
1 2 3 4 5 6 7 8 9 10 11 12 13 14 15 16 17 18 19 20 21 22 23 24 25 | static { // high value may be configured by property int h = 127; String integerCacheHighPropValue = sun.misc.VM.getSavedProperty("java.lang.Integer.IntegerCache.high"); if (integerCacheHighPropValue != null) { try { int i = parseInt(integerCacheHighPropValue); i = Math.max(i, 127); // Maximum array size is Integer.MAX_VALUE h = Math.min(i, Integer.MAX_VALUE - (-low) -1); } catch( NumberFormatException nfe) { // If the property cannot be parsed into an int, ignore it. } } high = h; cache = new Integer[(high - low) + 1]; int j = low; for(int k = 0; k < cache.length; k++) cache[k] = new Integer(j++); // range [-128, 127] must be interned (JLS7 5.1.7) assert IntegerCache.high >= 127;} |
从valueOf方法中可以看到,这个方法会返回一个表示指定整数的Integer实例。
如果传入的整数i在IntegerCache的范围内(默认是-128至127,但也可以通过系统属性进行配置),那么方法会从IntegerCache的缓存数组中取出对应的Integer对象返回。这样做可以避免频繁地创建和销毁对象,从而提高性能。
如果传入的整数i超出了IntegerCache的范围,那么就会通过new操作符创建一个新的Integer对象返回。
这个方法提供了一种对象复用的方式,使得在某些场景下可以提高运行效率和节省内存。
1 2 3 4 5 | public static Integer valueOf(int i) { if (i >= IntegerCache.low && i <= IntegerCache.high) return IntegerCache.cache[i + (-IntegerCache.low)]; return new Integer(i);} |
3.11、 代理模式(Proxy Pattern)
在代理模式(Proxy Pattern)中,一个类代表另一个类的功能。这种类型的设计模式属于结构型模式。
在代理模式中,我们创建具有现有对象的对象,以便向外界提供功能接口。
静态代理和动态代理简单实现Java-JDK动态代理(AOP)使用及实现原理分析
3.12、模板模式(Template Pattern)
制作豆浆的流程:选材--->添加配料--->浸泡--->放到豆浆机打碎
通过添加不同的配料,可以制作出不同口味的豆浆
选材、浸泡和放到豆浆机打碎这几个步骤对于制作每种口味的豆浆都是一样的
基本介绍:
在一个抽象类公开定义了执行它的方法的模板。它的子类可以按需要重写方法实现,但调用将以抽象类中定义的方式进行。
简单说,模板方法模式定义一个操作中的算法的骨架,而将一些步骤延迟到子类中,使得子类可以不改变一个算法的结构,就可以重定义该算法的某些特定步骤。
这种类型的设计模式属于行为型模式。
模板方法模式
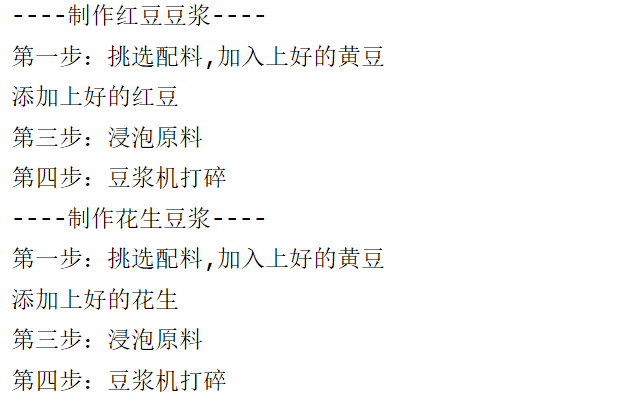
1 2 3 4 5 6 7 8 9 10 11 12 13 14 15 16 17 18 19 20 21 22 23 24 25 26 27 28 29 30 31 32 33 34 35 36 37 38 39 40 41 42 43 44 45 46 47 48 49 50 51 52 53 54 55 56 57 58 59 60 61 62 63 64 | /** * 模板方法模式 */public abstract class AbstractSoyaMilk { /** * 模板方法; 做豆浆的一套模板; */ final void template() { select(); addCondiments(); soak(); beat(); } private void select() { System.out.println("第一步:挑选配料,加入上好的黄豆"); } /** * 添加不同的配料,抽象方法,子类具体实现 */ abstract void addCondiments(); private void soak() { System.out.println("第三步:浸泡原料"); } private void beat() { System.out.println("第四步:豆浆机打碎"); }}/** * 子类实现:红豆豆浆 */class RedBeanSoyMilk extends AbstractSoyaMilk { @Override public void addCondiments() { System.out.println("添加上好的红豆"); }}/** * 子类实现:花生豆浆 */class PeanutMilk extends AbstractSoyaMilk { @Override public void addCondiments() { System.out.println("添加上好的花生"); }}class Client { public static void main(String[] args) { System.out.println("----制作红豆豆浆----"); RedBeanSoyMilk redBeanSoyaMilk = new RedBeanSoyMilk(); redBeanSoyaMilk.template(); System.out.println("----制作花生豆浆----"); PeanutMilk peanutMilk =new PeanutMilk(); peanutMilk.template(); }} |
测试结果:
3.13、命令模式(Command Pattern)
基本介绍
命令模式(Command Pattern):在软件设计中,我们经常需要向某些对象发送请求,但是并不知道请求的接收者是谁,也不知道被请求的操作是哪个,我们只需在程序运行时指定具体的请求接收者即可。
此时,可以使用命令模式来进行设计。
命令模式使得请求发送者与请求接收者消除彼此之间的耦合,让对象之间的调用关系更加灵活,实现解耦。
在命令模式中,会将一个请求封装为一个对象,以便使用不同参数来表示不同的请求(即命名),同时命令模式也支持可撤销的操作。
通俗易懂的理解:将军发布命令,士兵去执行。其中有几个角色:
- 将军(命令发布者)、
- 士兵(命令的具体执行者)、
- 命令(连接将军和士兵)。
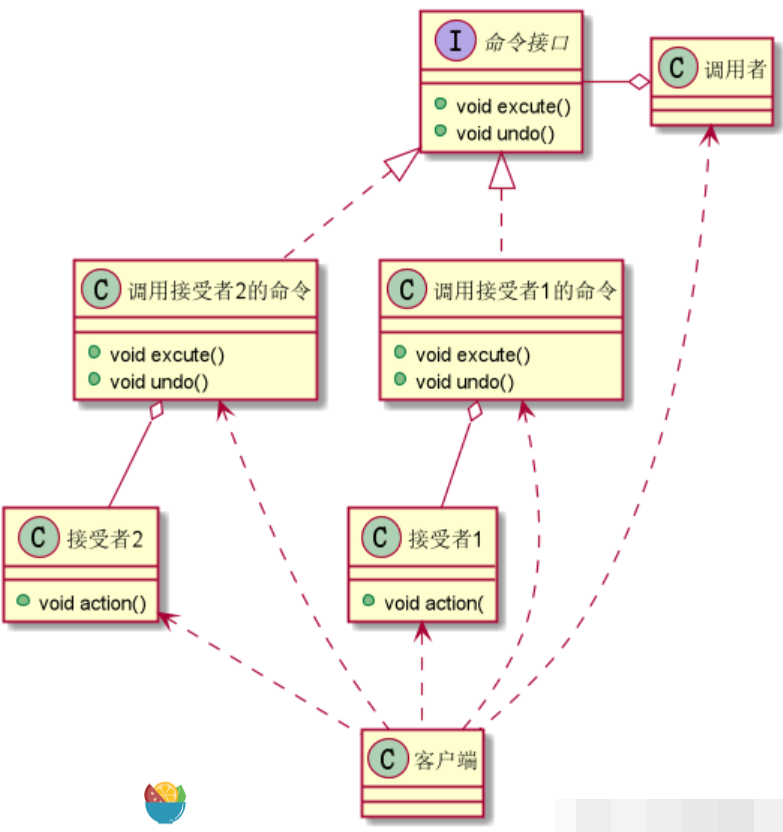
- Invoker 是调用者(将军),
- Receiver 是被调用者(士兵),
- MyCommand 是命令,实现了 Command 接口,持有接收对象。
实现
1 2 3 4 5 6 7 8 9 10 11 12 13 14 15 16 17 18 19 20 21 22 23 24 25 26 27 28 29 30 31 32 33 34 35 36 37 38 39 40 41 42 43 44 45 46 47 48 49 50 51 52 53 54 55 56 57 58 59 60 61 62 63 64 65 66 67 68 69 70 71 72 73 74 75 76 77 78 79 80 81 82 83 84 85 86 87 88 89 90 91 92 93 94 95 96 97 98 99 100 101 102 103 104 105 106 107 108 109 110 111 112 113 114 115 116 117 118 119 120 121 122 123 124 125 126 127 128 129 130 131 132 133 134 135 136 137 138 139 140 141 142 143 144 145 146 147 148 149 150 151 152 153 154 155 156 157 158 159 160 161 162 163 164 165 166 167 168 169 170 171 172 173 174 175 176 177 178 179 180 181 182 183 184 185 186 187 188 189 190 191 192 193 194 195 196 197 198 199 200 201 202 203 204 205 206 207 208 209 210 211 212 213 214 215 216 217 218 219 220 221 222 223 224 225 226 227 228 229 230 231 232 233 234 235 236 237 238 239 240 241 242 243 244 245 246 247 248 249 250 251 252 253 254 255 256 257 258 259 260 261 262 263 264 265 266 267 268 269 270 | /** * 命令模式 */public interface Command { /** * 执行 */ void execute(); /** * 撤销 */ void undo();}/** * 电灯操作命令 */class LightReceiver { public void on() { System.out.println("电灯打开了"); } public void off() { System.out.println("电灯关闭了"); }}/** * 电视机操作命令 */class TVReceiver { public void on() { System.out.println("电视机打开了"); } public void off() { System.out.println("电视机关闭了"); }}/** * 电灯打开命令 */class LightOnCommand implements Command { /** * 聚合,电灯 */ LightReceiver light; public LightOnCommand(LightReceiver light) { this.light = light; } /** * 点击按钮表示打开 */ public void execute() { light.on(); } /** * 点击撤销按钮表示关闭 */ public void undo() { light.off(); }}/** * 电灯关闭命令 */class LightOffCommand implements Command { /** * 聚合,电灯 */ LightReceiver light; public LightOffCommand(LightReceiver light) { this.light = light; } /** * 点击按钮表示关闭 */ public void execute() { light.off(); } /** * 点击撤销按钮表示打开 */ public void undo() { light.on(); }}/** * 电视机打开命令 */class TVOnCommand implements Command { /** * 聚合,电视机 */ TVReceiver tvReceiver; public TVOnCommand(TVReceiver tvReceiver) { this.tvReceiver = tvReceiver; } /** * 点击按钮表示打开电视 */ public void execute() { tvReceiver.on(); } /** * 点击撤销按钮表示关闭电视 */ public void undo() { tvReceiver.off(); }}/** * 电视机关闭命令 */class TVOffCommand implements Command { /** * 聚合,电视机 */ TVReceiver tvReceiver; public TVOffCommand(TVReceiver tvReceiver) { this.tvReceiver = tvReceiver; } /** * 点击按钮表示关闭电视 */ public void execute() { tvReceiver.off(); } /** * 点击撤销按钮表示打开电视 */ public void undo() { tvReceiver.on(); }}/** * 空命令,用于初始化每个按钮,当调用空命令时,对象什么都不做 */class NoCommad implements Command { public void execute() { } public void undo() { }}/** * 调用者:遥控器 */class RemoteController { /** * 打开按钮命令组 */ Command[] onCommands; /** * 关闭按钮命令组 */ Command[] offCommands; /** * 撤销按钮命令组 */ Command undoCommand; /** * 初始化为空命令组 */ public RemoteController() { offCommands = new Command[5]; onCommands = new Command[5]; for (int i = 0; i < 5; i++) { onCommands[i] = new NoCommad(); offCommands[i] = new NoCommad(); } } /** * 设置命令 * * @param no 按钮位置 * @param onCommand 打开命令 * @param offCommand 关闭命令 */ public void setCommand(int no, Command onCommand, Command offCommand) { onCommands[no] = onCommand; offCommands[no] = offCommand; } /** * 执行命令 * * @param no 按钮位置 */ public void onButtonWasPushed(int no) { onCommands[no].execute(); // 记录这次的操作,用于撤销 undoCommand = onCommands[no]; } /** * 关闭命令 * * @param no 按钮位置 */ public void offButtonWasPushed(int no) { offCommands[no].execute(); // 记录这次的操作,用于撤销 undoCommand = offCommands[no]; } /** * 撤销命令 */ public void undoButtonWasPushed() { undoCommand.undo(); }}class Client { public static void main(String[] args) { //电灯 --> 命令接收者 LightReceiver lightReceiver = new LightReceiver(); //电灯打开,关闭命令 LightOnCommand lightOnCommand = new LightOnCommand(lightReceiver); LightOffCommand lightOffCommand = new LightOffCommand(lightReceiver); //电视 --> 命令接收者 TVReceiver tvReceiver = new TVReceiver(); //电视机打开,关闭命令 TVOnCommand tvOnCommand = new TVOnCommand(tvReceiver); TVOffCommand tvOffCommand = new TVOffCommand(tvReceiver); //遥控器 RemoteController remoteController = new RemoteController(); //设置电灯命令 remoteController.setCommand(0, lightOnCommand, lightOffCommand); //设置电视机命令 remoteController.setCommand(1, tvOnCommand, tvOffCommand); //执行命令 remoteController.onButtonWasPushed(0); // 打开电灯 remoteController.offButtonWasPushed(0); // 关闭电灯 remoteController.undoButtonWasPushed(); // 撤销关闭电灯,打开电灯 remoteController.offButtonWasPushed(0); // 关闭电灯 remoteController.onButtonWasPushed(1); // 打开电视机 remoteController.offButtonWasPushed(1); // 关闭电视机 remoteController.undoButtonWasPushed(); // 撤销关闭电视机,打开电视机 remoteController.offButtonWasPushed(1); // 关闭电视机 }} |
3.14、访问者模式(Visitor Pattern)
基本介绍:
- Visitor:接口或者抽象类,定义了对每个 Element 访问的行为,它的参数就是被访问的元素,它的方法个数理论上与元素的个数是一样的,因此,访问者模式要求元素的类型要稳定,如果经常添加、移除元素类,必然会导致频繁地修改 Visitor 接口,如果出现这种情况,则说明不适合使用访问者模式。
- ConcreteVisitor:具体的访问者,它需要给出对每一个元素类访问时所产生的具体行为。
- Element:元素接口或者抽象类,它定义了一个接受访问者(accept)的方法,其意义是指每一个元素都要可以被访问者访问。
- ElementA、ElementB:具体的元素类,它提供接受访问的具体实现,而这个具体的实现,通常情况下是使用访问者提供的访问该元素类的方法。
- ObjectStructure:定义当中所提到的对象结构,对象结构是一个抽象表述,它内部管理了元素集合,并且可以迭代这些元素提供访问者访问。

使用场景:
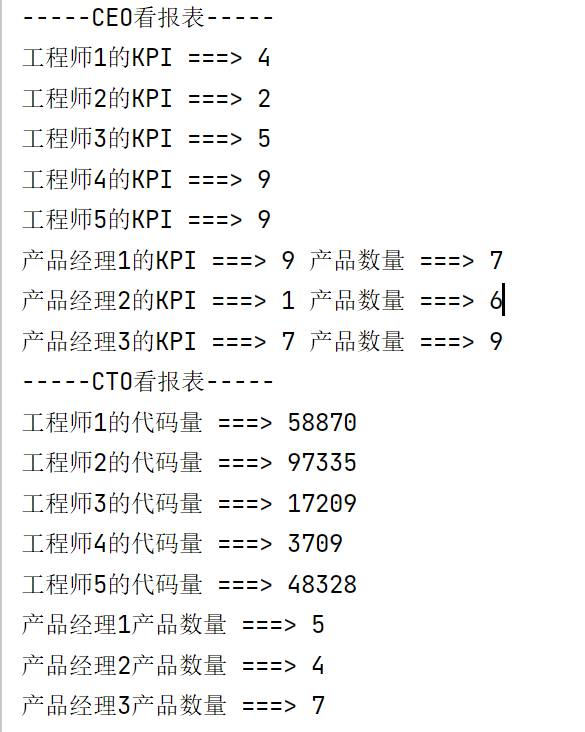
年底,CEO和CTO开始评定员工一年的工作绩效,员工分为工程师和经理。
CTO关注工程师的代码量、经理的新产品数量。
CEO关注的是工程师的KPI和经理的KPI以及新产品数量。
由于CEO和CTO对于不同员工的关注点是不一样的,这就需要对不同员工类型进行不同的处理。访问者模式此时可以派上用场了。
代码
1 2 3 4 5 6 7 8 9 10 11 12 13 14 15 16 17 18 19 20 21 22 23 24 25 26 27 28 29 30 31 32 33 34 35 36 37 38 39 40 41 42 43 44 45 46 47 48 49 50 51 52 53 54 55 56 57 58 59 60 61 62 63 64 65 66 67 68 69 70 71 72 73 74 75 76 77 78 79 80 81 82 83 84 85 86 87 88 89 90 91 92 93 94 95 96 97 98 99 100 101 102 103 104 105 106 107 108 109 110 111 112 113 114 115 116 117 118 119 120 121 122 123 124 125 126 127 128 129 130 131 132 133 134 135 136 137 138 139 140 141 142 143 144 145 146 147 148 149 150 151 152 153 154 155 156 157 158 159 160 161 162 163 164 165 166 167 168 169 170 171 172 173 174 175 | import java.util.ArrayList;import java.util.List;import java.util.Random;/** * 员工基类:提取经理和工程师的共同特征 */public abstract class Staff { /** * 姓名 */ public String name; /** * 绩效 */ public int kpi; public Staff(String name) { this.name = name; this.kpi = new Random().nextInt(10); } /** * 核心方法,接受访问者的访问 * * @param visitor 访问者 */ public abstract void accept(Visitor visitor);}/** * 工程师 */class Engineer extends Staff { public Engineer(String name) { super(name); } @Override public void accept(Visitor visitor) { visitor.visit(this); } /** * 获取代码量 * * @return 代码量 */ public int getCodeLines() { return new Random().nextInt(10 * 10000); }}/** * 经理 */class Manager extends Staff { public Manager(String name) { super(name); } @Override public void accept(Visitor visitor) { visitor.visit(this); } /** * 获取产品数量 * * @return 产品数量 */ public int getProducts() { return new Random().nextInt(10); }}/** * 工程师是代码数量,经理是产品数量,他们的职责不一样,也就是因为差异性,才使得访问模式能够发挥它的作用。 * Staff、Engineer、Manager 3个类型就是对象结构,这些类型相对稳定,不会发生变化。 * 然后将这些员工添加到一个业务报表类中,公司高层可以通过该报表类的 showReport 方法查看所有员工的业绩 */class BusinessReport { private List<Staff> list = new ArrayList<>(); /** * 添加员工 * @param staff 员工 */ public void addStaff(Staff staff){ list.add(staff); } /** * 删除员工 * @param staff 员工 */ public void removeStaff(Staff staff){ list.remove(staff); } /** * 展示报表 * @param visitor 访问者 */ public void show(Visitor visitor){ for (Staff staff : list) { staff.accept(visitor); } }}/** * 访问者接口 */interface Visitor { /** * 访问工程师类型 * * @param engineer 工程师 */ void visit(Engineer engineer); /** * 访问经理类型 * * @param manager 经理 */ void visit(Manager manager);}class CEO implements Visitor { public void visit(Engineer engineer) { System.out.println(engineer.name + "的KPI ===> " + engineer.kpi); } public void visit(Manager manager) { System.out.println(manager.name + "的KPI ===> " + manager.kpi + " 产品数量 ===> " + manager.getProducts()); }}class CTO implements Visitor { public void visit(Engineer engineer) { System.out.println(engineer.name + "的代码量 ===> " + engineer.getCodeLines()); } public void visit(Manager manager) { System.out.println(manager.name + "产品数量 ===> " + manager.getProducts()); }}class Client { public static void main(String[] args) { BusinessReport businessReport = new BusinessReport(); businessReport.addStaff(new Engineer("工程师1")); businessReport.addStaff(new Engineer("工程师2")); businessReport.addStaff(new Engineer("工程师3")); businessReport.addStaff(new Engineer("工程师4")); businessReport.addStaff(new Engineer("工程师5")); businessReport.addStaff(new Manager("产品经理1")); businessReport.addStaff(new Manager("产品经理2")); businessReport.addStaff(new Manager("产品经理3")); System.out.println("-----CEO看报表-----"); businessReport.show(new CEO()); System.out.println("-----CTO看报表-----"); businessReport.show(new CTO()); }} |
3.15、迭代器模式(Iterator Pattern)
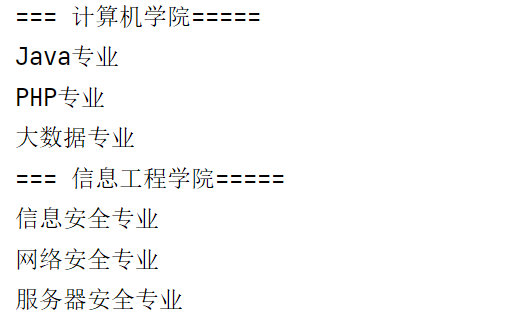
在一个页面中展示出学校的院系组成,一个学校有多个学院, 一个学院有多个系。
如果我们的集合元素是用不同的方式实现的,有数组,还有 java 的集合类,或者还有其他方式,当客户端要遍历这些集合元素的时候就要使用多种遍历方式,而且还会暴露元素的内部结构,可以考虑使用迭代器模式解决。
迭代器模式,提供一种遍历集合元素的统一接口,用一致的方法遍历集合元素,不需要知道集合对象的底层表示,即:不暴露其内部的结构。
属于行为型模式。
Iterator接口:
1 2 3 4 5 6 7 8 9 10 11 12 13 14 15 16 | public interface Iterator<E> { boolean hasNext(); E next(); default void remove() { throw new UnsupportedOperationException("remove"); } default void forEachRemaining(Consumer<? super E> action) { Objects.requireNonNull(action); while (hasNext()) action.accept(next()); }} |
- Iterator:迭代器接口,系统提供
- ConcreteIterator:具体的迭代器类,管理迭代
- Aggregate:一个统一的聚合接口,将客户端和具体聚合解耦
- ConcreteAggreage:具体的聚合持有对象集合,并提供一个方法,返回一个迭代器,该迭代器可以正确遍历集合
- Client:客户端,通过 Iterator 和 Aggregate 依赖子类
代码实现
1 2 3 4 5 6 7 8 9 10 11 12 13 14 15 16 17 18 19 20 21 22 23 24 25 26 27 28 29 30 31 32 33 34 35 36 37 38 39 40 41 42 43 44 45 46 47 48 49 50 51 52 53 54 55 56 57 58 59 60 61 62 63 64 65 66 67 68 69 70 71 72 73 74 75 76 77 78 79 80 81 82 83 84 85 86 87 88 89 90 91 92 93 94 95 96 97 98 99 100 101 102 103 104 105 106 107 108 109 110 111 112 113 114 115 116 117 118 119 120 121 122 123 124 125 126 127 128 129 130 131 132 133 134 135 136 137 138 139 140 141 142 143 144 145 146 147 148 149 150 151 152 153 154 155 156 157 158 159 160 161 162 163 164 165 166 167 168 169 170 171 172 173 174 175 176 177 178 179 180 181 182 183 184 185 186 187 188 189 190 191 192 193 194 195 196 197 198 199 200 201 202 203 204 205 206 207 208 209 210 211 212 213 214 215 216 217 218 219 220 221 222 223 224 225 226 227 228 229 230 231 232 233 234 235 236 237 238 239 240 241 242 243 244 245 246 247 248 249 250 251 252 253 254 255 256 257 258 259 260 261 262 263 264 265 266 267 268 269 270 | import java.util.ArrayList;import java.util.Iterator;import java.util.List;/** * 院系 */class Department { /** * 系的名称 */ private String name; /** * 系的描述 */ private String desc; public Department(String name, String desc) { this.name = name; this.desc = desc; } public String getName() { return name; } public void setName(String name) { this.name = name; } public String getDesc() { return desc; } public void setDesc(String desc) { this.desc = desc; }}/** * 学院接口 */interface College<T> { /** * 返回学院的名称 * * @return 学院的名称 */ String getName(); /** * 增加系的方法 * * @param name 系的名称 * @param desc 系的描述 */ void addDepartment(String name, String desc); /** * 返回一个迭代器,遍历 * * @return 迭代器 */ Iterator<T> createIterator();}/** * 计算机学院 */class ComputerCollege implements College { Department[] departments; // 保存当前数组的对象个数 int numOfDepartment = 0; public ComputerCollege() { departments = new Department[5]; addDepartment("Java专业", " Java专业 "); addDepartment("PHP专业", " PHP专业 "); addDepartment("大数据专业", " 大数据专业 "); } @Override public String getName() { return "计算机学院"; } @Override public void addDepartment(String name, String desc) { Department department = new Department(name, desc); departments[numOfDepartment] = department; numOfDepartment += 1; } @Override public Iterator createIterator() { return new ComputerCollegeIterator(departments); }}/** * 信息工程学院 */class InfoCollege implements College { List<Department> departmentList; public InfoCollege() { departmentList = new ArrayList<Department>(); addDepartment("信息安全专业", " 信息安全专业 "); addDepartment("网络安全专业", " 网络安全专业 "); addDepartment("服务器安全专业", " 服务器安全专业 "); } @Override public String getName() { return "信息工程学院"; } @Override public void addDepartment(String name, String desc) { Department department = new Department(name, desc); departmentList.add(department); } @Override public Iterator createIterator() { return new InfoColleageIterator(departmentList); }}/** * 计算机学院迭代器 */class ComputerCollegeIterator implements Iterator { //这里我们需要Department 是以怎样的方式存放=>数组 Department[] departments; //遍历的位置 int position = 0; public ComputerCollegeIterator(Department[] departments) { this.departments = departments; } /** * 判断是否还有下一个元素 * * @return true 表示有下一个元素,false 表示没有下一个元素 */ @Override public boolean hasNext() { return position < departments.length && departments[position] != null; } @Override public Object next() { Department department = departments[position]; position += 1; return department; } //删除的方法,默认空实现 public void remove() { }}/** * 信息工程学院迭代器 */class InfoColleageIterator implements Iterator { List<Department> departmentList; // 信息工程学院是以List方式存放系 int index = -1;//索引 public InfoColleageIterator(List<Department> departmentList) { this.departmentList = departmentList; } //判断list中还有没有下一个元素 @Override public boolean hasNext() { if (index >= departmentList.size() - 1) { return false; } else { index += 1; return true; } } @Override public Object next() { return departmentList.get(index); } //空实现remove public void remove() { }}class OutPutImpl { //学院集合 List<College> collegeList; public OutPutImpl(List<College> collegeList) { this.collegeList = collegeList; } //遍历所有学院,然后调用printDepartment 输出各个学院的系 public void printCollege() { //从collegeList 取出所有学院, Java 中的 List 已经实现Iterator Iterator<College> iterator = collegeList.iterator(); while (iterator.hasNext()) { //取出一个学院 College college = iterator.next(); System.out.println("=== " + college.getName() + "====="); printDepartment(college.createIterator()); //得到对应迭代器 } } //输出 学院输出 系 public void printDepartment(Iterator iterator) { while (iterator.hasNext()) { Department d = (Department) iterator.next(); System.out.println(d.getName()); } }}class Client { public static void main(String[] args) { //创建学院 List<College> collegeList = new ArrayList<>(); ComputerCollege computerCollege = new ComputerCollege(); InfoCollege infoCollege = new InfoCollege(); // 将学院添加到collegeList collegeList.add(computerCollege); collegeList.add(infoCollege); //创建输出对象 OutPutImpl outPutImpl = new OutPutImpl(collegeList); outPutImpl.printCollege(); }} |
3.16、观察者设计模式(Observer Pattern)
https://www.cnblogs.com/zhangzhixi/p/14157482.html
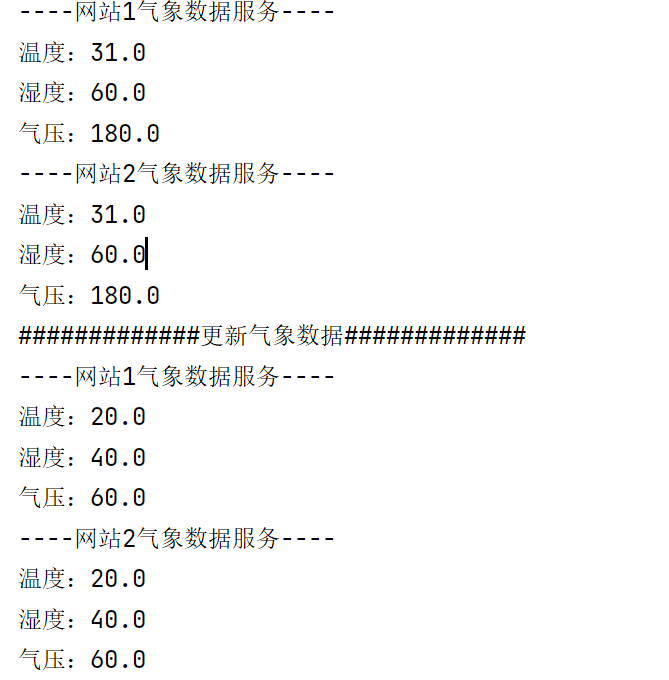
以天气预报项目引入观察者模式
- 气象站可以将每天测量到的温度,湿度,气压等等以公告的形式发布给第三方。
- 需要设计开放型 API,便于其他第三方也能接入气象站获取数据。
- 测量数据更新时,要能实时的通知给第三方
代码实现:
1 2 3 4 5 6 7 8 9 10 11 12 13 14 15 16 17 18 19 20 21 22 23 24 25 26 27 28 29 30 31 32 33 34 35 36 37 38 39 40 41 42 43 44 45 46 47 48 49 50 51 52 53 54 55 56 57 58 59 60 61 62 63 64 65 66 67 68 69 70 71 72 73 74 75 76 77 78 79 80 81 82 83 84 85 86 87 88 89 90 91 92 93 94 95 96 97 98 99 100 101 102 103 104 105 106 107 108 109 110 111 112 113 114 115 116 117 118 119 120 121 122 123 124 125 126 127 128 129 130 131 132 133 134 135 136 137 138 139 140 141 142 143 144 145 146 147 148 149 150 151 152 153 154 155 156 157 158 159 160 161 162 163 164 165 166 167 168 169 170 171 172 173 174 175 176 177 178 179 180 181 182 183 184 185 186 187 188 189 190 191 192 193 194 195 196 197 198 199 200 201 202 203 204 205 206 207 208 209 210 211 212 213 214 215 216 217 218 | import java.util.ArrayList;/** * 观察者接口 */interface Observer { /** * 更新天气数据 * * @param temperature 温度 * @param humidity 湿度 * @param pressure 气压 */ void update(float temperature, float humidity, float pressure);}/** * 观察者1号,网站1 */class Website1 implements Observer { /** * 温度 */ private float temperature; /** * 湿度 */ private float humidity; /** * 气压 */ private float pressure; /** * 更新气象数据; * * @param temperature 温度 * @param humidity 湿度 * @param pressure 气压 */ public void update(float temperature, float humidity, float pressure) { this.temperature = temperature; this.humidity = humidity; this.pressure = pressure; display(); } /** * 显示气象数据 */ public void display() { System.out.println("----网站1气象数据服务----"); System.out.println("温度:" + temperature); System.out.println("湿度:" + humidity); System.out.println("气压:" + pressure); }}/** * 观察者2号,网站2 */class Website2 implements Observer { /** * 温度 */ private float temperature; /** * 湿度 */ private float humidity; /** * 气压 */ private float pressure; /** * 更新气象数据 * * @param temperature 温度 * @param humidity 湿度 * @param pressure 气压 */ public void update(float temperature, float humidity, float pressure) { this.temperature = temperature; this.humidity = humidity; this.pressure = pressure; display(); } /** * 显示气象数据 */ public void display() { System.out.println("----网站2气象数据服务----"); System.out.println("温度:" + temperature); System.out.println("湿度:" + humidity); System.out.println("气压:" + pressure); }}/** * 被观察者接口,有注册,移出,通知观察者三个方法 */interface Subject { /** * 增加观察者 * * @param observer 观察者 */ void registerObserver(Observer observer); /** * 移出观察者 * * @param observer 观察者 */ void remove(Observer observer); /** * 通知所有的注册的用户 */ void notifyObserver(); /** * 设置数据 * * @param temperature 温度 * @param humidity 湿度 * @param pressure 气压 */ void setData(float temperature, float humidity, float pressure);}/** * 被观察接口实现类,处理天气数据 */class WeatherData implements Subject { /** * 温度 */ private float temperature; /** * 湿度 */ private float humidity; /** * 气压 */ private float pressure; /** * 观察者(用户集合) */ private final ArrayList<Observer> observerArrayList; /** * 初始化信息 */ public WeatherData() { observerArrayList = new ArrayList<Observer>(); } /** * 设置传入数据 * * @param temperature 温度 * @param humidity 湿度 * @param pressure 气压 */ @Override public void setData(float temperature, float humidity, float pressure) { this.temperature = temperature; this.humidity = humidity; this.pressure = pressure; // 通知观察者 notifyObserver(); } @Override public void registerObserver(Observer observer) { observerArrayList.add(observer); } @Override public void remove(Observer observer) { observerArrayList.remove(observer); } @Override public void notifyObserver() { for (Observer observer : observerArrayList) { observer.update(this.temperature, this.humidity, this.pressure); } }}class CLient { public static void main(String[] args) { // 1、创建被观察者对象 Subject weatherData = new WeatherData(); // 2、创建观察者对象 Website1 website1 = new Website1(); Website2 website2 = new Website2(); // 3、注册观察者 weatherData.registerObserver(website1); weatherData.registerObserver(website2); // 设置气象数据,通知观察者 weatherData.setData(31f, 60f, 180f); System.out.println("#############更新气象数据#############"); // 更新气象数据 weatherData.setData(20f, 40f, 60f); }} |
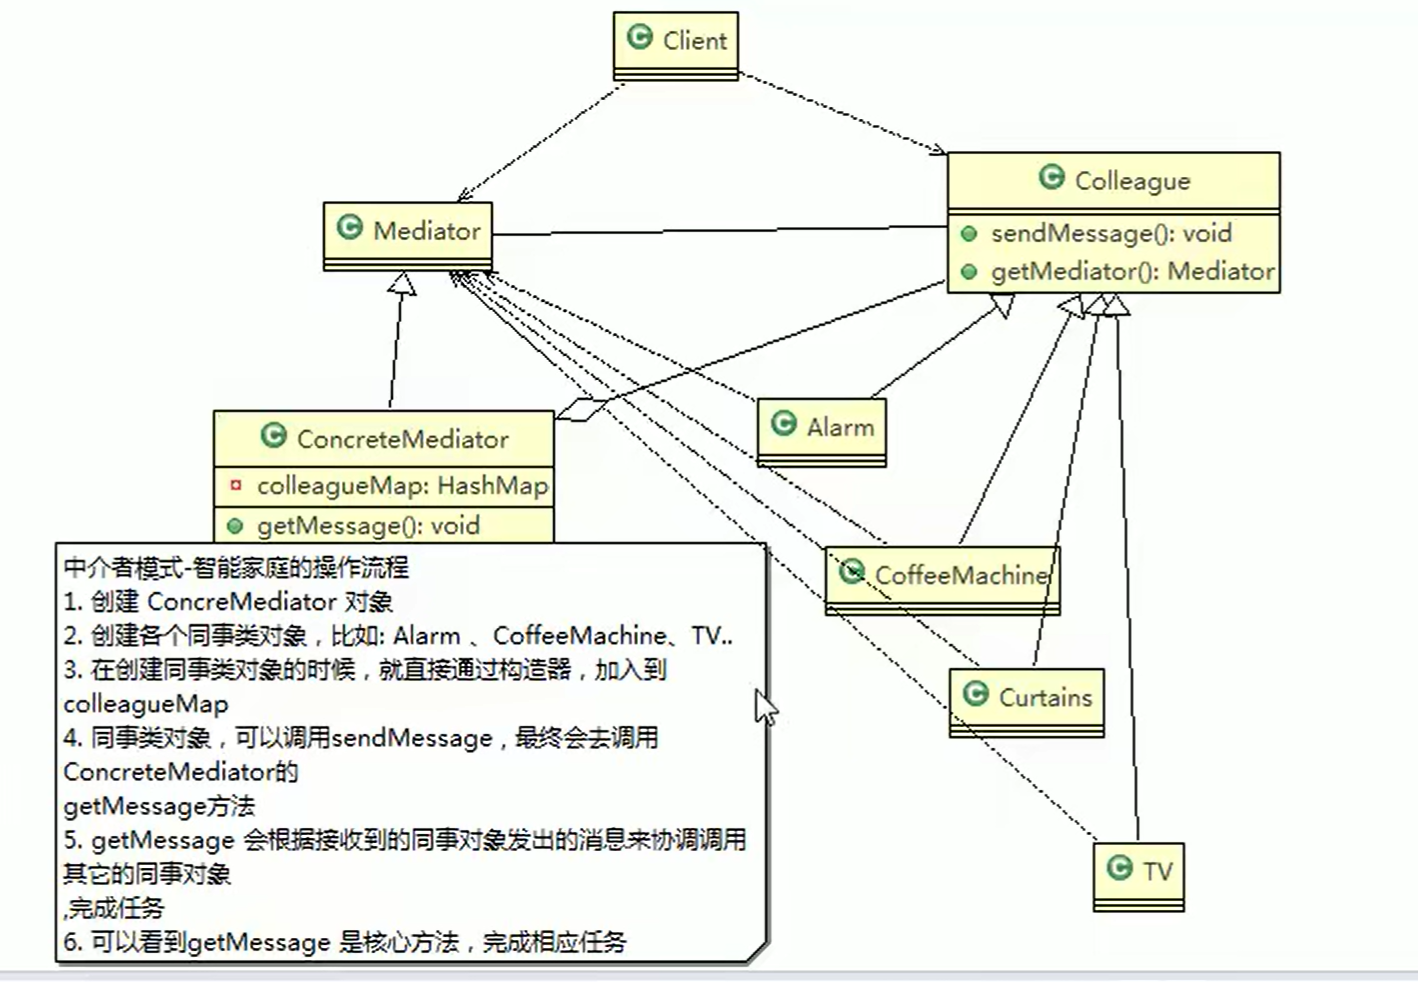
3.17、中介者模式(Mediator Pattern)
以智能家居引入中介者模式:
智能家庭包括各种设备,闹钟、咖啡机、电视机、窗帘等。主人要看电视时,各个设备可以协同工作,自动完成看电视的准备工作,比如流程为:
闹铃响起->咖啡机开始做咖啡->窗帘自动落下->电视机开始播放
基本介绍
中介者模式(Mediator Pattern),用一个中介对象来封装一系列的对象交互。中介者使各个对象不需要显式地相互引用,从而使其耦合松散,而且可以独立地改变它们之间的交互。
属于行为型模式:比如 MVC 模式,C(Controller 控制器)是 M(Model 模型)和 V(View 视图)的中介者,在前后端交互时起到了中间人的作用。
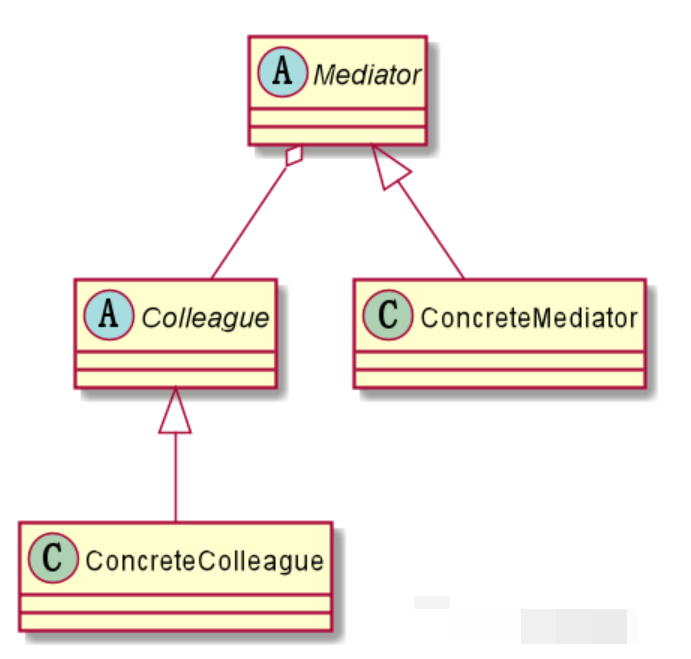
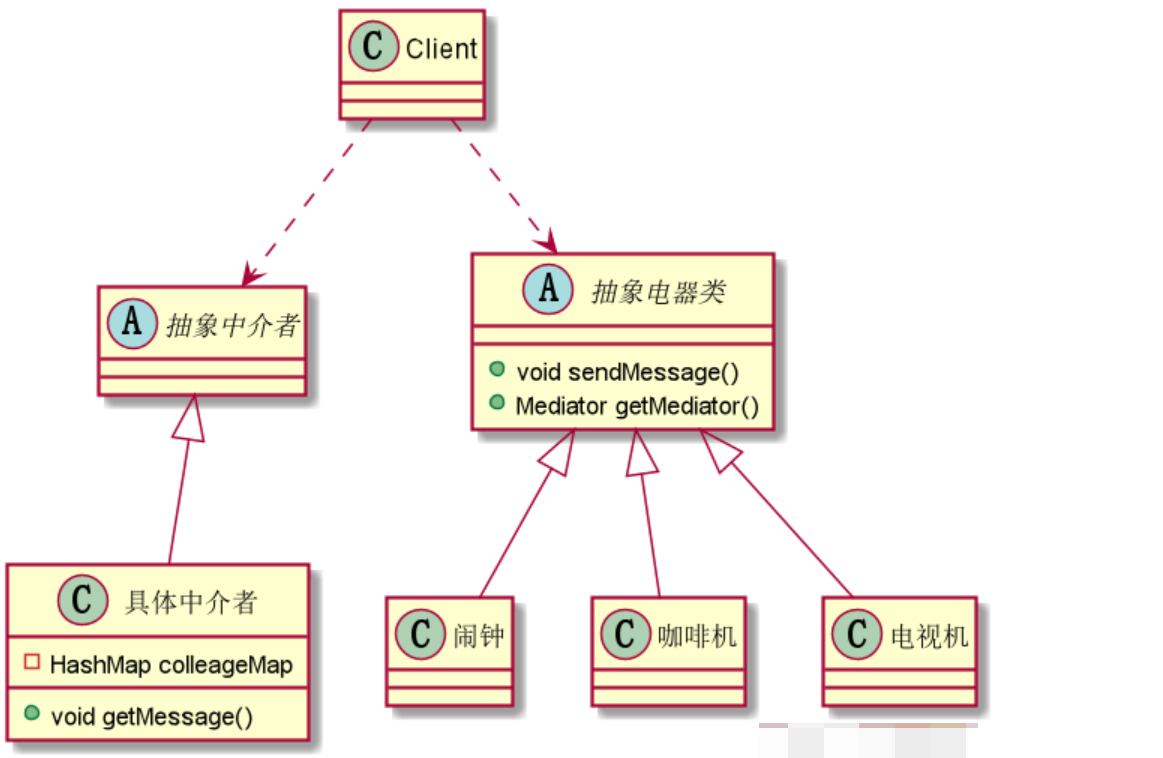
- Mediator:抽象中介者,定义了同事对象到中介者对象的接口
- Colleague:抽象同事类
- ConcreteMediator:具体的中介者对象,实现抽象方法,需要知道所有的具体的同事类,即以一个集合来管理,并接受某个同事对象消息,完成相应的任务
- ConcreteColleague:具体的同事类,会有很多,每个同事只知道自己的行为,而不了解其他同事类的行为(方法), 但是他们都依赖中介者对象
代码实现:
抽象中介者类:
1 2 3 4 5 6 7 8 9 10 11 12 13 14 15 16 17 18 19 20 | /** * 中介者模式,抽象中介者类 */abstract class Mediator { /** * 添加电器 * * @param colleagueName 电器名称 * @param colleague 电器 */ public abstract void register(String colleagueName, Colleague colleague); /** * 接收电器消息 * * @param stateChange 消息类型 * @param colleagueName 电器名称 */ public abstract void getMessage(int stateChange, String colleagueName);} |
抽象电器类
1 2 3 4 5 6 7 8 9 10 11 12 13 14 15 16 17 18 19 20 21 22 23 24 25 26 27 28 29 30 31 32 33 34 35 36 | /** * 电器类 */abstract class Colleague { /** * 中介者 */ private Mediator mediator; /** * 电器名称 */ private String name; public Colleague(Mediator mediator, String name) { this.mediator = mediator; this.name = name; } public Mediator getMediator() { return mediator; } public String getName() { return name; } /** * 向中介者发送消息 * * @param stateChange 消息类型 */ public abstract void sendMessage(int stateChange);} |
具体电器类:闹钟
1 2 3 4 5 6 7 8 9 10 11 12 13 14 15 16 17 18 19 20 21 22 23 24 25 26 27 28 29 30 31 | /** * 闹钟类 */class Alarm extends Colleague { public Alarm(Mediator mediator, String name) { super(mediator, name); //在中介者中添加电器 mediator.register(name, this); } /** * 设置闹钟 * * @param stateChange 消息类型 */ public void setAlarm(int stateChange) { sendMessage(stateChange); } /** * 向中介者发送消息 * * @param stateChange 消息类型 */ @Override public void sendMessage(int stateChange) { //中介者接收消息 getMediator().getMessage(stateChange, getName()); }} |
具体电器类:咖啡机
1 2 3 4 5 6 7 8 9 10 11 12 13 14 15 16 17 18 19 20 21 22 23 24 25 26 27 28 29 30 31 32 33 34 35 36 | /** * 咖啡机类 */class Coffee extends Colleague { public Coffee(Mediator mediator, String name) { super(mediator, name); //在中介者中添加电器 mediator.register(name, this); } /** * 开启咖啡机 */ public void startCoffee() { System.out.println("咖啡机已经开启"); } /** * 关闭咖啡机 */ public void finishCoffee() { System.out.println("咖啡机已经关闭"); } /** * 向中介者发送消息 * * @param stateChange 消息类型 */ @Override public void sendMessage(int stateChange) { //中介者接收消息 getMediator().getMessage(stateChange, getName()); }} |
具体电器类:电视机
1 2 3 4 5 6 7 8 9 10 11 12 13 14 15 16 17 18 19 20 21 22 23 24 25 26 27 28 29 30 31 32 33 34 35 36 | /** * 电视机类 */class TV extends Colleague { public TV(Mediator mediator, String name) { super(mediator, name); //在中介者中添加电器 mediator.register(name, this); } /** * 打开电视机 */ public void startTV() { System.out.println("电视机打开"); } /** * 关闭电视机 */ public void finishTV() { System.out.println("电视机关闭了"); } /** * 给中间者发送消息 * * @param stateChange 消息类型 */ @Override public void sendMessage(int stateChange) { //中介者接收消息 getMediator().getMessage(stateChange, getName()); }} |
具体中介者类,由此类来聚合各个电器,实现功能
1 2 3 4 5 6 7 8 9 10 11 12 13 14 15 16 17 18 19 20 21 22 23 24 25 26 27 28 29 30 31 32 33 34 35 36 37 38 39 40 41 42 43 44 45 | /** * 具体中介者类 */class ConcreteMediator extends Mediator { /** * 存入具体的电器对象 */ private HashMap<String, Colleague> colleagueMap; public ConcreteMediator() { colleagueMap = new HashMap<>(); } /** * 将电器加入到集合中 * @param colleagueName 电器名称 * @param colleague 电器 */ @Override public void register(String colleagueName, Colleague colleague) { colleagueMap.put(colleagueName, colleague); } /** * 接收电器的消息 * @param stateChange 消息类型 * @param colleagueName 电器名称 */ @Override public void getMessage(int stateChange, String colleagueName) { // 如果是闹钟发出的消息 if (colleagueMap.get(colleagueName) instanceof Alarm) { // 发送的消息是100,开启咖啡机和电视机 if (stateChange == 100) { ((Coffee) colleagueMap.get("Coffee")).startCoffee(); ((TV) colleagueMap.get("TV")).startTV(); // 发送的消息是101,关闭咖啡机和电视机 } else if (stateChange == 101) { ((Coffee) colleagueMap.get("Coffee")).finishCoffee(); ((TV) colleagueMap.get("TV")).finishTV(); } } }} |
测试
1 2 3 4 5 6 7 8 9 10 11 12 13 14 15 16 17 | class Client { public static void main(String[] args) { //创建中介者对象 ConcreteMediator concreteMediator = new ConcreteMediator(); //具体电器,加入到中介者中 Alarm alarm = new Alarm(concreteMediator, "Alarm"); new Coffee(concreteMediator, "Coffee"); new TV(concreteMediator, "TV"); //开咖啡机,开电视 alarm.setAlarm(100); System.out.println("--------"); //关咖啡机,关电视 alarm.setAlarm(101); }} |
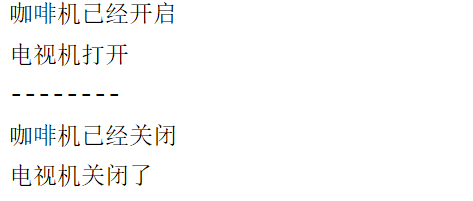
3.18、(备忘录模式(Memento Pattern)
备忘录模式(Memento Pattern)在不破坏封装性的前提下,捕获一个对象的内部状态,并在该对象之外保存这个状态。这样以后就可将该对象恢复到原先保存的状态。
可以这里理解备忘录模式:现实生活中的备忘录是用来记录某些要去做的事情,或者是记录已经达成的共同意见的事情,以防忘记了。像是一个快照的感觉。
而在软件层面,备忘录模式有着相同的含义,备忘录对象主要用来记录一个对象的某种状态,或者某些数据,当要做回退时,可以从备忘录对象里获取原来的数据进行恢复操作,属于行为型模式。
- Originator:需要保存状态的对象
- Memento:备忘录对象,负责保存好记录,即 Originator 内部状态
- Caretaker:守护者对象,负责保存多个备忘录对象,使用集合管理提高效率
代码实现
1 2 3 4 5 6 7 8 9 10 11 12 13 14 15 16 17 18 19 20 21 22 23 24 25 26 27 28 29 30 31 32 33 34 35 36 37 38 39 40 41 42 43 44 45 46 47 48 49 50 51 52 53 54 55 56 57 58 59 60 61 62 63 64 65 66 67 68 69 70 71 72 73 74 75 76 77 78 79 80 81 82 83 84 85 86 87 88 89 90 91 92 93 94 95 96 97 98 99 100 101 102 103 104 105 106 107 108 109 110 111 112 113 114 115 116 117 118 119 120 121 122 123 124 125 126 127 128 129 130 131 132 133 134 135 136 137 138 139 140 141 142 143 144 145 146 147 148 149 150 151 152 153 154 155 156 157 158 159 160 161 162 163 164 165 166 167 168 169 170 171 | import java.util.HashMap;import java.util.Map;/** * 备忘录对象-游戏角色 */class MementoGame { /** * 攻击力 */ private int attackForce; /** * 防御力 */ private int phylacticPower; public MementoGame(int attackForce, int phylacticPower) { this.attackForce = attackForce; this.phylacticPower = phylacticPower; } /** * 获取攻击力 * * @return 攻击力 */ public int getAttackForce() { return attackForce; } /** * 获取防御力 * * @return 防御力 */ public int getPhylacticPower() { return phylacticPower; }}/** * 需要保存状态的对象 */class OriginatorGame { /** * 攻击力 */ private int attackForce; /** * 防御力 */ private int phylacticPower; public OriginatorGame(int attackForce, int phylacticPower) { this.attackForce = attackForce; this.phylacticPower = phylacticPower; } /** * 创建备忘录对象 * * @return 备忘录对象-游戏角色 */ public MementoGame createMementoGame() { return new MementoGame(attackForce, phylacticPower); } /** * 通过备忘录对象恢复原始状态 * * @param mementoGame 备忘录对象-游戏角色 */ public void getStateFromMementoGame(MementoGame mementoGame) { this.attackForce = mementoGame.getAttackForce(); this.phylacticPower = mementoGame.getPhylacticPower(); } /** * 展示当前状态 */ public void show() { System.out.println("当前攻击力===> " + attackForce + ", 当前防御力" + phylacticPower); } public int getAttackForce() { return attackForce; } public void setAttackForce(int attackForce) { this.attackForce = attackForce; } public int getPhylacticPower() { return phylacticPower; } public void setPhylacticPower(int phylacticPower) { this.phylacticPower = phylacticPower; }}class Caretaker { /** * 使用集合管理多个备忘录对象 */ private Map<String, MementoGame> map; public Caretaker() { map = new HashMap<String, MementoGame>(); } /** * 添加备忘录对象 * * @param name 备注 * @param mementoGame 备忘录对象 */ public void addMementos(String name, MementoGame mementoGame) { map.put(name, mementoGame); } /** * 通过备注获取备忘录对象 * @param name 备注 * @return 备忘录对象 */ public MementoGame getMementos(String name) { return map.get(name); }}class Client { public static void main(String[] args) { // 1、创建管理备忘录对象的实例 Caretaker caretaker = new Caretaker(); // 2、创建需要保存状态的对象 OriginatorGame originatorGame = new OriginatorGame(100, 100); // 3、执行备份 caretaker.addMementos("初始备份", originatorGame.createMementoGame()); System.out.println("----初始状态----"); originatorGame.show(); System.out.println("----10分钟后,防御力下降----"); originatorGame.setPhylacticPower(50); caretaker.addMementos("开始10分钟的备份", originatorGame.createMementoGame()); originatorGame.show(); System.out.println("----20分钟后,战斗力提升----"); originatorGame.setAttackForce(200); caretaker.addMementos("开始20分钟的备份", originatorGame.createMementoGame()); originatorGame.show(); System.out.println("----恢复备份----"); System.out.println("----开始20分钟的备份----"); originatorGame.getStateFromMementoGame(caretaker.getMementos("开始20分钟的备份")); originatorGame.show(); System.out.println("----开始10分钟的备份----"); originatorGame.getStateFromMementoGame(caretaker.getMementos("开始10分钟的备份")); originatorGame.show(); System.out.println("----初始备份----"); originatorGame.getStateFromMementoGame(caretaker.getMementos("初始备份")); originatorGame.show(); }} |
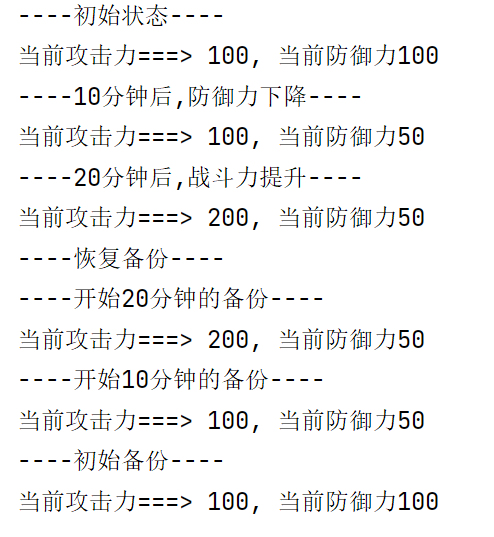
3.19、解释器模式(Interpreter Pattern)
以四则运算问题引入解释器模式:先输入表达式的形式,比如 a+b+c-d+e,要求表达式的字母不能重复,在分别输入 a、b、c、d的值,最后求出结果。
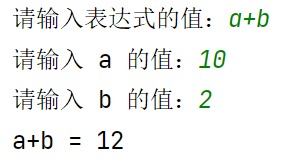
基本介绍
基本介绍
在编译原理中,一个算术表达式通过词法分析器形成词法单元,而后这些词法单元再通过语法分析器构建语法分析树,最终形成一颗抽象的语法分析树。
这里的词法分析器和语法分析器都可以看做是解释器。
解释器模式(Interpreter Pattern):是指给定一个语言(表达式),定义它的文法的一种表示,并定义一个解释器,使用该解释器来解释语言中的句子(表达式)
应用场景:将一个需要解释执行的语言中的句子表示为一个抽象语法树,一些重复出现的问题可以用一种简单的语言来表达,编译器、运算表达式计算、正则表达式、机器人等
- Context:是环境角色,含有解释器之外的全局信息.
- AbstractExpression:抽象表达式, 声明一个抽象的解释操作,这个方法为抽象语法树中所有的节点所共享。
- TerminalExpression:为终结符表达式,实现与文法中的终结符相关的解释操作
- NonTermialExpression:为非终结符表达式,为文法中的非终结符实现解释操作
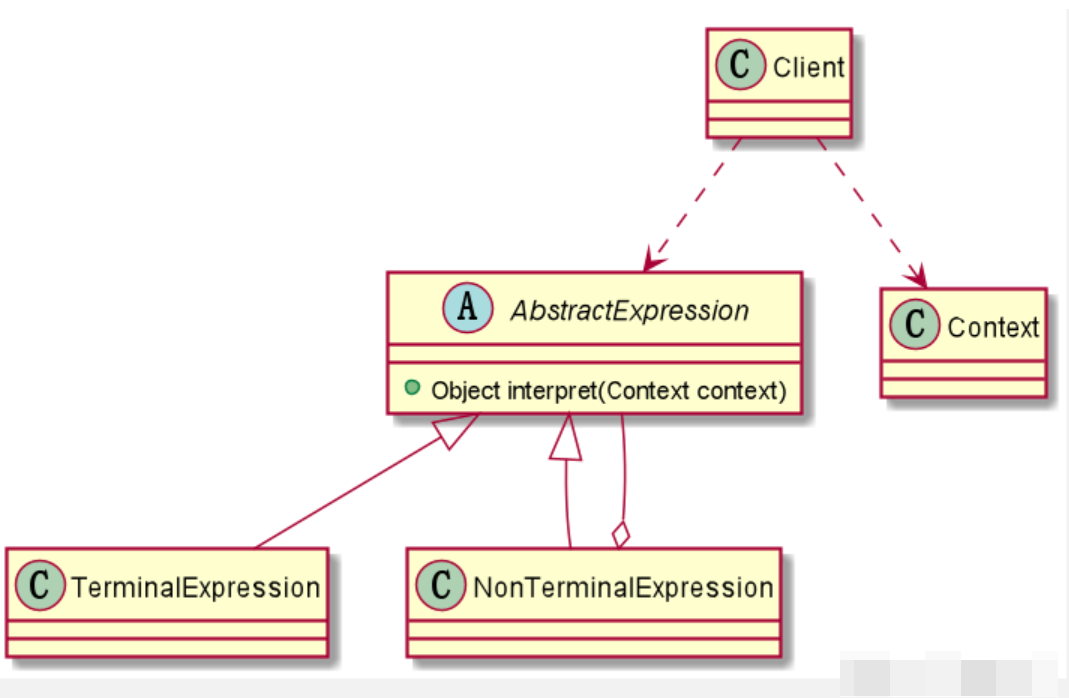
代码实现
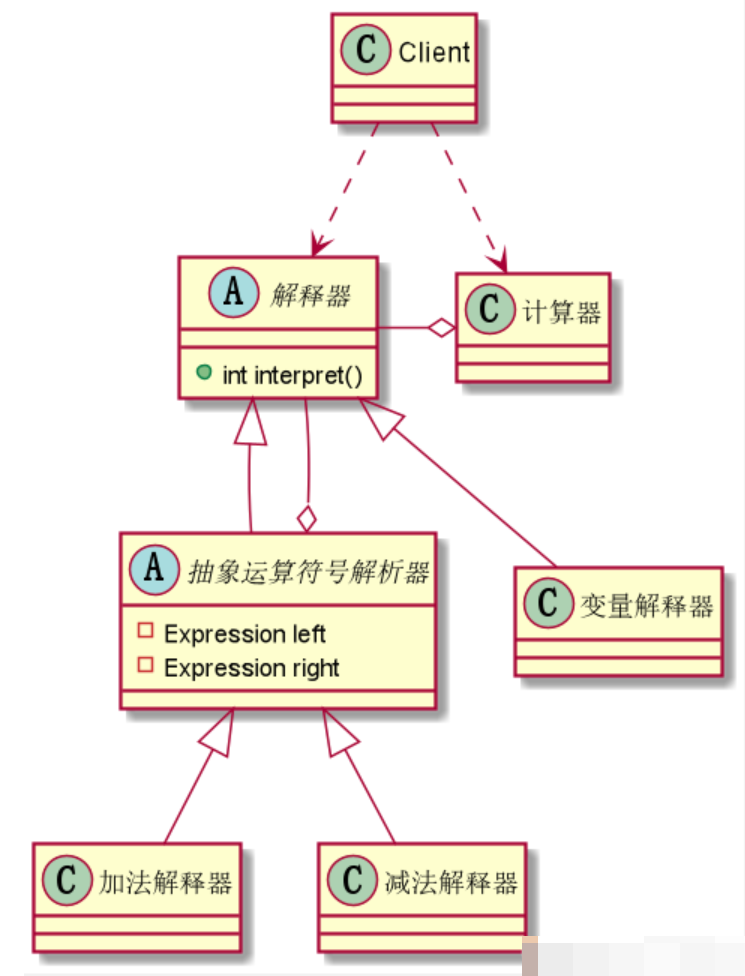
1 2 3 4 5 6 7 8 9 10 11 12 13 14 15 16 17 18 19 20 21 22 23 24 25 26 27 28 29 30 31 32 33 34 35 36 37 38 39 40 41 42 43 44 45 46 47 48 49 50 51 52 53 54 55 56 57 58 59 60 61 62 63 64 65 66 67 68 69 70 71 72 73 74 75 76 77 78 79 80 81 82 83 84 85 86 87 88 89 90 91 92 93 94 95 96 97 98 99 100 101 102 103 104 105 106 107 108 109 110 111 112 113 114 115 116 117 118 119 120 121 122 123 124 125 126 127 128 129 130 131 132 133 134 135 136 137 138 139 140 141 142 143 144 145 146 147 148 149 150 151 152 153 154 155 156 157 158 159 160 161 162 163 164 165 166 167 168 169 170 171 172 173 174 175 176 177 178 179 180 | import java.io.BufferedReader;import java.io.IOException;import java.io.InputStreamReader;import java.util.HashMap;import java.util.Stack;/** * 抽象类解释器Expression,比如公式a+b-c */abstract class Expression { /** * 根据变量名称,返回对应值 * 例如: a + b ,key就是公式参数[a , b], value就是就是具体值 * * @param var {a=10, b=20} * @return 变量名称对应的值 */ public abstract int interpret(HashMap<String, Integer> var);}/** * 变量解释器,比如公式参数a,b,c */class VarExpression extends Expression { /** * key = a , b */ private final String key; public VarExpression(String key) { this.key = key; } //var就是{a=10, b=20} //根据变量名称,返回对应值 @Override public int interpret(HashMap<String, Integer> var) { return var.get(this.key); }}/** * 抽象运算符号解析器,这里每个运算符号都只和自己左右两个数字有关系 */abstract class SymbolExpression extends Expression { /** * 左侧的表达式 */ protected Expression left; /** * 右侧的表达式 */ protected Expression right; public SymbolExpression(Expression left, Expression right) { this.left = left; this.right = right; } /** * 让其子类来实现 * * @param var {a=10, b=20} * @return 根据表达式对应的值进行计算 */ public abstract int interpret(HashMap<String, Integer> var);}/** * 加法解释器 */class AddExpression extends SymbolExpression { public AddExpression(Expression left, Expression right) { super(left, right); } ///求left 和 right表达式相加后的结果 @Override public int interpret(HashMap<String, Integer> var) { return super.left.interpret(var) + super.right.interpret(var); }}/** * 减法解释器 */class SubExpression extends SymbolExpression { public SubExpression(Expression left, Expression right) { super(left, right); } //求出 left和 right表达式相减后的结果 @Override public int interpret(HashMap<String, Integer> var) { return super.left.interpret(var) - super.right.interpret(var); }}class Calculator { /** * 定义表达式 */ private final Expression expression; //构造函数传参并解析 public Calculator(String expStr) { //通过栈来进行运算操作 Stack<Expression> stack = new Stack<>(); //表达式拆分成字符数组:[a, +, b] char[] charArray = expStr.toCharArray(); Expression left = null; Expression right = null; //遍历我们的字符数组,针对不同的情况做处理 for (int i = 0; i < charArray.length; i++) { switch (charArray[i]) { case '+': left = stack.pop(); right = new VarExpression(String.valueOf(charArray[++i])); stack.push(new AddExpression(left, right)); break; case '-': left = stack.pop(); right = new VarExpression(String.valueOf(charArray[++i])); stack.push(new SubExpression(left, right)); break; default: //如果是一个 Var 就创建 VarExpression 对象,并 push 到 stack stack.push(new VarExpression(String.valueOf(charArray[i]))); } } this.expression = stack.pop(); } public int run(HashMap<String, Integer> map) { return this.expression.interpret(map); }}class Client { public static void main(String[] args) throws IOException { //获得表达式 String expStr = getExpStr(); //去掉空格 String str = expStr.replaceAll(" ", ""); //获得值映射 HashMap<String, Integer> map = getValue(str); Calculator calculator = new Calculator(str); //得到计算结果 int result = calculator.run(map); System.out.println(expStr + " = " + result); } //获得表达式 public static String getExpStr() throws IOException { System.out.print("请输入表达式的值:"); return new BufferedReader(new InputStreamReader(System.in)).readLine(); } //获得值映射 public static HashMap<String, Integer> getValue(String expStr) throws IOException { HashMap<String, Integer> map = new HashMap<>(16); for (char ch : expStr.toCharArray()) { if (ch != '+' && ch != '-') { if (!map.containsKey(String.valueOf(ch))) { System.out.print("请输入 " + ch + " 的值:"); String in = new BufferedReader(new InputStreamReader(System.in)).readLine(); map.put(String.valueOf(ch), Integer.valueOf(in)); } } } return map; }} |
3.20、状态模式(Statement Pattern)
以抽奖活动引出状态模式:
假如每参加一次抽奖活动要扣除用户 50 积分,中奖概率是 10%,奖品数量固定,抽完就不能抽奖。
活动有四个状态:可以抽奖、不能抽奖、发放奖品和奖品领完
基本介绍:
状态模式(State Pattern):它主要用来解决对象在多种状态转换时,需要对外输出不同的行为的问题。状态和行为是一一对应的,状态之间可以相互转换。
当一个对象的内在状态改变时,允许改变其行为,这个对象看起来像是改变了其类。
- Context:环境角色,用于维护 State 实例,这个实例定义当前状态
- State:是抽象状态角色,封装与 Context 的一个特点接口相关行为
- ConcreteState:具体的状态角色,每个子类实现一个与 Context 的一个状态相关行为
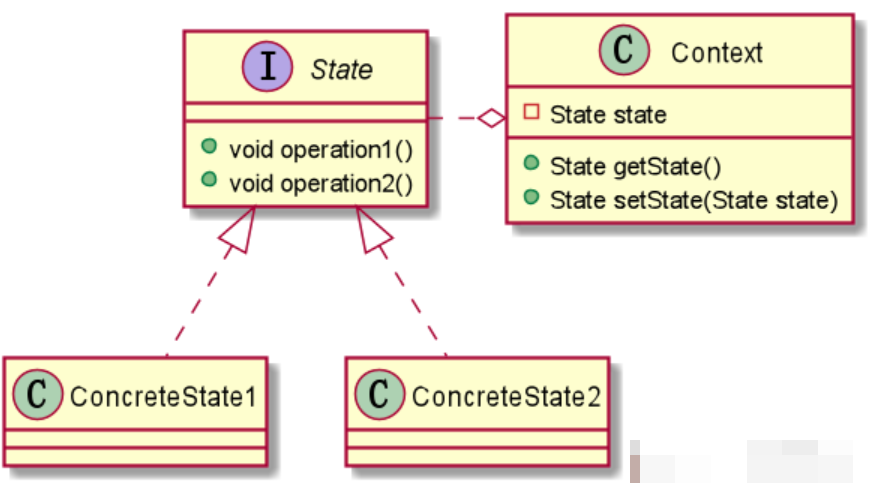
代码实现:

根据抽奖状态关系转换图,可以在抽象状态中定义三个方法
- 扣除积分(每次抽奖前都要扣除积分)
- 是否中奖(抽奖时有两种情况,中奖和不中奖)
- 领取奖品(领取奖品有两种情况,有奖品和没有奖品)
1 2 3 4 5 6 7 8 9 10 11 12 13 14 15 16 17 18 19 20 21 22 23 24 25 26 27 28 29 30 31 32 33 34 35 36 37 38 39 40 41 42 43 44 45 46 47 48 49 50 51 52 53 54 55 56 57 58 59 60 61 62 63 64 65 66 67 68 69 70 71 72 73 74 75 76 77 78 79 80 81 82 83 84 85 86 87 88 89 90 91 92 93 94 95 96 97 98 99 100 101 102 103 104 105 106 107 108 109 110 111 112 113 114 115 116 117 118 119 120 121 122 123 124 125 126 127 128 129 130 131 132 133 134 135 136 137 138 139 140 141 142 143 144 145 146 147 148 149 150 151 152 153 154 155 156 157 158 159 160 161 162 163 164 165 166 167 168 169 170 171 172 173 174 175 176 177 178 179 180 181 182 183 184 185 186 187 188 189 190 191 192 193 194 195 196 197 198 199 200 201 202 203 204 205 206 207 208 209 210 211 212 213 214 215 216 217 218 219 220 221 222 223 224 225 226 227 228 229 230 231 232 233 234 235 236 237 238 239 240 241 242 243 244 245 246 247 248 249 250 251 252 253 254 255 | import java.util.Random;public abstract class State { /** * 扣除积分 -50 */ public abstract void deductIntegral(); /** * 是否抽中奖品 * * @return true 抽中奖品, false 未抽中奖品 */ public abstract boolean raffle(); /** * 发放奖品 */ public abstract void dispensePrize();}//不能抽奖状态class NoRaffleState extends State { private RaffleActivity raffleActivity; public NoRaffleState(RaffleActivity raffleActivity) { this.raffleActivity = raffleActivity; } //扣除积分 -50 @Override public void deductIntegral() { System.out.println("扣除50积分成功,您可以抽奖了"); //状态转换:不能抽奖状态 ===> 抽奖状态 raffleActivity.setState(raffleActivity.getRaffleState()); } //是否抽中奖品 @Override public boolean raffle() { System.out.println("对不起,扣除积分才能抽奖"); return false; } //发放奖品 @Override public void dispensePrize() { System.out.println("没参与抽奖,不能发放奖品"); }}//抽奖状态class RaffleState extends State { private final RaffleActivity raffleActivity; public RaffleState(RaffleActivity raffleActivity) { this.raffleActivity = raffleActivity; } //扣除积分 -50 @Override public void deductIntegral() { System.out.println("已经扣过积分,参与抽奖吧"); } //是否抽中奖品 @Override public boolean raffle() { System.out.println("要抽奖啦"); int i = new Random().nextInt(5); //只有 25% 的可能性抽中奖品 if (i == 1) { //抽奖状态 ===> 发放奖品状态 raffleActivity.setState(raffleActivity.getDispenseState()); return true; } else { System.out.println("没抽中奖品,再接再厉"); //抽奖状态 ===> 不能抽奖状态 raffleActivity.setState(raffleActivity.getNoRaffleState()); return false; } } //发放奖品 @Override public void dispensePrize() { System.out.println("没中奖,不给奖品"); }}//发放奖品状态class DispenseState extends State { private RaffleActivity raffleActivity; public DispenseState(RaffleActivity raffleActivity) { this.raffleActivity = raffleActivity; } //扣除积分 -50 @Override public void deductIntegral() { System.out.println("发奖品呢,扣什么积分"); } //是否抽中奖品 @Override public boolean raffle() { System.out.println("你已经在领奖了,还抽奖干嘛"); return false; } //发放奖品 @Override public void dispensePrize() { int count = raffleActivity.getCount(); if (count > 0) { System.out.println("恭喜你,领取奖品成功,奖品剩余 " + --count + "个"); //领奖状态 ===> 不能抽奖状态 raffleActivity.setState(raffleActivity.getNoRaffleState()); raffleActivity.setCount(count); } else { System.out.println("不好意思,没有奖品了"); //领奖状态 ===> 奖品领完状态 raffleActivity.setState(raffleActivity.getDispenseOutState()); } }}//奖品领完状态class DispenseOutState extends State { private RaffleActivity raffleActivity; public DispenseOutState(RaffleActivity raffleActivity) { this.raffleActivity = raffleActivity; } //扣除积分 -50 @Override public void deductIntegral() { System.out.println("奖品没了,就不扣您的积分了"); } //是否抽中奖品 @Override public boolean raffle() { System.out.println("奖品都没了,您还抽什么奖啊!"); return false; } //发放奖品 @Override public void dispensePrize() { System.out.println("奖品都没了,不用来领奖了!"); }}class RaffleActivity { //抽奖状态 private State state; //奖品数量 private int count; //不能抽奖状态 private NoRaffleState noRaffleState = new NoRaffleState(this); //能抽奖状态 private RaffleState raffleState = new RaffleState(this); //发放奖品状态 private DispenseState dispenseState = new DispenseState(this); //奖品领完状态 private DispenseOutState dispenseOutState = new DispenseOutState(this); public RaffleActivity(int count) { System.out.println("快来玩啊,抽奖活动开始了"); // 初始化状态为 ===> 不能抽奖状态 this.state = this.noRaffleState; this.count = count; } //扣除积分; public void deductIntegral() { state.deductIntegral(); } //抽奖; public void raffle() { if (state.raffle()) { //抽中了就做好发奖品的准备吧 state.dispensePrize(); } } public State getState() { return state; } public void setState(State state) { this.state = state; } public NoRaffleState getNoRaffleState() { return noRaffleState; } public void setNoRaffleState(NoRaffleState noRaffleState) { this.noRaffleState = noRaffleState; } public RaffleState getRaffleState() { return raffleState; } public void setRaffleState(RaffleState raffleState) { this.raffleState = raffleState; } public DispenseState getDispenseState() { return dispenseState; } public void setDispenseState(DispenseState dispenseState) { this.dispenseState = dispenseState; } public DispenseOutState getDispenseOutState() { return dispenseOutState; } public void setDispenseOutState(DispenseOutState dispenseOutState) { this.dispenseOutState = dispenseOutState; } public int getCount() { return count; } public void setCount(int count) { this.count = count; }}class Client { public static void main(String[] args) { RaffleActivity raffleActivity = new RaffleActivity(2); for (int i = 1; i <= 10; i++) { System.out.println("-----第" + i + "次抽奖-----"); raffleActivity.deductIntegral(); raffleActivity.raffle(); } }} |
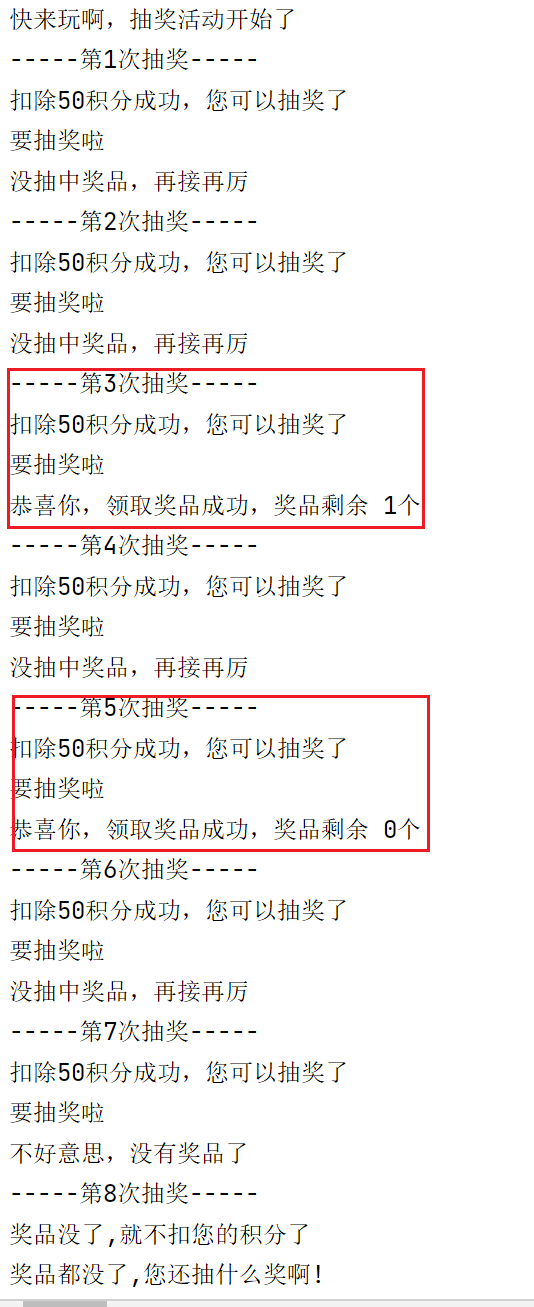
3.21、策略模式(Strategy Pattern)
在策略模式(Strategy Pattern)中,一个类的行为或其算法可以在运行时更改。这种类型的设计模式属于行为型模式。
介绍
意图:定义一系列的算法,把它们一个个封装起来, 并且使它们可相互替换。
主要解决:在有多种算法相似的情况下,使用 if...else 所带来的复杂和难以维护。
何时使用:一个系统有许多许多类,而区分它们的只是他们直接的行为。
如何解决:将这些算法封装成一个一个的类,任意地替换。
关键代码:实现同一个接口。
应用实例: 1、诸葛亮的锦囊妙计,每一个锦囊就是一个策略。 2、旅行的出游方式,选择骑自行车、坐汽车,每一种旅行方式都是一个策略。
缺点: 1、策略类会增多。 2、所有策略类都需要对外暴露。
使用场景: 1、如果在一个系统里面有许多类,它们之间的区别仅在于它们的行为,那么使用策略模式可以动态地让一个对象在许多行为中选择一种行为。 2、一个系统需要动态地在几种算法中选择一种。 3、如果一个对象有很多的行为,如果不用恰当的模式,这些行为就只好使用多重的条件选择语句来实现。
注意事项:如果一个系统的策略多于四个,就需要考虑使用混合模式,解决策略类膨胀的问题。
案例说明
1 2 3 4 5 6 7 8 9 | 策略模式是一种行为设计模式,它允许在运行时选择算法的不同策略来完成特定任务。在这个例子中,有一个Handler接口,定义了一个handler方法,用于处理字符串。AbstractHandler是Handler接口的抽象实现类,定义了一个通用的处理方法handler,其中包含了一个抽象方法doHandler。ReplaceHandler和LowerHandler是AbstractHandler的具体实现类,分别实现了具体的处理方法doHandler。HandlerEnum是一个枚举类,列举了不同的处理策略(REPLACE和LOWER),并且每个枚举常量都关联了一个对应的Handler实现对象。HandlerTest类用于测试策略模式的使用。它定义了一个main方法和一个enumHandler方法。main方法中使用了enumHandler方法来处理一个字符串,通过传入不同的HandlerEnum枚举常量来选择不同的策略进行处理。这种设计的好处是可以方便地添加和扩展不同的处理策略,而不需要修改现有的代码。通过使用接口和抽象类,可以实现策略的解耦和灵活切换。我们可以根据具体的需求,通过添加新的策略实现类和枚举常量来扩展系统的功能和灵活性。同时,通过定义抽象类封装通用的处理逻辑,可以避免代码的重复和冗余。 |

代码
1 2 3 4 5 6 7 8 9 10 11 12 13 14 15 16 17 18 19 20 21 22 23 24 25 26 27 28 29 30 31 32 33 34 35 36 37 38 39 40 41 42 43 44 45 46 47 48 49 50 51 52 53 54 55 56 57 58 59 60 61 62 63 64 65 66 67 68 69 70 71 72 73 74 75 76 77 78 79 80 81 82 83 84 85 86 87 88 89 90 91 92 93 94 95 96 97 98 99 100 101 102 103 104 105 106 107 108 109 110 111 | import java.util.Objects;/** * @author zhangzhixi * @version 1.0 * @description 策略模式-定义策略接口 * @date 2023-06-20 17:19 */interface Handler { /** * 具体的处理方法 * * @param str 要处理的字符串 * @return 处理后的字符串 */ String handler(String str);}/** * @description 策略模式-定义抽象的策略 */abstract class AbstractHandler implements Handler { /** * 通用的处理方法 * * @param str 要处理的字符串 * @return 处理后的字符串 */ @Override public String handler(String str) { if (Objects.isNull(str) || str.length() == 0) { throw new RuntimeException("参数不能为空"); } return doHandler(str); } /** * 具体的处理方法 * * @param str 要处理的字符串 * @return 处理后的字符串 */ public abstract String doHandler(String str);}/** * @description 策略模式-定义具体的策略 * 字符串替换 */class ReplaceHandler extends AbstractHandler { @Override public String doHandler(String str) { return str.replace("a", "@"); }}/** * @description 策略模式-定义具体的策略 * 字符串转小写 */class LowerHandler extends AbstractHandler { @Override public String doHandler(String str) { return str.toLowerCase(); }}enum HandlerEnum { /** * 字符串替换 */ REPLACE(new ReplaceHandler()), /** * 字符串转小写 */ LOWER(new LowerHandler()); private final Handler handler; HandlerEnum(Handler handler) { this.handler = handler; } public Handler getHandler() { return handler; }}class HandlerTest { public static void main(String[] args) { String str = "Aabc"; System.out.println(enumHandler(str, HandlerEnum.REPLACE)); // A@bc System.out.println(enumHandler(str, HandlerEnum.LOWER)); // aabc } /** * 字符串处理 * @param str 要处理的字符串 * @param handlerEnum 具体要处理的策略 * @return 处理后的字符串 */ public static String enumHandler(String str, HandlerEnum handlerEnum) { return handlerEnum.getHandler().handler(str); }} |
3.22、责任链模式(Chain of Responsibility Pattern)
基本介绍:
职责链模式(Chain of Responsibility Pattern),又叫责任链模式,为请求创建了一个接收者对象的链。这种模式对请求的发送者和接收者进行解耦。
职责链模式通常每个接收者都包含对另一个接收者的引用。如果一个对象不能处理该请求,那么它会把相同的请求传给下一个接收者,依此类推。
属于行为型模式。
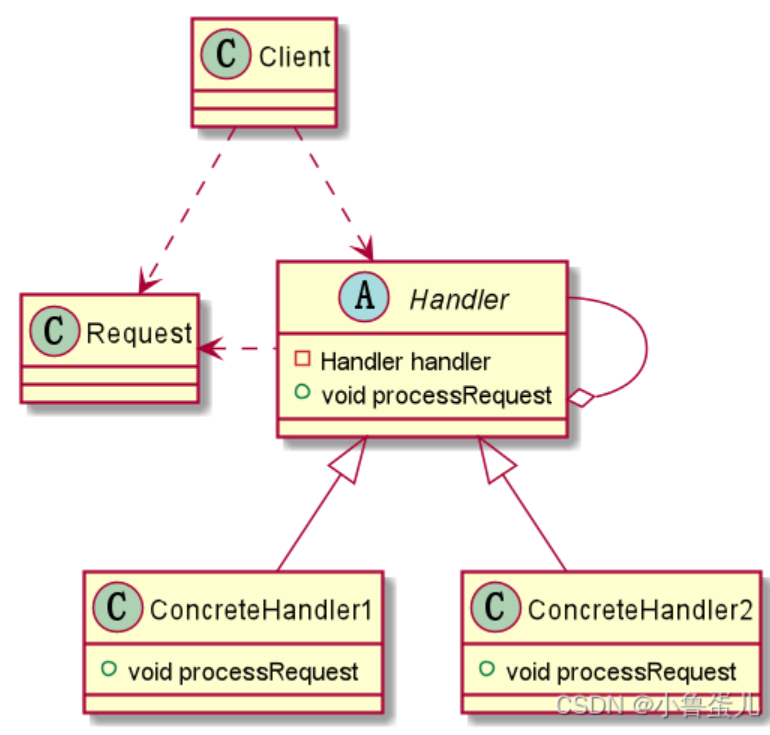
- Handler:抽象的处理者,定义了一个处理请求的接口。
- ConcreteHandlerA , B :具体的处理者,处理它自己负责的请求,可以访问它的后继者(即下一个处理者), 如果可以处理当前请求,则处理,否则就将该请求交个后继者去处理,从而形成一个职责链。
- Request:含有很多属性,表示一个请求。
代码实现:
1 2 3 4 5 6 7 8 9 10 11 12 13 14 15 16 17 18 19 20 21 22 23 24 25 26 27 28 29 30 31 32 33 34 35 36 37 38 39 40 41 42 43 44 45 46 47 48 49 50 51 52 53 54 55 56 57 58 59 60 61 62 63 64 65 66 67 68 69 70 71 72 73 74 75 76 77 78 79 80 81 82 83 84 85 86 87 88 89 90 91 92 93 94 95 96 97 98 99 100 101 102 103 104 105 106 107 108 109 110 111 112 113 114 115 116 117 118 119 120 121 122 123 124 125 126 127 128 129 130 131 132 133 134 135 136 137 138 139 140 141 142 143 144 145 146 147 148 149 150 151 152 153 154 155 156 157 158 159 160 161 162 163 164 165 166 167 168 169 170 171 172 | /** * 需要进行处理的请求 */public class SchoolRequest { /** * 请求的类型 */ private final String type; /** * 请求的大概金额 */ private final float money; /** * 请求的编号 */ private final int id; public SchoolRequest(String type, float money, int id) { this.type = type; this.money = money; this.id = id; } public String getType() { return type; } public float getMoney() { return money; } public int getId() { return id; }}/** * 审批者抽象类 */abstract class Approver { /** * 聚合,下一个处理的审批者; */ Approver approver; /** * 当前审批的部门名字 */ String name; public Approver(String name) { this.name = name; } /** * 设置下一个审批者到底是谁 * * @param approver 审批者 */ public void setApprover(Approver approver) { this.approver = approver; } /** * 处理请求的方法 * * @param schoolRequest 请求对象 */ public abstract void handlingRequest(SchoolRequest schoolRequest);}/** * 教导主任审批 */class DirectorApprover extends Approver { public DirectorApprover(String name) { super(name); } @Override public void handlingRequest(SchoolRequest schoolRequest) { if (schoolRequest.getMoney() <= 5000) { System.out.println(this.name + "能处理这个项目===>" + schoolRequest.getType()); System.out.println("项目ID为" + schoolRequest.getId()); } else { // 交给下一个审批者处理 approver.handlingRequest(schoolRequest); } }}/** * 院长审批 */class DeanApprover extends Approver { public DeanApprover(String name) { super(name); } @Override public void handlingRequest(SchoolRequest schoolRequest) { if (schoolRequest.getMoney() <= 5000 && schoolRequest.getMoney() <= 10000) { System.out.println(this.name + "能处理这个项目===>" + schoolRequest.getType()); System.out.println("项目ID为" + schoolRequest.getId()); } else { // 交给下一个审批者处理 approver.handlingRequest(schoolRequest); } }}/** * 副校长审批 */class VicePresidentApprover extends Approver { public VicePresidentApprover(String name) { super(name); } @Override public void handlingRequest(SchoolRequest schoolRequest) { if (schoolRequest.getMoney() > 10000 && schoolRequest.getMoney() <= 30000) { System.out.println(this.name + "能处理这个项目===>" + schoolRequest.getType()); System.out.println("项目ID为" + schoolRequest.getId()); } else { // 交给下一个审批者处理 approver.handlingRequest(schoolRequest); } }}/** * 校长审批 */class PresidentApprover extends Approver { public PresidentApprover(String name) { super(name); } @Override public void handlingRequest(SchoolRequest schoolRequest) { System.out.println(this.name + "能处理这个项目===>" + schoolRequest.getType()); System.out.println("项目ID为" + schoolRequest.getId()); }}class Client { public static void main(String[] args) { //提出请求 SchoolRequest schoolRequest = new SchoolRequest("采购教学用品", 60000, 1); DirectorApprover directorApprover = new DirectorApprover("教导主任"); DeanApprover deanApprover = new DeanApprover("院长"); VicePresidentApprover vicePresidentApprover = new VicePresidentApprover("副校长"); PresidentApprover presidentApprover = new PresidentApprover("校长"); //设置好下一个处理的人 directorApprover.setApprover(deanApprover); deanApprover.setApprover(vicePresidentApprover); vicePresidentApprover.setApprover(presidentApprover); //教导主任收到请求时 directorApprover.handlingRequest(schoolRequest); }} |


【推荐】国内首个AI IDE,深度理解中文开发场景,立即下载体验Trae
【推荐】编程新体验,更懂你的AI,立即体验豆包MarsCode编程助手
【推荐】抖音旗下AI助手豆包,你的智能百科全书,全免费不限次数
【推荐】轻量又高性能的 SSH 工具 IShell:AI 加持,快人一步
· 被坑几百块钱后,我竟然真的恢复了删除的微信聊天记录!
· 没有Manus邀请码?试试免邀请码的MGX或者开源的OpenManus吧
· 【自荐】一款简洁、开源的在线白板工具 Drawnix
· 园子的第一款AI主题卫衣上架——"HELLO! HOW CAN I ASSIST YOU TODAY
· Docker 太简单,K8s 太复杂?w7panel 让容器管理更轻松!