


🌽Shiro学习
 Shiro是一个功能强大且易于使用的Java安全框架,可执行身份验证、授权、加密和会话管理。
使用Shiro易于理解的API,您可以快速轻松地保护任何应用程序,从最小的移动应用程序到最大的web和企业应用程序。
Shiro是一个功能强大且易于使用的Java安全框架,可执行身份验证、授权、加密和会话管理。
使用Shiro易于理解的API,您可以快速轻松地保护任何应用程序,从最小的移动应用程序到最大的web和企业应用程序。
Shiro
课程地址:
【【编程不良人】2020最新版Shiro教程,整合SpringBoot项目实战教程】 https://www.bilibili.com/video/BV1uz4y197Zm/?p=6&share_source=copy_web&vd_source=045f1e1c5f0609a50870e499d44940af
GitHub:
https://github.com/zhangzhixi0305/springboot-study-shiro
Gitee:
https://gitee.com/zhang-zhixi/springboot-study-shiro
一、Shiro
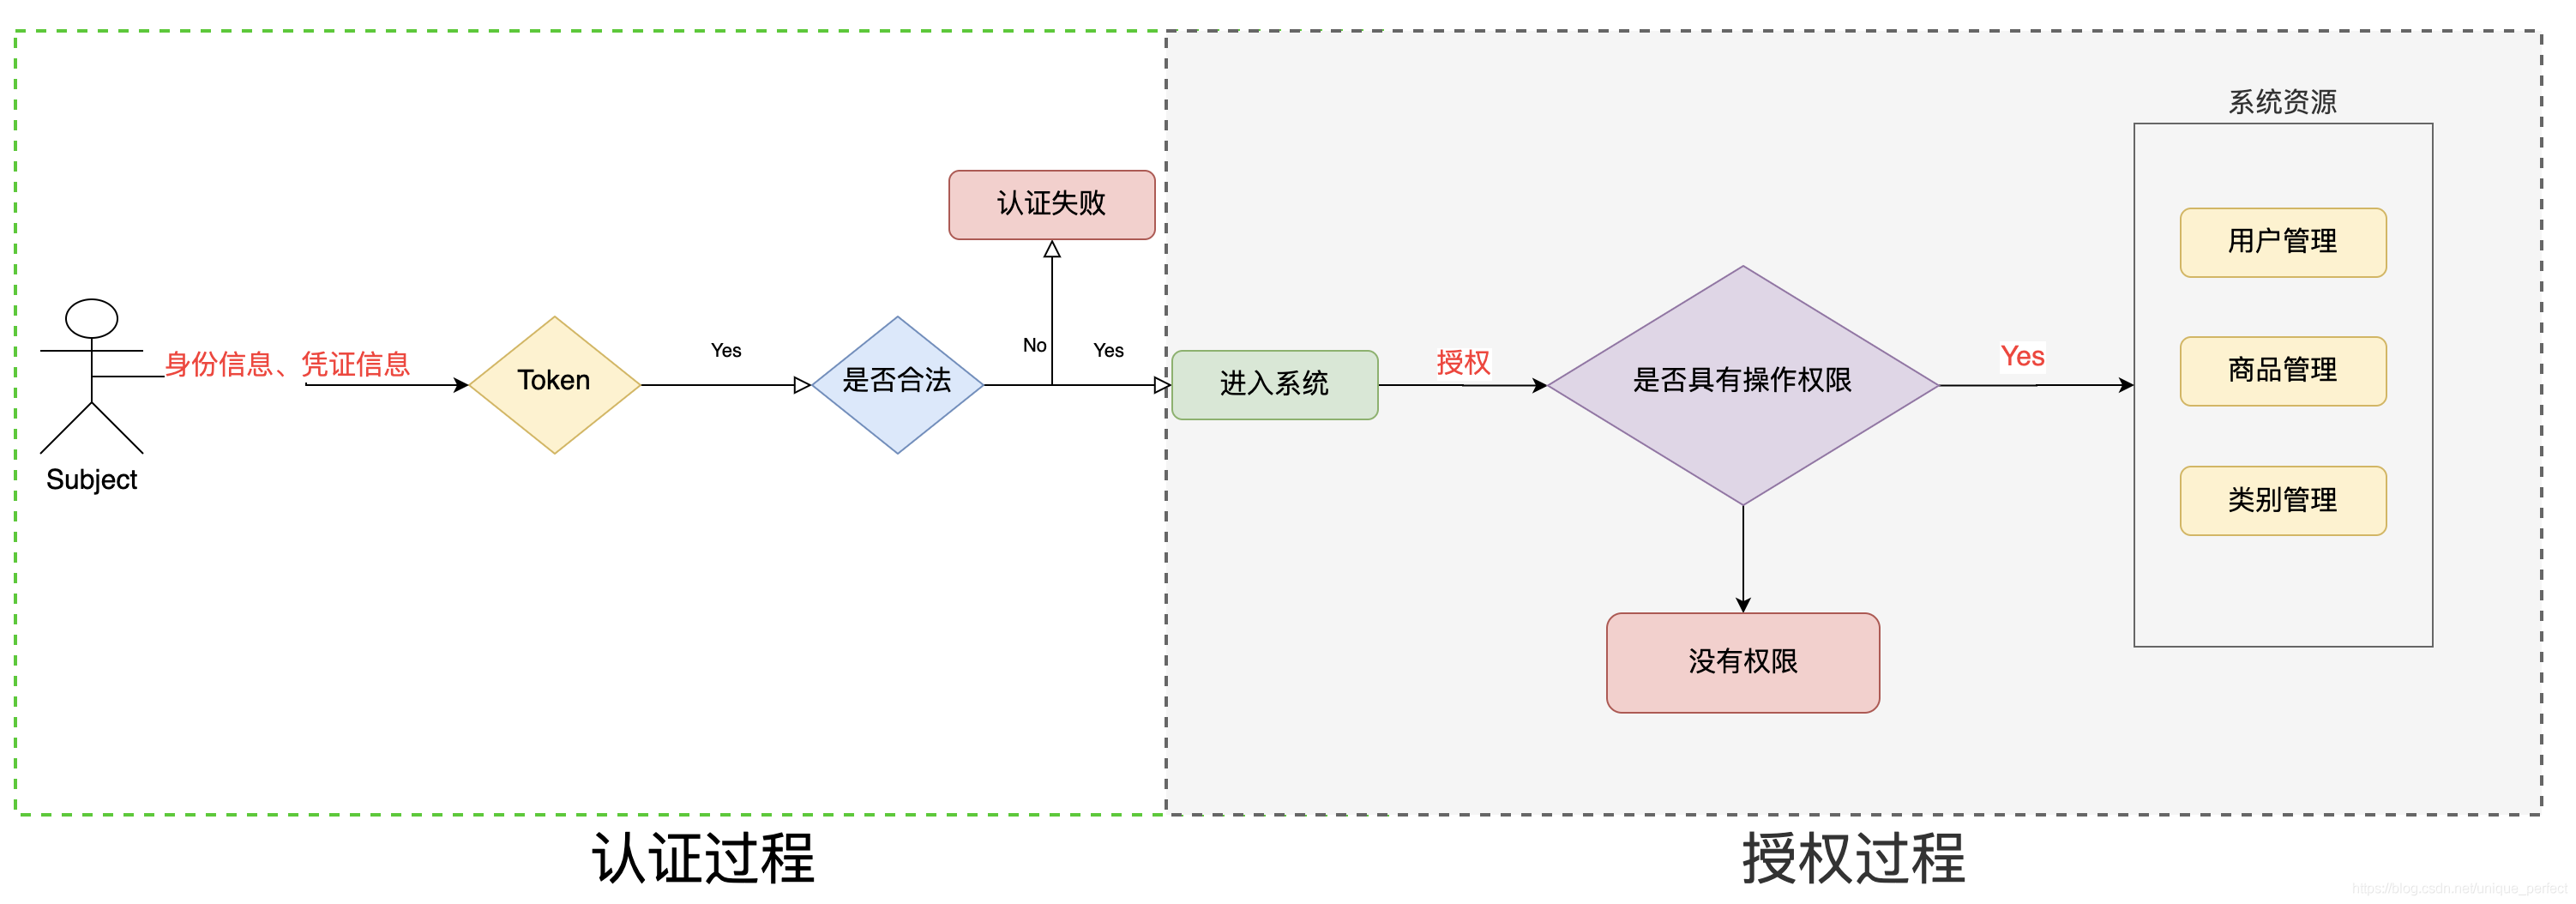
1.1、权限管理
什么是权限管理
1 2 3 | 权限管理包括用户身份认证和授权两部分,简称认证授权。对于需要访问控制的资源用户首先经过身份认证,认证通过后用户具有该资源的访问权限方可访问 |
什么是身份认证:Authenticator
1 2 3 4 5 | 身份认证,就是判断一个用户是否为合法用户的处理过程。最常用的简单身份认证方式是系统通过核对用户输入的用户名和口令,看其是否与系统中存储的该用户的用户名和口令一致,来判断用户身份是否正确。对于采用指纹等系统,则出示指纹;对于硬件Key等刷卡系统,则需要刷卡。 |
什么是授权:Authorizer
1 2 3 | 授权,即访问控制,控制谁能访问哪些资源。主体进行身份认证后需要分配权限方可访问系统的资源,对于某些资源没有权限是无法访问的 |
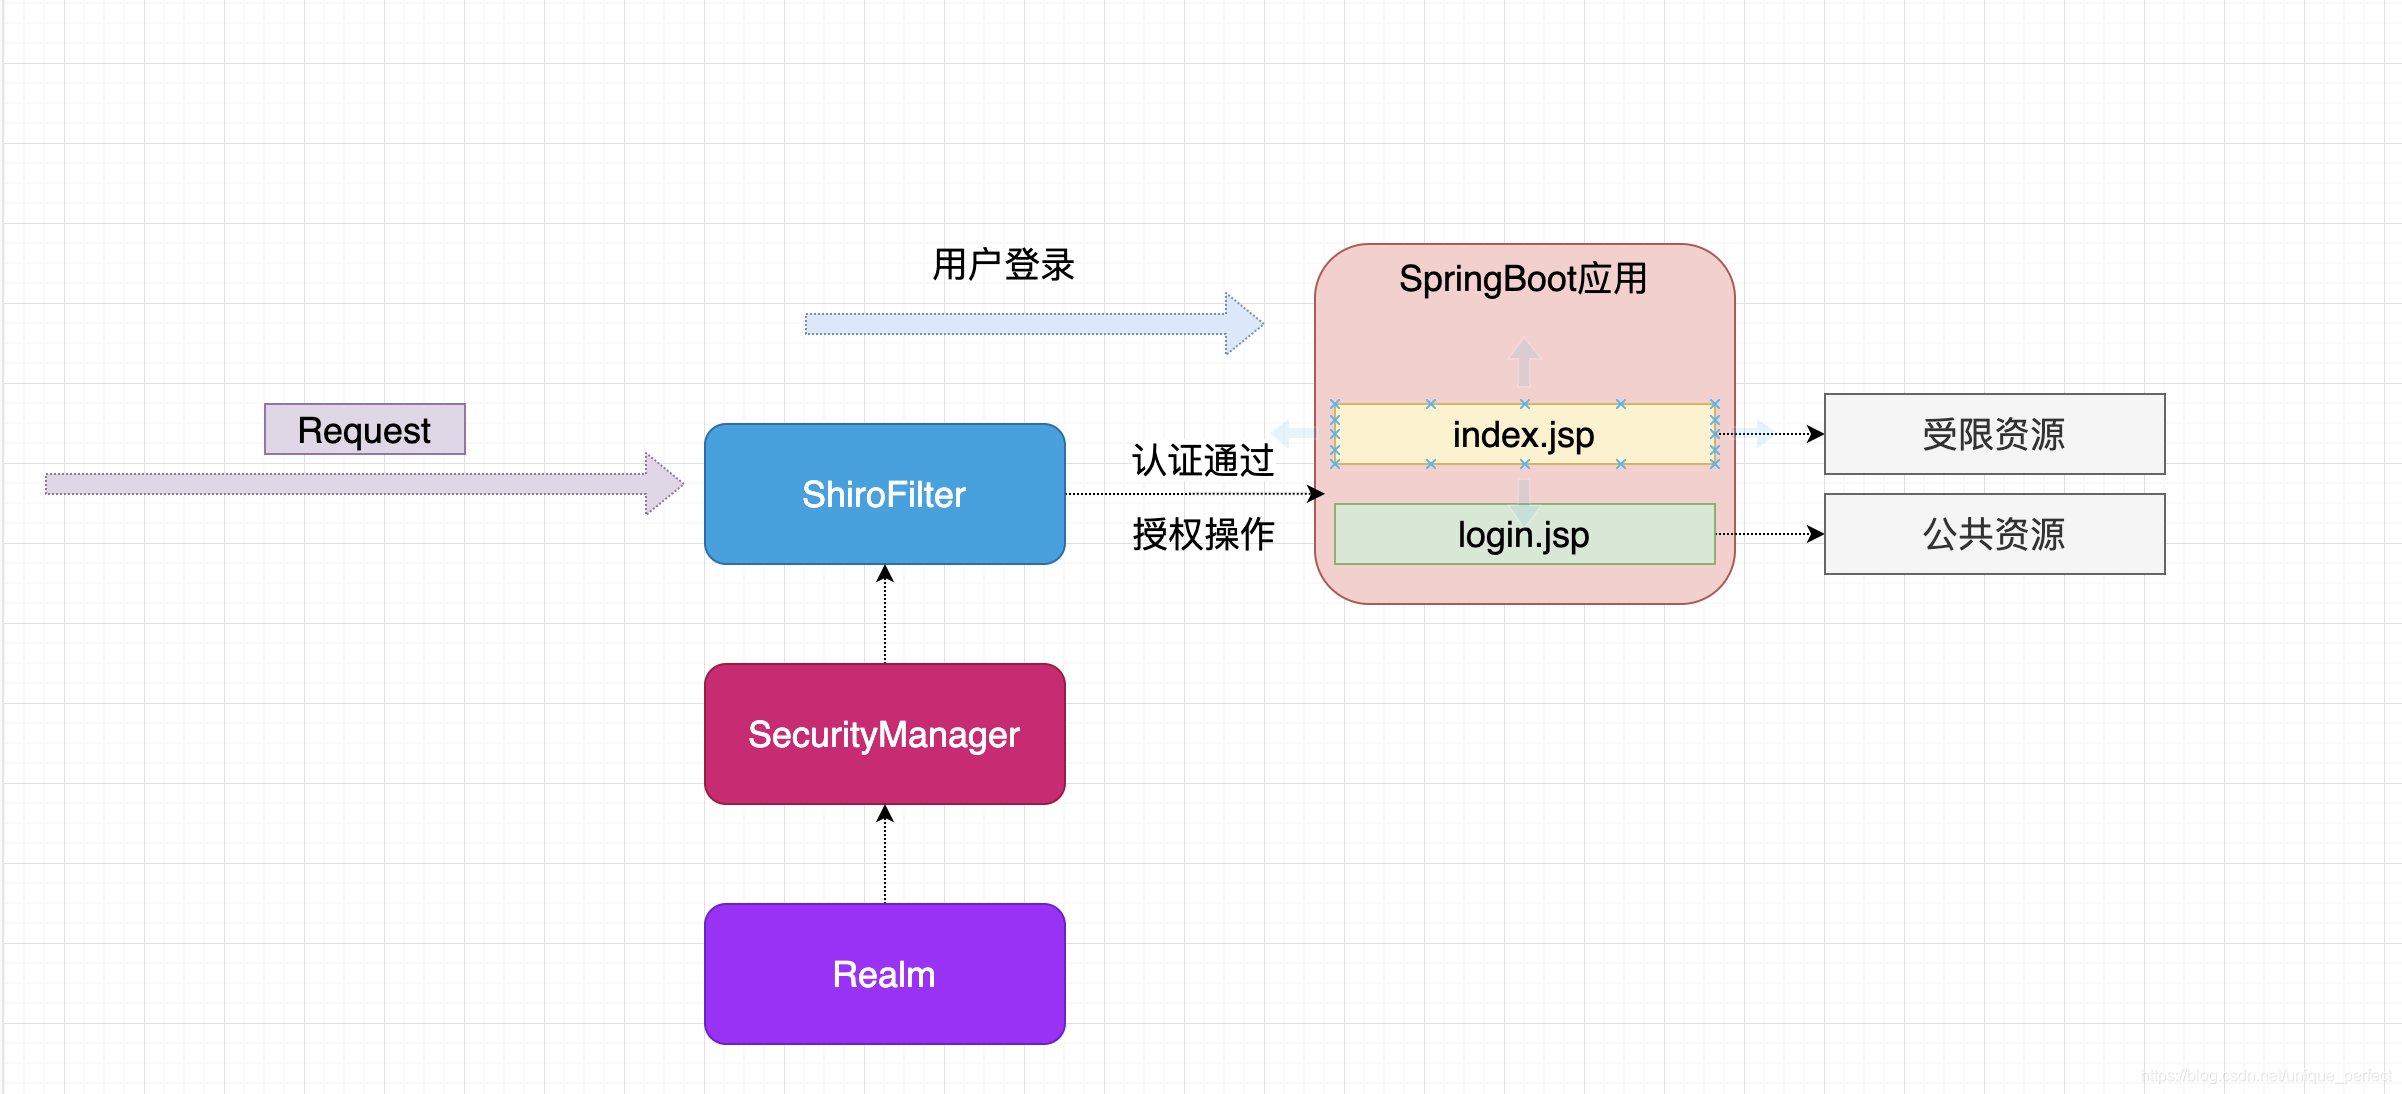
1.2、Shiro核心架构
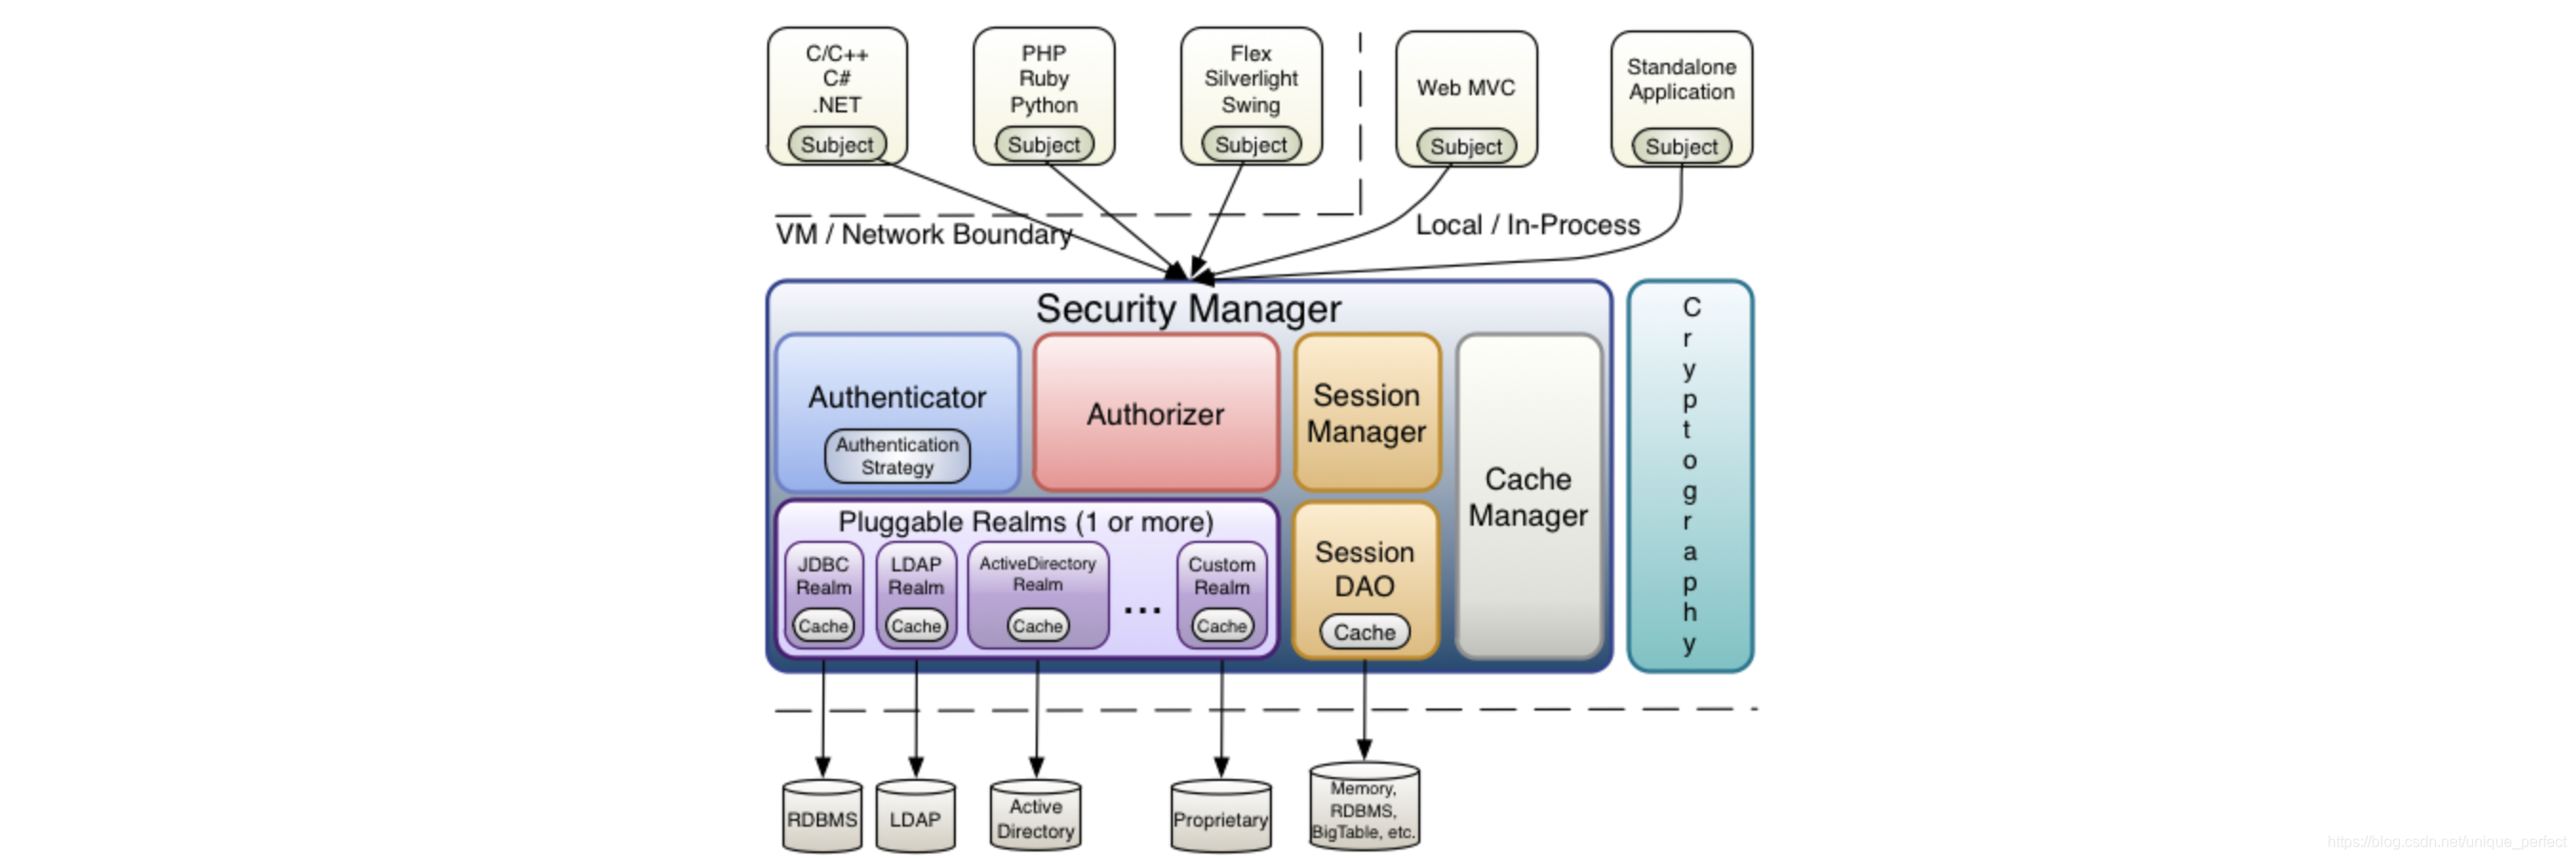
Subject
1 2 3 4 5 6 | Subject即主体,外部应用与subject进行交互,subject记录了当前操作用户,将用户的概念理解为当前操作的主体,可能是一个通过浏览器请求的用户,也可能是一个运行的程序。 Subject在shiro中是一个接口,接口中定义了很多认证授相关的方法,外部程序通过subject进行认证授,而subject是通过SecurityManager安全管理器进行认证授权 |
SecurityManager
1 2 3 4 | SecurityManager即安全管理器,对全部的subject进行安全管理,它是shiro的核心,负责对所有的subject进行安全管理。通过SecurityManager可以完成subject的认证、授权等.实质上SecurityManager是通过Authenticator进行认证,通过Authorizer进行授权,通过SessionManager进行会话管理等。SecurityManager是一个接口,继承了Authenticator, Authorizer,SessionManager这三个接口。 |
Authenticator
1 2 | Authenticator即认证器,对用户身份进行认证,Authenticator是一个接口.shiro提供ModularRealmAuthenticator实现类,通过ModularRealmAuthenticator基本上可以满足大多数需求,也可以自定义认证器。 |
Authorizer
1 | Authorizer即授权器,用户通过认证器认证通过,在访问功能时需要通过授权器判断用户是否有此功能的操作权限。 |
Realm
1 2 | Realm即领域,相当于datasource数据源,securityManager进行安全认证需要通过Realm获取用户权限数据.比如:如果用户身份数据在数据库那么realm就需要从数据库获取用户身份信息。 |
注意:不要把realm理解成只是从数据源取数据,在realm中还有认证授权校验的相关的代码。
SessionManager
1 2 | sessionManager即会话管理,shiro框架定义了一套会话管理,它不依赖web容器的session.所以shiro可以使用在非web应用上,也可以将分布式应用的会话集中在一点管理,此特性可使它实现单点登录。 |
SessionDAO
1 | SessionDAO即会话dao,是对session会话操作的一套接口,比如要将session存储到数据库,可以通过jdbc将会话存储到数据库 |
CacheManager
1 | CacheManager即缓存管理,将用户权限数据存储在缓存,这样可以提高性能 |
Cryptography
1 | Cryptography即密码管理,shiro提供了一套加密/解密的组件,方便开发。比如提供常用的散列、加/解密等功能 |
1.3、Shiro中的认证
1、创建maven项目,引入依赖
1 2 3 4 5 | <dependency> <groupId>org.apache.shiro</groupId> <artifactId>shiro-core</artifactId> <version>1.11.0</version></dependency> |
2、创建shiro配置文件并加入如下配置:shiro.ini
1 2 3 | [users]xiaochen=123zhangsan=456 |
3、认证代码
1 2 3 4 5 6 7 8 9 10 11 12 13 14 15 16 17 18 19 20 21 22 23 24 25 26 27 28 29 30 31 32 33 34 35 36 37 | import org.apache.shiro.SecurityUtils;import org.apache.shiro.authc.IncorrectCredentialsException;import org.apache.shiro.authc.UnknownAccountException;import org.apache.shiro.authc.UsernamePasswordToken;import org.apache.shiro.mgt.DefaultSecurityManager;import org.apache.shiro.realm.text.IniRealm;import org.apache.shiro.subject.Subject;public class TestAuthenticator { public static void main(String[] args) { //1.创建安全管理器对象 DefaultSecurityManager securityManager = new DefaultSecurityManager(); //2.给安全管理器设置realm securityManager.setRealm( new IniRealm( "classpath:shiro.ini" )); //3.SecurityUtils 给全局安全工具类设置安全管理器 SecurityUtils.setSecurityManager(securityManager); //4.关键对象 subject 主体 Subject subject = SecurityUtils.getSubject(); //5.创建令牌 UsernamePasswordToken token = new UsernamePasswordToken( "xiaochen1" , "123" ); try { System. out .println( "认证状态: " + subject.isAuthenticated()); //用户认证 subject.login(token); System. out .println( "认证状态: " + subject.isAuthenticated()); } catch (UnknownAccountException e){ e.printStackTrace(); System. out .println( "认证失败: 用户名不存在~" ); } catch (IncorrectCredentialsException e){ e.printStackTrace(); System. out .println( "认证失败: 密码错误~" ); } }} |
4、异常
1 2 3 4 | DisabledAccountException(帐号被禁用)LockedAccountException(帐号被锁定)ExcessiveAttemptsException(登录失败次数过多)ExpiredCredentialsException(凭证过期)等 |
1.3.1、自定义Realm
上边的程序使用的是Shiro自带的IniRealm,IniRealm从ini配置文件中读取用户的信息,大部分情况下需要从系统的数据库中读取用户信息,所以需要自定义realm。
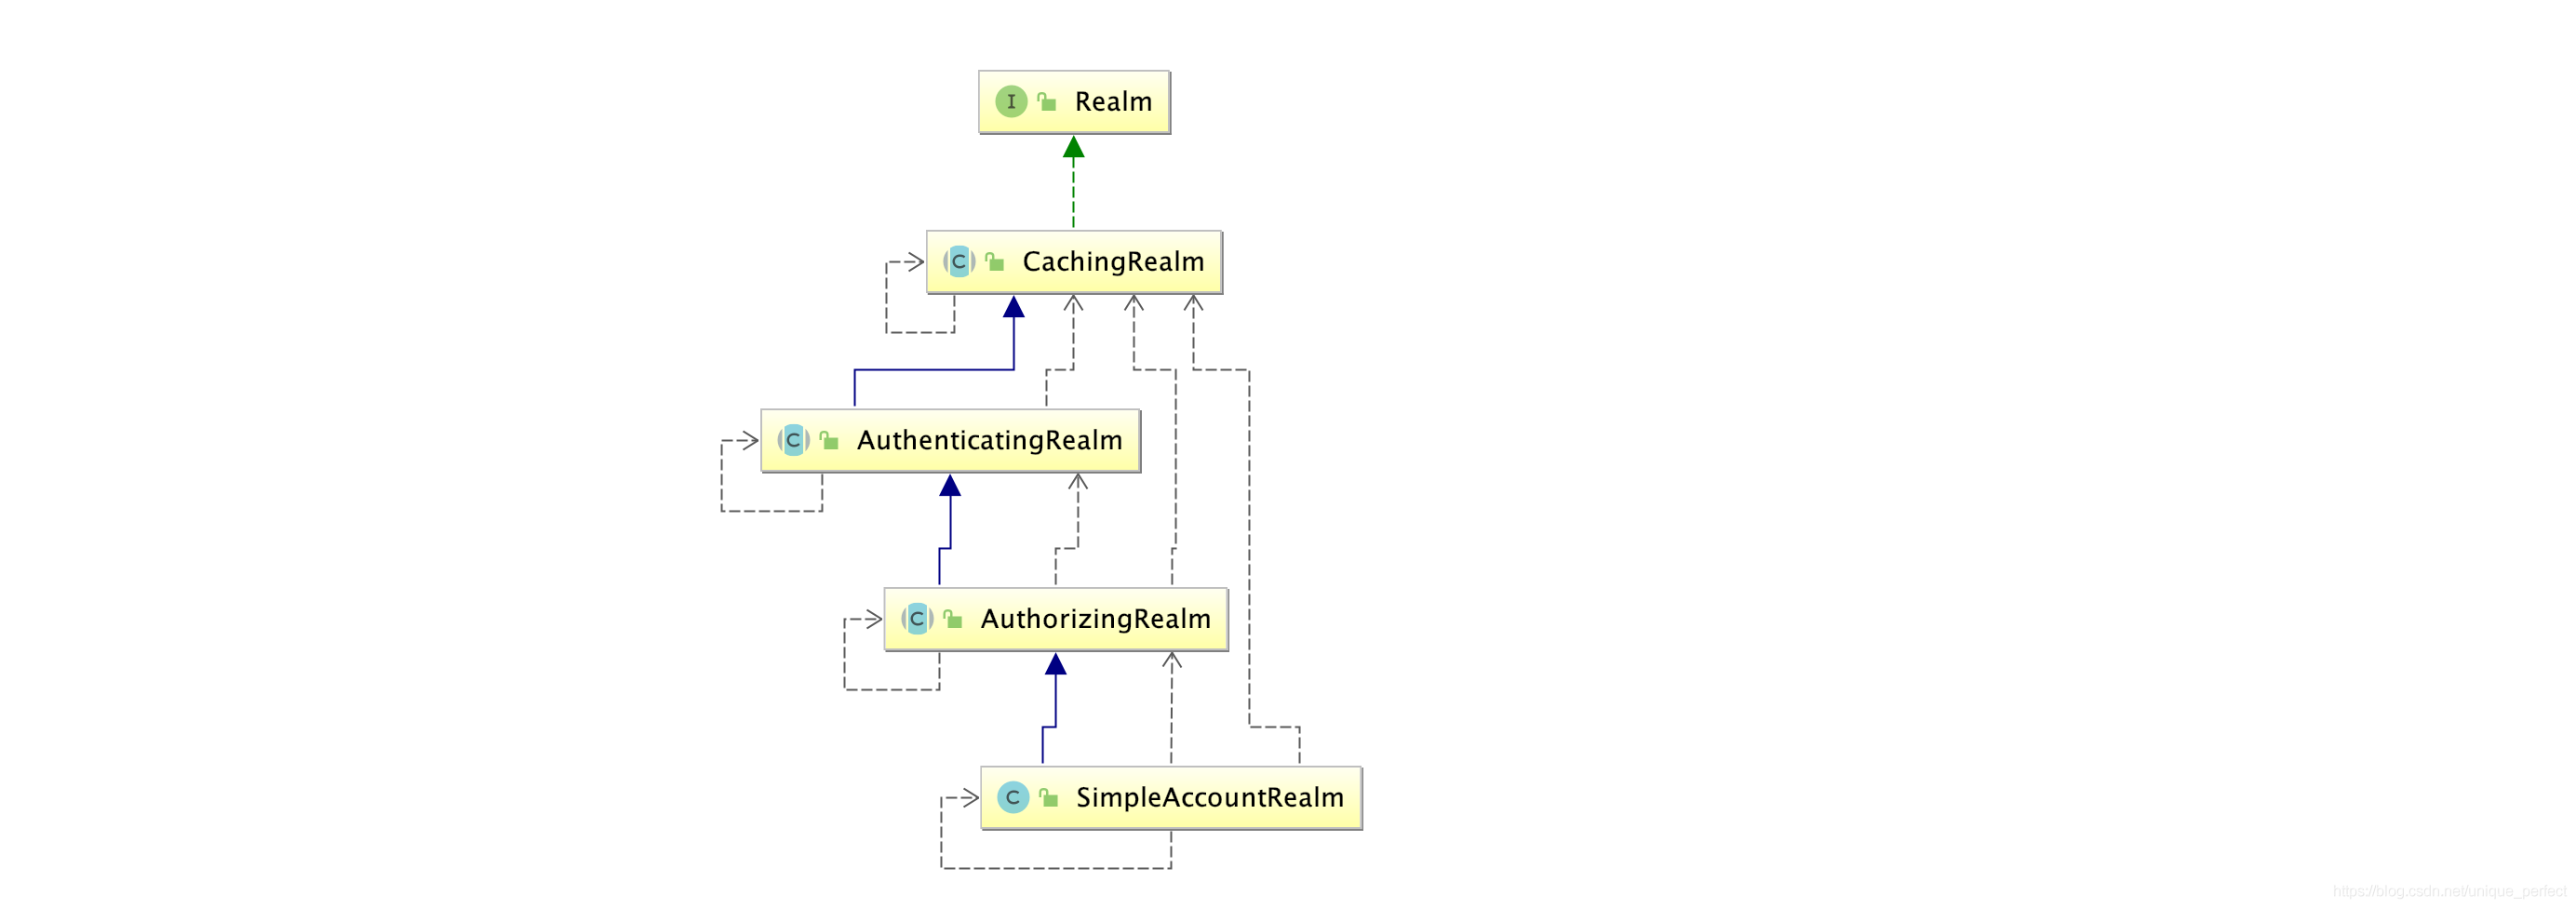
Shiro提供的Realm
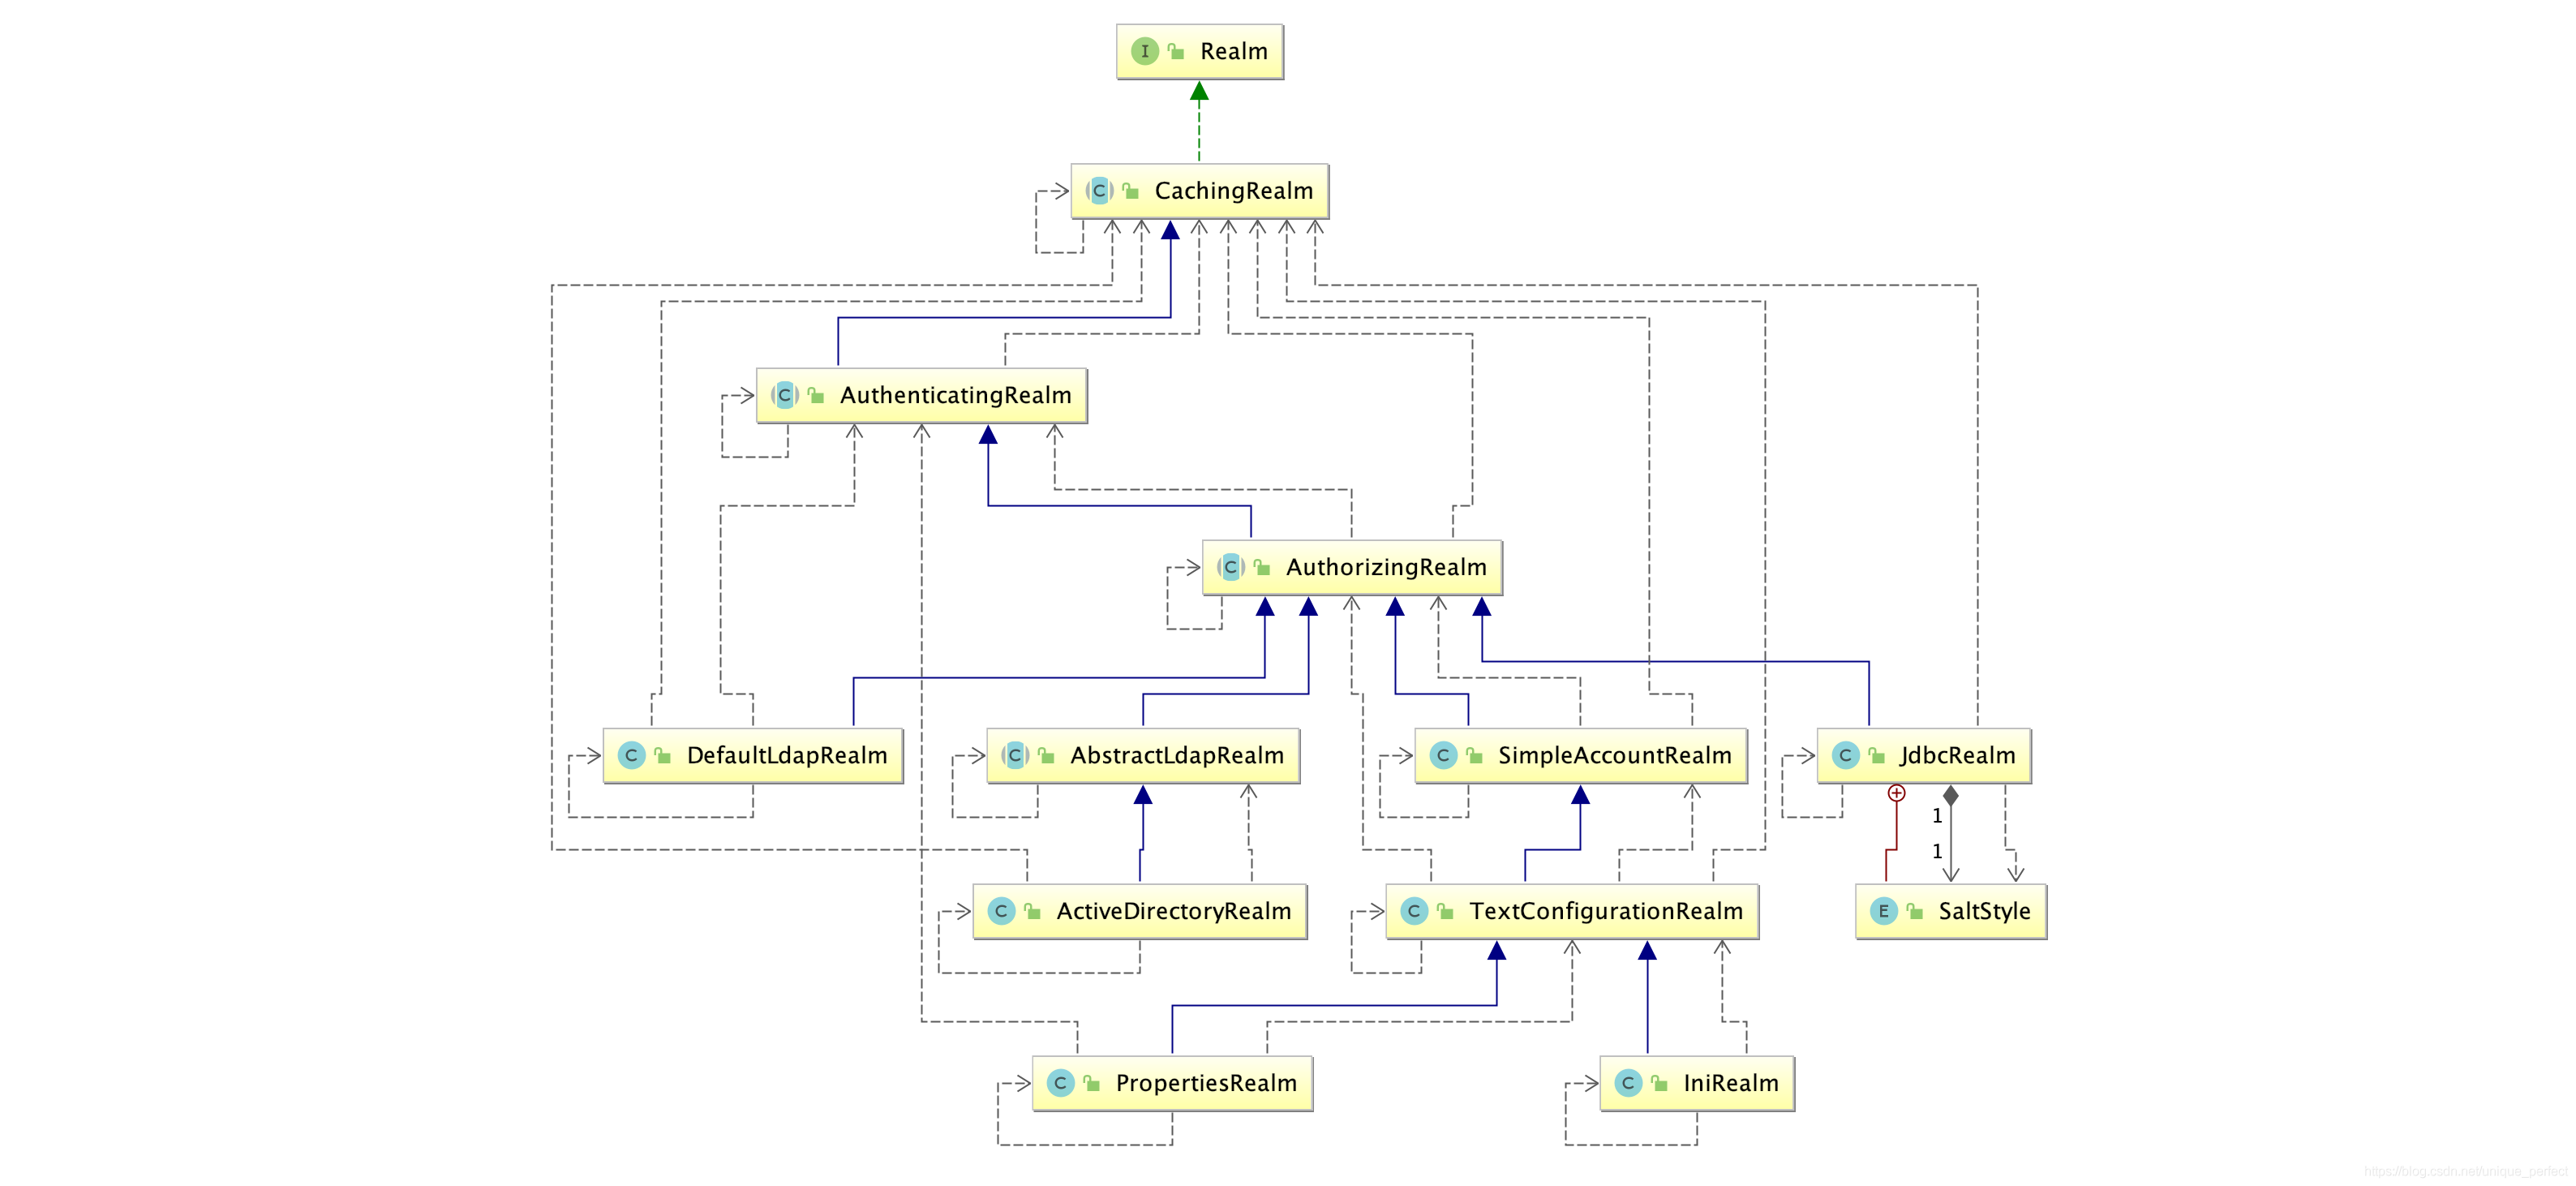
自定义Realm实现AuthorizingRealm:源码
1 2 3 4 5 6 7 8 9 10 11 12 13 14 15 16 17 18 19 20 21 22 23 24 25 26 27 28 29 30 31 | public class SimpleAccountRealm extends AuthorizingRealm { //.......省略 protected AuthenticationInfo doGetAuthenticationInfo(AuthenticationToken token) throws AuthenticationException { UsernamePasswordToken upToken = (UsernamePasswordToken) token; SimpleAccount account = getUser(upToken.getUsername()); if (account != null ) { if (account.isLocked()) { throw new LockedAccountException( "Account [" + account + "] is locked." ); } if (account.isCredentialsExpired()) { String msg = "The credentials for account [" + account + "] are expired" ; throw new ExpiredCredentialsException(msg); } } return account; } protected AuthorizationInfo doGetAuthorizationInfo(PrincipalCollection principals) { String username = getUsername(principals); USERS_LOCK.readLock(). lock (); try { return this .users. get (username); } finally { USERS_LOCK.readLock().unlock(); } }} |
自定义Realm
1 2 3 4 5 6 7 8 9 10 11 12 13 14 15 16 17 18 19 20 21 22 23 24 25 26 27 28 29 30 31 32 33 34 35 36 37 38 39 40 41 | import org.apache.shiro.authc.AuthenticationException;import org.apache.shiro.authc.AuthenticationInfo;import org.apache.shiro.authc.AuthenticationToken;import org.apache.shiro.authc.SimpleAuthenticationInfo;import org.apache.shiro.authz.AuthorizationInfo;import org.apache.shiro.realm.AuthorizingRealm;import org.apache.shiro.subject.PrincipalCollection;/** * @ClassName ConsumerRealm * @Author zhangzhixi * @Description * @Date 2023-03-12 22:17 * @Version 1.0 */public class ConsumerRealm extends AuthorizingRealm { // 授权 @Override protected AuthorizationInfo doGetAuthorizationInfo(PrincipalCollection principals) { return null ; } /** * 认证 * * @param token 用户名密码token * @return 认证实例 * @throws AuthenticationException 身份验证异常 */ @Override protected AuthenticationInfo doGetAuthenticationInfo(AuthenticationToken token) throws AuthenticationException { // 通过token获取用户名 String userName = token.getPrincipal().toString(); // 这里模拟从数据库中验证用户,之后可能从JDBC、Mybatis取 if ( "xiaochen" . equals (userName)) { // 参数1:返回数据库中正确的用户名 参数2:返回数据库中正确密码 参数3:提供当前realm的名字 this.getName(); return new SimpleAuthenticationInfo(userName, "1234" , this .getName()); } return null ; }} |
测试
1 2 3 4 5 6 7 8 9 10 11 12 13 14 15 16 17 18 19 20 21 22 23 24 25 26 | public class TestConsumerRealm { public static void main(String[] args) { //创建securityManager DefaultSecurityManager defaultSecurityManager = new DefaultSecurityManager(); //设置自定义realm defaultSecurityManager.setRealm( new ConsumerRealm()); //将安全工具类设置安全工具类 SecurityUtils.setSecurityManager(defaultSecurityManager); //通过安全工具类获取subject Subject subject = SecurityUtils.getSubject(); //创建token UsernamePasswordToken token = new UsernamePasswordToken( "xiaochen" , "123" ); //执行登录 try { subject.login(token); } catch (UnknownAccountException unknownAccountException) { unknownAccountException.printStackTrace(); System. out .println( "用户名验证错误" ); } catch (IncorrectCredentialsException incorrectCredentialsException) { incorrectCredentialsException.printStackTrace(); System. out .println( "密码验证错误" ); } }} |
1.3.2、使用MD5+盐(Salt),实现认证
1、创建用户名和密码时候使用的加盐规则
1 2 3 4 5 6 7 8 9 10 11 12 13 14 15 16 17 18 19 20 21 22 23 24 25 26 27 | import org.apache.shiro.crypto.hash.Md5Hash;/** * @ClassName ShiroMd5Utils * @Author zhangzhixi * @Description * @Date 2023-03-12 23:13 * @Version 1.0 */public class ShiroMd5Utils { public static void main(String[] args) { // 使用用户名做盐值,为了让盐是动态的 String userName = "xiaochen" ; //使用md5 Md5Hash md5Hash = new Md5Hash( "123" ); System. out .println(md5Hash.toHex()); //使用MD5 + salt处理 Md5Hash md5Hash1 = new Md5Hash( "123" , userName); System. out .println(md5Hash1.toHex()); //使用md5 + salt + hash散列 Md5Hash md5Hash2 = new Md5Hash( "123" , userName, 1024); System. out .println(md5Hash2.toHex()); }} |
2、设置自定义:MD5+盐,的认证代码
1 2 3 4 5 6 7 8 9 10 11 12 13 14 15 16 17 18 19 20 21 22 23 24 25 26 27 28 29 30 31 32 33 34 35 36 37 38 39 40 41 | import org.apache.shiro.authc.AuthenticationException;import org.apache.shiro.authc.AuthenticationInfo;import org.apache.shiro.authc.AuthenticationToken;import org.apache.shiro.authc.SimpleAuthenticationInfo;import org.apache.shiro.authz.AuthorizationInfo;import org.apache.shiro.realm.AuthorizingRealm;import org.apache.shiro.subject.PrincipalCollection;import org.apache.shiro.util.ByteSource;/** * 使用自定义realm 加入md5 + salt +hash */public class CustomerMd5Realm extends AuthorizingRealm { //授权 @Override protected AuthorizationInfo doGetAuthorizationInfo(PrincipalCollection principals) { return null ; } // 认证 @Override protected AuthenticationInfo doGetAuthenticationInfo(AuthenticationToken token) throws AuthenticationException { //获取身份信息 String principal = token.getPrincipal().toString(); //根据用户名查询数据库 if ( "xiaochen" . equals (principal)) { // 参数1: 数据库用户名 // 参数2:数据库md5+salt之后的密码 // 参数3:注册时的随机盐,本例子中使用动态的,用户名作为随机盐 // 参数4:realm的名字 return new SimpleAuthenticationInfo( principal, "847b2f7a3705be61f6738b48bed195f8" , ByteSource.Util.bytes(principal), this .getName()); } return null ; }} |
3、测试
1 2 3 4 5 6 7 8 9 10 11 12 13 14 15 16 17 18 19 20 21 22 23 24 25 26 27 28 29 30 31 32 33 34 35 36 37 38 39 40 41 42 43 44 45 46 47 48 | import org.apache.shiro.SecurityUtils;import org.apache.shiro.authc.IncorrectCredentialsException;import org.apache.shiro.authc.UnknownAccountException;import org.apache.shiro.authc.UsernamePasswordToken;import org.apache.shiro.authc.credential.HashedCredentialsMatcher;import org.apache.shiro.mgt.DefaultSecurityManager;import org.apache.shiro.subject.Subject;public class TestCustomerMd5RealmAuthenicator { public static void main(String[] args) { // 1、创建安全管理器 DefaultSecurityManager defaultSecurityManager = new DefaultSecurityManager(); // 2、注入realm CustomerMd5Realm realm = new CustomerMd5Realm(); // 3、设置realm使用hash凭证匹配器 HashedCredentialsMatcher credentialsMatcher = new HashedCredentialsMatcher(); // 使用算法 credentialsMatcher.setHashAlgorithmName( "md5" ); // 散列次数 credentialsMatcher.setHashIterations(1024); // 4、设置凭据匹配器 realm.setCredentialsMatcher(credentialsMatcher); defaultSecurityManager.setRealm(realm); // 5、将安全管理器注入安全工具 SecurityUtils.setSecurityManager(defaultSecurityManager); // 6、通过安全工具类获取subject Subject subject = SecurityUtils.getSubject(); // 7、认证 UsernamePasswordToken token = new UsernamePasswordToken( "xiaochen" , "123" ); try { subject.login(token); System. out .println( "登录成功" ); } catch (UnknownAccountException e) { e.printStackTrace(); System. out .println( "用户名错误" ); } catch (IncorrectCredentialsException e){ e.printStackTrace(); System. out .println( "密码错误" ); } }} |
1.4、Shiro中的授权
授权,即访问控制,控制谁能访问哪些资源。主体进行身份认证后需要分配权限方可访问系统的资源,对于某些资源没有权限是无法访问的。
1.4.1、关键对象
1 2 3 4 5 6 7 8 9 10 11 | Who,即主体(Subject),主体需要访问系统中的资源。What,即资源(Resource),如系统菜单、页面、按钮、类方法、系统商品信息等。资源包括资源类型和资源实例,比如商品信息为资源类型,类型为t01的商品为资源实例,编号为001的商品信息也属于资源实例。How,权限/许可(Permission),规定了主体对资源的操作许可,权限离开资源没有意义,如用户查询权限、用户添加权限、某个类方法的调用权限、编号为001用户的修改权限等,通过权限可知主体对哪些资源都有哪些操作许可。 |
1.4.2、授权流程
1.4.3、授权方式
基于角色的访问控制RBAC基于角色的访问控制(Role-Based Access Control)是以角色为中心进行访问控制
1 2 3 | if (subject.hasRole( "admin" )){ //操作什么资源} |
基于资源的访问控制RBAC基于资源的访问控制(Resource-Based Access Control)是以资源为中心进行访问控制
1 2 3 4 5 6 | if (subject.isPermission( "user:update:01" )){ //资源实例//对01用户进行修改}if (subject.isPermission( "user:update:*" )){ //资源类型//对01用户进行修改} |
1.4.4、权限字符串
权限字符串的规则是:
资源标识符:操作:资源实例标识符
意思是对哪个资源的哪个实例具有什么操作,“:”是资源/操作/实例的分割符,权限字符串也可以使用*通配符。
1 2 3 4 | 例子: 用户创建权限:user:create,或user:create:* 用户修改实例001的权限:user:update:001 用户实例001的所有权限:user:*:001 |
1.4.5、自定义Realm重写授权

import org.apache.shiro.authc.AuthenticationException;
import org.apache.shiro.authc.AuthenticationInfo;
import org.apache.shiro.authc.AuthenticationToken;
import org.apache.shiro.authc.SimpleAuthenticationInfo;
import org.apache.shiro.authz.AuthorizationInfo;
import org.apache.shiro.authz.SimpleAuthorizationInfo;
import org.apache.shiro.realm.AuthorizingRealm;
import org.apache.shiro.subject.PrincipalCollection;
import org.apache.shiro.util.ByteSource;

import java.util.Arrays;

/**
 * 使用自定义realm 加入md5 + salt +hash
 */
public class CustomerMd5Realm extends AuthorizingRealm {


    /**
     * 授权
     * @param principals subject实体
     * @return 授权对象
     */
    @Override
    protected AuthorizationInfo doGetAuthorizationInfo(PrincipalCollection principals) {
        // 1、获取当前身份信息
        String userName = principals.getPrimaryPrincipal().toString();

        // 2、获取权限对象
        SimpleAuthorizationInfo authorizationInfo = new SimpleAuthorizationInfo();
        // 3、添加角色(从数据库中获取)
        authorizationInfo.addRoles(Arrays.asList("admin", "user"));
        // 4、添加权限:userName这个用户在user模块具有所有权限
        authorizationInfo.addStringPermissions(Arrays.asList("user:*:" + userName));
        return authorizationInfo;
    }

    // 认证
    @Override
    protected AuthenticationInfo doGetAuthenticationInfo(AuthenticationToken token) throws AuthenticationException {
        //获取身份信息
        String principal = token.getPrincipal().toString();

        //根据用户名查询数据库
        if ("xiaochen".equals(principal)) {
            // 参数1: 数据库用户名
            // 参数2:数据库md5+salt之后的密码
            // 参数3:注册时的随机盐,本例子中使用动态的,用户名作为随机盐
            // 参数4:realm的名字
            return new SimpleAuthenticationInfo(
                    principal,
                    "847b2f7a3705be61f6738b48bed195f8",
                    ByteSource.Util.bytes(principal),
                    this.getName());
        }
        return null;
    }
}
1.4.6、测试授权
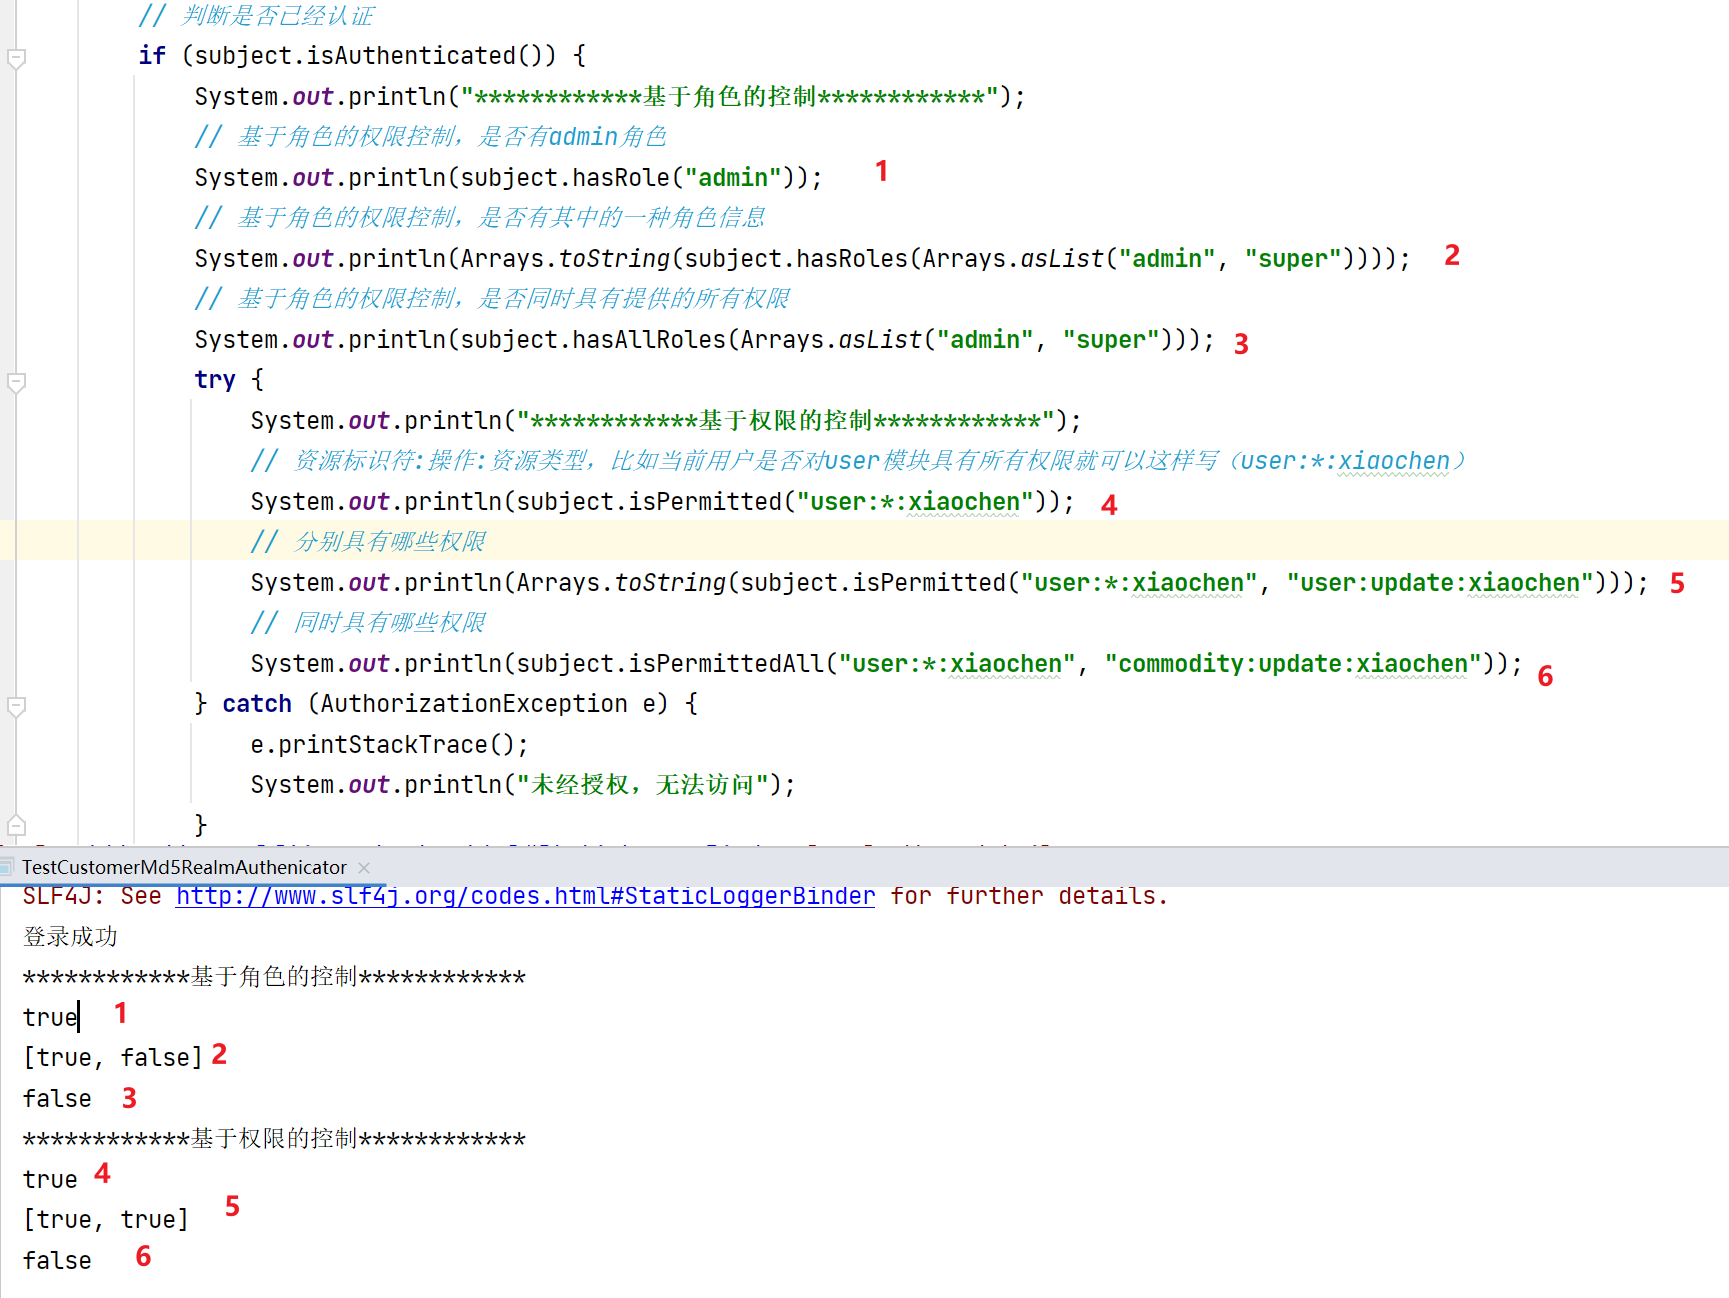
import org.apache.shiro.SecurityUtils;
import org.apache.shiro.authc.IncorrectCredentialsException;
import org.apache.shiro.authc.UnknownAccountException;
import org.apache.shiro.authc.UsernamePasswordToken;
import org.apache.shiro.authc.credential.HashedCredentialsMatcher;
import org.apache.shiro.authz.AuthorizationException;
import org.apache.shiro.mgt.DefaultSecurityManager;
import org.apache.shiro.subject.Subject;

import java.util.Arrays;

public class TestCustomerMd5RealmAuthenicator {

    public static void main(String[] args) {

        // 1、创建安全管理器
        DefaultSecurityManager defaultSecurityManager = new DefaultSecurityManager();

        // 2、注入realm
        CustomerMd5Realm realm = new CustomerMd5Realm();
        // 3、设置realm使用hash凭证匹配器
        HashedCredentialsMatcher credentialsMatcher = new HashedCredentialsMatcher();
        // 使用算法
        credentialsMatcher.setHashAlgorithmName("md5");
        // 散列次数
        credentialsMatcher.setHashIterations(1024);
        // 4、设置凭据匹配器
        realm.setCredentialsMatcher(credentialsMatcher);

        defaultSecurityManager.setRealm(realm);
        // 5、将安全管理器注入安全工具
        SecurityUtils.setSecurityManager(defaultSecurityManager);

        // 6、通过安全工具类获取subject
        Subject subject = SecurityUtils.getSubject();

        // 7、认证
        UsernamePasswordToken token = new UsernamePasswordToken("xiaochen", "123");
        try {
            subject.login(token);
            System.out.println("登录成功");
        } catch (UnknownAccountException e) {
            e.printStackTrace();
            System.out.println("用户名错误");
        } catch (IncorrectCredentialsException e) {
            e.printStackTrace();
            System.out.println("密码错误");
        }

        // 判断是否已经认证
        if (subject.isAuthenticated()) {
            System.out.println("************基于角色的控制************");
            // 基于角色的权限控制,是否有admin角色
            System.out.println(subject.hasRole("admin"));
            // 基于角色的权限控制,是否有其中的一种角色信息
            System.out.println(Arrays.toString(subject.hasRoles(Arrays.asList("admin", "super"))));
            // 基于角色的权限控制,是否同时具有提供的所有权限
            System.out.println(subject.hasAllRoles(Arrays.asList("admin", "super")));
            try {
                System.out.println("************基于权限的控制************");
                // 资源标识符:操作:资源类型,比如当前用户是否对user模块具有所有权限就可以这样写(user:*:xiaochen)
                System.out.println(subject.isPermitted("user:*:xiaochen"));
                // 分别具有哪些权限
                System.out.println(Arrays.toString(subject.isPermitted("user:*:xiaochen", "user:update:xiaochen")));
                // 同时具有哪些权限
                System.out.println(subject.isPermittedAll("user:*:xiaochen", "commodity:update:xiaochen"));
            } catch (AuthorizationException e) {
                e.printStackTrace();
                System.out.println("未经授权,无法访问");
            }
        }
    }
}
1.5、常见过滤器
| 配置缩写 | 对应的过滤器 | 功能 |
|---|---|---|
| anon | AnonymousFilter | 指定url可以匿名访问 |
| authc | FormAuthenticationFilter | 指定url需要form表单登录,默认会从请求中获取username、password,rememberMe等参数并尝试登录,如果登录不了就会跳转到loginUrl配置的路径。我们也可以用这个过滤器做默认的登录逻辑,但是一般都是我们自己在控制器写登录逻辑的,自己写的话出错返回的信息都可以定制嘛。 |
| authcBasic | BasicHttpAuthenticationFilter | 指定url需要basic登录 |
| logout | LogoutFilter | 登出过滤器,配置指定url就可以实现退出功能,非常方便 |
| noSessionCreation | NoSessionCreationFilter | 禁止创建会话 |
| perms | PermissionsAuthorizationFilter | 需要指定权限才能访问 |
| port | PortFilter | 需要指定端口才能访问 |
| rest | HttpMethodPermissionFilter | 将http请求方法转化成相应的动词来构造一个权限字符串,这个感觉意义不大,有兴趣自己看源码的注释 |
| roles | RolesAuthorizationFilter | 需要指定角色才能访问 |
| ssl | SslFilter | 需要https请求才能访问 |
| user | UserFilter | 需要已登录或“记住我”的用户才能访问 |
二、SpringBoot整合Shiro(JSP)
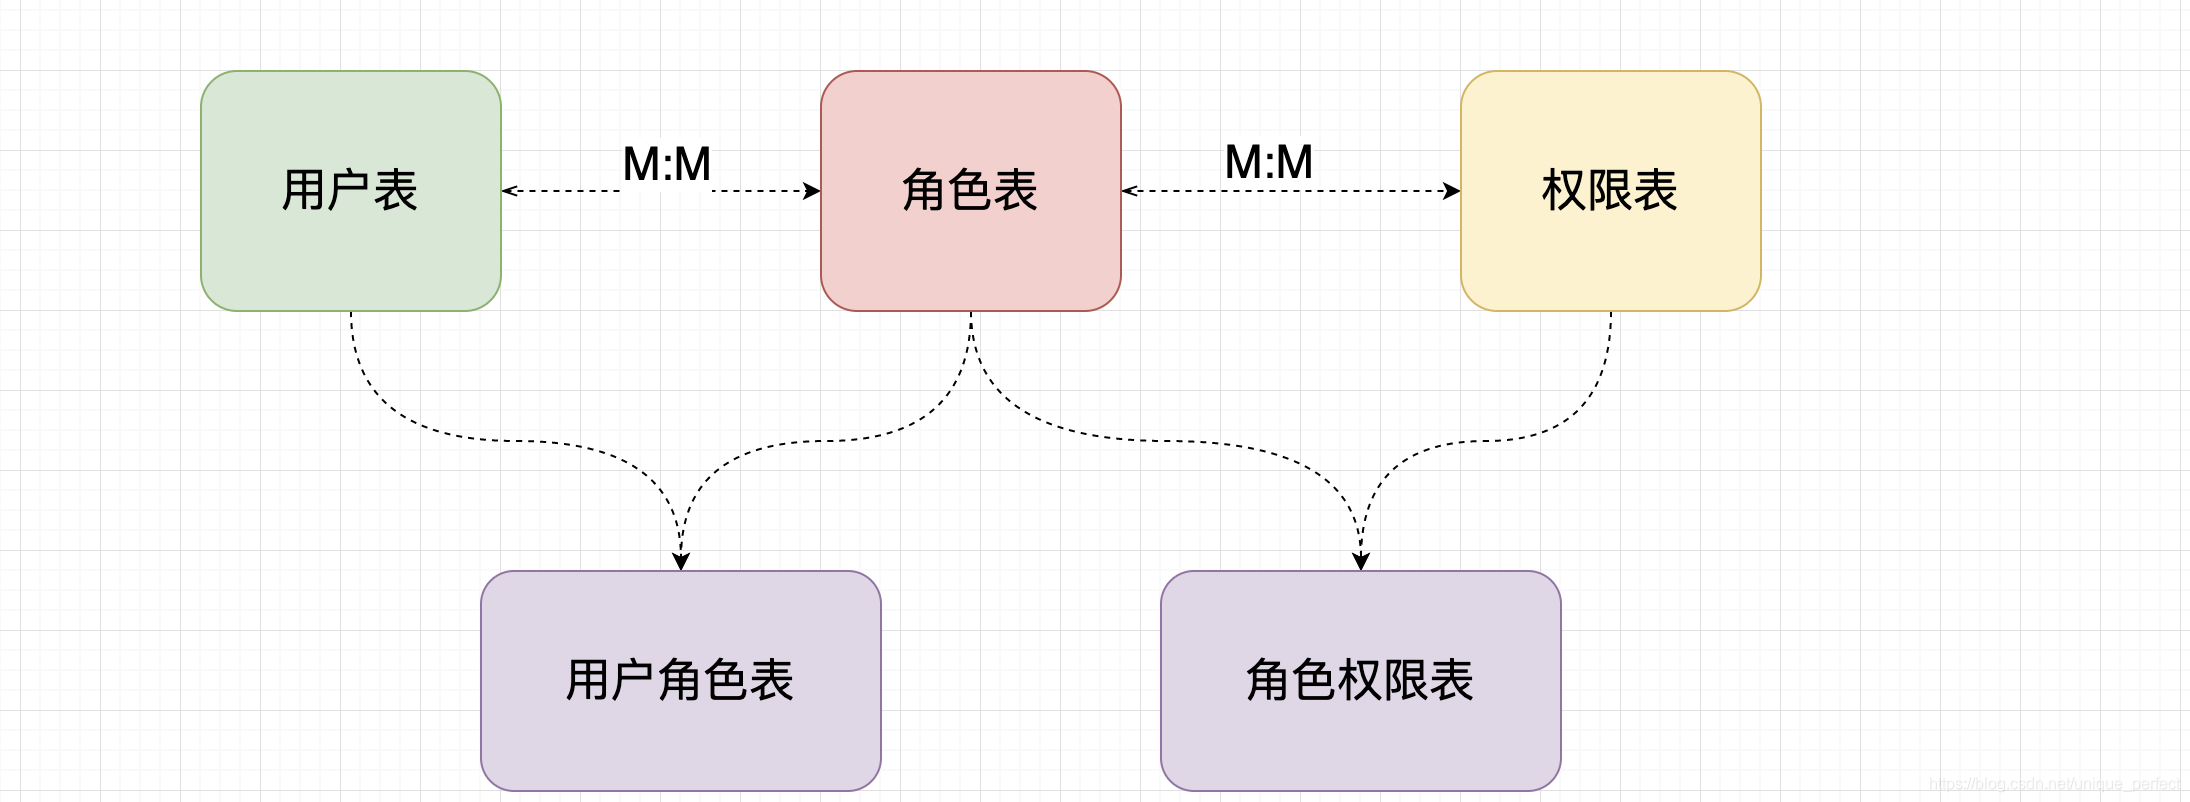
2.0、数据库表设计
在使用Apache Shiro框架时,可以设计以下几张表来处理用户权限相关的信息:
- 用户表(user)
- 角色表(role)
- 权限表(permission)
- 用户角色关联表(user_role)
- 角色权限关联表(role_permission)
1 2 3 4 5 6 7 8 9 10 11 12 13 14 15 16 17 18 19 20 21 22 23 24 25 26 27 28 29 30 31 32 33 34 35 36 37 38 39 40 41 42 43 44 45 46 47 48 49 50 51 52 53 54 55 56 57 58 59 60 61 62 63 | SET NAMES utf8mb4;SET FOREIGN_KEY_CHECKS = 0;-- ------------------------------ 用户表-- ----------------------------DROP TABLE IF EXISTS `t_user`;CREATE TABLE `t_user` ( `id` int(6) NOT NULL AUTO_INCREMENT, `username` varchar(40) DEFAULT NULL, `password` varchar(40) DEFAULT NULL, `salt` varchar(255) DEFAULT NULL, PRIMARY KEY (`id`)) ENGINE=InnoDB AUTO_INCREMENT=2 DEFAULT CHARSET=utf8;-- ------------------------------ 角色表-- ----------------------------DROP TABLE IF EXISTS `t_role`;CREATE TABLE `t_role` ( `id` int(6) NOT NULL AUTO_INCREMENT, `name` varchar(60) DEFAULT NULL, PRIMARY KEY (`id`)) ENGINE=InnoDB DEFAULT CHARSET=utf8; -- ------------------------------ 权限表-- ----------------------------DROP TABLE IF EXISTS `t_pers`;CREATE TABLE `t_pers` ( `id` int(6) NOT NULL AUTO_INCREMENT, `name` varchar(80) DEFAULT NULL, `url` varchar(255) DEFAULT NULL, PRIMARY KEY (`id`)) ENGINE=InnoDB DEFAULT CHARSET=utf8; -- ------------------------------ 用户角色关联表-- ----------------------------DROP TABLE IF EXISTS `t_user_role`;CREATE TABLE `t_user_role` ( `id` int(6) NOT NULL, `userid` int(6) DEFAULT NULL, `roleid` int(6) DEFAULT NULL, PRIMARY KEY (`id`)) ENGINE=InnoDB DEFAULT CHARSET=utf8;-- ------------------------------ 角色权限关联表-- ----------------------------DROP TABLE IF EXISTS `t_role_perms`;CREATE TABLE `t_role_perms` ( `id` int(6) NOT NULL, `roleid` int(6) DEFAULT NULL, `permsid` int(6) DEFAULT NULL, PRIMARY KEY (`id`)) ENGINE=InnoDB DEFAULT CHARSET=utf8; SET FOREIGN_KEY_CHECKS = 1; |
1 2 3 4 5 6 7 8 9 10 11 | -- 添加用户信息INSERT INTO `shiro`.`t_user` (`id`, `username`, `password`, `salt`) VALUES (1, 'xiaochen', 'b81f9fd16871f518865c680de016ff5c', '%ut0ZmSH');INSERT INTO `shiro`.`t_user` (`id`, `username`, `password`, `salt`) VALUES (2, 'zhangsan', 'a7c5d959a1a8ee1b983cd991bb32ad8e', '@MoM7X5G');-- 添加角色信息INSERT INTO `shiro`.`t_role` (`id`, `name`) VALUES (1, 'admin');INSERT INTO `shiro`.`t_role` (`id`, `name`) VALUES (2, 'user');INSERT INTO `shiro`.`t_role` (`id`, `name`) VALUES (3, 'product');-- 添加用户角色信息INSERT INTO `shiro`.`t_user_role` (`id`, `userid`, `roleid`) VALUES (1, 1, 1);INSERT INTO `shiro`.`t_user_role` (`id`, `userid`, `roleid`) VALUES (2, 2, 2);INSERT INTO `shiro`.`t_user_role` (`id`, `userid`, `roleid`) VALUES (3, 2, 3); |
2.1、环境配置
注意:
启动项目需要在IDEA的配置上加上工作目录:$MODULE_WORKING_DIR$

2.1.1、引入依赖
1 2 3 4 5 6 7 8 9 10 11 12 13 14 15 16 17 18 19 20 21 22 23 24 25 26 27 28 29 30 31 32 33 34 35 36 37 38 39 40 41 42 43 44 | <dependencies> <dependency> <groupId>mysql</groupId> <artifactId>mysql-connector-java</artifactId> </dependency> <dependency> <groupId>org.mybatis.spring.boot</groupId> <artifactId>mybatis-spring-boot-starter</artifactId> <version>2.2.2</version> </dependency> <!--jsp依赖--> <dependency> <groupId>org.apache.tomcat.embed</groupId> <artifactId>tomcat-embed-jasper</artifactId> </dependency> <dependency> <groupId>javax.servlet.jsp.jstl</groupId> <artifactId>jstl-api</artifactId> <version>1.2</version> </dependency> <dependency> <groupId>org.apache.shiro</groupId> <artifactId>shiro-spring-boot-starter</artifactId> <version>1.5.3</version> </dependency> <dependency> <groupId>org.springframework.boot</groupId> <artifactId>spring-boot-starter-web</artifactId> </dependency> <dependency> <groupId>org.projectlombok</groupId> <artifactId>lombok</artifactId> <optional>true</optional> </dependency> <dependency> <groupId>org.springframework.boot</groupId> <artifactId>spring-boot-starter-test</artifactId> <scope>test</scope> </dependency></dependencies> |
2.1.2、配置项目
1 2 3 | server.servlet.context-path=/spring.mvc.view.prefix=/spring.mvc.view.suffix=.jsp |
2.1.3、编写jsp页面
1 2 3 4 5 6 7 8 9 | ├─resources│ │ application.properties│ │ rebel.xml│ ││ ├─ static│ └─templates└─webapp index.jsp -- 受限资源 login.jsp -- 公共资源 |
2.1.4、自定义Realm
1 2 3 4 5 6 7 8 9 10 11 12 13 14 | public class CustomerRealm extends AuthorizingRealm { //处理授权 @Override protected AuthorizationInfo doGetAuthorizationInfo(PrincipalCollection principals) { return null ; } //处理认证 @Override protected AuthenticationInfo doGetAuthenticationInfo(AuthenticationToken token) throws AuthenticationException { return null ; }} |
2.1.5、配置Shiro
1 2 3 4 5 6 7 8 9 10 11 12 13 14 15 16 17 18 19 20 21 22 23 24 25 26 27 28 29 30 31 32 33 34 35 36 37 38 39 40 41 42 43 44 45 46 47 48 49 50 51 52 53 54 55 56 57 58 59 60 61 62 63 64 65 | import org.apache.shiro.mgt.SecurityManager;import org.apache.shiro.realm.Realm;import org.apache.shiro.spring.web.ShiroFilterFactoryBean;import org.apache.shiro.web.mgt.DefaultWebSecurityManager;import org.springframework.beans.factory.annotation.Qualifier;import org.springframework.context.annotation.Bean;import org.springframework.context.annotation.Configuration;import java.util.HashMap;import java.util.Map;/** * @ClassName ShiroConfig * @Author zhangzhixi * @Description * @Date 2023-03-15 16:35 * @Version 1.0 */@Configurationpublic class ShiroConfig { /** * shiro过滤器工厂 * @param securityManager shiro安全管理器 * @return 过滤器 */ @Bean public ShiroFilterFactoryBean getShiroFilterFactoryBean(@Qualifier( "securityManager" ) SecurityManager securityManager) { // 1、创建shiro的filter ShiroFilterFactoryBean shiroFilterFactoryBean = new ShiroFilterFactoryBean(); // 2、注入安全管理器 shiroFilterFactoryBean.setSecurityManager(securityManager); Map<string, string=""> authMap = new HashMap<>(); // 配置公共资源 // 配置受限资源 authMap.put( "/index.jsp" , "authc" ); // 如果是受限资源,默认会重定向login.jsp //shiroFilterFactoryBean.setLoginUrl("/login.jsp"); shiroFilterFactoryBean.setFilterChainDefinitionMap(authMap); return shiroFilterFactoryBean; } /** * shiro的安全管理器 * @param realm realm * @return shiro的安全管理器 */ @Bean( "securityManager" ) public DefaultWebSecurityManager getSecurityManager(@Qualifier( "realm" ) Realm realm) { DefaultWebSecurityManager defaultWebSecurityManager = new DefaultWebSecurityManager(); defaultWebSecurityManager.setRealm(realm); return defaultWebSecurityManager; } /** * 创建自定义realm * @return 自定义Realm */ @Bean( "realm" ) public Realm getRealm() { return new CustomerRealm(); }}</string,> |
2.1.6、测试
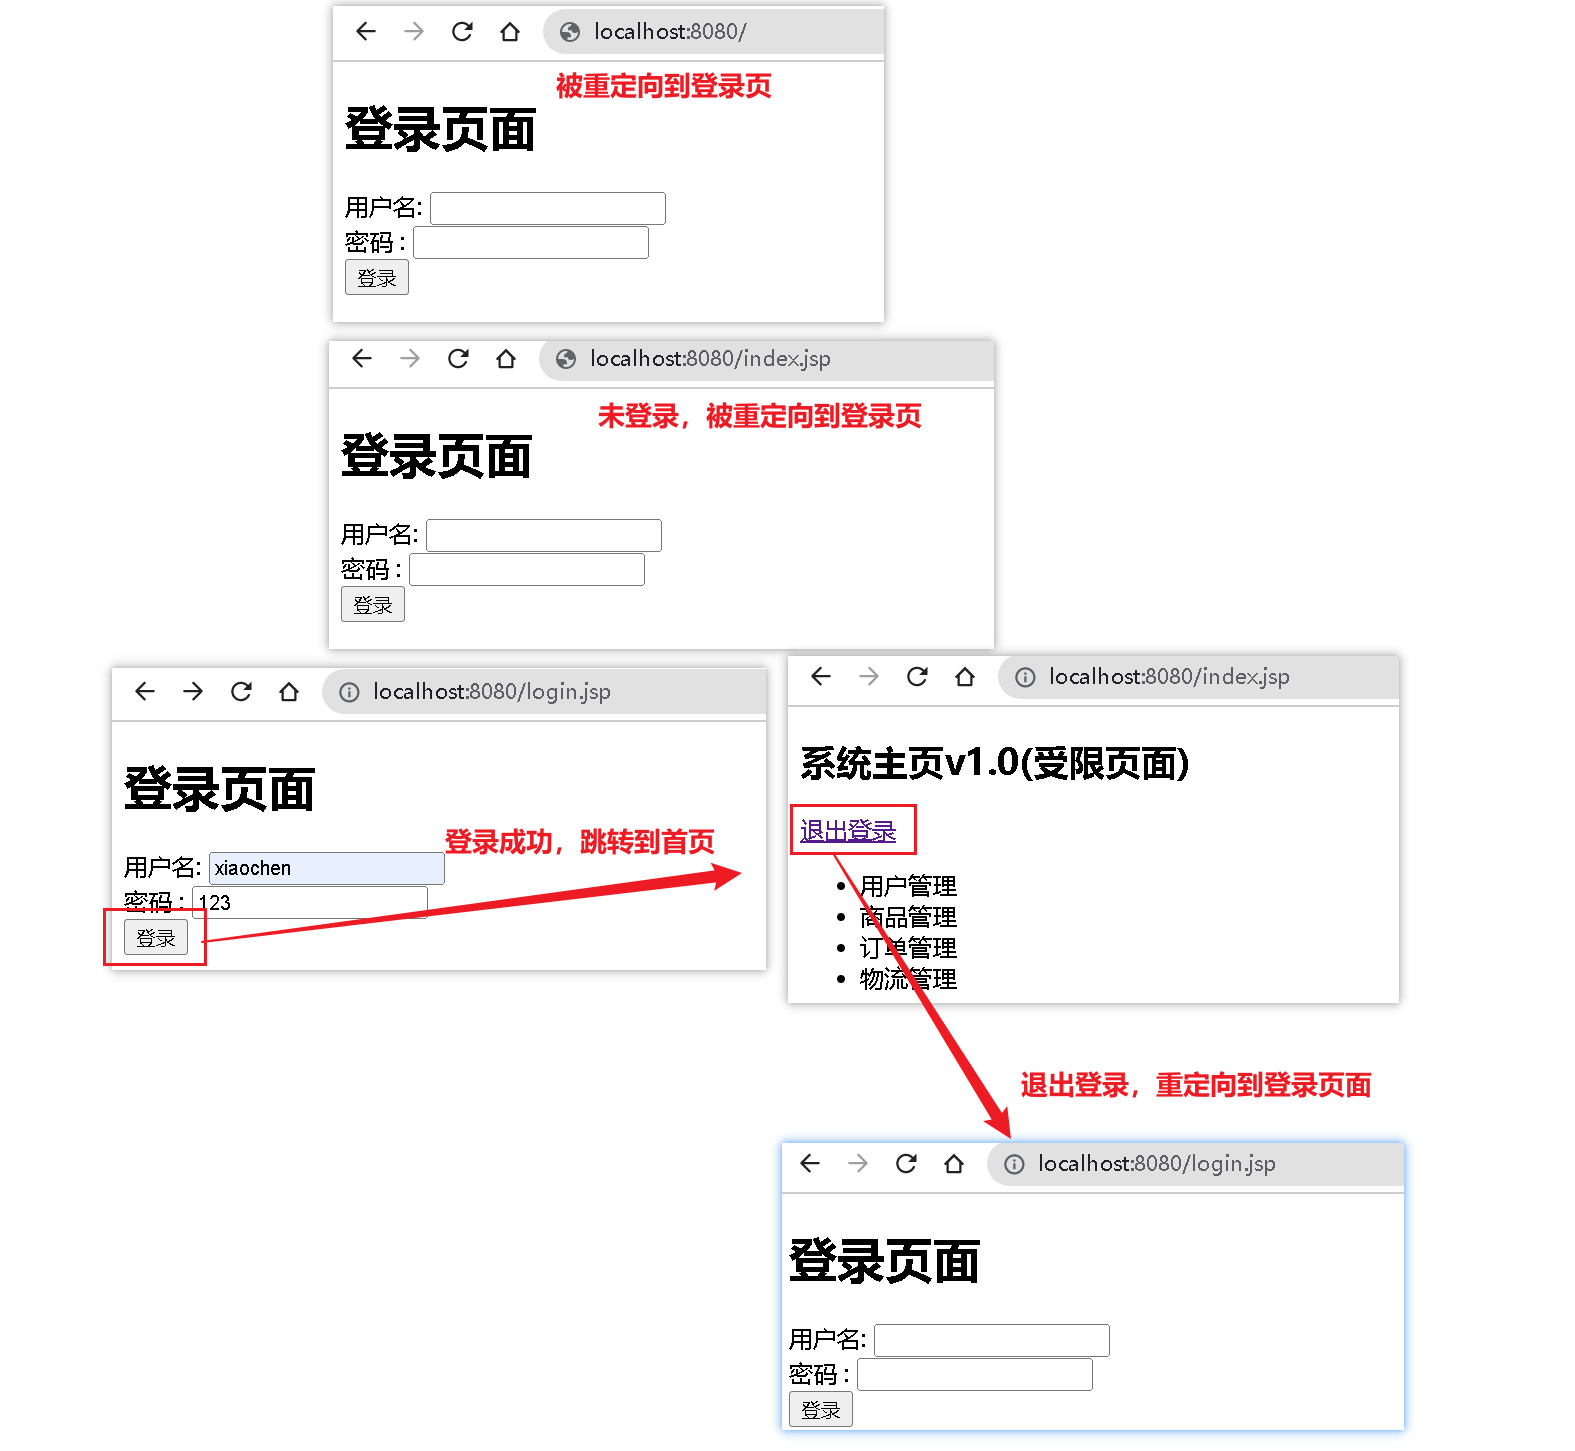
2.2、认证与退出登录(不操作DB)
登录表单:login.jsp
1 2 3 4 5 6 7 8 9 10 11 12 | <h1>登录页面</h1><form action="${pageContext.request.contextPath}/user/login" method="post"> <label> 用户名: <input type="text" name="username"> </label> <br/> <label> 密码 : <input type="text" name="password"> </label> <br> <input type="submit" value="登录"></form> |
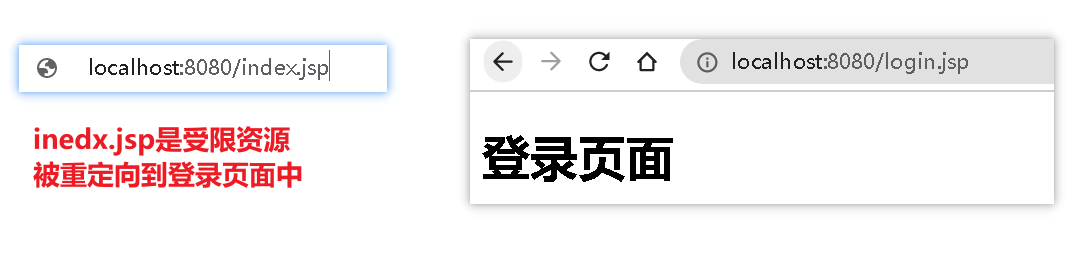
受限页面:index.jsp
1 2 3 4 5 6 7 8 9 10 11 12 | <h2>系统主页v1.0(受限页面)</h2><label> <a href="${pageContext.request.contextPath}/user/logout">退出登录</a></label><ul> <li>用户管理</li> <li>商品管理</li> <li>订单管理</li> <li>物流管理</li></ul></body></html> |
配置拦截路径:ShiroConfig
1 2 3 4 5 6 7 8 9 10 11 12 13 14 15 16 17 18 19 20 21 22 23 | /** * shiro过滤器工厂 * @param securityManager shiro安全管理器 * @return 过滤器 */@Beanpublic ShiroFilterFactoryBean getShiroFilterFactoryBean(@Qualifier("securityManager") SecurityManager securityManager) { // 1、创建shiro的filter ShiroFilterFactoryBean shiroFilterFactoryBean = new ShiroFilterFactoryBean(); // 2、注入安全管理器 shiroFilterFactoryBean.setSecurityManager(securityManager); Map<String, String> authMap = new HashMap<>(); // 配置公共资源 authMap.put("/login.jsp", "anon"); // 配置受限资源 authMap.put("/index.jsp", "authc"); authMap.put("/", "authc"); // 如果是受限资源,默认会重定向login.jsp //shiroFilterFactoryBean.setLoginUrl("/login.jsp"); shiroFilterFactoryBean.setFilterChainDefinitionMap(authMap); return shiroFilterFactoryBean;} |
自定义Realm处理认证:ConsumerRealm
1 2 3 4 5 6 7 8 9 10 11 12 13 14 15 16 17 18 19 | public class CustomerRealm extends AuthorizingRealm { //处理授权 @Override protected AuthorizationInfo doGetAuthorizationInfo(PrincipalCollection principals) { return null; } //处理认证 @Override protected AuthenticationInfo doGetAuthenticationInfo(AuthenticationToken token) throws AuthenticationException { System.out.println("=========================="); String principal = (String) token.getPrincipal(); // 后序这里的用户名密码,从数据库中查 if ("xiaochen".equals(principal)) { return new SimpleAuthenticationInfo(principal, "123", this.getName()); } return null; }} |
web请求:UserController
1 2 3 4 5 6 7 8 9 10 11 12 13 14 15 16 17 18 19 20 21 22 23 24 25 26 27 28 29 30 31 32 33 34 35 36 37 38 39 40 41 42 43 44 45 46 47 48 | import org.apache.shiro.SecurityUtils;import org.apache.shiro.authc.IncorrectCredentialsException;import org.apache.shiro.authc.UnknownAccountException;import org.apache.shiro.authc.UsernamePasswordToken;import org.apache.shiro.subject.Subject;import org.springframework.stereotype.Controller;import org.springframework.web.bind.annotation.GetMapping;import org.springframework.web.bind.annotation.RequestMapping;import org.springframework.web.bind.annotation.RequestMethod;@Controller@RequestMapping("user")public class UserController { /** * 用来处理身份认证 * * @param username 用户名 * @param password 密码 * @return 登录成功返回页面 */ @RequestMapping(value = "login",method = RequestMethod.POST) public String login(String username, String password) { //获取主体对象 Subject subject = SecurityUtils.getSubject(); try { subject.login(new UsernamePasswordToken(username, password)); return "redirect:/index.jsp"; } catch (UnknownAccountException e) { e.printStackTrace(); System.out.println("用户名错误!"); } catch (IncorrectCredentialsException e) { e.printStackTrace(); System.out.println("密码错误!"); } return "redirect:/login.jsp"; } /** * 退出系统 */ @GetMapping("/logout") public String logout() { Subject subject = SecurityUtils.getSubject(); subject.logout(); return "redirect:/login.jsp"; }} |
2.3、认证(MD5+Sale)(连接数据库,操作Mybatis)
1、注册页面
1 2 3 4 5 6 7 8 9 10 11 12 13 14 15 16 17 18 19 20 21 22 23 24 25 26 27 28 | <%@page contentType="text/html; UTF-8" pageEncoding="UTF-8" isELIgnored="false" %><!doctype html><html lang="en"><head> <meta charset="UTF-8"> <meta name="viewport" content="width=device-width, user-scalable=no, initial-scale=1.0, maximum-scale=1.0, minimum-scale=1.0"> <meta http-equiv="X-UA-Compatible" content="ie=edge"> <title>Document</title></head><body><h1>注册页面</h1><form action="${pageContext.request.contextPath}/user/register" method="post"> <!--指定实际发送的请求方式--> <input type="hidden" name="_method" value="PUT"> <label> 用户名: <input type="text" name="username"> </label> <br/> <label> 密码 : <input type="text" name="password"> </label> <br> <input type="submit" value="注册"></form></body></html> |
2、登录页面
1 2 3 4 5 6 7 8 9 10 11 12 13 14 15 16 17 18 19 20 21 22 23 24 25 26 | <%@page contentType="text/html; UTF-8" pageEncoding="UTF-8" isELIgnored="false" %><!doctype html><html lang="en"><head> <meta charset="UTF-8"> <meta name="viewport" content="width=device-width, user-scalable=no, initial-scale=1.0, maximum-scale=1.0, minimum-scale=1.0"> <meta http-equiv="X-UA-Compatible" content="ie=edge"> <title>Document</title></head><body><h1>登录页面</h1><form action="${pageContext.request.contextPath}/user/login" method="post"> <label> 用户名: <input type="text" name="username"> </label> <br/> <label> 密码 : <input type="text" name="password"> </label> <br> <input type="submit" value="登录"> <a href="/register.jsp">没有账号?点我注册</a></form></body></html> |
3、Controller
1 2 3 4 5 6 7 8 9 10 11 12 13 14 15 16 17 18 19 20 21 22 23 24 25 26 27 28 29 30 31 32 33 34 35 36 37 38 39 40 41 42 43 44 45 46 47 48 49 50 51 52 53 54 55 56 57 58 59 60 61 62 63 64 | @Autowired private UserService userService; /** * 用来处理身份认证 * * @return 登录成功返回页面 */ @RequestMapping(value = "login", method = RequestMethod.POST) public String login(User user) { //获取主体对象 Subject subject = SecurityUtils.getSubject(); try { subject.login(new UsernamePasswordToken(user.getUsername(), user.getPassword())); return "redirect:/index.jsp"; } catch (UnknownAccountException e) { e.printStackTrace(); System.out.println("用户名错误!"); } catch (IncorrectCredentialsException e) { e.printStackTrace(); System.out.println("密码错误!"); } return "redirect:/login.jsp"; } /** * 退出系统 */ @GetMapping("/logout") public String logout() { Subject subject = SecurityUtils.getSubject(); subject.logout(); return "redirect:/login.jsp"; } /** * 用户注册 * @param user 用户实体 * @return 注册成功返回登录页面,注册失败返回注册页面 */ @PutMapping("/register") public String saveUser(User user) { int count = userService.saveUser(user); if (count == 1) { return "redirect:/login.jsp"; } return "redirect:/register.jsp"; } @RequestMapping("save") public String save() { //获取主体对象 Subject subject = SecurityUtils.getSubject(); // 基于角色权限控制 if (subject.hasRole("admin")) { System.out.println("保存订单!"); } else { System.out.println("无权访问!"); } //基于权限字符串判断是否有权限访问 subject.isPermitted("admin", "user"); return "redirect:/index.jsp"; } |
4、mapper
1 2 3 4 | <insert id="saveUser" parameterType="com.zhixi.pojo.User" useGeneratedKeys="true"> insert into shiro.t_user(username, password, salt) values (#{username}, #{password}, #{salt});</insert> |
5、service层,对密码字段进行md5+Sale+Hash
1 2 3 4 5 6 7 8 9 10 11 12 13 14 | @Autowiredprivate UserMapper userMapper;@Overridepublic int saveUser(User user) { //处理业务调用dao //1.生成随机盐 String salt = SaltUtils.getSalt(8); //2.将随机盐保存到数据 user.setSalt(salt); //3.明文密码进行md5 + salt + hash散列 Md5Hash md5Hash = new Md5Hash(user.getPassword(), salt, 1024); user.setPassword(md5Hash.toHex()); return userMapper.saveUser(user);} |
6、自定义Realm处理登录
1 2 3 4 5 6 7 8 9 10 11 12 13 14 | /** * 处理认证 * @param token 用户登录信息 * @return 身份验证信息 * @throws AuthenticationException 异常 */@Overrideprotected AuthenticationInfo doGetAuthenticationInfo(AuthenticationToken token) throws AuthenticationException { // 获取当前登录的用户名 String principal = token.getPrincipal().toString(); // 查询数据库 User user = userService.selectUserByName(principal); return new SimpleAuthenticationInfo(user, user.getPassword(), ByteSource.Util.bytes(user.getSalt()), this.getName());} |
7、Shiro配置:配置请求过滤以及自定义Realm使用到的加密算法以及散列次数
1 2 3 4 5 6 7 8 9 10 11 12 13 14 15 16 17 18 19 20 21 22 23 24 25 26 27 28 29 30 31 32 33 34 35 36 37 38 39 40 41 42 43 44 45 46 47 48 49 50 51 52 53 54 55 56 57 58 59 60 61 62 63 64 65 66 67 68 69 70 71 72 73 74 75 76 77 78 79 | import org.apache.shiro.authc.credential.HashedCredentialsMatcher;import org.apache.shiro.mgt.SecurityManager;import org.apache.shiro.realm.Realm;import org.apache.shiro.spring.web.ShiroFilterFactoryBean;import org.apache.shiro.web.mgt.DefaultWebSecurityManager;import org.springframework.beans.factory.annotation.Qualifier;import org.springframework.context.annotation.Bean;import org.springframework.context.annotation.Configuration;import java.util.HashMap;import java.util.Map;/** * @ClassName ShiroConfig * @Author zhangzhixi * @Description * @Date 2023-03-15 16:35 * @Version 1.0 */@Configurationpublic class ShiroConfig { /** * shiro过滤器工厂 * @param securityManager shiro安全管理器 * @return 过滤器 */ @Bean public ShiroFilterFactoryBean getShiroFilterFactoryBean(@Qualifier("securityManager") SecurityManager securityManager) { // 1、创建shiro的filter ShiroFilterFactoryBean shiroFilterFactoryBean = new ShiroFilterFactoryBean(); // 2、注入安全管理器 shiroFilterFactoryBean.setSecurityManager(securityManager); Map<String, String> authMap = new HashMap<>(); // 配置公共资源 authMap.put("/login.jsp", "anon"); authMap.put("/user/login", "anon"); authMap.put("/register.jsp", "anon"); authMap.put("/user/register", "anon"); // 配置受限资源 authMap.put("/**", "authc"); authMap.put("/index.jsp", "authc"); authMap.put("/", "authc"); // 如果是受限资源,默认会重定向login.jsp //shiroFilterFactoryBean.setLoginUrl("/login.jsp"); shiroFilterFactoryBean.setFilterChainDefinitionMap(authMap); return shiroFilterFactoryBean; } /** * shiro的安全管理器 * @param realm realm * @return shiro的安全管理器 */ @Bean("securityManager") public DefaultWebSecurityManager getSecurityManager(@Qualifier("realm") Realm realm) { DefaultWebSecurityManager defaultWebSecurityManager = new DefaultWebSecurityManager(); defaultWebSecurityManager.setRealm(realm); return defaultWebSecurityManager; } /** * 创建自定义realm * @return 自定义Realm */ @Bean("realm") public Realm getRealm(){ CustomerRealm customerRealm = new CustomerRealm(); //设置hashed凭证匹配器 HashedCredentialsMatcher credentialsMatcher = new HashedCredentialsMatcher(); //设置md5加密 credentialsMatcher.setHashAlgorithmName("md5"); //设置散列次数 credentialsMatcher.setHashIterations(1024); customerRealm.setCredentialsMatcher(credentialsMatcher); return customerRealm; }} |
8、测试
添加用户:
ShiroConfig->register.jsp-->Controller->入库
用户登录:
ShiroConfig-->login.jsp-->Controller-->自定义Realm处理认证
2.4、授权(不操作DB)
2.4.1、Shiro中实现授权方式
1 2 3 4 5 6 7 8 9 10 11 12 13 14 15 16 17 18 19 20 | // 编码式Subject subject = SecurityUtils.getSubject();if(subject.hasRole(“admin”)) { //有权限} else { //无权限}// 注解式@RequiresRoles("admin")public void hello() { //有权限}// 标签式JSP/GSP 标签:在JSP/GSP 页面通过相应的标签完成:<shiro:hasRole name="admin"><!— 有权限—></shiro:hasRole>注意: Thymeleaf 中使用shiro需要额外集成! |
2.4.2、实现授权-自定义realm
1 2 3 4 5 6 7 8 9 10 11 12 13 14 15 16 17 18 | /** * 处理授权 * @param principals 权限数据 * @return 返回的授权信息 */@Overrideprotected AuthorizationInfo doGetAuthorizationInfo(PrincipalCollection principals) { // 获取登录用户名 String userName = principals.getPrimaryPrincipal().toString(); SimpleAuthorizationInfo simpleAuthorizationInfo = new SimpleAuthorizationInfo(); if ("admin".equals(userName)) { // 添加角色 simpleAuthorizationInfo.addRoles(Arrays.asList("admin", "user")); // 添加资源 simpleAuthorizationInfo.addStringPermissions(Arrays.asList("user:*:*", "admin:*:*")); } return simpleAuthorizationInfo;} |
2.4.3、实现授权-页面授权方式
1 2 3 4 5 6 7 8 9 10 11 12 13 14 15 16 17 18 19 20 21 22 23 24 25 26 27 28 29 30 31 32 33 34 35 36 37 38 39 40 41 42 43 44 45 46 | <%@ taglib prefix="shiro" uri="http://shiro.apache.org/tags" %><%@page contentType="text/html; UTF-8" pageEncoding="UTF-8" isELIgnored="false" %><!doctype html><html lang="en"><head> <meta charset="UTF-8"> <meta name="viewport" content="width=device-width, user-scalable=no, initial-scale=1.0, maximum-scale=1.0, minimum-scale=1.0"> <meta http-equiv="X-UA-Compatible" content="ie=edge"> <title>Document</title></head><body><h2>系统主页v1.0(受限页面)</h2><label> <a href="${pageContext.request.contextPath}/user/logout">退出登录</a></label><shiro:hasAnyRoles name="user,admin"> <li><a href="">用户管理(满足user/admin权限)</a> <ul> <shiro:hasPermission name="user:add:*"> <li><a href="">添加</a></li> </shiro:hasPermission> <shiro:hasPermission name="user:delete:*"> <li><a href="">删除</a></li> </shiro:hasPermission> <shiro:hasPermission name="user:update:*"> <li><a href="">修改</a></li> </shiro:hasPermission> <shiro:hasPermission name="user:find:*"> <li><a href="">查询</a></li> </shiro:hasPermission> </ul> </li></shiro:hasAnyRoles><hr><shiro:hasRole name="admin"><li><a href="">用户管理(满足admin权限)</a><ul> <li><a href="">商品管理</a></li> <li><a href="">订单管理</a></li> <li><a href="">物流管理</a></li></ul></shiro:hasRole></body></html> |
登录后即可看到页面上面展示的列表数据。
2.4.4、实现授权-代码授权方式
1 2 3 4 5 6 7 8 9 10 11 12 13 14 | @RequestMapping("save")public String save(){ //获取主体对象 Subject subject = SecurityUtils.getSubject(); // 基于角色权限控制 if (subject.hasRole("admin")) { System.out.println("保存订单!"); }else{ System.out.println("无权访问!"); } //基于权限字符串判断是否有权限访问 subject.isPermitted("admin", "user"); return "redirect:/index.jsp";} |
2.4.5、实现授权-注解授权方式
@RequiresRoles 用来基于角色进行授权
@RequiresPermissions 用来基于权限进行授权
1 2 3 4 5 6 7 8 | // 用来判断角色:具有 admin/user@RequiresRoles(value = {"admin", "user"}, logical = Logical.OR)// 用来判断权限字符串@RequiresPermissions("user:update:01")@RequestMapping("saveToPermissions")public String saveToPermissions() { return "redirect:/index.jsp";} |
2.5、授权-基于角色(连接数据库,操作Mybatis)
1、数据库表设计
2、实体
1 2 3 4 5 6 7 8 9 10 11 12 13 14 15 16 17 18 19 20 21 22 23 24 25 26 27 28 29 30 31 32 33 34 35 36 37 38 39 40 41 42 | @Datapublic class User { private Integer id; private String username; private String password; private String salt; /** * 用户角色信息 */ private List<Role> roles;}@Datapublic class Role { /** * 主键 */ private Integer id; /** * 角色名称 */ private String name;}@Datapublic class Perms { private Integer id; /** * 权限字符串 */ private String name; /** * 权限url */ private String url;} |
3、根据用户名查询角色信息
1 2 3 4 5 6 | /** * 根据用户名查询角色信息 * @param username 用户名 * @return 用户角色集合 */List<User> findRolesByUsernameRoles(String username); |
4、mapper文件
1 2 3 4 5 6 7 8 9 10 11 12 13 14 15 | <resultMap id="userRoleMap" type="com.zhixi.pojo.User"> <id column="id" property="id"/> <result column="username" property="username"/> <collection property="roles" javaType="list" ofType="com.zhixi.pojo.Role"> <result column="roleid" property="id"/> <result column="rname" property="name"/> </collection></resultMap><select id="findRolesByUsernameRoles" resultMap="userRoleMap"> SELECT t.id, t.username, ur.roleid, r.`name` rname FROM shiro.t_user t LEFT JOIN shiro.t_user_role ur ON t.id = ur.userid LEFT JOIN shiro.t_role r ON r.id = ur.roleid WHERE t.username = #{username}</select> |
5、修改自定义Realm中自定义授权代码
1 2 3 4 5 6 7 8 9 10 11 12 13 14 15 16 17 18 19 20 21 22 23 24 25 26 27 28 29 30 31 32 33 34 35 36 37 38 39 40 41 42 43 44 45 46 47 48 49 50 51 52 53 54 | import com.zhixi.pojo.User;import com.zhixi.sevice.UserService;import org.apache.shiro.authc.AuthenticationException;import org.apache.shiro.authc.AuthenticationInfo;import org.apache.shiro.authc.AuthenticationToken;import org.apache.shiro.authc.SimpleAuthenticationInfo;import org.apache.shiro.authz.AuthorizationInfo;import org.apache.shiro.authz.SimpleAuthorizationInfo;import org.apache.shiro.realm.AuthorizingRealm;import org.apache.shiro.subject.PrincipalCollection;import org.apache.shiro.util.ByteSource;import org.springframework.beans.factory.annotation.Autowired;import org.springframework.stereotype.Component;import java.util.List;import java.util.Optional;@Componentpublic class CustomerRealm extends AuthorizingRealm { @Autowired UserService userService; /** * 处理授权 * * @param principals 权限数据 * @return 返回的授权信息 */ @Override protected AuthorizationInfo doGetAuthorizationInfo(PrincipalCollection principals) { // 获取登录用户名(从认证那里传过来的) User userLogin = (User)principals.getPrimaryPrincipal(); SimpleAuthorizationInfo simpleAuthorizationInfo = new SimpleAuthorizationInfo(); // 查询登录用户权限集合 List<User> userList = userService.findRolesByUsernameRoles(userLogin.getUsername()); Optional.ofNullable(userList).ifPresent(users -> users.forEach(user -> user.getRoles().forEach(role -> simpleAuthorizationInfo.addRole(role.getName())))); // 添加角色权限 System.out.println(userList); return simpleAuthorizationInfo; } //处理认证 @Override protected AuthenticationInfo doGetAuthenticationInfo(AuthenticationToken token) throws AuthenticationException { System.out.println("=========================="); // 获取当前登录的用户名 String principal = token.getPrincipal().toString(); // 查询数据库 User user = userService.selectUserByName(principal); return new SimpleAuthenticationInfo(user, user.getPassword(), ByteSource.Util.bytes(user.getSalt()), this.getName()); }} |
6、受限页面:index.jsp
1 2 3 4 5 6 7 8 9 10 11 12 13 14 15 16 17 18 19 20 21 22 23 24 25 26 27 28 29 30 31 32 33 34 35 36 37 38 39 40 41 42 43 44 45 46 47 48 49 50 51 52 53 | <%@ taglib prefix="shiro" uri="http://shiro.apache.org/tags" %><%@page contentType="text/html; UTF-8" pageEncoding="UTF-8" isELIgnored="false" %><!doctype html><html lang="en"><head> <meta charset="UTF-8"> <meta name="viewport" content="width=device-width, user-scalable=no, initial-scale=1.0, maximum-scale=1.0, minimum-scale=1.0"> <meta http-equiv="X-UA-Compatible" content="ie=edge"> <title>Document</title></head><body><h2>系统主页v1.0(受限页面)</h2><label> <a href="${pageContext.request.contextPath}/user/logout">退出登录</a></label><%--获取当前登录的用户名--%><shiro:authenticated> <%--填写的是放在认证,SimpleAuthenticationInfo中的user数据--%> <h3> 当前登录用户是:<shiro:principal property="username"/> </h3></shiro:authenticated><shiro:hasAnyRoles name="user,admin"> <li><a href="">用户管理(满足user/admin权限)</a> <ul> <shiro:hasPermission name="user:add:*"> <li><a href="">添加</a></li> </shiro:hasPermission> <shiro:hasPermission name="user:delete:*"> <li><a href="">删除</a></li> </shiro:hasPermission> <shiro:hasPermission name="user:update:*"> <li><a href="">修改</a></li> </shiro:hasPermission> <shiro:hasPermission name="user:find:*"> <li><a href="">查询</a></li> </shiro:hasPermission> </ul> </li></shiro:hasAnyRoles><hr><shiro:hasRole name="admin"><li><a href="">用户管理(满足admin权限)</a> <ul> <li><a href="">商品管理</a></li> <li><a href="">订单管理</a></li> <li><a href="">物流管理</a></li> </ul> </shiro:hasRole></body></html> |
7、测试
2.6、授权-基于权限(连接数据库,操作Mybatis)
1、DB
1 2 3 4 5 6 7 8 9 10 | -- 权限表数据INSERT INTO `shiro`.`t_pers` (`id`, `name`, `url`) VALUES (1, 'user:*:*', NULL);INSERT INTO `shiro`.`t_pers` (`id`, `name`, `url`) VALUES (2, 'product:*:01', NULL);INSERT INTO `shiro`.`t_pers` (`id`, `name`, `url`) VALUES (3, 'order:*:*', NULL);-- 基于角色的权限,一个角色可以有多个权限INSERT INTO `shiro`.`t_role_perms` (`id`, `roleid`, `permsid`) VALUES (1, 1, 1);INSERT INTO `shiro`.`t_role_perms` (`id`, `roleid`, `permsid`) VALUES (2, 1, 2);INSERT INTO `shiro`.`t_role_perms` (`id`, `roleid`, `permsid`) VALUES (3, 1, 3);INSERT INTO `shiro`.`t_role_perms` (`id`, `roleid`, `permsid`) VALUES (4, 2, 1);INSERT INTO `shiro`.`t_role_perms` (`id`, `roleid`, `permsid`) VALUES (5, 3, 2); |
2、接口
1 2 3 4 5 6 7 | /** * 根据角色id查询权限集合 * * @param id 角色ID * @return 角色的权限集合 */List<Perms> findPermsByRoleId(Integer id); |
3、 mapper
1 2 3 4 5 6 7 8 9 10 11 12 13 14 | <resultMap id="roleToPerms" type="com.zhixi.pojo.Perms"> <result column="pers_name" property="name"/> <result column="pers_url" property="url"/></resultMap><select id="findPermsByRoleId" resultMap="roleToPerms"> SELECT role.id, role.name as role_name, pers.`name` as pers_name, pers.url as pers_url FROM shiro.t_role role LEFT JOIN shiro.t_role_perms rp ON role.id = rp.roleid LEFT JOIN shiro.t_pers pers ON rp.permsid = pers.id WHERE role.id = #{id}</select> |
4、自定义Realm-添加权限信息
1 2 3 4 5 6 7 8 9 10 11 12 13 14 15 16 17 18 19 20 21 22 23 24 25 26 27 28 | /** * 处理授权 * * @param principals 权限数据 * @return 返回的授权信息 */@Overrideprotected AuthorizationInfo doGetAuthorizationInfo(PrincipalCollection principals) { // 获取登录用户名(从认证那里传过来的) User userLogin = (User) principals.getPrimaryPrincipal(); SimpleAuthorizationInfo simpleAuthorizationInfo = new SimpleAuthorizationInfo(); // 查询登录用户权限集合 List<User> userList = userService.findRolesByUsernameRoles(userLogin.getUsername()); Optional.ofNullable(userList). ifPresent(users -> users.forEach(user -> { user.getRoles().forEach(role -> { // 添加角色信息 simpleAuthorizationInfo.addRole(role.getName()); // 根据角色ID查询权限集合 List<Perms> permsByRoleId = userService.findPermsByRoleId(role.getId()); // 添加权限信息 Optional.ofNullable(permsByRoleId).ifPresent(perms -> perms.forEach(per -> simpleAuthorizationInfo.addStringPermission(per.getName()))); } ); })); // 添加角色权限 return simpleAuthorizationInfo;} |
5、受限页面:index.jsp
1 2 3 4 5 6 7 8 9 10 11 12 13 14 15 16 17 18 19 20 21 22 23 24 25 26 27 28 29 30 31 32 33 34 35 36 37 38 39 40 41 42 43 44 45 46 47 48 49 50 51 52 53 | <%@ taglib prefix="shiro" uri="http://shiro.apache.org/tags" %><%@page contentType="text/html; UTF-8" pageEncoding="UTF-8" isELIgnored="false" %><!doctype html><html lang="en"><head> <meta charset="UTF-8"> <meta name="viewport" content="width=device-width, user-scalable=no, initial-scale=1.0, maximum-scale=1.0, minimum-scale=1.0"> <meta http-equiv="X-UA-Compatible" content="ie=edge"> <title>Document</title></head><body><h2>系统主页v1.0(受限页面)</h2><label> <a href="${pageContext.request.contextPath}/user/logout">退出登录</a></label><%--获取当前登录的用户名--%><shiro:authenticated> <%--填写的是放在认证,SimpleAuthenticationInfo中的user数据--%> <h3> 当前登录用户是:<shiro:principal property="username"/> </h3></shiro:authenticated><shiro:hasAnyRoles name="user,admin"> <li><a href="">用户管理(满足user/admin权限)</a> <ul> <shiro:hasPermission name="user:add:*"> <li><a href="">添加</a></li> </shiro:hasPermission> <shiro:hasPermission name="user:delete:*"> <li><a href="">删除</a></li> </shiro:hasPermission> <shiro:hasPermission name="user:update:*"> <li><a href="">修改</a></li> </shiro:hasPermission> <shiro:hasPermission name="order:find:*"> <li><a href="">查询</a></li> </shiro:hasPermission> </ul> </li></shiro:hasAnyRoles><hr><shiro:hasRole name="admin"><li><a href="">用户管理(满足admin权限)</a> <ul> <li><a href="">商品管理</a></li> <li><a href="">订单管理</a></li> <li><a href="">物流管理</a></li> </ul> </shiro:hasRole></body></html> |
6、测试
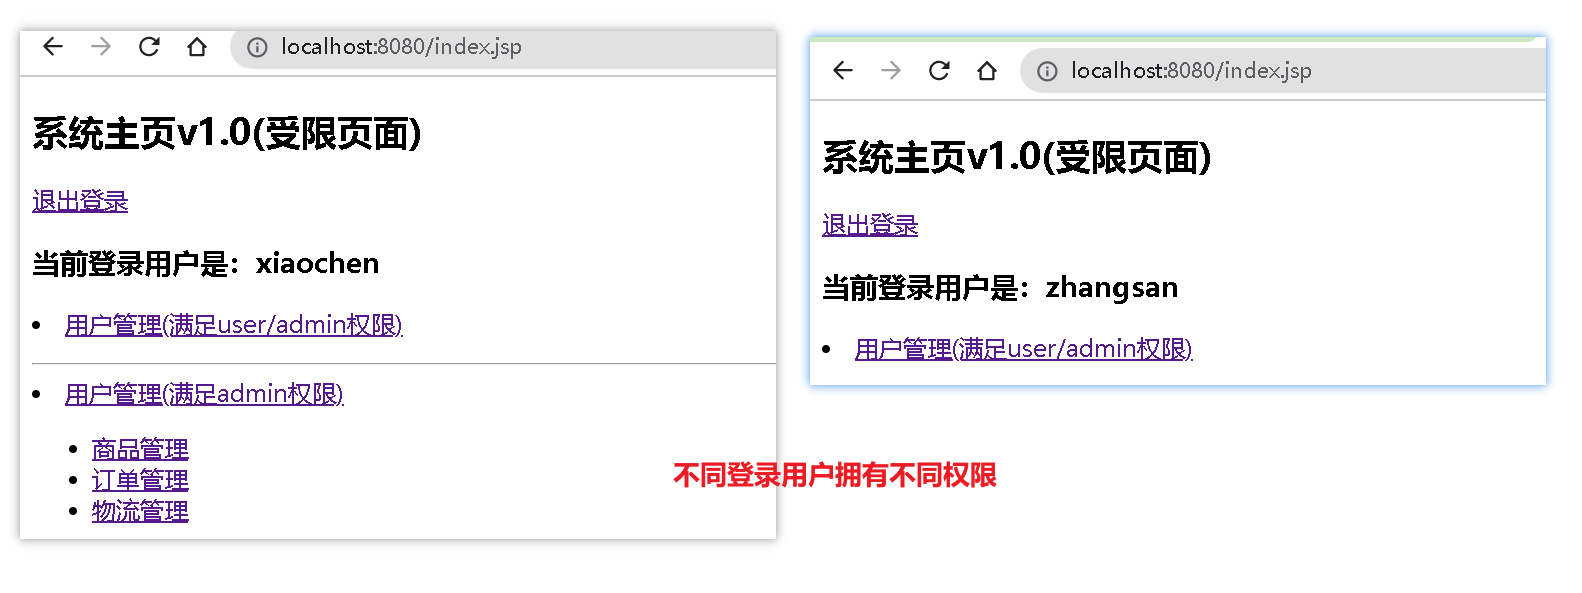
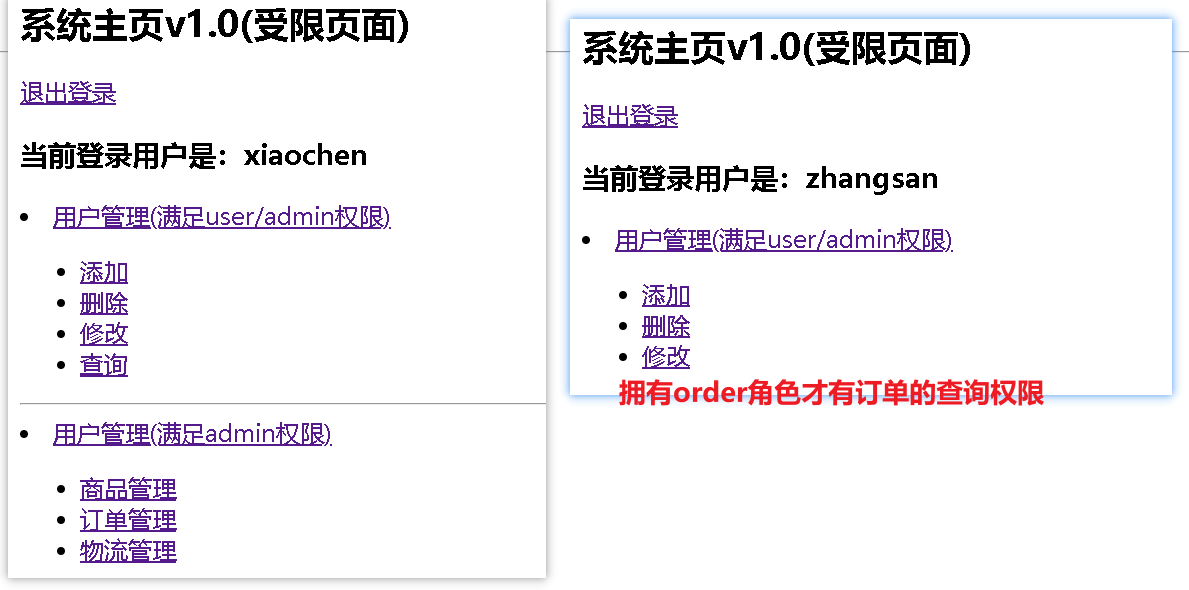
使用xiaochen登录,xioachen具有admin角色,admin角色具有:user:*:* product:*:01 order:*:*权限
使用zhangsan登录,zhangsan具有user、product角色。
user角色具有:user:*:*
product角色具有:product:*:01 权限
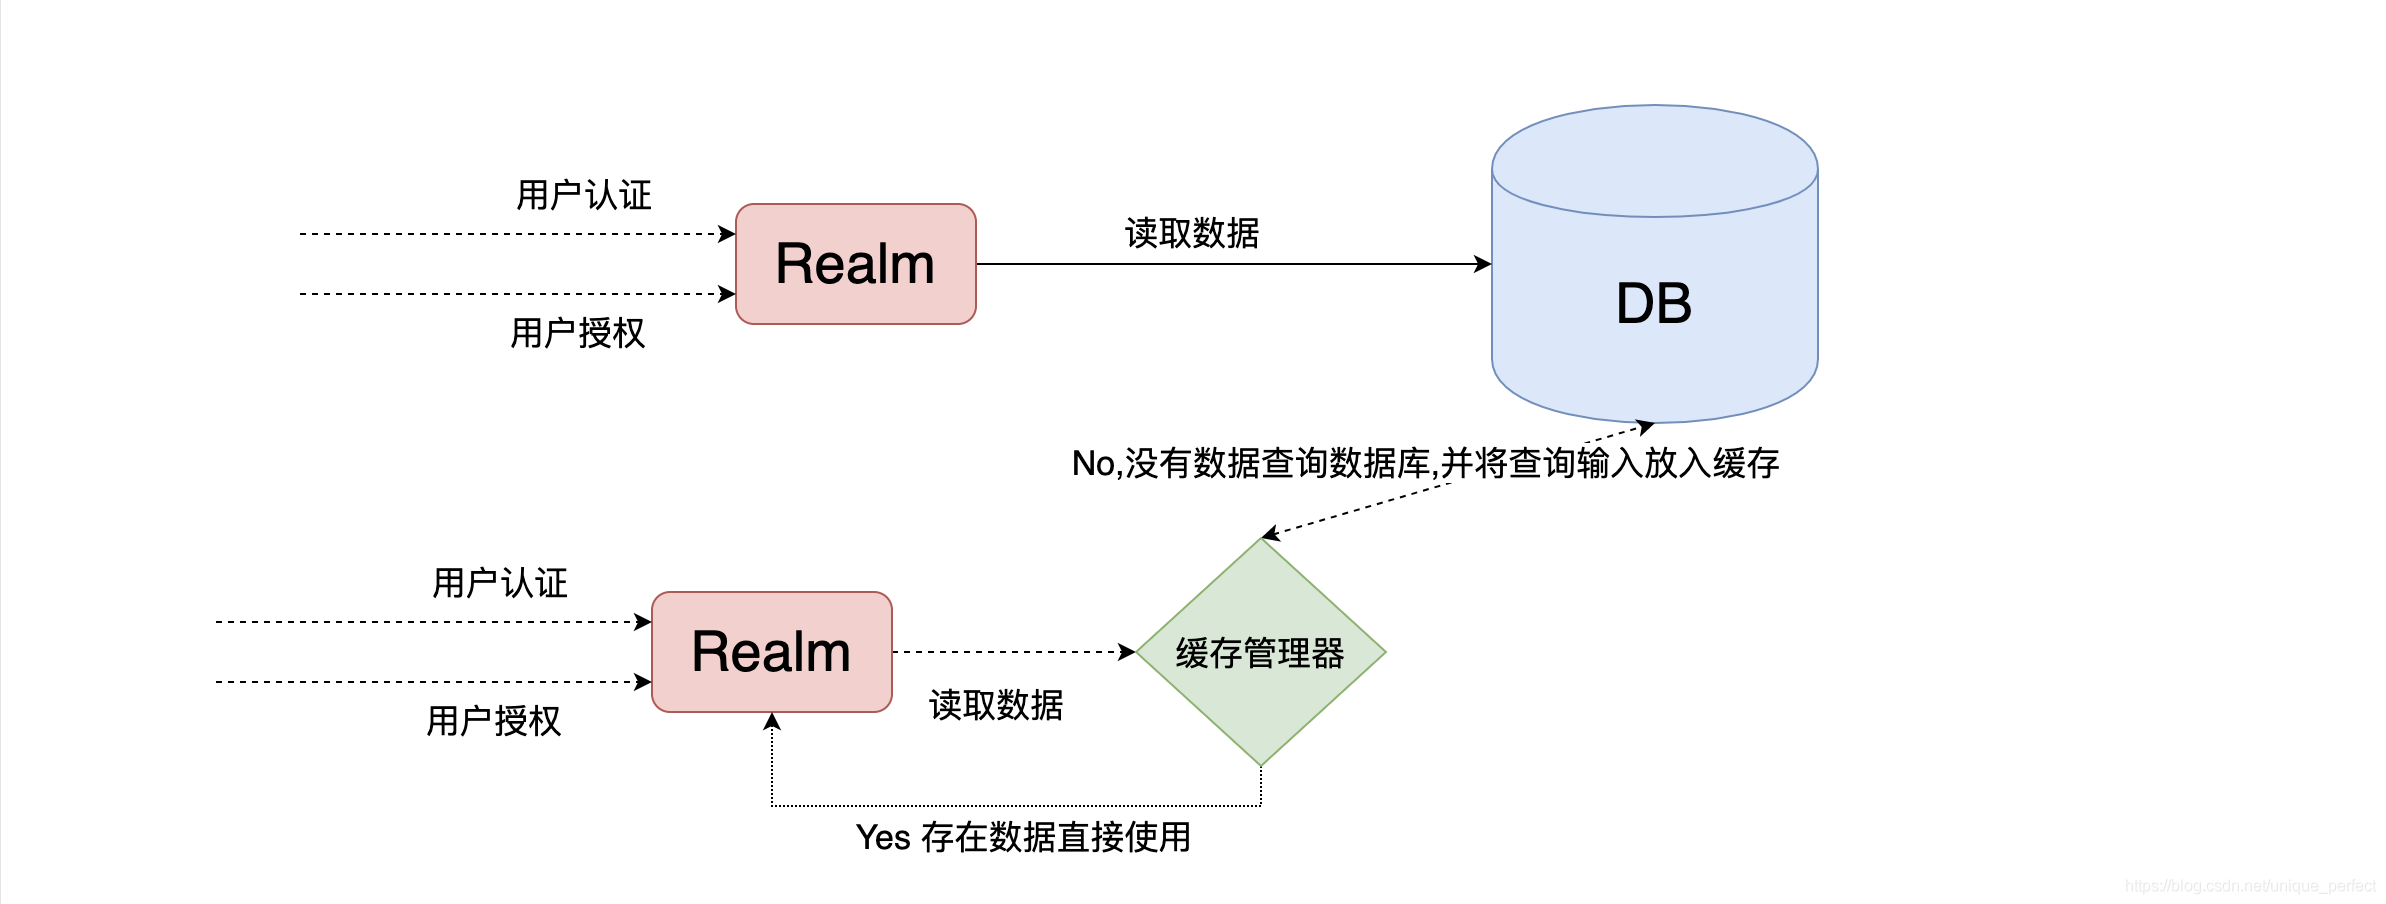
三、Shiro整合Cache
3.1、整合Ehcache
引入依赖
1 2 3 4 5 6 | <!--Shiro整合Ehcache--><dependency> <groupId>org.apache.shiro</groupId> <artifactId>shiro-ehcache</artifactId> <version>1.5.3</version></dependency> |
修改自定义Realm
/**
 * 创建自定义realm
 * @return 自定义Realm
 */
@Bean("realm")
public Realm getRealm(){
    CustomerRealm customerRealm = new CustomerRealm();
    //设置hashed凭证匹配器
    HashedCredentialsMatcher credentialsMatcher = new HashedCredentialsMatcher();
    //设置md5加密
    credentialsMatcher.setHashAlgorithmName("md5");
    //设置散列次数
    credentialsMatcher.setHashIterations(1024);
    customerRealm.setCredentialsMatcher(credentialsMatcher);
    //开启缓存管理
    customerRealm.setCacheManager(new EhCacheManager());
    customerRealm.setCachingEnabled(true);//开启全局缓存
    customerRealm.setAuthenticationCachingEnabled(true);//认证认证缓存
    customerRealm.setAuthenticationCacheName("authenticationCache");
    customerRealm.setAuthorizationCachingEnabled(true);//开启授权缓存
    customerRealm.setAuthorizationCacheName("authorizationCache");
return customerRealm;
}
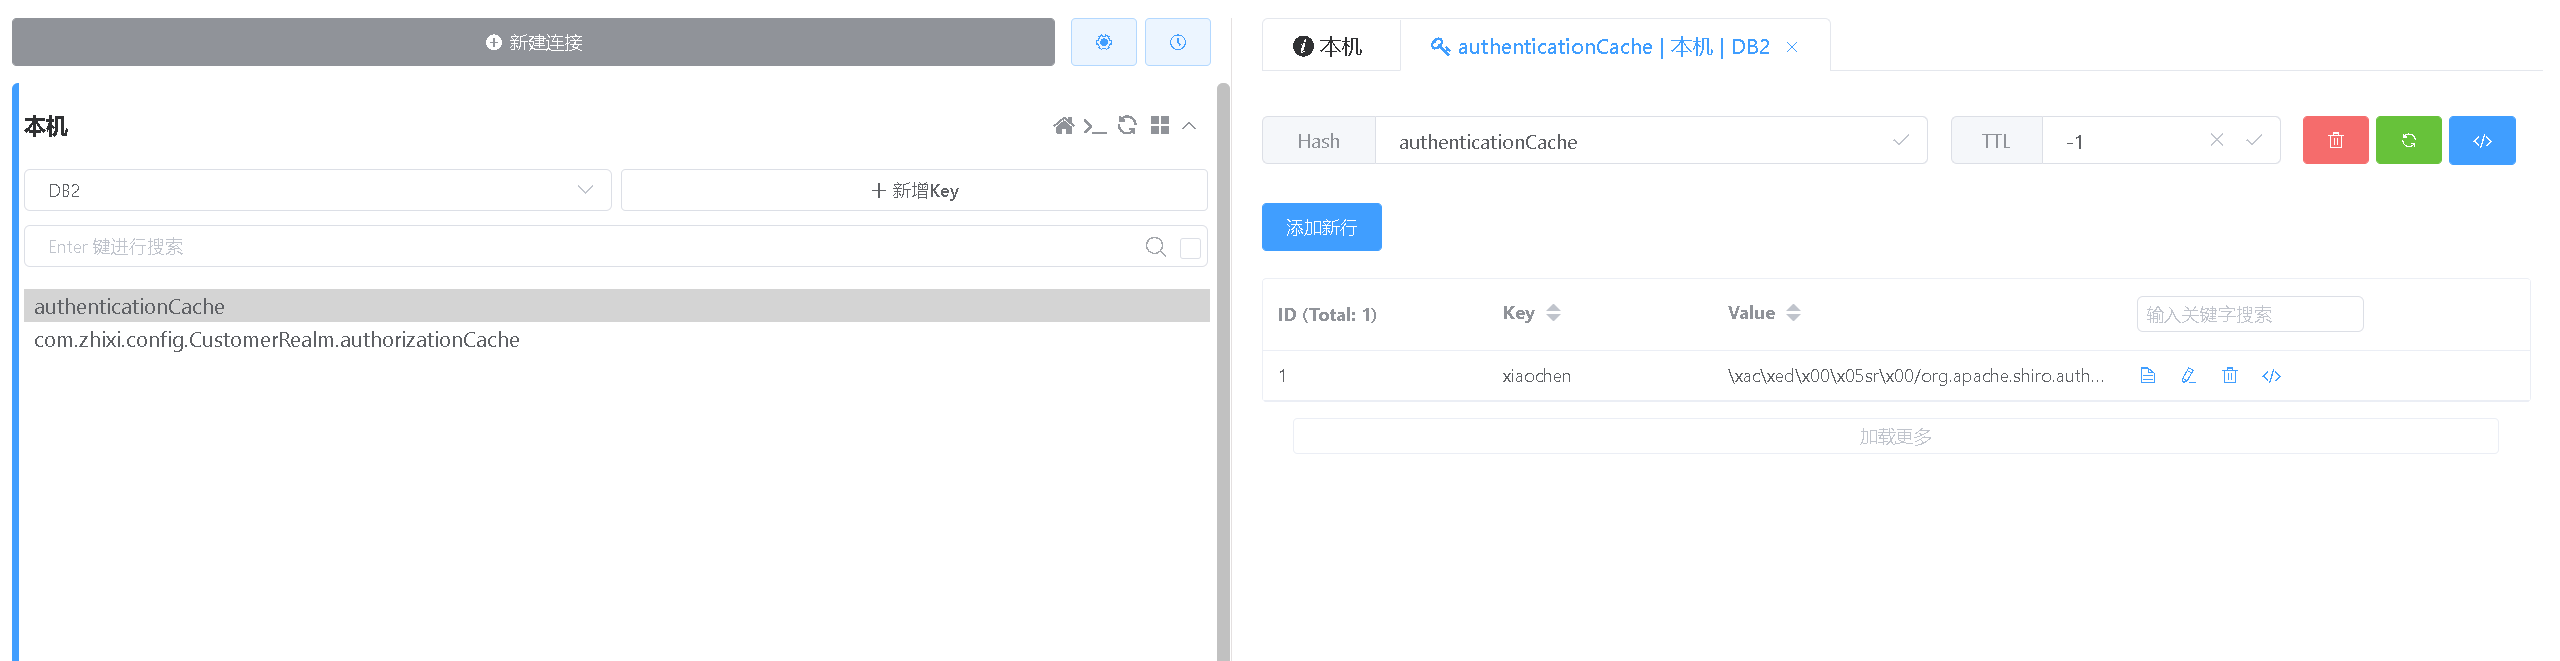
测试
在第一次加载的时候会加载权限认证授权等数据,后序不会加载。
3.2、整合Redis
1、导入SpringBoot整合Redis依赖
1 2 3 4 5 | <!--redis整合springboot--><dependency> <groupId>org.springframework.boot</groupId> <artifactId>spring-boot-starter-data-redis</artifactId></dependency> |
2、配置application.properties
1 2 3 4 | ##################Redis配置#############spring.redis.port=6379spring.redis.host=localhostspring.redis.database=2 |
3、SpringBoot获取Bean工具类
1 2 3 4 5 6 7 8 9 10 11 12 13 14 15 16 17 18 19 20 21 22 23 24 25 26 27 28 29 | import org.springframework.beans.BeansException;import org.springframework.context.ApplicationContext;import org.springframework.context.ApplicationContextAware;import org.springframework.stereotype.Component;/** * @author zhixi */@Componentpublic class ApplicationContextUtils implements ApplicationContextAware { private static ApplicationContext context; @Override public void setApplicationContext(ApplicationContext applicationContext) throws BeansException { context = applicationContext; } /** * 根据bean名字获取工厂中指定bean 对象 * * @param beanName bean名称 * @return bean对象 */ public static Object getBean(String beanName) { return context.getBean(beanName); }} |
4、创建Redis缓存管理器
1 2 3 4 5 6 7 8 9 10 11 12 13 14 15 16 17 18 19 20 21 22 23 24 25 | import org.apache.shiro.cache.Cache;import org.apache.shiro.cache.CacheException;import org.apache.shiro.cache.CacheManager;/** * @author zhixi */public class RedisCacheManager implements CacheManager { /** * 缓存 * * @param cacheName 认证或者是授权缓存的统一名称 * @param <K> k * @param <V> v * @return 自定义CacheManager * @throws CacheException 异常 */ @Override public <K, V> Cache<K, V> getCache(String cacheName) throws CacheException { System.out.println(cacheName); return new RedisCache<K, V>(cacheName); }} |
5、Redis缓存实现类
1 2 3 4 5 6 7 8 9 10 11 12 13 14 15 16 17 18 19 20 21 22 23 24 25 26 27 28 29 30 31 32 33 34 35 36 37 38 39 40 41 42 43 44 45 46 47 48 49 50 51 52 53 54 55 56 57 58 59 60 61 62 63 64 65 66 67 68 | /** * 自定义redis缓存的实现 * * @param <k> k * @param <v> v */@SuppressWarnings("all")public class RedisCache<k, v> implements Cache<k, v> { private String cacheName; public RedisCache() { } public RedisCache(String cacheName) { this.cacheName = cacheName; } @Override public v get(k k) throws CacheException { v v = (v) getRedisTemplate().opsForHash().get(this.cacheName, k.toString()); return v; } @Override public v put(k k, v v) throws CacheException { System.out.println("put key: " + k); System.out.println("put value:" + v); getRedisTemplate().opsForHash().put(this.cacheName, k.toString(), v); return null; } @Override public v remove(k k) throws CacheException { System.out.println("=============remove============="); return (v) getRedisTemplate().opsForHash().delete(this.cacheName, k.toString()); } @Override public void clear() throws CacheException { System.out.println("=============clear=============="); getRedisTemplate().delete(this.cacheName); } @Override public int size() { return getRedisTemplate().opsForHash().size(this.cacheName).intValue(); } @Override public Set<k> keys() { return getRedisTemplate().opsForHash().keys(this.cacheName); } @Override public Collection<v> values() { return getRedisTemplate().opsForHash().values(this.cacheName); } private RedisTemplate getRedisTemplate() { RedisTemplate redisTemplate = (RedisTemplate) ApplicationContextUtils.getBean("redisTemplate"); /*设置key的序列化方式*/ redisTemplate.setKeySerializer(new StringRedisSerializer()); redisTemplate.setHashKeySerializer(new StringRedisSerializer()); return redisTemplate; }} |
6、设置Shiro盐的序列化方式
此处需要在认证的时候设置盐的序列化方式,不能够使用之前的ByteSource.Util了,否则会出现登录(序列化)正常,第二次登录(反序列化)失败的错误
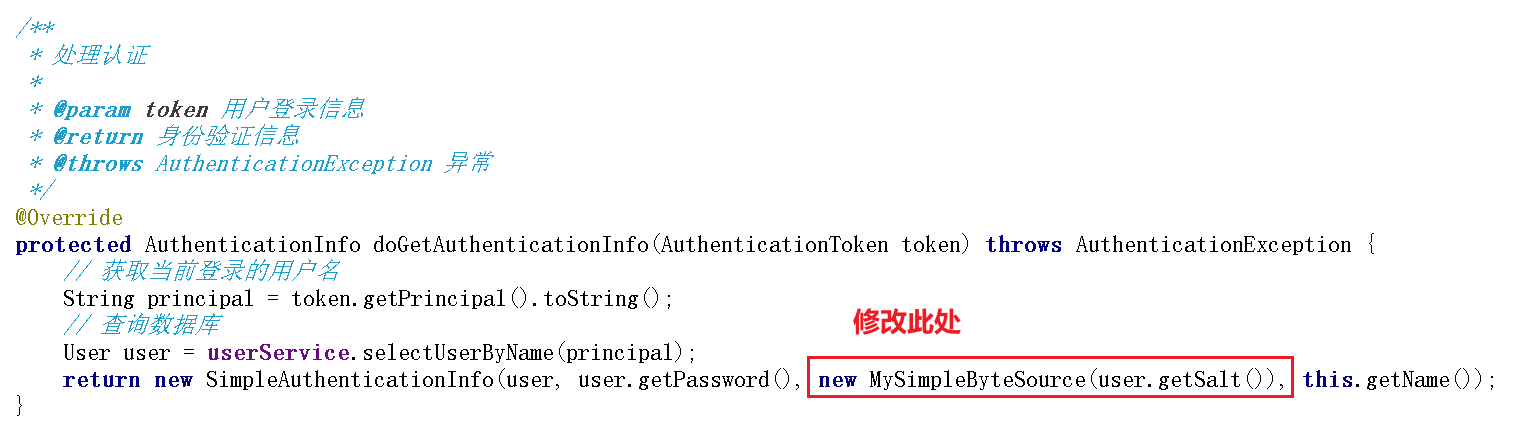
1 2 3 4 5 6 7 8 9 10 11 12 13 14 15 16 17 18 19 20 21 22 23 24 25 26 27 28 29 30 31 32 33 34 35 36 37 38 39 40 41 42 43 44 45 46 47 48 49 50 51 52 53 54 55 56 57 58 59 60 61 62 63 64 65 66 67 68 69 70 71 72 73 74 75 76 77 78 79 80 81 82 83 84 85 86 87 88 89 90 91 92 93 94 95 96 97 98 99 100 101 102 103 104 105 106 107 108 109 110 111 112 113 114 115 116 117 118 119 120 121 | import org.apache.shiro.codec.Base64;import org.apache.shiro.codec.CodecSupport;import org.apache.shiro.codec.Hex;import org.apache.shiro.util.ByteSource;import java.io.File;import java.io.InputStream;import java.io.Serializable;import java.util.Arrays;/** * 解决: * shiro 使用缓存时出现:java.io.NotSerializableException: org.apache.shiro.util.SimpleByteSource * no valid constructor * 序列化后,无法反序列化的问题(https://blog.csdn.net/qq_15090197/article/details/108743271) */public class MySimpleByteSource implements ByteSource, Serializable { private static final long serialVersionUID = 1L; private byte[] bytes; private String cachedHex; private String cachedBase64; public MySimpleByteSource(){ } public MySimpleByteSource(byte[] bytes) { this.bytes = bytes; } public MySimpleByteSource(char[] chars) { this.bytes = CodecSupport.toBytes(chars); } public MySimpleByteSource(String string) { this.bytes = CodecSupport.toBytes(string); } public MySimpleByteSource(ByteSource source) { this.bytes = source.getBytes(); } public MySimpleByteSource(File file) { this.bytes = (new MySimpleByteSource.BytesHelper()).getBytes(file); } public MySimpleByteSource(InputStream stream) { this.bytes = (new MySimpleByteSource.BytesHelper()).getBytes(stream); } public static boolean isCompatible(Object o) { return o instanceof byte[] || o instanceof char[] || o instanceof String || o instanceof ByteSource || o instanceof File || o instanceof InputStream; } public void setBytes(byte[] bytes) { this.bytes = bytes; } @Override public byte[] getBytes() { return this.bytes; } @Override public String toHex() { if(this.cachedHex == null) { this.cachedHex = Hex.encodeToString(this.getBytes()); } return this.cachedHex; } @Override public String toBase64() { if(this.cachedBase64 == null) { this.cachedBase64 = Base64.encodeToString(this.getBytes()); } return this.cachedBase64; } @Override public boolean isEmpty() { return this.bytes == null || this.bytes.length == 0; } @Override public String toString() { return this.toBase64(); } @Override public int hashCode() { return this.bytes != null && this.bytes.length != 0? Arrays.hashCode(this.bytes):0; } @Override public boolean equals(Object o) { if(o == this) { return true; } else if(o instanceof ByteSource) { ByteSource bs = (ByteSource)o; return Arrays.equals(this.getBytes(), bs.getBytes()); } else { return false; } } private static final class BytesHelper extends CodecSupport { private BytesHelper() { } public byte[] getBytes(File file) { return this.toBytes(file); } public byte[] getBytes(InputStream stream) { return this.toBytes(stream); } }} |
7、设置自定义Realm的管理器为redis

8、测试
四、SpringBoot整合验证码功能(非shiro)
1、验证码工具类


import javax.imageio.ImageIO;
import java.awt.*;
import java.awt.geom.AffineTransform;
import java.awt.image.BufferedImage;
import java.io.File;
import java.io.FileOutputStream;
import java.io.IOException;
import java.io.OutputStream;
import java.util.Arrays;
import java.util.Random;

/**
 * @创建人 cx
 * @创建时间 2018/11/27 17:36
 * @描述 验证码生成
 */
public class VerifyCodeUtils {

    //使用到Algerian字体,系统里没有的话需要安装字体,字体只显示大写,去掉了1,0,i,o几个容易混淆的字符
    public static final String VERIFY_CODES = "23456789ABCDEFGHJKLMNPQRSTUVWXYZ";
    private static final Random random = new Random();


    /**
     * 使用系统默认字符源生成验证码
     *
     * @param verifySize 验证码长度
     * @return
     */
    public static String generateVerifyCode(int verifySize) {
        return generateVerifyCode(verifySize, VERIFY_CODES);
    }

    /**
     * 使用指定源生成验证码
     *
     * @param verifySize 验证码长度
     * @param sources    验证码字符源
     * @return
     */
    public static String generateVerifyCode(int verifySize, String sources) {
        if (sources == null || sources.length() == 0) {
            sources = VERIFY_CODES;
        }
        int codesLen = sources.length();
        Random rand = new Random(System.currentTimeMillis());
        StringBuilder verifyCode = new StringBuilder(verifySize);
        for (int i = 0; i < verifySize; i++) {
            verifyCode.append(sources.charAt(rand.nextInt(codesLen - 1)));
        }
        return verifyCode.toString();
    }

    /**
     * 生成随机验证码文件,并返回验证码值
     *
     * @param w
     * @param h
     * @param outputFile
     * @param verifySize
     * @return
     * @throws IOException
     */
    public static String outputVerifyImage(int w, int h, File outputFile, int verifySize) throws IOException {
        String verifyCode = generateVerifyCode(verifySize);
        outputImage(w, h, outputFile, verifyCode);
        return verifyCode;
    }

    /**
     * 输出随机验证码图片流,并返回验证码值
     *
     * @param w
     * @param h
     * @param os
     * @param verifySize
     * @return
     * @throws IOException
     */
    public static String outputVerifyImage(int w, int h, OutputStream os, int verifySize) throws IOException {
        String verifyCode = generateVerifyCode(verifySize);
        outputImage(w, h, os, verifyCode);
        return verifyCode;
    }

    /**
     * 生成指定验证码图像文件
     *
     * @param w
     * @param h
     * @param outputFile
     * @param code
     * @throws IOException
     */
    public static void outputImage(int w, int h, File outputFile, String code) throws IOException {
        if (outputFile == null) {
            return;
        }
        File dir = outputFile.getParentFile();
        if (!dir.exists()) {
            dir.mkdirs();
        }
        try {
            outputFile.createNewFile();
            FileOutputStream fos = new FileOutputStream(outputFile);
            outputImage(w, h, fos, code);
            fos.close();
        } catch (IOException e) {
            throw e;
        }
    }

    /**
     * 输出指定验证码图片流
     *
     * @param w
     * @param h
     * @param os
     * @param code
     * @throws IOException
     */
    public static void outputImage(int w, int h, OutputStream os, String code) throws IOException {
        int verifySize = code.length();
        BufferedImage image = new BufferedImage(w, h, BufferedImage.TYPE_INT_RGB);
        Random rand = new Random();
        Graphics2D g2 = image.createGraphics();
        g2.setRenderingHint(RenderingHints.KEY_ANTIALIASING, RenderingHints.VALUE_ANTIALIAS_ON);
        Color[] colors = new Color[5];
        Color[] colorSpaces = new Color[]{Color.WHITE, Color.CYAN,
                Color.GRAY, Color.LIGHT_GRAY, Color.MAGENTA, Color.ORANGE,
                Color.PINK, Color.YELLOW};
        float[] fractions = new float[colors.length];
        for (int i = 0; i < colors.length; i++) {
            colors[i] = colorSpaces[rand.nextInt(colorSpaces.length)];
            fractions[i] = rand.nextFloat();
        }
        Arrays.sort(fractions);

        g2.setColor(Color.GRAY);// 设置边框色
        g2.fillRect(0, 0, w, h);

        Color c = getRandColor(200, 250);
        g2.setColor(c);// 设置背景色
        g2.fillRect(0, 2, w, h - 4);

        //绘制干扰线
        Random random = new Random();
        g2.setColor(getRandColor(160, 200));// 设置线条的颜色
        for (int i = 0; i < 20; i++) {
            int x = random.nextInt(w - 1);
            int y = random.nextInt(h - 1);
            int xl = random.nextInt(6) + 1;
            int yl = random.nextInt(12) + 1;
            g2.drawLine(x, y, x + xl + 40, y + yl + 20);
        }

        // 添加噪点
        float yawpRate = 0.05f;// 噪声率
        int area = (int) (yawpRate * w * h);
        for (int i = 0; i < area; i++) {
            int x = random.nextInt(w);
            int y = random.nextInt(h);
            int rgb = getRandomIntColor();
            image.setRGB(x, y, rgb);
        }

        shear(g2, w, h, c);// 使图片扭曲

        g2.setColor(getRandColor(100, 160));
        int fontSize = h - 4;
        Font font = new Font("Algerian", Font.ITALIC, fontSize);
        g2.setFont(font);
        char[] chars = code.toCharArray();
        for (int i = 0; i < verifySize; i++) {
            AffineTransform affine = new AffineTransform();
            affine.setToRotation(Math.PI / 4 * rand.nextDouble() * (rand.nextBoolean() ? 1 : -1), (w / verifySize) * i + fontSize / 2, h / 2);
            g2.setTransform(affine);
            g2.drawChars(chars, i, 1, ((w - 10) / verifySize) * i + 5, h / 2 + fontSize / 2 - 10);
        }

        g2.dispose();
        ImageIO.write(image, "jpg", os);
    }

    private static Color getRandColor(int fc, int bc) {
        if (fc > 255)
            fc = 255;
        if (bc > 255)
            bc = 255;
        int r = fc + random.nextInt(bc - fc);
        int g = fc + random.nextInt(bc - fc);
        int b = fc + random.nextInt(bc - fc);
        return new Color(r, g, b);
    }

    private static int getRandomIntColor() {
        int[] rgb = getRandomRgb();
        int color = 0;
        for (int c : rgb) {
            color = color << 8;
            color = color | c;
        }
        return color;
    }

    private static int[] getRandomRgb() {
        int[] rgb = new int[3];
        for (int i = 0; i < 3; i++) {
            rgb[i] = random.nextInt(255);
        }
        return rgb;
    }

    private static void shear(Graphics g, int w1, int h1, Color color) {
        shearX(g, w1, h1, color);
        shearY(g, w1, h1, color);
    }

    private static void shearX(Graphics g, int w1, int h1, Color color) {

        int period = random.nextInt(2);

        boolean borderGap = true;
        int frames = 1;
        int phase = random.nextInt(2);

        for (int i = 0; i < h1; i++) {
            double d = (double) (0)
                    * Math.sin((double) i / (double) period
                    + (6.2831853071795862D * (double) phase)
                    / (double) frames);
            g.copyArea(0, i, w1, 1, (int) d, 0);
            g.setColor(color);
            g.drawLine((int) d, i, 0, i);
            g.drawLine((int) d + w1, i, w1, i);
        }

    }

    private static void shearY(Graphics g, int w1, int h1, Color color) {

        int period = random.nextInt(40) + 10; // 50;

        boolean borderGap = true;
        int frames = 20;
        int phase = 7;
        for (int i = 0; i < w1; i++) {
            double d = (double) (period >> 1)
                    * Math.sin((double) i / (double) period
                    + (6.2831853071795862D * (double) phase)
                    / (double) frames);
            g.copyArea(i, 0, 1, h1, 0, (int) d);
            g.setColor(color);
            g.drawLine(i, (int) d, i, 0);
            g.drawLine(i, (int) d + h1, i, h1);

        }
    }
}
2、添加验证码请求以及修改登录请求
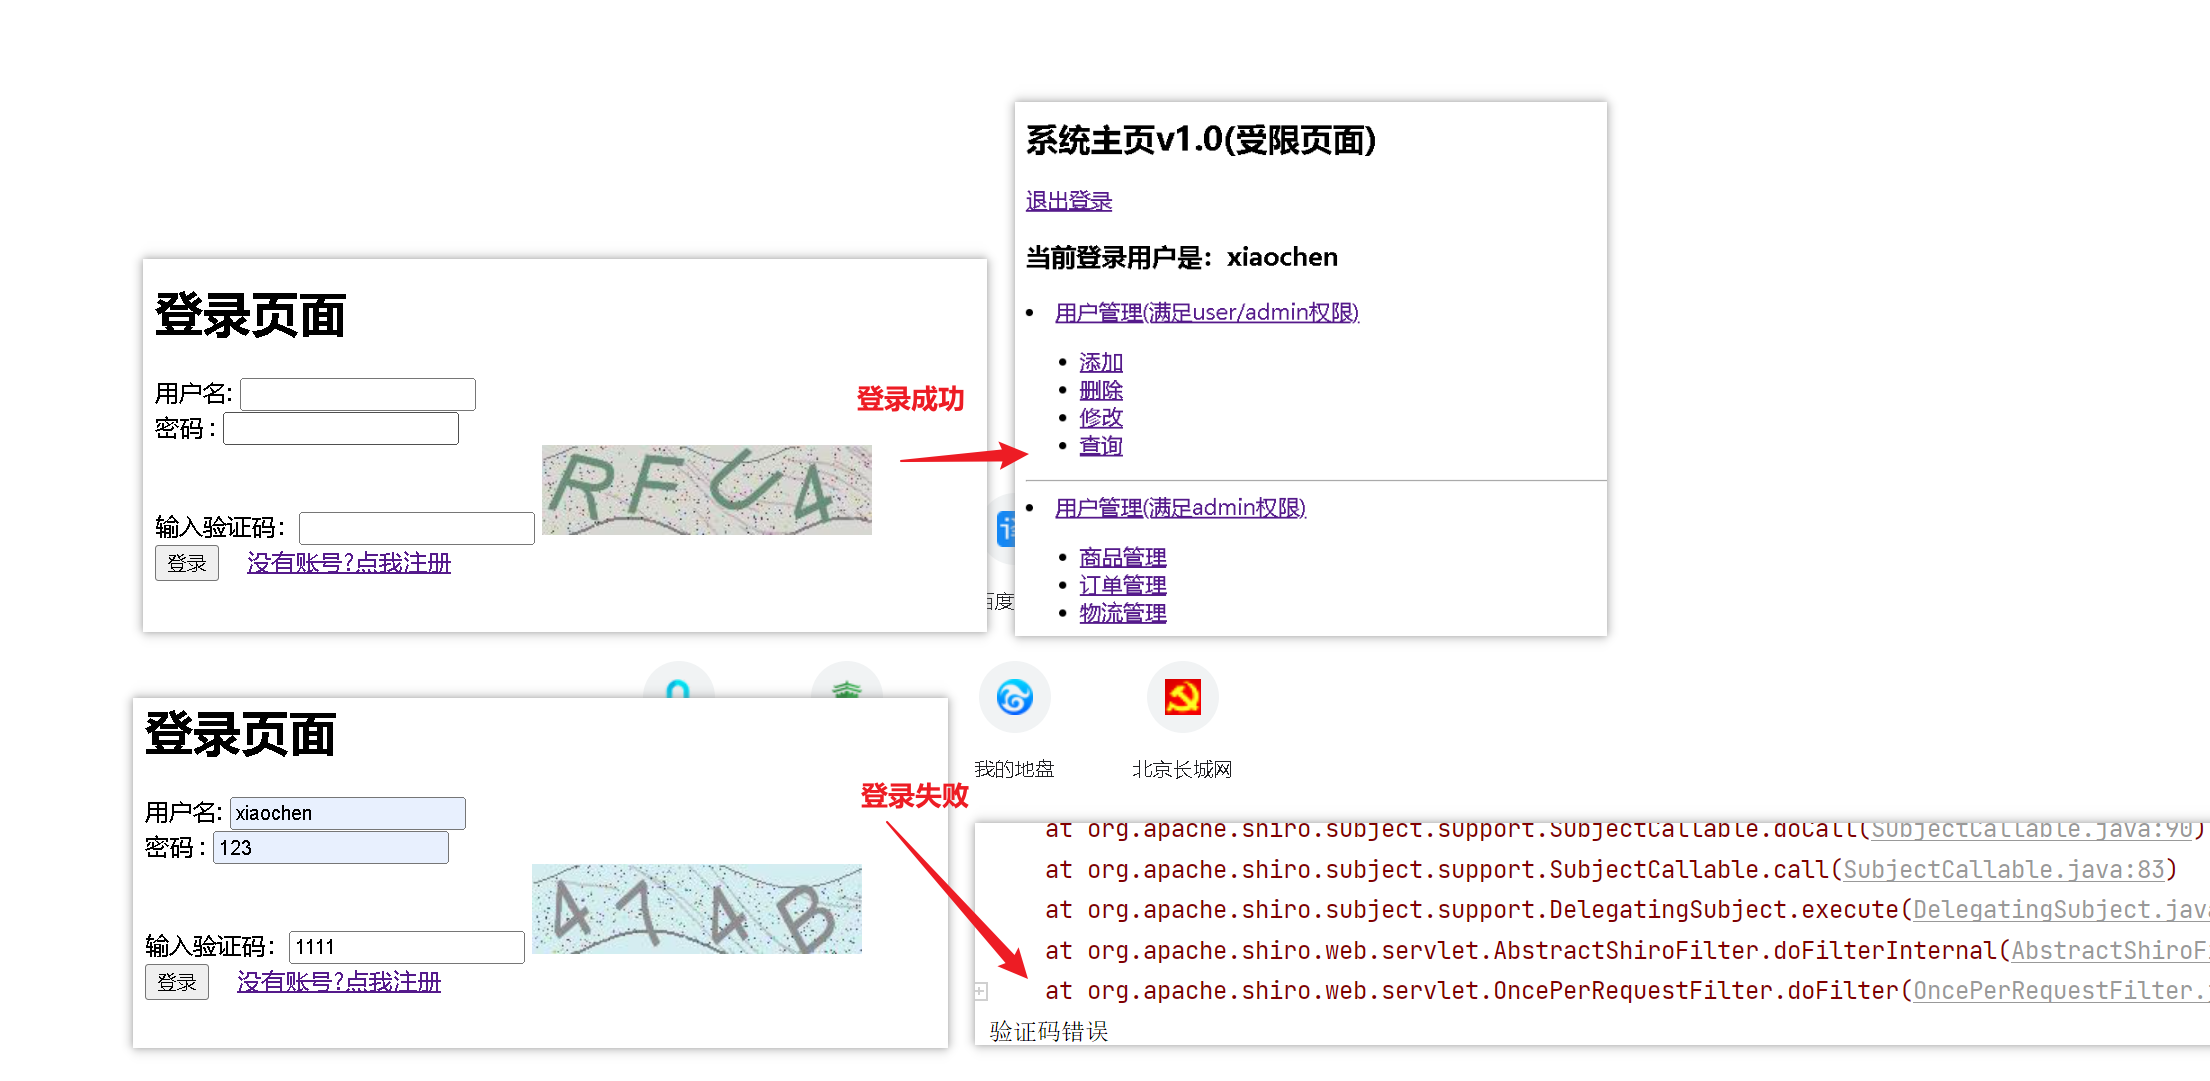
1 2 3 4 5 6 7 8 9 10 11 12 13 14 15 16 17 18 19 20 21 22 23 24 25 26 27 28 29 30 | /** * 用来处理身份认证 * * @return 登录成功返回页面 */@RequestMapping(value = "login", method = RequestMethod.POST)public String login(User user, String code, HttpSession session) { //比较验证码 String codes = session.getAttribute("code").toString(); try { if (codes.equalsIgnoreCase(code)) { //获取主体对象 Subject subject = SecurityUtils.getSubject(); subject.login(new UsernamePasswordToken(user.getUsername(), user.getPassword())); return "redirect:/index.jsp"; }else{ throw new RuntimeException("验证码错误!"); } } catch (UnknownAccountException e) { e.printStackTrace(); System.out.println("用户名错误!"); } catch (IncorrectCredentialsException e) { e.printStackTrace(); System.out.println("密码错误!"); } catch (Exception e) { e.printStackTrace(); System.out.println("验证码错误"); } return "redirect:/login.jsp";} |
3、登录页面添加验证码标签
1 2 3 4 5 6 7 8 9 10 11 12 13 14 15 16 17 18 19 20 21 22 23 24 25 26 27 28 29 30 31 | <%@page contentType="text/html; UTF-8" pageEncoding="UTF-8" isELIgnored="false" %><!doctype html><html lang="en"><head> <meta charset="UTF-8"> <meta name="viewport" content="width=device-width, user-scalable=no, initial-scale=1.0, maximum-scale=1.0, minimum-scale=1.0"> <meta http-equiv="X-UA-Compatible" content="ie=edge"> <title>Document</title></head><body><h1>登录页面</h1><form action="${pageContext.request.contextPath}/user/login" method="post"> <label> 用户名: <input type="text" name="username"> </label> <br/> <label> 密码 : <input type="text" name="password"> </label> <br> <label> 输入验证码:<input type="text" name="code"> <img src="${pageContext.request.contextPath}/user/getImage" alt="验证码"/> </label><br> <input type="submit" value="登录"> <a href="/register.jsp">没有账号?点我注册</a></form></body></html> |
4、Shiro放行验证码请求
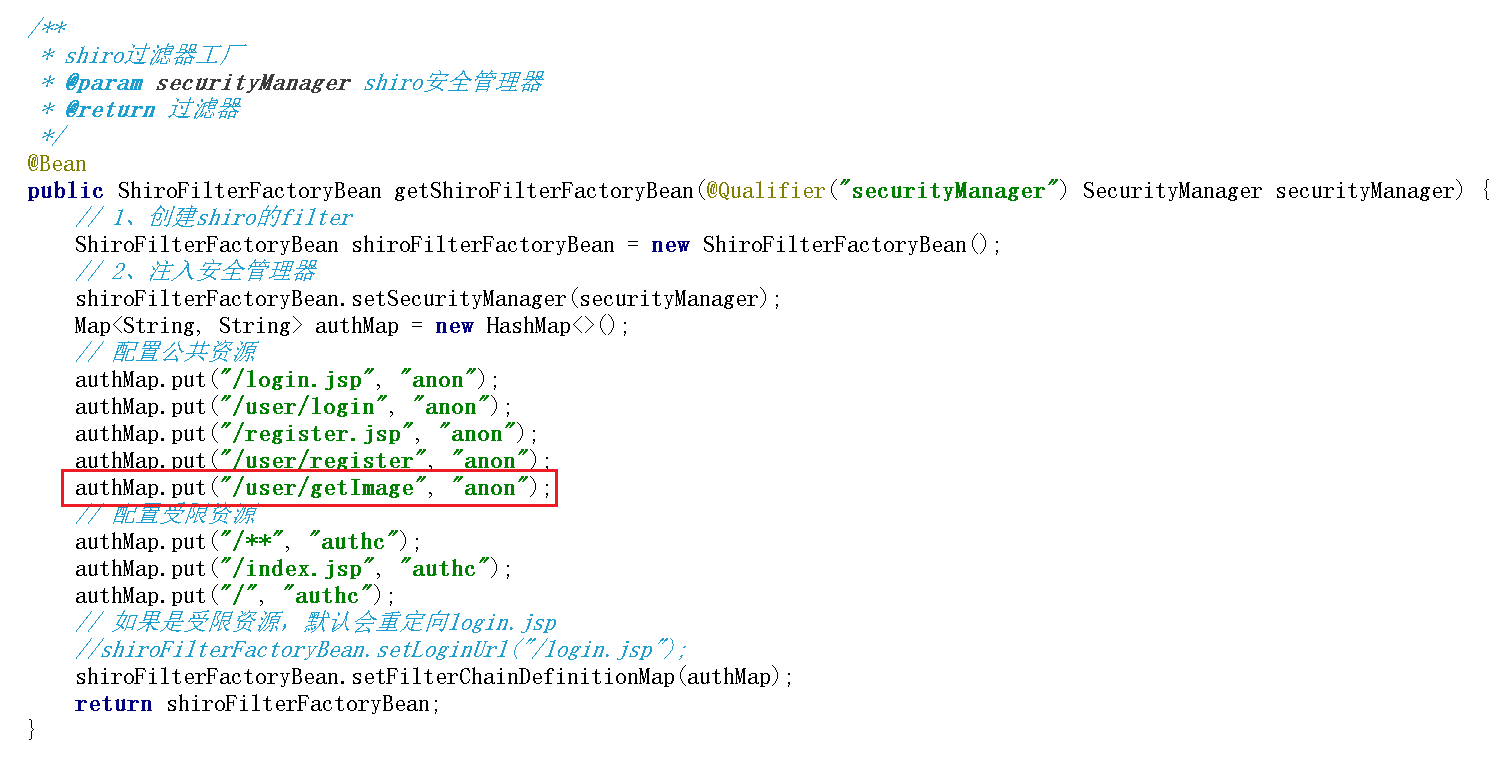
5、测试
五、Shiro整合Thymeleaf
https://github.com/zhangzhixi0305/springboot-study-shiro/tree/master/shiro-04-thymeleaf


【推荐】国内首个AI IDE,深度理解中文开发场景,立即下载体验Trae
【推荐】编程新体验,更懂你的AI,立即体验豆包MarsCode编程助手
【推荐】抖音旗下AI助手豆包,你的智能百科全书,全免费不限次数
【推荐】轻量又高性能的 SSH 工具 IShell:AI 加持,快人一步
· TypeScript + Deepseek 打造卜卦网站:技术与玄学的结合
· Manus的开源复刻OpenManus初探
· AI 智能体引爆开源社区「GitHub 热点速览」
· 三行代码完成国际化适配,妙~啊~
· .NET Core 中如何实现缓存的预热?
2022-03-12 Git实战
2021-03-12 平衡二叉树(AVL树)
2021-03-12 Tomcat的安装与使用