


SpringBoot下定时任务
参考江南一点雨大佬的文章:
https://www.cnblogs.com/lenve/p/10728897.html
cron工具网站:
https://www.bejson.com/othertools/cron/
写在前面:Linux下的Cron跟Spring下的Cron表达式有些许的不一样,注意到网站上去验证
一、SpringBoot中实现定时任务的两种方式
在 Spring + SpringMVC 环境中,一般来说,要实现定时任务,我们有两中方案,一种是使用 Spring 自带的定时任务处理器 @Scheduled 注解,另一种就是使用第三方框架 Quartz 。
Spring Boot 源自 Spring+SpringMVC ,因此天然具备这两个 Spring 中的定时任务实现策略,当然也支持 Quartz,本文我们就来看下 Spring Boot 中两种定时任务的实现方式;
一、@Scheduled
使用 @Scheduled 非常容易,直接创建一个 Spring Boot 项目,并且添加 web 依赖 spring-boot-starter-web,项目创建成功后,添加 @EnableScheduling 注解
1、开启定时任务:
1 2 3 4 5 6 7 8 | @EnableScheduling@SpringBootApplicationpublic class Springboot19ScheduledApplication { public static void main(String[] args) { SpringApplication.run(Springboot19ScheduledApplication.class, args); }} |
2、配置定时任务:具体的表达式请参考上面的网址自行验证
cron表达式示例:
- second(秒), minute(分), hour(时), day of month(日), month(月), day of week(周几).
- 【0 0/5 14,18 * * ?】 每天14点整,和18点整,每隔5分钟执行一次
- 【0 15 10 ? * 1-6】 每个月的周一至周六10:15分执行一次
- 【0 0 2 ? * 6L】每个月的最后一个周六凌晨2点执行一次
- 【0 0 2 LW * ?】每个月的最后一个工作日凌晨2点执行一次
- 【0 0 2-4 ? * 1#1】每个月的第一个周一凌晨2点到4点期间,每个整点都执行一次;
1 2 3 4 5 6 7 8 9 10 11 12 13 14 15 16 17 18 19 20 21 22 23 24 25 26 27 28 29 30 31 32 33 34 35 36 37 | import org.springframework.context.annotation.Configuration;import org.springframework.scheduling.annotation.Scheduled;import java.util.Date;/** * @ClassName ScheduledTaskConfig * @Author zhangzhixi * @Description 定时任务配置类 * @Date 2022-2-27 19:20 * @Version 1.0 */@Configurationpublic class ScheduledTaskConfig { @Scheduled(fixedRate = 2000) public void fixedRate() { System.out.println("fixedRate>>>" + new Date()); } @Scheduled(fixedDelay = 2000) public void fixedDelay() { System.out.println("fixedDelay>>>" + new Date()); } @Scheduled(initialDelay = 2000, fixedDelay = 2000) public void initialDelay() { System.out.println("initialDelay>>>" + new Date()); } /** * 每5秒执行一次 */ @Scheduled(cron = "0/5 * * * * *") public void cron() { System.out.println("cronExpression>>>" + new Date()); }} |
- 首先使用 @Scheduled 注解开启一个定时任务。
- fixedRate 表示任务执行之间的时间间隔,具体是指两次任务的开始时间间隔,即第二次任务开始时,第一次任务可能还没结束。
- fixedDelay 表示任务执行之间的时间间隔,具体是指本次任务结束到下次任务开始之间的时间间隔。
- initialDelay 表示首次任务启动的延迟时间。
- 所有时间的单位都是毫秒。
二、Quatz
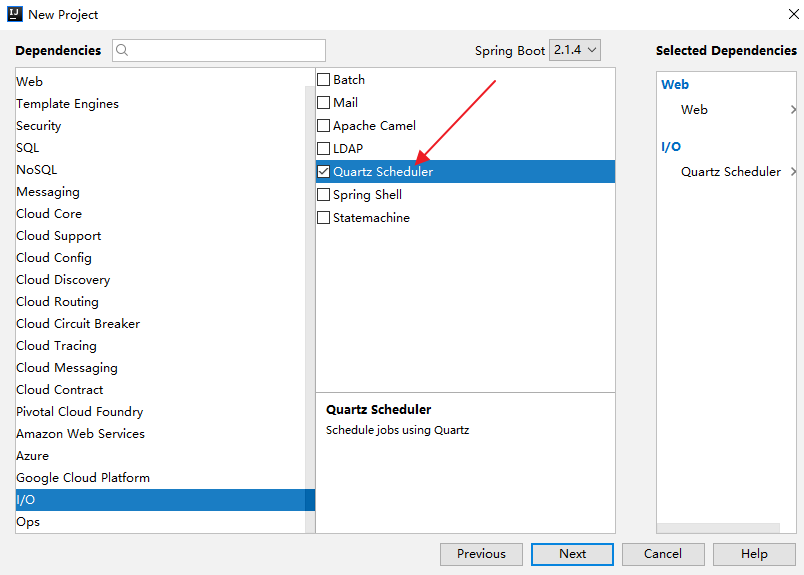
一般在项目中,除非定时任务涉及到的业务实在是太简单,使用 @Scheduled 注解来解决定时任务,否则大部分情况可能都是使用 Quartz 来做定时任务。在 Spring Boot 中使用 Quartz ,只需要在创建项目时,添加 Quartz 依赖即可:
1 2 3 4 | <dependency> <groupId>org.springframework.boot</groupId> <artifactId>spring-boot-starter-quartz</artifactId></dependency> |
1:开启定时任务的注解
1 2 3 4 5 6 7 | @EnableScheduling@SpringBootApplicationpublic class Springboot18QuartzApplication { public static void main(String[] args) { SpringApplication.run(Springboot18QuartzApplication.class, args); }} |
Quartz 在使用过程中,有两个关键概念,一个是JobDetail(要做的事情),另一个是触发器(什么时候做),要定义 JobDetail,需要先定义 Job,Job 的定义有两种方式:
2.1:Job的第一种定义方式:直接定义bean
1 2 3 4 5 6 7 8 9 10 11 12 13 | /** * @ClassName MyJobOne * @Author zhangzhixi * @Description * @Date 2022-2-27 16:58 * @Version 1.0 */@Componentpublic class MyJobOne { public void sayHello() { System.out.println(MyJobOne.class + "========>" + new SimpleDateFormat("yyyy-MM-dd HH:mm:ss").format(new Date())); }} |
关于这种定义方式说两点:
- 首先将这个 Job 注册到 Spring 容器中。
- 这种定义方式有一个缺陷,就是无法传参。
2.2:Job的第二种定义方式:继承 QuartzJobBean 并实现默认的方法
1 2 3 4 5 6 7 8 9 10 11 12 13 14 15 | /** * @ClassName MyJonTwo * @Author zhangzhixi * @Description * @Date 2022-2-27 17:01 * @Version 1.0 */@Componentpublic class MyJonTwo extends QuartzJobBean { @Override protected void executeInternal(JobExecutionContext jobExecutionContext) { new HelloService().sayHello(); }} |
HelloService:
1 2 3 4 5 6 7 8 9 10 11 12 | /** * @ClassName HelloService * @Author zhangzhixi * @Description * @Date 2022-2-27 17:07 * @Version 1.0 */public class HelloService { public void sayHello() { System.out.println(HelloService.class + "========>" + new SimpleDateFormat("yyyy-MM-dd HH:mm:ss").format(new Date())); }} |
和第1种方式相比,这种方式支持传参,任务启动时,executeInternal 方法将会被执行。
Job 有了之后,接下来创建类,配置 JobDetail 和 Trigger 触发器,如下:
3:配置触发器
1 2 3 4 5 6 7 8 9 10 11 12 13 14 15 16 17 18 19 20 21 22 23 24 25 26 27 28 29 30 31 32 33 34 35 36 37 38 39 40 41 42 43 44 45 46 47 48 49 50 51 52 53 54 55 56 57 58 59 60 61 62 63 64 65 66 67 68 69 70 71 72 73 74 75 76 77 78 79 80 81 82 83 84 85 86 87 88 89 | /** * @ClassName QuartzConfig * @Author zhangzhixi * @Description * @Date 2022-2-27 17:05 * @Version 1.0 */@Configurationpublic class QuartzConfig { /** * JobDetail的配置1: * 使用 MethodInvokingJobDetailFactoryBean 可以配置目标 Bean 的名字和目标方法的名字,这种方式不支持传参。 * @return */ @Bean MethodInvokingJobDetailFactoryBean methodInvokingJobDetailFactoryBean() { MethodInvokingJobDetailFactoryBean bean = new MethodInvokingJobDetailFactoryBean(); bean.setTargetBeanName("myJobOne"); bean.setTargetMethod("sayHello"); return bean; } /** * JobDetail的配置2: * 使用 JobDetailFactoryBean 可以配置 JobDetail ,任务类继承自 QuartzJobBean ,这种方式支持传参,将参数封装在 JobDataMap 中进行传递。 * @return */ @Bean JobDetailFactoryBean jobDetailFactoryBean() { JobDetailFactoryBean bean = new JobDetailFactoryBean(); bean.setJobClass(MyJonTwo.class); JobDataMap map = new JobDataMap(); map.put("helloService", helloService()); bean.setJobDataMap(map); return bean; } /** * 触发器:simpleTrigger * @return */ @Bean SimpleTriggerFactoryBean simpleTriggerFactoryBean() { SimpleTriggerFactoryBean bean = new SimpleTriggerFactoryBean(); /*1.设置触发器开始的时间*/ bean.setStartTime(new Date()); /*2.设置触发器执行的次数*/ bean.setRepeatCount(5); /*3.设置执行间隔(单位:ms)*/ bean.setRepeatInterval(3000); /*4.添加MethodInvokingJobDetailFactoryBean触发器的设置*/ bean.setJobDetail(Objects.requireNonNull(methodInvokingJobDetailFactoryBean().getObject())); return bean; } /** * 触发器:cronTrigger * @return */ @Bean CronTriggerFactoryBean cronTrigger() { CronTriggerFactoryBean bean = new CronTriggerFactoryBean(); /*1、添加cron表达式*/ bean.setCronExpression("0/10 * * * * ?"); /*2、添加JobDetailFactoryBean的设置*/ bean.setJobDetail(Objects.requireNonNull(jobDetailFactoryBean().getObject())); return bean; } /** * 触发器程序调度工厂,传入触发器 * @return */ @Bean SchedulerFactoryBean schedulerFactoryBean() { SchedulerFactoryBean bean = new SchedulerFactoryBean(); /*传入触发器:参数是可变长参数*/ bean.setTriggers(cronTrigger().getObject(), simpleTriggerFactoryBean().getObject()); return bean; } @Bean HelloService helloService() { return new HelloService(); }} |
启动SpringBoot项目即可:

关于这个配置说如下几点:
- JobDetail 的配置有两种方式:MethodInvokingJobDetailFactoryBean 和 JobDetailFactoryBean 。
- 使用 MethodInvokingJobDetailFactoryBean 可以配置目标 Bean 的名字和目标方法的名字,这种方式不支持传参。
- 使用 JobDetailFactoryBean 可以配置 JobDetail ,任务类继承自 QuartzJobBean ,这种方式支持传参,将参数封装在 JobDataMap 中进行传递。
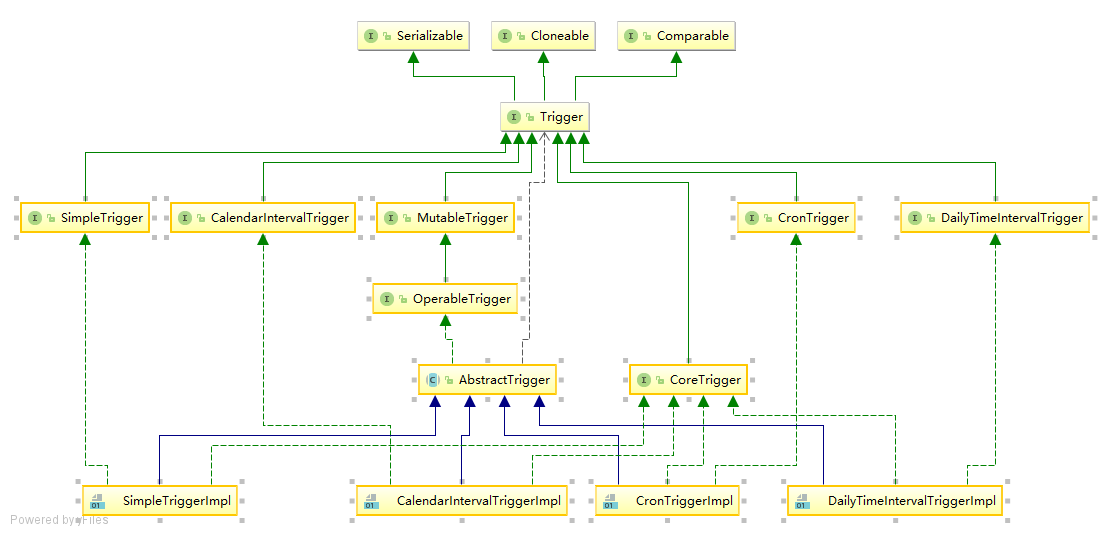
- Trigger 是指触发器,Quartz 中定义了多个触发器,这里向大家展示其中两种的用法,SimpleTrigger 和 CronTrigger 。
- SimpleTrigger 有点类似于前面说的 @Scheduled 的基本用法。
- CronTrigger 则有点类似于 @Scheduled 中 cron 表达式的用法。
二、动态修改定时任务时间
1、编写application.properties配置文件,配置定时任务的时间
1 | printTime.cron=0/10 * * * * ? |
2、定时任务执行类
1 2 3 4 5 6 7 8 9 10 11 12 13 14 15 16 17 18 19 20 21 22 23 24 25 26 27 28 29 30 31 | import lombok.Data;import lombok.extern.slf4j.Slf4j;import org.springframework.beans.factory.annotation.Value;import org.springframework.scheduling.annotation.SchedulingConfigurer;import org.springframework.scheduling.config.ScheduledTaskRegistrar;import org.springframework.scheduling.support.CronTrigger;import org.springframework.stereotype.Component;import java.time.LocalDateTime;@Data@Slf4j@Componentpublic class ScheduleTask implements SchedulingConfigurer { @Value("${printTime.cron}") private String cron; @Override public void configureTasks(ScheduledTaskRegistrar taskRegistrar) { // 动态使用cron表达式设置循环间隔 taskRegistrar.addTriggerTask(() -> { // 执行定时任务的代码处 log.info("Current time: {}", LocalDateTime.now()); }, triggerContext -> { // 使用CronTrigger触发器,可动态修改cron表达式来操作循环规则 CronTrigger cronTrigger = new CronTrigger(cron); return cronTrigger.nextExecutionTime(triggerContext); }); }} |
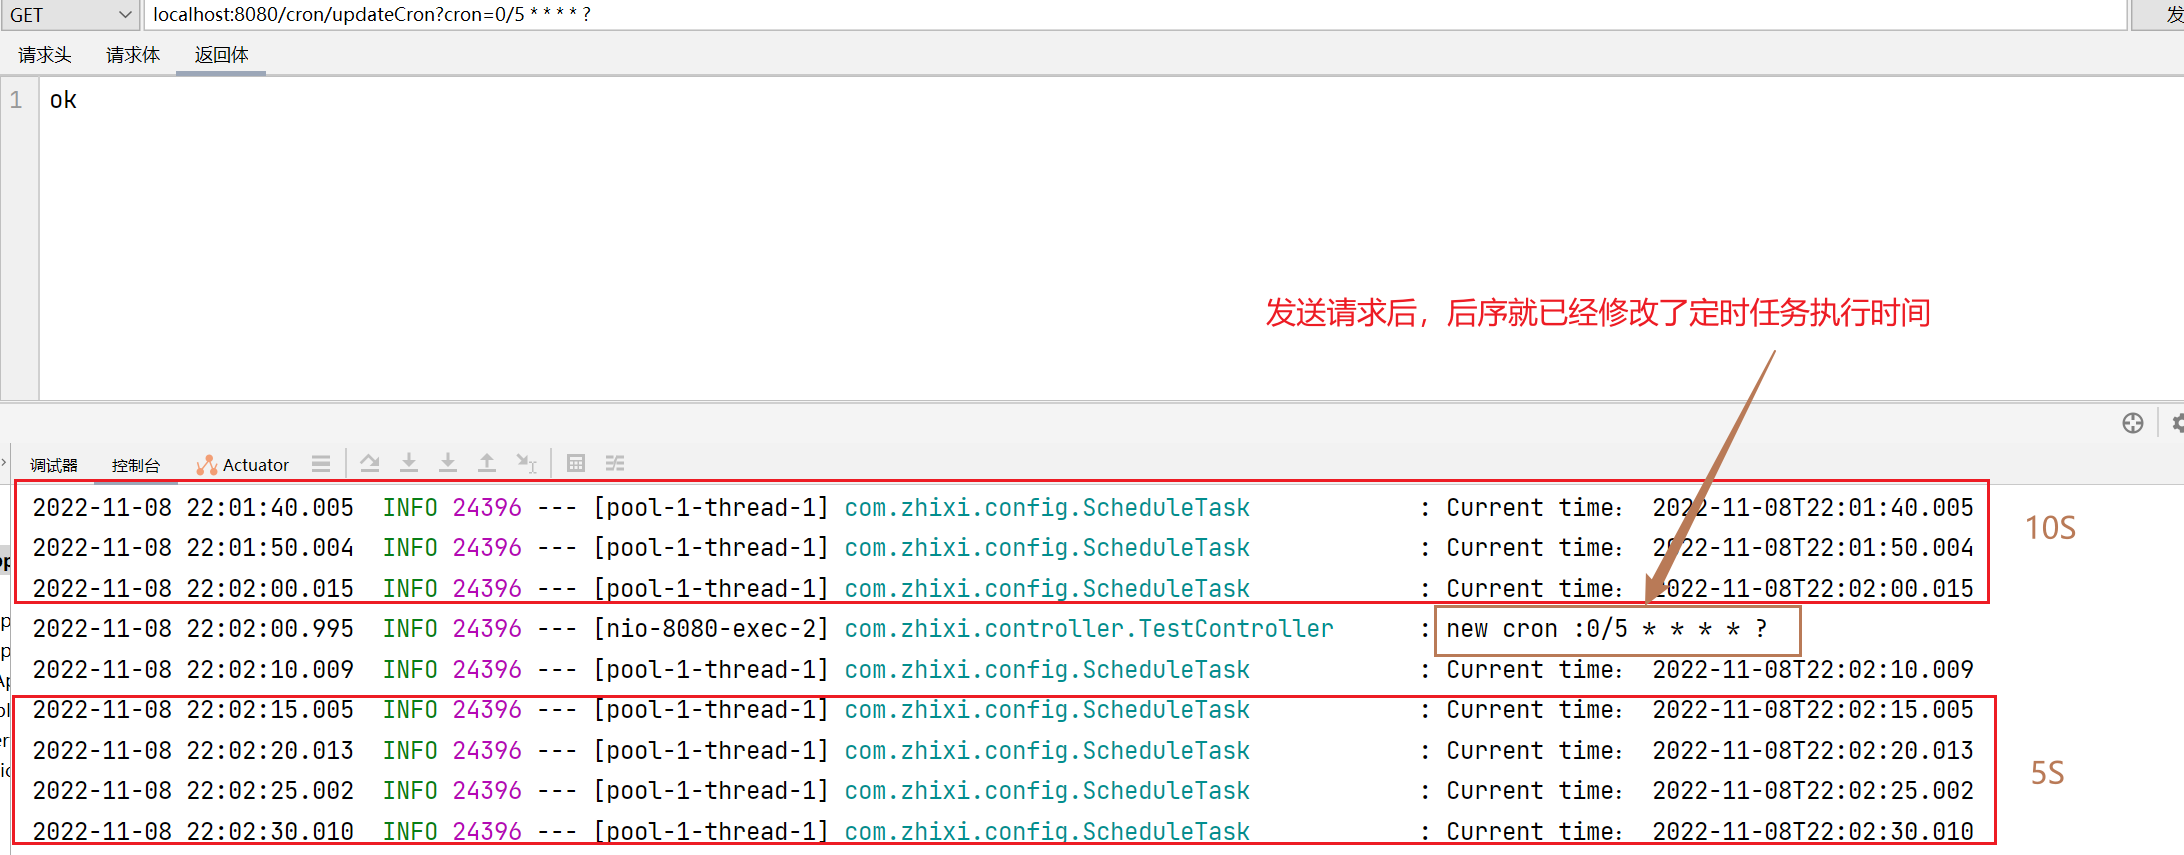
3、编写一个接口,使得可以通过调用接口动态修改该定时任务的执行时间
1 2 3 4 5 6 7 8 9 10 11 12 13 14 15 16 17 18 19 20 21 22 23 24 25 26 27 | import com.zhixi.config.ScheduleTask;import lombok.extern.slf4j.Slf4j;import org.springframework.beans.factory.annotation.Autowired;import org.springframework.web.bind.annotation.GetMapping;import org.springframework.web.bind.annotation.RequestMapping;import org.springframework.web.bind.annotation.RestController;@Slf4j@RestController@RequestMapping("/cron")public class TestController { private final ScheduleTask scheduleTask; @Autowired public TestController(ScheduleTask scheduleTask) { this.scheduleTask = scheduleTask; } @GetMapping("/updateCron") public String updateCron(String cron) { log.info("new cron :{}", cron); scheduleTask.setCron(cron); return "ok"; }} |
4、测试发送请求修改cron执行时间
1 | localhost:8080/cron/updateCron?cron=0/5 * * * * ? |
三、定时任务巡检网站,应用宕机,及时发送短信/邮件
这里定时任务代码编写就不说了,上面的示例都有,下面主要写如何实现。
1、定义枚举类:给哪些网站/IP发送请求
1 2 3 4 5 6 7 8 9 10 11 12 13 14 15 16 17 18 19 20 21 22 23 24 25 26 27 28 29 30 31 32 33 34 35 36 37 38 39 40 | package com.mixky.app.bjcc.sms;/** * @author zhixi */@SuppressWarnings("all")public enum SendHttpEnum { SITE_NAME_CCW_WEB_1("长城网网站-WEB-1", "http://192.168.148.225/index.html"), SITE_NAME_CCW_WEB_2("长城网网站-WEB-2", "http://192.168.148.226/index.html"), SITE_NAME_CCW_WEB_3("长城网网站-WEB-3", "http://192.168.148.216/index.html"), SITE_NAME_CCW_WEB_4("长城网后台-WEB", "http://192.168.182.77:8080/manager/home.do"), SITE_NAME_CCW_WEB_5("长城网后台-搜索", "https://www.bjcc.gov.cn/getSearchPagination.html?keyWords=%E5%9B%BD%E5%BA%86&st=sp&searchType=1"); /** * 网站/ip名称 */ private String siteName; /** * url地址 */ private String siteUrl; SendHttpEnum() { } SendHttpEnum(String siteName, String siteUrl) { this.siteName = siteName; this.siteUrl = siteUrl; } public String getSiteName() { return siteName; } public String getSiteUrl() { return siteUrl; }} |
2、编写实现的逻辑,主要是通过发送Http请求,短信/邮件自行实现即可
1 2 3 4 5 6 7 8 9 10 11 12 13 14 15 16 17 18 19 20 21 22 23 24 25 26 27 28 29 30 31 32 33 34 35 36 37 38 39 40 41 42 43 44 45 46 47 48 49 50 51 52 53 54 55 56 57 58 59 60 61 62 63 64 65 66 67 68 69 70 71 72 73 74 75 76 77 78 79 80 81 82 83 84 85 86 87 88 89 90 91 92 93 94 95 96 97 98 99 100 101 102 103 104 105 106 107 108 109 110 111 112 113 114 115 116 117 118 119 | package com.mixky.app.bjcc.sms;import com.mixky.app.bjcc.member.entity.SMSClient;import lombok.SneakyThrows;import lombok.extern.slf4j.Slf4j;import java.io.IOException;import java.io.UnsupportedEncodingException;import java.net.HttpURLConnection;import java.net.URL;import java.util.ArrayList;import java.util.List;/** * @ClassName SmSendByCheckEveryDay * @Author zhangzhixi * @Description 每日巡检定时任务 * @Date 2023-03-02 9:46 * @Version 1.0 */@Slf4j@SuppressWarnings("all")public class SmSendByCheckEveryDay implements Runnable { // 给谁发送短信,如果使用邮箱,自行填写发送邮箱逻辑即可 private static final String phone = "手机号"; // 枚举类 private SendHttpEnum sendHttpEnum; public SmSendByCheckEveryDay() { } public SmSendByCheckEveryDay(SendHttpEnum sendHttpEnum) { this.sendHttpEnum = sendHttpEnum; } public void checkEveryDay() throws UnsupportedEncodingException { log.info("******************************长城网-巡检-开始执行******************************"); // 1、添加需要进行访问的网站/IP地址 List<SendHttpEnum> enumList = new ArrayList<>(); enumList.add(SendHttpEnum.SITE_NAME_CCW_WEB_1); enumList.add(SendHttpEnum.SITE_NAME_CCW_WEB_2); enumList.add(SendHttpEnum.SITE_NAME_CCW_WEB_3); enumList.add(SendHttpEnum.SITE_NAME_CCW_WEB_4); enumList.add(SendHttpEnum.SITE_NAME_CCW_WEB_5); // 2、执行任务 for (SendHttpEnum anEnum : enumList) { SmSendByCheckEveryDay smSenderByManDao = new SmSendByCheckEveryDay(anEnum); smSenderByManDao.run(); } log.info("******************************长城网-巡检-执行结束******************************"); } @Override public void run() { SendHttpEnum sendHttpEnum = this.sendHttpEnum; String siteUrl = sendHttpEnum.getSiteUrl(); HttpURLConnection connection = null; try { URL url = new URL(siteUrl); connection = (HttpURLConnection) url.openConnection(); connection.setRequestMethod("GET"); // 置连接超时时间,即在请求连接时等待的最长时间,如果在指定时间内没有连接成功,则抛出异常 connection.setConnectTimeout(20000); // 设置读取超时时间,即在请求连接成功后,等待响应数据的最长时间,如果在指定时间内没有读取到数据,则抛出异常 connection.setReadTimeout(20000); connection.connect(); int responseCode = connection.getResponseCode(); if (responseCode != 200) { log.info("=====网站:" + sendHttpEnum.getSiteName() + "无法连接或访问超时,状态码是:" + responseCode + "===="); senSms("【" + sendHttpEnum.getSiteName() + ":" + sendHttpEnum.getSiteUrl() + "】无法连接或访问超时,请及时处理!"); } } catch (IOException e) { // 超时 log.info("=====网站:" + sendHttpEnum.getSiteName() + "无法连接或访问超时===="); senSms("【" + sendHttpEnum.getSiteName() + ":" + sendHttpEnum.getSiteUrl() + "】无法连接或访问超时,请及时处理!"); e.printStackTrace(); } finally { connection.disconnect(); } } /** * 发送短信的方法,可替换为发送邮件 * @param sendMessage 发送消息的内容 */ @SneakyThrows private void senSms(String sendMessage) { //漫道短信接口接入 String content = sendMessage; // xml转义 if (content.indexOf("&") >= 0) { content = content.replace("&", "&"); } if (content.indexOf("<") >= 0) { content = content.replace("<", "<"); } if (content.indexOf(">") >= 0) { content = content.replace(">", ">"); } content = "【北京长城网】" + content; String SN = "SDX-010-27451"; String PWD = "d-10e"; SMSClient client = new SMSClient(SN, PWD); String result_mt = client.mt(phone, content, "", "", ""); System.out.println(content); if (result_mt.startsWith("-") || result_mt.equals("")) { log.info("发送失败!返回值为:" + result_mt + "。请查看webservice返回值对照表"); } else { log.info("发送成功,返回值为:" + result_mt); } }} |
3、编写定时任务,对此方法checkEveryDay进行执行即可


【推荐】国内首个AI IDE,深度理解中文开发场景,立即下载体验Trae
【推荐】编程新体验,更懂你的AI,立即体验豆包MarsCode编程助手
【推荐】抖音旗下AI助手豆包,你的智能百科全书,全免费不限次数
【推荐】轻量又高性能的 SSH 工具 IShell:AI 加持,快人一步
· 分享一个免费、快速、无限量使用的满血 DeepSeek R1 模型,支持深度思考和联网搜索!
· 基于 Docker 搭建 FRP 内网穿透开源项目(很简单哒)
· ollama系列01:轻松3步本地部署deepseek,普通电脑可用
· 按钮权限的设计及实现
· 25岁的心里话