


8、Shiro安全框架入门学习
shiro简介
使用到的pom依赖:


<dependencies>
        <!--创建springboot项目时候勾选web、thymeleaf、-->
        <dependency>
            <groupId>org.springframework.boot</groupId>
            <artifactId>spring-boot-starter-thymeleaf</artifactId>
        </dependency>
        <dependency>
            <groupId>org.springframework.boot</groupId>
            <artifactId>spring-boot-starter-web</artifactId>
        </dependency>

        <dependency>
            <groupId>org.springframework.boot</groupId>
            <artifactId>spring-boot-starter</artifactId>
        </dependency>
        <dependency>
            <groupId>org.springframework.boot</groupId>
            <artifactId>spring-boot-starter-test</artifactId>
            <scope>test</scope>
        </dependency>

        <!--快速生成pojo的方法有关的lombok-->
        <dependency>
            <groupId>org.projectlombok</groupId>
            <artifactId>lombok</artifactId>
            <version>1.16.10</version>
        </dependency>
        <!--mysql数据库连接-->
        <dependency>
            <groupId>mysql</groupId>
            <artifactId>mysql-connector-java</artifactId>
            <version>8.0.15</version>
        </dependency>

        <dependency>
            <groupId>com.alibaba</groupId>
            <artifactId>druid</artifactId>
            <version>1.1.12</version>
        </dependency>
        <dependency>
            <groupId>log4j</groupId>
            <artifactId>log4j</artifactId>
            <version>1.2.17</version>
        </dependency>
        <!--
            Subject 用户,
            SecurityManager 管理所有用户,
            Realm 连接数据,需要自定义
        -->
        <!--shiro整合spring的包-->
        <dependency>
            <groupId>org.apache.shiro</groupId>
            <artifactId>shiro-spring</artifactId>
            <version>1.4.0</version>
        </dependency>
        <!--整合mybatis-->
        <dependency>
            <groupId>org.mybatis.spring.boot</groupId>
            <artifactId>mybatis-spring-boot-starter</artifactId>
            <version>2.1.1</version>
        </dependency>
    </dependencies>
基本功能点
Shiro 可以非常容易的开发出足够好的应用,其不仅可以用在 JavaSE 环境,也可以用在 JavaEE 环境。Shiro 可以帮助我们完成:认证、授权、加密、会话管理、与 Web 集成、缓存等。其基本功能点如下图所示: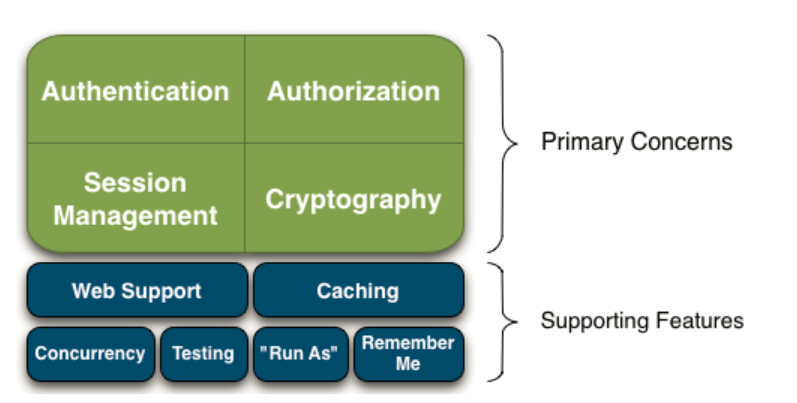
记住一点,Shiro 不会去维护用户、维护权限;这些需要我们自己去设计 / 提供;然后通过相应的接口注入给 Shiro 即可。
Shiro的架构
什么是Shiro?
Apache Shiro是一个Java 的安全(权限)框架。Shiro可以非常容易的开发出足够好的应用,其不仅可以用在JavaSE环境,也可以用在JavaEE环境。Shiro可以完成,认证,授权,加密,会话管理,Web集成,缓存等.- 下载地址: http://shiro.apache.org/

有哪些功能
- Authentication:身份认证 / 登录,验证用户是不是拥有相应的身份;
- Authorization:授权,即权限验证,验证某个已认证的用户是否拥有某个权限;即判断用户是否能做事情,常见的如:验证某个用户是否拥有某个角色。或者细粒度的验证某个用户对某个资源是否具有某个权限;
- Session Manager:会话管理,即用户登录后就是一次会话,在没有退出之前,它的所有信息都在会话中;会话可以是普通 JavaSE 环境的,也可以是如 Web 环境的;
- Cryptography:加密,保护数据的安全性,如密码加密存储到数据库,而不是明文存储;
- Web Support:Web 支持,可以非常容易的集成到 Web 环境;
- Caching:缓存,比如用户登录后,其用户信息、拥有的角色 / 权限不必每次去查,这样可以提高效率;
- Concurrency:shiro 支持多线程应用的并发验证,即如在一个线程中开启另一个线程,能把权限自动传播过去;
- Testing:提供测试支持;
- Run As:允许一个用户假装为另一个用户(如果他们允许)的身份进行访问;
- Remember Me:记住我,这个是非常常见的功能,即一次登录后,下次再来的话不用登录了。
Shiro架构(外部)
我们从外部来看 Shiro ,即从应用程序角度的来观察如何使用 Shiro 完成工作。如下图:
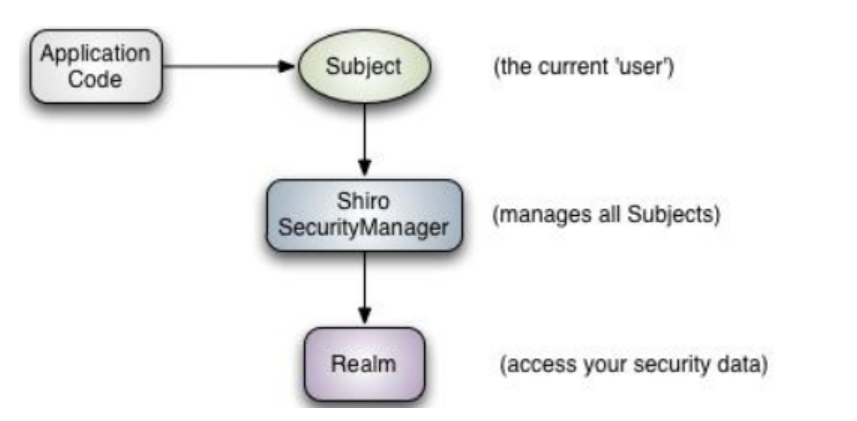
可以看到:应用代码直接交互的对象是 Subject,也就是说 Shiro 的对外 API 核心就是 Subject;其每个 API 的含义:
Subject:主体,代表了当前 “用户”,这个用户不一定是一个具体的人,与当前应用交互的任何东西都Subject,如网络爬虫,机器人等;即一个抽象概念;所有 Subject 都绑定到 SecurityManager,与 Subject 的所有交互都会委托给 SecurityManager;可以把 Subject 认为是一个门面;SecurityManager 才是实际的执行者;
SecurityManager:安全管理器;即所有与安全有关的操作都会与 SecurityManager 交互;且它管理着所有 Subject;可以看出它是 Shiro 的核心,它负责与后边介绍的其他组件进行交互,如果学习过 SpringMVC,你可以把它看成 DispatcherServlet 前端控制器;
Realm:域,Shiro 从 Realm 获取安全数据(如用户、角色、权限),就是说 SecurityManager 要验证用户身份,那么它需要从 Realm 获取相应的用户进行比较以确定用户身份是否合法;也需要从 Realm 得到用户相应的角色 / 权限进行验证用户是否能进行操作;可以把 Realm 看成 DataSource,即安全数据源。
也就是说对于我们而言,最简单的一个 Shiro 应用:
- 应用代码通过 Subject 来进行认证和授权,而 Subject 又委托给 SecurityManager;
- 我们需要给 Shiro 的 SecurityManager 注入 Realm,从而让 SecurityManager 能得到合法的用户及其权限进行判断。
从以上也可以看出,Shiro 不提供维护用户 / 权限,而是通过 Realm 让开发人员自己注入。
内部
接下来我们来从 Shiro 内部来看下 Shiro 的架构,如下图所示:
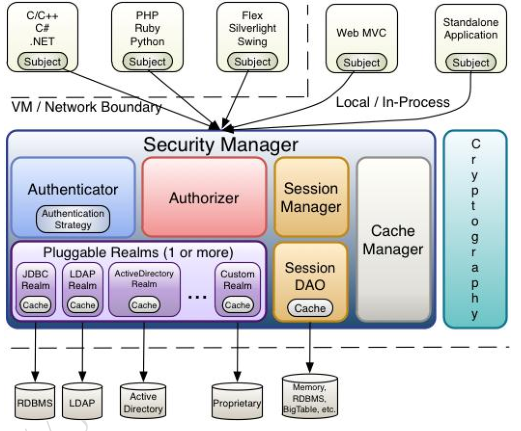
Subject:主体,可以看到主体可以是任何可以与应用交互的 “用户”;
SecurityManager:相当于 SpringMVC 中的 DispatcherServlet 或者 Struts2 中的 FilterDispatcher;是 Shiro 的心脏;所有具体的交互都通过 SecurityManager 进行控制;它管理着所有 Subject、且负责进行认证和授权、及会话、缓存的管理。
Authenticator:认证器,负责主体认证的,这是一个扩展点,如果用户觉得 Shiro 默认的不好,可以自定义实现;其需要认证策略(Authentication Strategy),即什么情况下算用户认证通过了;
Authrizer:授权器,或者访问控制器,用来决定主体是否有权限进行相应的操作;即控制着用户能访问应用中的哪些功能;
Realm:可以有 1 个或多个 Realm,可以认为是安全实体数据源,即用于获取安全实体的;可以是 JDBC 实现,也可以是 LDAP 实现,或者内存实现等等;由用户提供;注意:Shiro 不知道你的用户 / 权限存储在哪及以何种格式存储;所以我们一般在应用中都需要实现自己的 Realm;
SessionManager:如果写过 Servlet 就应该知道 Session 的概念,Session 呢需要有人去管理它的生命周期,这个组件就是 SessionManager;而 Shiro 并不仅仅可以用在 Web 环境,也可以用在如普通的 JavaSE 环境、EJB 等环境;所有呢,Shiro 就抽象了一个自己的 Session 来管理主体与应用之间交互的数据;这样的话,比如我们在 Web 环境用,刚开始是一台 Web 服务器;接着又上了台 EJB 服务器;这时想把两台服务器的会话数据放到一个地方,这个时候就可以实现自己的分布式会话(如把数据放到 Memcached 服务器);
SessionDAO:DAO 大家都用过,数据访问对象,用于会话的 CRUD,比如我们想把 Session 保存到数据库,那么可以实现自己的 SessionDAO,通过如 JDBC 写到数据库;比如想把 Session 放到 Memcached 中,可以实现自己的 Memcached SessionDAO;另外 SessionDAO 中可以使用 Cache 进行缓存,以提高性能;
CacheManager:缓存控制器,来管理如用户、角色、权限等的缓存的;因为这些数据基本上很少去改变,放到缓存中后可以提高访问的性能
Cryptography:密码模块,Shiro 提高了一些常见的加密组件用于如密码加密 / 解密的。
shiro组件
身份验证
身份验证,即在应用中谁能证明他就是他本人。一般提供如他们的身份 ID 一些标识信息来表明他就是他本人,如提供身份证,用户名 / 密码来证明。
在 shiro 中,用户需要提供 principals (身份)和 credentials(证明)给 shiro,从而应用能验证用户身份:
principals:身份,即主体的标识属性,可以是任何东西,如用户名、邮箱等,唯一即可。一个主体可以有多个 principals,但只有一个 Primary principals,一般是用户名 / 密码 / 手机号。
credentials:证明 / 凭证,即只有主体知道的安全值,如密码 / 数字证书等。
最常见的 principals 和 credentials 组合就是用户名 / 密码了。接下来先进行一个基本的身份认证。
另外两个相关的概念是之前提到的 Subject 及 Realm,分别是主体及验证主体的数据源。
快速开始:快速搭建第一个shiro
1、新建一个简单的Maven项目
2、pom.xml
 1 <dependencies>
 2         <!-- thymeleaf-shiro整合包 -->
 3         <dependency>
 4             <groupId>com.github.theborakompanioni</groupId>
 5             <artifactId>thymeleaf-extras-shiro</artifactId>
 6             <version>2.0.0</version>
 7         </dependency>
 8
 9         <!--快速生成pojo的方法有关的lombok-->
10         <dependency>
11             <groupId>org.projectlombok</groupId>
12             <artifactId>lombok</artifactId>
13             <version>1.16.10</version>
14         </dependency>
15         <!-- 引入 myBatis,这是 MyBatis官方提供的适配 Spring Boot 的,而不是Spring Boot自己的-->
16         <dependency>
17             <groupId>org.mybatis.spring.boot</groupId>
18             <artifactId>mybatis-spring-boot-starter</artifactId>
19             <version>2.1.0</version>
20         </dependency>
21         <dependency>
22             <groupId>mysql</groupId>
23             <artifactId>mysql-connector-java</artifactId>
24             <version>8.0.15</version>
25         </dependency>
26         <dependency>
27             <groupId>com.alibaba</groupId>
28             <artifactId>druid</artifactId>
29             <version>1.1.12</version>
30         </dependency>
31         <!-- https://mvnrepository.com/artifact/log4j/log4j -->
32         <dependency>
33             <groupId>log4j</groupId>
34             <artifactId>log4j</artifactId>
35             <version>1.2.17</version>
36         </dependency>
37         <!--
38             Subject 用户,
39             SecurityManager 管理所有用户,
40             Realm 连接数据,需要自定义
41         -->
42         <!--shiro整合spring的包-->
43         <dependency>
44             <groupId>org.apache.shiro</groupId>
45             <artifactId>shiro-spring</artifactId>
46             <version>1.4.0</version>
47         </dependency>
48         <dependency>
49             <groupId>org.springframework.boot</groupId>
50             <artifactId>spring-boot-starter-web</artifactId>
51         </dependency>
52
53         <!--thymeleaf模板-->
54         <dependency>
55             <groupId>org.thymeleaf</groupId>
56             <artifactId>thymeleaf-spring5</artifactId>
57         </dependency>
58         <dependency>
59             <groupId>org.thymeleaf.extras</groupId>
60             <artifactId>thymeleaf-extras-java8time</artifactId>
61         </dependency>
62
63         <dependency>
64             <groupId>org.springframework.boot</groupId>
65             <artifactId>spring-boot-starter-test</artifactId>
66             <scope>test</scope>
67             <exclusions>
68                 <exclusion>
69                     <groupId>org.junit.vintage</groupId>
70                     <artifactId>junit-vintage-engine</artifactId>
71                 </exclusion>
72             </exclusions>
73         </dependency>
74     </dependencies>
3、resources/shiro.ini(配置文件)
 1 [users]
 2 # user 'root' with password 'secret' and the 'admin' role
 3 root = secret, admin
 4 # user 'guest' with the password 'guest' and the 'guest' role
 5 guest = guest, guest
 6 # user 'presidentskroob' with password '12345' ("That's the same combination on
 7 # my luggage!!!" ;)), and role 'president'
 8 presidentskroob = 12345, president
 9 # user 'darkhelmet' with password 'ludicrousspeed' and roles 'darklord' and 'schwartz'
10 darkhelmet = ludicrousspeed, darklord, schwartz
11 # user 'lonestarr' with password 'vespa' and roles 'goodguy' and 'schwartz'
12 lonestarr = vespa, goodguy, schwartz
13
14 [roles]
15 # 'admin' role has all permissions, indicated by the wildcard '*'
16 admin = *
17 # The 'schwartz' role can do anything (*) with any lightsaber:
18 schwartz = lightsaber:*
19 # The 'goodguy' role is allowed to 'drive' (action) the winnebago (type) with
20 # license plate 'eagle5' (instance specific id)
21 goodguy = winnebago:drive:eagle5
4、resources/log4j.properties
 1 log4j.rootLogger=INFO, stdout
 2
 3 log4j.appender.stdout=org.apache.log4j.ConsoleAppender
 4 log4j.appender.stdout.layout=org.apache.log4j.PatternLayout
 5 log4j.appender.stdout.layout.ConversionPattern=%d %p [%c] - %m %n
 6
 7 # General Apache libraries
 8 log4j.logger.org.apache=WARN
 9
10 # Spring
11 log4j.logger.org.springframework=WARN
12
13 # Default Shiro logging
14 log4j.logger.org.apache.shiro=INFO
15
16 # Disable verbose logging
17 log4j.logger.org.apache.shiro.util.ThreadContext=WARN
18 log4j.logger.org.apache.shiro.cache.ehcache.EhCache=WARN
5、java/Quickstart
 1 import org.apache.shiro.SecurityUtils;
 2 import org.apache.shiro.authc.*;
 3 import org.apache.shiro.config.IniSecurityManagerFactory;
 4 import org.apache.shiro.mgt.SecurityManager;
 5 import org.apache.shiro.session.Session;
 6 import org.apache.shiro.subject.Subject;
 7 import org.apache.shiro.util.Factory;
 8 import org.slf4j.Logger;
 9 import org.slf4j.LoggerFactory;
10
11 public class Quickstart {
12
13
14     private static final transient Logger log = LoggerFactory.getLogger(Quickstart.class);
15
16     public static void main(String[] args) {
17
18
19         Factory<SecurityManager> factory = new IniSecurityManagerFactory("classpath:shiro.ini");
20         SecurityManager securityManager = factory.getInstance();
21
22         SecurityUtils.setSecurityManager(securityManager);
23
24         //获取当前的用户对象 Subject
25         Subject currentUser = SecurityUtils.getSubject();
26
27         // 通过当前用户拿到Session
28         Session session = currentUser.getSession();
29         session.setAttribute("someKey", "aValue");
30         String value = (String) session.getAttribute("someKey");
31         if (value.equals("aValue")) {
32             log.info("Subject=>session[" + value + "]");
33         }
34
35         //判断当前用户是否被认证
36         if (!currentUser.isAuthenticated()) {
37             //Token: 令牌
38             UsernamePasswordToken token = new UsernamePasswordToken("lonestarr", "vespa");
39             token.setRememberMe(true);//设置记住我
40             try {
41                 currentUser.login(token);//执行登陆操作
42             } catch (UnknownAccountException uae) {
43                 log.info("There is no user with username of " + token.getPrincipal());
44             } catch (IncorrectCredentialsException ice) {
45                 log.info("Password for account " + token.getPrincipal() + " was incorrect!");
46             } catch (LockedAccountException lae) {
47                 log.info("The account for username " + token.getPrincipal() + " is locked.  " +
48                         "Please contact your administrator to unlock it.");
49             }
50             // ... catch more exceptions here (maybe custom ones specific to your application?
51             catch (AuthenticationException ae) {
52                 //unexpected condition?  error?
53             }
54         }
55
56         //say who they are:
57         //print their identifying principal (in this case, a username):
58         log.info("User [" + currentUser.getPrincipal() + "] logged in successfully.");
59
60         //test a role:
61         if (currentUser.hasRole("schwartz")) {
62             log.info("May the Schwartz be with you!");
63         } else {
64             log.info("Hello, mere mortal.");
65         }
66
67         //test a typed permission (not instance-level)
68         if (currentUser.isPermitted("lightsaber:wield")) {
69             log.info("You may use a lightsaber ring.  Use it wisely.");
70         } else {
71             log.info("Sorry, lightsaber rings are for schwartz masters only.");
72         }
73
74         //a (very powerful) Instance Level permission:
75         if (currentUser.isPermitted("winnebago:drive:eagle5")) {
76             log.info("You are permitted to 'drive' the winnebago with license plate (id) 'eagle5'.  " +
77                     "Here are the keys - have fun!");
78         } else {
79             log.info("Sorry, you aren't allowed to drive the 'eagle5' winnebago!");
80         }
81
82         //all done - log out!
83         currentUser.logout();
84
85         System.exit(0);
86     }
87 }
6、启动Quickstart测试

在SpringBoot中集成Shiro
环境搭建:
1、创建springboot项目,创建时选择导入springboot web和thmyeleaf
pom.xml需要导入的:
<!--快速生成pojo的方法有关的lombok-->
<dependency>
    <groupId>org.projectlombok</groupId>
    <artifactId>lombok</artifactId>
    <version>1.16.10</version>
</dependency>
<dependency>
    <groupId>mysql</groupId>
    <artifactId>mysql-connector-java</artifactId>
    <version>8.0.15</version>
</dependency>
<dependency>
    <groupId>com.alibaba</groupId>
    <artifactId>druid</artifactId>
    <version>1.1.12</version>
</dependency>
<dependency>
    <groupId>log4j</groupId>
    <artifactId>log4j</artifactId>
    <version>1.2.17</version>
</dependency>
<!--
    Subject 用户,
    SecurityManager 管理所有用户,
    Realm 连接数据,需要自定义
-->
<!--shiro整合spring的包-->
<dependency>
    <groupId>org.apache.shiro</groupId>
    <artifactId>shiro-spring</artifactId>
    <version>1.4.0</version>
</dependency>
pendencies>
2、编写UserRealm类--> /config/UserRealm
 1 package com.zhixi.config;
 2
 3
 4 import org.apache.shiro.authc.AuthenticationException;
 5 import org.apache.shiro.authc.AuthenticationInfo;
 6 import org.apache.shiro.authc.AuthenticationToken;
 7 import org.apache.shiro.authz.AuthorizationInfo;
 8 import org.apache.shiro.realm.AuthorizingRealm;
 9 import org.apache.shiro.subject.PrincipalCollection;
10
11 //自定义的UserRealm
12 public class UserRealm extends AuthorizingRealm {
13
14     //授权
15     @Override
16     protected AuthorizationInfo doGetAuthorizationInfo(PrincipalCollection principalCollection) {
17         System.out.println("执行了=》授权");
18         return null;
19     }
20
21     //认证
22     @Override
23     protected AuthenticationInfo doGetAuthenticationInfo(AuthenticationToken authenticationToken) throws AuthenticationException {
24         System.out.println("执行了=》认证");
25         return null;
26     }
27 }
3、编写Shiroconfig类(三个方法,从下往上写)-->
 1 package com.zhixi.config;
 2
 3 import org.apache.shiro.spring.web.ShiroFilterFactoryBean;
 4 import org.apache.shiro.web.mgt.DefaultWebSecurityManager;
 5 import org.springframework.beans.factory.annotation.Qualifier;
 6 import org.springframework.context.annotation.Bean;
 7 import org.springframework.context.annotation.Configuration;
 8
 9 @Configuration
10 public class ShiroConfig {
11     //shiroFilterFactoryBean:3
12     public ShiroFilterFactoryBean getShiroFilterFactoryBean(@Qualifier("securityManager") DefaultWebSecurityManager defaultWebSecurityManager) {
13         ShiroFilterFactoryBean bean = new ShiroFilterFactoryBean();
14         //设置安全管理器
15         bean.setSecurityManager(defaultWebSecurityManager);
16         return bean;
17     }
18
19     //DefaultWebSecurityManager:2
20     @Bean(name = "securityManager")
21     public DefaultWebSecurityManager getdefaultWebSecurityManager(@Qualifier("userRealm") UserRealm userRealm) {
22         DefaultWebSecurityManager securityManager = new DefaultWebSecurityManager();
23         securityManager.setRealm(userRealm);
24         return securityManager;
25     }
26
27     //创建realm对象:1
28     @Bean
29     public UserRealm userRealm() {
30         return new UserRealm();
31     }
32 }
实现登陆拦截
1、配置ShiroConfig配置类
1 2 3 4 5 6 7 8 9 10 11 12 13 14 15 16 17 18 19 20 21 | @Beanpublic ShiroFilterFactoryBean getShiroFilterFactoryBean(@Qualifier("securityManager") DefaultWebSecurityManager defaultWebSecurityManager) { ShiroFilterFactoryBean bean = new ShiroFilterFactoryBean(); //设置安全管理器 bean.setSecurityManager(defaultWebSecurityManager); /* 添加shiro的内置过滤器 anon:无需认证 authc:必须认证了才能访问 user:必须拥有记住我功能才能用 perms:拥有对某个资源的权限才能访问 role:拥有某个角色权限才能访问 */ Map<String, String> filterMap = new LinkedHashMap<>(); filterMap.put("/add", "authc"); filterMap.put("/update", "authc"); bean.setFilterChainDefinitionMap(filterMap); //如果没有权限就调到登陆页面 bean.setLoginUrl("/toLogin"); return bean;} |
2、编写controller请求:用户没有权限就跳到登录页面
1 2 3 4 | @RequestMapping("/toLogin")public String login(){ return "login";} |
3、对比请求的跳转(未设置登录页,和设置登录页的跳转)
用户认证:
1、在controller配置请求
1 2 3 4 5 6 7 8 9 10 11 12 13 14 15 16 17 | @RequestMapping("/login")public String login(String username, String password, Model model) { //获取当前的用户 Subject subject = SecurityUtils.getSubject(); //封装用户的登陆数据 UsernamePasswordToken token = new UsernamePasswordToken(username, password); try { subject.login(token);//执行登陆方法,如果没有异常就说明登陆成功 return "index"; } catch (UnknownAccountException e) {//用户名不存在 model.addAttribute("msg", "用户名不存在"); return "login"; } catch (IncorrectCredentialsException e) { model.addAttribute("msg", "密码错误"); return "login"; }} |
2、UserRealm认证
1 2 3 4 5 6 7 8 9 10 11 12 13 14 | //认证@Overrideprotected AuthenticationInfo doGetAuthenticationInfo(AuthenticationToken token) throws AuthenticationException { System.out.println("执行了=》认证"); //用户名密码 数据库取 String name = "root"; String password = "123"; UsernamePasswordToken userToken = (UsernamePasswordToken) token; System.out.println(userToken.toString()); if (!userToken.getUsername().equals(name)) { return null; //抛出异常 UnknownAccountException } return new SimpleAuthenticationInfo("", password, "");} |
3、login.html页面
 1 <!DOCTYPE html>
 2 <html lang="en" xmlns:th="http://www.thymeleaf.org">
 3 <head>
 4     <meta charset="UTF-8">
 5     <title>登录页面</title>
 6 </head>
 7 <body>
 8 <h1>登录</h1>
 9 <p th:text="${msg}" style="color: red"></p>
10 <form th:action="@{/login}">
11     <input type="text" name="username"><br>
12     <input type="password" name="password"><br>
13     <input type="submit" value="提交">
14 </form>
15 </body>
16 </html>
程序执行流程
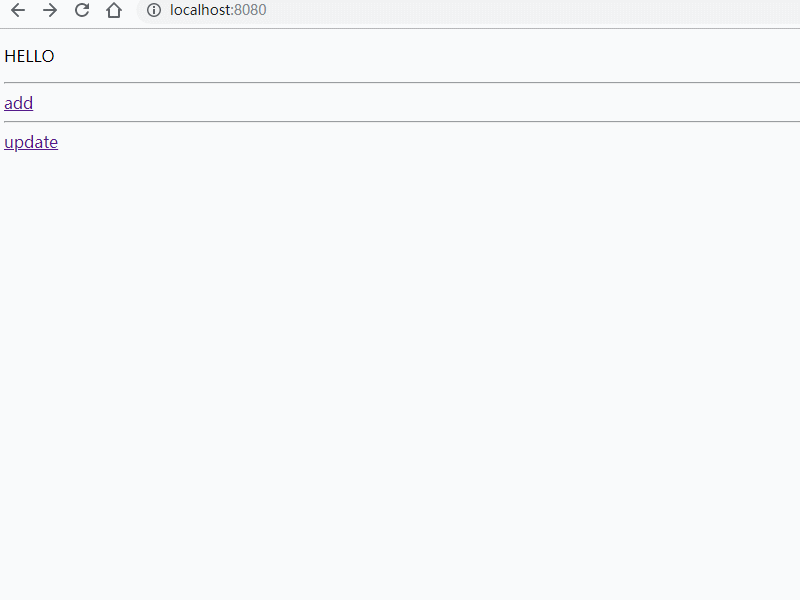
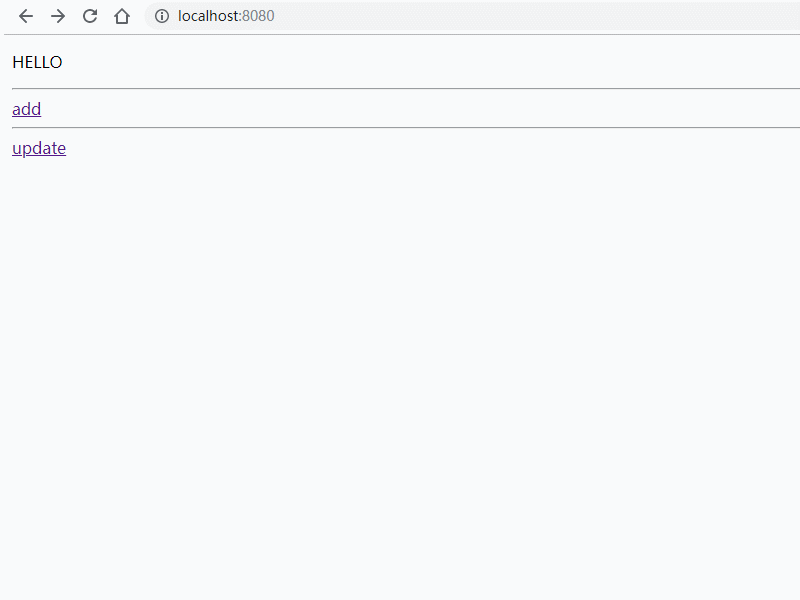
1、用户进入到localhost:8080
2、没有权限跳转到登录页面
1 2 | //如果没有权限就调到登陆页面bean.setLoginUrl("/toLogin"); |
3、输入账号密码,在controller中走/login请求
4、在UserRealm中执行认证操作,验证用户名跟密码
1 2 3 4 5 6 | 执行了=》认证org.apache.shiro.authc.UsernamePasswordToken - root, rememberMe=false执行了=》认证org.apache.shiro.authc.UsernamePasswordToken - , rememberMe=false执行了=》认证org.apache.shiro.authc.UsernamePasswordToken - root, rememberMe=false |
5、用户名为空或者密码错误抛出相应的异常,然后在controller中拿到用户信息和异常信息

6、演示:为了方便,在controller中设置登录成功跳转到 首页
整合mybatis
1、配置application.properties
1 2 3 4 5 6 7 8 9 10 11 12 13 14 15 16 17 18 19 20 21 22 23 24 25 26 27 28 29 30 31 32 33 34 35 36 37 38 39 40 41 | # 应用名称spring.application.name=springboot-07-shriotoboot# 应用服务 WEB 访问端口server.port=8080# 数据库驱动:spring.datasource.driver-class-name=com.mysql.cj.jdbc.Driver# 数据源名称# spring.datasource.name=# 数据库连接地址spring.datasource.url=jdbc:mysql://localhost:3306/mybatis?serverTimezone=UTC&useUnicode=true&characterEncoding=utf-8# 数据库用户名&密码:spring.datasource.username=rootspring.datasource.password=zhixi158# THYMELEAF (ThymeleafAutoConfiguration)# 开启模板缓存(默认值: true )spring.thymeleaf.cache=true# 检查模板是否存在,然后再呈现spring.thymeleaf.check-template=true# 检查模板位置是否正确(默认值 :true )spring.thymeleaf.check-template-location=true#Content-Type 的值(默认值: text/html )spring.thymeleaf.content-type=text/html# 开启 MVC Thymeleaf 视图解析(默认值: true )spring.thymeleaf.enabled=true# 模板编码spring.thymeleaf.encoding=UTF-8# 要被排除在解析之外的视图名称列表,⽤逗号分隔# spring.thymeleaf.excluded-view-names=# 要运⽤于模板之上的模板模式。另⻅ StandardTemplate-ModeHandlers( 默认值: HTML5)spring.thymeleaf.mode=HTML5# 在构建 URL 时添加到视图名称前的前缀(默认值: classpath:/templates/ )spring.thymeleaf.prefix=classpath:/templates/# 在构建 URL 时添加到视图名称后的后缀(默认值: .html )spring.thymeleaf.suffix=.html# 整合mybatis#-----------------------------# 给实体类起别名mybatis.type-aliases-package=com.zhixi.pojo# mapper映射mybatis.mapper-locations=classpath:mapper/*.xml |
2、编写mapper接口和mapper.xml
mapper/UserMapper
1 2 3 4 5 6 7 8 9 10 11 12 | import com.zhixi.pojo.User;import org.apache.ibatis.annotations.Mapper;import org.springframework.stereotype.Component;/** * @author zhangzhixi */@Component@Mapperpublic interface UserMapper { User getUserName(String name);} |
resources/mapper/UserMapper.xml
<?xml version="1.0" encoding="UTF-8" ?>
<!DOCTYPE mapper
        PUBLIC "-//mybatis.org//DTD Mapper 3.0//EN"
        "http://mybatis.org/dtd/mybatis-3-mapper.dtd">
<mapper namespace="com.zhixi.mapper.UserMapper">
    <select id="getUserName" resultType="user">
        select *
        from mybatis.user
        where name = #{name};
    </select>
</mapper>
3、编写service层以及service层接口
service/UserService
1 2 3 4 5 6 7 | import com.zhixi.pojo.User;import org.springframework.stereotype.Component;@Componentpublic interface UserService { User getUserName(String name);} |
service/UserServiceImpl
1 2 3 4 5 6 7 8 9 10 11 12 13 14 15 | import com.zhixi.mapper.UserMapper;import com.zhixi.pojo.User;import org.springframework.beans.factory.annotation.Autowired;import org.springframework.stereotype.Service;@Servicepublic class UserServiceImpl implements UserService { @Autowired UserMapper userMapper; @Override public User getUserName(String name) { return userMapper.getUserName(name); }} |
4、实现认证
config/UserRealm
主要实现的就是替换其中的数据
1 2 3 4 5 6 7 8 9 10 11 12 13 14 15 16 17 18 19 20 21 22 23 24 25 26 27 28 29 | //自定义的UserRealmpublic class UserRealm extends AuthorizingRealm { @Autowired UserServiceImpl userService; //授权 @Override protected AuthorizationInfo doGetAuthorizationInfo(PrincipalCollection principalCollection) { System.out.println("执行了=》授权"); return null; } //认证 @Override protected AuthenticationInfo doGetAuthenticationInfo(AuthenticationToken token) throws AuthenticationException { System.out.println("执行了=》认证"); UsernamePasswordToken userToken = (UsernamePasswordToken) token; //数据库中获取用户名 User user = userService.getUserName(userToken.getUsername()); if (user == null) { //没有这个用户 return null; //抛出异常 UnknownAccountException } return new SimpleAuthenticationInfo("", user.getPwd(), ""); }} |
5、测试
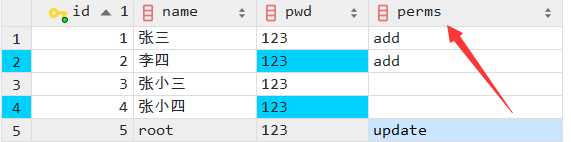
这是数据库中的数据:


shiro请求授权实现:
没有权限的用户会进行信息提示
1、数据库建立对应的用户权限字段
2、对资源设置权限:config/ShiroConfig
1 2 3 4 5 6 7 8 9 10 11 12 13 14 | /*添加shiro的内置过滤器 anon:无需认证 authc:必须认证了才能访问 user:必须拥有记住我功能才能用 perms:拥有对某个资源的权限才能访问 role:拥有某个角色权限才能访问 */Map<String, String> filterMap = new LinkedHashMap<>();// add请求在中,有user:add的字符串才会被赋予权限,在权限设置中进行添加filterMap.put("/add", "perms[add]");filterMap.put("/update", "perms[update]");// 设置过滤器链定义bean.setFilterChainDefinitionMap(filterMap); |
3、对登陆用户进行授权,该用户拥有的权限从数据库取得
1 2 3 4 5 6 7 8 9 10 11 | //授权@Overrideprotected AuthorizationInfo doGetAuthorizationInfo(PrincipalCollection principalCollection) { System.out.println("执行了=》授权"); SimpleAuthorizationInfo info = new SimpleAuthorizationInfo(); //拿到当前登陆的对象 Subject subject = SecurityUtils.getSubject(); User currentUser = (User) subject.getPrincipal();//拿到User info.addStringPermission(currentUser.getPerms());//授权 return info;} |
在认证中传入user,上面的授权才能拿到
1 2 3 4 5 6 7 8 9 10 11 12 13 14 | //认证@Overrideprotected AuthenticationInfo doGetAuthenticationInfo(AuthenticationToken token) throws AuthenticationException { System.out.println("执行了=》认证"); UsernamePasswordToken userToken = (UsernamePasswordToken) token; //数据库中获取用户名 User user = userService.getUserName(userToken.getUsername()); if (user == null) { //没有这个用户 return null; //抛出异常 UnknownAccountException } // 这边传入了user,在授权中才能给用户设置授权信息 return new SimpleAuthenticationInfo(user, user.getPwd(), "");} |
测试:
shiro整合thymeleaf以及注销功能
实现功能:
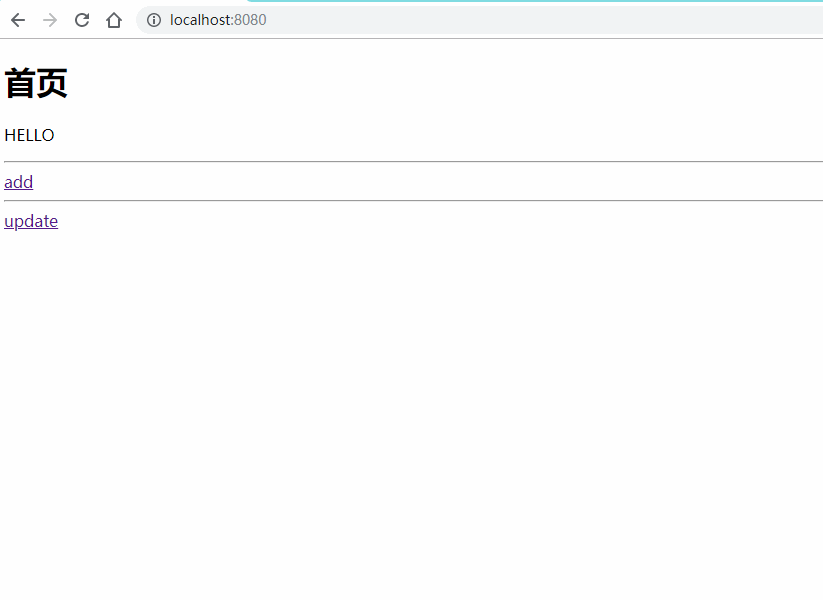
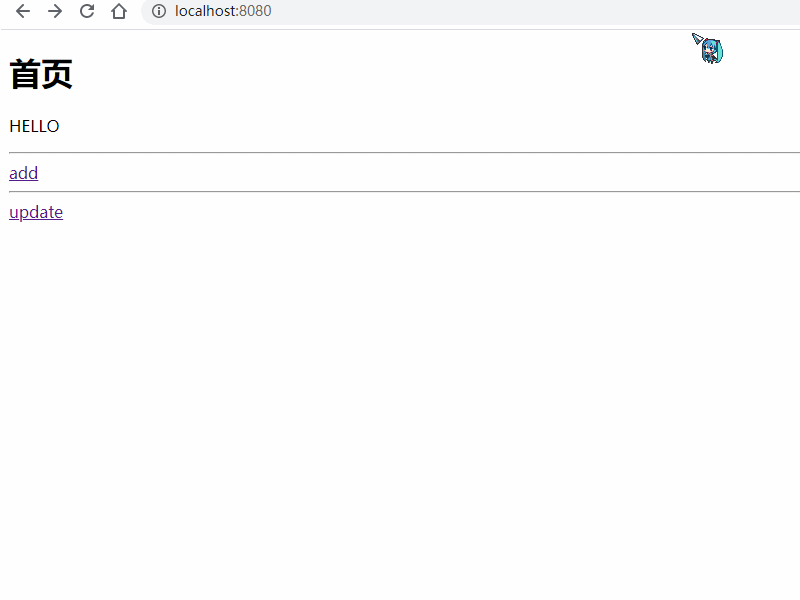
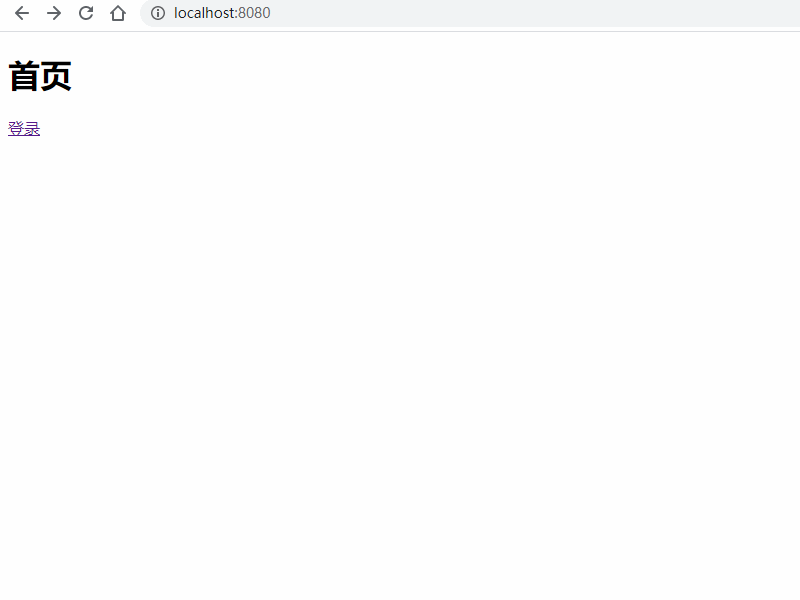
用户访问首页,只显示登录按钮
用户拥有add权限,就显示add界面的内容
用户拥有update权限,就显示update的内容
1、导入shiro整合thymeleaf的maven资源
<!--shiro整合thymeleaf-->
<dependency>
    <groupId>com.github.theborakompanioni</groupId>
    <artifactId>thymeleaf-extras-shiro</artifactId>
    <version>2.0.0</version>
</dependency>
2、配置bean
config/ShiroConfig
1 2 3 4 5 | @Bean//整合shiroDialect :用来整合shiro和thymeleafpublic ShiroDialect getShiroDialect() { return new ShiroDialect();} |
3、配置注销功能(清除session)
1 2 3 4 5 6 | @RequestMapping("/logout")@ResponseBodypublic String logOut(HttpSession session) { session.invalidate(); return "注销成功!";} |
4、显示用户对应权限的页面
 1 <!DOCTYPE html>
 2 <html lang="en"
 3       xmlns:th="http://www.thymeleaf.org"
 4       xmlns:shiro="http://www.thymeleaf.org/thymeleaf-extras-shiro">
 5 <head>
 6     <meta charset="UTF-8">
 7     <title>Title</title>
 8 </head>
 9 <body>
10 <h1>首页</h1>
11
12 <!--登录成功后不显示登录按钮-->
13 <div>
14     <a th:href="@{/toLogin}" shiro:guest="true">登录</a>
15 </div>
16
17 <!--有add的权限就显示add页面-->
18 <div shiro:hasPermission="add">
19     <a th:href="@{/add}">add</a>
20     <a th:href="@{/logout}">退出</a>
21 </div>
22 <!--有update的权限就显示update页面-->
23 <div shiro:hasPermission="update">
24     <a th:href="@{/update}">update</a>
25     <a th:href="@{/logout}">退出</a>
26 </div>
27
28 </body>
29 </html>
测试:


【推荐】国内首个AI IDE,深度理解中文开发场景,立即下载体验Trae
【推荐】编程新体验,更懂你的AI,立即体验豆包MarsCode编程助手
【推荐】抖音旗下AI助手豆包,你的智能百科全书,全免费不限次数
【推荐】轻量又高性能的 SSH 工具 IShell:AI 加持,快人一步
· go语言实现终端里的倒计时
· 如何编写易于单元测试的代码
· 10年+ .NET Coder 心语,封装的思维:从隐藏、稳定开始理解其本质意义
· .NET Core 中如何实现缓存的预热?
· 从 HTTP 原因短语缺失研究 HTTP/2 和 HTTP/3 的设计差异
· 分享一个免费、快速、无限量使用的满血 DeepSeek R1 模型,支持深度思考和联网搜索!
· 基于 Docker 搭建 FRP 内网穿透开源项目(很简单哒)
· ollama系列01:轻松3步本地部署deepseek,普通电脑可用
· 按钮权限的设计及实现
· 25岁的心里话