
Behavioral patterns deal with object interconnection and algorithms.
• The Chain of Responsibility pattern
The Chain of Responsibility pattern offers an elegant way to handle requests by passing them through a chain of handlers. Each handler in the chain has the autonomy to decide whether it can process the request or if it should delegate it further along the chain. This pattern shines when dealing with operations that involve multiple handlers but don’t necessarily require all of them to be involved.
In practice, this pattern encourages us to focus on objects and the flow of a request within an application. Notably, the client code remains blissfully unaware of the entire chain of handlers. Instead, it only interacts with the first processing element in the chain. Similarly, each processing element knows only about its immediate successor, forming a one-way relationship similar to a singly linked list. This structure is purposefully designed to achieve decoupling between the sender (client) and the receivers (processing elements).
Real-world examples
ATMs and, in general, any kind of machine that accepts/returns banknotes or coins (for example, a snack-vending machine) use the Chain of Responsibility pattern. There is always a single slot for all banknotes, as shown in the following diagram, courtesy of www.sourcemaking.com:
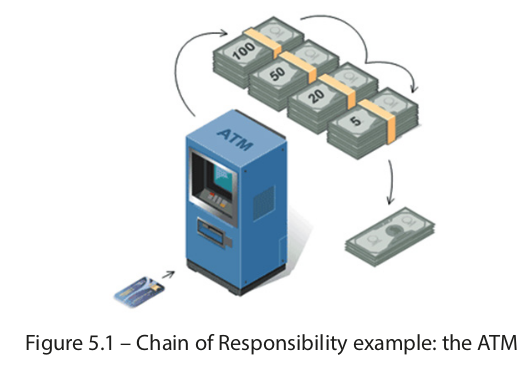
When a banknote is dropped, it is routed to the appropriate receptacle. When it is returned, it is taken from the appropriate receptacle. We can think of the single slot as the shared communication medium and the different receptacles as the processing elements. The result contains cash from one or more receptacles. For example, in the preceding diagram, we see what happens when we request $175 from the ATM.
In some web frameworks, filters or middleware are pieces of code that are executed before an HTTP request arrives at a target. There is a chain of filters. Each filter performs a different action (user authentication, logging, data compression, and so forth), and either forwards the request to the next filter until the chain is exhausted, or it breaks the flow if there is an error—for example, the authentication failed three consecutive times.
Use cases for the Chain of Responsibility pattern
By using the Chain of Responsibility pattern, we provide a chance for a number of different objects to satisfy a specific request. This is useful when we don’t know in advance which object should satisfy a given request. An example of this is a purchase system. In purchase systems, there are many approval authorities. One approval authority might be able to approve orders up to a certain value, let’s say 100, the order is sent to the next approval authority in the chain, which can approve orders up to $200, and so forth.
Another case where the Chain of Responsibility is useful is when we know that more than one object might need to process a single request. This is what happens in event-based programming. A single event, such as a left-mouse click, can be caught by more than one listener.
It is important to note that the Chain of Responsibility pattern is not very useful if all the requests can be taken care of by a single processing element unless we really don’t know which element that is. The value of this pattern is the decoupling that it offers, as we have seen in the Loose coupling section of Chapter 1, Foundational Design Principles. Instead of having a many-to-many relationship between a client and all processing elements (and the same is true regarding the relationship between a processing element and all other processing elements), a client only needs to know how to communicate with the start (head) of the chain.
Implementing the Chain of Responsibility pattern
There are many ways to implement a Chain of Responsibility in Python, but my favorite implementation is the one by Vespe Savikko (https://legacy.python.org/workshops/1997-10/proceedings/savikko.html). Vespe’s implementation uses dynamic dispatching in a Pythonic style to handle requests.
Let’s implement a simple, event-based system using Vespe’s implementation as a guide. The following is the UML class diagram of the system:

The Event class describes an event. We’ll keep it simple, so, in our case, an event has only name:
class Event:
    def __init__(self, name):
        self.name = name

    def __str__(self):
        return self.name
The Widget class is the core class of the application. The parent aggregation shown in the UML diagram indicates that each widget can have a reference to a parent object, which, by convention, we assume is a Widget instance. Note, however, that according to the rules of inheritance, an instance of any of the subclasses of Widget (for example, an instance of MsgText) is also an instance of Widget. The class has a handle() method, which uses dynamic dispatching through hasattr() and getattr() to decide who the handler of a specific request (event) is. If the widget that is asked to handle an event does not support it, there are two fallback mechanisms. If the widget has a parent, then the handle() method of the parent is executed. If the widget has no parent but a handle_default() method, handle_default() is executed. The code is as follows:

class Widget:
    def __init__(self, parent=None):
        self.parent = parent

    def handle(self, event):
        handler = f"handle_{event}"
        if hasattr(self, handler):
            method = getattr(self, handler)
            method(event)
        elif self.parent is not None:
            self.parent.handle(event)
        elif hasattr(self, "handle_default"):
            self.handle_default(event)
At this point, you might have realized why the Widget and Event classes are only associated (no aggregation or composition relationships) in the UML class diagram. The association is used to show that the Widget class knows about the Event class but does not have any strict reference to it, since an event needs to be passed only as a parameter to handle().
MainWIndow, MsgText, and SendDialog are all widgets with different behaviors. Not all these three widgets are expected to be able to handle the same events, and even if they can handle the same event, they might behave differently. MainWindow can handle only the close and default events:
class MainWindow(Widget):
    def handle_close(self, event):
        print(f"MainWindow: {event}")

    def handle_default(self, event):
        print(f"MainWindow Default: {event}")
SendDialog can handle only the paint event:
class SendDialog(Widget):
    def handle_paint(self, event):
        print(f"SendDialog: {event}")
Finally, MsgText can handle only the down event:
class MsgText(Widget):
    def handle_down(self, event):
        print(f"MsgText: {event}")
The main() function shows how we can create a few widgets and events, and how the widgets react to those events. All events are sent to all the widgets. Note the parent relationship of each widget—the sd object (an instance of SendDialog) has as its parent the mw object (an instance of MainWindow). However, not all objects need to have a parent that is an instance of MainWindow. For example, the msg object (an instance of MsgText) has the sd object as a parent:
def main():
    mw = MainWindow()
    sd = SendDialog(mw)
    msg = MsgText(sd)

    for e in ("down", "paint", "unhandled", "close"):
        evt = Event(e)
        print(f"Sending event -{evt}- to MainWindow")
        mw.handle(evt)
        print(f"Sending event -{evt}- to SendDialog")
        sd.handle(evt)
        print(f"Sending event -{evt}- to MsgText")
        msg.handle(evt)
• The Command pattern
The Command design pattern helps us encapsulate an operation (undo, redo, copy, paste, and so forth) as an object. What this simply means is that we create a class that contains all the logic and the methods required to implement the operation. The advantages of doing this are as follows:
• We don’t have to execute a command directly. It can be executed at will.
• The object that invokes the command is decoupled from the object that knows how to perform it. The invoker does not need to know any implementation details about the command.
• If it makes sense, multiple commands can be grouped to allow the invoker to execute them in order. This is useful, for instance, when implementing a multilevel undo command.
Use cases for the Command pattern
Many developers use the undo example as the only use case of the Command pattern. The truth is that undo is the killer feature of the Command pattern. However, the Command pattern can actually do much more:
• GUI buttons and menu items: The PyQt example that was already mentioned uses the Command pattern to implement actions on buttons and menu items.
• Other operations: Apart from undo, commands can be used to implement any operation. A few examples are cut, copy, paste, redo, and capitalize text.
• Transactional behavior and logging: Transactional behavior and logging are important to keep a persistent log of changes. They are used by operating systems to recover from system crashes, relational databases to implement transactions, filesystems to implement snapshots, and installers (wizards) to revert canceled installations.
• Macros: By macros, in this case, we mean a sequence of actions that can be recorded and executed on demand at any point in time. Popular editors such as Emacs and Vim support macros.
Implementing the Command pattern
Let’s use the Command pattern to implement the following basic file utilities:
• Creating a file and, optionally, adding text to it
• Reading the contents of a file
• Renaming a file
We are not going to implement these utilities from scratch since Python already offers good implementations for them in the os module. What we want to do is to add an extra abstraction level on top of them so that they can be treated as commands. By doing this, we get all the advantages offered by commands.
Each command has two parts:
• The initialization part: It is taken care of by the __init__() method and contains all the information required by the command to be able to do something useful (the path of a file, the contents that will be written to the file, and so forth).
• The execution part: It is taken care of by the execute() method. We call that method when we want to run a command. This is not necessarily right after initializing it.
Let’s start with the rename utility, which we implement using the RenameFile class. The class is initialized using the source and destination file paths. We add the execute() method, which does the actual renaming using os.rename(). To provide support for the undo operation, we add the undo() method, where we use os.rename() again to revert the name of the file to its original value. Note that we also use logging to improve the output.
The beginning of the code, the imports we need, and the RenameFile class, are as follows:
import logging
import os


logging.basicConfig(level=logging.DEBUG)


class RenameFile:
    def __init__(self, src, dest):
        self.src = src
        self.dest = dest

    def execute(self):
        logging.info(
            f"[renaming '{self.src}' to '{self.dest}']"
        )
        os.rename(self.src, self.dest)

    def undo(self):
        logging.info(
            f"[renaming '{self.dest}' back to '{self.src}']"
        )
        os.rename(self.dest, self.src)
Next, we add a CreateFile class for the command used to create a file. The initialization method for that class accepts the familiar path parameter and a txt parameter for the content that will be written to the file. If nothing is passed as content, the default “hello world” text is written to the file. Normally, the sane default behavior is to create an empty file, but for the needs of this example, I decided to write a default string in it. Then, we add an execute() method, in which we use Python’s open()
function to open the file in write mode, and the write() function to write the txt string to it.
The undo for the operation of creating a file is to delete that file. Thus, the undo() method is added to the class, where we use the os.remove() function to do the job.
The definition for the CreateFile class is as follows:
class CreateFile:
    def __init__(self, path, txt="hello world\n"):
        self.path = path
        self.txt = txt

    def execute(self):
        logging.info(f"[creating file '{self.path}']")
        with open(
            self.path, "w", encoding="utf-8"
        ) as out_file:
            out_file.write(self.txt)

    def undo(self):
        logging.info(f"deleting file {self.path}")
        os.remove(self.path)
The last utility gives us the ability to read the contents of a file. The execute() method of the ReadFile class uses open() again, this time in read mode, and just prints the content of the file.
The ReadFile class is defined as follows:
class ReadFile:
    def __init__(self, path):
        self.path = path

    def execute(self):
        logging.info(f"[reading file '{self.path}']")
        with open(
            self.path, "r", encoding="utf-8"
        ) as in_file:
            print(in_file.read(), end="")
The main() function makes use of the utilities we have defined. The orig_name and new_name parameters are the original and new name of the file that is created and renamed. A commands list is used to add (and configure) all the commands that we want to execute at a later point. The code is as follows:
def main():
    orig_name, new_name = "file1", "file2"

    commands = (
        CreateFile(orig_name),
        ReadFile(orig_name),
        RenameFile(orig_name, new_name),
    )

 for c in commands:
     c.execute()
Then, we ask the users whether they want to undo the executed commands or not. The user selects whether the commands will be undone or not. If they choose to undo them, undo() is executed for all commands in the commands list. However, since not all commands support undo, exception handling is used to catch (and log) the AttributeError exception generated when the undo() method is missing. That part of the code would look like the following:
    answer = input("reverse the executed commands? [y/n] ")
    if answer not in "yY":
        print(f"the result is {new_name}")
        exit()

    for c in reversed(commands):
        try:
            c.undo()
        except AttributeError as e:
            logging.error(str(e))
• The Observer pattern
The Observer pattern describes a publish-subscribe relationship between a single object, the publisher, which is also known as the subject or observable, and one or more objects, the subscribers, also known as observers. So, the subject notifies the subscribers of any state changes, typically by calling one of their methods.
The ideas behind the Observer pattern are the same as those behind the separation of concerns principle, that is, to increase decoupling between the publisher and subscribers, and to make it easy to add/remove subscribers at runtime.
Real-world examples
Dynamics in an auction are similar to the behavior of the Observer pattern. Every auction bidder has a number paddle that is raised whenever they want to place a bid. Whenever the paddle is raised by a bidder, the auctioneer acts as the subject by updating the price of the bid and broadcasting the new price to all bidders (subscribers).
In software, we can cite at least two examples:
• Kivy, the Python framework for developing user interfaces (UIs), has a module called Properties, which implements the Observer pattern. Using this technique, you can specify what should happen when a property’s value changes.
• The RabbitMQ library provides an implementation of an Advanced Message Queuing Protocol (AMQP) messaging broker. It is possible to construct a Python application that interacts with RabbitMQ in such a way that it subscribes to messages and publishes them to queues, which is essentially the Observer design pattern.
Use cases for the Observer pattern
We generally use the Observer pattern when we want to inform/update one or more objects (observers/subscribers) about a change that happened on a given object (subject/publisher/observable). The number of observers, as well as who those observers are, may vary and can be changed dynamically. We can think of many cases where Observer can be useful. One such use case is news feeds. With RSS, Atom, or other related formats, you follow a feed, and every time it is updated, you receive a notification about the update.
The same concept exists in social networking applications. If you are connected to another person using a social networking service, and your connection updates something, you are notified about it. Event-driven systems are another example where Observer is usually used. In such systems, you have listeners that listen for specific events. The listeners are triggered when an event they are listening to is created. This can be typing a specific key (on the keyboard), moving the mouse, and more. The
event plays the role of the publisher, and the listeners play the role of the observers. The key point in this case is that multiple listeners (observers) can be attached to a single event (publisher).
Implementing the Observer pattern
As an example, let’s implement a weather monitoring system. In such a system, you have a weather station that collects weather-related data (temperature, humidity, and atmospheric pressure). Our system needs to allow different devices and applications to receive real-time updates whenever there is a change in the weather data.
We can apply the Observer pattern using the following elements:
• Subject (weather station): Create a WeatherStation class that acts as the subject. This class will maintain a list of observers (devices or applications) interested in receiving weather updates.
• Observers (devices and applications): Implement various observer classes, representing devices such as smartphones, tablets, weather apps, and even a display screen in a local store. Each observer will subscribe to receive updates from the weather station.
• Registration and notification: The weather station provides methods for observers to register (subscribe) and unregister (unsubscribe) themselves. When there is a change in weather data (e.g., a new temperature reading), the weather station notifies all registered observers.
• Update mechanism: Each observer defines an update() method that the weather station calls when notifying about changes. For instance, a smartphone observer may update its weather app with the latest data, while a local store display may update its digital sign.
First, we define the Observer interface, which holds an update method that observers must implement. Observers are expected to update themselves when the subject’s state changes:
class Observer:
    def update(self, temperature, humidity, pressure):
        pass
Next, we define the WeatherStation subject class. It maintains a list of observers and provides methods to add and remove observers. The set_weather_data method is used to simulate changes in weather data. When the weather data changes, it notifies all registered observers by calling their update methods. The code is as follows:
class WeatherStation:
    def __init__(self):
        self.observers = []

    def add_observer(self, observer):
        self.observers.append(observer)

    def remove_observer(self, observer):
        self.observers.remove(observer)

    def set_weather_data(self, temperature, humidity, pressure):
        for observer in self.observers:
            observer.update(temperature, humidity, pressure)
Let’s now define the DisplayDevice observer class. Its update method prints weather information when called:
class DisplayDevice(Observer):
    def __init__(self, name):
        self.name = name

    def update(self, temperature, humidity, pressure):
        print(f"{self.name} Display")
        print(
            f" - Temperature: {temperature}°C, Humidity: {humidity}%, Pressure: {pressure}hPa"
        )
Similarly, we define another observer class, WeatherApp, which prints weather information in a different format when its update method is called:
class WeatherApp(Observer):
    def __init__(self, name):
        self.name = name

    def update(self, temperature, humidity, pressure):
        print(f"{self.name} App - Weather Update")
        print(
            f" - Temperature: {temperature}°C, Humidity: {humidity}%, Pressure: {pressure}hPa"
        )
Now, in the main() function, we do several things:
• We create an instance of the WeatherStation class, which acts as the subject.
• We create instances of DisplayDevice and WeatherApp, representing different types of observers.
• We register these observers with weather_station using the add_observer method.
• We simulate changes in weather data by calling the set_weather_data method of weather_station. This triggers updates to all registered observers.
The code of the main() function is as follows:
def main():
    # Create the WeatherStation
    weather_station = WeatherStation()

    # Create and register observers
    display1 = DisplayDevice("Living Room")
    display2 = DisplayDevice("Bedroom")
    app1 = WeatherApp("Mobile App")

    weather_station.add_observer(display1)
    weather_station.add_observer(display2)
    weather_station.add_observer(app1)

    # Simulate weather data changes
    weather_station.set_weather_data(25.5, 60, 1013.2)
    weather_station.set_weather_data(26.0, 58, 1012.8)
• The State pattern
OOP focuses on maintaining the states of objects that interact with each other. A very handy tool to model state transitions when solving many problems is known as a finite-state machine (commonly called a state machine).
What’s a state machine? A state machine is an abstract machine that has two key components, that is, states and transitions. A state is the current (active) status of a system.
A nice feature of state machines is that they can be represented as graphs (called state diagrams), where each state is a node, and each transition is an edge between two nodes.
Technical requirements
Install the state_machine module, using the command: python -m pip install state_machine.
Implementing the State pattern
The State design pattern is usually implemented using a parent State class that contains the common functionality of all the states, and several concrete classes derived from State, where each derived class contains only the state-specific required functionality. The State pattern focuses on implementing a state machine. The core parts of a state machine are the states and transitions between the states. It doesn’t matter how those parts are implemented.
To avoid reinventing the wheel, we can make use of existing Python modules that not only help us create state machines but also do it in a Pythonic way. A module that I find very useful is state_machine.
Let’s start with the Process class. Each created process has its own state machine. The first step to creating a state machine using the state_machine module is to use the @acts_as_state_machine decorator. Then, we define the states of our state machine. This is a one-to-one mapping of what we see in the state diagram. The only difference is that we should give a hint about the initial state of the state machine. We do that by setting the initial attribute value to True:
from state_machine import acts_as_state_machine, before, after, State, Event, InvalidStateTransition


@acts_as_state_machine
class Process:
    created = State(initial=True)
    waiting = State()
    running = State()
    terminated = State()
    blocked = State()
    swapped_out_waiting = State()
    swapped_out_blocked = State()

    wait = Event(
        from_states=(
            created,
            running,
            blocked,
            swapped_out_waiting,
        ),
        to_state=waiting,
    )

    run = Event(
        from_states=waiting, to_state=running
    )

    terminate = Event(
        from_states=running, to_state=terminated
    )

    block = Event(
        from_states=(
            running,
            swapped_out_blocked,
        ),
        to_state=blocked,
    )

    swap_wait = Event(
        from_states=waiting,
        to_state=swapped_out_waiting,
    )

    swap_block = Event(
        from_states=blocked,
        to_state=swapped_out_blocked,
    )

    def __init__(self, name):
        self.name = name

    @after("wait")
    def wait_info(self):
        print(f"{self.name} entered waiting mode")

    @after("run")
    def run_info(self):
        print(f"{self.name} is running")

    @before("terminate")
    def terminate_info(self):
        print(f"{self.name} terminated")

    @after("block")
    def block_info(self):
        print(f"{self.name} is blocked")

    @after("swap_wait")
    def swap_wait_info(self):
        print(f"{self.name} is swapped out and waiting")

    @after("swap_block")
    def swap_block_info(self):
        print(f"{self.name} is swapped out and blocked")
Next, we are going to define the transitions. In the state_machine module, a transition is an instance of the Event class. We define the possible transitions using the from_states and to_state arguments. Also, as you may have noticed that from_states can be either a single state or a group of states (tuple).
Each process has a name. Officially, a process needs to have much more information to be useful (for example, ID, priority, status, and so forth) but let’s keep it simple to focus on the pattern.
Transitions are not very useful if nothing happens when they occur. The state_machine module provides us with the @before and @after decorators that can be used to execute actions before or after a transition occurs, respectively. You can imagine updating some objects within the system or sending an email or a notification to someone. For this example, the actions are limited to printing information about the state change of the process.
Next, we need the transition() function, which accepts three arguments:
• process, which is an instance of Process
• event, which is an instance of Event (wait, run, terminate, and so forth)
• event_name, which is the name of the event
The name of the event is printed if something goes wrong when trying to execute event. Here is the code for the function:
def transition(proc, event, event_name):
    try:
        event()
    except InvalidStateTransition:
        msg = (
            f"Transition of {proc.name} from {proc.current_state} "
            f"to {event_name} failed"
        )
        print(msg)
The state_info() function shows some basic information about the current (active) state of the process:
def state_info(proc):
    print(f"state of {proc.name}: {proc.current_state}")
At the beginning of the main() function, we define some string constants, which are passed as event_name:
Next, we create two Process instances and display information about their initial state:
p1, p2 = Process("process1"), Process("process2")
[state_info(p) for p in (p1, p2)]
The rest of the function experiments with different transitions. Recall the state diagram we covered in this chapter. The allowed transitions should be with respect to the state diagram. For example, it should be possible to switch from a running state to a blocked state, but it shouldn’t be possible to switch from a blocked state to a running state:
print()
transition(p1, p1.wait, WAITING)
transition(p2, p2.terminate, TERMINATED)
[state_info(p) for p in (p1, p2)]

print()
transition(p1, p1.run, RUNNING)
transition(p2, p2.wait, WAITING)
[state_info(p) for p in (p1, p2)]

print()
transition(p2, p2.run, RUNNING)
[state_info(p) for p in (p1, p2)]

print()
[
    transition(p, p.block, BLOCKED)
    for p in (p1, p2)
]
[state_info(p) for p in (p1, p2)]

print()
[
    transition(p, p.terminate, TERMINATED)
    for p in (p1, p2)
]
[state_info(p) for p in (p1, p2)]
• The Interpreter pattern
Often, we need to create a domain-specific language (DSL). A DSL is a computer language of limited expressiveness targeting a particular domain. DSLs are used for different things, such as combat simulation, billing, visualization, configuration, and communication protocols. DSLs are divided into internal DSLs and external DSLs.
Internal DSLs are built on top of a host programming language. An example of an internal DSL is a language that solves linear equations using Python. The advantages of using an internal DSL are that we don’t have to worry about creating, compiling, and parsing grammar because these are already taken care of by the host language. The disadvantage is that we are constrained by the features of the host language. It is very challenging to create an expressive, concise, and fluent internal DSL if the
host language does not have these features.
External DSLs do not depend on host languages. The creator of the DSL can decide all aspects of the language (grammar, syntax, and so forth). They are also responsible for creating a parser and compiler for it.
The Interpreter pattern is related only to internal DSLs. Therefore, the goal is to create a simple but useful language using the features provided by the host programming language, which in this case is Python. Note that Interpreter does not address parsing at all. It assumes that we already have the parsed data in some convenient form. This can be an abstract syntax tree (AST) or any other handy data structure
Technical requirements
Install the pyparsing module, using the command: python –m pip install pyparsing.
Use cases for the Interpreter pattern
The Interpreter pattern is used when we want to offer a simple language to domain experts and advanced users to solve their problems. The first thing we should stress is that the Interpreter pattern should only be used to implement simple languages. If the language has the requirements of an external DSL, there are better tools to create languages from scratch (Yacc and Lex, Bison, ANTLR, and so on).
Our goal is to offer the right programming abstractions to the specialist, who is often not a programmer, to make them productive. Ideally, they shouldn’t know advanced Python to use our DSL, but knowing even a little bit of Python is a plus since that’s what we eventually get at the end. Advanced Python concepts should not be a requirement. Moreover, the performance of the DSL is usually not an important concern. The focus is on offering a language that hides the peculiarities of the host language and offers a more human-readable syntax.
Implementing the Interpreter pattern
Let’s create an internal DSL to control a smart house. This example fits well into the internet of things (IoT) era, which is getting more and more attention nowadays. The user can control their home using a very simple event notation. An event has the form of command -> receiver -> arguments. The arguments part is optional.
Not all events require arguments. An example of an event that does not require any arguments is shown here:
open -> gate
An example of an event that requires arguments is shown here:
increase -> boiler temperature -> 3 degrees
The -> symbol is used to mark the end of one part of an event and state the beginning of the next one. There are many ways to implement an internal DSL. We can use plain old regular expressions, string processing, a combination of operator overloading, and metaprogramming, or a library/tool that can do the hard work for us. Although, officially, the Interpreter pattern does not address parsing, I feel that a practical example needs to cover parsing as well. For this reason, I decided to use a tool to take care of the parsing part. The tool is called pyparsing and, to find out more about it, check out the mini-book Getting Started with Pyparsing by Paul McGuire (https://www.oreilly.com/library/view/getting-started-with/9780596514235/).
Before getting into coding, it is a good practice to define a simple grammar for our language. We can define the grammar using the Backus-Naur Form (BNF) notation:
event ::= command token receiver token arguments
command ::= word+
word ::= a collection of one or more alphanumeric characters
token ::= ->
receiver ::= word+
arguments ::= word+
What the grammar basically tells us is that an event has the form of command -> receiver -> arguments, and that commands, receivers, and arguments have the same form: a group of one or more alphanumeric characters. If you are wondering about the necessity of the numeric part, it is included to allow us to pass arguments, such as three degrees at the increase -> boiler temperature -> 3 degrees command.
Now that we have defined the grammar, we can move on to converting it to actual code. Here’s what the code looks like:
word = Word(alphanums)
command = Group(OneOrMore(word))
token = Suppress("->")
device = Group(OneOrMore(word))
argument = Group(OneOrMore(word))
event = command + token + device + Optional(token + argument)
The basic difference between the code and grammar definition is that the code needs to be written in the bottom-up approach. For instance, we cannot use a word without first assigning it a value. Suppress is used to state that we want the -> symbol to be skipped from the parsed results. The full code of the final implementation example uses many placeholder classes, but to keep you focused, I will first show a minimal version featuring only one class. Let’s look at the Boiler class. A boiler has a default temperature of 83° Celsius. There are also two methods to increase and decrease the current temperature:
from pyparsing import Word, alphanums, Group, OneOrMore, Suppress, Optional


class Boiler:
    def __init__(self):
        self.temperature = 83  # in celsius

    def __str__(self):
        return f"boiler temperature: {self.temperature}"

    def increase_temperature(self, amount):
        print(f"increasing the boiler's temperature by {amount} degrees")
        self.temperature += amount

    def decrease_temperature(self, amount):
        print(f"decreasing the boiler's temperature by {amount} degrees")
        self.temperature -= amount


word = Word(alphanums)
command = Group(OneOrMore(word))
token = Suppress("->")
device = Group(OneOrMore(word))
argument = Group(OneOrMore(word))
event = command + token + device + Optional(token + argument)

boiler = Boiler()

test = "increase -> boiler temperature -> 3 degrees"
cmd, dev, arg = event.parseString(test)
cmd_str = " ".join(cmd)
dev_str = " ".join(dev)
if "increase" in cmd_str and "boiler" in dev_str:
    boiler.increase_temperature(int(arg[0]))
print(boiler)
The next step is to add the grammar, which we already covered. We will also create a boiler instance and print its default state.
The simplest way to retrieve the parsed output of pyparsing is by using the parseString() method. The result is a ParseResults instance, which is a parse tree that can be treated as a nested list. For example, executing print(event.parseString('increase -> boiler temperature-> 3 degrees')) would give ‘[['increase']' ['boiler', 'temperature']'''3', 'degrees']] as a result.
So, in this case, we know that the first sublist is the command (increase), the second sublist is the receiver (boiler temperature), and the third sublist is the argument (3°). We can unpack the ParseResults instance, which gives us direct access to these three parts of the event. Having direct access means that we can match patterns to find out which method should be executed:
Executing the preceding code snippet gives the following output:
increasing the boiler's temperature by 3 degrees
boiler temperature: 86


【推荐】国内首个AI IDE,深度理解中文开发场景,立即下载体验Trae
【推荐】编程新体验,更懂你的AI,立即体验豆包MarsCode编程助手
【推荐】抖音旗下AI助手豆包,你的智能百科全书,全免费不限次数
【推荐】轻量又高性能的 SSH 工具 IShell:AI 加持,快人一步
· 震惊!C++程序真的从main开始吗?99%的程序员都答错了
· 【硬核科普】Trae如何「偷看」你的代码?零基础破解AI编程运行原理
· 单元测试从入门到精通
· 上周热点回顾(3.3-3.9)
· winform 绘制太阳,地球,月球 运作规律