A short refresher on Docker caching
Docker uses layer caching to reuse previously computed build results. Each instruction in a Dockerfile is associated with a layer that contains the changes caused by executing that instruction. If previous layers, as well as any inputs to an instruction, haven't changed, and the instruction has already been run and cached previously, Docker will use the cached layer for it. Otherwise, Docker will rebuild that layer and all layers that follow it.
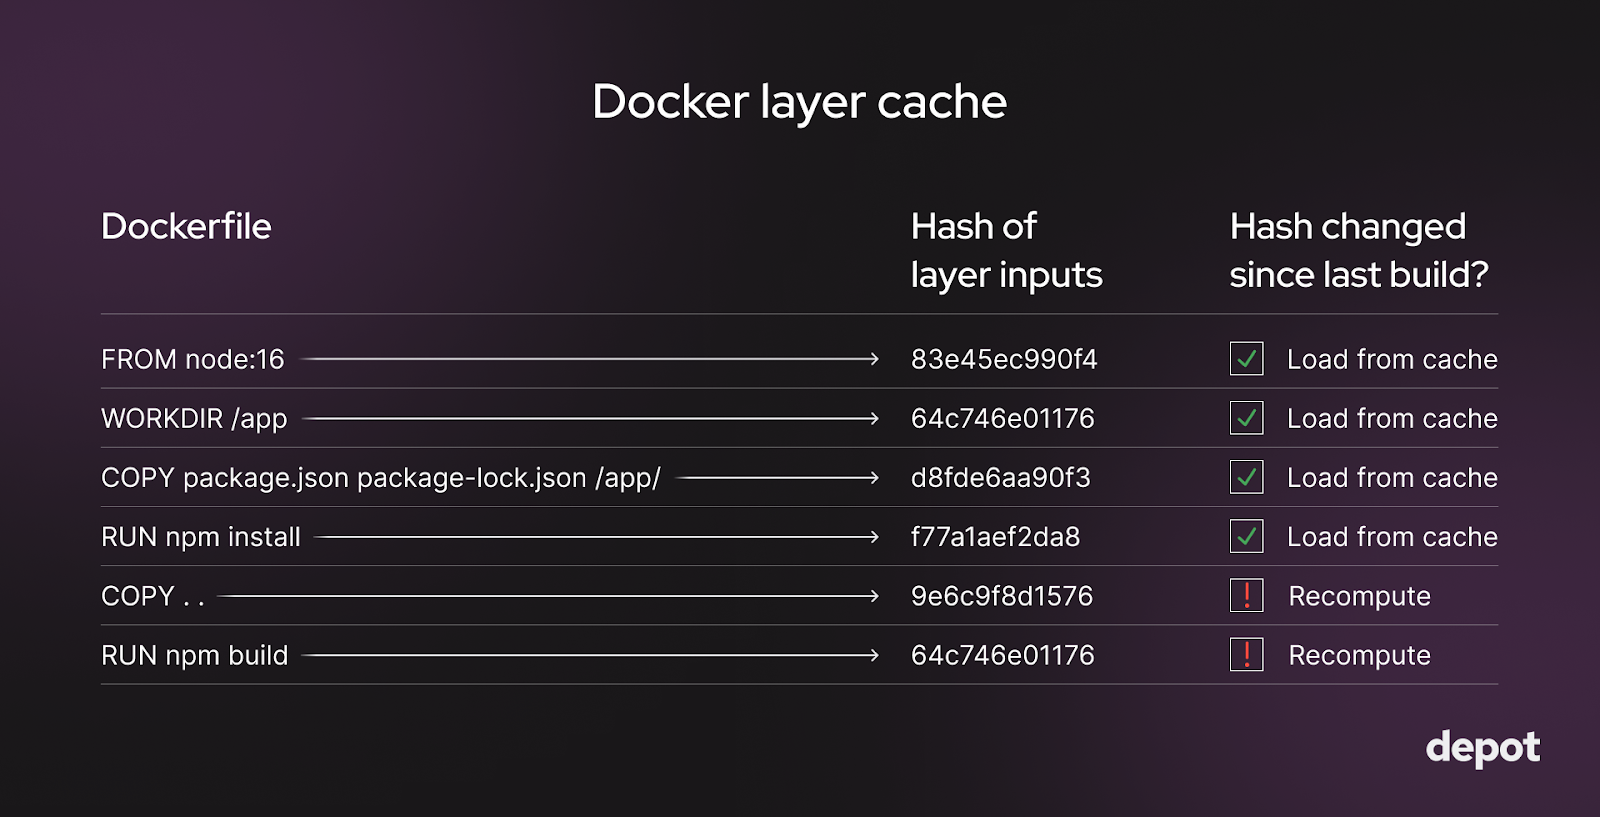
The Docker layers for which the hash of the inputs (such as source code files on disk or the parent layer) haven't changed get loaded from the cache and reused. For layers where the hash of inputs has changed, the layers get recomputed.
Using a cached layer is much faster than recomputing an instruction from scratch. So, generally, you want as much of your Docker build as possible to come from the cache and to only rebuild layers that have changed since the last build.
One of the main factors that affects how many of the layers in your image need to be rebuilt is the ordering of operations in your Dockerfile.
How much disk space is Docker using?
The first step is knowing the disk usage of Docker. We can use the docker system df command to get a breakdown of how much disk space is being taken up by various artifacts.
docker system df
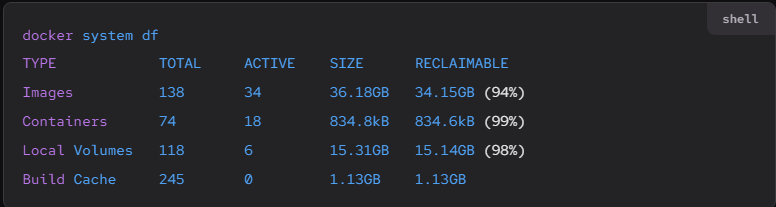
Docker uses 36.18 GB for images, 834.8 kB for containers, 15.31 GB for local volumes, and 1.13 GB for the Docker build cache. This comes to about 50 GB of space in total, and a large chunk of it is reclaimable.
What space can we claim back without affecting Docker build performance?
It's generally quite safe to remove unused Docker images and layers — unless you are building in CI. For CI, clearing the layers might affect performance, so it's better not to do it. Instead, jump to our CI-focused section.
Removing containers from the Docker cache
We can use the docker container prune command to clear the disk space used by containers. This command will remove all stopped containers from the system.
We can omit the -f flag here and in subsequent examples to get a confirmation prompt before artifacts are removed.
docker container prune -f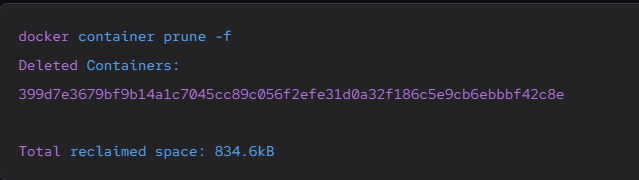
Which containers are unused?
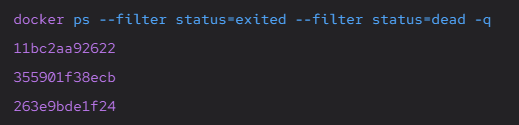
We can see the IDs of unused containers by running the docker ps command with filters on the status of the container. A container is unused if it has a status of exited or dead.
docker ps --filter status=exited --filter status=dead -q
Note: If we want to know the size of the unused container, we can replace the -q flag with -s to get the size and other metadata about the container.
Removing all containers
If we want to remove all containers from the system, we can stop any running containers and then use the same prune command. Do this by feeding the output of docker ps -q into the docker stop or docker kill command if you want to kill the container forcibly.
docker stop $(docker ps -q)
docker container prune
Another option is the docker rm command, which can be used with docker ps -a -q to remove all containers.
docker rm $(docker ps -a -q)Note: The docker rm command forces the removal of a running container via a SIGKILL signal. This is the same as the docker kill command. The docker ps -a -q command will list all containers on the system, including running containers, and feed that into the docker rm command.
Removing images
Docker images can take up a significant amount of disk space. We accumulate new images when base images change or build new ones via docker build, for example. We can use the docker image prune command to remove unused images from the system.
By default, it only removes dangling images, which are not associated with any container and don't have tags.
docker image prune -f
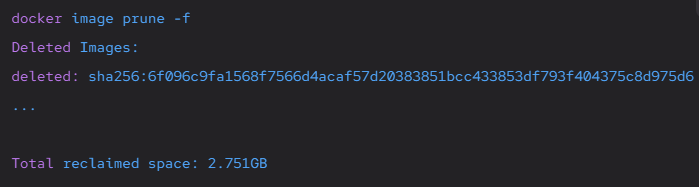
We reclaimed over 2.7 GB of space by removing dangling images. But, if we recall from the output of our docker system df command, we have 34.15 GB of reclaimable images.
Where is the rest of that space coming from? These are images on our system that are tagged or associated with a container. We can run the docker image prune -a command to force the removal of these images as well, assuming they're unused images.
docker image prune -a -f
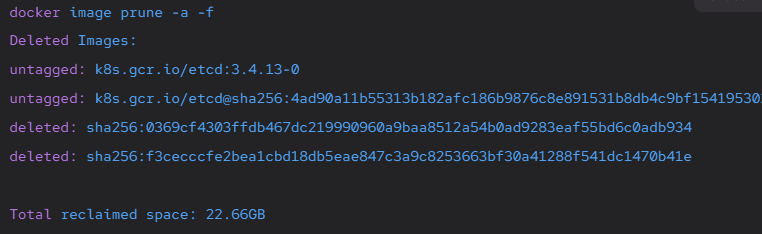
In this way, we remove all unused images not associated with a container, not just the dangling ones.
Removing volumes
Volumes are never cleaned up automatically in Docker because they could contain valuable data. But, if we know that we no longer need the data in a volume, we can remove it with the docker volume prune command. This removes all anonymous volumes not used by any containers.
docker volume prune -f
Total reclaimed space: 0B
Interestingly, we see that we didn't reclaim any space. This is because we have volumes that are associated with containers. We can see these volumes by running the docker volume ls command.

We get an output that shows the driver and the volume name. The command docker volume prune only removes anonymous volumes. These volumes are not named and don't have a specific source from outside the container. We can use the docker volume rm -a command to remove all volumes.
docker volume prune -a -f
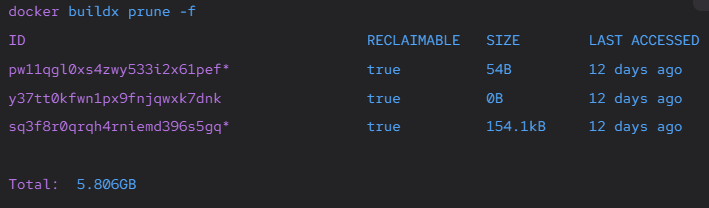
Removing build cache
To remove the Docker build cache, we can run the docker buildx prune command to clear the build cache of the default builder.
docker buildx prune -f
If we want to remove the build cache for a specific builder, we can use the --builder flag to specify the builder name.
docker buildx prune --builder builder-name -fRemoving networks
While Docker networks don't take up disk space on our machine, they do create network bridges, iptables, and routing table entries. So, similarly to the other artifacts, we can remove unused networks with the docker network prune command to clean these up.
docker network prune -f
Deleted Networks:test-network-1
Removing everything with docker system prune
The equivalent of a docker clean all is better known as Docker prune. We can remove all unused artifacts Docker has produced by running docker system prune. This will remove all unused containers, images, networks, and build cache.
docker system prune -f
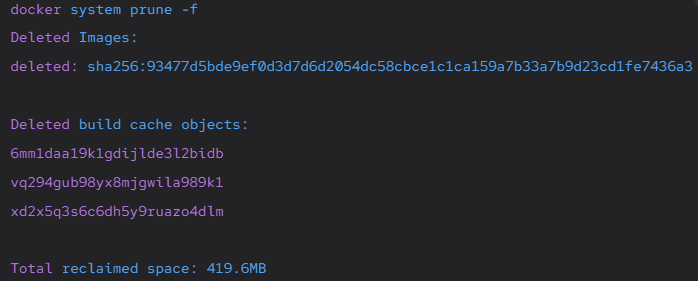
By default, Docker prune will not remove volumes and only removes dangling Docker images. We can use the --volumes flag to remove volumes as well. We can also add the -a flag again to remove all images not associated with a container.
docker system prune --volumes -afManaging Docker build cache in CI
If you are building Docker images in a CI environment, you can, of course, use the above commands as well. However, your builds might not be fully taking advantage of the Docker build cache for the following structural reasons:
-
In a CI environment with ephemeral runners, such as GitHub Actions or GitLab CI, build cache isn't persisted across builds without saving/loading it over the network to somewhere off of the ephemeral runner. Saving and loading the cache is therefore slow because the network transfer speed is slow.
-
By default, all CI runners are ephemeral unless you run your own.
-
If there is disk space, it's usually capped at 10 to 15 GB. Thus, if you're building large images with large layers, you will likely exhaust it.
Even if you are building very small images and only keep essential layers in the Docker cache on each CI runner, your builds will likely not use the cache and thus be quite slow, as computing each layer on every build can take a while.
Copied from: https://depot.dev/blog/docker-clear-cache
Docker images location:
/var/lib/docker/overlay2
WARNING: Don't delete the folder 'l' under this directory.
zzh@ZZHPC:~$ sudo ls -lhrt /var/lib/docker/overlay2
total 4.0K
drwx------ 2 root root 4.0K Jan 12 09:19 l


 浙公网安备 33010602011771号