You can view all of your settings and where they are coming from using:
$ git config --list --show-origin
The first thing you should do when you install Git is to set your user name and email address. This is important because every Git commit uses this information, and it’s immutably baked into the commits you start creating:
$ git config --global user.name "John Doe"
$ git config --global user.email johndoe@example.com
Now that your identity is set up, you can configure the default text editor that will be used when Git needs you to type in a message. If not configured, Git uses your system’s default editor.
If you want to use a different text editor, such as Emacs, you can do the following:
$ git config --global core.editor emacs
Your default branch name
By default Git will create a branch called master when you create a new repository with git init. From Git version 2.28 onwards, you can set a different name for the initial branch.
To set main as the default branch name do:
$ git config --global init.defaultBranch main
Checking Your Settings
If you want to check your configuration settings, you can use the git config --list command to list all the settings Git can find at that point:
$ git config --list
You can also check what Git thinks a specific key’s value is by typing git config <key>:
$ git config user.name
Getting Help
$ git help <verb>
$ git <verb> --help
$ man git-<verb>
$ git help config$ git add -h
Getting a Git Repository
You typically obtain a Git repository in one of two ways:
-
You can take a local directory that is currently not under version control, and turn it into a Git repository, or
-
You can clone an existing Git repository from elsewhere.
$ git init$ git clone <url>If you want to clone the repository into a directory named something other than libgit2, you can specify the new directory name as an additional argument:
$ git clone https://github.com/libgit2/libgit2 mylibgit
Short Status
While the git status output is pretty comprehensive, it’s also quite wordy. Git also has a short status flag so you can see your changes in a more compact way. If you run git status -s or git status --short you get a far more simplified output from the command:
$ git status -s
 M README
MM Rakefile
A  lib/git.rb
M  lib/simplegit.rb
?? LICENSE.txt
New files that aren’t tracked have a ?? next to them, new files that have been added to the staging area have an A, modified files have an M and so on. There are two columns to the output — the left-hand column indicates the status of the staging area and the right-hand column indicates the status of the working tree. So for example in that output, the README file is modified in the working directory but not yet staged, while the lib/simplegit.rb file is modified and staged. The Rakefile was modified, staged and then modified again, so there are changes to it that are both staged and unstaged.
Ignoring Files
Often, you’ll have a class of files that you don’t want Git to automatically add or even show you as being untracked. These are generally automatically generated files such as log files or files produced by your build system. In such cases, you can create a file listing patterns to match them named .gitignore. Here is an example .gitignore file:
$ cat .gitignore
*.[oa]
*~
The first line tells Git to ignore any files ending in “.o” or “.a” — object and archive files that may be the product of building your code. The second line tells Git to ignore all files whose names end with a tilde (~), which is used by many text editors such as Emacs to mark temporary files. You may also include a log, tmp, or pid directory; automatically generated documentation; and so on. Setting up a .gitignore file for your new repository before you get going is generally a good idea so you don’t accidentally commit files that you really don’t want in your Git repository.
The rules for the patterns you can put in the .gitignore file are as follows:
-
Blank lines or lines starting with
#are ignored. -
Standard glob patterns work, and will be applied recursively throughout the entire working tree.
-
You can start patterns with a forward slash (
/) to avoid recursivity. -
You can end patterns with a forward slash (
/) to specify a directory. -
You can negate a pattern by starting it with an exclamation point (
!).
Glob patterns are like simplified regular expressions that shells use. An asterisk (*) matches zero or more characters; [abc] matches any character inside the brackets (in this case a, b, or c); a question mark (?) matches a single character; and brackets enclosing characters separated by a hyphen ([0-9]) matches any character between them (in this case 0 through 9). You can also use two asterisks to match nested directories; a/**/z would match a/z, a/b/z, a/b/c/z, and so on.
Here is another example .gitignore file:
# ignore all .a files
*.a

# but do track lib.a, even though you're ignoring .a files above
!lib.a

# only ignore the TODO file in the current directory, not subdir/TODO
/TODO

# ignore all files in any directory named build
build/

# ignore doc/notes.txt, but not doc/server/arch.txt
doc/*.txt

# ignore all .pdf files in the doc/ directory and any of its subdirectories
doc/**/*.pdf
Viewing Your Staged and Unstaged Changes
If the git status command is too vague for you — you want to know exactly what you changed, not just which files were changed — you can use the git diff command.
To see what you’ve changed but not yet staged, type git diff with no other arguments:
$ git diff
diff --git a/CONTRIBUTING.md b/CONTRIBUTING.md
index 8ebb991..643e24f 100644
--- a/CONTRIBUTING.md
+++ b/CONTRIBUTING.md
@@ -65,7 +65,8 @@ branch directly, things can get messy.
 Please include a nice description of your changes when you submit your PR;
 if we have to read the whole diff to figure out why you're contributing
 in the first place, you're less likely to get feedback and have your change
-merged in.
+merged in. Also, split your changes into comprehensive chunks if your patch is
+longer than a dozen lines.

 If you are starting to work on a particular area, feel free to submit a PR
 that highlights your work in progress (and note in the PR title that it's
That command compares what is in your working directory with what is in your staging area. The result tells you the changes you’ve made that you haven’t yet staged.
If you want to see what you’ve staged that will go into your next commit, you can use git diff --staged. This command compares your staged changes to your last commit:
$ git diff --staged
diff --git a/README b/README
new file mode 100644
index 0000000..03902a1
--- /dev/null
+++ b/README
@@ -0,0 +1 @@
+My Project
It’s important to note that git diff by itself doesn’t show all changes made since your last commit — only changes that are still unstaged. If you’ve staged all of your changes, git diff will give you no output.
git diff --cached to see what you’ve staged so far (--staged and --cached are synonyms)
Remember that the commit records the snapshot you set up in your staging area. Anything you didn’t stage is still sitting there modified; you can do another commit to add it to your history. Every time you perform a commit, you’re recording a snapshot of your project that you can revert to or compare to later.
Skipping the Staging Area
Although it can be amazingly useful for crafting commits exactly how you want them, the staging area is sometimes a bit more complex than you need in your workflow. If you want to skip the staging area, Git provides a simple shortcut. Adding the -a option to the git commit command makes Git automatically stage every file that is already tracked before doing the commit, letting you skip the git add part:
$ git status
On branch master
Your branch is up-to-date with 'origin/master'.
Changes not staged for commit:
  (use "git add <file>..." to update what will be committed)
  (use "git checkout -- <file>..." to discard changes in working directory)

    modified:   CONTRIBUTING.md

no changes added to commit (use "git add" and/or "git commit -a")
$ git commit -a -m 'Add new benchmarks'
[master 83e38c7] Add new benchmarks
 1 file changed, 5 insertions(+), 0 deletions(-)
Notice how you don’t have to run git add on the CONTRIBUTING.md file in this case before you commit. That’s because the -a flag includes all changed files. This is convenient, but be careful; sometimes this flag will cause you to include unwanted changes.
Removing Files
To remove a file from Git, you have to remove it from your tracked files (more accurately, remove it from your staging area) and then commit. The git rm command does that, and also removes the file from your working directory so you don’t see it as an untracked file the next time around.
If you simply remove the file from your working directory, it shows up under the “Changes not staged for commit” (that is, unstaged) area of your git status output:
$ rm PROJECTS.md
$ git status
On branch master
Your branch is up-to-date with 'origin/master'.
Changes not staged for commit:
  (use "git add/rm <file>..." to update what will be committed)
  (use "git checkout -- <file>..." to discard changes in working directory)

        deleted:    PROJECTS.md

no changes added to commit (use "git add" and/or "git commit -a")
Then, if you run git rm, it stages the file’s removal:
$ git rm PROJECTS.md
rm 'PROJECTS.md'
$ git status
On branch master
Your branch is up-to-date with 'origin/master'.
Changes to be committed:
  (use "git reset HEAD <file>..." to unstage)

    deleted:    PROJECTS.md
The next time you commit, the file will be gone and no longer tracked. If you modified the file or had already added it to the staging area, you must force the removal with the -f option. This is a safety feature to prevent accidental removal of data that hasn’t yet been recorded in a snapshot and that can’t be recovered from Git.
Another useful thing you may want to do is to keep the file in your working tree but remove it from your staging area. In other words, you may want to keep the file on your hard drive but not have Git track it anymore. This is particularly useful if you forgot to add something to your .gitignore file and accidentally staged it, like a large log file or a bunch of .a compiled files. To do this, use the --cached option:
$ git rm --cached READMEYou can pass files, directories, and file-glob patterns to the git rm command. That means you can do things such as:
$ git rm log/\*.logNote the backslash (\) in front of the *. This is necessary because Git does its own filename expansion in addition to your shell’s filename expansion. This command removes all files that have the .log extension in the log/ directory. Or, you can do something like this:
$ git rm \*~This command removes all files whose names end with a ~.
Moving Files
Unlike many other VCSs, Git doesn’t explicitly track file movement. If you rename a file in Git, no metadata is stored in Git that tells it you renamed the file. However, Git is pretty smart about figuring that out after the fact — we’ll deal with detecting file movement a bit later.
Thus it’s a bit confusing that Git has a mv command. If you want to rename a file in Git, you can run something like:
$ git mv file_from file_toand it works fine. In fact, if you run something like this and look at the status, you’ll see that Git considers it a renamed file:
$ git mv README.md README
$ git status
On branch master
Your branch is up-to-date with 'origin/master'.
Changes to be committed:
  (use "git reset HEAD <file>..." to unstage)

    renamed:    README.md -> README
However, this is equivalent to running something like this:
$ mv README.md README
$ git rm README.md
$ git add README
Git figures out that it’s a rename implicitly, so it doesn’t matter if you rename a file that way or with the mv command. The only real difference is that git mv is one command instead of three — it’s a convenience function. More importantly, you can use any tool you like to rename a file, and address the add/rm later, before you commit.
Viewing the Commit History
$ git logOne of the more helpful options is -p or --patch, which shows the difference (the patch output) introduced in each commit. You can also limit the number of log entries displayed, such as using -2 to show only the last two entries.
$ git log -p -2
commit ca82a6dff817ec66f44342007202690a93763949
Author: Scott Chacon <schacon@gee-mail.com>
Date:   Mon Mar 17 21:52:11 2008 -0700

    Change version number

diff --git a/Rakefile b/Rakefile
index a874b73..8f94139 100644
--- a/Rakefile
+++ b/Rakefile
@@ -5,7 +5,7 @@ require 'rake/gempackagetask'
 spec = Gem::Specification.new do |s|
     s.platform  =   Gem::Platform::RUBY
     s.name      =   "simplegit"
-    s.version   =   "0.1.0"
+    s.version   =   "0.1.1"
     s.author    =   "Scott Chacon"
     s.email     =   "schacon@gee-mail.com"
     s.summary   =   "A simple gem for using Git in Ruby code."

commit 085bb3bcb608e1e8451d4b2432f8ecbe6306e7e7
Author: Scott Chacon <schacon@gee-mail.com>
Date:   Sat Mar 15 16:40:33 2008 -0700

    Remove unnecessary test

diff --git a/lib/simplegit.rb b/lib/simplegit.rb
index a0a60ae..47c6340 100644
--- a/lib/simplegit.rb
+++ b/lib/simplegit.rb
@@ -18,8 +18,3 @@ class SimpleGit
     end

 end
-
-if $0 == __FILE__
-  git = SimpleGit.new
-  puts git.show
-end
If you want to see some abbreviated stats for each commit, you can use the --stat option:
$ git log --stat
commit ca82a6dff817ec66f44342007202690a93763949
Author: Scott Chacon <schacon@gee-mail.com>
Date:   Mon Mar 17 21:52:11 2008 -0700

    Change version number

 Rakefile | 2 +-
 1 file changed, 1 insertion(+), 1 deletion(-)

commit 085bb3bcb608e1e8451d4b2432f8ecbe6306e7e7
Author: Scott Chacon <schacon@gee-mail.com>
Date:   Sat Mar 15 16:40:33 2008 -0700

    Remove unnecessary test

 lib/simplegit.rb | 5 -----
 1 file changed, 5 deletions(-)

commit a11bef06a3f659402fe7563abf99ad00de2209e6
Author: Scott Chacon <schacon@gee-mail.com>
Date:   Sat Mar 15 10:31:28 2008 -0700

    Initial commit

 README           |  6 ++++++
 Rakefile         | 23 +++++++++++++++++++++++
 lib/simplegit.rb | 25 +++++++++++++++++++++++++
 3 files changed, 54 insertions(+)
As you can see, the --stat option prints below each commit entry a list of modified files, how many files were changed, and how many lines in those files were added and removed. It also puts a summary of the information at the end.
Another really useful option is --pretty. This option changes the log output to formats other than the default. A few prebuilt option values are available for you to use. The oneline value for this option prints each commit on a single line, which is useful if you’re looking at a lot of commits. In addition, the short, full, and fuller values show the output in roughly the same format but with less or more information, respectively:
$ git log --pretty=oneline
ca82a6dff817ec66f44342007202690a93763949 Change version number
085bb3bcb608e1e8451d4b2432f8ecbe6306e7e7 Remove unnecessary test
a11bef06a3f659402fe7563abf99ad00de2209e6 Initial commit
The most interesting option value is format, which allows you to specify your own log output format. This is especially useful when you’re generating output for machine parsing — because you specify the format explicitly, you know it won’t change with updates to Git:
$ git log --pretty=format:"%h - %an, %ar : %s"
ca82a6d - Scott Chacon, 6 years ago : Change version number
085bb3b - Scott Chacon, 6 years ago : Remove unnecessary test
a11bef0 - Scott Chacon, 6 years ago : Initial commit
Useful specifiers for git log --pretty=format lists some of the more useful specifiers that format takes.
| Specifier | Description of Output |
|---|---|
|
|
Commit hash |
|
|
Abbreviated commit hash |
|
|
Tree hash |
|
|
Abbreviated tree hash |
|
|
Parent hashes |
|
|
Abbreviated parent hashes |
|
|
Author name |
|
|
Author email |
|
|
Author date (format respects the --date=option) |
|
|
Author date, relative |
|
|
Committer name |
|
|
Committer email |
|
|
Committer date |
|
|
Committer date, relative |
|
|
Subject |
You may be wondering what the difference is between author and committer. The author is the person who originally wrote the work, whereas the committer is the person who last applied the work. So, if you send in a patch to a project and one of the core members applies the patch, both of you get credit — you as the author, and the core member as the committer. We’ll cover this distinction a bit more in Distributed Git.
The oneline and format option values are particularly useful with another log option called --graph. This option adds a nice little ASCII graph showing your branch and merge history:
$ git log --pretty=format:"%h %s" --graph
* 2d3acf9 Ignore errors from SIGCHLD on trap
*  5e3ee11 Merge branch 'master' of git://github.com/dustin/grit
|\
| * 420eac9 Add method for getting the current branch
* | 30e367c Timeout code and tests
* | 5a09431 Add timeout protection to grit
* | e1193f8 Support for heads with slashes in them
|/
* d6016bc Require time for xmlschema
*  11d191e Merge branch 'defunkt' into local
This type of output will become more interesting as we go through branching and merging in the next chapter.
| Option | Description |
|---|---|
|
|
Show the patch introduced with each commit. |
|
|
Show statistics for files modified in each commit. |
|
|
Display only the changed/insertions/deletions line from the --stat command. |
|
|
Show the list of files modified after the commit information. |
|
|
Show the list of files affected with added/modified/deleted information as well. |
|
|
Show only the first few characters of the SHA-1 checksum instead of all 40. |
|
|
Display the date in a relative format (for example, “2 weeks ago”) instead of using the full date format. |
|
|
Display an ASCII graph of the branch and merge history beside the log output. |
|
|
Show commits in an alternate format. Option values include oneline, short, full, fuller, and format (where you specify your own format). |
|
|
Shorthand for |
Limiting Log Output
In addition to output-formatting options, git log takes a number of useful limiting options; that is, options that let you show only a subset of commits. You’ve seen one such option already — the -2 option, which displays only the last two commits. In fact, you can do -<n>, where n is any integer to show the last n commits. In reality, you’re unlikely to use that often, because Git by default pipes all output through a pager so you see only one page of log output at a time.
However, the time-limiting options such as --since and --until are very useful. For example, this command gets the list of commits made in the last two weeks:
$ git log --since=2.weeksThis command works with lots of formats — you can specify a specific date like "2008-01-15", or a relative date such as "2 years 1 day 3 minutes ago".
You can also filter the list to commits that match some search criteria. The --author option allows you to filter on a specific author, and the --grep option lets you search for keywords in the commit messages.
|
Note
|
You can specify more than one instance of both the |
Another really helpful filter is the -S option (colloquially referred to as Git’s “pickaxe” option), which takes a string and shows only those commits that changed the number of occurrences of that string. For instance, if you wanted to find the last commit that added or removed a reference to a specific function, you could call:
$ git log -S function_nameThe last really useful option to pass to git log as a filter is a path. If you specify a directory or file name, you can limit the log output to commits that introduced a change to those files. This is always the last option and is generally preceded by double dashes (--) to separate the paths from the options:
$ git log -- path/to/fileIn Options to limit the output of git log we’ll list these and a few other common options for your reference.
| Option | Description |
|---|---|
|
|
Show only the last n commits |
|
|
Limit the commits to those made after the specified date. |
|
|
Limit the commits to those made before the specified date. |
|
|
Only show commits in which the author entry matches the specified string. |
|
|
Only show commits in which the committer entry matches the specified string. |
|
|
Only show commits with a commit message containing the string |
|
|
Only show commits adding or removing code matching the string |
For example, if you want to see which commits modifying test files in the Git source code history were committed by Junio Hamano in the month of October 2008 and are not merge commits, you can run something like this:
$ git log --pretty="%h - %s" --author='Junio C Hamano' --since="2008-10-01" \
   --before="2008-11-01" --no-merges -- t/
5610e3b - Fix testcase failure when extended attributes are in use
acd3b9e - Enhance hold_lock_file_for_{update,append}() API
f563754 - demonstrate breakage of detached checkout with symbolic link HEAD
d1a43f2 - reset --hard/read-tree --reset -u: remove unmerged new paths
51a94af - Fix "checkout --track -b newbranch" on detached HEAD
b0ad11e - pull: allow "git pull origin $something:$current_branch" into an unborn branch
Of the nearly 40,000 commits in the Git source code history, this command shows the 6 that match those criteria.
|
Tip
|
Preventing the display of merge commits
Depending on the workflow used in your repository, it’s possible that a sizable percentage of the commits in your log history are just merge commits, which typically aren’t very informative. To prevent the display of merge commits cluttering up your log history, simply add the log option |
Undoing Things
At any stage, you may want to undo something. Here, we’ll review a few basic tools for undoing changes that you’ve made. Be careful, because you can’t always undo some of these undos. This is one of the few areas in Git where you may lose some work if you do it wrong.
One of the common undos takes place when you commit too early and possibly forget to add some files, or you mess up your commit message. If you want to redo that commit, make the additional changes you forgot, stage them, and commit again using the --amend option:
$ git commit --amendThis command takes your staging area and uses it for the commit. If you’ve made no changes since your last commit (for instance, you run this command immediately after your previous commit), then your snapshot will look exactly the same, and all you’ll change is your commit message.
The same commit-message editor fires up, but it already contains the message of your previous commit. You can edit the message the same as always, but it overwrites your previous commit.
As an example, if you commit and then realize you forgot to stage the changes in a file you wanted to add to this commit, you can do something like this:
$ git commit -m 'Initial commit'
$ git add forgotten_file
$ git commit --amend
You end up with a single commit — the second commit replaces the results of the first.
|
Note
|
It’s important to understand that when you’re amending your last commit, you’re not so much fixing it as replacing it entirely with a new, improved commit that pushes the old commit out of the way and puts the new commit in its place. Effectively, it’s as if the previous commit never happened, and it won’t show up in your repository history. The obvious value to amending commits is to make minor improvements to your last commit, without cluttering your repository history with commit messages of the form, “Oops, forgot to add a file” or “Darn, fixing a typo in last commit”. |
|
Note
|
Only amend commits that are still local and have not been pushed somewhere. Amending previously pushed commits and force pushing the branch will cause problems for your collaborators. For more on what happens when you do this and how to recover if you’re on the receiving end read The Perils of Rebasing. |
Undoing things with git restore
Git version 2.23.0 introduced a new command: git restore. It’s basically an alternative to git reset which we just covered. From Git version 2.23.0 onwards, Git will use git restore instead of git reset for many undo operations.
Showing Your Remotes
To see which remote servers you have configured, you can run the git remote command. It lists the shortnames of each remote handle you’ve specified. If you’ve cloned your repository, you should at least see origin — that is the default name Git gives to the server you cloned from:
You can also specify -v, which shows you the URLs that Git has stored for the shortname to be used when reading and writing to that remote:
$ git remote -v
origin	https://github.com/schacon/ticgit (fetch)
origin	https://github.com/schacon/ticgit (push)
Adding Remote Repositories
We’ve mentioned and given some demonstrations of how the git clone command implicitly adds the origin remote for you. Here’s how to add a new remote explicitly. To add a new remote Git repository as a shortname you can reference easily, run git remote add <shortname> <url>:
$ git remote add pb https://github.com/paulboone/ticgitNow you can use the string pb on the command line in lieu of the whole URL. For example, if you want to fetch all the information that Paul has but that you don’t yet have in your repository, you can run git fetch pb:
$ git fetch pb
remote: Counting objects: 43, done.
remote: Compressing objects: 100% (36/36), done.
remote: Total 43 (delta 10), reused 31 (delta 5)
Unpacking objects: 100% (43/43), done.
From https://github.com/paulboone/ticgit
 * [new branch]      master     -> pb/master
 * [new branch]      ticgit     -> pb/ticgit
Paul’s master branch is now accessible locally as pb/master — you can merge it into one of your branches, or you can check out a local branch at that point if you want to inspect it. We’ll go over what branches are and how to use them in much more detail in Git Branching.
Fetching and Pulling from Your Remotes
As you just saw, to get data from your remote projects, you can run:
$ git fetch <remote>The command goes out to that remote project and pulls down all the data from that remote project that you don’t have yet. After you do this, you should have references to all the branches from that remote, which you can merge in or inspect at any time.
If you clone a repository, the command automatically adds that remote repository under the name “origin”. So, git fetch origin fetches any new work that has been pushed to that server since you cloned (or last fetched from) it. It’s important to note that the git fetch command only downloads the data to your local repository — it doesn’t automatically merge it with any of your work or modify what you’re currently working on. You have to merge it manually into your work when you’re ready.
If your current branch is set up to track a remote branch (see the next section and Git Branching for more information), you can use the git pull command to automatically fetch and then merge that remote branch into your current branch. This may be an easier or more comfortable workflow for you; and by default, the git clone command automatically sets up your local master branch to track the remote master branch (or whatever the default branch is called) on the server you cloned from. Running git pull generally fetches data from the server you originally cloned from and automatically tries to merge it into the code you’re currently working on.
|
Note
|
From git version 2.27 onward, If you want the default behavior of git (fast-forward if possible, else create a merge commit): If you want to rebase when pulling: |
Pushing to Your Remotes
When you have your project at a point that you want to share, you have to push it upstream. The command for this is simple: git push <remote> <branch>. If you want to push your master branch to your origin server (again, cloning generally sets up both of those names for you automatically), then you can run this to push any commits you’ve done back up to the server:
$ git push origin masterThis command works only if you cloned from a server to which you have write access and if nobody has pushed in the meantime. If you and someone else clone at the same time and they push upstream and then you push upstream, your push will rightly be rejected. You’ll have to fetch their work first and incorporate it into yours before you’ll be allowed to push. See Git Branching for more detailed information on how to push to remote servers.
Inspecting a Remote
If you want to see more information about a particular remote, you can use the git remote show <remote> command. If you run this command with a particular shortname, such as origin, you get something like this:
$ git remote show origin
* remote origin
  Fetch URL: https://github.com/schacon/ticgit
  Push  URL: https://github.com/schacon/ticgit
  HEAD branch: master
  Remote branches:
    master                               tracked
    dev-branch                           tracked
  Local branch configured for 'git pull':
    master merges with remote master
  Local ref configured for 'git push':
    master pushes to master (up to date)
It lists the URL for the remote repository as well as the tracking branch information. The command helpfully tells you that if you’re on the master branch and you run git pull, it will automatically merge the remote’s master branch into the local one after it has been fetched. It also lists all the remote references it has pulled down.
That is a simple example you’re likely to encounter. When you’re using Git more heavily, however, you may see much more information from git remote show:
$ git remote show origin
* remote origin
  URL: https://github.com/my-org/complex-project
  Fetch URL: https://github.com/my-org/complex-project
  Push  URL: https://github.com/my-org/complex-project
  HEAD branch: master
  Remote branches:
    master                           tracked
    dev-branch                       tracked
    markdown-strip                   tracked
    issue-43                         new (next fetch will store in remotes/origin)
    issue-45                         new (next fetch will store in remotes/origin)
    refs/remotes/origin/issue-11     stale (use 'git remote prune' to remove)
  Local branches configured for 'git pull':
    dev-branch merges with remote dev-branch
    master     merges with remote master
  Local refs configured for 'git push':
    dev-branch                     pushes to dev-branch                     (up to date)
    markdown-strip                 pushes to markdown-strip                 (up to date)
    master                         pushes to master                         (up to date)
This command shows which branch is automatically pushed to when you run git push while on certain branches. It also shows you which remote branches on the server you don’t yet have, which remote branches you have that have been removed from the server, and multiple local branches that are able to merge automatically with their remote-tracking branch when you run git pull.
Renaming and Removing Remotes
You can run git remote rename to change a remote’s shortname. For instance, if you want to rename pb to paul, you can do so with git remote rename:
$ git remote rename pb paul
$ git remote
origin
paul
It’s worth mentioning that this changes all your remote-tracking branch names, too. What used to be referenced at pb/master is now at paul/master.
If you want to remove a remote for some reason — you’ve moved the server or are no longer using a particular mirror, or perhaps a contributor isn’t contributing anymore — you can either use git remote remove or git remote rm:
$ git remote remove paul
$ git remote
origin
Once you delete the reference to a remote this way, all remote-tracking branches and configuration settings associated with that remote are also deleted.
Listing Your Tags
Listing the existing tags in Git is straightforward. Just type git tag (with optional -l or --list):
$ git tag
v1.0
v2.0
This command lists the tags in alphabetical order; the order in which they are displayed has no real importance.
You can also search for tags that match a particular pattern. The Git source repo, for instance, contains more than 500 tags. If you’re interested only in looking at the 1.8.5 series, you can run this:
$ git tag -l "v1.8.5*"Creating Tags
Git supports two types of tags: lightweight and annotated.
A lightweight tag is very much like a branch that doesn’t change — it’s just a pointer to a specific commit.
Annotated tags, however, are stored as full objects in the Git database. They’re checksummed; contain the tagger name, email, and date; have a tagging message; and can be signed and verified with GNU Privacy Guard (GPG). It’s generally recommended that you create annotated tags so you can have all this information; but if you want a temporary tag or for some reason don’t want to keep the other information, lightweight tags are available too.
Annotated Tags
Creating an annotated tag in Git is simple. The easiest way is to specify -a when you run the tag command:
$ git tag -a v1.4 -m "my version 1.4"Lightweight Tags
Another way to tag commits is with a lightweight tag. This is basically the commit checksum stored in a file — no other information is kept. To create a lightweight tag, don’t supply any of the -a, -s, or -m options, just provide a tag name:
$ git tag v1.4-lwTagging Later
You can also tag commits after you’ve moved past them. Suppose your commit history looks like this:
$ git log --pretty=oneline
9fceb02d0ae598e95dc970b74767f19372d61af8 Update rakefile
964f16d36dfccde844893cac5b347e7b3d44abbc Commit the todo
8a5cbc430f1a9c3d00faaeffd07798508422908a Update readme
Now, suppose you forgot to tag the project at v1.2, which was at the “Update rakefile” commit. You can add it after the fact. To tag that commit, you specify the commit checksum (or part of it) at the end of the command:
$ git tag -a v1.2 9fceb02Sharing Tags
By default, the git push command doesn’t transfer tags to remote servers. You will have to explicitly push tags to a shared server after you have created them. This process is just like sharing remote branches — you can run git push origin <tagname>.
$ git push origin v1.5
Counting objects: 14, done.
Delta compression using up to 8 threads.
Compressing objects: 100% (12/12), done.
Writing objects: 100% (14/14), 2.05 KiB | 0 bytes/s, done.
Total 14 (delta 3), reused 0 (delta 0)
To git@github.com:schacon/simplegit.git
 * [new tag]         v1.5 -> v1.5
If you have a lot of tags that you want to push up at once, you can also use the --tags option to the git push command. This will transfer all of your tags to the remote server that are not already there.
$ git push origin --tags
Counting objects: 1, done.
Writing objects: 100% (1/1), 160 bytes | 0 bytes/s, done.
Total 1 (delta 0), reused 0 (delta 0)
To git@github.com:schacon/simplegit.git
 * [new tag]         v1.4 -> v1.4
 * [new tag]         v1.4-lw -> v1.4-lw
Now, when someone else clones or pulls from your repository, they will get all your tags as well.
|
Note
|
git push pushes both types of tags
|
Deleting Tags
To delete a tag on your local repository, you can use git tag -d <tagname>. For example, we could remove our lightweight tag above as follows:
$ git tag -d v1.4-lw
Deleted tag 'v1.4-lw' (was e7d5add)
Note that this does not remove the tag from any remote servers. There are two common variations for deleting a tag from a remote server.
The first variation is git push <remote> :refs/tags/<tagname>:
$ git push origin :refs/tags/v1.4-lw
To /git@github.com:schacon/simplegit.git
 - [deleted]         v1.4-lw
The way to interpret the above is to read it as the null value before the colon is being pushed to the remote tag name, effectively deleting it.
The second (and more intuitive) way to delete a remote tag is with:
$ git push origin --delete <tagname>Checking out Tags
If you want to view the versions of files a tag is pointing to, you can do a git checkout of that tag, although this puts your repository in “detached HEAD” state, which has some ill side effects:
$ git checkout v2.0.0
Note: switching to 'v2.0.0'.

You are in 'detached HEAD' state. You can look around, make experimental
changes and commit them, and you can discard any commits you make in this
state without impacting any branches by performing another checkout.

If you want to create a new branch to retain commits you create, you may
do so (now or later) by using -c with the switch command. Example:

  git switch -c <new-branch-name>

Or undo this operation with:

  git switch -

Turn off this advice by setting config variable advice.detachedHead to false

HEAD is now at 99ada87... Merge pull request #89 from schacon/appendix-final

$ git checkout v2.0-beta-0.1
Previous HEAD position was 99ada87... Merge pull request #89 from schacon/appendix-final
HEAD is now at df3f601... Add atlas.json and cover image
In “detached HEAD” state, if you make changes and then create a commit, the tag will stay the same, but your new commit won’t belong to any branch and will be unreachable, except by the exact commit hash. Thus, if you need to make changes — say you’re fixing a bug on an older version, for instance — you will generally want to create a branch:
$ git checkout -b version2 v2.0.0
Switched to a new branch 'version2'
If you do this and make a commit, your version2 branch will be slightly different than your v2.0.0 tag since it will move forward with your new changes, so do be careful.
Creating a New Branch
You do this with the git branch command:
$ git branch testingThis creates a new pointer to the same commit you’re currently on.
How does Git know what branch you’re currently on? It keeps a special pointer called HEAD.
In Git, this is a pointer to the local branch you’re currently on. In this case, you’re still on master. The git branch command only created a new branch — it didn’t switch to that branch.
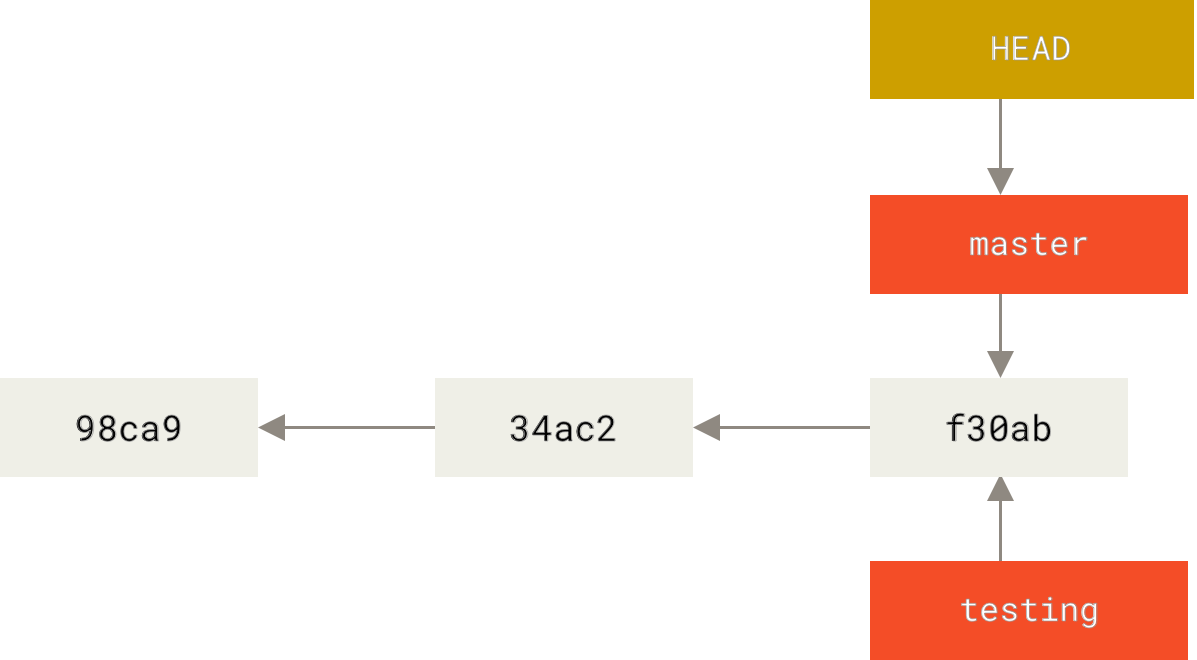
You can easily see this by running a simple git log command that shows you where the branch pointers are pointing. This option is called --decorate.
$ git log --oneline --decorate
f30ab (HEAD -> master, testing) Add feature #32 - ability to add new formats to the central interface
34ac2 Fix bug #1328 - stack overflow under certain conditions
98ca9 Initial commit
You can see the master and testing branches that are right there next to the f30ab commit.
Switching Branches
To switch to an existing branch, you run the git checkout command. Let’s switch to the new testing branch:
$ git checkout testingThis moves HEAD to point to the testing branch.
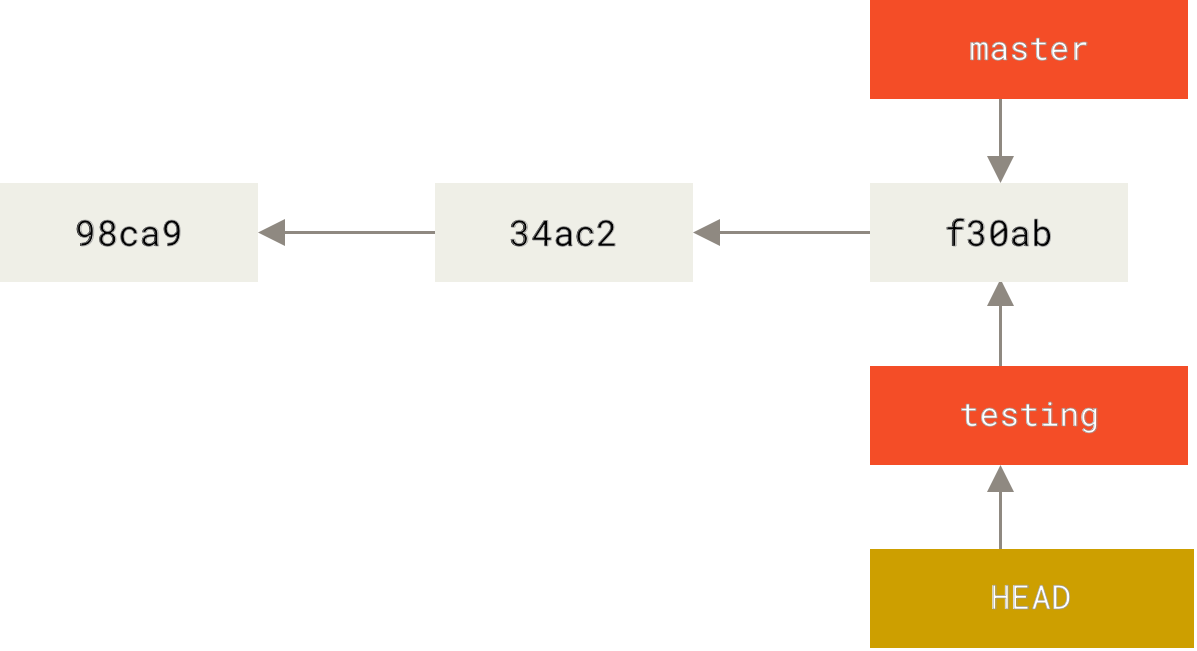
Well, let’s do another commit:
$ vim test.rb
$ git commit -a -m 'made a change'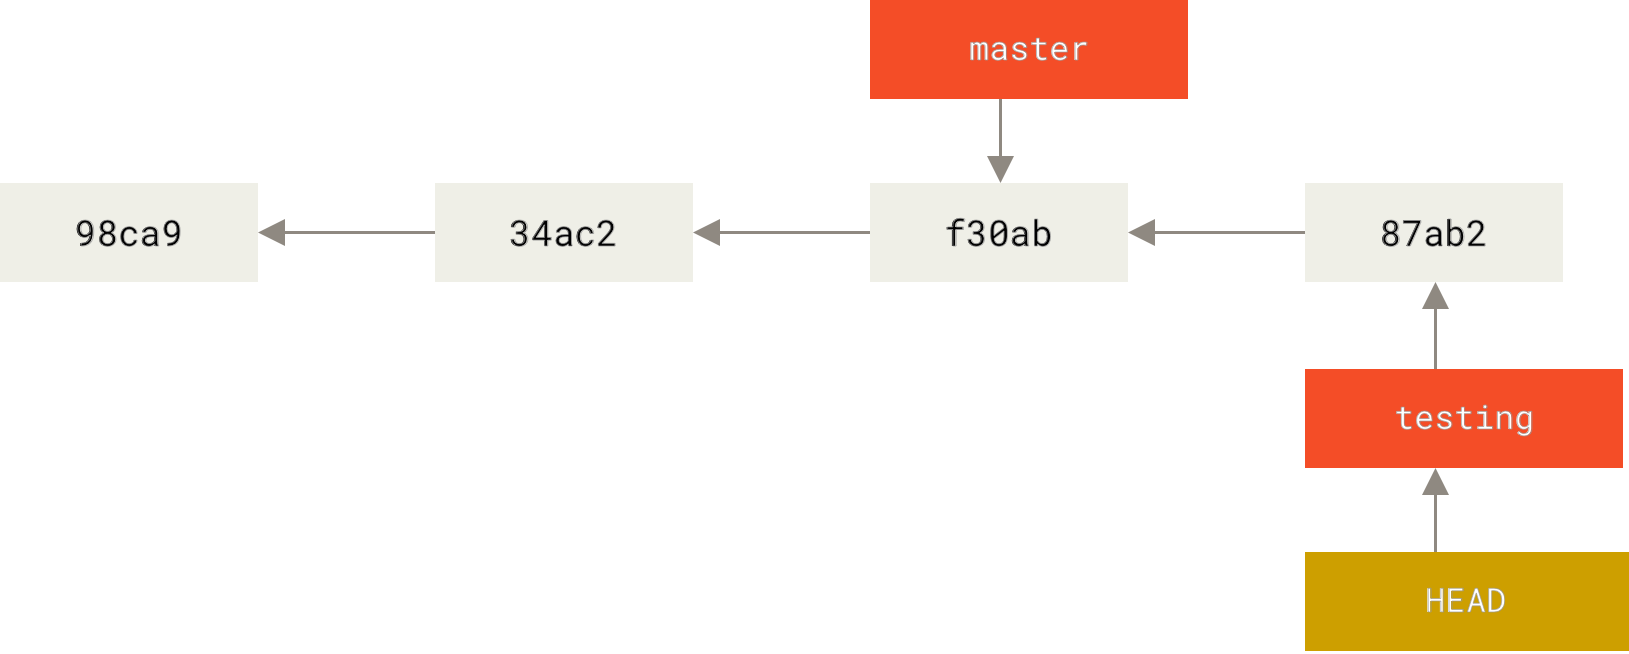
$ git checkout master|
Note
|
git log doesn’t show all the branches all the timeIf you were to run The branch hasn’t disappeared; Git just doesn’t know that you’re interested in that branch and it is trying to show you what it thinks you’re interested in. In other words, by default, To show commit history for the desired branch you have to explicitly specify it: |
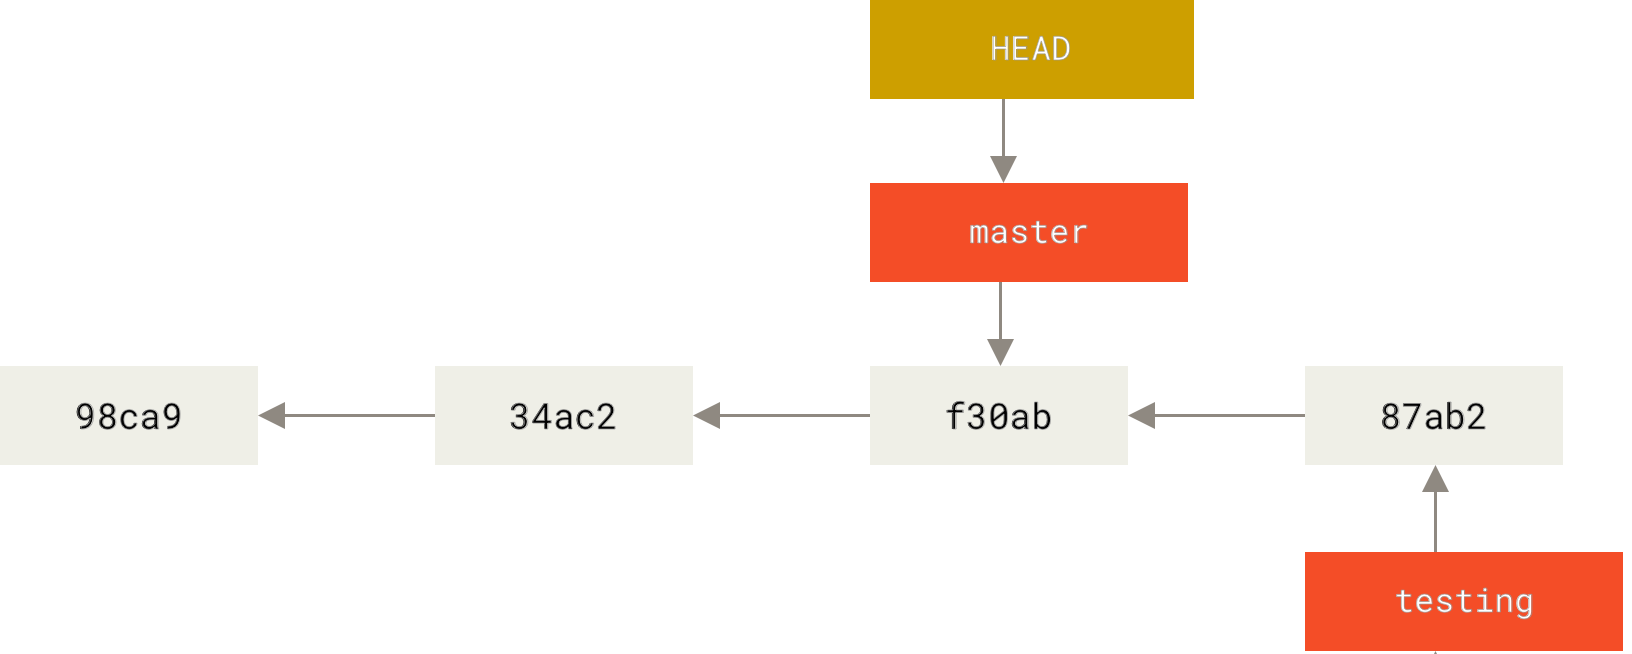
That command did two things. It moved the HEAD pointer back to point to the master branch, and it reverted the files in your working directory back to the snapshot that master points to. This also means the changes you make from this point forward will diverge from an older version of the project. It essentially rewinds the work you’ve done in your testing branch so you can go in a different direction.
|
Note
|
Switching branches changes files in your working directory
It’s important to note that when you switch branches in Git, files in your working directory will change. If you switch to an older branch, your working directory will be reverted to look like it did the last time you committed on that branch. If Git cannot do it cleanly, it will not let you switch at all. |
Let’s make a few changes and commit again:
$ vim test.rb
$ git commit -a -m 'made other changes'
Now your project history has diverged (see Divergent history). You created and switched to a branch, did some work on it, and then switched back to your main branch and did other work. Both of those changes are isolated in separate branches: you can switch back and forth between the branches and merge them together when you’re ready. And you did all that with simple branch, checkout, and commit commands.
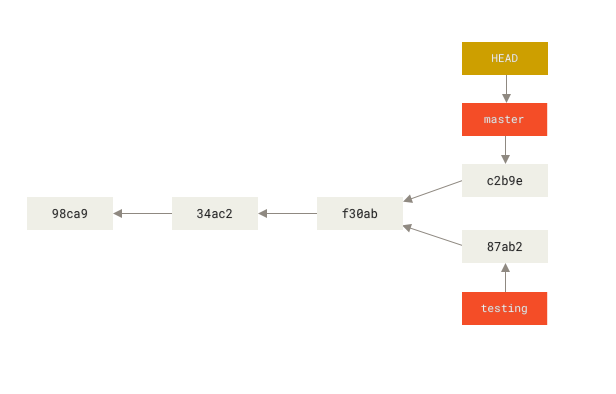
You can also see this easily with the git log command. If you run git log --oneline --decorate --graph --all it will print out the history of your commits, showing where your branch pointers are and how your history has diverged.
$ git log --oneline --decorate --graph --all
* c2b9e (HEAD, master) Made other changes
| * 87ab2 (testing) Made a change
|/
* f30ab Add feature #32 - ability to add new formats to the central interface
* 34ac2 Fix bug #1328 - stack overflow under certain conditions
* 98ca9 initial commit of my project
Because a branch in Git is actually a simple file that contains the 40 character SHA-1 checksum of the commit it points to, branches are cheap to create and destroy. Creating a new branch is as quick and simple as writing 41 bytes to a file (40 characters and a newline).
Let’s see why you should do so.
|
Note
|
Creating a new branch and switching to it at the same time
It’s typical to create a new branch and want to switch to that new branch at the same time — this can be done in one operation with |
|
Note
|
From Git version 2.23 onwards you can use
|
Basic Branching

$ git checkout -b iss53
Switched to a new branch "iss53"
This is shorthand for:
$ git branch iss53
$ git checkout iss53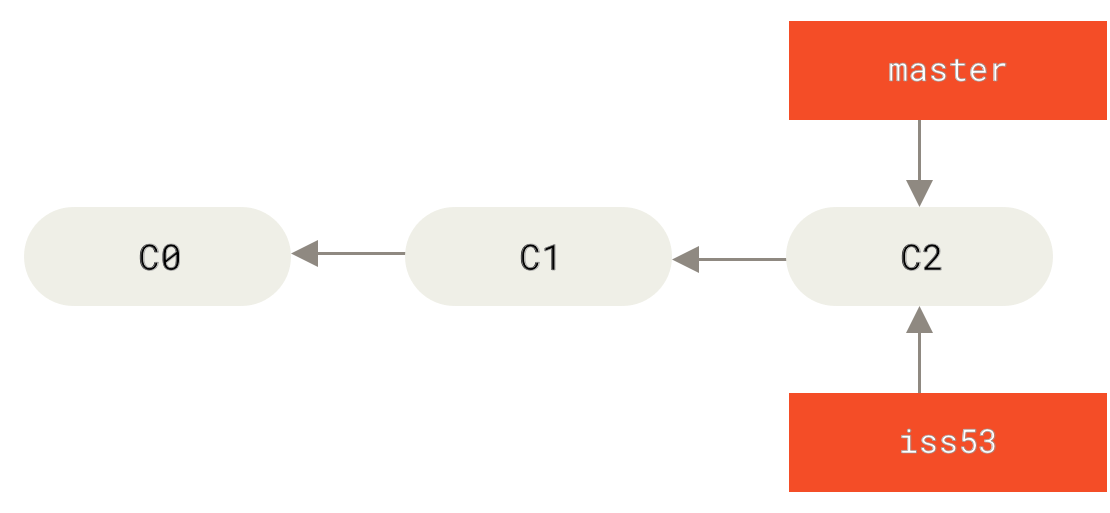
$ vim index.html
$ git commit -a -m 'Create new footer [issue 53]'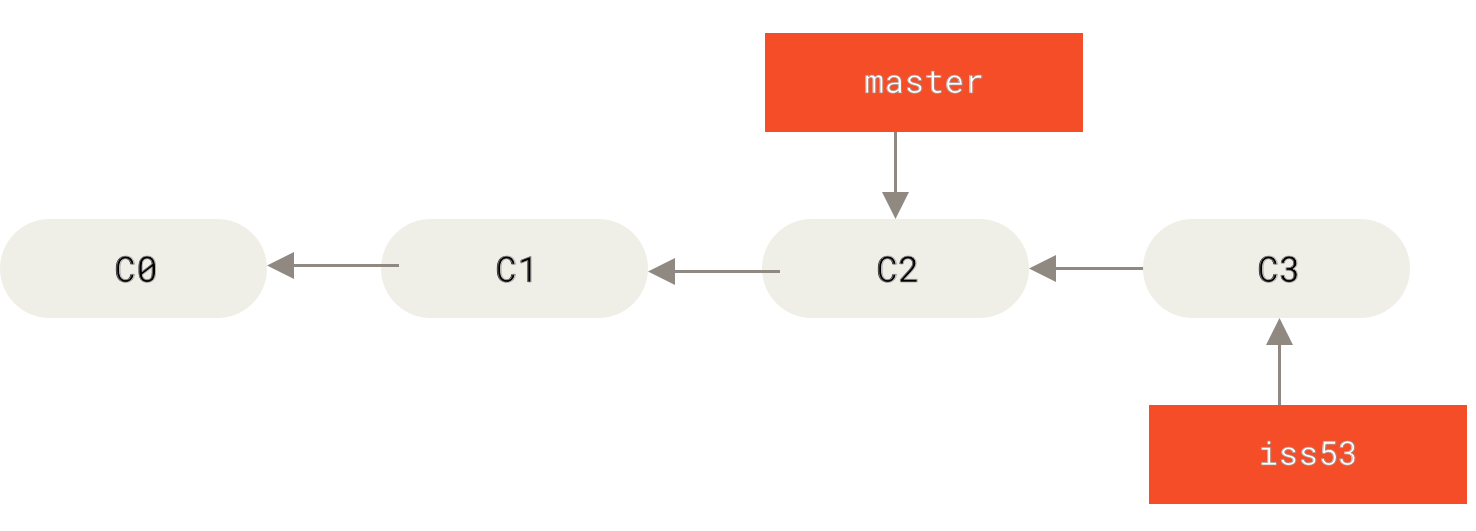
iss53 changes you’ve made, and you don’t have to put a lot of effort into reverting those changes before you can work on applying your fix to what is in production. All you have to do is switch back to your master branch.However, before you do that, note that if your working directory or staging area has uncommitted changes that conflict with the branch you’re checking out, Git won’t let you switch branches. It’s best to have a clean working state when you switch branches. There are ways to get around this (namely, stashing and commit amending) that we’ll cover later on, in Stashing and Cleaning. For now, let’s assume you’ve committed all your changes, so you can switch back to your master branch:
$ git checkout master
Switched to branch 'master'
At this point, your project working directory is exactly the way it was before you started working on issue #53, and you can concentrate on your hotfix. This is an important point to remember: when you switch branches, Git resets your working directory to look like it did the last time you committed on that branch. It adds, removes, and modifies files automatically to make sure your working copy is what the branch looked like on your last commit to it.
Next, you have a hotfix to make. Let’s create a hotfix branch on which to work until it’s completed:
$ git checkout -b hotfix
Switched to a new branch 'hotfix'
$ vim index.html
$ git commit -a -m 'Fix broken email address'
[hotfix 1fb7853] Fix broken email address
 1 file changed, 2 insertions(+)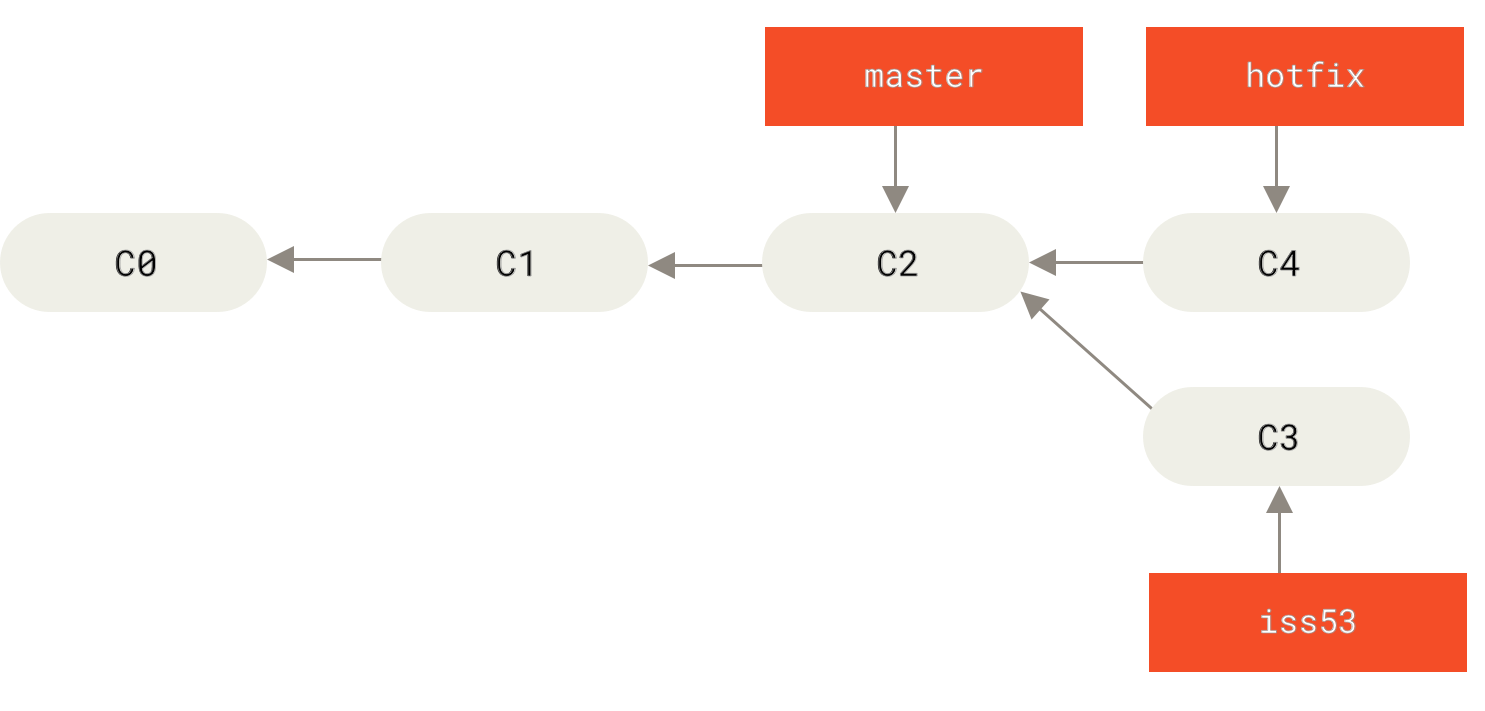
hotfix branch back into your master branch to deploy to production. You do this with the git merge command:$ git checkout master
$ git merge hotfix
Updating f42c576..3a0874c
Fast-forward
index.html | 2 ++
1 file changed, 2 insertions(+)You’ll notice the phrase “fast-forward” in that merge. Because the commit C4 pointed to by the branch hotfix you merged in was directly ahead of the commit C2 you’re on, Git simply moves the pointer forward. To phrase that another way, when you try to merge one commit with a commit that can be reached by following the first commit’s history, Git simplifies things by moving the pointer forward because there is no divergent work to merge together — this is called a “fast-forward.”
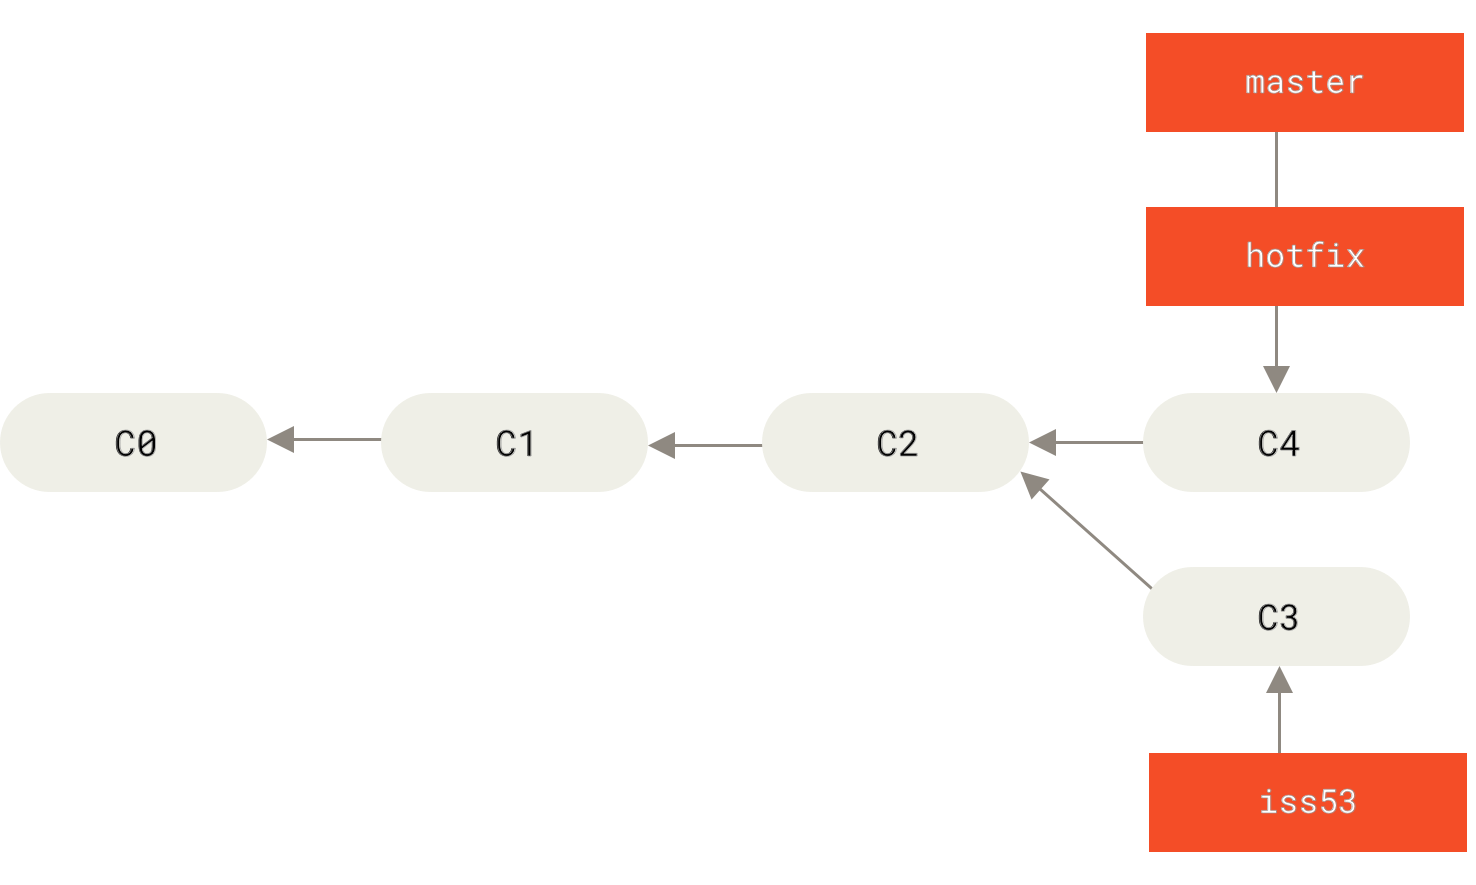
hotfix branch, because you no longer need it — the master branch points at the same place. You can delete it with the -d option to git branch:$ git branch -d hotfix
Deleted branch hotfix (3a0874c).Now you can switch back to your work-in-progress branch on issue #53 and continue working on it.
$ git checkout iss53
Switched to branch "iss53"
$ vim index.html
$ git commit -a -m 'Finish the new footer [issue 53]'
[iss53 ad82d7a] Finish the new footer [issue 53]
1 file changed, 1 insertion(+)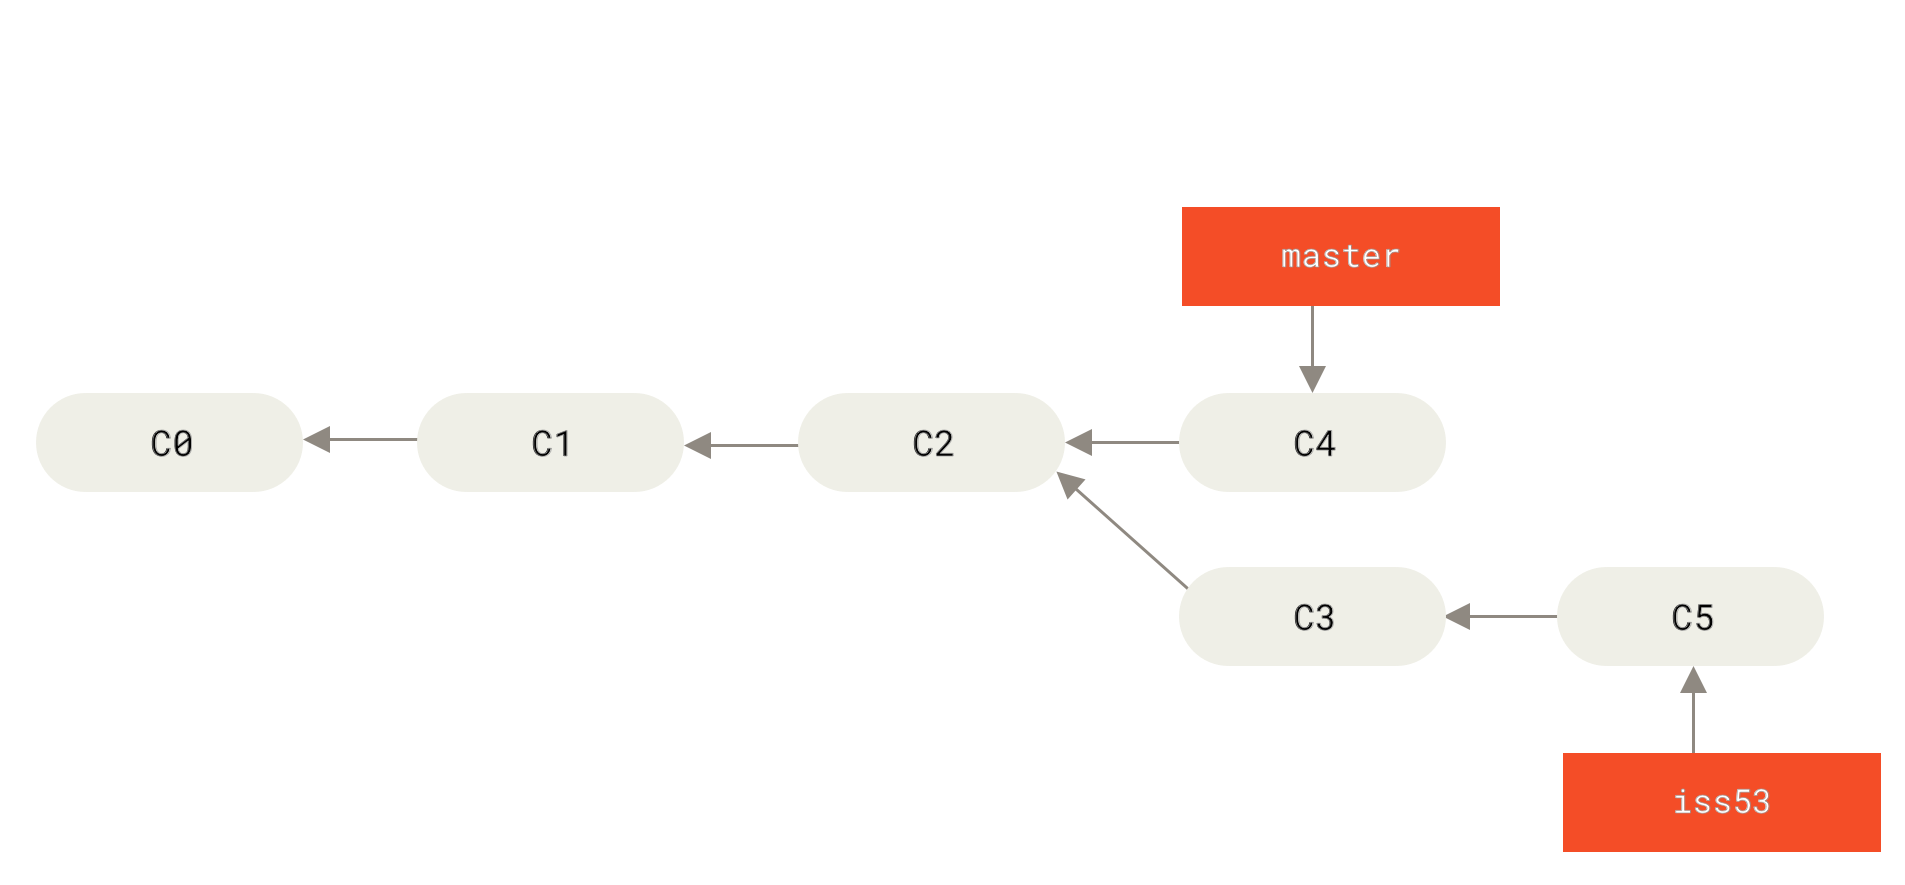
hotfix branch is not contained in the files in your iss53 branch. If you need to pull it in, you can merge your master branch into your iss53 branch by running git merge master, or you can wait to integrate those changes until you decide to pull the iss53 branch back into master later.Basic Merging
Suppose you’ve decided that your issue #53 work is complete and ready to be merged into your master branch. In order to do that, you’ll merge your iss53 branch into master, much like you merged your hotfix branch earlier. All you have to do is check out the branch you wish to merge into and then run the git merge command:
$ git checkout master
Switched to branch 'master'
$ git merge iss53
Merge made by the 'recursive' strategy.
index.html |    1 +
1 file changed, 1 insertion(+)
In this case, Git does a simple three-way merge, using the two snapshots pointed to by the branch tips and the common ancestor of the two.
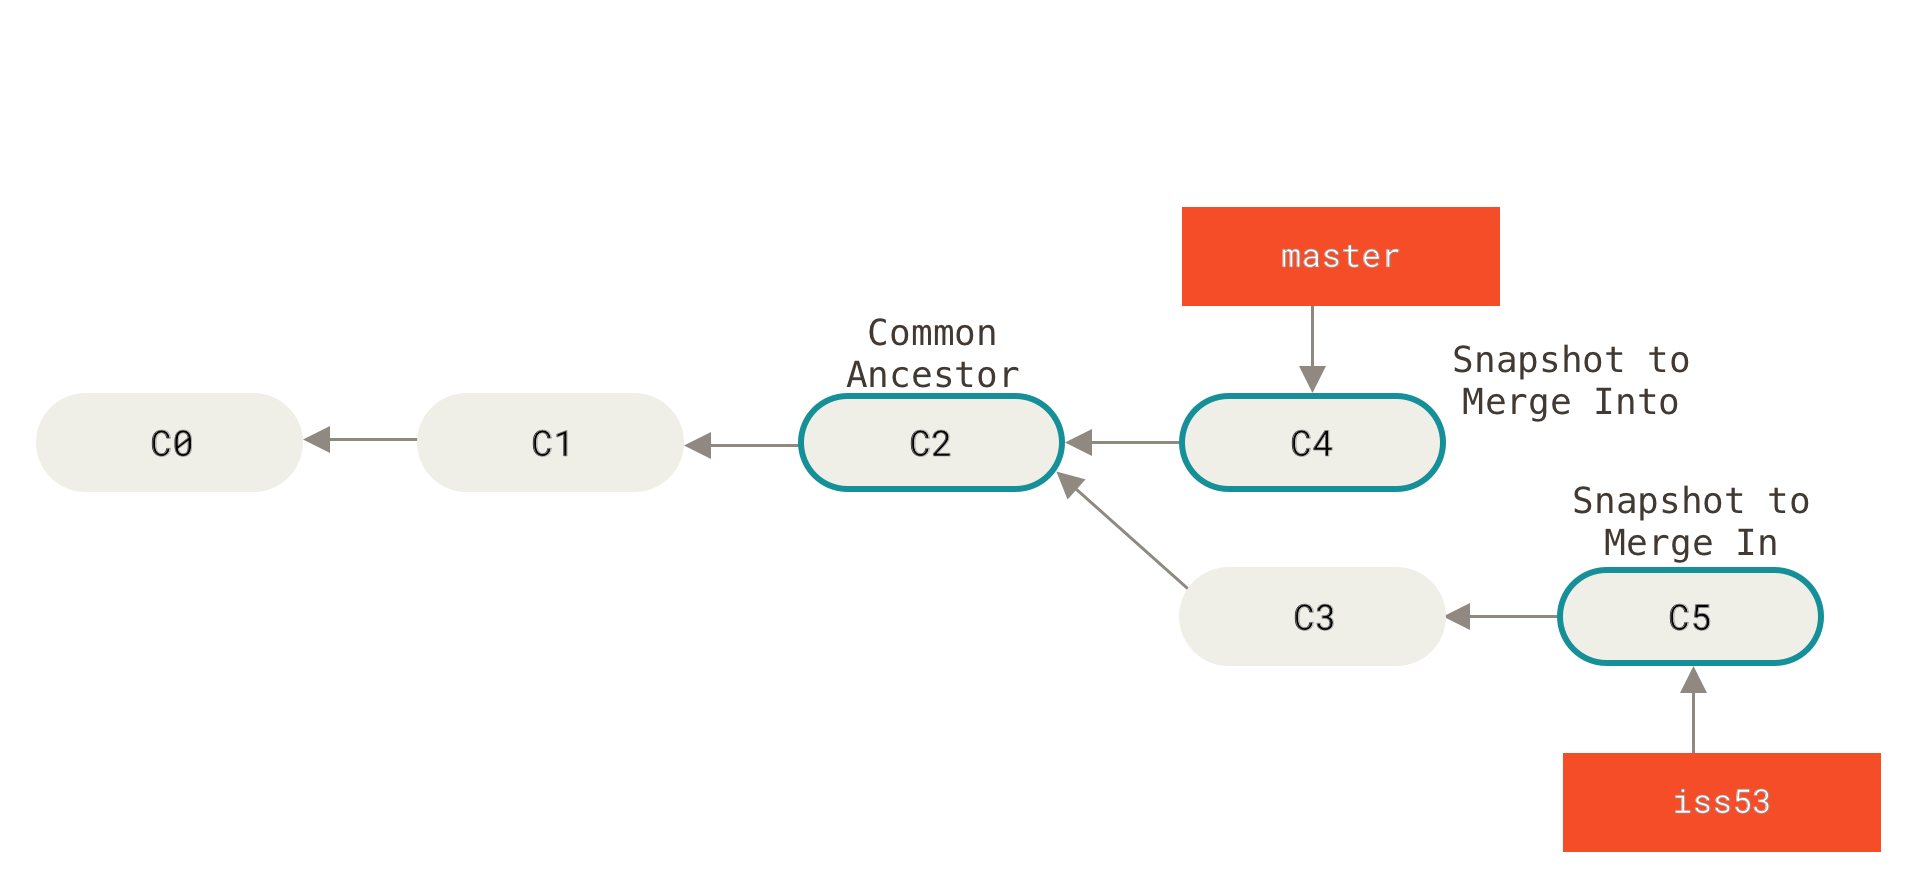
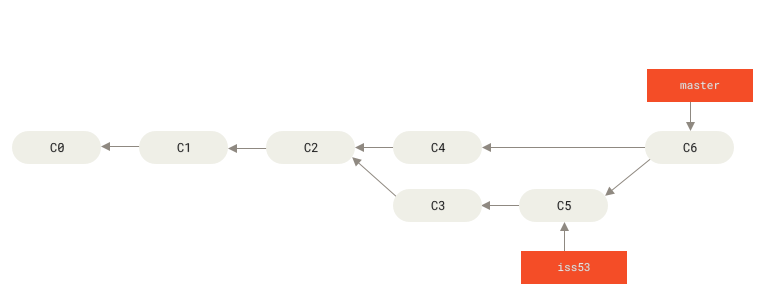
iss53 branch. You can close the issue in your issue-tracking system, and delete the branch:$ git branch -d iss53Basic Merge Conflicts
Occasionally, this process doesn’t go smoothly. If you changed the same part of the same file differently in the two branches you’re merging, Git won’t be able to merge them cleanly. If your fix for issue #53 modified the same part of a file as the hotfix branch, you’ll get a merge conflict that looks something like this:
$ git merge iss53
Auto-merging index.html
CONFLICT (content): Merge conflict in index.html
Automatic merge failed; fix conflicts and then commit the result.
Git hasn’t automatically created a new merge commit. It has paused the process while you resolve the conflict. If you want to see which files are unmerged at any point after a merge conflict, you can run git status:
$ git status
On branch master
You have unmerged paths.
  (fix conflicts and run "git commit")

Unmerged paths:
  (use "git add <file>..." to mark resolution)

    both modified:      index.html

no changes added to commit (use "git add" and/or "git commit -a")
Anything that has merge conflicts and hasn’t been resolved is listed as unmerged. Git adds standard conflict-resolution markers to the files that have conflicts, so you can open them manually and resolve those conflicts. Your file contains a section that looks something like this:
<<<<<<< HEAD:index.html
<div id="footer">contact : email.support@github.com</div>
=======
<div id="footer">
 please contact us at support@github.com
</div>
>>>>>>> iss53:index.html
This means the version in HEAD (your master branch, because that was what you had checked out when you ran your merge command) is the top part of that block (everything above the =======), while the version in your iss53 branch looks like everything in the bottom part. In order to resolve the conflict, you have to either choose one side or the other or merge the contents yourself. For instance, you might resolve this conflict by replacing the entire block with this:
<div id="footer">
please contact us at email.support@github.com
</div>
This resolution has a little of each section, and the <<<<<<<, =======, and >>>>>>> lines have been completely removed. After you’ve resolved each of these sections in each conflicted file, run git add on each file to mark it as resolved. Staging the file marks it as resolved in Git.
If you want to use a graphical tool to resolve these issues, you can run git mergetool, which fires up an appropriate visual merge tool and walks you through the conflicts:
$ git mergetool

This message is displayed because 'merge.tool' is not configured.
See 'git mergetool --tool-help' or 'git help config' for more details.
'git mergetool' will now attempt to use one of the following tools:
opendiff kdiff3 tkdiff xxdiff meld tortoisemerge gvimdiff diffuse diffmerge ecmerge p4merge araxis bc3 codecompare vimdiff emerge
Merging:
index.html

Normal merge conflict for 'index.html':
  {local}: modified file
  {remote}: modified file
Hit return to start merge resolution tool (opendiff):
If you want to use a merge tool other than the default (Git chose opendiff in this case because the command was run on a Mac), you can see all the supported tools listed at the top after “one of the following tools.” Just type the name of the tool you’d rather use.
|
Note
|
If you need more advanced tools for resolving tricky merge conflicts, we cover more on merging in Advanced Merging. |
After you exit the merge tool, Git asks you if the merge was successful. If you tell the script that it was, it stages the file to mark it as resolved for you. You can run git status again to verify that all conflicts have been resolved:
$ git status
On branch master
All conflicts fixed but you are still merging.
  (use "git commit" to conclude merge)

Changes to be committed:

    modified:   index.html
If you’re happy with that, and you verify that everything that had conflicts has been staged, you can type git commit to finalize the merge commit. The commit message by default looks something like this:
Merge branch 'iss53'

Conflicts:
    index.html
#
# It looks like you may be committing a merge.
# If this is not correct, please remove the file
#	.git/MERGE_HEAD
# and try again.


# Please enter the commit message for your changes. Lines starting
# with '#' will be ignored, and an empty message aborts the commit.
# On branch master
# All conflicts fixed but you are still merging.
#
# Changes to be committed:
#	modified:   index.html
#
If you think it would be helpful to others looking at this merge in the future, you can modify this commit message with details about how you resolved the merge and explain why you did the changes you made if these are not obvious.
Branch Management
The git branch command does more than just create and delete branches. If you run it with no arguments, you get a simple listing of your current branches:
$ git branch
  iss53
* master
  testing
Notice the * character that prefixes the master branch: it indicates the branch that you currently have checked out (i.e., the branch that HEAD points to). To see the last commit on each branch, you can run git branch -v:
$ git branch -v
  iss53   93b412c Fix javascript issue
* master  7a98805 Merge branch 'iss53'
  testing 782fd34 Add scott to the author list in the readme
The useful --merged and --no-merged options can filter this list to branches that you have or have not yet merged into the branch you’re currently on. To see which branches are already merged into the branch you’re on, you can run git branch --merged:
$ git branch --merged
  iss53
* master
Because you already merged in iss53 earlier, you see it in your list. Branches on this list without the * in front of them are generally fine to delete with git branch -d; you’ve already incorporated their work into another branch, so you’re not going to lose anything.
To see all the branches that contain work you haven’t yet merged in, you can run git branch --no-merged:
$ git branch --no-merged
  testing
This shows your other branch. Because it contains work that isn’t merged in yet, trying to delete it with git branch -d will fail:
$ git branch -d testing
error: The branch 'testing' is not fully merged.
If you are sure you want to delete it, run 'git branch -D testing'.
If you really do want to delete the branch and lose that work, you can force it with -D, as the helpful message points out.
|
Tip
|
The options described above, You can always provide an additional argument to ask about the merge state with respect to some other branch without checking that other branch out first, as in, what is not merged into the |
Changing a branch name
|
Caution
|
Do not rename branches that are still in use by other collaborators. Do not rename a branch like master/main/mainline without having read the section "Changing the master branch name". |
Suppose you have a branch that is called bad-branch-name and you want to change it to corrected-branch-name, while keeping all history. You also want to change the branch name on the remote (GitHub, GitLab, other server). How do you do this?
Rename the branch locally with the git branch --move command:
$ git branch --move bad-branch-name corrected-branch-nameThis replaces your bad-branch-name with corrected-branch-name, but this change is only local for now. To let others see the corrected branch on the remote, push it:
$ git push --set-upstream origin corrected-branch-nameNow we’ll take a brief look at where we are now:
$ git branch --all
* corrected-branch-name
  main
  remotes/origin/bad-branch-name
  remotes/origin/corrected-branch-name
  remotes/origin/main
Notice that you’re on the branch corrected-branch-name and it’s available on the remote. However, the branch with the bad name is also still present there but you can delete it by executing the following command:
$ git push origin --delete bad-branch-nameNow the bad branch name is fully replaced with the corrected branch name.
Changing the master branch name
|
Warning
|
Changing the name of a branch like master/main/mainline/default will break the integrations, services, helper utilities and build/release scripts that your repository uses. Before you do this, make sure you consult with your collaborators. Also, make sure you do a thorough search through your repo and update any references to the old branch name in your code and scripts. |
Rename your local master branch into main with the following command:
$ git branch --move master mainThere’s no local master branch anymore, because it’s renamed to the main branch.
To let others see the new main branch, you need to push it to the remote. This makes the renamed branch available on the remote.
$ git push --set-upstream origin mainNow we end up with the following state:
$ git branch --all
* main
  remotes/origin/HEAD -> origin/master
  remotes/origin/main
  remotes/origin/master
Your local master branch is gone, as it’s replaced with the main branch. The main branch is present on the remote. However, the old master branch is still present on the remote. Other collaborators will continue to use the master branch as the base of their work, until you make some further changes.
Now you have a few more tasks in front of you to complete the transition:
-
Any projects that depend on this one will need to update their code and/or configuration.
-
Update any test-runner configuration files.
-
Adjust build and release scripts.
-
Redirect settings on your repo host for things like the repo’s default branch, merge rules, and other things that match branch names.
-
Update references to the old branch in documentation.
-
Close or merge any pull requests that target the old branch.
After you’ve done all these tasks, and are certain the main branch performs just as the master branch, you can delete the master branch:
$ git push origin --delete masterTopic Branches
A topic branch is a short-lived branch that you create and use for a single particular feature or related work.
Remote Branches
Remote references are references (pointers) in your remote repositories, including branches, tags, and so on. You can get a full list of remote references explicitly with git ls-remote <remote>, or git remote show <remote> for remote branches as well as more information. Remote-tracking branches are references to the state of remote branches. They’re local references that you can’t move; Git moves them for you whenever you do any network communication, to make sure they accurately represent the state of the remote repository. Think of them as bookmarks, to remind you where the branches in your remote repositories were the last time you connected to them.
Remote-tracking branch names take the form <remote>/<branch>. For instance, if you wanted to see what the master branch on your origin remote looked like as of the last time you communicated with it, you would check the origin/master branch. If you were working on an issue with a partner and they pushed up an iss53 branch, you might have your own local iss53 branch, but the branch on the server would be represented by the remote-tracking branch origin/iss53.
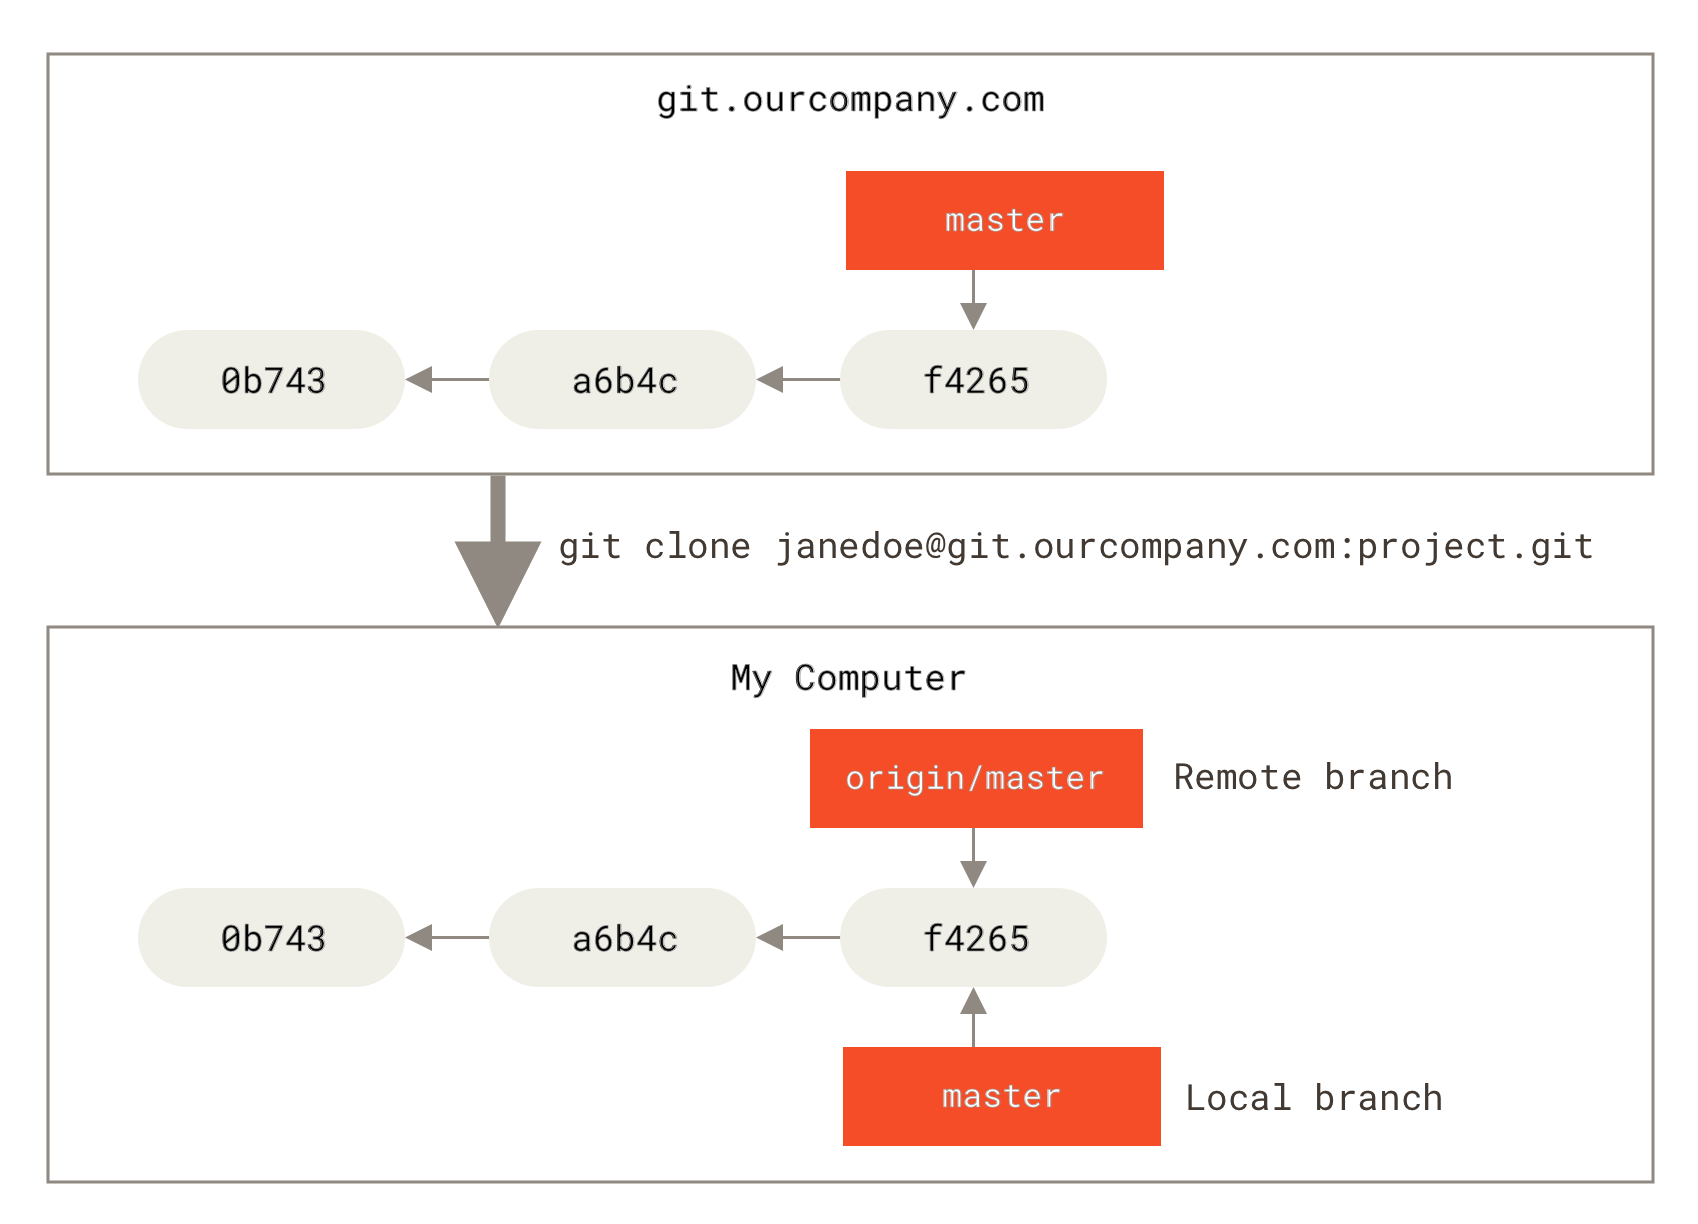
This may be a bit confusing, so let’s look at an example. Let’s say you have a Git server on your network at git.ourcompany.com. If you clone from this, Git’s clone command automatically names it origin for you, pulls down all its data, creates a pointer to where its master branch is, and names it origin/master locally. Git also gives you your own local master branch starting at the same place as origin’s master branch, so you have something to work from.
|
Note
|
“origin” is not special
Just like the branch name “master” does not have any special meaning in Git, neither does “origin”. While “master” is the default name for a starting branch when you run |
master branch, and, in the meantime, someone else pushes to git.ourcompany.com and updates its master branch, then your histories move forward differently. Also, as long as you stay out of contact with your origin server, your origin/master pointer doesn’t move.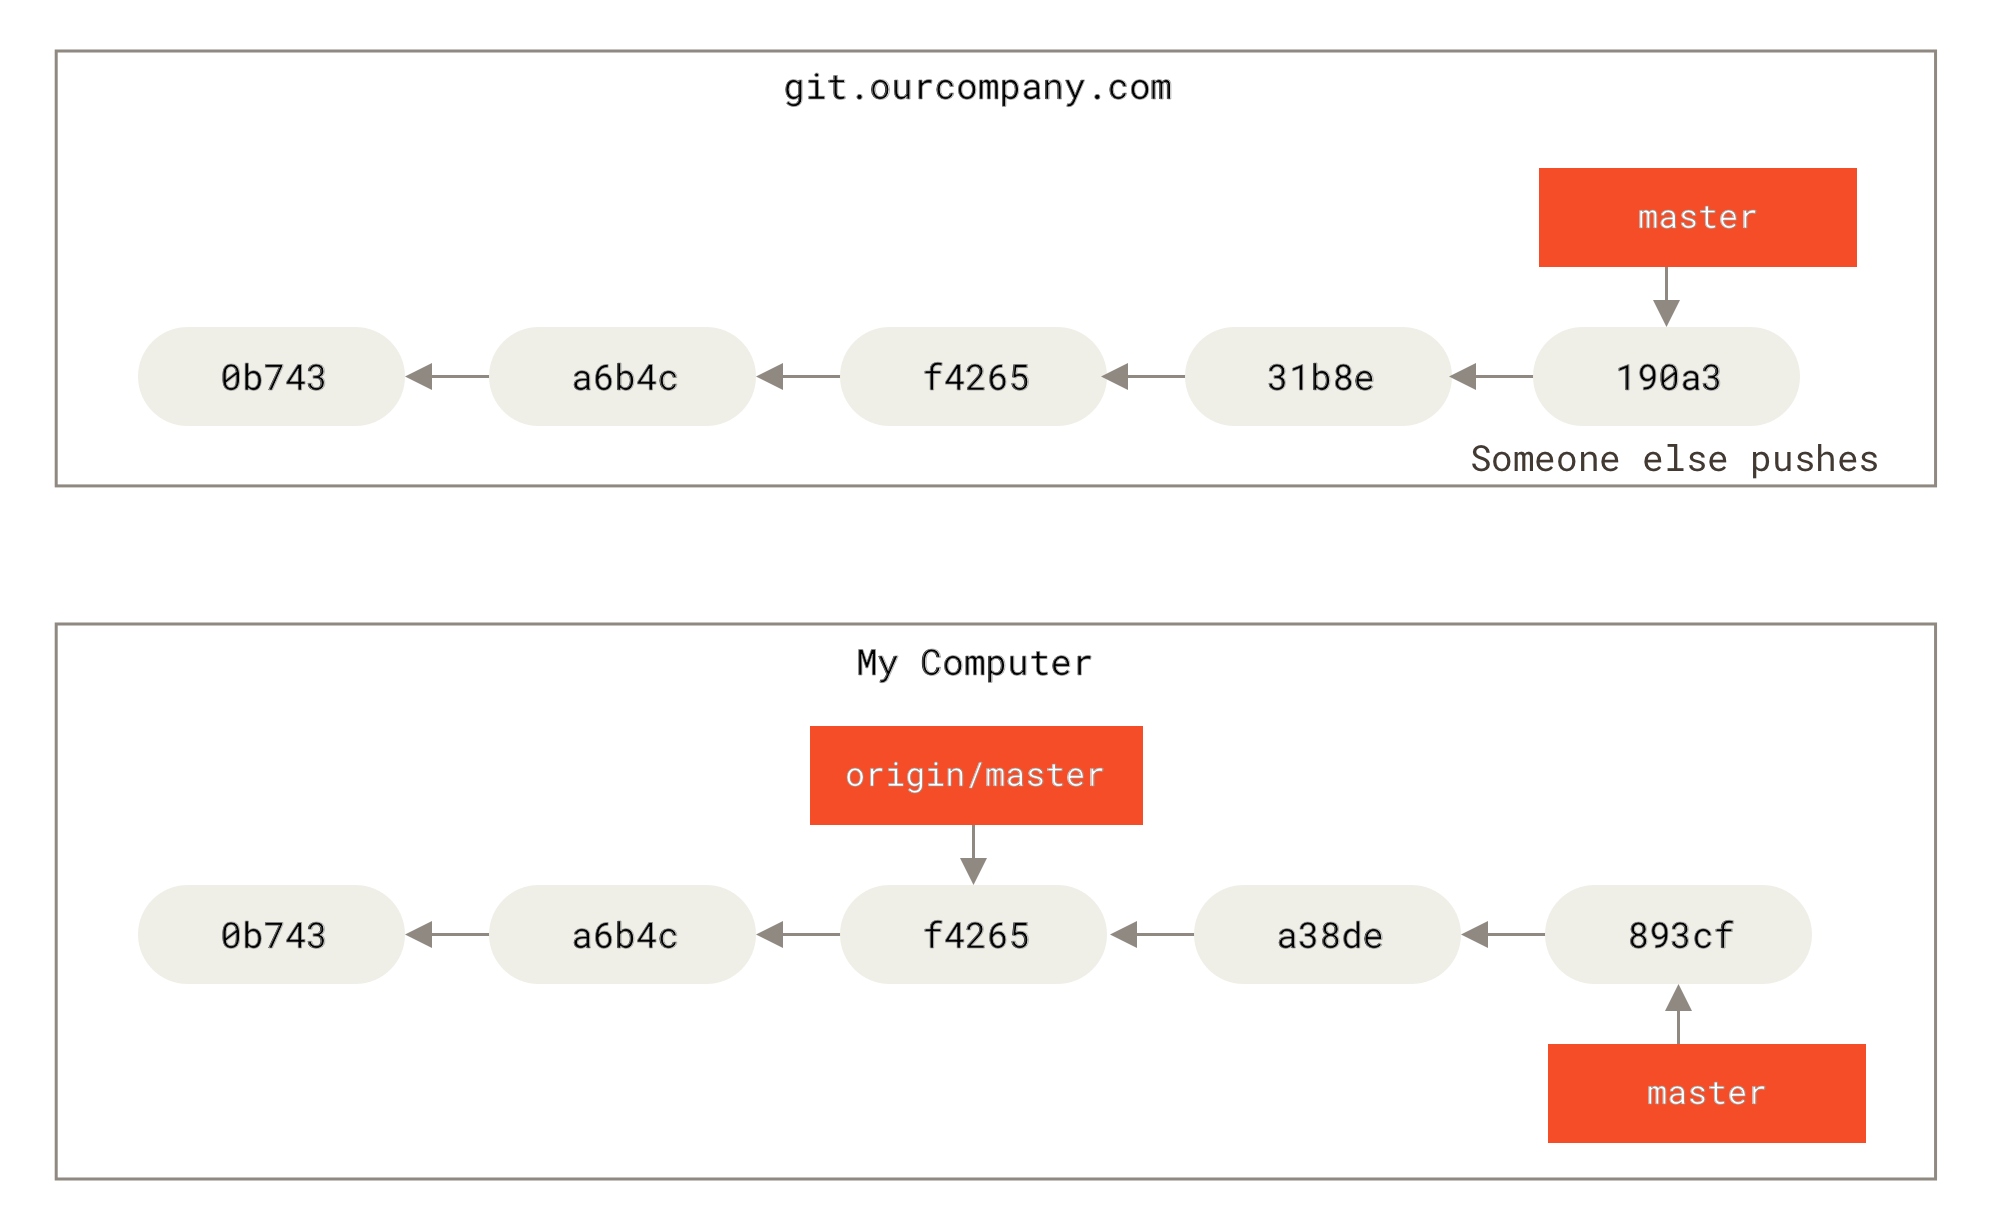
git fetch <remote> command (in our case, git fetch origin). This command looks up which server “origin” is (in this case, it’s git.ourcompany.com), fetches any data from it that you don’t yet have, and updates your local database, moving your origin/master pointer to its new, more up-to-date position.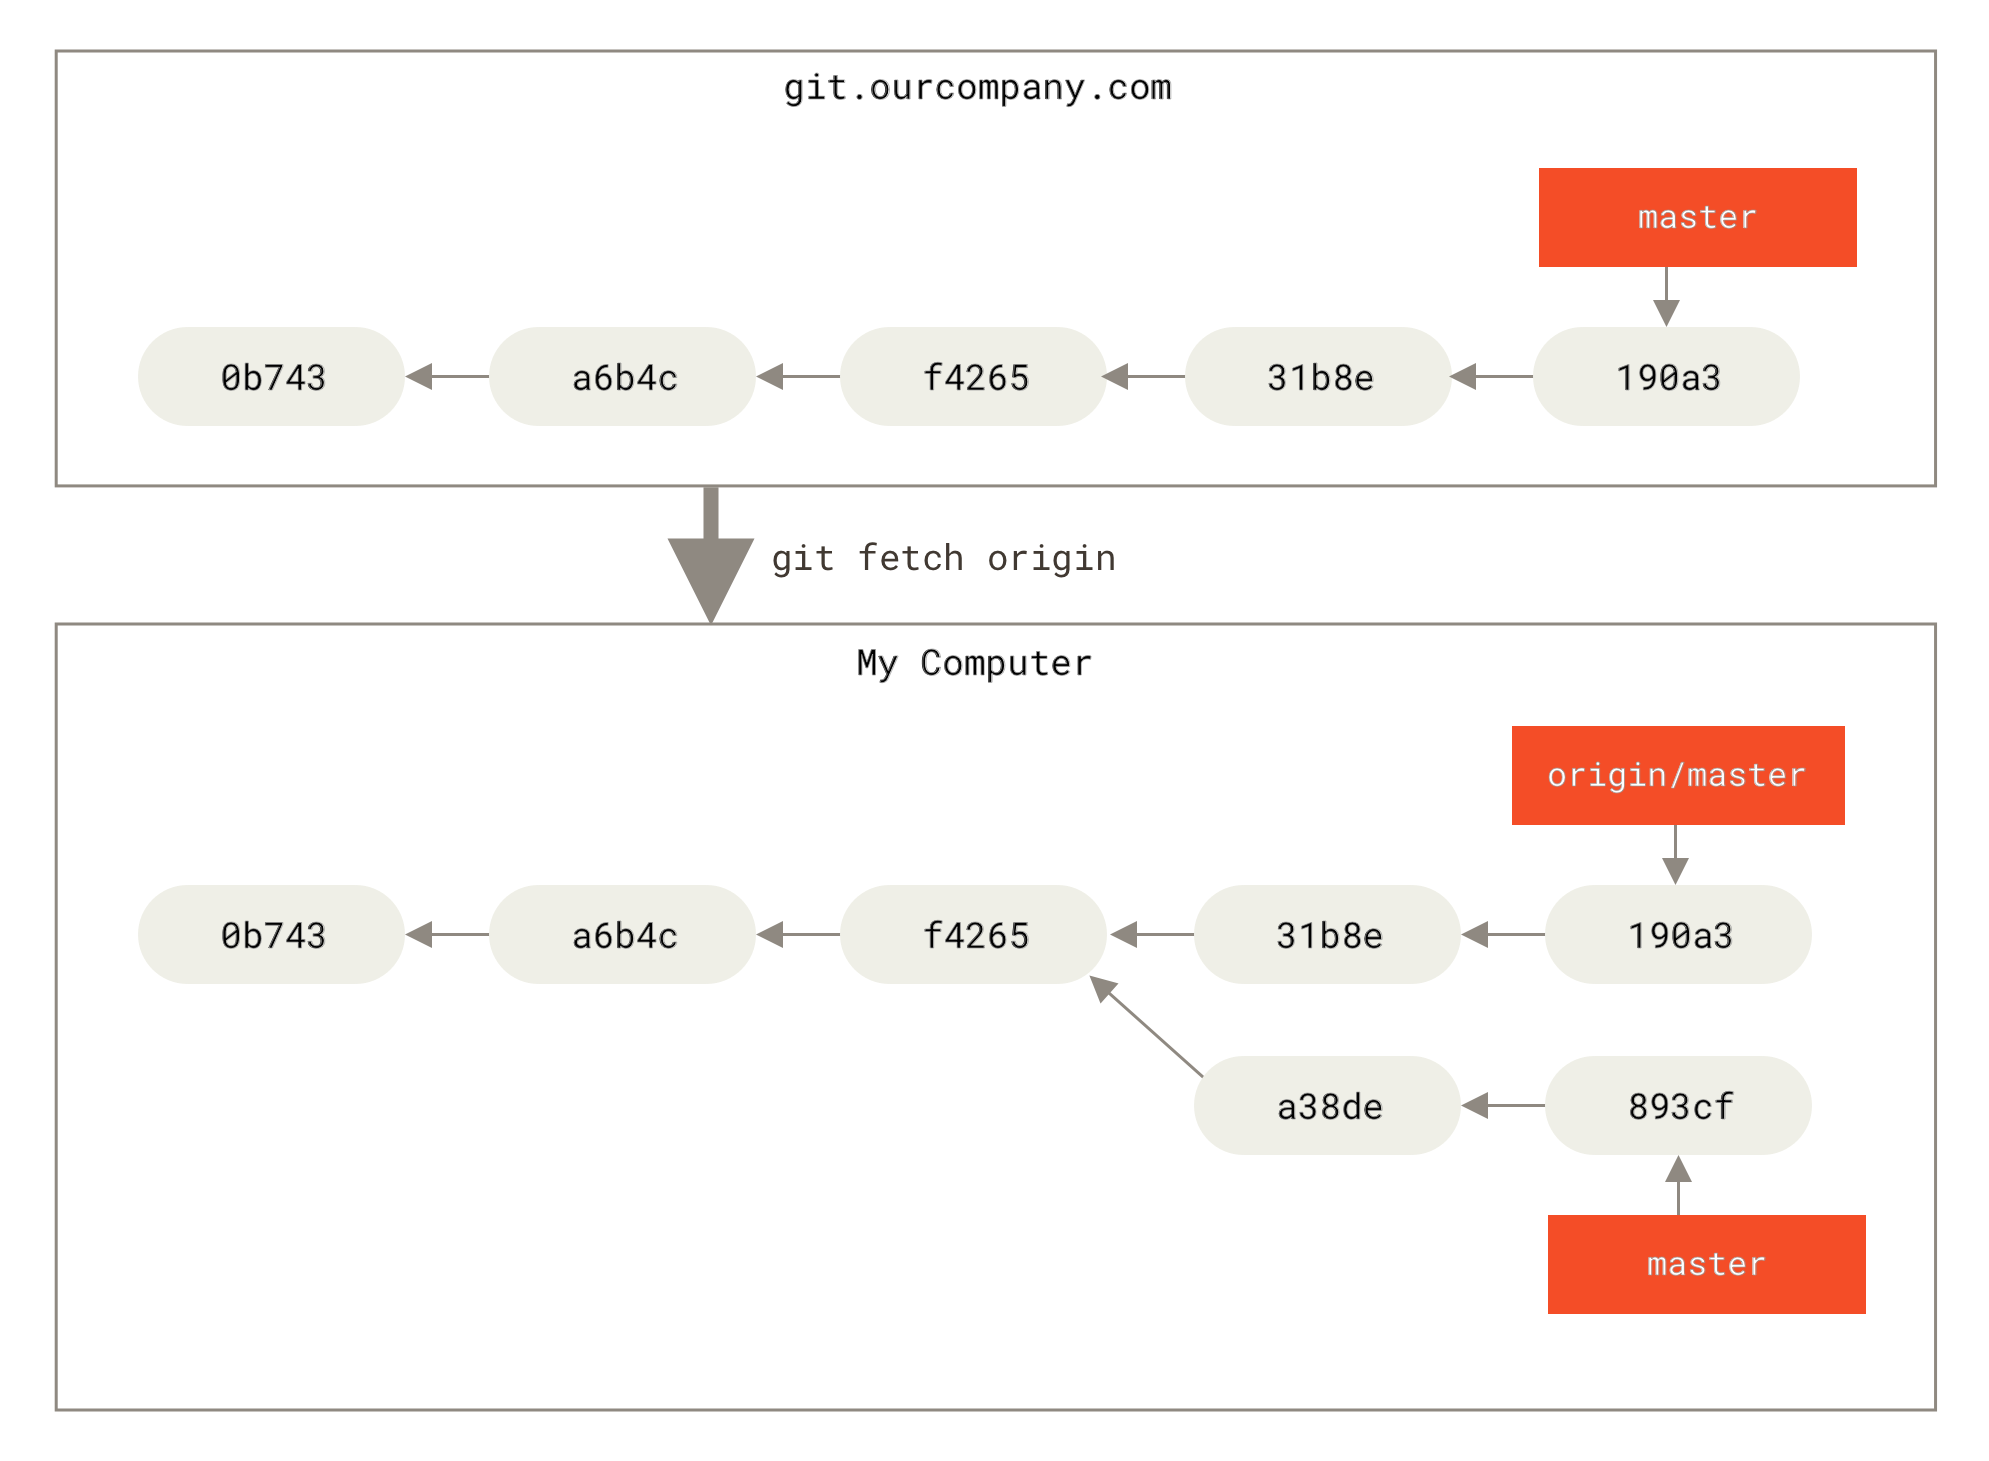
git.team1.ourcompany.com. You can add it as a new remote reference to the project you’re currently working on by running the git remote add command as we covered in Git Basics. Name this remote teamone, which will be your shortname for that whole URL.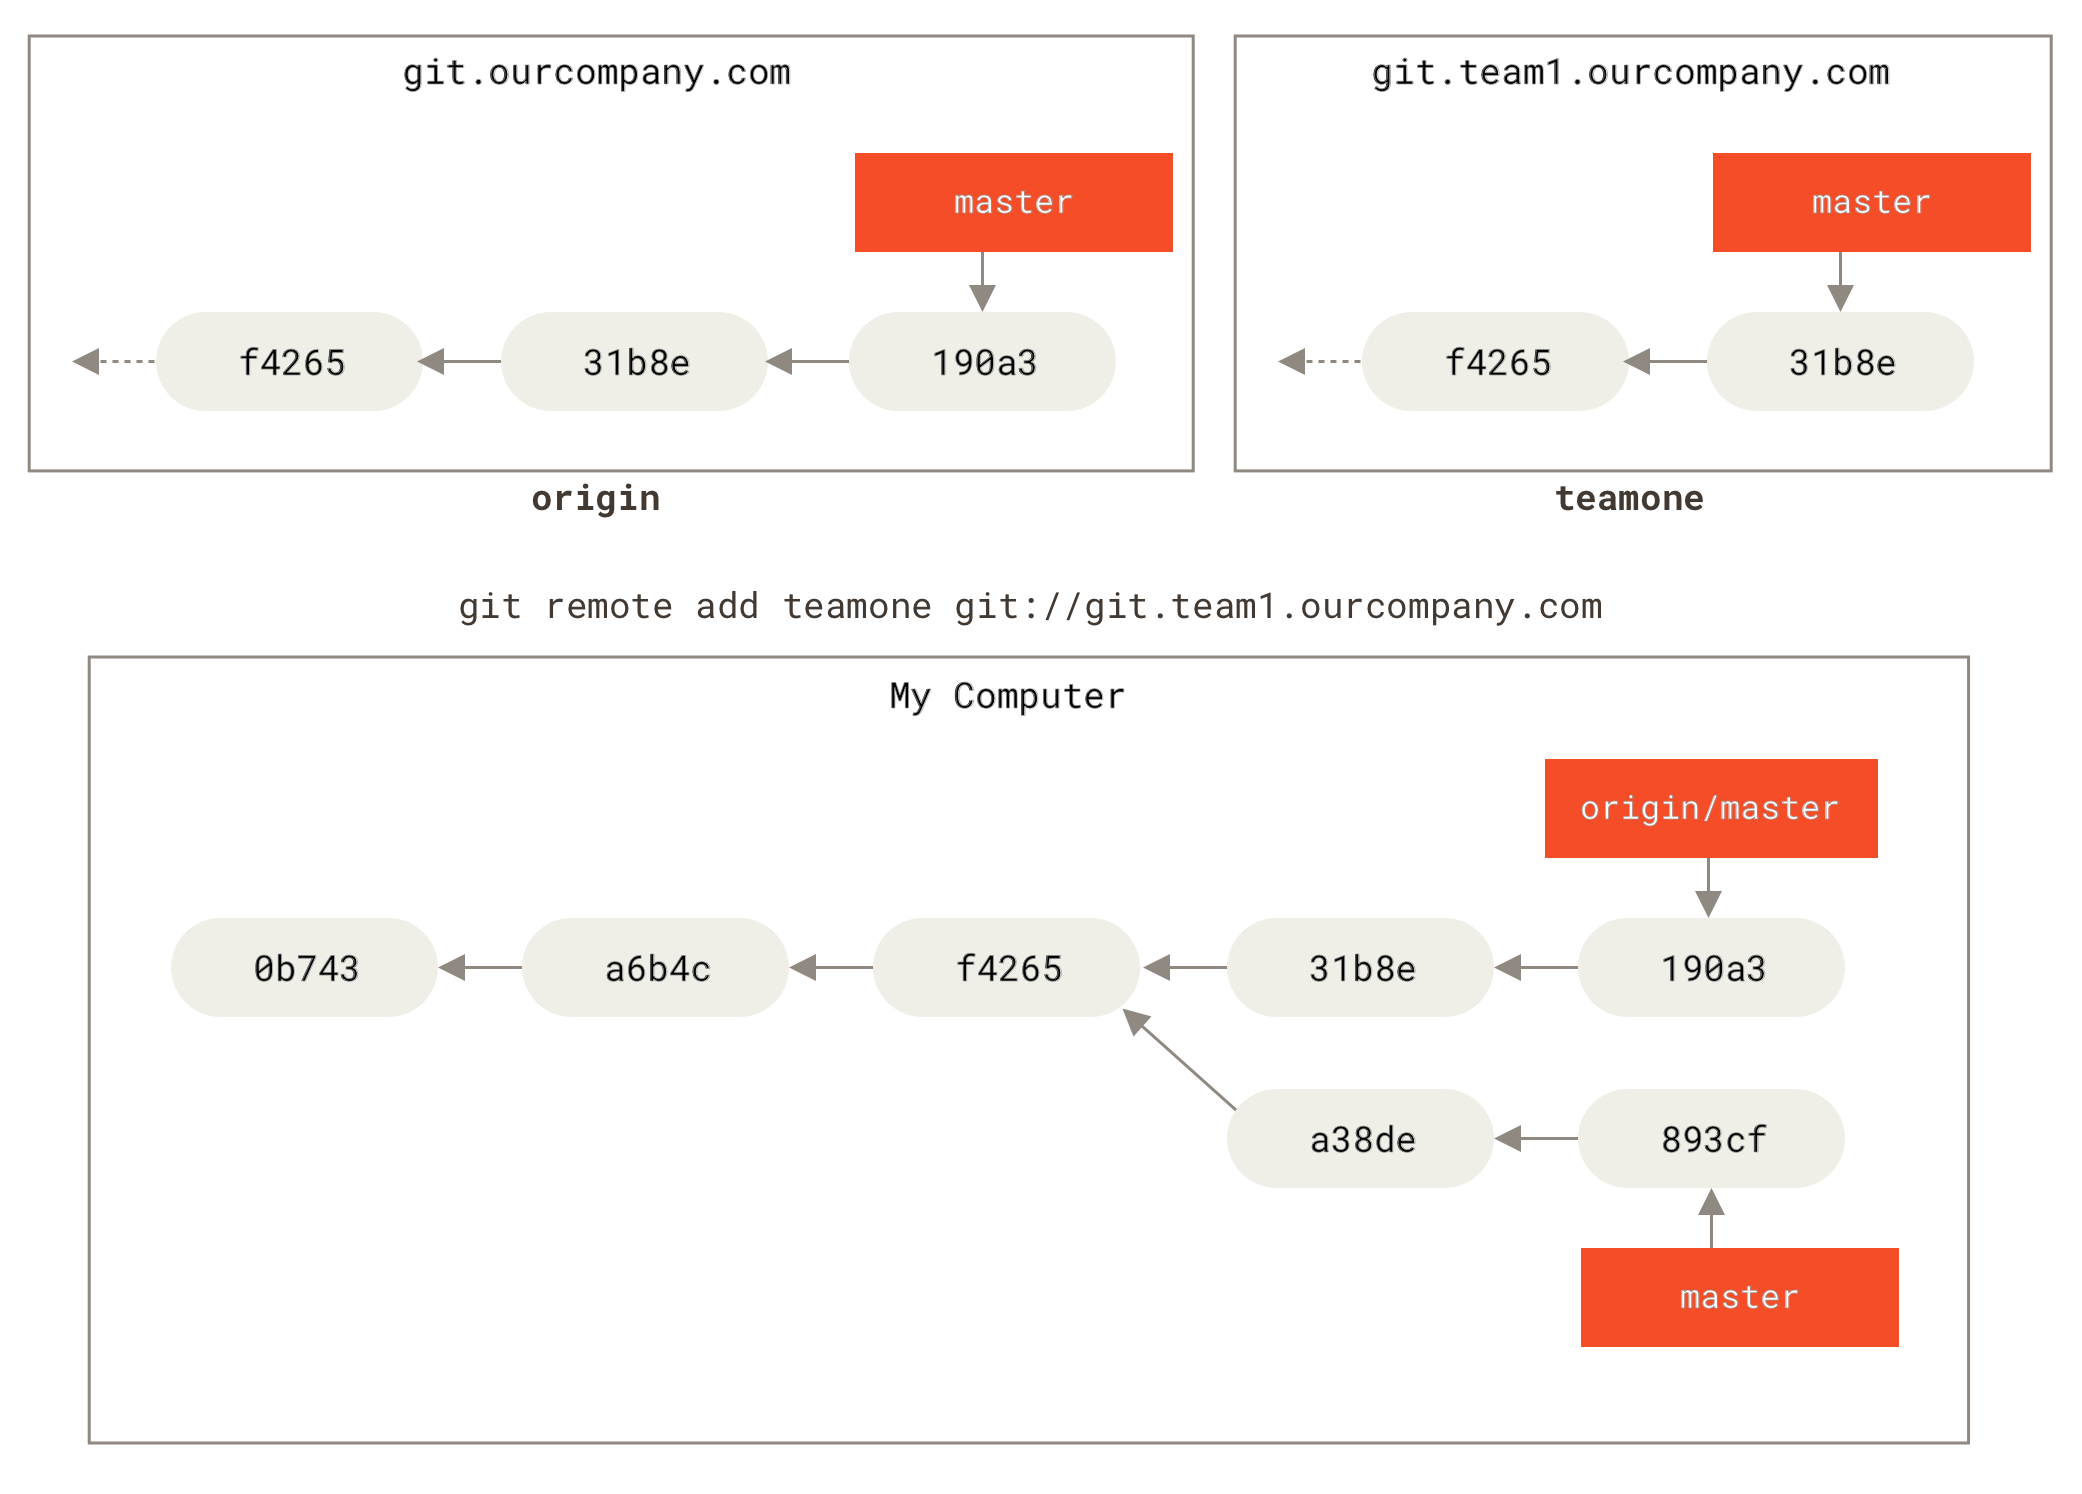
git fetch teamone to fetch everything the remote teamone server has that you don’t have yet. Because that server has a subset of the data your origin server has right now, Git fetches no data but sets a remote-tracking branch called teamone/master to point to the commit that teamone has as its master branch.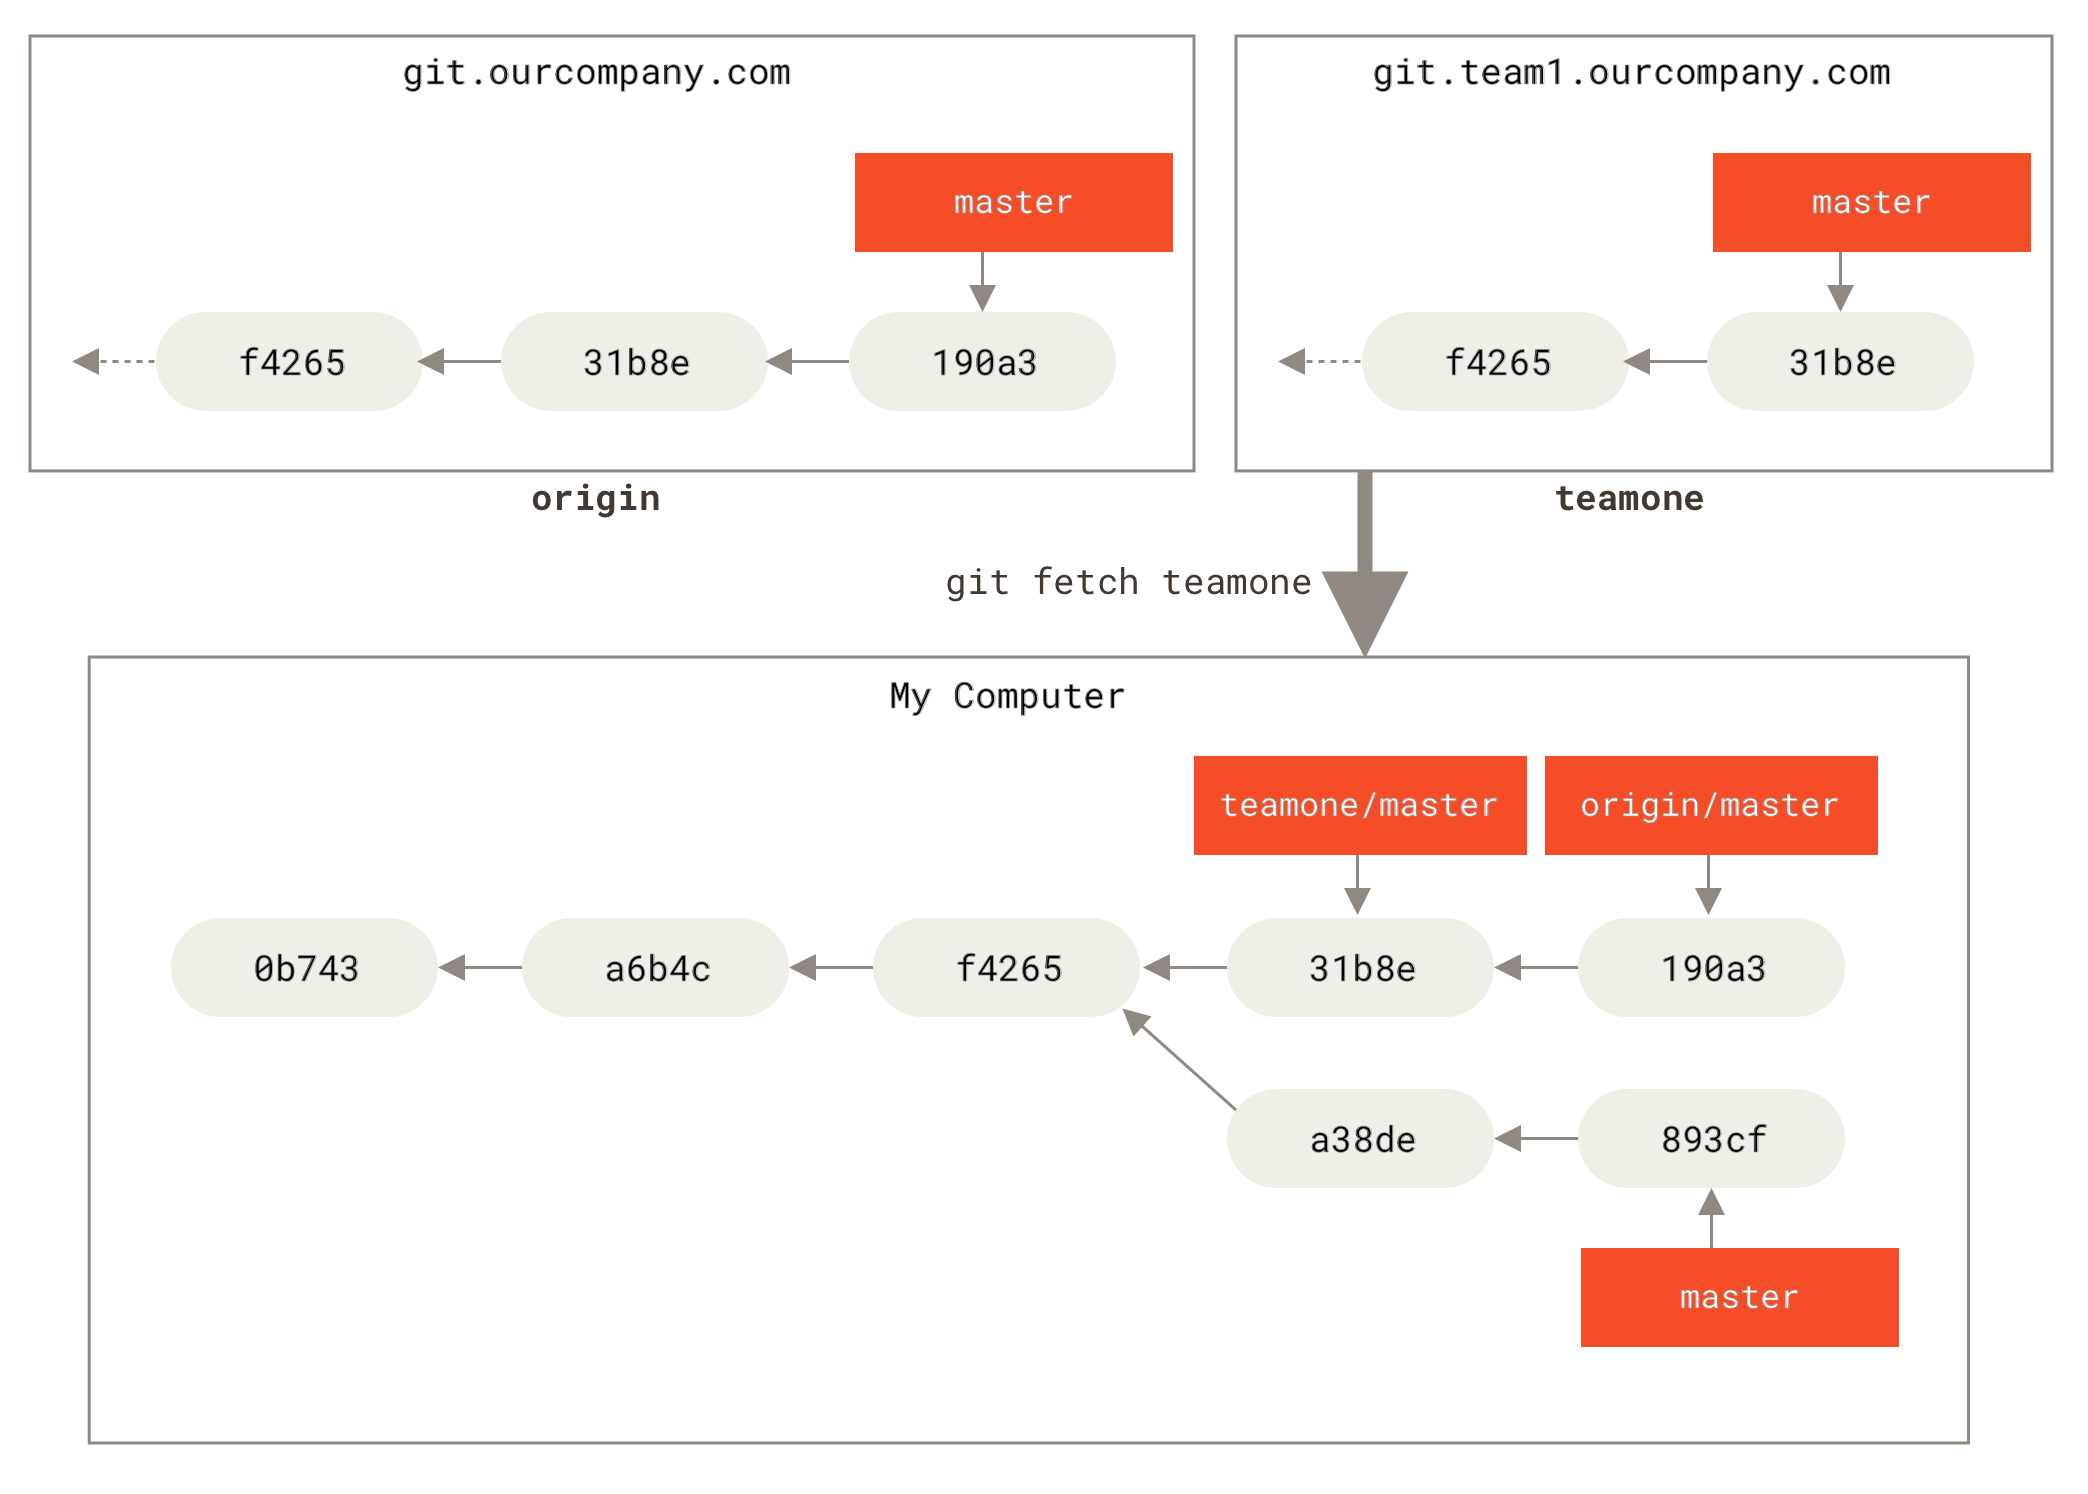
When you want to share a branch with the world, you need to push it up to a remote to which you have write access. Your local branches aren’t automatically synchronized to the remotes you write to — you have to explicitly push the branches you want to share. That way, you can use private branches for work you don’t want to share, and push up only the topic branches you want to collaborate on.
If you have a branch named serverfix that you want to work on with others, you can push it up the same way you pushed your first branch. Run git push <remote> <branch>:
$ git push origin serverfix
Counting objects: 24, done.
Delta compression using up to 8 threads.
Compressing objects: 100% (15/15), done.
Writing objects: 100% (24/24), 1.91 KiB | 0 bytes/s, done.
Total 24 (delta 2), reused 0 (delta 0)
To https://github.com/schacon/simplegit
 * [new branch]      serverfix -> serverfix
This is a bit of a shortcut. Git automatically expands the serverfix branchname out to refs/heads/serverfix:refs/heads/serverfix, which means, “Take my serverfix local branch and push it to update the remote’s serverfix branch.” We’ll go over the refs/heads/ part in detail in Git Internals, but you can generally leave it off. You can also do git push origin serverfix:serverfix, which does the same thing — it says, “Take my serverfix and make it the remote’s serverfix.” You can use this format to push a local branch into a remote branch that is named differently. If you didn’t want it to be called serverfix on the remote, you could instead run git push origin serverfix:awesomebranch to push your local serverfix branch to the awesomebranch branch on the remote project.
|
Note
|
Don’t type your password every time
If you’re using an HTTPS URL to push over, the Git server will ask you for your username and password for authentication. By default it will prompt you on the terminal for this information so the server can tell if you’re allowed to push. If you don’t want to type it every single time you push, you can set up a “credential cache”. The simplest is just to keep it in memory for a few minutes, which you can easily set up by running For more information on the various credential caching options available, see Credential Storage. |
The next time one of your collaborators fetches from the server, they will get a reference to where the server’s version of serverfix is under the remote branch origin/serverfix:
$ git fetch origin
remote: Counting objects: 7, done.
remote: Compressing objects: 100% (2/2), done.
remote: Total 3 (delta 0), reused 3 (delta 0)
Unpacking objects: 100% (3/3), done.
From https://github.com/schacon/simplegit
 * [new branch]      serverfix    -> origin/serverfix
It’s important to note that when you do a fetch that brings down new remote-tracking branches, you don’t automatically have local, editable copies of them. In other words, in this case, you don’t have a new serverfix branch — you have only an origin/serverfix pointer that you can’t modify.
To merge this work into your current working branch, you can run git merge origin/serverfix. If you want your own serverfix branch that you can work on, you can base it off your remote-tracking branch:
$ git checkout -b serverfix origin/serverfix
Branch serverfix set up to track remote branch serverfix from origin.
Switched to a new branch 'serverfix'
This gives you a local branch that you can work on that starts where origin/serverfix is.
Tracking Branches
Checking out a local branch from a remote-tracking branch automatically creates what is called a “tracking branch” (and the branch it tracks is called an “upstream branch”). Tracking branches are local branches that have a direct relationship to a remote branch. If you’re on a tracking branch and type git pull, Git automatically knows which server to fetch from and which branch to merge in.
When you clone a repository, it generally automatically creates a master branch that tracks origin/master. However, you can set up other tracking branches if you wish — ones that track branches on other remotes, or don’t track the master branch. The simple case is the example you just saw, running git checkout -b <branch> <remote>/<branch>. This is a common enough operation that Git provides the --track shorthand:
$ git checkout --track origin/serverfix
Branch serverfix set up to track remote branch serverfix from origin.
Switched to a new branch 'serverfix'
In fact, this is so common that there’s even a shortcut for that shortcut. If the branch name you’re trying to checkout (a) doesn’t exist and (b) exactly matches a name on only one remote, Git will create a tracking branch for you:
$ git checkout serverfix
Branch serverfix set up to track remote branch serverfix from origin.
Switched to a new branch 'serverfix'
To set up a local branch with a different name than the remote branch, you can easily use the first version with a different local branch name:
$ git checkout -b sf origin/serverfix
Branch sf set up to track remote branch serverfix from origin.
Switched to a new branch 'sf'
Now, your local branch sf will automatically pull from origin/serverfix.
If you already have a local branch and want to set it to a remote branch you just pulled down, or want to change the upstream branch you’re tracking, you can use the -u or --set-upstream-to option to git branch to explicitly set it at any time.
$ git branch -u origin/serverfix
Branch serverfix set up to track remote branch serverfix from origin.|
Note
|
Upstream shorthand
When you have a tracking branch set up, you can reference its upstream branch with the |
If you want to see what tracking branches you have set up, you can use the -vv option to git branch. This will list out your local branches with more information including what each branch is tracking and if your local branch is ahead, behind or both.
$ git branch -vv
  iss53     7e424c3 [origin/iss53: ahead 2] Add forgotten brackets
  master    1ae2a45 [origin/master] Deploy index fix
* serverfix f8674d9 [teamone/server-fix-good: ahead 3, behind 1] This should do it
  testing   5ea463a Try something new
So here we can see that our iss53 branch is tracking origin/iss53 and is “ahead” by two, meaning that we have two commits locally that are not pushed to the server. We can also see that our master branch is tracking origin/master and is up to date. Next we can see that our serverfix branch is tracking the server-fix-good branch on our teamone server and is ahead by three and behind by one, meaning that there is one commit on the server we haven’t merged in yet and three commits locally that we haven’t pushed. Finally we can see that our testing branch is not tracking any remote branch.
It’s important to note that these numbers are only since the last time you fetched from each server. This command does not reach out to the servers, it’s telling you about what it has cached from these servers locally. If you want totally up to date ahead and behind numbers, you’ll need to fetch from all your remotes right before running this. You could do that like this:
$ git fetch --all; git branch -vvPulling
While the git fetch command will fetch all the changes on the server that you don’t have yet, it will not modify your working directory at all. It will simply get the data for you and let you merge it yourself. However, there is a command called git pull which is essentially a git fetch immediately followed by a git merge in most cases. If you have a tracking branch set up as demonstrated in the last section, either by explicitly setting it or by having it created for you by the clone or checkout commands, git pull will look up what server and branch your current branch is tracking, fetch from that server and then try to merge in that remote branch.
Generally it’s better to simply use the fetch and merge commands explicitly as the magic of git pull can often be confusing.
Deleting Remote Branches
Suppose you’re done with a remote branch — say you and your collaborators are finished with a feature and have merged it into your remote’s master branch (or whatever branch your stable codeline is in). You can delete a remote branch using the --delete option to git push. If you want to delete your serverfix branch from the server, you run the following:
$ git push origin --delete serverfix
To https://github.com/schacon/simplegit
 - [deleted]         serverfix
Basically all this does is to remove the pointer from the server. The Git server will generally keep the data there for a while until a garbage collection runs, so if it was accidentally deleted, it’s often easy to recover.
Rebasing
In Git, there are two main ways to integrate changes from one branch into another: the merge and the rebase.
The Basic Rebase
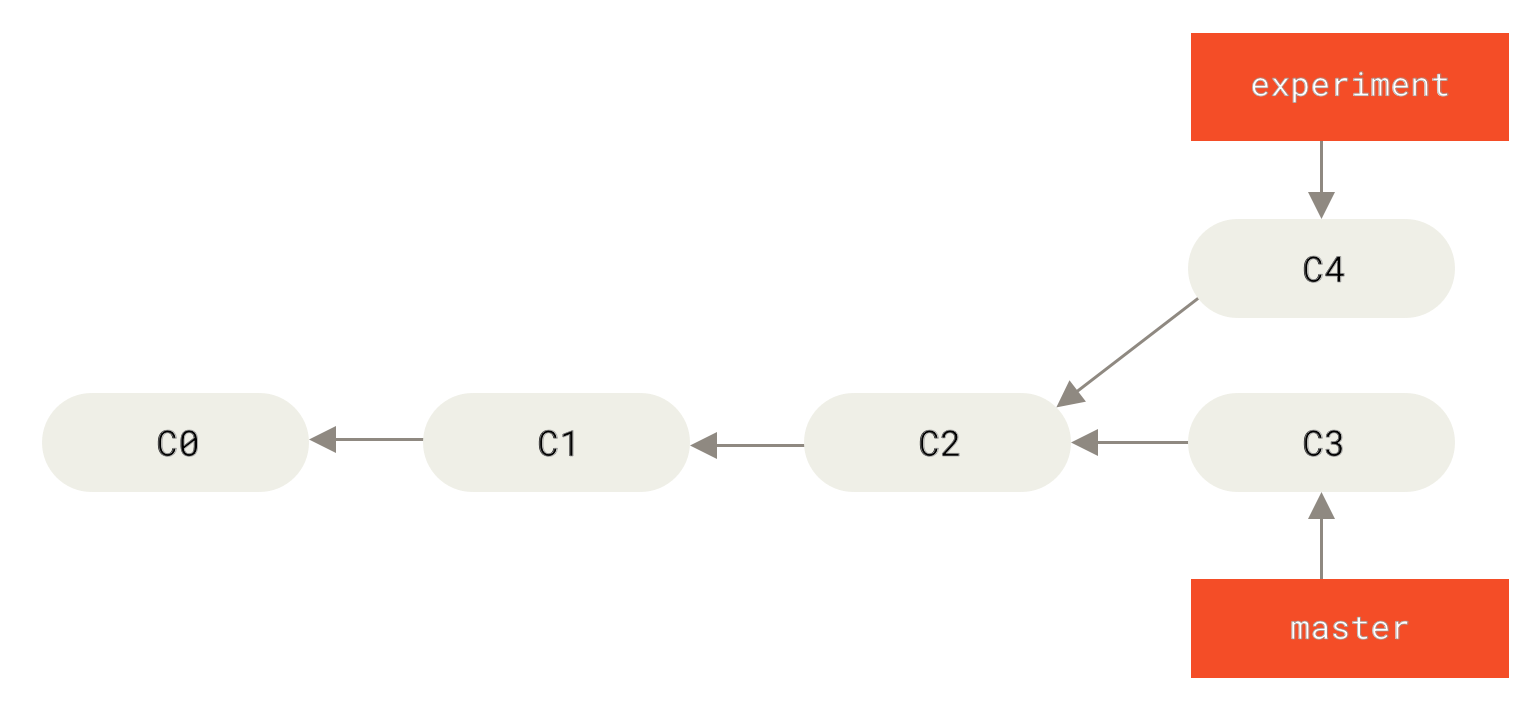
The easiest way to integrate the branches, as we’ve already covered, is the merge command. It performs a three-way merge between the two latest branch snapshots (C3 and C4) and the most recent common ancestor of the two (C2), creating a new snapshot (and commit).
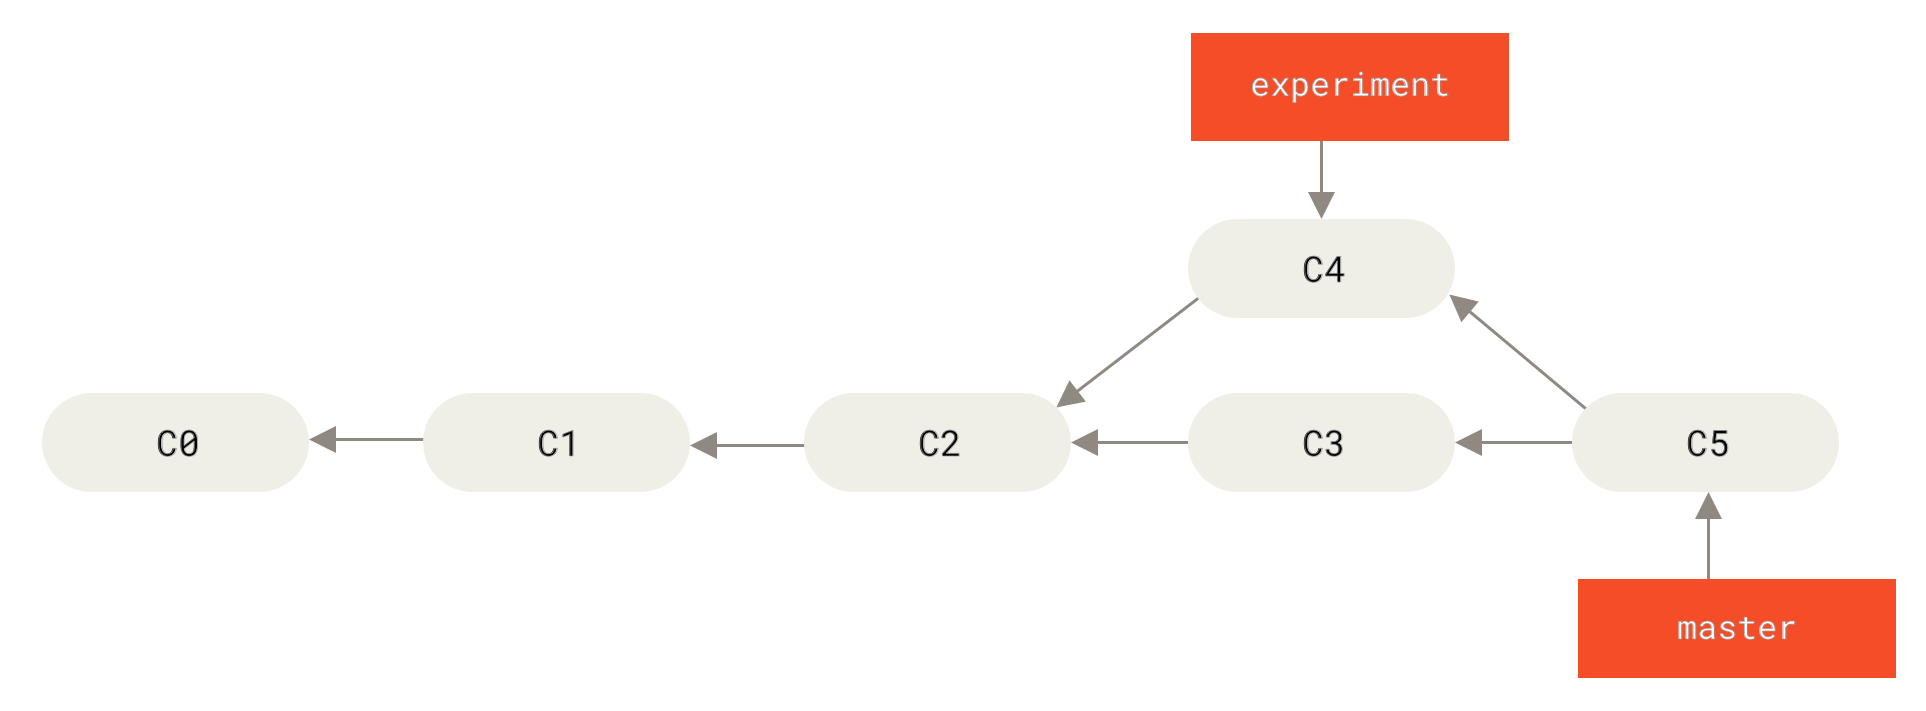
However, there is another way: you can take the patch of the change that was introduced in C4 and reapply it on top of C3. In Git, this is called rebasing. With the rebase command, you can take all the changes that were committed on one branch and replay them on a different branch.
For this example, you would check out the experiment branch, and then rebase it onto the master branch as follows:
$ git checkout experiment
$ git rebase master
First, rewinding head to replay your work on top of it...
Applying: added staged command
This operation works by going to the common ancestor of the two branches (the one you’re on and the one you’re rebasing onto), getting the diff introduced by each commit of the branch you’re on, saving those diffs to temporary files, resetting the current branch to the same commit as the branch you are rebasing onto, and finally applying each change in turn.

C4 onto C3At this point, you can go back to the master branch and do a fast-forward merge.
$ git checkout master
$ git merge experiment
master branchNow, the snapshot pointed to by C4' is exactly the same as the one that was pointed to by C5 in the merge example. There is no difference in the end product of the integration, but rebasing makes for a cleaner history. If you examine the log of a rebased branch, it looks like a linear history: it appears that all the work happened in series, even when it originally happened in parallel.
Often, you’ll do this to make sure your commits apply cleanly on a remote branch — perhaps in a project to which you’re trying to contribute but that you don’t maintain. In this case, you’d do your work in a branch and then rebase your work onto origin/master when you were ready to submit your patches to the main project. That way, the maintainer doesn’t have to do any integration work — just a fast-forward or a clean apply.
Note that the snapshot pointed to by the final commit you end up with, whether it’s the last of the rebased commits for a rebase or the final merge commit after a merge, is the same snapshot — it’s only the history that is different. Rebasing replays changes from one line of work onto another in the order they were introduced, whereas merging takes the endpoints and merges them together.
More Interesting Rebases
You can also have your rebase replay on something other than the rebase target branch. Take a history like A history with a topic branch off another topic branch, for example. You branched a topic branch (server) to add some server-side functionality to your project, and made a commit. Then, you branched off that to make the client-side changes (client) and committed a few times. Finally, you went back to your server branch and did a few more commits.
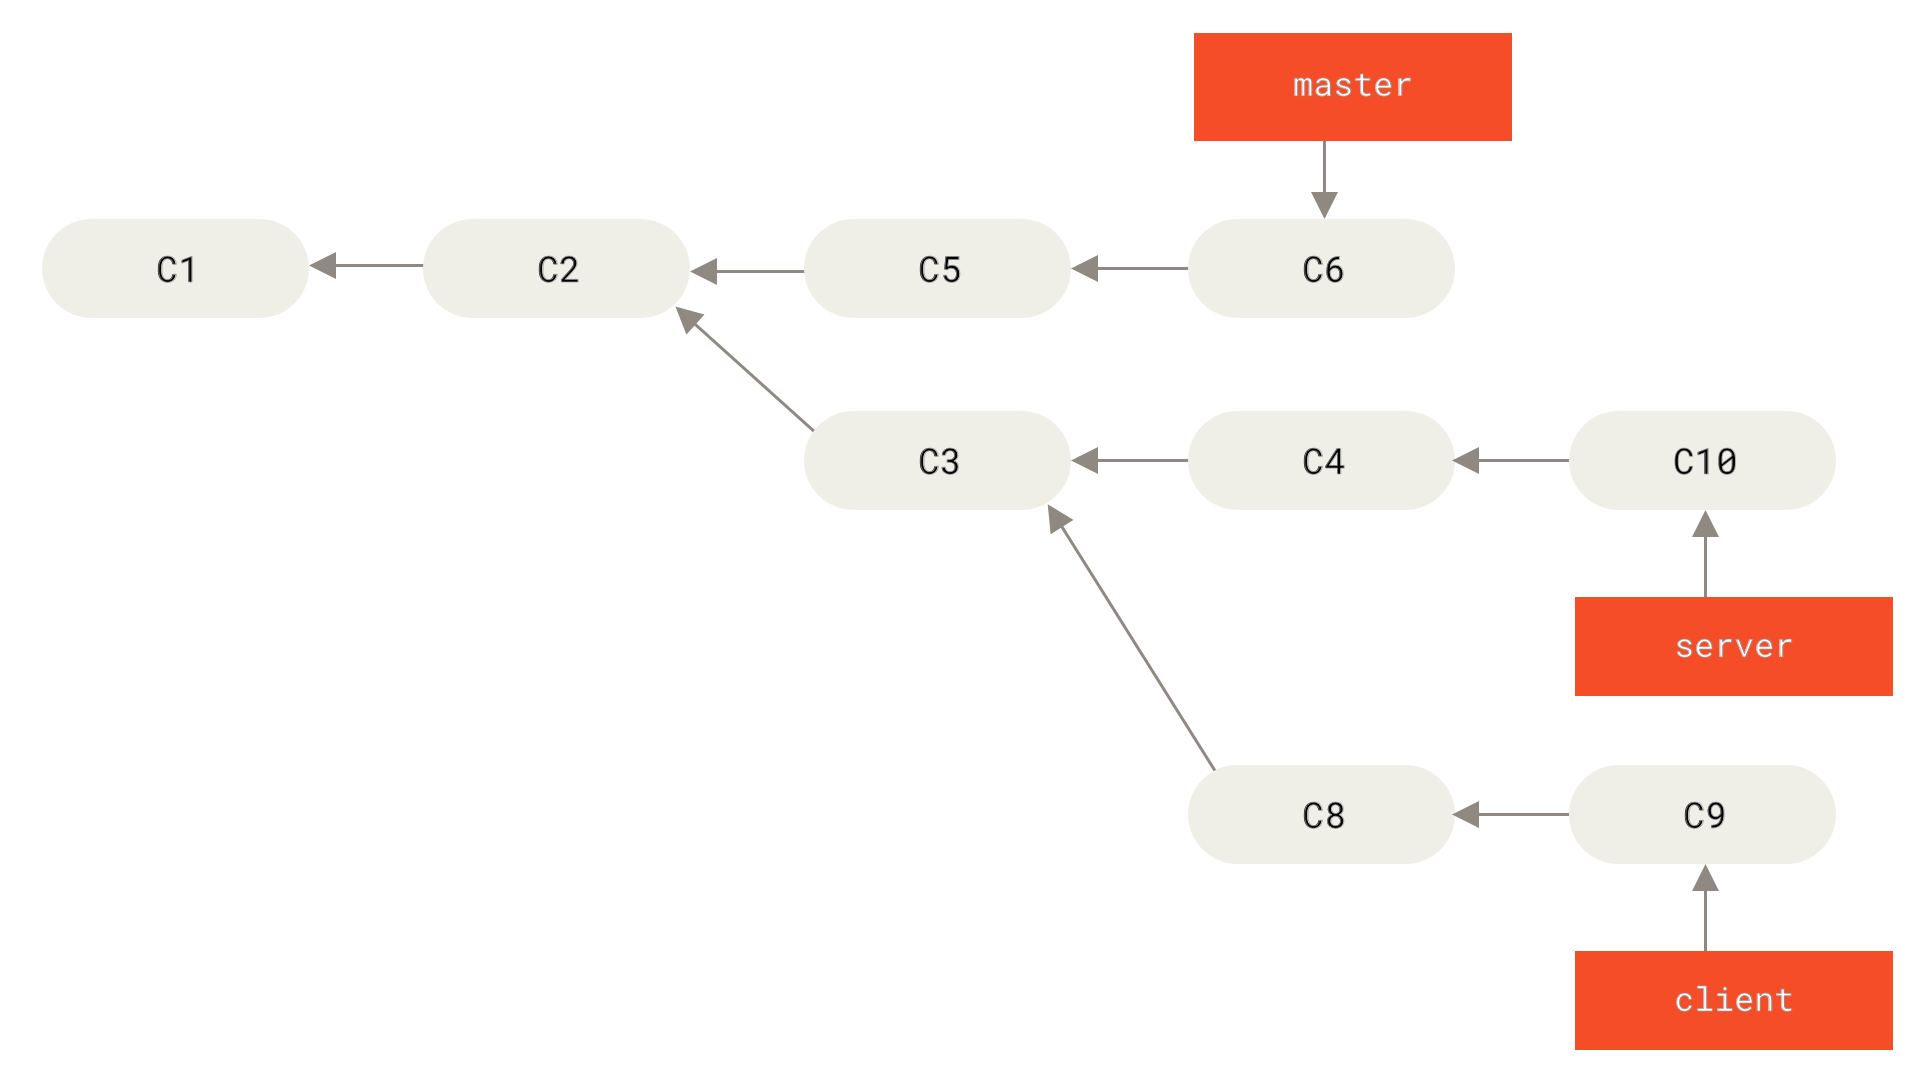
client that aren’t on server (C8 and C9) and replay them on your master branch by using the --onto option of git rebase:$ git rebase --onto master server clientThis basically says, “Take the client branch, figure out the patches since it diverged from the server branch, and replay these patches in the client branch as if it was based directly off the master branch instead.” It’s a bit complex, but the result is pretty cool.
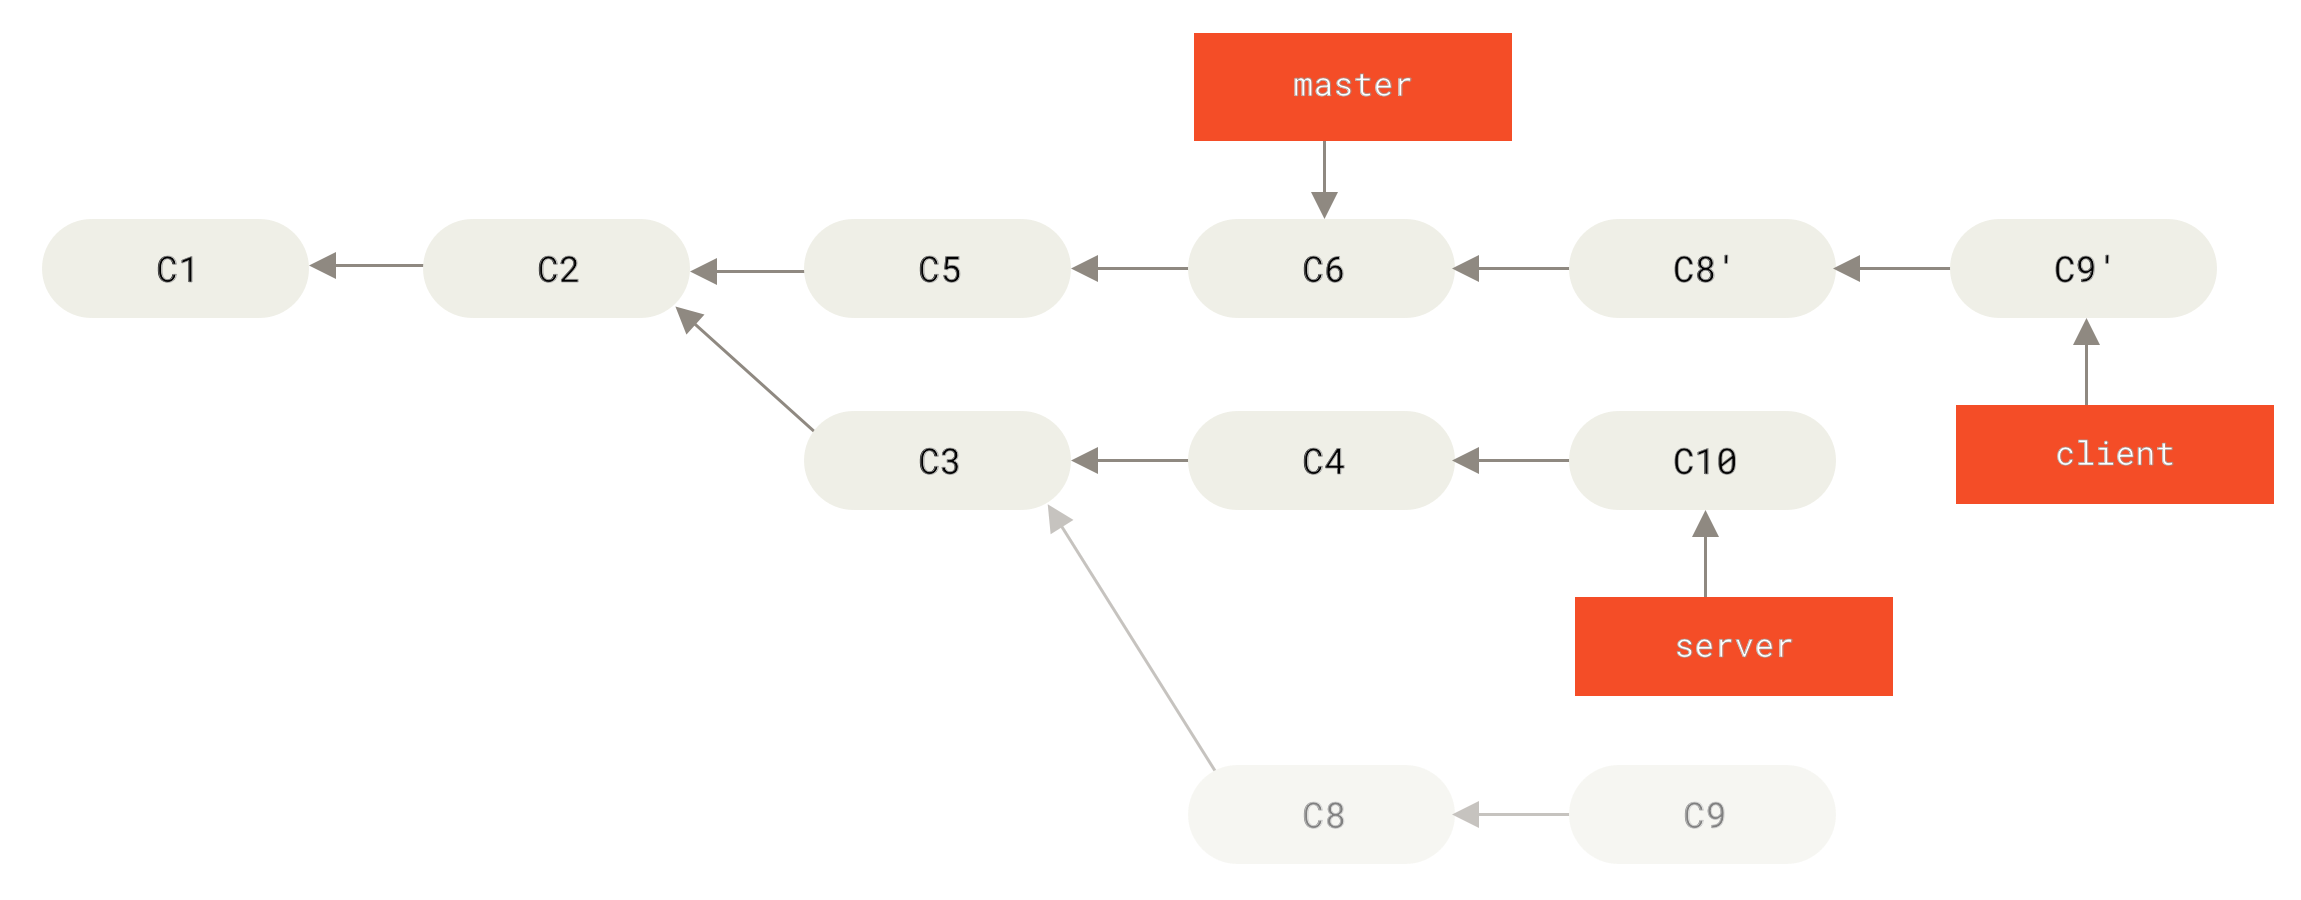
master branch:$ git checkout master
$ git merge client
master branch to include the client branch changesLet’s say you decide to pull in your server branch as well. You can rebase the server branch onto the master branch without having to check it out first by running git rebase <basebranch> <topicbranch> — which checks out the topic branch (in this case, server) for you and replays it onto the base branch (master):
$ git rebase master serverThis replays your server work on top of your master work.

master branchThen, you can fast-forward the base branch (master):
$ git checkout master
$ git merge server
You can remove the client and server branches because all the work is integrated and you don’t need them anymore, leaving your history for this entire process looking like Final commit history:
$ git branch -d client
$ git branch -d server
The Perils of Rebasing
Ahh, but the bliss of rebasing isn’t without its drawbacks, which can be summed up in a single line:
Do not rebase commits that exist outside your repository and that people may have based work on.
If you follow that guideline, you’ll be fine. If you don’t, people will hate you, and you’ll be scorned by friends and family.
When you rebase stuff, you’re abandoning existing commits and creating new ones that are similar but different. If you push commits somewhere and others pull them down and base work on them, and then you rewrite those commits with git rebase and push them up again, your collaborators will have to re-merge their work and things will get messy when you try to pull their work back into yours.
Rebase When You Rebase
If you do find yourself in a situation like this, Git has some further magic that might help you out. If someone on your team force pushes changes that overwrite work that you’ve based work on, your challenge is to figure out what is yours and what they’ve rewritten.
It turns out that in addition to the commit SHA-1 checksum, Git also calculates a checksum that is based just on the patch introduced with the commit. This is called a “patch-id”.
If you pull down work that was rewritten and rebase it on top of the new commits from your partner, Git can often successfully figure out what is uniquely yours and apply them back on top of the new branch.
For instance, in the previous scenario, if instead of doing a merge when we’re at Someone pushes rebased commits, abandoning commits you’ve based your work on we run git rebase teamone/master, Git will:
-
Determine what work is unique to our branch (C2, C3, C4, C6, C7)
-
Determine which are not merge commits (C2, C3, C4)
-
Determine which have not been rewritten into the target branch (just C2 and C3, since C4 is the same patch as C4')
-
Apply those commits to the top of
teamone/master
So instead of the result we see in You merge in the same work again into a new merge commit, we would end up with something more like Rebase on top of force-pushed rebase work.
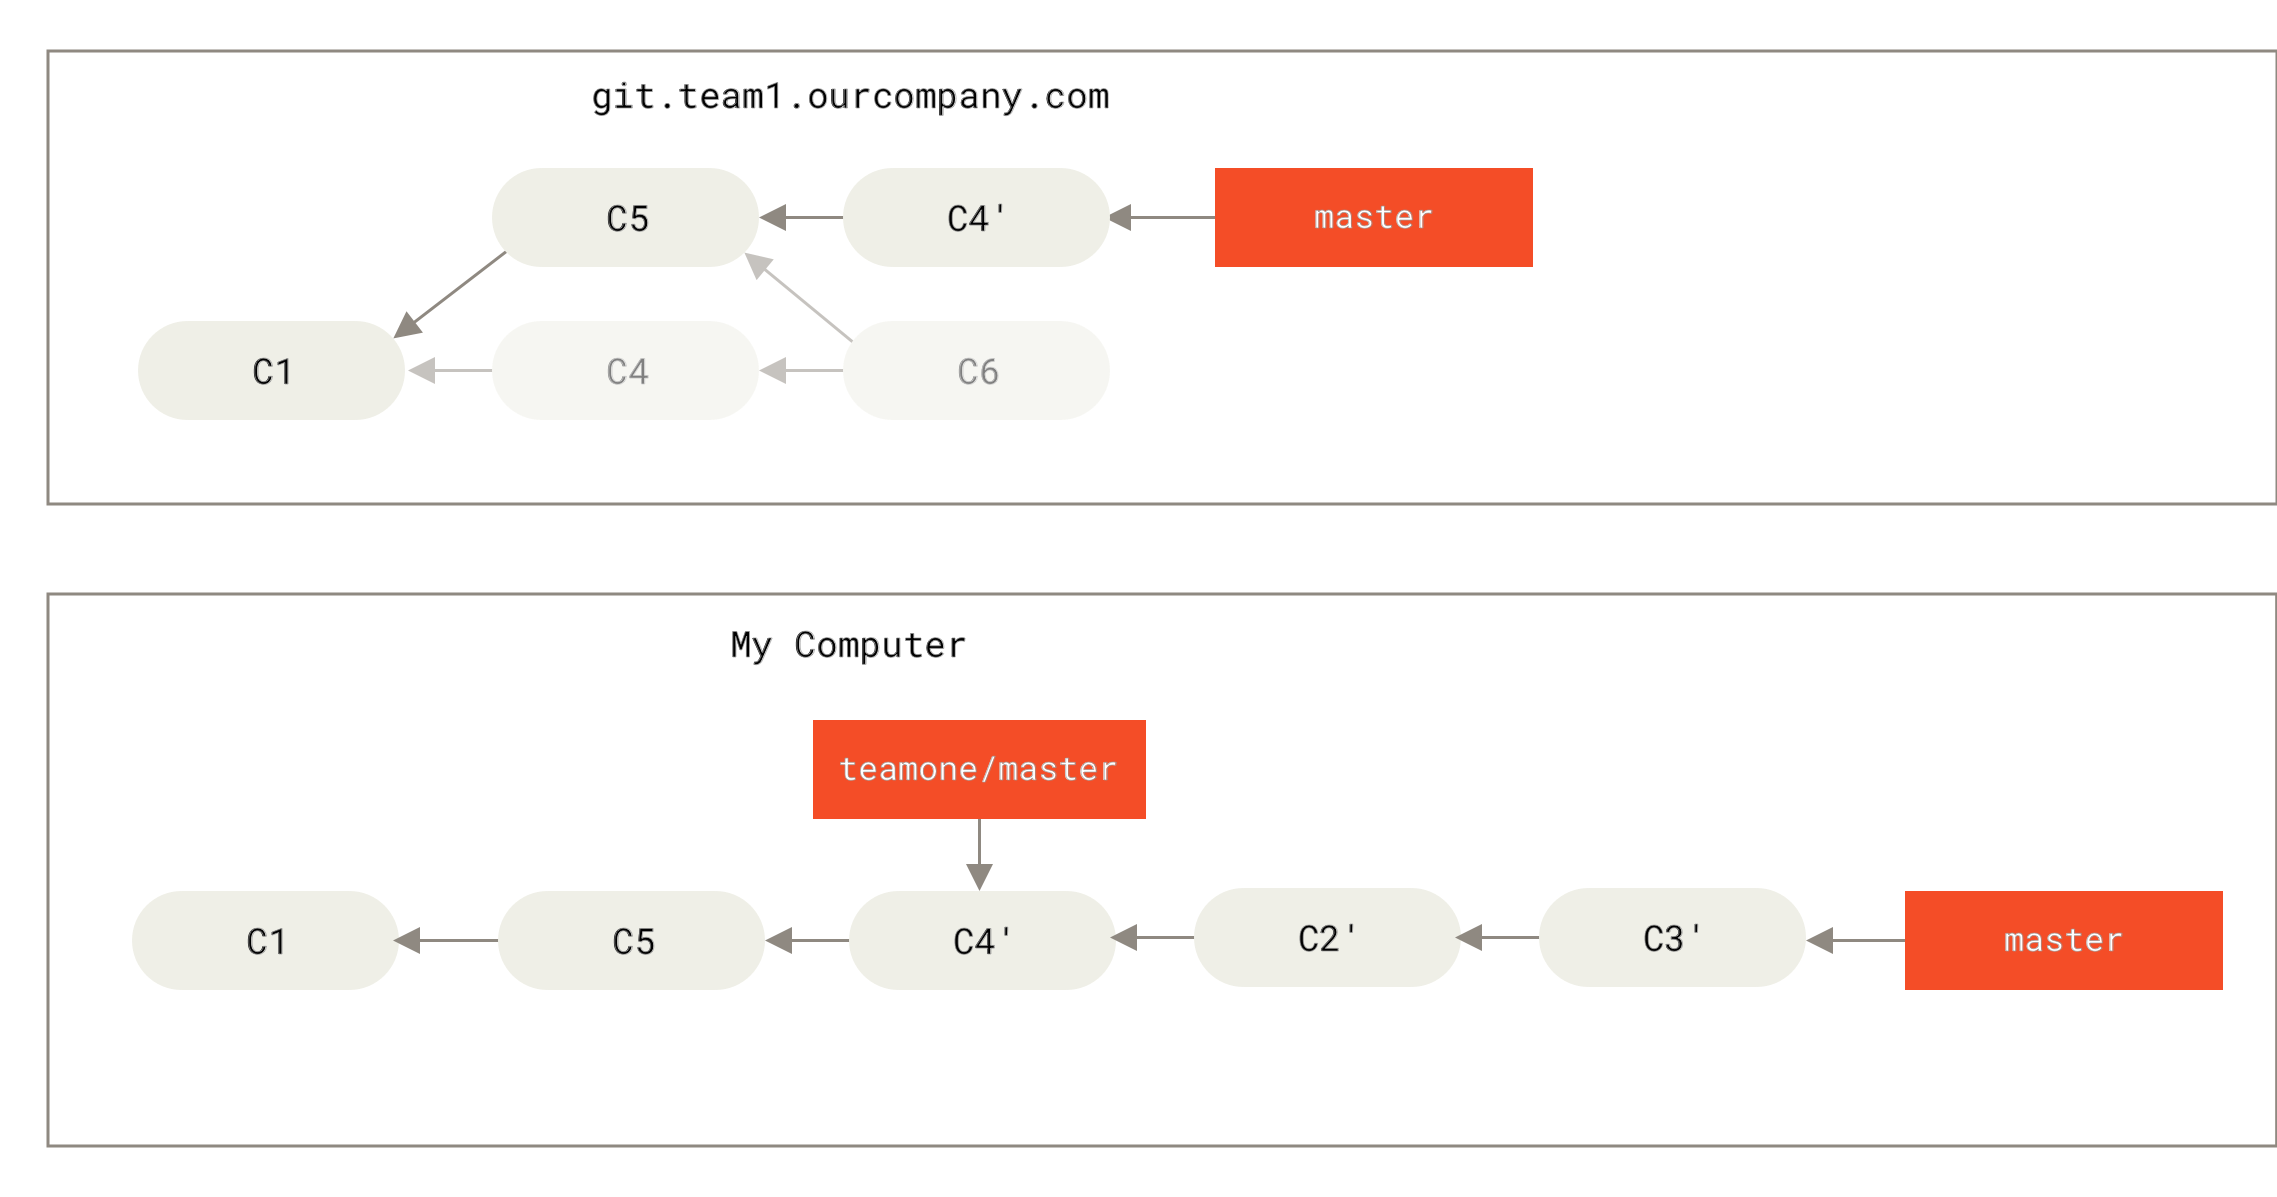
This only works if C4 and C4' that your partner made are almost exactly the same patch. Otherwise the rebase won’t be able to tell that it’s a duplicate and will add another C4-like patch (which will probably fail to apply cleanly, since the changes would already be at least somewhat there).
You can also simplify this by running a git pull --rebase instead of a normal git pull. Or you could do it manually with a git fetch followed by a git rebase teamone/master in this case.
If you are using git pull and want to make --rebase the default, you can set the pull.rebase config value with something like git config --global pull.rebase true.
If you only ever rebase commits that have never left your own computer, you’ll be just fine. If you rebase commits that have been pushed, but that no one else has based commits from, you’ll also be fine. If you rebase commits that have already been pushed publicly, and people may have based work on those commits, then you may be in for some frustrating trouble, and the scorn of your teammates.
If you or a partner does find it necessary at some point, make sure everyone knows to run git pull --rebase to try to make the pain after it happens a little bit simpler.
Rebase vs. Merge
Now that you’ve seen rebasing and merging in action, you may be wondering which one is better. Before we can answer this, let’s step back a bit and talk about what history means.
One point of view on this is that your repository’s commit history is a record of what actually happened. It’s a historical document, valuable in its own right, and shouldn’t be tampered with. From this angle, changing the commit history is almost blasphemous; you’re lying about what actually transpired. So what if there was a messy series of merge commits? That’s how it happened, and the repository should preserve that for posterity.
The opposing point of view is that the commit history is the story of how your project was made. You wouldn’t publish the first draft of a book, so why show your messy work? When you’re working on a project, you may need a record of all your missteps and dead-end paths, but when it’s time to show your work to the world, you may want to tell a more coherent story of how to get from A to B. People in this camp use tools like rebase and filter-branch to rewrite their commits before they’re merged into the mainline branch. They use tools like rebase and filter-branch, to tell the story in the way that’s best for future readers.
Now, to the question of whether merging or rebasing is better: hopefully you’ll see that it’s not that simple. Git is a powerful tool, and allows you to do many things to and with your history, but every team and every project is different. Now that you know how both of these things work, it’s up to you to decide which one is best for your particular situation.
You can get the best of both worlds: rebase local changes before pushing to clean up your work, but never rebase anything that you’ve pushed somewhere.
Getting Git on a Server
In order to initially set up any Git server, you have to export an existing repository into a new bare repository — a repository that doesn’t contain a working directory. This is generally straightforward to do. In order to clone your repository to create a new bare repository, you run the clone command with the --bare option. By convention, bare repository directory names end with the suffix .git, like so:
$ git clone --bare my_project my_project.git
Cloning into bare repository 'my_project.git'...
done.
You should now have a copy of the Git directory data in your my_project.git directory.
This is roughly equivalent to something like:
$ cp -Rf my_project/.git my_project.gitThere are a couple of minor differences in the configuration file but, for your purpose, this is close to the same thing. It takes the Git repository by itself, without a working directory, and creates a directory specifically for it alone.
zzh@ZZHPC:/zdata/Github$ git clone --bare my_project my_project.git
fatal: repository 'my_project' does not exist

zzh@ZZHPC:/zdata/Github$ git clone --bare zgrpc-go-professionals zgrpc.git
Cloning into bare repository 'zgrpc.git'...
done.

zzh@ZZHPC:/zdata/Github$ cd zgrpc.git

zzh@ZZHPC:/zdata/Github/zgrpc.git$ ls -F
branches/  config  description  HEAD  hooks/  info/  objects/  packed-refs  refs/
Putting the Bare Repository on a Server
Now that you have a bare copy of your repository, all you need to do is put it on a server and set up your protocols. Let’s say you’ve set up a server called git.example.com to which you have SSH access, and you want to store all your Git repositories under the /srv/git directory. Assuming that /srv/git exists on that server, you can set up your new repository by copying your bare repository over:
$ scp -r my_project.git user@git.example.com:/srv/gitAt this point, other users who have SSH-based read access to the /srv/git directory on that server can clone your repository by running:
$ git clone user@git.example.com:/srv/git/my_project.gitIf a user SSHs into a server and has write access to the /srv/git/my_project.git directory, they will also automatically have push access.
Git will automatically add group write permissions to a repository properly if you run the git init command with the --shared option. Note that by running this command, you will not destroy any commits, refs, etc. in the process.
$ ssh user@git.example.com
$ cd /srv/git/my_project.git
$ git init --bare --shared
You see how easy it is to take a Git repository, create a bare version, and place it on a server to which you and your collaborators have SSH access. Now you’re ready to collaborate on the same project.
It’s important to note that this is literally all you need to do to run a useful Git server to which several people have access — just add SSH-able accounts on a server, and stick a bare repository somewhere that all those users have read and write access to. You’re ready to go — nothing else needed.
In the next few sections, you’ll see how to expand to more sophisticated setups. This discussion will include not having to create user accounts for each user, adding public read access to repositories, setting up web UIs and more. However, keep in mind that to collaborate with a couple of people on a private project, all you need is an SSH server and a bare repository.
Small Setups
If you’re a small outfit or are just trying out Git in your organization and have only a few developers, things can be simple for you. One of the most complicated aspects of setting up a Git server is user management. If you want some repositories to be read-only for certain users and read/write for others, access and permissions can be a bit more difficult to arrange.
SSH Access
If you have a server to which all your developers already have SSH access, it’s generally easiest to set up your first repository there, because you have to do almost no work (as we covered in the last section). If you want more complex access control type permissions on your repositories, you can handle them with the normal filesystem permissions of your server’s operating system.
If you want to place your repositories on a server that doesn’t have accounts for everyone on your team for whom you want to grant write access, then you must set up SSH access for them. We assume that if you have a server with which to do this, you already have an SSH server installed, and that’s how you’re accessing the server.
There are a few ways you can give access to everyone on your team. The first is to set up accounts for everybody, which is straightforward but can be cumbersome. You may not want to run adduser (or the possible alternative useradd) and have to set temporary passwords for every new user.
A second method is to create a single 'git' user account on the machine, ask every user who is to have write access to send you an SSH public key, and add that key to the ~/.ssh/authorized_keys file of that new 'git' account. At that point, everyone will be able to access that machine via the 'git' account. This doesn’t affect the commit data in any way — the SSH user you connect as doesn’t affect the commits you’ve recorded.
Another way to do it is to have your SSH server authenticate from an LDAP server or some other centralized authentication source that you may already have set up. As long as each user can get shell access on the machine, any SSH authentication mechanism you can think of should work.
Generating Your SSH Public Key
Many Git servers authenticate using SSH public keys. In order to provide a public key, each user in your system must generate one if they don’t already have one. This process is similar across all operating systems. First, you should check to make sure you don’t already have a key. By default, a user’s SSH keys are stored in that user’s ~/.ssh directory. You can easily check to see if you have a key already by going to that directory and listing the contents:
$ cd ~/.ssh
$ ls
authorized_keys2  id_dsa       known_hosts
config            id_dsa.pub
You’re looking for a pair of files named something like id_dsa or id_rsa and a matching file with a .pub extension. The .pub file is your public key, and the other file is the corresponding private key. If you don’t have these files (or you don’t even have a .ssh directory), you can create them by running a program called ssh-keygen, which is provided with the SSH package on Linux/macOS systems and comes with Git for Windows:
$ ssh-keygen -o
Generating public/private rsa key pair.
Enter file in which to save the key (/home/schacon/.ssh/id_rsa):
Created directory '/home/schacon/.ssh'.
Enter passphrase (empty for no passphrase):
Enter same passphrase again:
Your identification has been saved in /home/schacon/.ssh/id_rsa.
Your public key has been saved in /home/schacon/.ssh/id_rsa.pub.
The key fingerprint is:
d0:82:24:8e:d7:f1:bb:9b:33:53:96:93:49:da:9b:e3 schacon@mylaptop.local
First it confirms where you want to save the key (.ssh/id_rsa), and then it asks twice for a passphrase, which you can leave empty if you don’t want to type a password when you use the key. However, if you do use a password, make sure to add the -o option; it saves the private key in a format that is more resistant to brute-force password cracking than is the default format. You can also use the ssh-agent tool to prevent having to enter the password each time.
Setting Up the Server
Let’s walk through setting up SSH access on the server side. In this example, you’ll use the authorized_keys method for authenticating your users.
|
Note
|
A good deal of what is described here can be automated by using the |
First, you create a git user account and a .ssh directory for that user.
$ sudo adduser git
$ su git
$ cd
$ mkdir .ssh && chmod 700 .ssh
$ touch .ssh/authorized_keys && chmod 600 .ssh/authorized_keys
Next, you need to add some developer SSH public keys to the authorized_keys file for the git user.
$ cat /tmp/id_rsa.john.pub >> ~/.ssh/authorized_keys
$ cat /tmp/id_rsa.josie.pub >> ~/.ssh/authorized_keys
$ cat /tmp/id_rsa.jessica.pub >> ~/.ssh/authorized_keys
Now, you can set up an empty repository for them by running git init with the --bare option, which initializes the repository without a working directory:
$ cd /srv/git
$ mkdir project.git
$ cd project.git
$ git init --bare
Initialized empty Git repository in /srv/git/project.git/
Then, John, Josie, or Jessica can push the first version of their project into that repository by adding it as a remote and pushing up a branch. Note that someone must shell onto the machine and create a bare repository every time you want to add a project. Let’s use gitserver as the hostname of the server on which you’ve set up your git user and repository.
# on John's computer
$ cd myproject
$ git init
$ git add .
$ git commit -m 'Initial commit'
$ git remote add origin git@gitserver:/srv/git/project.git
$ git push origin master
At this point, the others can clone it down and push changes back up just as easily:
$ git clone git@gitserver:/srv/git/project.git
$ cd project
$ vim README
$ git commit -am 'Fix for README file'
$ git push origin master
With this method, you can quickly get a read/write Git server up and running for a handful of developers.
You should note that currently all these users can also log into the server and get a shell as the git user. If you want to restrict that, you will have to change the shell to something else in the /etc/passwd file.
You can easily restrict the git user account to only Git-related activities with a limited shell tool called git-shell that comes with Git. If you set this as the git user account’s login shell, then that account can’t have normal shell access to your server. To use this, specify git-shell instead of bash or csh for that account’s login shell. To do so, you must first add the full pathname of the git-shell command to /etc/shells if it’s not already there:
$ cat /etc/shells   # see if git-shell is already in there. If not...
$ which git-shell   # make sure git-shell is installed on your system.
$ sudo -e /etc/shells  # and add the path to git-shell from last command
Now you can edit the shell for a user using chsh <username> -s <shell>:
$ sudo chsh git -s $(which git-shell)Now, the git user can still use the SSH connection to push and pull Git repositories but can’t shell onto the machine. If you try, you’ll see a login rejection like this:
$ ssh git@gitserver
fatal: Interactive git shell is not enabled.
hint: ~/git-shell-commands should exist and have read and execute access.
Connection to gitserver closed.
At this point, users are still able to use SSH port forwarding to access any host the git server is able to reach. If you want to prevent that, you can edit the authorized_keys file and prepend the following options to each key you’d like to restrict:
no-port-forwarding,no-X11-forwarding,no-agent-forwarding,no-ptyThe result should look like this:
$ cat ~/.ssh/authorized_keys
no-port-forwarding,no-X11-forwarding,no-agent-forwarding,no-pty ssh-rsa
AAAAB3NzaC1yc2EAAAADAQABAAABAQCB007n/ww+ouN4gSLKssMxXnBOvf9LGt4LojG6rs6h
PB09j9R/T17/x4lhJA0F3FR1rP6kYBRsWj2aThGw6HXLm9/5zytK6Ztg3RPKK+4kYjh6541N
YsnEAZuXz0jTTyAUfrtU3Z5E003C4oxOj6H0rfIF1kKI9MAQLMdpGW1GYEIgS9EzSdfd8AcC
IicTDWbqLAcU4UpkaX8KyGlLwsNuuGztobF8m72ALC/nLF6JLtPofwFBlgc+myivO7TCUSBd
LQlgMVOFq1I2uPWQOkOWQAHukEOmfjy2jctxSDBQ220ymjaNsHT4kgtZg2AYYgPqdAv8JggJ
ICUvax2T9va5 gsg-keypair

no-port-forwarding,no-X11-forwarding,no-agent-forwarding,no-pty ssh-rsa
AAAAB3NzaC1yc2EAAAADAQABAAABAQDEwENNMomTboYI+LJieaAY16qiXiH3wuvENhBG...
Now Git network commands will still work just fine but the users won’t be able to get a shell.
GitLab
Installation
GitLab is a database-backed web application, so its installation is more involved than some other Git servers. GitLab strongly recommends installing GitLab on your server via the official Omnibus GitLab package.
Administration
GitLab’s administration interface is accessed over the web. Simply point your browser to the hostname or IP address where GitLab is installed, and log in as the admin user. The default username is admin@local.host, and the default password is 5iveL!fe (which you must change right away). After you’ve logged in, click the “Admin area” icon in the menu at the top right.
Users
Everybody using your GitLab server must have a user account. User accounts are quite simple, they mainly contain personal information attached to login data. Each user account has a namespace, which is a logical grouping of projects that belong to that user. If the user jane had a project named project, that project’s URL would be http://server/jane/project.
A GitLab group is a collection of projects, along with data about how users can access those projects. Each group has a project namespace (the same way that users do), so if the group training has a project materials, its URL would be http://server/training/materials.
Projects
A GitLab project roughly corresponds to a single Git repository. Every project belongs to a single namespace, either a user or a group. If the project belongs to a user, the owner of the project has direct control over who has access to the project; if the project belongs to a group, the group’s user-level permissions will take effect.
Every project has a visibility level, which controls who has read access to that project’s pages and repository. If a project is Private, the project’s owner must explicitly grant access to specific users. An Internal project is visible to any logged-in user, and a Public project is visible to anyone. Note that this controls both git fetch access as well as access to the web UI for that project.
Hooks
GitLab includes support for hooks, both at a project or system level. For either of these, the GitLab server will perform an HTTP POST with some descriptive JSON whenever relevant events occur. This is a great way to connect your Git repositories and GitLab instance to the rest of your development automation, such as CI servers, chat rooms, or deployment tools.
Basic Usage
The first thing you’ll want to do with GitLab is create a new project. You can do this by clicking on the “+” icon on the toolbar. You’ll be asked for the project’s name, which namespace it should belong to, and what its visibility level should be. Most of what you specify here isn’t permanent, and can be changed later through the settings interface. Click “Create Project”, and you’re done.
Once the project exists, you’ll probably want to connect it with a local Git repository. Each project is accessible over HTTPS or SSH, either of which can be used to configure a Git remote. The URLs are visible at the top of the project’s home page. For an existing local repository, this command will create a remote named gitlab to the hosted location:
$ git remote add gitlab https://server/namespace/project.gitIf you don’t have a local copy of the repository, you can simply do this:
$ git clone https://server/namespace/project.gitThe web UI provides access to several useful views of the repository itself. Each project’s home page shows recent activity, and links along the top will lead you to views of the project’s files and commit log.
Working Together
The simplest way of working together on a GitLab project is by giving each user direct push access to the Git repository. You can add a user to a project by going to the “Members” section of that project’s settings, and associating the new user with an access level (the different access levels are discussed a bit in Groups). By giving a user an access level of “Developer” or above, that user can push commits and branches directly to the repository.
Another, more decoupled way of collaboration is by using merge requests. This feature enables any user that can see a project to contribute to it in a controlled way. Users with direct access can simply create a branch, push commits to it, and open a merge request from their branch back into master or any other branch. Users who don’t have push permissions for a repository can “fork” it to create their own copy, push commits to their copy, and open a merge request from their fork back to the main project. This model allows the owner to be in full control of what goes into the repository and when, while allowing contributions from untrusted users.
Merge requests and issues are the main units of long-lived discussion in GitLab. Each merge request allows a line-by-line discussion of the proposed change (which supports a lightweight kind of code review), as well as a general overall discussion thread. Both can be assigned to users, or organized into milestones.
Distributed Workflows
Centralized Workflow
In centralized systems, there is generally a single collaboration model — the centralized workflow. One central hub, or repository, can accept code, and everyone synchronizes their work with it. A number of developers are nodes — consumers of that hub — and synchronize with that centralized location.
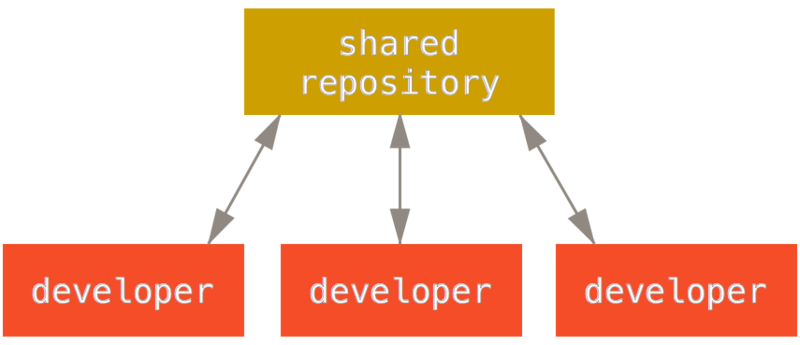
This means that if two developers clone from the hub and both make changes, the first developer to push their changes back up can do so with no problems. The second developer must merge in the first one’s work before pushing changes up, so as not to overwrite the first developer’s changes. This concept is as true in Git as it is in Subversion (or any CVCS), and this model works perfectly well in Git.
If you are already comfortable with a centralized workflow in your company or team, you can easily continue using that workflow with Git. Simply set up a single repository, and give everyone on your team push access; Git won’t let users overwrite each other.
This is also not limited to small teams. With Git’s branching model, it’s possible for hundreds of developers to successfully work on a single project through dozens of branches simultaneously.
Integration-Manager Workflow
Because Git allows you to have multiple remote repositories, it’s possible to have a workflow where each developer has write access to their own public repository and read access to everyone else’s. This scenario often includes a canonical repository that represents the “official” project. To contribute to that project, you create your own public clone of the project and push your changes to it. Then, you can send a request to the maintainer of the main project to pull in your changes. The maintainer can then add your repository as a remote, test your changes locally, merge them into their branch, and push back to their repository. The process works as follows (see Integration-manager workflow):
-
The project maintainer pushes to their public repository.
-
A contributor clones that repository and makes changes.
-
The contributor pushes to their own public copy.
-
The contributor sends the maintainer an email asking them to pull changes.
-
The maintainer adds the contributor’s repository as a remote and merges locally.
-
The maintainer pushes merged changes to the main repository.
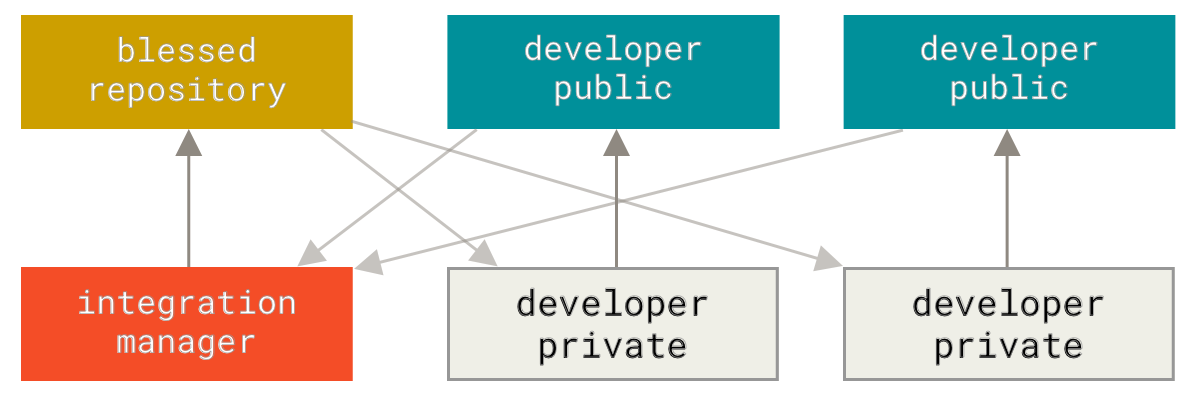
This is a very common workflow with hub-based tools like GitHub or GitLab, where it’s easy to fork a project and push your changes into your fork for everyone to see. One of the main advantages of this approach is that you can continue to work, and the maintainer of the main repository can pull in your changes at any time. Contributors don’t have to wait for the project to incorporate their changes — each party can work at their own pace.
Dictator and Lieutenants Workflow
This is a variant of a multiple-repository workflow. It’s generally used by huge projects with hundreds of collaborators; one famous example is the Linux kernel. Various integration managers are in charge of certain parts of the repository; they’re called lieutenants. All the lieutenants have one integration manager known as the benevolent dictator. The benevolent dictator pushes from their directory to a reference repository from which all the collaborators need to pull. The process works like this (see Benevolent dictator workflow):
-
Regular developers work on their topic branch and rebase their work on top of
master. Themasterbranch is that of the reference repository to which the dictator pushes. -
Lieutenants merge the developers' topic branches into their
masterbranch. -
The dictator merges the lieutenants'
masterbranches into the dictator’smasterbranch. -
Finally, the dictator pushes that
masterbranch to the reference repository so the other developers can rebase on it.
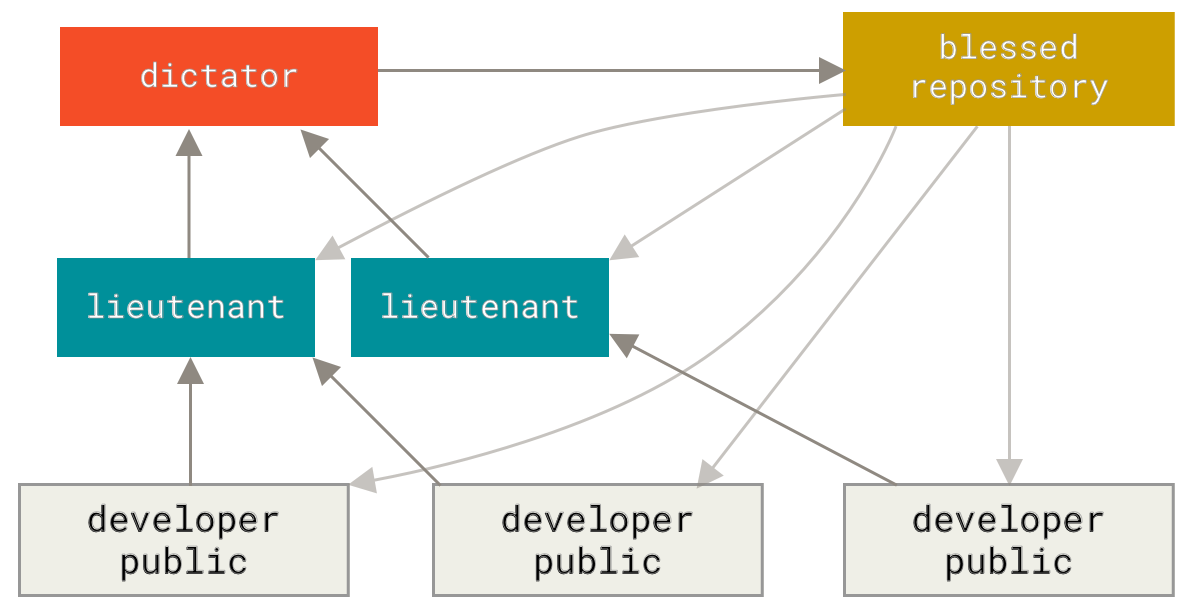
This kind of workflow isn’t common, but can be useful in very big projects, or in highly hierarchical environments. It allows the project leader (the dictator) to delegate much of the work and collect large subsets of code at multiple points before integrating them.
Patterns for Managing Source Code Branches
|
Note
|
Martin Fowler has made a guide "Patterns for Managing Source Code Branches". This guide covers all the common Git workflows, and explains how/when to use them. There’s also a section comparing high and low integration frequencies. |
Commit Guidelines
The Git project provides a document that lays out a number of good tips for creating commits from which to submit patches — you can read it in the Git source code in the Documentation/SubmittingPatches file.
First, your submissions should not contain any whitespace errors. Git provides an easy way to check for this — before you commit, run git diff --check, which identifies possible whitespace errors and lists them for you.
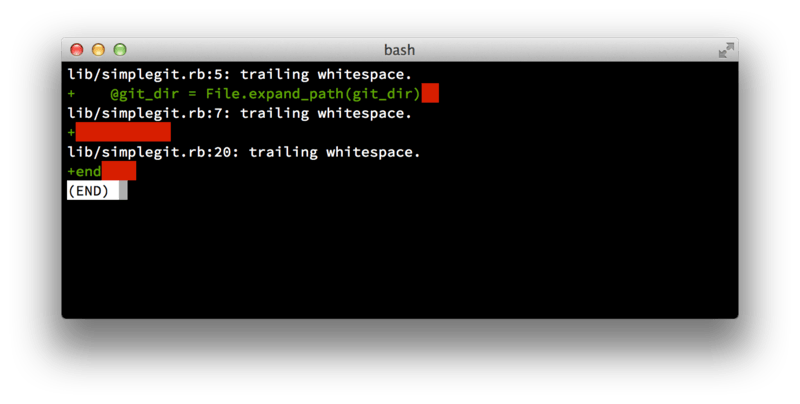
Next, try to make each commit a logically separate changeset. If you can, try to make your changes digestible — don’t code for a whole weekend on five different issues and then submit them all as one massive commit on Monday. Even if you don’t commit during the weekend, use the staging area on Monday to split your work into at least one commit per issue, with a useful message per commit. If some of the changes modify the same file, try to use git add --patch to partially stage files (covered in detail in Interactive Staging). The project snapshot at the tip of the branch is identical whether you do one commit or five, as long as all the changes are added at some point, so try to make things easier on your fellow developers when they have to review your changes.
This approach also makes it easier to pull out or revert one of the changesets if you need to later. Rewriting History describes a number of useful Git tricks for rewriting history and interactively staging files — use these tools to help craft a clean and understandable history before sending the work to someone else.
The last thing to keep in mind is the commit message. Getting in the habit of creating quality commit messages makes using and collaborating with Git a lot easier. As a general rule, your messages should start with a single line that’s no more than about 50 characters and that describes the changeset concisely, followed by a blank line, followed by a more detailed explanation. The Git project requires that the more detailed explanation include your motivation for the change and contrast its implementation with previous behavior — this is a good guideline to follow. Write your commit message in the imperative: "Fix bug" and not "Fixed bug" or "Fixes bug." Here is a template you can follow, which we’ve lightly adapted from one originally written by Tim Pope:
Capitalized, short (50 chars or less) summary

More detailed explanatory text, if necessary.  Wrap it to about 72
characters or so.  In some contexts, the first line is treated as the
subject of an email and the rest of the text as the body.  The blank
line separating the summary from the body is critical (unless you omit
the body entirely); tools like rebase will confuse you if you run the
two together.

Write your commit message in the imperative: "Fix bug" and not "Fixed bug"
or "Fixes bug."  This convention matches up with commit messages generated
by commands like git merge and git revert.

Further paragraphs come after blank lines.

- Bullet points are okay, too

- Typically a hyphen or asterisk is used for the bullet, followed by a
  single space, with blank lines in between, but conventions vary here

- Use a hanging indent
If all your commit messages follow this model, things will be much easier for you and the developers with whom you collaborate. The Git project has well-formatted commit messages — try running git log --no-merges there to see what a nicely-formatted project-commit history looks like.


【推荐】国内首个AI IDE,深度理解中文开发场景,立即下载体验Trae
【推荐】编程新体验,更懂你的AI,立即体验豆包MarsCode编程助手
【推荐】抖音旗下AI助手豆包,你的智能百科全书,全免费不限次数
【推荐】轻量又高性能的 SSH 工具 IShell:AI 加持,快人一步
· 震惊!C++程序真的从main开始吗?99%的程序员都答错了
· 【硬核科普】Trae如何「偷看」你的代码?零基础破解AI编程运行原理
· 单元测试从入门到精通
· 上周热点回顾(3.3-3.9)
· winform 绘制太阳,地球,月球 运作规律