Django——实现最基础的评论功能(只有一级评论)
我对评论功能的理解:
————————(1)数据库建一个评论的表
————————(2)前端建一个提交评论的form表单
————————(3)表单提交评论内容后写入到数据库评论表中
————————(4)将评论表的数据取出来展示到前端评论列表中
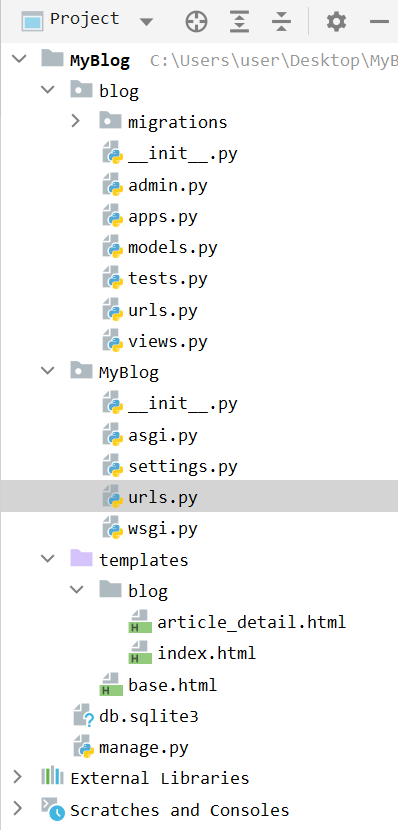
1、项目目录结构
2、路由
(1)总路由:
1 2 3 4 5 6 7 | from django.contrib import adminfrom django.urls import path,includeurlpatterns = [ path('admin/', admin.site.urls), path('blog/',include('blog.urls'))] |
(2)app路由:
1 2 3 4 5 6 7 | from django.urls import path,re_pathfrom blog import viewsurlpatterns = [ path('',views.index), re_path('article_detail/(\d+)',views.article_detail) # 传入文章ID参数] |
3、模型
1 2 3 4 5 6 7 8 9 10 11 12 13 14 15 16 17 18 19 20 21 22 23 24 25 | from django.db import modelsfrom django.contrib.auth.models import Userclass Article(models.Model): title = models.CharField(max_length=70,verbose_name='文章标题') content = models.TextField(verbose_name='正文') author = models.ForeignKey(to=User,on_delete=models.DO_NOTHING,verbose_name='作者') created_time = models.DateTimeField(auto_now_add=True,verbose_name='发布时间') class Meta: db_table = 'article' verbose_name = '文章' verbose_name_plural = verbose_nameclass Comment(models.Model): article = models.ForeignKey(to=Article,on_delete=models.DO_NOTHING,verbose_name='文章') content = models.TextField(verbose_name='评论内容') author = models.ForeignKey(User,on_delete=models.DO_NOTHING,verbose_name='评论者') post_time = models.DateTimeField(auto_now_add=True,verbose_name='评论时间') class Meta: db_table = 'comment' verbose_name = '评论' verbose_name_plural = verbose_name |
4、视图函数
1 2 3 4 5 6 7 8 9 10 11 12 13 14 15 16 17 18 19 20 21 22 23 24 25 26 27 28 29 30 31 32 33 34 35 | from django.shortcuts import render,HttpResponse,redirectfrom django.core.paginator import Paginatorfrom blog.models import Articlefrom blog.models import Commentdef index(request): all_article_list = Article.objects.all() paginator = Paginator(all_article_list,10) #实例化分页器对象 page = int(request.GET.get('page',1)) #获取页码数 article_list_obj = paginator.page(page) #获取当前页的分页对象 article_list = article_list_obj.object_list #获取当前页的数据列表 context = { 'article_list': article_list, 'paginator': paginator, 'article_list_obj': article_list_obj } return render(request,'blog/index.html',context=context)def article_detail(request,article_id): if request.method == 'GET': article = Article.objects.get(id=article_id) comment_list = Comment.objects.filter(article_id=article.id) context = { 'article': article, 'request': request, 'comment_list': comment_list } return render(request,'blog/article_detail.html',context=context) else: c_id = article_id c_author = request.user.id c_content = request.POST.get('content') Comment.objects.create(content=c_content,article_id=c_id,author_id=c_author) return redirect('/blog/article_detail/{}/'.format(c_id)) |
5、模板HTML
(1)base.html
1 2 3 4 5 6 7 8 9 10 11 12 13 14 15 16 17 18 19 20 21 22 23 24 25 26 27 28 29 30 31 32 33 34 35 36 37 38 39 40 41 42 43 44 45 46 47 48 49 50 51 52 53 54 55 56 57 58 59 | <!doctype html><html lang="zh-CN"> <head> <meta charset="utf-8"> <meta http-equiv="X-UA-Compatible" content="IE=edge"> <meta name="viewport" content="width=device-width, initial-scale=1"> <!-- The above 3 meta tags *must* come first in the head; any other head content must come *after* these tags --> <meta name="description" content=""> <meta name="author" content=""> <link rel="icon" href="https://cdn.jsdelivr.net/npm/@bootcss/v3.bootcss.com@1.0.14/favicon.ico"> <link rel="canonical" href="https://getbootstrap.com/docs/3.4/examples/jumbotron/"> <title>{% block title %}{% endblock %}</title> <!-- Bootstrap core CSS --> <link href="https://cdn.jsdelivr.net/npm/@bootcss/v3.bootcss.com@1.0.14/dist/css/bootstrap.min.css" rel="stylesheet"> <!-- IE10 viewport hack for Surface/desktop Windows 8 bug --> <link href="https://cdn.jsdelivr.net/npm/@bootcss/v3.bootcss.com@1.0.14/assets/css/ie10-viewport-bug-workaround.css" rel="stylesheet"> <!-- Custom styles for this template --> <link href="https://cdn.jsdelivr.net/npm/@bootcss/v3.bootcss.com@1.0.14/examples/jumbotron/jumbotron.css" rel="stylesheet"> <!-- Just for debugging purposes. Don't actually copy these 2 lines! --> <!--[if lt IE 9]><script src="https://cdn.jsdelivr.net/npm/@bootcss/v3.bootcss.com@1.0.14/assets/js/ie8-responsive-file-warning.js"></script><![endif]--> <script src="https://cdn.jsdelivr.net/npm/@bootcss/v3.bootcss.com@1.0.14/assets/js/ie-emulation-modes-warning.js"></script> <!-- HTML5 shim and Respond.js for IE8 support of HTML5 elements and media queries --> <!--[if lt IE 9]> <script src="https://oss.maxcdn.com/html5shiv/3.7.3/html5shiv.min.js"></script> <script src="https://oss.maxcdn.com/respond/1.4.2/respond.min.js"></script> <![endif]--> </head> <body> <nav class="navbar navbar-inverse navbar-fixed-top"> <div class="container"> <div class="navbar-header"> <a class="navbar-brand" href="/blog/">博客首页</a> </div> <div id="navbar" class="navbar-collapse collapse"> <form class="navbar-form navbar-right"> <div class="form-group"> <input type="text" placeholder="Email" class="form-control"> </div> <div class="form-group"> <input type="password" placeholder="Password" class="form-control"> </div> <button type="submit" class="btn btn-success">登录</button> </form> </div><!--/.navbar-collapse --> </div> </nav> <br> {% block content %} {% endblock %} </body></html> |
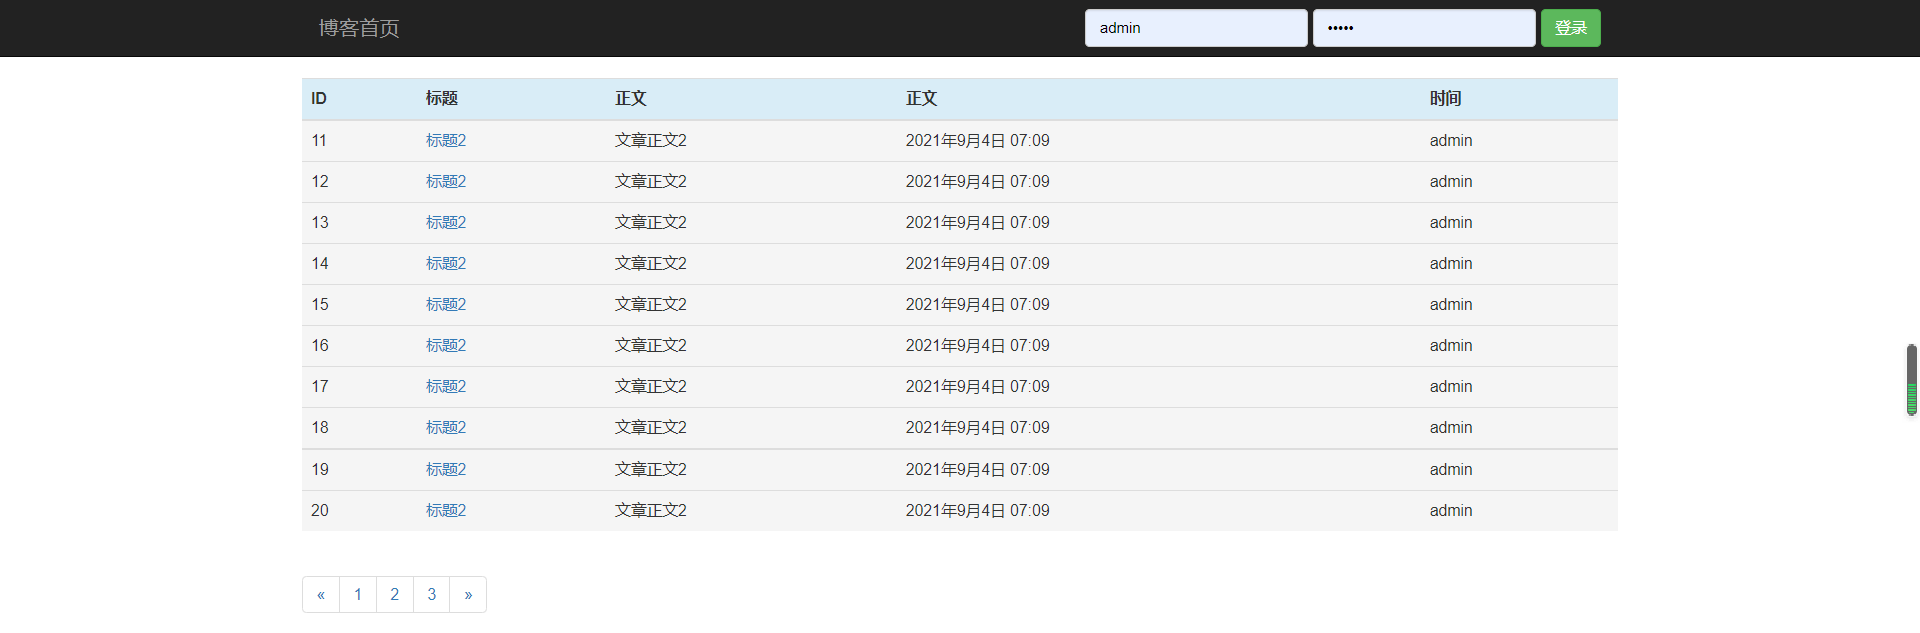
(2)首页index.html
1 2 3 4 5 6 7 8 9 10 11 12 13 14 15 16 17 18 19 20 21 22 23 24 25 26 27 28 29 30 31 32 33 34 35 36 37 38 39 40 41 42 43 44 45 46 47 48 49 50 51 52 53 54 55 56 57 58 59 60 | {% extends 'base.html' %}{% block title %} 博客首页{% endblock %}{% block content %} <div class="container"> <div class="row"> <div class="el-col-md-12"> <table class="table"> {# 文章列表 #} <tr class="info"> <th>ID</th> <th>标题</th> <th>正文</th> <th>正文</th> <th>时间</th> </tr> {% for article in article_list %} <tr class="active"> <td>{{ article.id }}</td> <td><a href="/blog/article_detail/{{ article.id }}/">{{ article.title}}</a></td> <td>{{ article.content|truncatechars:100}}</td> <td>{{ article.created_time}}</td> <td>{{ article.author.username}}</td> </tr> {% endfor %} </table> {# 文章列表结束 #} <div> {# 分页块 #} <nav aria-label="Page navigation"> <ul class="pagination"> {% if article_list_obj.has_previous %} <li> <a href="/blog/?page={{ article_list_obj.previous_page_number }}" aria-label="Previous"> <span aria-hidden="true">«</span> </a> </li> {% endif %} {% for number in paginator.page_range %} <li><a href="/blog/?page={{ number }}">{{ number }}</a></li> {% endfor %} {% if article_list_obj.has_next %} <li> <a href="/blog/?page={{ article_list_obj.next_page_number }}" aria-label="Next"> <span aria-hidden="true">»</span> </a> </li> {% endif %} </ul> </nav> </div> {# 分页块结束 #} </div> </div> </div>{% endblock %} |
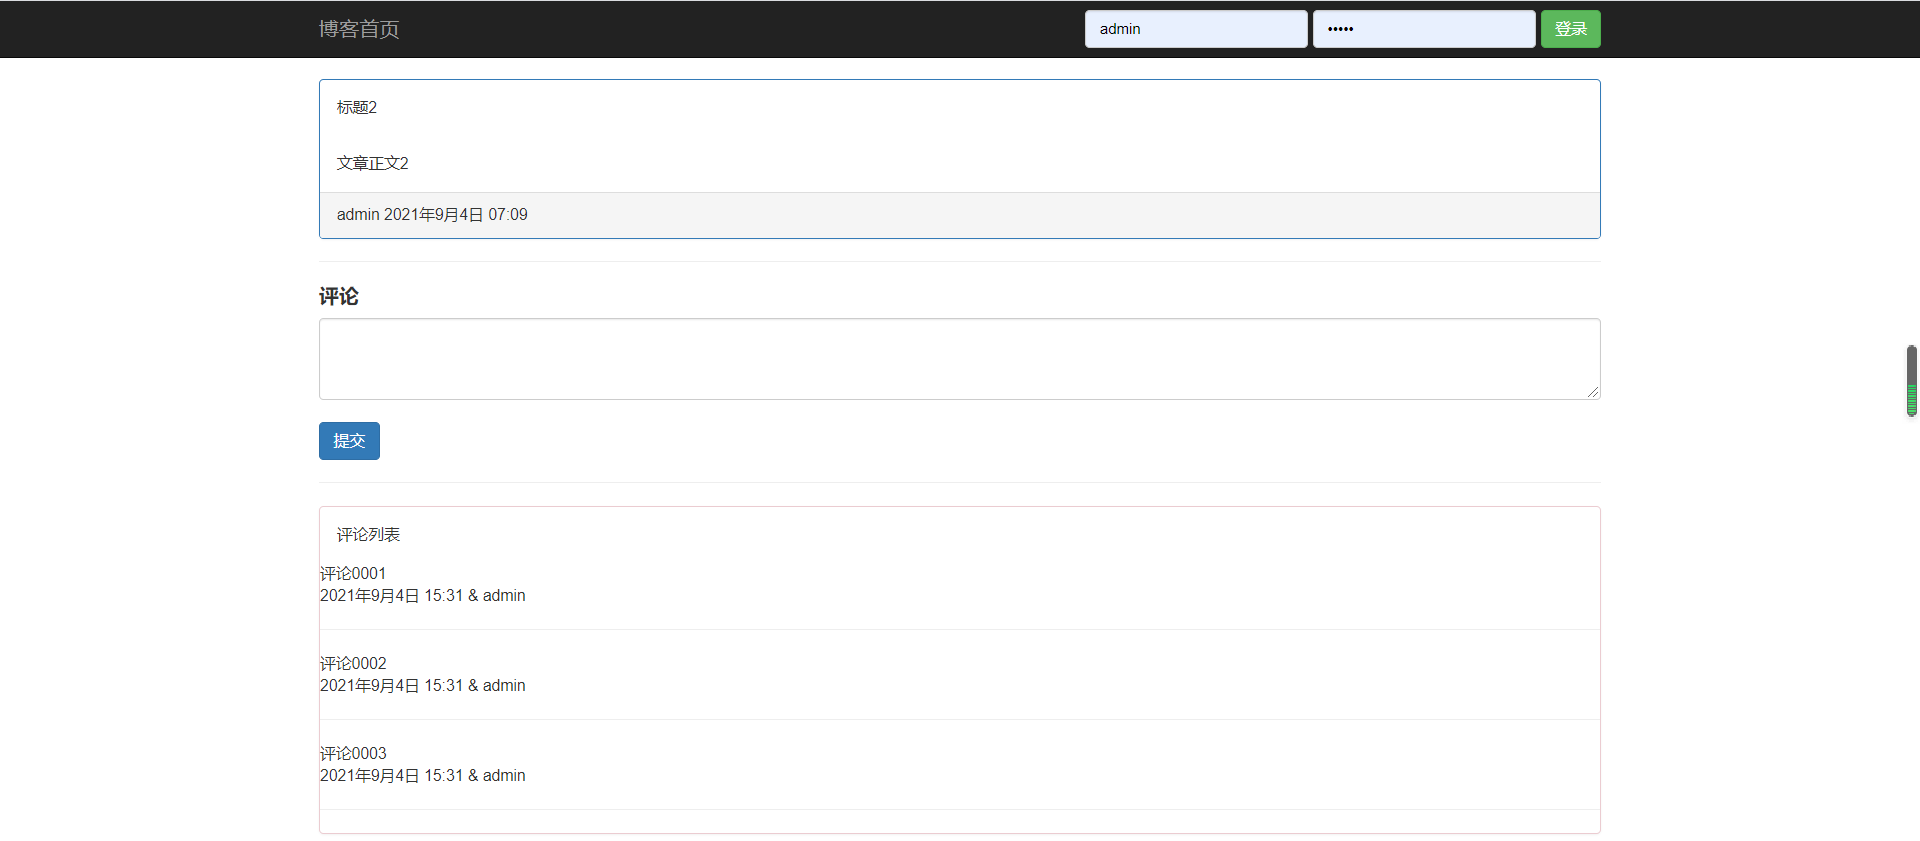
(3)文章详情article_detail.html
1 2 3 4 5 6 7 8 9 10 11 12 13 14 15 16 17 18 19 20 21 22 23 24 25 26 27 28 29 30 31 32 33 34 35 36 37 38 39 40 41 42 43 44 45 46 47 48 49 | {% extends 'base.html' %}{% block title %} 文章详情{% endblock %}{% block content %}<div class="container"> <div class="row"> <div class="col-md-12"> <div class="panel panel-primary"> {# 文章详情区域 #} <div class="panel-body"> {{ article.title }} </div> <div class="panel-body"> {{ article.content }} </div> <div class="panel-footer">{{ article.author }} {{ article.created_time }}</div> </div> {# 文章详情区域结束 #} <div> <hr> <h4><b>评论</b></h4> <form action="" method="post"> <textarea class="form-control" rows="3" name="content"></textarea> <br> <button type="submit" class="btn btn-primary">提交</button> </form> <hr> <div class="panel panel-danger"> <div class="panel-body">评论列表</div> <div> {% for comment in comment_list %} <div> {{ comment.content }}</div> <div> {{ comment.post_time }} & {{ comment.author.username }}</div> <hr> {% endfor %} </div> </div> </div> </div> </div></div>{% endblock %} |
6、效果


【推荐】国内首个AI IDE,深度理解中文开发场景,立即下载体验Trae
【推荐】编程新体验,更懂你的AI,立即体验豆包MarsCode编程助手
【推荐】抖音旗下AI助手豆包,你的智能百科全书,全免费不限次数
【推荐】轻量又高性能的 SSH 工具 IShell:AI 加持,快人一步
· AI与.NET技术实操系列:基于图像分类模型对图像进行分类
· go语言实现终端里的倒计时
· 如何编写易于单元测试的代码
· 10年+ .NET Coder 心语,封装的思维:从隐藏、稳定开始理解其本质意义
· .NET Core 中如何实现缓存的预热?
· 分享一个免费、快速、无限量使用的满血 DeepSeek R1 模型,支持深度思考和联网搜索!
· 基于 Docker 搭建 FRP 内网穿透开源项目(很简单哒)
· ollama系列01:轻松3步本地部署deepseek,普通电脑可用
· 25岁的心里话
· 按钮权限的设计及实现