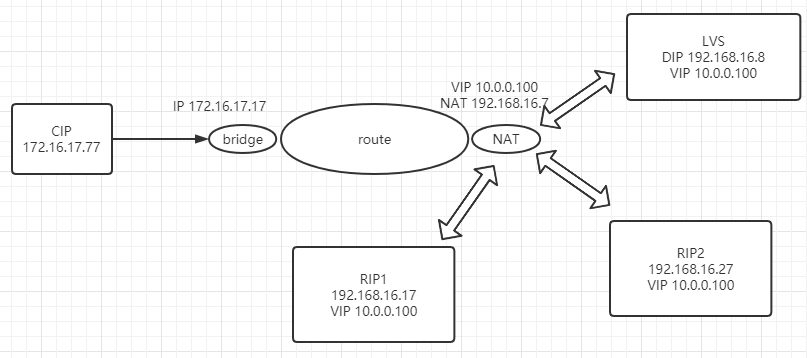
LVS DR模式的简单应用
1、DR模式下vip不在同一网段上实现过程(跨网段)

#客户端CIP配置
[root@CIP ~]#vim /etc/sysconfig/network-scripts/ifcfg-eth0
DEVICE=eth0
NAME=eth0
BOOTPROTO=static
IPADDR=172.16.17.77
PREFIX=24
GATEWAY=172.16.17.17
ONBOOT=yes
#路由配置route
[root@router ~]#cat /etc/sysconfig/network-scripts/ifcfg-eth0
DEVICE=eth0
NAME=eth0
BOOTPROTO=static
IPADDR=172.16.17.17
PREFIX=24
ONBOOT=yes

[root@router ~]#cat /etc/sysconfig/network-scripts/ifcfg-eth1
DEVICE=eth1
NAME=eth1
BOOTPROTO=static
IPADDR=192.168.16.7
PREFIX=24
ONBOOT=yes

[root@router ~]#ip addr add 10.0.0.100/24 dev eth0
#后端RS1,2配置
#RS1的网络配置
[root@rs1 ~]#yum -y install httpd ;systemctl enable --now httpd
[root@rs1 ~]#echo "RS1" > /var/www/html/index.html
[root@rs1 ~]#cat /etc/sysconfig/network-scripts/ifcfg-eth0
DEVICE=eth0
NAME=eth0
BOOTPROTO=static
IPADDR=192.168.16.17
PREFIX=24
GATEWAY=192.168.16.7
ONBOOT=yes

[root@rs1 ~]#ip addr add 10.0.0.100/24 dev eth0
[root@rs2 ~]#yum -y install httpd ;systemctl enable --now httpd
[root@rs2 ~]#echo "RS2" > /var/www/html/index.html
[root@rs2 ~]#cat /etc/sysconfig/network-scripts/ifcfg-eth0
DEVICE=eth0
NAME=eth0
BOOTPROTO=static
IPADDR=192.168.16.27
PREFIX=24
GATEWAY=192.168.16.7
ONBOOT=yes
[root@rs2 ~] #ip addr add 10.0.0.100/24 dev eth0


#RS1和RS2都进行如下配置
echo 1 > /proc/sys/net/ipv4/conf/all/arp_ignore
echo 1 > /proc/sys/net/ipv4/conf/lo/arp_ignore
echo 2 > /proc/sys/net/ipv4/conf/all/arp_announce
echo 2 > /proc/sys/net/ipv4/conf/lo/arp_announce
#LVS配置
[root@lvs ~]#yum -y install httpd ipvsadm ;systemctl enable --now httpd
[root@lvs ~]#echo "LVS " > /var/www/html/index.html
[root@lvs ~]#cat /etc/sysconfig/network-scripts/ifcfg-eth0
DEVICE=eth0
NAME=eth0
BOOTPROTO=static
IPADDR=192.168.16.8
PREFIX=24
GATEWAY=192.168.16.7
ONBOOT=yes
[root@lvs ~] #ip addr add 10.0.0.100/24 dev eth0
#设置规则
[root@LVS ~]#iptables -F && iptables -F -t nat
[root@LVS ~]#ipvsadm -A -t 10.0.0.100:80 -s wrr
[root@LVS ~]#ipvsadm -a -t 10.0.0.100:80 -r 192.168.16.17 -g -w 1
[root@LVS ~]#ipvsadm -a -t 10.0.0.100:80 -r 192.168.16.27-g -w 1
#测试访问
[root@internet ~]#curl 10.0.0.100
RS1

[root@internet ~]#curl 10.0.0.100
RS2
2、CentOS7.6 中 nfs 客户端使用 /etc/fatab 实现开机自动挂载
[root@centos7 ~]# vim /etc/fstab
10.0.0.18:/data/home          /mnt         nfs        netdev,rw       0 0
#把10.0.0.18上/data/home挂载到本地/mnt上以rw方式,实现开机自动挂载
3、CentOS7.6 中 nfs 客户端使用 autofs 实现使用 nfs 时实时挂载
#服务端安装nfs-utils,并启动nfs-server服务
[root@centos7 ~]# yum -y install nfs-untils;systemctl enable --now nfs-server
#客户端安装autofs,并启动服务,安装nfs-server
[root@centos7 ~]#yum -y install autofs nfs-utils;systemctl enable --now autofs
#NFS服务器创建用户和相应的家目录,将用户家目录共享,安装nfs-utils和auto方式 并启动服务
[root@centos7 ~]#mkdir -pv /data/home
[root@centos7 ~]#useradd -d /data/home/user1 -u 2000 user1
[root@centos7 ~]#vim /etc/exports.d/test.exports
/data/home *(rw)
[root@centos7 ~]#exportfs -r             #生效文件
[root@centos7 ~]#showmount  -e      #查看文件共享
#在第一台NFS客户端主机10.0.0.7上实现相对路径法的autofs
[root@centos7 ~]#useradd -M -u 2000 user1
[root@centos7 ~]#getent   passwd  user1
user1:x:2000:2000::home/user1:/bin/bash
[root@centos7 ~]#vim /etc/auto.master
/home   /etc/auto.home
[root@centos7 ~]#vim /etc/auto.home

*  -fstype=nfs,vers=3 10.0.0.8:/data/home/&
[root@centos7 ~]#systemctl restart autofs
[root@centos7 ~]#su - user1
Last login: Fri Jul  3 16:33:34 CST 2020 on pts/0
[user1@centos7 ~]$pwd
/home/user1
[user1@centos7 ~]$df /home/user1 -T
Filesystem               Type 1K-blocks   Used Available Use% Mounted on

10.0.0.8:/data/home/user1 nfs4  52403200 398464  52004736   1% /home/user1

#注意:home目录下其它用户家目录无法访问
#在第二台NFS客户端主机10.0.0.6上实现绝对路径法的autofs
[root@centos6 ~]#useradd -M -u 2000 user1
[root@centos6 ~]#vim /etc/auto.master
/- /etc/auto.home
[root@centos6 ~]#vim /etc/auto.home
/home/user1  -fstype=nfs,vers=3 nfsserver:/data/home/user1
[root@centos6 ~]#service autofs restart
[root@centos6 ~]#su - user1
[user1@centos6 ~]$pwd
/home/user1
[user1@centos6 ~]$df -T /home/user1
Filesystem                                 Type 1K-blocks   Used Available Use% Mounted on

10.0.0.8:/data/home/user1        nfs   52403200 398464  52004736   1% /home/user1


【推荐】编程新体验,更懂你的AI,立即体验豆包MarsCode编程助手
【推荐】凌霞软件回馈社区,博客园 & 1Panel & Halo 联合会员上线
【推荐】抖音旗下AI助手豆包,你的智能百科全书,全免费不限次数
【推荐】博客园社区专享云产品让利特惠,阿里云新客6.5折上折
【推荐】轻量又高性能的 SSH 工具 IShell:AI 加持,快人一步
· 开发中对象命名的一点思考
· .NET Core内存结构体系(Windows环境)底层原理浅谈
· C# 深度学习:对抗生成网络(GAN)训练头像生成模型
· .NET 适配 HarmonyOS 进展
· .NET 进程 stackoverflow异常后,还可以接收 TCP 连接请求吗?
· 本地部署 DeepSeek:小白也能轻松搞定!
· 基于DeepSeek R1 满血版大模型的个人知识库,回答都源自对你专属文件的深度学习。
· 在缓慢中沉淀,在挑战中重生!2024个人总结!
· 如何给本地部署的DeepSeek投喂数据,让他更懂你
· 大人,时代变了! 赶快把自有业务的本地AI“模型”训练起来!