ansible常用命令大全
ansible命令参数介绍
|
1
2
3
4
5
6
7
8
9
10
11
12
13
14
15
16
17
18
19
|
-m:要执行的模块,默认为command-a:模块的参数-u:ssh连接的用户名,默认用root,ansible.cfg中可以配置-k:提示输入ssh登录密码。当使用密码验证的时候用-s:sudo运行-U:sudo到那个用户,默认为root-K:提示输入sudo密码,当不是NOPASSWD模式时使用-C:只是测试一下会改变什么内容,不会真正去执行-c:连接类型(default=smart)-f:fork多少个进程并发处理,默认为5个-i:指定hosts文件路径,默认default=/etc/ansible/hosts-I 指定pattern,对<host_pattern>已匹配的主机中再过滤一次--list-hosts:只打印有哪些主机会执行这个playbook文件,不是实际执行-M:要执行的模块路径,默认为/usr/share/ansible-o:压缩输出,摘要输出--private-key 私钥路径-T: ssh连接超时时间,默认10秒-t:日志输出到该目录,日志文件名以主机名命名-v:verbost |
ansible 默认提供了很多模块来供我们使用。在 Linux 中,我们可以通过 ansible-doc -l 命令查看到当前 ansible 都支持哪些模块,通过 ansible-doc -s 模块名 又可以查看该模块有哪些参数可以使用。
我们常用的几个模块:
copy file cron group user yum service script ping command raw get_url synchronize
ansible '*' -m command -a 'uptime'
'*':自己定义的主机 -m command:命令
# 指定节点上的权限,属主和数组为root
ansible '*' -m file -a "dest=/tmp/t.sh mode=755 owner=root group=root"
#指定节点上定义一个计划任务,每隔3分钟到主控端更新一次时间
ansible '*' -m cron -a 'name="custom job" minute=*/3 hour=* day=* month=* weekday=* job="/usr/sbin/ntpdate 172.16.254.139"'
# 指定节点上创建一个组名为aaa,gid为2017的组
ansible all -m group -a 'gid=2017 name=a'
# 在节点上创建一个用户aaa,组为aaa
ansible all -m user -a 'name=aaa groups=aaa state=present'
删除用户示例
ansible all -m user -a 'name=aaa groups=aaa remove=yes'
# 在节点上安装httpd
ansible all -m yum -a "state=present name=httpd"
# 在节点上启动服务,并开机自启动
ansible all -m service -a 'name=httpd state=started enabled=yes'
# 检查主机连接
ansible '*' -m ping
# 执行远程命令
ansible '*' -m command -a 'uptime'
# 执行主控端脚本
ansible '*' -m script -a '/root/test.sh'
# 执行远程主机的脚本
ansible '*' -m shell -a 'ps aux|grep zabbix'
# 类似shell
ansible '*' -m raw -a "ps aux|grep zabbix|awk '{print \$2}'"
# 创建软链接
ansible '*' -m file -a "src=/etc/resolv.conf dest=/tmp/resolv.conf state=link"
# 删除软链接
ansible '*' -m file -a "path=/tmp/resolv.conf state=absent"
# 复制文件到远程服务器
ansible '*' -m copy -a "src=/etc/ansible/ansible.cfg dest=/tmp/ansible.cfg owner=root group=root mode=0644"
# 在节点上运行hostname
ansible all -m raw -a 'hostname|tee'
# 将指定url上的文件下载到/tmp下
ansible all -m get_url -a 'url=http://10.1.1.116/favicon.ico dest=/tmp'
synchronize模块:
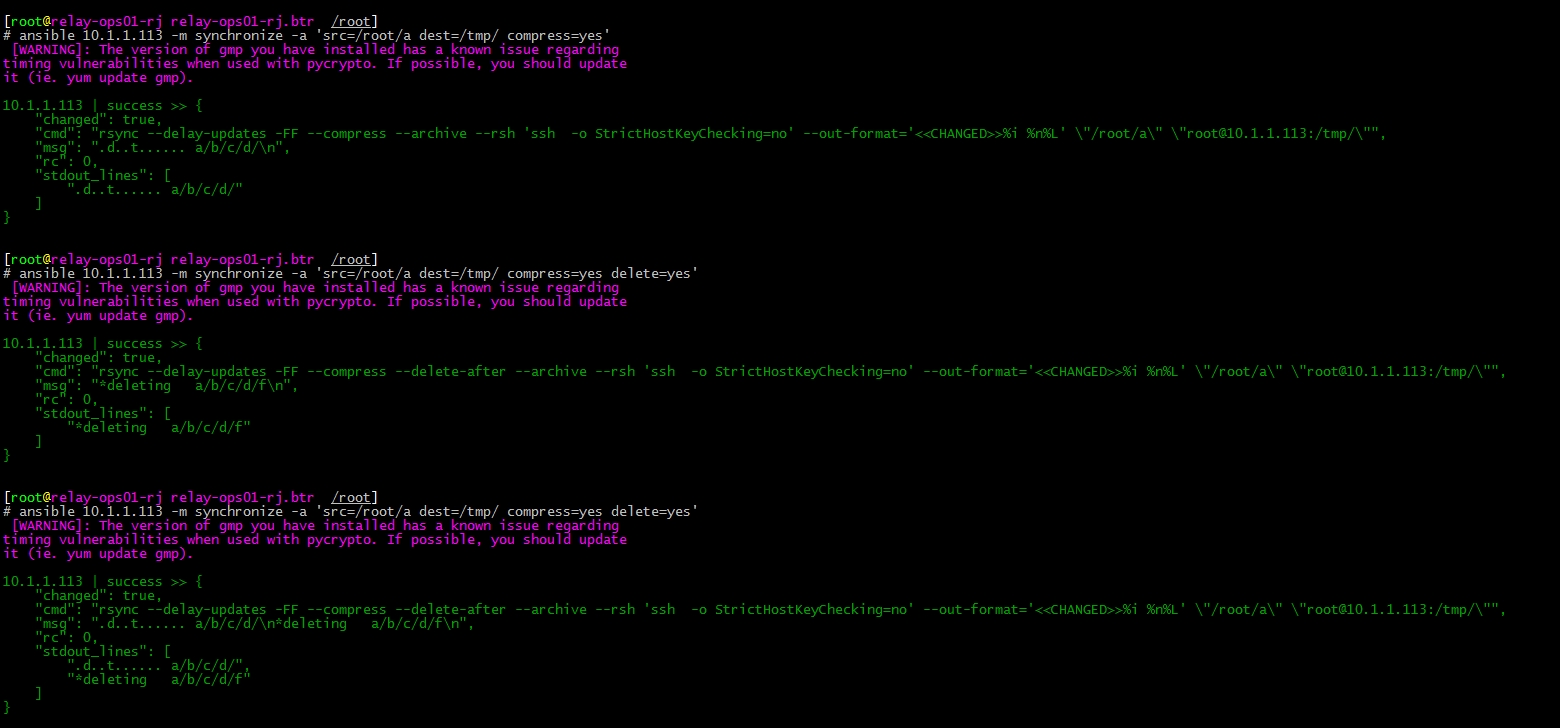
目的:将主控方/root/a目录推送到指定节点的/tmp目录下
命令:ansible all -m synchronize -a 'src=/root/a dest=/tmp/ compress=yes'
执行效果:
delete=yes 使两边的内容一样(即以推送方为主)
compress=yes 开启压缩,默认为开启
--exclude=.git 忽略同步.git结尾的文件
由于模块,默认都是推送push。因此,如果你在使用拉取pull功能的时候,可以参考如下来实现
mode=pull 更改推送模式为拉取模式
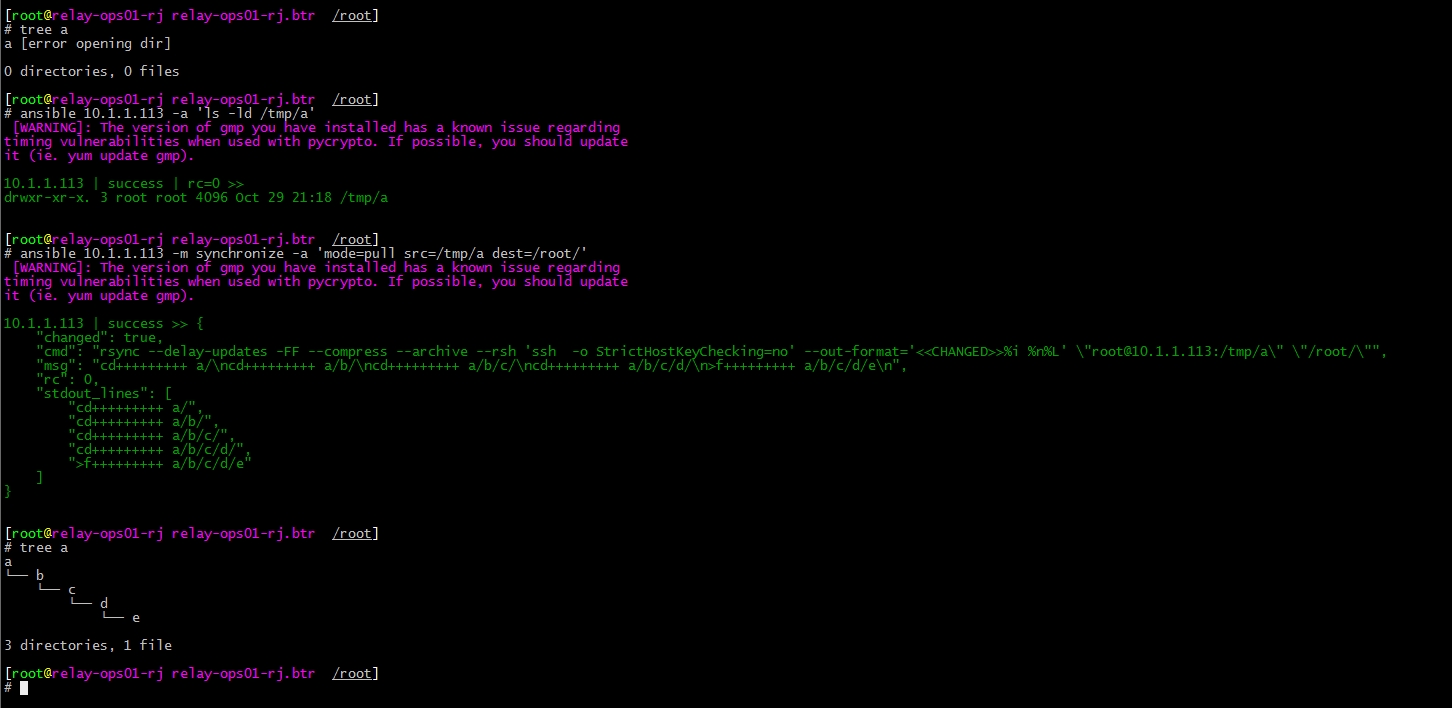
目的:将10.1.1.113节点的/tmp/a目录拉取到主控节点的/root目录下
命令:ansible 10.1.1.113 -m synchronize -a 'mode=pull src=/tmp/a dest=/root/'
执行效果:
由于模块默认启用了archive参数,该参数默认开启了recursive, links, perms, times, owner,group和-D参数。如果你将该参数设置为no,那么你将停止很多参数,比如会导致如下目的递归失败,导致无法拉取
其它相关的参数解释:
|
1
2
3
|
dest_port=22 # 指定目的主机的ssh端口,ansible配置文件中的 ansible_ssh_port 变量优先级高于该 dest_port 变量rsync_path # 指定 rsync 命令来在远程服务器上运行。这个参考rsync命令的--rsync-path参数,--rsync-path=PATH # 指定远程服务器上的rsync命令所在路径信息rsync_timeout # 指定 rsync 操作的 IP 超时时间,和rsync命令的 --timeout 参数效果一样 |
-------------------------------------------
个性签名:独学而无友,则孤陋而寡闻。做一个灵魂有趣的人!
如果觉得这篇文章对你有小小的帮助的话,记得在右下角点个“推荐”哦,在此感谢!


