ansible 模块 roles
ansible_all_ipv4_addresses # ipv4的所有地址
ansible_all_ipv6_addresses # ipv6的所有地址
ansible_date_time # 获取到控制节点时间
ansible_default_ipv4 # 默认的ipv4地址
ansible_distribution # 系统
ansible_distribution_major_version # 系统的大版本
ansible_distribution_version # 系统的版本号
ansible_domain #系统所在的域
ansible_env #系统的环境变量
ansible_hostname #系统的主机名
ansible_fqdn #系统的全名
ansible_machine #系统的架构
ansible_memory_mb #系统的内存信息
ansible_os_family # 系统的家族
ansible_pkg_mgr # 系统的包管理工具
ansible_processor_cores #系统的cpu的核数(每颗)
ansible_processor_count #系统cpu的颗数
ansible_processor_vcpus #系统cpu的总个数=cpu的颗数*CPU的核数
ansible_python # 系统上的python
ansible cache -m setup -a 'filter=*processor*' # 用来搜索
-
-
不同的环境
-
不同的用户
标准:
- hosts: db
  remote_user: root
  tasks:
  - name: createfile
    copy: content="大弦嘈嘈如急雨" dest=/tmp/a.txt
    when: a=="3"
  - name: cratefile
    copy: content="小弦切切如私语" dest=/tmp/a.txt
    when: a=="4"
ansible-playbook -e 'a=="3""' p1.yml
Ubuntu 安装包的方式是apt-get
- hosts: web
  tasks:
  - name: installnginx
    yum: name=nginx
  - name: copyfile
    copy: src=/etc/nginx/nginx.conf dest=/etc/nginx/nginx.conf
    tags: copyfile
  - name: start
    service: name=nginx state=started

#使用tags作用是在多个任务中只选择一个执行,在执行的下面输入 tags=name
执行
ansible-playbook -t copyfile p7.yml
#使用 - t name 进行执行
- hosts: web
  tasks:
  - name: crateuser
    user: name={{item}}
    with_items:
    - alex20
    - alex21
    - alex22
- hosts: web
  tasks:
  - name: crateuser
    user: name={{item}}
    with_items:
    - alex30
    - alex31
    - alex32
  - name: crategroup
    group: name={{item}}
    with_items:
    - wulaoshi20
    - wulaoshi21
    - wulaoshi22
#都可以用{{item}}为参数传递
- hosts: web
  tasks:
  - name: crategroup
    group: name={{item}}
    with_items:
    - wulaoshi30
    - wulaoshi31
    - wulaoshi32
  - name: createuser
    user: name={{item.name}} group={{item.group}}
    with_items:
    - {'name':alex40,'group':wulaoshi30}
    - {'name':alex41,'group':wulaoshi31}
    - {'name':alex42,'group':wulaoshi32}

#通过进行字典的创建来完成嵌套
copy和tamplate的区别
-
copy模块不替代参数
-
template模块替代参数
绝对路径
- hosts: web
  tasks:
  - name: installredis
    yum: name=redis
  - name: copyfile
    template: src=/etc/redis.conf dest=/etc/redis.conf
#使用绝对路径写
  - name: start
    service: name=redis state=started
  配置文件: bind {{ ansible_default_ipv4.address }}
相对路径
- hosts: web
  tasks:
  - name: installredis
    yum: name=redis
  - name: copyfile
    template: src=redis.conf dest=/etc/redis.conf
  - name: start
    service: name=redis state=started
- hosts: web
  tasks:
  - name: installredis
    yum: name=redis
  - name: copyfile
    template: src=redis.conf dest=/etc/redis.conf
  - name: start
    service: name=redis state=started
ps:写相对路径: 在当前目录下新建一个templates目录,然后把文件放在templates目录里面 将文件cp到templates
- hosts: web
  tasks:
  - name: installredis
    yum: name=redis
  - name: copyfile
    template: src=redis.conf dest=/etc/redis.conf
    tags: copyfile
    notify: restart
  - name: start
    service: name=redis state=started
  handlers:
  - name: restart
    service: name=redis state=restarted
回顾 playbook

传参

条件判断 when

循环 with_items  item

嵌套循环  字典  通过点来取值

标签  tags  -t 来传递标签

模板  template

handlers   不会执行, notify
-
-
可以互相调用
使用:
在/root 下新建文件夹
mkdir roles
roles文件夹里面是要创建的每一个角色,每一个角色一个文件夹
mkdir web
mkdir acahe
mkdir db
每一个角色里面都有tasks(必须的),templates,files,handlers,vars目录
-pv mkdir {tasks(必须的),templates,files,handlers,vars}
递归创建文件夹
在每一个目录下,都要创建main.yml文件,通过import_tasks来调用,tasks下的main.yml
- import_tasks: copyfile.yml
- import_tasks: install.yml
- import_tasks: start.yml
- import_tasks: roles/db/tasks/createuser.yml
tasks目录下的任务
copyfile.yml
- name: copyfile
  template: src=redis.conf.j2 dest=/etc/redis.conf
  tags: copyfile
  notify: restart
install.yml
- name: install
  yum: name=redis
~
start.yml
- name: start
  service: name=redis state=started
其中templates文件夹中的文件可以通过相对路径来调用
在 templates 文件夹下为相对路径template 录入文件
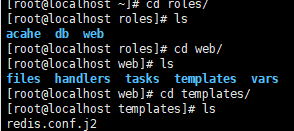
cp /etc/redis/redis.conf /redis.conf.j2
将文件名改为jinjia2 格式
在这些步骤完成后,就差启动了 ,创建 roles 文件夹下同级目录 ,web.yml
- hosts: web
  remote_user: root
  roles:
  - web
ansible-playbook --syntax-check web.yml
ansible-playbook -t copyfile web.yml
如何调用roles ?
进入roles 文件夹
假设roles 下的db 使用web 的文件夹
进入 db 文件夹下,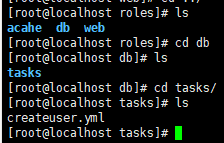
创建文件 createuser.yml
- name: createuser
  user: name=alex888
由于是借助web 文件下的roles,所以到 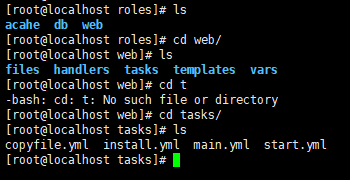
在main.yml写入
- import_tasks: copyfile.yml
- import_tasks: install.yml
- import_tasks: start.yml
- import_tasks: roles/db/tasks/createuser.yml  #这个借助要使用绝对路径
最后启动web.yml就好了
