6-5 vue-router、vue-cli和单文件组件-模块化开发
目录:
- vue-router 模块化
- axios模块化
- 自定义组件添加事件
一、vue-router 模块化
我们在安装webpack的时候,并没有默认安装 vue-router,所以我们这会需要安装 vue-router,并且实现vue-router的模块化。
目录结构:
vue-cli-demo   //项目名
    |-node_modules  //插件安装目录
    |-src
        |-assets   //项目所需的资源目录(静态资源)
            |-logs.png
        |-components  //手动创建我们需要 路由 跳转的组件(分别是home和news)
            |-MyButton.vue  //自定义按钮组件,在App.vue中调用,并且 绑定事件
            |-Home.vue     //<template><div id="home"><h1>这是主页</h1></div></template>
            |-News.vue    //<template><div id="news"><h1>这是新闻</h1></div></template>
        |-App.vue
        |-main.js    //入口文件
        |-routes.config.js   //单独手动创建配置路由的文件
    |-.babelrc
    |-editorconfig
    |-.gitignore
    |-index.html    //挂载文件
    |-package.json    //工程文件
    |-package-lock.json
    |-README.md
    |-webpack.config.js   //webpack配置文件
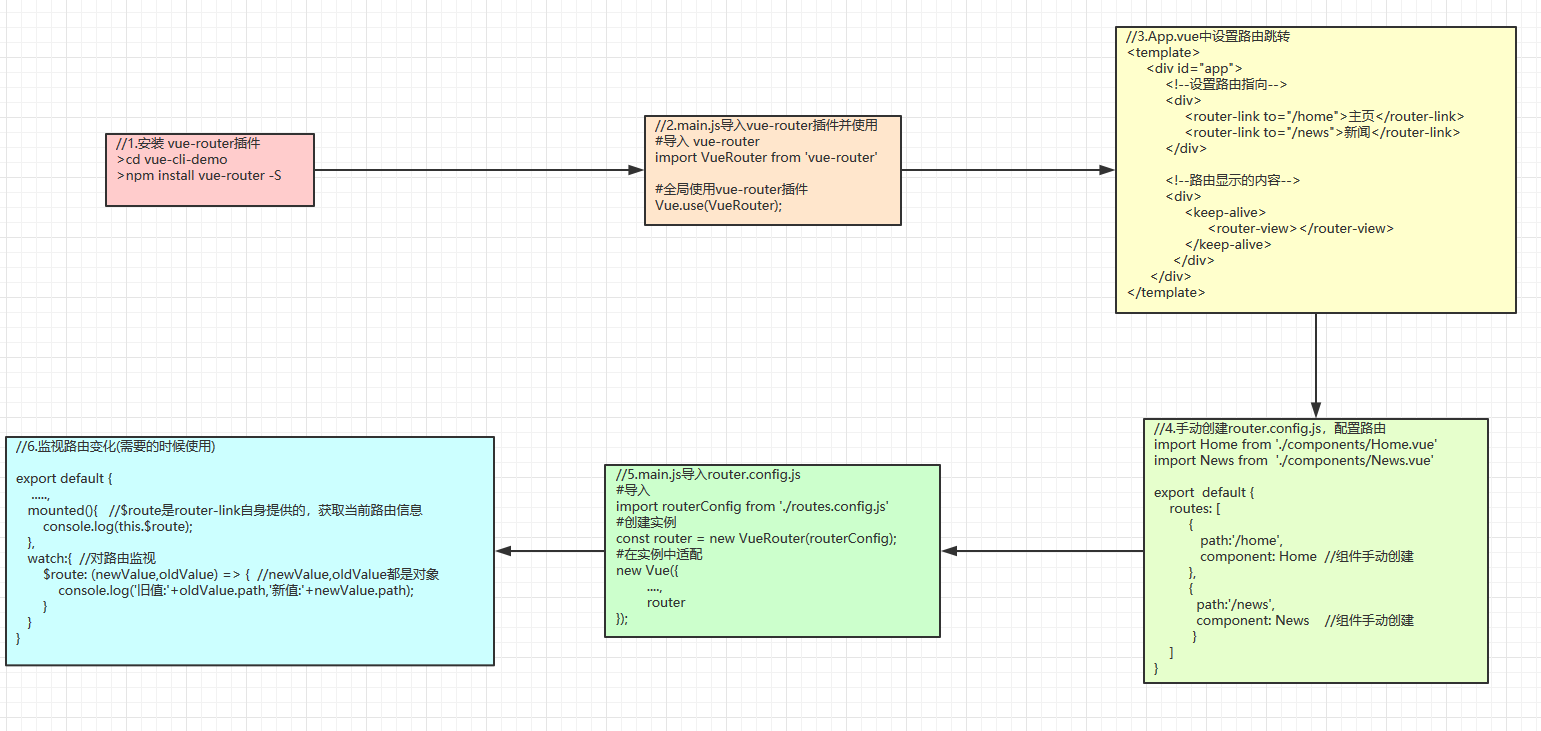
思路图:

1.1、vue-router安装
#进入webpack项目
D:\PycharmProjects\vue>cd vue-cli-demo

#安装生产需要的 vue-router 模块,-S:指的是生产需要
D:\PycharmProjects\vue\vue-cli-demo>npm install vue-router -S
1.2、编辑main.js
说明:当我们导入 vue-router的时候需要使用 Vue.use()安装插件,具体使用方法:Vue.use(plugin)
import Vue from 'vue'
import App from './App.vue'

#'vue-router' 是固定的,是我们安装vue-router的名字,VueRouter 是别名
import VueRouter from 'vue-router'

//使用VueRouter
Vue.use(VueRouter);

new Vue({
  el: '#app',
  render: h => h(App)
})
1.3、 编辑 App.vue
说明:vue-router路由组件导入之后,router-link标签就可以在任何组件中使用
<template>
  <div id="app">
    {{msg}}
    <!--设置路由指向-->
    <div>
      <router-link to="/home">主页</router-link>
      <router-link to="/news">新闻</router-link>
    </div>
    <!--路由显示的内容-->
    <div>
      <keep-alive>
        <router-view></router-view>
      </keep-alive>
    </div>
  </div>
</template>

<script>
  //export default{}
</script>
1.4、编辑router.config.js
//专门搞一个路由配置文件
import Home from './components/Home.vue'
import News from  './components/News.vue'

export  default {  //之前我们定义在外面的,现在我们把它定义在对象里面
  routes: [
    {
      path:'/home',
      component: Home
    },
    {
      path:'/news',
      component: News
    }
  ]
}
1.5、在main.js中导入router.config.js
import Vue from 'vue'
import App from './App.vue'
import VueRouter from 'vue-router'

//导入路由配置文件
import routerConfig from './routes.config.js'

Vue.use(VueRouter);

//创建路由实例
const router = new VueRouter(routerConfig);

new Vue({
  el: '#app',
  render: h => h(App),
  router   //创建好的路由实例,需要在vue实例中适配一下
});
1.6、对路由监视,编写App.vue
说明: 主要通过 watch选项,监视 $route的路由变化。关于watch的使用:实例方法/数据
<template>
 //html内容,上面的App.vue中有
</template>

<script>
export default {
  name: 'app',
  data() {
    //数据
  },
  mounted(){
    console.log(this.$route); //$route是router-link自身提供的,获取当前路由信息
  },
  watch:{ //对路由监视
    $route: (newValue,oldValue) => { //newValue,oldValue都是对象
      console.log('旧值:'+oldValue.path,'新值:'+newValue.path);
    }
  }
}
</script>
知识点:(非常重要!!!)
就是说我们在模块化开发的过程中,一个js文件需要导入其他js文件中的 属性或者方法也好,需要在定义完成属性和方法之后,需要以对象的方式进行导出后,再去引用:
//1.routes.js 定义
//定义常量
const   routes= [....]

//必须导出单个对象
export  default routes

//必须导出多个对象,这样其他js文件才能使用
export  default {routes,....}


//2.main.js中引用

//必须导入路由对象
import routes from './routes.js'

//引用导入的路由对象
const router = new VueRouter(routes);
好了,路由配置结束了。
二、axios模块化
2.1、axios的安装
注:-S表示生产依赖,-D表示开发依赖,安装axios目的是给后端项目发送ajax请求
D:\PycharmProjects\vue>cd vue-cli-demo
#安装 axios插件
D:\PycharmProjects\vue\vue-cli-demo>npm install axios -S
2.2、axios的使用
说明:axios跟vue-router是不一样的,vue-router只要我在main.js入口文件引入,并且 Vue.use()使用就可以。axios就不一样了,axios是没有办法采用 Vue.use(axios)方式去全局引用。
- 方式1:在每个组件中引入axios
- 方式2:在main.js中全局引入axios并添加到Vue原型中
方式1:在每个组件中都需要引入axios
//1.在App.vue中引用
<template>
  <div id="app">
    <!--触发事件按钮-->
    <button @click="send">发送AJAX请求</button>
  </div>
</template>

<script>
  //导入axios
  import axios from 'axios'
  //在组件对象中使用
  export default {
    methods:{
      send(){ //请求ajax方法
        axios.get("url").then(resp=>{}).catch(err=>{});
      }
    }
  }
</script>

//2.其他组件中使用也必须要引如axios插件,如New.vue组件中
<template>
  //html代码
</template>

<script>
   //必须导入axios
  import axios from 'axios'
</script>
方式2:在main.js中全局引入axios并添加到Vue原型中
1、编写main.js入口文件
import Vue from 'vue'
import App from './App.vue'
.....
//导入axios插件
import axios from 'axios'

//添加到vue的原型中,Vue.prototype.方法名(自定义)=引入插件名
Vue.prototype.axios = axios; //一般定义为Vue.prototype.$http = axios,这个随便你自己定义
.....

new Vue({
  .....
});
分析 Vue.prototype.axios = axios:其实就是给Vue的原型加一个方法,Vue.prototype.方法名(自定义)=引入插件名,这个类似Vue.component一样都是Vue的原型上加的方法。
2、在App.vue组件中使用:
说明: this.axios.get(),可以写 this.axios也可以写Vue.axios,因为在main.js中对所有Vue的原型,也就是说对所有的Vue对象加了一个axios方法。
//1.在任何组件中引用,无需导入
<template>
  .....
</template>

<script>
  //直接使用,无需导入axios
  export default {
    methods:{
      send(){ //请求ajax方法
        this.axios.get("url").then(resp=>{}).catch(err=>{});
      }
    }
  }
</script>
axios模块化到此结束啦!!!
三、自定义组件添加事件
之前我们都是在组件内部绑定事件,比如说一个button按钮,绑定一个 事件,但是我们有的时候需要自定义一些组件,但是这些组件恰好是我们想要的按钮之类的组件,然后我们在组件上绑定事件,那这个时候我们怎么操作呐?
1、先自定义一个 Button按钮 组件 => MyButton.vue
<template>
  <button>自定义按钮</button>
</template>

<style scoped>
  button{
    width: 100px;
    height: 30px;
    background-color: #ccc;
    color: red;
  }
</style>
2、在App.vue组件中引入并绑定事件
说明:MyButto组件绑定事件,绑定事件需要以 @click.native="事件名" 方式绑定。修饰符:.native - 监听组件根元素的原生事件。更多修饰符,请详细查看 v-on 指令。
<template>
  <div id="app">
    <!--3.MyButto组件绑定事件,绑定事件需要以 @click.native="事件名"-->
    <MyButton @click.native="send"></MyButton>
    <br>
    <!--组件内部绑定事件-->
    <button @click="send">发送AJAX请求</button>
  </div>
</template>

<script>
  //1.导入button按钮
  import MyButton from './components/MyButton.vue'

  export default {
    ...,
    components:{
      MyButton //2.导入后注册
    },
    methods:{
      send(){
        this.axios.get("https://api.github.com/users/tangyang8942").then(resp => {
          console.log(resp.data);
        }).catch(err => {
          console.log(err);
        });
      }
    }
  }
</script>

<style>

