
Swagger2 生成 Spring Boot API 文档
Swagger 是一个规范和完整的框架,用于生成、描述、调用和可视化 RESTful 风格的 Web 服务。本文主要介绍了在 Spring Boot 添加 Swagger 支持, 生成可自动维护的 API 文档。
POM 文件
在pom.xml中加入Swagger2的依赖1 2 3 4 5 6 7 8 9 10 | <dependency> <groupId>io.springfox</groupId> <artifactId>springfox-swagger2</artifactId> <version>2.6.1</version></dependency><dependency> <groupId>io.springfox</groupId> <artifactId>springfox-swagger-ui</artifactId> <version>2.6.1</version></dependency> |
代码支持
其次我们需要在代码中添加支持,于 Application 同级目录添加 Swagger 配置类,类名随意,但需要增加@EnableSwagger2和@Configuration注解,如下:
1 2 3 4 5 6 7 8 9 10 11 12 13 14 15 16 17 18 19 20 21 22 23 24 25 26 27 28 29 30 31 32 | import org.springframework.context.annotation.Bean;import org.springframework.context.annotation.ComponentScan;import org.springframework.context.annotation.Configuration;import springfox.documentation.builders.ApiInfoBuilder;import springfox.documentation.builders.RequestHandlerSelectors;import springfox.documentation.service.ApiInfo;import springfox.documentation.service.Contact;import springfox.documentation.spi.DocumentationType;import springfox.documentation.spring.web.plugins.Docket;import springfox.documentation.swagger2.annotations.EnableSwagger2;@Configuration@EnableSwagger2public class Swagger2 { @Bean public Docket config() { return new Docket(DocumentationType.SWAGGER_2) .apiInfo(apiInfo()) .useDefaultResponseMessages(false) .select() .apis(RequestHandlerSelectors.basePackage("com.pxx.xxx.controller")) .build(); } //构建Api文档的详细信息函数 private ApiInfo apiInfo() { return new ApiInfoBuilder() .title("Blog系统API文档") .contact(new Contact("作者", "访问地址", "联系方式")) .build(); }} |
通过@Configuration注解,让Spring来加载该类配置,@EnableSwagger2注解来启用Swagger2。
再通过createRestApi函数创建Docket的Bean之后,apiInfo()用来创建该Api的基本信息(这些基本信息会展现在文档页面中)。select()函数返回一个ApiSelectorBuilder实例用来控制哪些接口暴露给Swagger来展现,本例采用指定扫描的包路径来定义,Swagger会扫描该包下所有Controller定义的API,并产生文档内容(除了被@ApiIgnore注解的API)
PS:这里需要注意的是.apis(RequestHandlerSelectors.basePackage("com.pxx.xxx.controller")) 指定了 Swagger 的扫描包名, 假如不指定此项, 在 Spring Boot 项目中, 会生成 base-err-controller 的 api 接口项。
访问地址
Ok. 接下来运行项目, 访问 http://项目启动地址/v2/api-docs , 就可以访问到生成的文档的json结构. (如下图 )
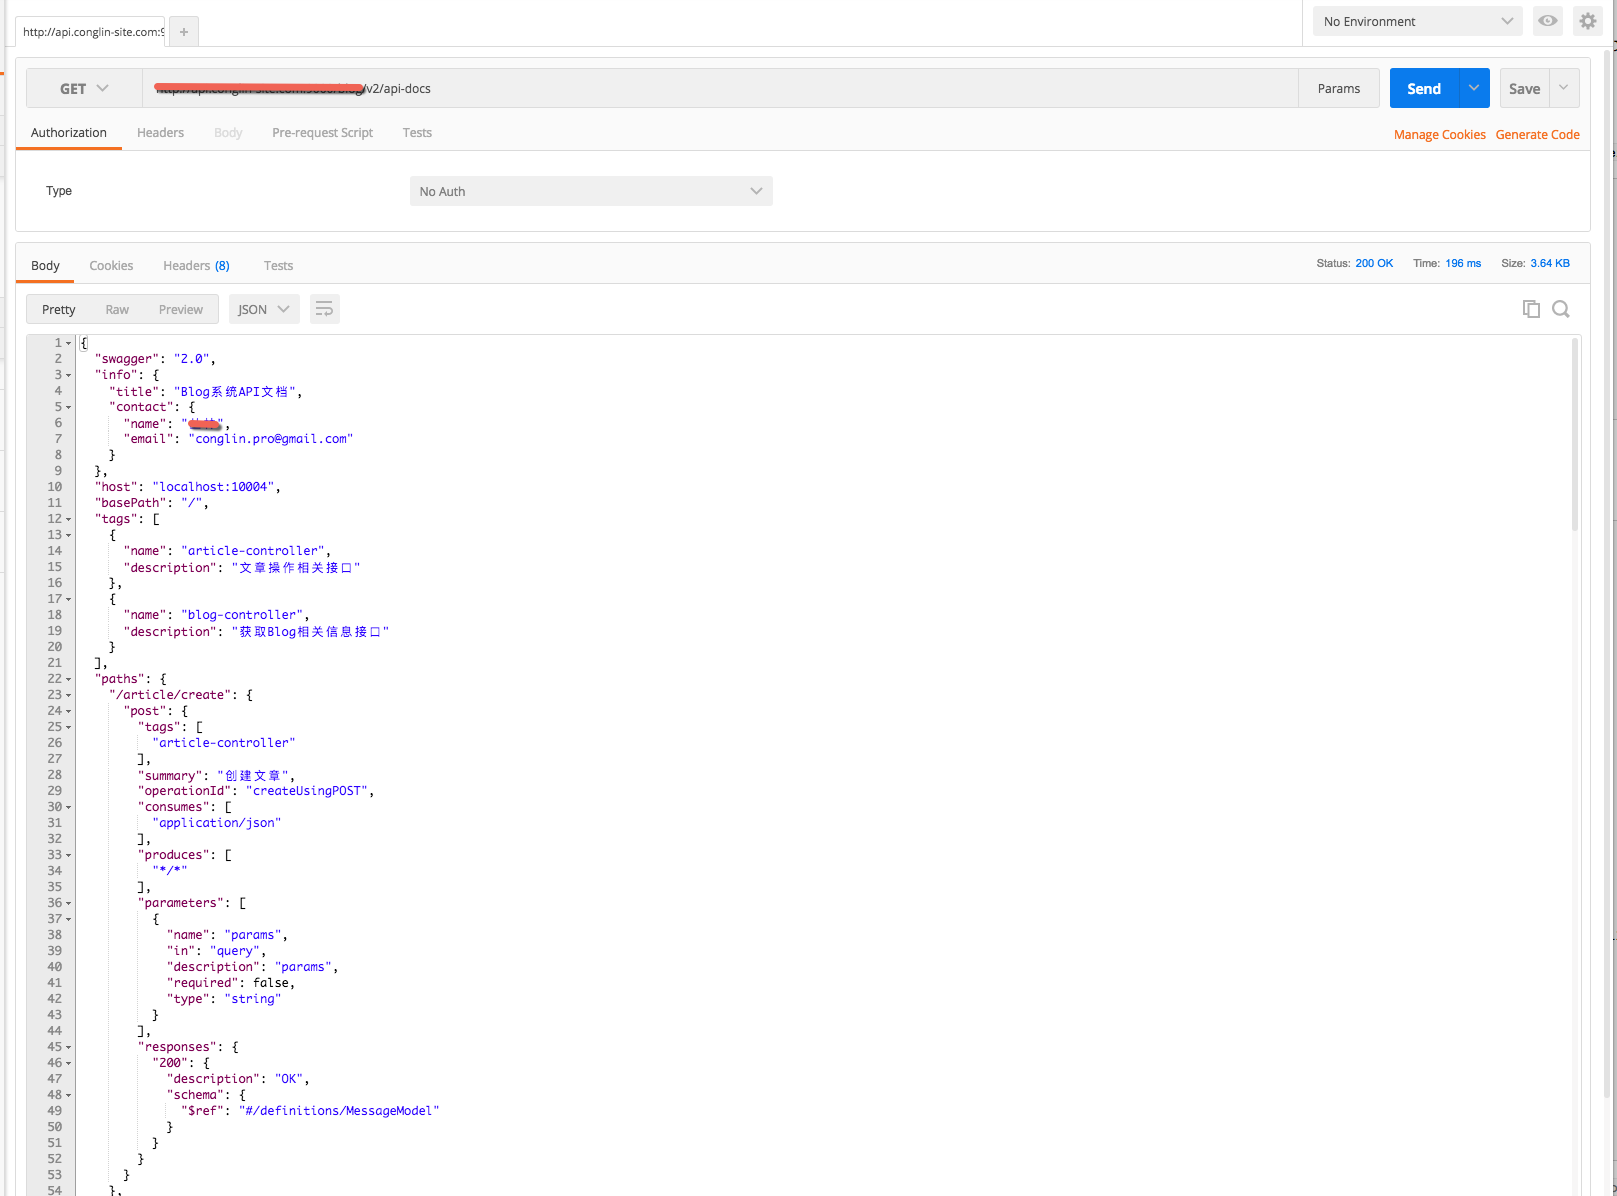
具体结构可参阅 Swagger官方示例
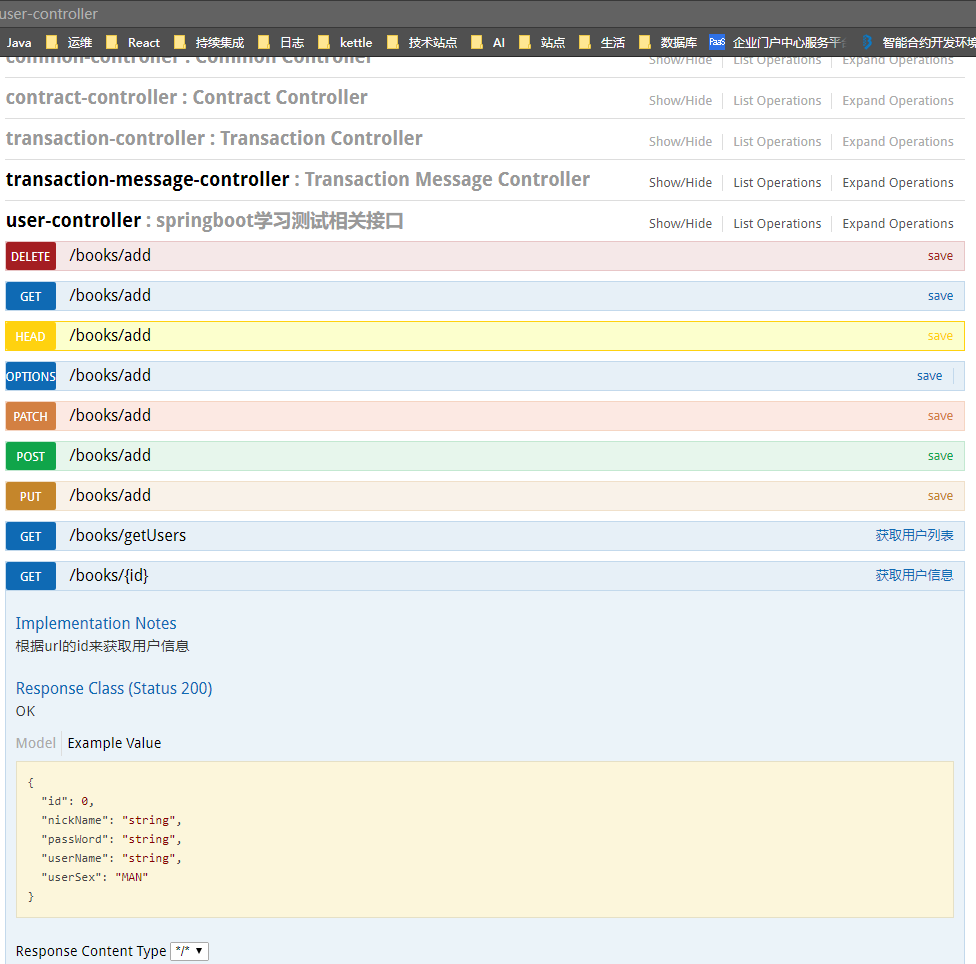
Swagger UI地址: 访问 http://项目启动地址//swagger-ui.html
注解OK. 现在所有工作基本就绪,通过添加相应注解就可以快速生成相关接口文档, 这也是个人认为比较好的一点。
这里开始编写自己的RESTful Controller,跟正常开发没什么区别。主要是接口方法上面新增了几个注解:
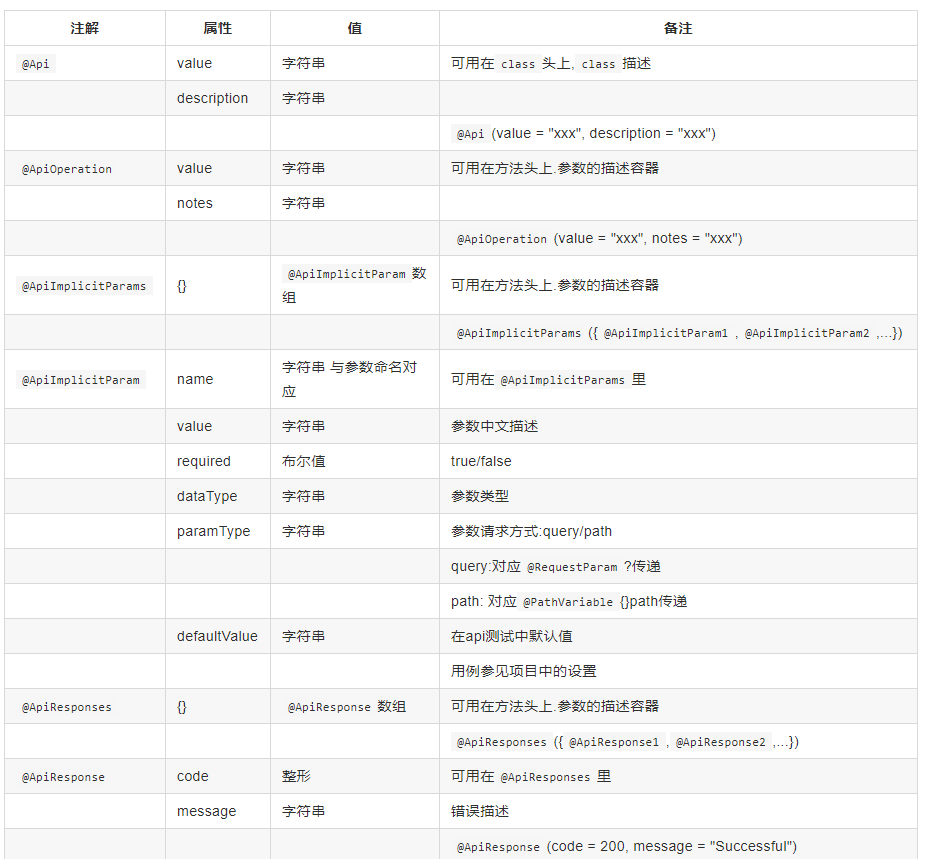
- 通过@ApiOperation注解来给API增加说明
- 通过@ApiImplicitParams、@ApiImplicitParam注解来给参数增加说明
- 通过@ApiIgnore来忽略那些不想让生成RESTful API文档的接口
1 2 3 4 5 6 7 8 9 10 11 12 13 14 15 16 17 18 19 20 21 22 23 24 25 26 27 28 29 30 31 32 33 34 35 36 37 38 39 40 41 42 43 44 45 46 | @Api(description = "文章操作相关接口")@RestController@RequestMapping("/article")public class ArticleController { private final Logger logger = LoggerFactory.getLogger(ArticleController.class); @Autowired private BlogService blogService; @Autowired private JsonMapper jsonMapper; @Autowired private Environment env; @Autowired private PxxHttp pxxHttp; @ApiOperation(value="创建文章", notes="") @RequestMapping(value = {"/create"} , method = RequestMethod.POST) MessageModel create(@ApiParam @RequestParam("params") String params) throws IOException { return result; } @ApiOperation(value="更新文章", notes="") @RequestMapping(value = "/update", method = RequestMethod.POST) public @ResponseBody MessageModel update(@ApiParam @RequestParam("params") String params) throws Exception { return result; } @ApiOperation(value="mns更新文章", notes="") @RequestMapping(value = "/updatearticle", method = RequestMethod.POST) public @ResponseBody MessageModel updateArticle(@ApiParam @RequestParam("params") String params) throws Exception { return result; }} |
@Api(description = ""): 对整个 Controller 的定义做一个解释@ApiOperation(value="", notes=""): 对 Controller 内 function 定义的内容作一解释@ApiParam: 添加到参数前, Swagger 会自动生成 API 文档中对参数的标示
1 2 3 4 5 6 7 8 9 10 11 12 13 14 15 16 17 18 19 20 21 22 23 24 25 26 27 28 29 30 31 32 33 34 35 36 37 38 39 40 41 42 | package com.osp.ethscan.config;import org.springframework.context.annotation.Bean;import org.springframework.context.annotation.Configuration;import springfox.documentation.builders.ApiInfoBuilder;import springfox.documentation.builders.PathSelectors;import springfox.documentation.builders.RequestHandlerSelectors;import springfox.documentation.service.ApiInfo;import springfox.documentation.service.Contact;import springfox.documentation.spi.DocumentationType;import springfox.documentation.spring.web.plugins.Docket;import springfox.documentation.swagger2.annotations.EnableSwagger2;/** * * @author zhangmingcheng * @date 2018年9月25日 */@Configuration@EnableSwagger2public class Swagger2 { @Bean public Docket createRestApi() { return new Docket(DocumentationType.SWAGGER_2).apiInfo(apiInfo()).select() .apis(RequestHandlerSelectors.basePackage("com.osp.ethscan.controller")).paths(PathSelectors.any()) .build(); } /** * 构建Api文档的详细信息函数 * * @return */ private ApiInfo apiInfo() { return new ApiInfoBuilder().title("osp-etherscan api文档") .description("简单优雅的restful风格,https://www.cnblogs.com/zhangmingcheng") .contact(new Contact("zmcheng", "", "")) .termsOfServiceUrl("https://www.cnblogs.com/zhangmingcheng").version("1.0").build(); }} |
Controller:
1 2 3 4 5 6 7 8 9 10 11 12 13 14 15 16 17 18 19 20 21 22 23 24 25 26 27 28 29 30 31 32 33 34 35 36 37 38 39 40 41 42 43 44 45 46 47 48 49 50 51 52 53 54 55 56 57 58 59 60 61 62 63 64 65 | package com.osp.ethscan.controller;import java.util.List;import org.springframework.beans.factory.annotation.Autowired;import org.springframework.web.bind.annotation.PathVariable;import org.springframework.web.bind.annotation.RequestMapping;import org.springframework.web.bind.annotation.RequestMethod;import org.springframework.web.bind.annotation.RestController;import com.osp.ethscan.entity.UserEntity;import com.osp.ethscan.mapper.UserMapper;import com.osp.ethscan.service.MailService;import io.swagger.annotations.Api;import io.swagger.annotations.ApiImplicitParam;import io.swagger.annotations.ApiOperation;import springfox.documentation.annotations.ApiIgnore;@Api(description = "springboot学习测试相关接口")@RestController@RequestMapping(value = "/books")public class UserController { @Autowired private UserMapper userMapper; @Autowired private MailService mailService; @ApiOperation(value = "获取用户列表", notes = "") @RequestMapping(value = "/getUsers", method = { RequestMethod.GET }) public List<UserEntity> getUsers() { List<UserEntity> users = userMapper.getAll(); mailService.sendSimpleMail("18753377530@163.com", "test simple mail", " hello this is simple mail"); return users; } // 如果请求参数在url上,@ApiImplicitParam上加paramType = "path" @RequestMapping(value = "/{id}", method = { RequestMethod.GET }) @ApiImplicitParam(name = "id", value = "用户ID", required = true, dataType = "Long", paramType = "path") @ApiOperation(value = "获取用户信息", notes = "根据url的id来获取用户信息") public UserEntity getUser(@PathVariable Long id) { UserEntity user = userMapper.getOne(id); return user; } @RequestMapping("/add") public void save(UserEntity user) { userMapper.insert(user); } @ApiIgnore // 使用该注解忽略这个API @RequestMapping(value = "update") public void update(UserEntity user) { userMapper.update(user); } @ApiIgnore // 使用该注解忽略这个API @RequestMapping(value = "/delete/{id}") public void delete(@PathVariable("id") Long id) { userMapper.delete(id); }} |


【推荐】国内首个AI IDE,深度理解中文开发场景,立即下载体验Trae
【推荐】编程新体验,更懂你的AI,立即体验豆包MarsCode编程助手
【推荐】抖音旗下AI助手豆包,你的智能百科全书,全免费不限次数
【推荐】轻量又高性能的 SSH 工具 IShell:AI 加持,快人一步
· .NET Core 中如何实现缓存的预热?
· 从 HTTP 原因短语缺失研究 HTTP/2 和 HTTP/3 的设计差异
· AI与.NET技术实操系列:向量存储与相似性搜索在 .NET 中的实现
· 基于Microsoft.Extensions.AI核心库实现RAG应用
· Linux系列:如何用heaptrack跟踪.NET程序的非托管内存泄露
· TypeScript + Deepseek 打造卜卦网站:技术与玄学的结合
· 阿里巴巴 QwQ-32B真的超越了 DeepSeek R-1吗?
· 【译】Visual Studio 中新的强大生产力特性
· 张高兴的大模型开发实战:(一)使用 Selenium 进行网页爬虫
· 【设计模式】告别冗长if-else语句:使用策略模式优化代码结构
2016-07-25 eclipse最有用快捷键整理
2016-07-25 eclipse中的Console控制台视图脱离主窗口解决办法