Golang gRPC-Gateway集成swagger
1、概述
Swagger是全球最大的OpenAPI规范(OAS)API开发工具框架,支持从设计和文档到测试和部署的整个API生命周期的开发。Swagger是目前最受欢迎的RESTful Api文档生成工具之一,主要的原因如下:
- 跨平台、跨语言的支持
- 强大的社区
- 生态圈 Swagger Tools(Swagger Editor、Swagger Codegen、Swagger UI ...)
- 强大的控制台
同时grpc-gateway也支持Swagger。
本文展示了gRPC-Gateway集成swagger的常规流程,由以下步骤组成:
- 新建工程文件夹;
- 安装必要的go包;
- 编写proto文件,使swagger支持http(默认是https);
- 生成gRPC、gRPC-Gateway所需的go源码;
- 生成swagger所需的json文件;
- 下载swagger-ui的源码,以此生成go源码;
- 编写gRPC的服务端代码;
- 编写gRPC-Gateway服务端的代码;
- 验证
注意:本文不再新建工程, 而是基于 Golang gRPC-Gateway:gRPC转换为HTTP协议对外提供服务 此篇博文创建的工程grpc-gateway-practice进行讲解。
2、环境配置
2.1 安装配置protocol buffers和protoc-gen-go
2.2 安装配置gRPC
步骤参见:Golang gRPC概述及入门示例
2.3 安装配置gRPC-Gateway插件
步骤参见:Golang gRPC-Gateway:gRPC转换为HTTP协议对外提供服务
2.4 安装配置protoc-gen-openapiv2插件
下载当前最新稳定版本的protoc-gen-openapi v2插件,用于生成swagger-ui要用的json文件,依据此文件,swagger才能正确的展现出gRPC-Gateway暴露的服务和参数定义:
go install github.com/grpc-ecosystem/grpc-gateway/v2/protoc-gen-openapiv2@latest
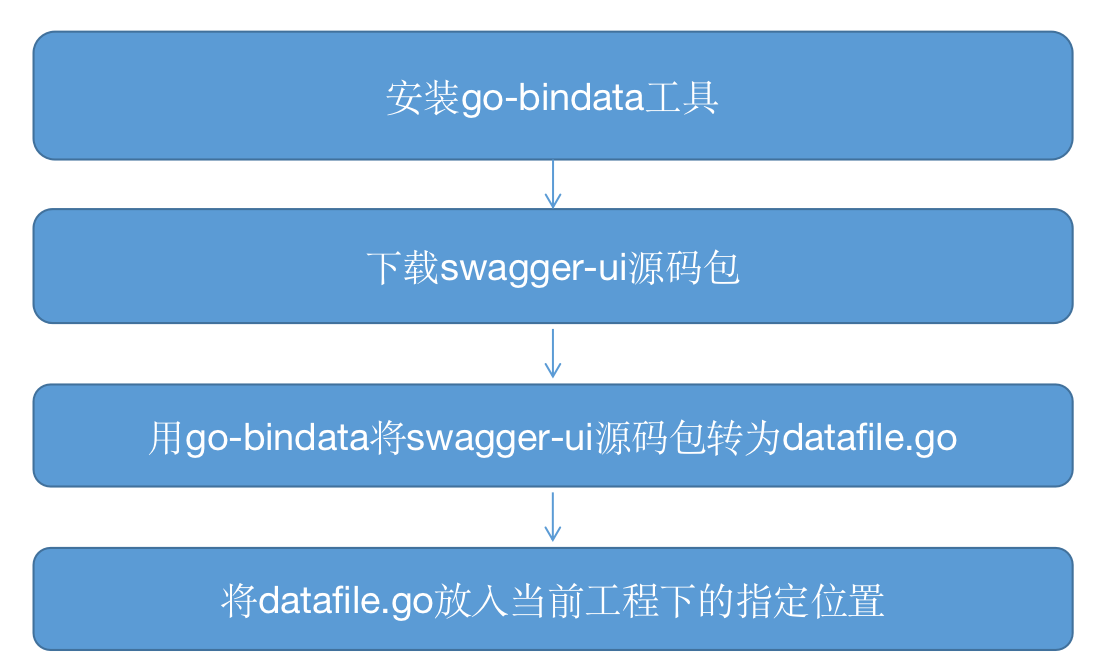
2.5 安装go-bindata
下载当前最新稳定版本go-bindata, 用于将swagger-ui的源码转为GO代码:
go install -a -v github.com/go-bindata/go-bindata/v3/...@latest
swagger-ui的代码由多个png、html、js文件组成,需要用工具go-bindata转换成go源码并放入合适的位置,流程如下图:
2.6 安装go-bindata-assetfs
下载当前最新稳定版本go-bindata-assetfs,在应用启动后,对外提供文件服务,这样可以通过web访问swagger的json文件:
go install github.com/elazarl/go-bindata-assetfs/...@latest
3、Golang gRPC-Gateway集成swagger示例
项目结构如下:
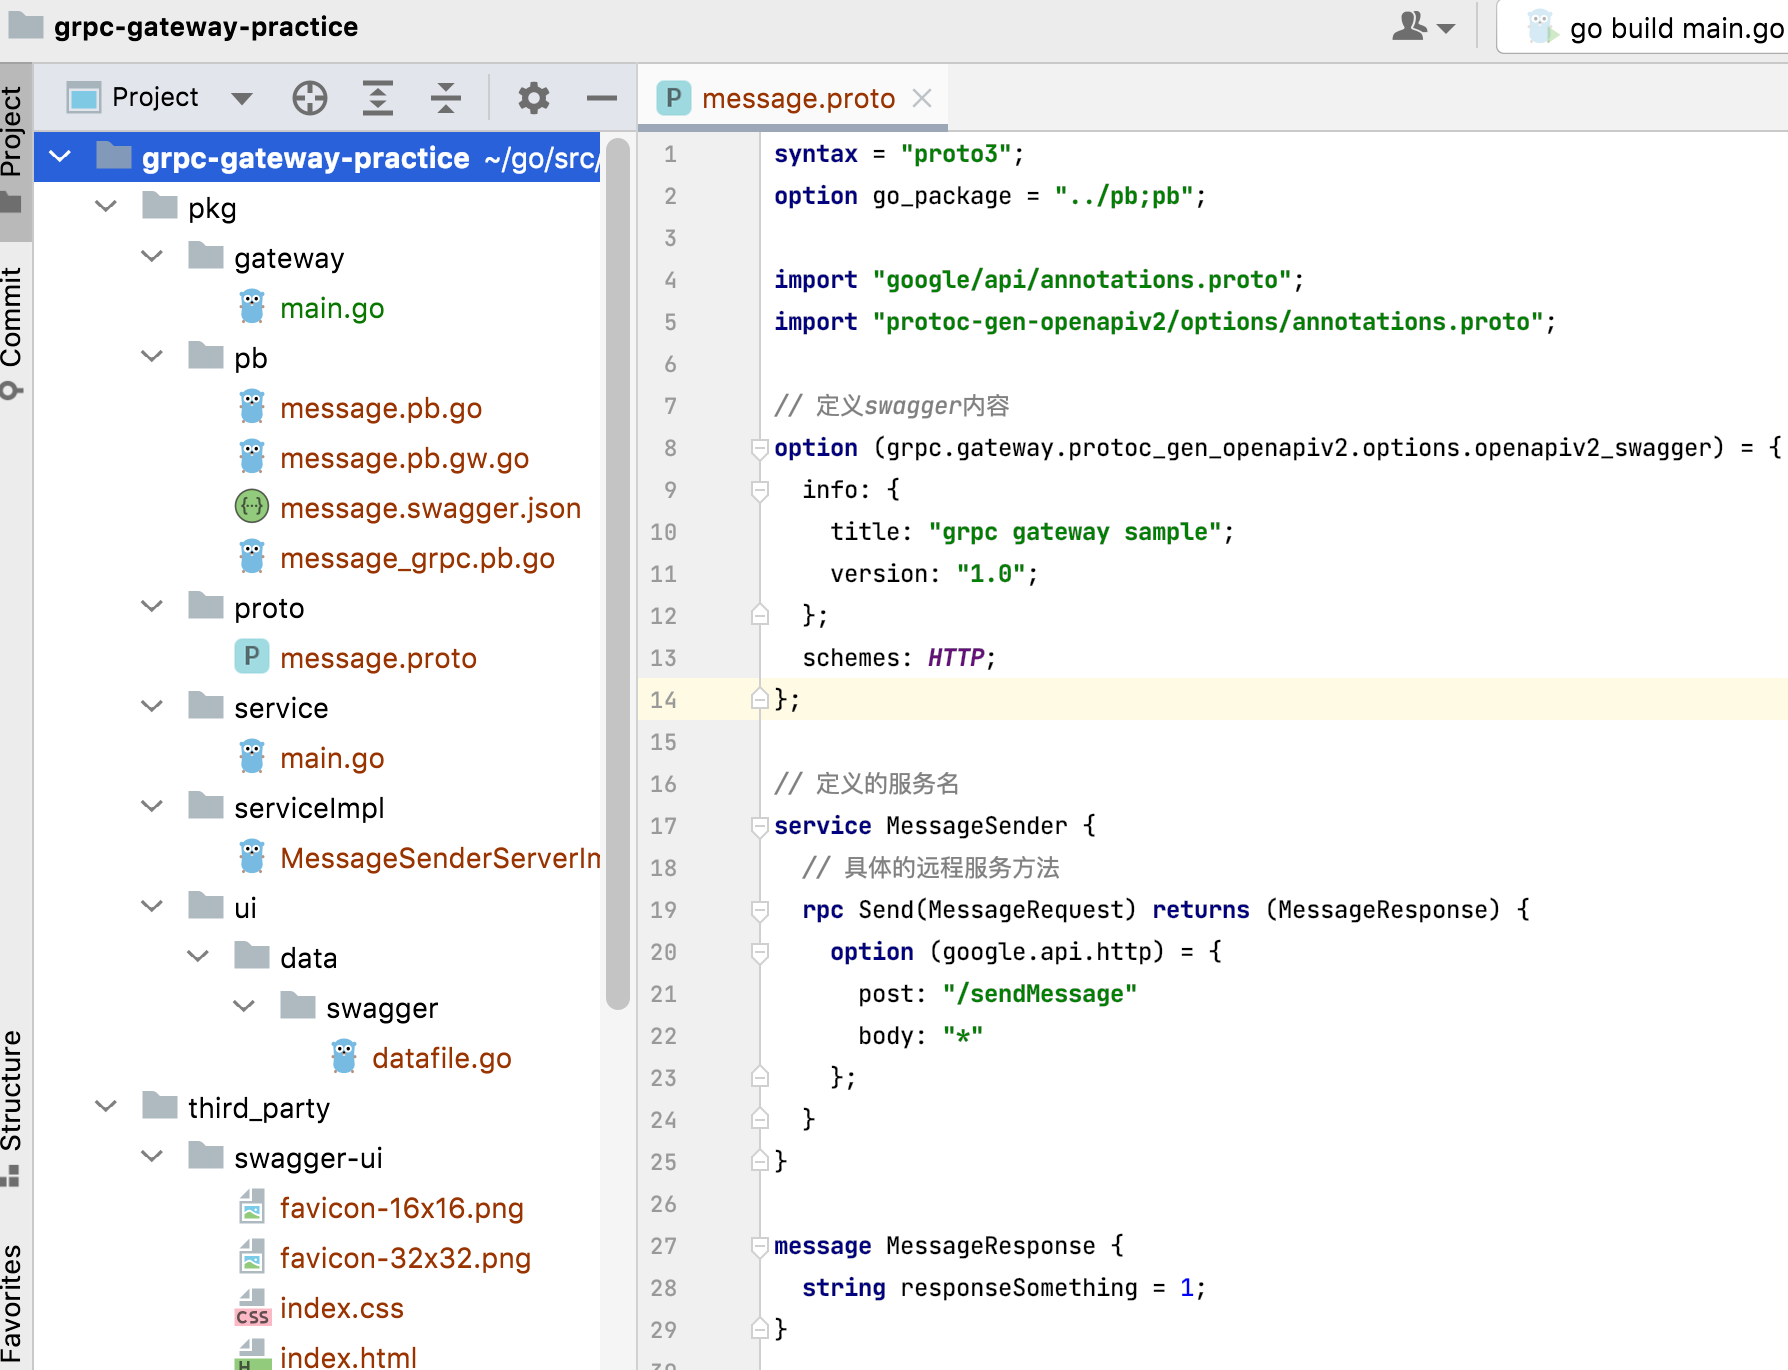
注意: 这是整个项目所有文件生成完后的结构,所有.proto和.go文件都是在3.1及其后步骤生成的,go.mod内容如下:
module grpc-gateway-practice

go 1.17

require (
	github.com/elazarl/go-bindata-assetfs v1.0.1
	github.com/grpc-ecosystem/grpc-gateway/v2 v2.10.3
	google.golang.org/genproto v0.0.0-20220519153652-3a47de7e79bd
	google.golang.org/grpc v1.46.2
	google.golang.org/protobuf v1.28.0
)

require (
	github.com/golang/protobuf v1.5.2 // indirect
	golang.org/x/net v0.0.0-20220127200216-cd36cc0744dd // indirect
	golang.org/x/sys v0.0.0-20211216021012-1d35b9e2eb4e // indirect
	golang.org/x/text v0.3.7 // indirect
)
3.1 编写proto文件,使swagger支持http
定义服务,这里直接粘贴下示例proto文件内容。
// 文件路径grpc-gateway-practice/pkg/proto/message.proto

syntax = "proto3";
option go_package = "../pb;pb";

import "google/api/annotations.proto";
import "protoc-gen-openapiv2/options/annotations.proto";

// 定义swagger内容
option (grpc.gateway.protoc_gen_openapiv2.options.openapiv2_swagger) = {
  info: {
    title: "grpc gateway sample";
    version: "1.0";
  };
  schemes: HTTP;
};

// 定义的服务名
service MessageSender {
  // 具体的远程服务方法
  rpc Send(MessageRequest) returns (MessageResponse) {
    option (google.api.http) = {
      post: "/sendMessage"
      body: "*"
    };
  }
}

message MessageResponse {
  string responseSomething = 1;
}

message MessageRequest {
  string saySomething = 1;
}
文件message.proto和《Golang gRPC-Gateway:gRPC转换为HTTP协议对外提供服务》一文中的proto文件大部分是一致的,不同之处在于增加了swagger的配置,这个配置的作用是让swagger把远程调用配置成http,如果没有这些配置,swagger默认的远程调用就是https的,而grpc-gateway-practice示例工程使用的是http,所以要加上这些配置,在上述message.proto的内容中,具体的配置有以下两处:
- 用import关键词导入 protoc-gen-openapiv2/options/annotations.proto (引用自github.com/grpc-ecosystem/grpc-gateway/v2@v2.10.3包)
- 下面这段就是swagger的配置了,重点是schemes,里面只有HTTP:
// 定义swagger内容
option (grpc.gateway.protoc_gen_openapiv2.options.openapiv2_swagger) = {
  info: {
    title: "grpc gateway sample";
    version: "1.0";
  };
  schemes: HTTP;
};
接着在grpc-gateway-practice/pkg/proto目录下执行如下命令:
protoc -I=. -I=$GOPATH/pkg/mod/github.com/googleapis/googleapis@v0.0.0-20220602015621-13f9b8908d84 -I=$GOPATH/pkg/mod/github.com/grpc-ecosystem/grpc-gateway/v2@v2.10.3 --go_out=. --go-grpc_out=. --grpc-gateway_out=. --openapiv2_out=../pb message.proto
这条命令会grpc-gateway-practice/pkg/pb目录中分别生成message.pb.go、message_grpc.pb.go、message.pb.gw.go、message.swagger.json这四个文件。在这四个文件中,包含了我们定义方法的go语言实现,也包含了我们定义的请求与相应的go语言实现。
注意:message.swagger.json为swagger-ui要用的json文件,依据此文件,swagger展现的页面中会有gRPC-Gateway暴露的服务和参数定义,可以在页面上发起请求。
3.2 生成swagger-ui的go文件
从Github下载最新稳定swagger-ui的源码,并解压
wget https://github.com/swagger-api/swagger-ui/archive/refs/tags/v4.12.0.tar.gz
tar -zxvf swagger-ui-4.12.0.tar.gz
将swagger-ui-4.12.0/dist下文件拷贝到grpc-gateway-practice工程third_party/swagger-ui目录下
cp swagger-ui-4.12.0/dist/* $GOPATH/src/grpc-gateway-practice/third_party/swagger-ui/
制作成go的内置数据文件(将swagger-ui源码转为datafile.go文件)
go-bindata --nocompress -pkg swagger -o pkg/ui/data/swagger/datafile.go third_party/swagger-ui/...
3.3 服务端
详细步骤参见《Golang gRPC-Gateway:gRPC转换为HTTP协议对外提供服务》步骤3.2。
3.4 gRPC-Gateway(反向代理Reverse Proxy)
开始编写gRPC-Gateway服务端代码,这是本文的重点所在,除了提供与前文一样的gRPC-Gateway服务,还提供了swagger的json文件服务,以及swagger的ui服务。
// 文件路径grpc-gateway-practice/pkg/gateway/main.go

package main

import (
	"context"
	"flag"
	assetfs "github.com/elazarl/go-bindata-assetfs"
	"github.com/grpc-ecosystem/grpc-gateway/v2/runtime"
	"google.golang.org/grpc"
	"grpc-gateway-practice/pkg/pb"
	"grpc-gateway-practice/pkg/ui/data/swagger"
	"log"
	"net/http"
	"path"
	"strings"
)

var (
	echoEndpoint = flag.String("echo_endpoint", "localhost:8002", "endpoint of grpcService")
)

func main() {
	ctx, cancel := context.WithCancel(context.Background())
	defer cancel()
	gateWayMux := runtime.NewServeMux()
	opts := []grpc.DialOption{grpc.WithInsecure()}
	err := pb.RegisterMessageSenderHandlerFromEndpoint(ctx, gateWayMux, *echoEndpoint, opts)

	if err != nil {
		log.Fatalf("failed to RegisterMessageSenderHandlerFromEndpoint: %v", err)
	}

	// register swagger
	mux := http.NewServeMux()
	mux.Handle("/", gateWayMux)
	mux.HandleFunc("/swagger/", swaggerFile)
	swaggerUI(mux)

	err = http.ListenAndServe(":9090", mux)
	if err != nil {
		log.Fatalf("failed to Listen: %v", err)
	}
}

/**
swaggerFile: 提供对swagger.json文件的访问支持
*/
func swaggerFile(w http.ResponseWriter, r *http.Request) {
	if !strings.HasSuffix(r.URL.Path, "swagger.json") {
		log.Printf("Not Found: %s", r.URL.Path)
		http.NotFound(w, r)
		return
	}

	p := strings.TrimPrefix(r.URL.Path, "/swagger/")
	name := path.Join("pkg/pb",p)
	log.Printf("Serving swagger-file: %s", name)
	http.ServeFile(w, r, name)
}

/**
serveSwaggerUI: 提供UI支持
*/
func swaggerUI(mux *http.ServeMux) {
	fileServer := http.FileServer(&assetfs.AssetFS{
		Asset:    swagger.Asset,
		AssetDir: swagger.AssetDir,
		Prefix:   "third_party/swagger-ui",
	})
	prefix := "/swagger-ui/"
	mux.Handle(prefix, http.StripPrefix(prefix, fileServer))
}
对于gRPC-gateway这个文件,有以下几处需要重点注意:
- 请求URL中如果含有/swagger,就交给swaggerFile方法处理,这里面的逻辑是将文件grpc-gateway-practice/pkg/pb/message.swagger.json返回给请求方;
- 重点关注swaggerUI方法,经过该方法的处理后,如果请求URL中含有/swagger-ui,就会交给前面生成的datafile.go处理,也就是打开了swagger-ui的页面;
- 默认情况下会发现swagger.Asset和swagger.AssetDir都会报Unresolved reference...错误,此时从IDE里面打开datafile.go文件,发现文件第一行提示"The file size exceeds the configured limit(6.29 MB)",这是因为swagger-ui源码转为datafile.go文件过大,超过了IDE限制的6.29MB,导致IDE不再对这个文件的进行代码解析,从而会导致datafile.go文件中的变量、方法等都不能被其他包引用,此时需要修改IDE配置把IDE关于代码解析的文件大小阈值调整一下即可:
Help>>>Edit Custom Properties
把idea.max.intellisense.filesize的值调大一点(如5000改为10000),然后重IDE即可。
至此,开发工作已经完成,可以开始验证了;
4、验证
分别将gRPC服务端和gRPC-Gateway都跑起来,然后浏览器访问swagger:http://127.0.0.1:9090/swagger/message.swagger.json,即可看到message.swagger.json文件内容:
{
  "swagger": "2.0",
  "info": {
    "title": "grpc gateway sample",
    "version": "1.0"
  },
  "tags": [
    {
      "name": "MessageSender"
    }
  ],
  "schemes": [
    "http"
  ],
  "consumes": [
    "application/json"
  ],
  "produces": [
    "application/json"
  ],
  "paths": {
    "/sendMessage": {
      "post": {
        "summary": "具体的远程服务方法",
        "operationId": "MessageSender_Send",
        "responses": {
          "200": {
            "description": "A successful response.",
            "schema": {
              "$ref": "#/definitions/MessageResponse"
            }
          },
          "default": {
            "description": "An unexpected error response.",
            "schema": {
              "$ref": "#/definitions/rpcStatus"
            }
          }
        },
        "parameters": [
          {
            "name": "body",
            "in": "body",
            "required": true,
            "schema": {
              "$ref": "#/definitions/MessageRequest"
            }
          }
        ],
        "tags": [
          "MessageSender"
        ]
      }
    }
  },
  "definitions": {
    "MessageRequest": {
      "type": "object",
      "properties": {
        "saySomething": {
          "type": "string"
        }
      }
    },
    "MessageResponse": {
      "type": "object",
      "properties": {
        "responseSomething": {
          "type": "string"
        }
      }
    },
    "protobufAny": {
      "type": "object",
      "properties": {
        "@type": {
          "type": "string"
        }
      },
      "additionalProperties": {}
    },
    "rpcStatus": {
      "type": "object",
      "properties": {
        "code": {
          "type": "integer",
          "format": "int32"
        },
        "message": {
          "type": "string"
        },
        "details": {
          "type": "array",
          "items": {
            "$ref": "#/definitions/protobufAny"
          }
        }
      }
    }
  }
}
访问swagger-ui页面,地址是:http://127.0.0.1:9090/swagger-ui/ ,如下图,可见swagger-ui功能正常:

至此,gRPC-Gateway集成swagger示例成功。
参考:https://grpc-ecosystem.github.io/grpc-gateway/docs/development/grpc-gateway_v2_migration_guide/

 浙公网安备 33010602011771号