Python常用模块
阅读目录
一、optparse
二、configparser
三、logging
四、zipfile
一、optparse
1 模块介绍
optparse是一个比旧的getopt模块更方便、灵活和强大的解析命令行选项的库
2 简单示例
编辑test.py
from optparse import OptionParser

# 实例对象
parser = OptionParser()
# 添加参数 -f 指定一个文件名称
parser.add_option("-f", "--file", dest="filename",
                  help="write report to FILE", metavar="FILE")
parser.add_option("-q", "--quiet",
                  action="store_false", dest="verbose", default=True,
                  help="don't print status messages to stdout")
# 解析参数
(options, args) = parser.parse_args()
print("options:", options)  # {'filename': 'aaa', 'verbose': False}
print("args:", args)        # ['bbb']

# 终端输入:python test.py -f aaa -q bbb
3 参数介绍
 action     解析选项时执行的动作:
            'store'——选项有一个参数需要读取和保存,如果没有任何显示指定动作,这就是默认动作
            'store_const'——选项不带任何参数,但是当遇到选项时,就会保存const关键字参数指定的常量值
            'stone_true'——解析选项时,保存的是BOOL值
            'store_false'——解析选项时,保存的是BOOL值
            'append'——选项有一个参数,解析时被附加到一个列表
            'count'——选项不带任何参数,但是保存一个计数器,遇到参数,计数器的值就会增加
            'callback'——遇到选项时,调用callback关键字指定的一个回调函数
            'help'——解析选项时打印一条帮助消息
            'version'——解析选项是获取指定文件版本
 callback   指定遇到选项时候调用的回调函数 callback(option,opt_str,value,parse,*rags,**kwarg)
 choices    指定所有可能的选项值的字符串列表,当一个选项只有一组有限的值时候使用
 const      通过store_const动作保存的常量值
 default    默认值None
 dest       设置用于保存解析期间选项值的属性名称
 help       这个特定选项的帮助文档
 metavar    指定打印帮助文本时使用的选项参数的名称
 nargs      为需要参数的动作指定选项参数的数量
 type       指定选项的类型
4 parser对象常用方法
parser.disable_interspersed_args()   #不接受简单选项和位置参数的混合使用
parser.enable_interspersed_args()    #选项与位置参数可以混合使用
parser.parse_args()                  #解析命令行选项,并返回一个元组(options,args)options包含所有选项的值得对象,args是所有余下位置参数的列表
parser.set_defaults()                #设置特定选项目的的默认值
5 实战应用
class SysEntrance(object):
    """系统入口"""

    def __init__(self):
        # 创建OptionParser类对象
        self.parser = optparse.OptionParser()
        self.add_option()
        self.options, self.args = self.parser.parse_args()  # 获取格式化获取的信息

    def add_option(self):
        """
        添加选项
        """
        self.parser.add_option("-d", "--dp", dest="path", metavar="PROFILE")  # 目录
        self.parser.add_option("-t", "--et", dest="type", choices=['1', '2', '3'])  # 执行类型
        self.parser.add_option("-b", "--build", action="callback", callback=self.vararg_callback, dest="build",
                               help="build", metavar="PROFILE")
        self.parser.add_option("-g", "--debug", action="store_true", dest="debug",
                               help="build with debug symbols, affects only full build")

    def vararg_callback(self, option, opt_str, value, parser):
        """
        调用parser.parse_args()触发回调函数, 可以实现对选项参数值的加工

        :param option:  optparse.Option类
        :param opt_str: 选项参数 -b/--build
        :param value:   //可以留言告诉我是什么值
        :param parser: optparse.OptionParser对象
        :return:
        """
        assert value is None
        value = []
        for arg in parser.rargs:
            # stop on --foo like options
            if arg[:2] == "--" and len(arg) > 2:
                break
            # stop on -a, but not on -3 or -3.0
            if arg[:1] == "-" and len(arg) > 1:
                break
            value.append(arg)

        del parser.rargs[:len(value)]
        # 重新设置dest对应的值
        setattr(parser.values, option.dest, value)

    def check_option(self):
        """检查option选项"""
        if self.options.path and not os.path.exists(self.options.__dict__.get('path')):
            return "选项[path]指定错误 >> 请指定有效的文件路径"

    def run(self):
        """根据配置信息进入不同的业务层"""
        err = self.check_option()
        if err:
            return None, err
        # 业务层
        if self.options.debug:
            global DEBUG
            DEBUG = True
        if self.options.type:
            return func(), None


DEBUG = False


def func():
    global DEBUG
    if DEBUG:
        print(1111)
    else:
        print(2222)


if __name__ == "__main__":
    _, err = SysEntrance().run()
    print(err)
二、configparser
1 模块介绍
configparser库实现了一种基本的配置文件解析语言,它提供了一种类似于microsoft windows ini文件的结构。
2 简单示例
import configparser
parser = configparser.ConfigParser()
parser.read_dict({'section1': {'key1': 'value1',
                               'key2': 'value2',
                               'key3': 'value3'},
                  'section2': {'keyA': 'valueA',
                               'keyB': 'valueB',
                               'keyC': 'valueC'},
                  'section3': {'foo': 'x',
                               'bar': 'y',
                               'baz': 'z'}
                  })
print(parser.sections())
# ['section1', 'section2', 'section3']
print([option for option in parser['section3']])
# ['foo', 'bar', 'baz']
3 常用介绍
3.1 读取配置文件
配置文件pro.ini
# 注释1
; 注释2

# DEFAULT为其它sections提供默认值
[DEFAULT]
a = 45

[Common]
# 引用同一节点
home_dir: /Users
my_dir: %(home_dir)s/lumberjack
my_pictures: %(my_dir)s/Pictures

[section1]
k1 = v1
k2:v2
# 引用不同节点 -> python3.8
path: ${Common:my_dir}/Library/Frameworks/

[section2]
k1 = v1
# 空值
k2 =
k3 = true
k4 = 22.05
Note1:在配置文件中%是唯一需要转义的字符,10%可使用10%%代替
Note2:key值不区分大小写,都会被转化为小写
import configparser

config=configparser.ConfigParser()
config.read('pro.ini')

#查看所有的标题
res=config.sections()
print(res) # ['Common', 'section1', 'section2']

#查看标题section1下所有key=value的key
options=config.options('section1')
print(options) #['k1', 'k2', 'path', 'a']

#查看标题section2下所有key=value的(key,value)格式
item_list=config.items('section2')
print(item_list) #[('a', '45'), ('k1', 'v1'), ('k2', '')]

#查看标题section1下k1的值=>字符串格式
val=config.get('section1','k1')
print(val) #v1

#查看标题section1下a的值=>整数格式
val1=config.getint('section1','a')
print(val1) #45

#查看标题section2下k3的值=>布尔值格式
val2=config.getboolean('section2','k3')
print(val2) #True

#查看标题section2下k4的值=>浮点型格式
val3=config.getfloat('section2','k4')
print(val3) #22.05

#删除整个标题section2
config.remove_section('section2')

#删除标题section1下的某个k1和k2
config.remove_option('section1','k1')
config.remove_option('section1','k2')

#判断标题section1下是否有k1
print(config.has_option('section1','k1'))

#判断是否存在某个标题
print(config.has_section('section1'))

#添加一个标题
config.add_section('Paths')

#在标题Paths下添加p1=/root,p2=/tmp的配置, 注意value值必须为字符串
config.set('Paths','p1','/root')
config.set('Paths','p2','/tmp')

#最后将修改的内容写入文件,完成最终的修改
config.write(open('pro.ini','w'))
4 实战应用
4.1 key值区分大小写
from configparser import ConfigParser

class NewConfigParser(ConfigParser):
    def __init__(self, defaults=None):
        ConfigParser.__init__(self, defaults=defaults)

    """复写方法实现key值区分大小写"""
    def optionxform(self, optionstr):
        return optionstr
4.2 实现配置文件启动系统
借助上面optparse的知识,实现一个可以通过命令行调用配置文件启动系统的功能
class ExecuteConfig(File):
    """执行器配置文件"""
    def __init__(self):
        self.configParser = ReConfigParser()

    def analysis(self, filename):
        """解析配置文件"""
        filepath = self.join_path(self.base_dir, filename)
        if not self.is_exist(filepath):
            return None, "配置文件异常 >> 配置文件不存在"

        self.configParser.read(filepath, encoding='utf-8')

        items = self.configParser.items('execute')   # 规定解析头必须为execute

        return items, None

class Options(object):

    def __init__(self):
        self.parser = OptionParser()
        self.add_option()

        self.options_dict = dict()  # 保存选项解析结果

        self.options, self.args = self.parser.parse_args()  # 获取格式化获取的信息

        self.pretreatment()

    def add_option(self):
        """
        添加选项
        :return:
        """
        self.parser.add_option("--ini", dest="ini")  # 启动配置
        '''
        自定制命令
        '''

    def pretreatment(self):
        """预处理"""
        if self.options.ini:
            # 启动文件
            config = ExecuteConfig()
            items, err = config.analysis(self.options.ini)
            if err:
                raise ValueError(err)
            for item in items:
                if hasattr(self, f'handle_{item[0]}'):
                    err = getattr(self, f'handle_{item[0]}')(item[1])
                    if err:
                        raise ValueError(err)
                else:
                    raise ValueError(f"选项解析失败 >> 无效配置参数【{item[0]}】")

    def handle_ini(self, args):
        pass

    '''处理选项操作逻辑'''
    def handle_logType(self, args):
        if not args:
            reutrn "选项错误 >> logType不能为空"
        self.options_dict.update({"logType": args})


    def handle_logLevel(self, args):
        if args:
            self.options_dict.update({"logLevel": args})

    def handle_logTo(self, args):
        if args:
            self.options_dict.update({"logTo": args})

接下来在系统入口实例化Options()类就可以实现配置文件启动了
三、logging
1 模块介绍
logging库提供python程序日志记录功能
2 简单示例
import logging

logging.debug("debug 日志")
logging.info("info 日志")
logging.warning("warning 日志")
logging.error("error 日志")
logging.critical("critical 日志")

输出结果:
WARNING:root:warning 日志
ERROR:root:error 日志
CRITICAL:root:critical 日志
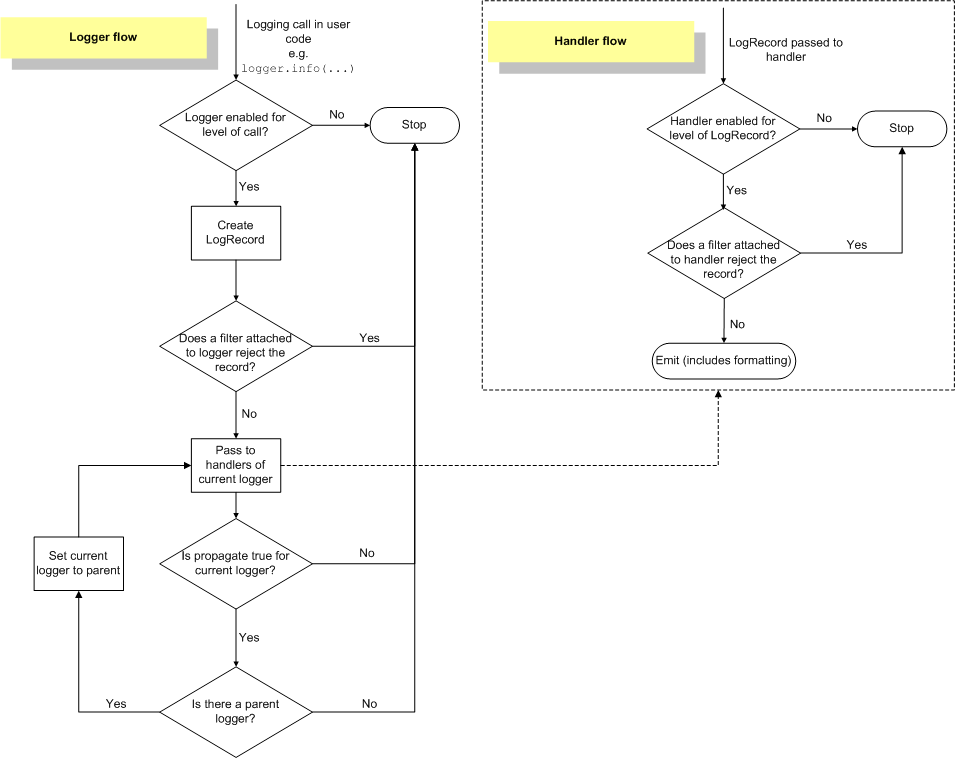
3 logging源码分析及流程图
3.1 源码分析
3.2 流程图

4 基本使用
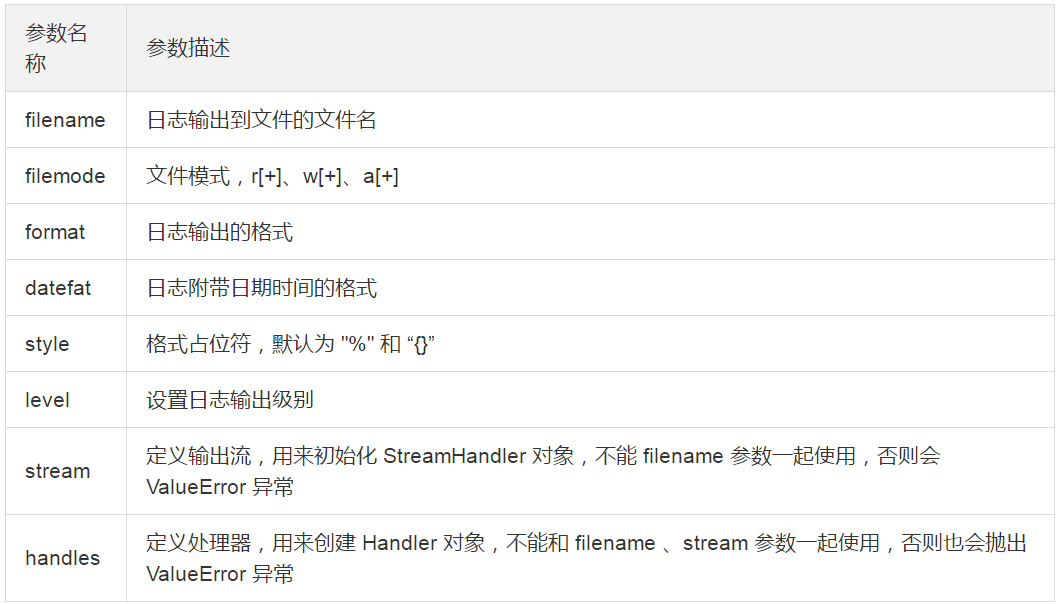
4.1 basicConfig
可选的参数如下表所示:

示例代码:
# stream设置文件流,繁殖中文乱码
f = open('test.log', 'w', encoding='utf-8')
logging.basicConfig(stream=f, format="%(asctime)s %(name)s:%(levelname)s:%(message)s", datefmt="%d-%M-%Y %H:%M:%S", level=logging.DEBUG)
logging.debug("debug 日志")
logging.info("info 日志")
logging.warning("warning 日志")
logging.error("error 日志")
logging.critical("critical 日志")
f.close()

生成日志:
23-18-2019 00:18:41 root:DEBUG:debug 日志
23-18-2019 00:18:41 root:INFO:info 日志
23-18-2019 00:18:41 root:WARNING:warning 日志
23-18-2019 00:18:41 root:ERROR:error 日志
23-18-2019 00:18:41 root:CRITICAL:critical 日志
当发生异常时,直接使用无参数的 debug()、info()、warning()、error()、critical() 方法并不能记录异常信息,需要设置 exc_info 参数为 True 才可以,或者使用 exception() 方法,还可以使用 log() 方法,但还要设置日志级别和 exc_info 参数。
import logging

logging.basicConfig(filename="test.log", filemode="w", format="%(asctime)s %(name)s:%(levelname)s:%(message)s", datefmt="%d-%M-%Y %H:%M:%S", level=logging.DEBUG)
a = 5
b = 0
try:
    c = a / b
except Exception as e:
    # 下面三种方式三选一,推荐使用第一种
    logging.exception("Exception occurred")
    logging.error("Exception occurred", exc_info=True)
    logging.log(level=logging.DEBUG, msg="Exception occurred", exc_info=True)
4.2 自定义Logger
getLogger函数获取一个Logger对象,使用给定名称对该函数的所有调用都返回相同的记录器实例。这意味着记录器实例永远不需要在应用程序的不同部分之间传递。
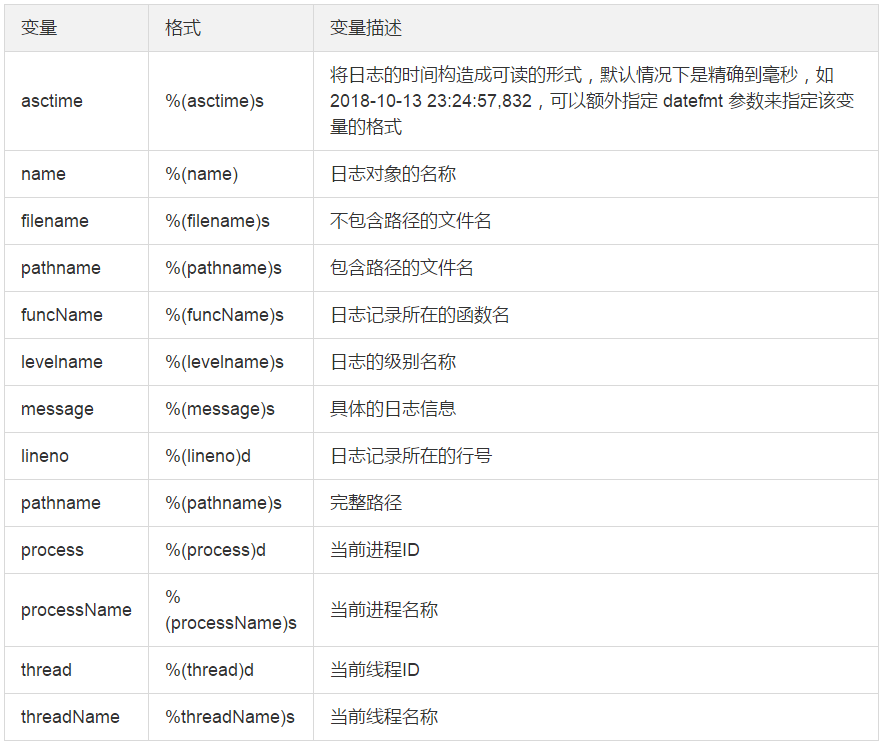
Logger 对象可以设置多个 Handler 对象和 Filter 对象,Handler 对象又可以设置 Formatter 对象。Formatter 对象用来设置具体的输出格式,常用变量格式如下表所示:

import logging
import logging.handlers

logger = logging.getLogger("logger")
# 解决handler重复添加问题
logger.propagate = 0

#设置控制台输出
handler1 = logging.StreamHandler()
#设置文件输出
handler2 = logging.FileHandler(filename="test.log")

#设置输出等级,输出时会和设置的最大值比较
logger.setLevel(logging.DEBUG)
handler1.setLevel(logging.WARNING)
handler2.setLevel(logging.DEBUG)

#添加格式化输出
formatter = logging.Formatter("%(asctime)s %(name)s %(levelname)s %(message)s")
handler1.setFormatter(formatter)
handler2.setFormatter(formatter)
#自定义logger对象添加handler处理对象
logger.addHandler(handler1)
logger.addHandler(handler2)

logger.debug("debug 日志")
logger.info("info 日志")
logger.warning("warning 日志")
logger.error("error 日志")
logger.critical("critical 日志")


终端输出:
2019-11-23 00:38:24,030 logger WARNING warning 日志
2019-11-23 00:38:24,030 logger ERROR error 日志
2019-11-23 00:38:24,030 logger CRITICAL critical 日志

test.log:
2019-11-23 00:38:24,030 logger DEBUG debug 日志
2019-11-23 00:38:24,030 logger INFO info 日志
2019-11-23 00:38:24,030 logger WARNING warning 日志
2019-11-23 00:38:24,030 logger ERROR error 日志
2019-11-23 00:38:24,030 logger CRITICAL critical 日志
NOTE:创建了自定义的 Logger 对象,就不要在用 logging 中的日志输出方法了,这些方法使用的是默认配置的 Logger 对象,否则会输出的日志信息会重复。
4.2 Logger配置
4.2.1 字典格式配置
import logging.config

config = {
    'version': 1,
    'formatters': {
        'simple': {
            'format': '%(asctime)s - %(name)s - %(levelname)s - %(message)s',
        },
        # 其他的 formatter
    },
    'handlers': {
        'console': {
            'class': 'logging.StreamHandler',
            'level': 'DEBUG',
            'formatter': 'simple'
        },
        'file': {
            'class': 'logging.FileHandler',
            'filename': 'logging.log',
            'level': 'DEBUG',
            'formatter': 'simple'
        },
        # 其他的 handler
    },
    'loggers':{
        'StreamLogger': {
            'handlers': ['console'],
            'level': 'DEBUG',
        },
        'FileLogger': {
            # 既有 console Handler,还有 file Handler
            'handlers': ['console', 'file'],
            'level': 'DEBUG',
        },
        # 其他的 Logger
    }
}

logging.config.dictConfig(config)
StreamLogger = logging.getLogger("StreamLogger")
FileLogger = logging.getLogger("FileLogger")
4.2.2 配置文件中获取配置信息
logger.ini文件
[loggers]
keys=root,sampleLogger

[handlers]
keys=consoleHandler

[formatters]
keys=sampleFormatter

[logger_root]
level=DEBUG
handlers=consoleHandler

[logger_sampleLogger]
level=DEBUG
handlers=consoleHandler
qualname=sampleLogger
propagate=0

[handler_consoleHandler]
class=StreamHandler
level=DEBUG
formatter=sampleFormatter
args=(sys.stdout,)

[formatter_sampleFormatter]
format=%(asctime)s - %(name)s - %(levelname)s - %(message)s
引用:
import logging.config

logging.config.fileConfig(fname='logger.ini', disable_existing_loggers=False)
logger = logging.getLogger("sampleLogger")
5 实战应用
5.1 日志文件按照时间划分或者按照大小划分
# 每隔 1000 Byte 划分一个日志文件,备份文件为 3 个
file_handler = logging.handlers.RotatingFileHandler("test.log", mode="w", maxBytes=1000, backupCount=3, encoding="utf-8")

# 每隔 1小时 划分一个日志文件,interval 是时间间隔,备份文件为 10 个
handler2 = logging.handlers.TimedRotatingFileHandler("test.log", when="H", interval=1, backupCount=10)
5.2 flask logging配置
project_name/conf/config.py
class BaseConfig(object):
    # SECRET_KEY = os.environ.get('SECRET_KEY') or 'awklihdytcbmoq'
    SECRET_KEY = os.urandom(24)
    PERMANENT_SESSION_LIFETIME = timedelta(days=7)

    PROJECT = '伟大的项目'
    VERSION = 'v1.0'
    API_VERSION = 'api/v1.0'
    # 指定json编码格式 如果为False 就不使用ascii编码,
    JSON_AS_ASCII = False
    # 指定浏览器渲染的文件类型,和解码格式;
    JSONIFY_MIMETYPE = "application/json;charset=utf-8"

    DEBUG = True
    TESTING = False
    PROD = False

    # QQ邮箱配置
    MAIL_DEBUG = True  # 开启debug,便于调试看信息
    MAIL_SUPPRESS_SEND = False  # 发送邮件,为True则不发送
    MAIL_SERVER = 'smtp.qq.com'  # 邮箱服务器
    MAIL_PORT = 465  # 端口
    MAIL_USE_SSL = True  # 重要,qq邮箱需要使用SSL
    MAIL_USE_TLS = False  # 不需要使用TLS
    MAIL_USERNAME = '4xxxxxxxx@qq.com'  # 填邮箱
    MAIL_PASSWORD = 'xcxxxxxxxxx'  # 填授权码 -> 百度怎么获取
    FLASK_MAIL_SENDER = 'xxxxxxxx@qq.com'  # 邮件发送方
    FLASK_MAIL_SUBJECT_PREFIX = '{伟大的项目} - 错误日志'  # 邮件标题
    MAIL_DEFAULT_SENDER = '4xxxxxxxx@qq.com'  # 填邮箱,默认发送者
class TestEnvConfig:
    pass
class ProdEnvConfig:
    pass
class DevConfig:
    pass
project_name/init.py
def create_app(config=None, app_name=None, blueprints=None):
    """Create Flask app"""

    if app_name is None:
        app_name = Configs.BaseConfig.PROJECT

    app = Flask(app_name, static_folder='xxx/static',
                template_folder='xxx/tempaltes')
    configure_app(app, config)
    configure_logging(app)

def configure_app(app, config):
    """Configure register app """
    import project_name.conf.config as Configs

    # 这里可以用变量设置导入开发环境/测试环境/生产环境不同配置
    app.config.from_object(Configs.BaseConfig)

def configure_logging(app):
    """Configure file(info) and email(error) logging."""

    if app.debug or app.testing:
        # Skip debug and test mode.
        return
    import logging,os
    from logging.handlers import SMTPHandler

    # Set info level on logger, which might be overwritten by handers.
    app.logger.setLevel(logging.INFO)   # 可以设置不同环境log级别  如: app.config['LOGGER_LEVEL']

    # Set log storage location
    info_log = os.path.join(app.root_path, "..", "logs", "app-info.log")
    info_file_handler = logging.handlers.RotatingFileHandler(
        info_log, maxBytes=1048576, backupCount=20)
    # handers Level  > logger Level ,might be overwrite
    info_file_handler.setLevel(logging.INFO)  # 可以设置不同环境log级别  如: app.config['HANDLER_LEVEL']
    # set log format
    info_file_handler.setFormatter(logging.Formatter(
        '%(asctime)s %(levelname)s: %(message)s '
        '[in %(pathname)s:%(lineno)d]')
    )
    app.logger.addHandler(info_file_handler)

    ADMINS = ['4xxxxxx@qq.com']
    mail_handler = SMTPHandler(app.config['MAIL_SERVER'],
                               app.config['MAIL_USERNAME'],
                               ADMINS,
                               'O_ops... %s failed!' % app.config['PROJECT'],
                               (app.config['MAIL_USERNAME'],
                                app.config['MAIL_PASSWORD']))
    mail_handler.setLevel(logging.ERROR)
    mail_handler.setFormatter(logging.Formatter(
        '%(asctime)s %(levelname)s: %(message)s '
        '[in %(pathname)s:%(lineno)d]')
    )
    app.logger.addHandler(mail_handler)
伟大的项目 全局使用log
current_app.logger.debug("debug信息")
current_app.logger.warning("warning信息")
current_app.logger.info("info信息")
current_app.logger.error("error信息")
current_app.logger.critical("critical信息")
四、zipfile
1 模块介绍
zipfile模块提供了创建、读取、写入、追加和列出zip文件的工具, 官网链接:https://docs.python.org/3/library/zipfile.html
2 简单示例
2.1 目录:

2.2 压缩:
def zip_write(zip_dir, zipname):
    """
    压缩文件
    :param zip_dir:压缩路径
    :param zipname:压缩后名称
    :return:
    """
    with zipfile.ZipFile(zipname, "w", zipfile.ZIP_DEFLATED) as zf:
        for path, dirnames, filenames in os.walk(zip_dir):
            for filename in filenames:
                zf.write(os.path.join(path, filename))

zip_write(r'C:\Users\keking\Desktop\test', 'test.zip')
2.3 压缩结果:

2.4 解压:
def zip_extract(zipname, ex_to=None):
    """
    解压zip文件
    :param zipname:解压文件名称
    :param ex_to:解压存放路径
    :return:
    """
    with zipfile.ZipFile(zipname, "r") as zf:
        for file in zf.namelist():
            zf.extract(file, ex_to)
zip_extract(r'C:\Users\keking\Desktop\test\test.zip')
3 常用方法总结
file_dir = 'C:\Users\keking\Desktop\test\test.zip'
zip_obj = zipfile.ZipFile(file_dir)
# 获取zip文档内所有文件的信息,返回一个zipfile.ZipInfo的列表
print(zip_obj.infolist())

# 获取zip文档内所有文件的名称列表
print(zip_obj.namelist())

# 将zip文档内的信息打印到控制台上
print(zip_obj.printdir())

# 上下文管理
with zipfile.ZipFile(file_dir) as zf:

# 压缩
zip_obj.write(filename, arcname=None, compress_type=None, compresslevel=None)
filename -> 文件名称
arcname -> 存档名称,存放目录名称
compress_type -> 通过数字指定压缩方法,ZIP_STORED=0,ZIP_DEFLATED=8,ZIP_BZIP2=12,ZIP_LZMA=14
compresslevel -> 文件写入归档文件时使用的压缩级别

# 解压
zip_obj.extract(member, path=None, pwd=None)
member -> namelist()返回的子成员
path -> 解压文件提取到
pwd -> 加密文件密码

# 多级目录解压
zip_obj.extractall(path=None, members=None, pwd=None)

# 加密
zip_obj.setpassword(pwd)


