综合架构_网络服务_nginx
前沿: 常用网站服务软件
http://nginx.org/en/docs/dirindex.html --nginx程序所有可以配置指令参数http://nginx.org/en/docs/varindex.html --nginx程序所有变量信息配置
http://nginx.org/en/docs/ --nginx程序可用的模块信息
处理静态资源网站服务:nginx apache
处理动态资源网站服务:php tomcat
nginx: 使用的是最新的网络模块 epoll  kqueue 异步处理模型,只需要几个进程,就能处理大量的在线请求
            擅长处理静态页面和反向代理  本身就是一个反向代理服务器,而且支持7层负载均衡
apache 2.4: 使用的是传统的网络模块 select(采用大量的线程,来处理大量的请求) 其中较为稳定的prefork模式,多进程模式,需要派生大量子进程,占用CPU资源
            擅长处理动态页面
1.nginx软件概述说明
1.支持高并发,官方测试数据,可以支持5W并发数,实际生产环境可以支持2-4w并发
2.遵守BSD开源协议,可以用作商业用途,相比较市面上卖的负载均衡交换机,价格低廉,节约成本
3.nginx软件并发处理静态请求能力较强, 服务器资源消耗少
4.不占用内存:网站服务压力测试 --- 几万并发 -- 大概100m内存
5节省带宽(支持压缩)
6.支持热部署(可是长时间不用关机,软件服务运行的时候,也可以更新软件版本)
7.nginx软件是由俄罗斯开发出来, C语言开发(少量信息python)
2.如何部署nginx软件程序
1. yum
a 官方源yum安装nginx 软件目录结构(标准) 最新稳定版
第一个历程: 更新yum源
vim /etc/yum.repos.d/nginx.repo
[nginx-stable]
name=nginx stable repo
baseurl=http://nginx.org/packages/centos/$releasever/$basearch/
gpgcheck=1
enabled=1
gpgkey=https://nginx.org/keys/nginx_signing.key
module_hotfixes=true

第二个历程: 安装软件
yum install -y nginx

b 非官方源yum安装nginx 软件目录结构 历史版本
yum install -y nginx
2.编译安装
第一个历程: 下载软件源码包
删除软件 yum remove --会删除一些依赖关系 不建议
rpm -e 软件包
rpm -e `rpm -qa|grep nginx`
wget -P /server/tools wget http://nginx.org/download/nginx-1.16.1.tar.gz
第二个历程: 下载nginx所需的依赖软件
yum install -y openssl-devel pcre-devel gcc c++
openssl-devel : 可以让网站实现HTTPs访问
pcre-devel : 兼容perl语言正则表达式
第三个历程: 解压软件程序 进入到软件源码目录编译安装
编译安装软件三步曲
./configure --prefix=/application/nginx1.16.1 --user=www --group=www --with-http_ssl_module --with-http_mp4_module --with-http_stub_status_module --with-stream --with-stream_ssl_module
--prefix=PATH       set installation prefix  程序安装好后存储数据目录
--sbin-path=PATH     set nginx binary pathname  设置命令文件保存目录
--modules-path=PATH   set modules path  设置模块保存目录
--conf-path=PATH     set nginx.conf pathname  配置文件保存目录
--error-log-path=PATH  set error log pathname
--pid-path=PATH      set nginx.pid pathname
--lock-path=PATH      set nginx.lock pathname
--user=USER        set non-privileged user for worker processes  指定worker进程管理用户
--group=GROUP       set non-privileged group for worker processes  指定worker进程管理用户组
--with-http_ssl_module enable ngx_http_ssl_module  激活ssl模块功能
--with-http_stub_status_module enable ngx_http_stub_status_module
$? 查看上一次的返回值【0 成功 1失败】
make
make install
/application/nginx1.16.1/sbin/nginx -V
创建软连接
ln -s /application/nginx1.16.1/ /application/nginx
创建命令的软连接
ln -s /application/nginx/sbin/nginx /sbin/
版本检查:
nginx -V
优点:安装灵活 可以自定义安装
缺点:安装麻烦 安装时间太久
自定义脚本
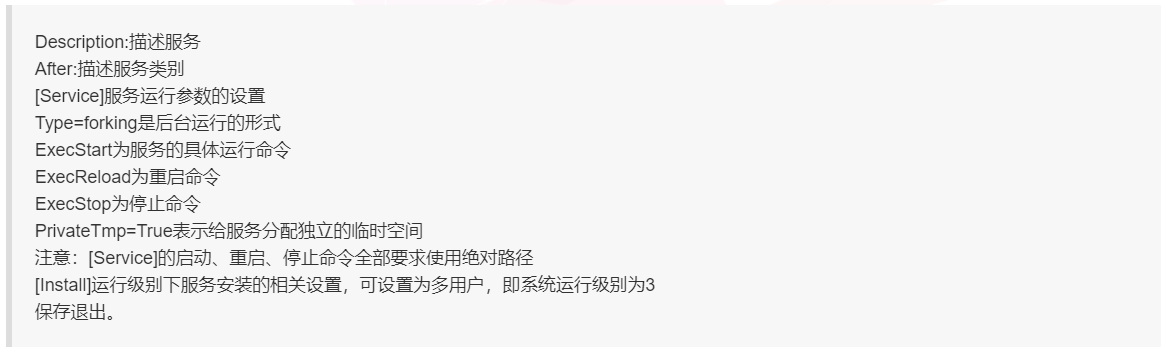
#!/bin/bash
#install nginx
NG_VER="1.16.1"
NG_SRC="nginx${NG_VER}"
NG_NA="nginx-${NG_VER}.tar.gz"
NG_DIR="/application/nginx-1.16.1/"
NG_URL="http://nginx.org/download/"
#yum 解决依赖
yum install tar pcre pcre-devel openssl openssl-devel make gcc gcc-c++ -y
#创建用户
useradd -s /sbin/nologin -M www
#下载nginx
wget ${NG_URL}$NG_NA
tar -xf $NG_NA
cd nginx-${NG_VER}/
./configure --prefix=$NG_DIR --with-http_stub_status_module  --with-http_ssl_module --with-pcre --user=www --group=www
make
make install
#让systemctl直接调用nginx,利用systemctl启动过nginx
echo "
[Unit]
Description=nginx service
After=network.target

[Service]
Type=forking
ExecStart=/application/nginx-1.16.1/sbin/nginx
ExecReload=/application/nginx-1.16.1/sbin/nginx -s reload
ExecStop=/application/nginx-1.16.1/sbin/nginx -s quit
PrivateTmp=true

[Install]
WantedBy=multi-user.target
">/lib/systemd/system/nginx.service
echo "
<html>
<h1> OLDBOY 66 test pages.</h1>
<hr color=red >
</html>
">/application/nginx-1.16.1/html/index.html

#启动nginx并设置为开机自启动
systemctl start nginx.service
systemctl enable nginx.service
ss -ntl
3.网站服务软件目录结构
/etc/logrotate.d/nginx ---实现日志切割功能
1.利用系统自带的软件实现日志切割
logrotate 程序
cat /etc/logrotate.conf   logrotate 程序主配置文件
weekly     日志切割周期(按天 按小时)
rotate 4   切割日志文件留存几次
create     创建新的日志信息
dateext   切割后日志文件标识信息(设置一个切割后问价的扩展名名称信息)
include /etc/logrotate.d 记载扩展切割日志配置文件
minsize  1M  切割日志大小条件(最小)
maxsize  100M  切割日志最大条件
 /var/log/wtmp {            指定日志文件单独进行切割处理
           monthly
           create 0664 root utmp
              minsize 1M
           rotate 1
}
nginx日志切割配置文件
dateformat %Y_%m_%d_%H(扩展)
/var/log/nginx/*.log {
daily ---指定以天数来转储
missingok ---发生错误忽略
rotate 52 ---转储的备份数量
compress ---转储时候是否压缩
delaycompress ---当前转储完成之后在下次转储压缩
notifempty ---空的日志不进行转储
create 640 nginx adm ---创一个640的属主和属组
sharedscripts ---执行完当前转储统一执行脚本
postrotate ---转储完之后执行脚本
if [ -f /var/run/nginx.pid ]; then
#kill -USR1 `cat /var/run/nginx.pid`
/bin/kill -USR1 `cat /run/nginx.pid 2>/dev/null` 2>/dev/null || true
fi
endscript
}
USR1亦通常被用来告知应用程序重载配置文件;例如,向Apache HTTP服务器发送一个USR1信号将导致以下步骤的发生:停止接受新的连接,
等待当前连接停止,重新载入配置文件,重新打开日志文件,重启服务器,从而实现相对平滑的不关机的更改。
2.利用编写脚本实现日志切割
#!/bin/bash
mv /var/log/nginx/acccess.log /var/log/nginx/access_$(date +%F_%T).log
systemctl reload nginx

编写定时任务:
crontab -e
0 */6 * * * /bin/bash 日志切割.sh &>/dev/null
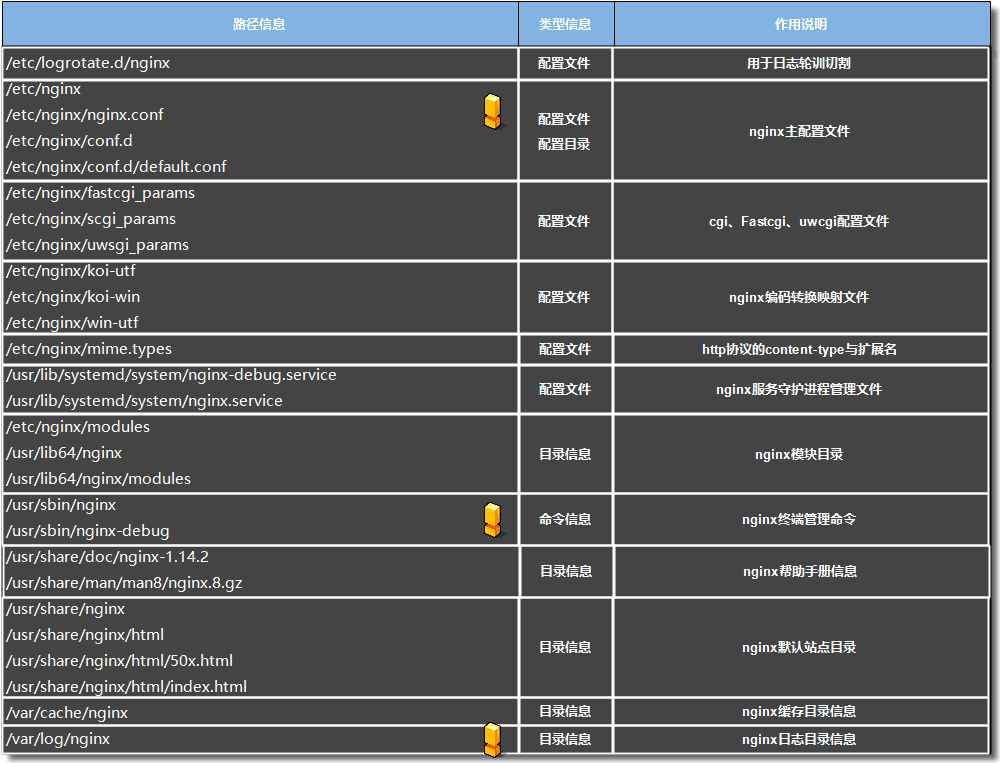
/etc/nginx                              --- nginx程序目录
/etc/nginx/nginx.conf              --- nginx程序主配置文件
/etc/nginx/conf.d/default.conf  --- nginx程序扩展配置文件
/etc/nginx/mime.types            --- nginx媒体资源类型 决定了哪些资源可以被nginx处理

/etc/nginx/fastcgi_params       --- 实现nginx将动态请求发送给动态服务 nginx->接口--> PHP
/etc/nginx/scgi_params
/etc/nginx/uwsgi_params        --- 实现nginx程序 --python

/etc/nginx/koi-utf                    ---程序字符编码有关文件
/etc/nginx/win-utf
/etc/nginx/koi-win
/etc/nginx/modules                 ---程序模块目录
说明: nginx程序配置文件

/etc/sysconfig/nginx              --- 程序进行调试有关(开发)
/etc/sysconfig/nginx-debug

/usr/lib/systemd/system/nginx-debug.service   --- 控制服务是否能够正常运行文件  systemctl start nginx
/usr/lib/systemd/system/nginx.service         --- shell介绍

/usr/lib64/nginx                              --- 程序运行需要调用库文件
/usr/lib64/nginx/modules
/usr/libexec/initscripts/legacy-actions/nginx
/usr/libexec/initscripts/legacy-actions/nginx/check-reload
/usr/libexec/initscripts/legacy-actions/nginx/upgrade
/usr/sbin/nginx--- 程序命令文件保存路径
/usr/sbin/nginx                               --- 程序命令文件保存路径
    -v            : show version and exit
                    显示软件版本
    -V            : show version and configure options then exit
                    显示软件版本和配置参数
    -t            : test configuration and exit   *
                    检测配置文件合法性
                    (指令信息后面需要有;结尾/ 花括号信息必须成对 / 参数指定要书写正确 并书写在合理位置 )
    -T            : test configuration, dump it and exit
                    检测配置文件合法性, 并将配置文件内容进行输出
    -q            : suppress non-error messages during configuration testing
                    抑制非错误消息输出
    -s signal     : send signal to a master process: stop, quit, reopen, reload  *
                    识别信号信息  stop  reload 【重新读取配置文件】
    -p prefix     : set prefix path (default: /etc/nginx/)
                    设置加载配置文件程序目录
    -c filename   : set configuration file (default: /etc/nginx/nginx.conf)
                    指定需要加载配置文件
    -g directives : set global directives out of configuration file

    /usr/sbin/nginx-debug

    /usr/share/doc/nginx-1.16.1               --- 文件文档说明信息
    /usr/share/doc/nginx-1.16.1/COPYRIGHT
    /usr/share/man/man8/nginx.8.gz

    /usr/share/nginx                          --- 指定程序站点目录
    /usr/share/nginx/html
    /usr/share/nginx/html/50x.html            --- 网站程序代码文件信息
    /usr/share/nginx/html/index.html

    /var/cache/nginx                          --- 程序缓存目录
  功能强大:
a 网站服务应用 web服务  apache
b 网站负载应用 lb服务   lvs
c 网站缓存应用 缓存服务器  squid 蓝汛
  /var/log/nginx                           --- 日志文件保存目录
4 网站服务程序配置文件说明
/etc/nginx/nginx.conf
主配置区域:     程序核心功能配置区域
时间配置区域:   程序性能参数信息
HTTP配置区域:    网站服务功能信息
server配置区域:  每一个网站页面配置信息
location配置区域:进行特殊功能设置 安全/跳转
if配置区域:      访问信息进判断
编译安装的配置文件
cp /application/nginx/conf/nginx.conf{,.bak}
egrep -v'^$|#' /application/nginx/conf/nginx.conf.bak >/application/nginx/conf/nginx.conf
[root@web01 modules]# grep -vE "#|^$" /etc/nginx/nginx.conf
user nginx; ---nginx启动子进程程默认用户 worker_processes 1; ---指定worker进程数量 数量<= 服务器总的核心数 error_log /var/log/nginx/error.log warn; ---错误日志保存路径 错误日志级别 pid /var/run/nginx.pid; ---程序PID文件保存路径 events { worker_connections 1024; ---每个worker进程并发连接数 连接数+进程数<系统打开文件数 }
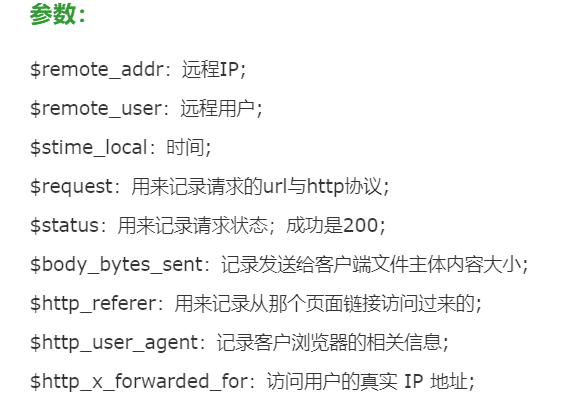
#http服务器设置 http { include /etc/nginx/mime.types; ---加载媒体资源文件, 识别静态资源信息 default_type application/octet-stream; ---默认识别文件类型 log_format main '$remote_addr - $remote_user [$time_local] "$request" ' --定义访问日志格式信息 '$status $body_bytes_sent "$http_referer" ' '"$http_user_agent" "$http_x_forwarded_for"' '"$request_uri" "$args" "$url"';
access_log /var/log/nginx/access.log main; ---定义全局使用日志信息
#sendfile指令指定 nginx 是否调用sendfile 函数(zero copy 方式)来输出文件,对于普通应用,必须设为on
#如果用来进行下载等应用磁盘IO重负载应用,可设置为off,以平衡磁盘与网络IO处理速度,降低系统uptime。
sendfile on; keepalive_timeout 65; ---连接回话超时时间 include /etc/nginx/conf.d/*.conf; ---加载其他配置文件信息
#client_max_body_size 10m; -- 上传文件的大小
server {
listen 80;
set $url $scheme://$host$request_uri; #创建变量
server_name localhost;
if( $http_user_agent ~* "android|ios|iphone" ) {
return 200 "mobile \n";
}
location / {
root html;
index index.html index.htm;
}
error_page 500 502 503 504 /50x.html;
location = /50x.html {
root html;
}
}
if location规则应用场景
location 匹配uri
if根据实际要求(开发 运营)

#需求1  172.1.x.x  带yucheng 返回200
        set $flag 0;
        if ( $remote_addr ~ "^172\.1\."){
        set $flag "${flag}1";     #如果  ip符合规则  则 $flag的内容是01
          }
        if ($http_user_agent ~ "yucheng"){  #如果用户的客户端是yucheng
         set $flag "${flag}2";    # set $flag  012     $flag的内容012
           }
        if ($flag = "012"){
        return 200;
          }
nginx进程信息:
    master process: 管理服务运行状态  进行存在--服务就可以正常运行    经理
    worker process: 处理用户访问请求  HTTP请求报文 -- worker进程处理  工人


系统打开文件数/系统文件句柄数
    open files                      (-n) 2  所有程序可以打开文件数
    程序运行起来 -- 进程nginx -- 打开一些文件 nginx.conf access.log error.log nginx.pid
    修改调整系统打开文件数:
    /etc/security/limitsc.conf
    *    -    nofile    65535  20
/etc/nginx/conf.d/default.conf
[root@web01 modules]# grep -vE "#|^$" /etc/nginx/conf.d/default.conf
server {
    listen       80;   --- 指定服务监听地址/指定服务端口信息
    server_name  localhost;  ---指定网站服务域名信息
    #定义web根路径
    location / {
        root   /usr/share/nginx/html; ---指定站定目录信息
        index  index.html index.htm; ---首页文件定义 首页文件不存在,会报403的错误!
        error_page   404 500 502 503 504  /error.html; --- 优雅显示错误页面

    }
}
5.部署搭建一个简单静态页面
第一个历程: 安装部署nginx服务

第二个历程: 编写nginx配置文件(扩展配置)
grep -vE "#|^$" /etc/nginx.conf.d/default.conf > www.conf

vim /etc/nginx/conf.d/www.conf
server {
    listen       80;
    server_name  www.oldboy.com;
  root   /html/www;
    index  index.html;
 }
第三个历程: 编写网站代码信息
# mkdir /html/www, -p # for name in www;do echo $name.oldboy.com >/html/$name/index.html;done

# for name in www;do cat /html/$name/index.html;done www.oldboy.com

第四个历程: 配置DNS解析信息(本地地址解析配置)
hosts 10.0.0.7 www.oldboy.com
5.1 企业环境搭建静态网站页面
第一个历程:编写nginx配置文件
第二个历程:让开发人员发送代码信息,上传到站点目录中
6 nginx服务企业配置方法
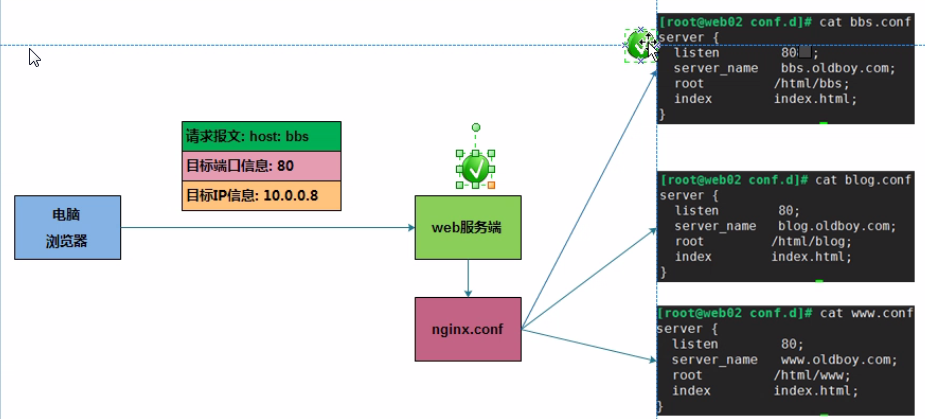
6.1 企业环境多个网站搭建(多个虚拟主机配置)
第一个步骤: 编写多个网站配置文件
    www.conf
    server {
      listen        80;
      server_name   www.oldboy.com;
      root         /html/www;
      index        index.html;
    }
    bbs.conf
    server {
      listen        80;
      server_name   bbs.oldboy.com;
      root         /html/bbs;
      index        index.html;
    }

    blog.conf
    server {
      listen        80;
      server_name   blog.oldboy.com;
      root          /html/blog;
      index         index.html;
    }
第二个步骤: 创建站点目录/创建网站首页文件
mkdir /html/{www,bbs,blog} -p
    for name in www bbs blog;do echo $name.oldboy.com >/html/$name/index.html;done
    for name in www bbs blog;do cat /html/$name/index.html;done

    www.oldboy.com
    bbs.oldboy.com
    blog.oldboy.com
第三个步骤: 进行DNS本地解析
    10.0.0.7  www.oldboy.com bbs.oldboy.com blog.oldboy.com
    检查:ping www.oldboy.com
      ping bbs.oldboy.com
         ping blog.oldboy.com
6.1.1 网站页面访问方式:
1) 基于域名访问方式
www.oldboy.com
2) 基于地址访问方式
配置: /etc/nginx/nginx.conf
include /etc/nginx/conf.d/www.conf;
结论: nginx服务涉及到IP地址的修改,必须重启nginx服务 *******
systemctl restart nginx
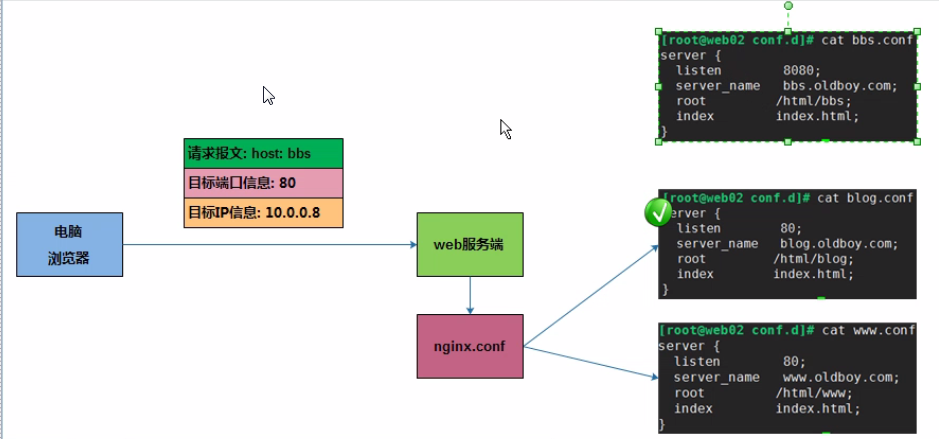
3) 基于端口访问方式 (没有的话,会加载符合信息的第一个端口信息) --> ll /etc/nginx/conf.d/*.conf
修改扩展配置文件
listen 8080; ==>www.oldboy.com:8080
systemctl restart nginx
检查端口信息:
netstat -lntup|grep nginx
访问: www.oldboy.com:8080
用户访问网站:
01:解封装数据包识别网络地址信息
02:解封装数据包识别传输层端口信息 可以匹配那个网站 --> 多个
03:解封装数据包识别应用层请求报文 Hosts信息

匹配   :根据Hosts信息,匹配不同网站页面
不匹配: 根据配置文件加载顺序,显示第一个匹配网站页面信息 (按照字母顺序,加载第一个server主机)
6.2 企业利用网站服搭建共享目录
01. 在站点目录创建共享的数据资源
02. 删除首页文件
03. 开启显示站点目录资源功能 autoindex on;
[root@web01 blog]# cat  /etc/nginx/conf.d/bbs.conf
server {
    listen       80;
    server_name  bbs.oldboy.com;
    charset      utf-8;      --- 页面显示出现乱码
    location / {
        root    /html/bbs;
        index  index.html;
        autoindex      on;   --- 必须满足首页文件不存在-->显示站点目录信息
     }
}
6.3 企业利用网站服务实现安全访问
6.3.1 网站页面进行策略控制
根据用户IP地址进行访问控制
      访问 大陆系列 目录中信息   10.0.0.1      可以查看
           location  /大陆系列 {
               allow  10.0.0.1;
               deny   all;
           }
      访问 日韩系列 目录中信息   172.16.1.0/24 可以查看
           location  /日韩系列 {
               allow  172.16.1.0/24;
               deny   all;
           }
      访问 欧美系列 目录中信息   172.16.1.41   可以查看
           location  /欧美系列 {
               allow  172.16.1.41;
               deny   all
           }

      访问控制模块: ngx_http_access_module
      allow : 设置白名单
      deny  : 设置黑名单

      location / {
          deny  192.168.1.1;
          allow 192.168.1.0/24;
          allow 10.1.1.0/16;
          deny  all;
      }

      访问大陆系列  http://bbs.oldboy.com  /大陆系列/
      访问欧美系列  http://bbs.oldboy.com  /欧美系列/

      配置文件编写信息
     [root@web01 bbs]# cat /etc/nginx/conf.d/bbs.conf
     server {
         listen         80;
         server_name  bbs.oldboy.com;
         charset utf-8;
         root   /html/bbs;
         autoindex   on;
         location  /大陆系列 {
             allow  10.0.0.1;
             deny   all;
         }
         location  /日韩系列 {
             allow  172.16.1.0/24;
             allow  10.0.0.1;
             deny   all;
         }
     }
6.3.2 网站页面访问认证控制
yum install -y httpd-tools

1) 进行网站认证访问
       认证模块: ngx_http_auth_basic_module
       指令信息:
       auth_basic            : 开启认证功能
       auth_basic_user_file  : 设置加载指定密码文件

       第一个历程: 编写配置文件
       server {
           listen         80;
           server_name  bbs.oldboy.com;
           charset utf-8;
           location / {
               root   /html/bbs;
               #index  index.html index.htm;
               autoindex   on;
               auth_basic           "财务网站认证";
               auth_basic_user_file /etc/nginx/password;
           }
       }

       第二个历程: 创建密码文件
       -c  :创建密码文件
       -b  :免交互追加用户信息
     -bc :免交互创建密码文件
    -D  :删除用户信息
       创建密码文件
       htpasswd  -bc  /etc/nginx/password  zhq  ******   --创建密码文件,并设置登录用户信息
       添加用户信息
       htpasswd  -b  /etc/nginx/password  zhq1  ******
       删除用户信息
       htpasswd -D /etc/nginx/password zhq

       chown www /etc/nginx/password

       500 Internal Server Error  :  网站程序文件配置不正确/网站代码文件配置不正确
                                     配置密码文件权限不正确
    第三个历程: 重启服务
    systemctl restart nginx
ps: 401 Authorization Required ---访问页面认证失败
6.4 网站页面状态监控功能
实现外网用户访问虚拟主机:
    第一个历程: 修改虚拟软件 虚拟网络编辑器
    vmnet8 nat设置中 ---> 端口转发设置
    访问 -- www.oldboy.com:9000 == 10.0.0.8:80
    第二个历程: 编写本地解析文件
    hosts
    192.168.34.112   www.oldboy.com

    问题: 统计有多少个用户访问我的网站

    配置页面访问监控功能:
    第一个步骤: 编写配置文件
    server {
      listen    80;
      server_name   state.oldboy.com;
      stub_status;    --- 开启访问状态监控功能
    }
location /nginx-status {
stub_status on;
access_log off;
allow 10.0.0.0/24;
deny all;
}
    第二个步骤: 域名解析
    hosts:
    10.0.0.8  state.oldboy.com

    Active connections: 11              --- 在线连接数  同时有多少客户端和网站服务端建立了三次握手过程
    server accepts 289                  --- 从服务运行开始, 接收的所有连接请求总和
    handled        289                  --- 从服务运行开始, 处理的所有连接请求总和
    requests       1005                 --- 从服务运行开始, 所用HTTP请求包的数量
    keepalive_timeout  65;       --- 主配置文件参数, 数值为0表示开启短连接/数值非0表示开启长连接

    Reading: 0 Writing: 1 Waiting: 10  ???
   Reading: 0                 --- 当前服务正在读取用户HTTP请求报文数量(连接数)
    Writing: 1                 --- 当前服务正在处理用户HTTP请求报文数量(连接数)
    Waiting: 4                 --- 等待处理请求数量
                                   异步网络模型 epoll 网络编程
                                   请求信息01 请求信息02 请求信息03  -- 队列机制 (内存)  -- 秒杀
6.5 nginx服务访问流量控制
网站受到攻击,使网站压力过大 (例如: dos 攻击)

    方式一: 基于IP地址连接数进行控制
    说明: 控制一个源IP地址只能建立1个连接

    http_limit_conn_module
    配置指令信息:
    Syntax:        limit_conn_zone key zone=name:size;
    Default:    —
    Context:    http

    key:   变量信息,在连接建立后,收集什么信息做控制管理
    · $remote_addr           变量的长度为7字节到15字节    存储状态在32位平台中占用32字节或64字节,在64位平台中占用64字节。
    · $binary_remote_addr    变量的长度是固定的4字节        存储状态在32位平台中占用32字节或64字节,在64位平台中占用64字节。
      1M共享空间可以保存3.2万个32位的状态,1.6万个64位的状态。
    zone:  定义共享存储空间
    · name: 存储空间的名称信息
    · size: 存储空间大小信息

    Syntax:        limit_conn zone number;
    Default:    —
    Context:    http, server, location

    zone:    调用响应的存储空间
    number:  限制存储空间源IP地址可以处理的数量

    配置样例:
    [root@web02 conf.d]# cat www.conf
    limit_conn_zone $binary_remote_addr zone=oldboy:10m;
    server {
      listen        80;
      server_name   www.oldboy.com;
      root         /html/www;
      index        index.html;
      limit_conn oldboy 1;
    }


    方式二: 基于用户访问请求的频次
    http_limit_req_module
    配置指令信息:
    Syntax:        limit_req_zone key zone=name:size rate=rate [sync];
    Default:    —
    Context:    http

    key:   变量信息,在连接建立后,收集什么信息做控制管理
    · $remote_addr            变量的长度为7字节到15字节    存储状态在32位平台中占用32字节或64字节,在64位平台中占用64字节。
    · $binary_remote_addr    变量的长度是固定的4字节        存储状态在32位平台中占用32字节或64字节,在64位平台中占用64字节。
      1M共享空间可以保存3.2万个32位的状态,1.6万个64位的状态。
    zone:  定义共享存储空间
    · name: 存储空间的名称信息
    · size: 存储空间大小信息
    rate:  多个请求频次信息


    Syntax:        limit_req zone=name [burst=number] [nodelay];
    Default:    —
    Context:    http, server, location

    burst=number:   最大的请求阈值, 超过阈值请求都会进行控制

    [root@web02 conf.d]# cat www.conf
    limit_req_zone $binary_remote_addr zone=creq:10m rate=1r/s;
    server {
      listen        80;
      server_name   www.oldboy.com;
      root         /html/www;
      index        index.html;
      limit_req zone=creq burst=10;

    }
6.6 网站日志信息配置方法
1) 访问日志: 记录访问网站用户信息

    访问日志如何配置:
    log_format  main  '$remote_addr - $remote_user [$time_local] "$request" '    定义日志信息格式
                      '$status $body_bytes_sent "$http_referer" '
                      '"$http_user_agent" "$http_x_forwarded_for"'
             '"$request_uri" "$args" "$url"';

curl -I 10.0.0.8/oldboy/aaaa/xxxxx/zhq.txt

access_log /var/log/nginx/access.log main; 定义日志保存路径 10.0.0.1 - - [09/Nov/2019:15:22:45 +0800] "GET / HTTP/1.1" 200 30 "-" "Mozilla/5.0 (Windows NT 6.1; Win64; x64; rv:70.0) Gecko/20100101 Firefox/70.0" "-"
编译安装位置: tail -f /application/nginx/logs/access.log
10.0.0.8 - - [18/Dec/2019:19:30:47 +0800] "HEAD /oldboy/aaaa/xxxxx/zhq.txt HTTP/1.1" 404 0 "-" "curl/7.29.0" "-""/oldboy/aaaa/xxxxx/zhq.txt" "-" "http://10.0.0.8/oldboy/aaaa/xxxxx/zhq.txt"
  访问日志的信息说明:
    $remote_addr              客户端源IP地址
    $remote_user              记录网站认证用户名称信息
    [$time_local]             客户端访问网站页面时间信息
    "$request"                请求报文起始行信息
    $request_uri              用户请求中uri部分
    $status                   服务端响应的状态码信息
    $body_bytes_sent        响应报文的主体内容大小信息(字节)
    "$http_referer"         记录跳转到网站,链接地址
    "$http_user_agent"      浏览器信息(代理)
    "$http_x_forwarded_for"  前端负载均衡 后端web服务记录用户正式ip地址
    $args                    用户请求中的参数 uri?后面的内容
   $scheme                  http或https
    $host                    用户请求的域名

 2) 错误日志: 记录服务运行状态信息/记录网站访问错误的信息
    错误日志如何配置:
    error_log  /var/log/nginx/error.log warn;  指定日志保存路径/指定记录日志级别
    常见调试/运行状态信息
    debug   调试级别               对低级别记录信息更多
    info    信息级别
    notice  通知级别
    warn    警告级别(建议)         ***
    产生信息表示服务运行异常
    error   错误界别               ***
    crit    严重的错误级别
    alert   非常验证的错误级别
    emerg   灾难级别               最高级别记录的信息更少
7 nginx 服务location配置 匹配uri
匹配不同网站资源, 进行不同处理方式
作用: 匹配指定的uri信息,可以根据访问不同的uri信息,做出不同处理方案
    举例:
    访问/oldboy    目录时, 禁止10.0.0.0/24   网段访问
    访问/oldgirl目录时, 禁止172.16.1.0/24 网段访问
    访问站点下面其他目录, 没有任何限制

    如何匹配uri信息:
    Syntax:     location [ = | ~ | ~* | ^~ ] uri { ... }
    Default:    —
    Context: server, location
    =   精确匹配指定uri信息                   == grep -o 只要匹配上的信息
    ~   模糊匹配指定uri信息(区分信息大小写)   == grep    匹配过滤信息
    ~*  模糊匹配指定uri信息(不区分大小写)     == grep -i 匹配过滤信息
    ^~  进行优先匹配/不识别扩展正则信息

    location = / {
        [ configuration A ]
    }

    location / {               --- 进行默认匹配???
        [ configuration B ]
    }

    location /documents/ {     --- 根据资源目录信息进行匹配
        [ configuration C ]
    }

    location ^~ /images/ {     --- 进行优先匹配 /images/目录
        [ configuration D ]
    }
    location ~* \.(gif|jpg|jpeg)$ {
        [ configuration E ]
    }


    实践配置:
    第一个历程: 编写配置文件
    [root@web02 conf.d]# cat www.conf
    server {
      listen        80;
      server_name   www.oldboy.com;
      # www.oldboy.com / --> index.html
      location / {                                      --- 默认匹配
          root  /html/www;
          index index.html;
      }
      # www.oldboy.com / --> oldboy.html                  --- 精确匹配的location 会最优先 01
      location = / {
          root /html/www;
          index oldboy.html;
      }
      # www.oldboy.com/documents/ --> oldgirl.html      --- 匹配指定目录,显示目录下面的首页文件信息
      location /documents/ {
          root /html/www;
          index oldgirl.html;
      }
      # www.oldboy.com/images/    --> oldboy.jpg        --- 优先匹配 02
      location ^~ /images/ {
          root /html/www;
          index oldboy.jpg;
      }
      # www.oldboy.com/xxxx.jpg  --> xxx.jpg
      location ~* \.(jpg|png|gif)$ {
          root /html/www;
      }
    }

    第二个历程: 根据配置文件信息创建相应目录和文件
    cd /html/www
    echo default-page >index.html
    echo oldboy-page >oldboy.html
    mkdir documents ; echo oldgirl-page > documents/oldgirl.html
    mkdir images

    测验:
    oldboy.jpg  ---> /html/www/oldboy/   www.oldboy.com/meinv01.html 显示 oldboy.jpg 图片
    oldgirl.jpg ---> /html/www/oldgirl/  www.oldboy.com/meinv02.html 显示 oldgirl.jpg 图片
    思路
    第一个步骤: 根据不同uri显示不同页面信息
    location  /meinv01.html {
       return meinv01
    }
    location  /meinv02.html {
       return meinv02
    }

    第二个步骤: 完善配置文件
    [root@web02 conf.d]# cat www.conf
    server {
      listen        80;
      server_name   www.oldboy.com;
      location  / {
            root /html/www;
      }
      location  /meinv01.html {
            return 301 http://www.oldboy.com/oldboy/oldboy.jpg;
      }
      location  /meinv02.html {
            return 301 http://www.oldboy.com/oldgirl/oldgirl.jpg;
      }
    }

    总结:
    01. 配置多个location时, 需要有一个默认的location
    02. 访问的uri文件信息必须存在
    03. 访问指定资源不存在,可以利用return功能进行跳转访问
8 nginx 服务rewrite配置
nginx程序rewrite跳转功能 用户浏览器 输入域名地址信息A -- web服务器 -- 自动处理 -- 访问域名地址信息B 场景一: jd.com --> www.jd.com #短域名跳转到长域名
场景二: www.360buy.com --> www.jd.com # 老域名跳转到新域名
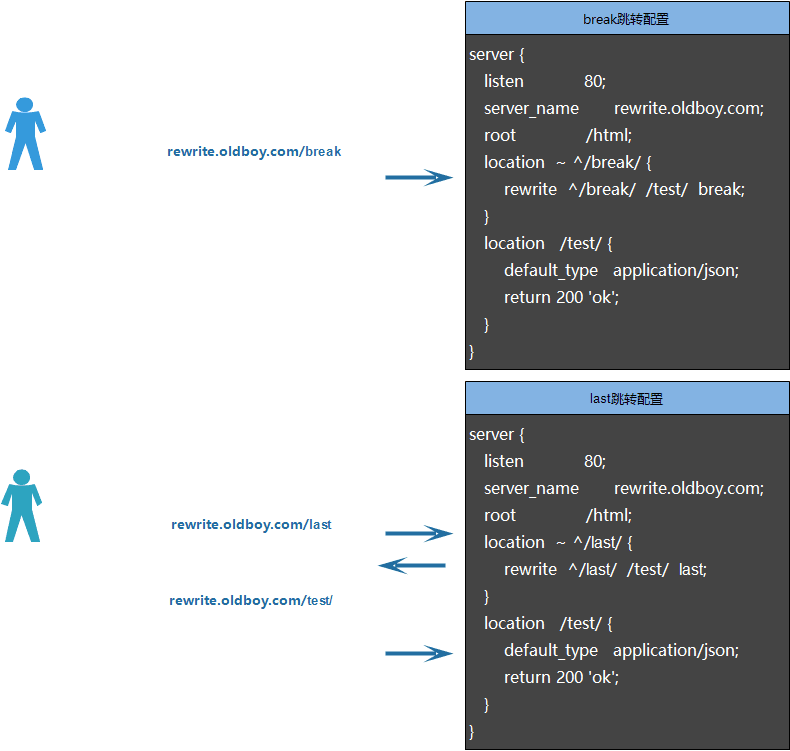
Syntax: rewrite regex replacement [flag]; Default: — Context: server, location, if regex: 正则匹配的信息(url/uri) replacement: 替换成什么信息/跳转成什么地址信息 [flag]: 指定进行跳转的方式 方式一: last 用户访问网站,进行跳转之后,会重启再次发起访问 不会改变url/uri信息 方式二: break 用户访问网站,进行跳转之后,会直接访问跳转之后的资源信息 不会改变url/uri信息 实践说明: server { listen 80; server_name www.oldboy.com; root /html/www; # www.oldboy.com/break/ -- 跳转(break) -- www.oldboy.com/test/ location ~ ^/break/ { rewrite ^/break/ /test/break; } # www.oldboy.com/last/ -- 跳转(last) -- www.oldboy.com/test/ location ~ ^/last/ { rewrite ^/last/ /test/last; } # www.oldboy.com/test/ --- 页面显示 ok location /test/ { default_type application/json; return 200 'ok'; } } 方式三: redirect (临时跳转) 将地址url/uri信息进行跳转变化 方式四: permanent(永久跳转) 将地址url/uri信息进行跳转变化 临时跳转: 不会让浏览器记录跳转信息 (uri信息跳转) 用户端访问网站 --- 浏览器 --- 网站服务器 --- 会将访问地址进行跳转 浏览器(访问跳转后地址) --- 网站服务器 --- 返回页面信息 用户端访问网站 --- 浏览器 --- 网站服务器 --- 会将访问地址进行跳转 浏览器(访问跳转后地址) --- 网站服务器 --- 返回页面信息 www.jd.com/shouji/index.html -- www.jd.com/shouji01/index.html www.jd.com/shouji/index.html -- www.jd.com/shouji02/index.html 永久跳转: 会让浏览器记录跳转信息 (url信息跳转) 用户端访问网站 --- 浏览器 --- 网站服务器 --- 会将访问地址进行跳转(告知浏览器进行记录) 浏览器(访问跳转后地址) --- 网站服务器 --- 返回页面信息 (记录跳转信息) 用户端访问网站 --- 浏览器(自动访问跳转后地址) --- 网站服务器 --- 返回页面信息 [root@web02 conf.d]# cat www.conf server { listen 80; server_name www.oldboy.com; # www.oldboy.com/break/ -- 跳转(break) -- www.oldboy.com/test/ location ~ ^/break/ { root /html/www; index index.html; rewrite ^/break/ /test/ redirect; } # www.oldboy.com/last/ -- 跳转(last) -- www.oldboy.com/test/ location ~ ^/last/ { root /html/www; index index.html; rewrite ^/last/ /test/ permanent; } # www.oldboy.com/test/ --- 页面显示 ok location /test/ { root /html/www; index index.html; default_type application/json; return 200 'ok'; } } uri地址跳转练习: 例1: 用户访问www.oldboy.com/abc/1.html 实际上真实访问是/ccc/bbb/2.html http://www.oldboy.com/abc/1.html ==> http://www.oldboy.com/ccc/bbb/2.html A -> B 第一个历程: 创建站点目录环境信息 跳转前环境: mkdir /html/www/abc -p; echo oldboy >/html/www/abc/1.html 跳转后环境: mkdir /html/www/ccc/bbb -p; echo oldboy >/html/www/ccc/bbb/2.html 第二个历程: 编写配置文件 [root@web02 conf.d]# cat www.conf server { listen 80; server_name www.oldboy.com; location / { root /html/www; index index.html; } location /abc/ { root /html/www; index index.html; rewrite (.*) /ccc/bbb/2.html redirect; } } 例2:用户访问www.oldboy.com/2014/ccc/bbb/2.html 实际上真实访问是/2018/ccc/bbb/2.html AB --> CB A(.*) -- C(\1) #http://www.oldboy.com/2014/ccc/bbb/2.html ==> http://www.oldboy.com/2018/ccc/bbb/2.html 第一个历程: 创建站点目录环境信息 跳转后环境: mkdir /html/www/2018/ccc/bbb/ -p; echo 2018 >/html/www/2018/ccc/bbb/2.html 第二个历程: 编写配置文件信息 [root@web02 conf.d]# cat www.conf server { listen 80; server_name www.oldboy.com; location / { root /html/www; index index.html; } location /2014/ { root /html/www; index index.html; rewrite ^/2014/(.*) /2018/$1 redirect; } }
跳转面试题:
访问http://127.0.0.1:8914/batch_no/11122asbc.jpeg连接实现跳转到http://127.0.0.1:8914/email_open_check?batch_no=11122asbc, 这个咋实现?
目标:
http://127.0.0.1:8914/batch_no/11122asbc.jpeg

结果:
http://127.0.0.1:8914/email_open_check?batch_no=文件名


rewrite ^/batch_no/([0-9a-zA-Z]+)\.jpeg  http://127.0.0.1:8914/email_open_check?batch_no=$1 ;

location  /batch_no  {
rewrite ^/batch_no/([0-9a-zA-Z]+)\.jpeg  http://127.0.0.1:8914/email_open_check?batch_no=$1 ;
}
rewrite ^/batch_no/(\S+)\.jpeg http://127.0.0.1:8914/email_open_check?batch_no=$1 permanent;
[0-9]    \d  数字
[^0-9]  	\D  数字以外符号
[ \t\n\r]   \s  匹配空字符  空格 tab 回车
[0-9a-zA-Z_] \w 数字 大小写字母 下划线
man perlretut
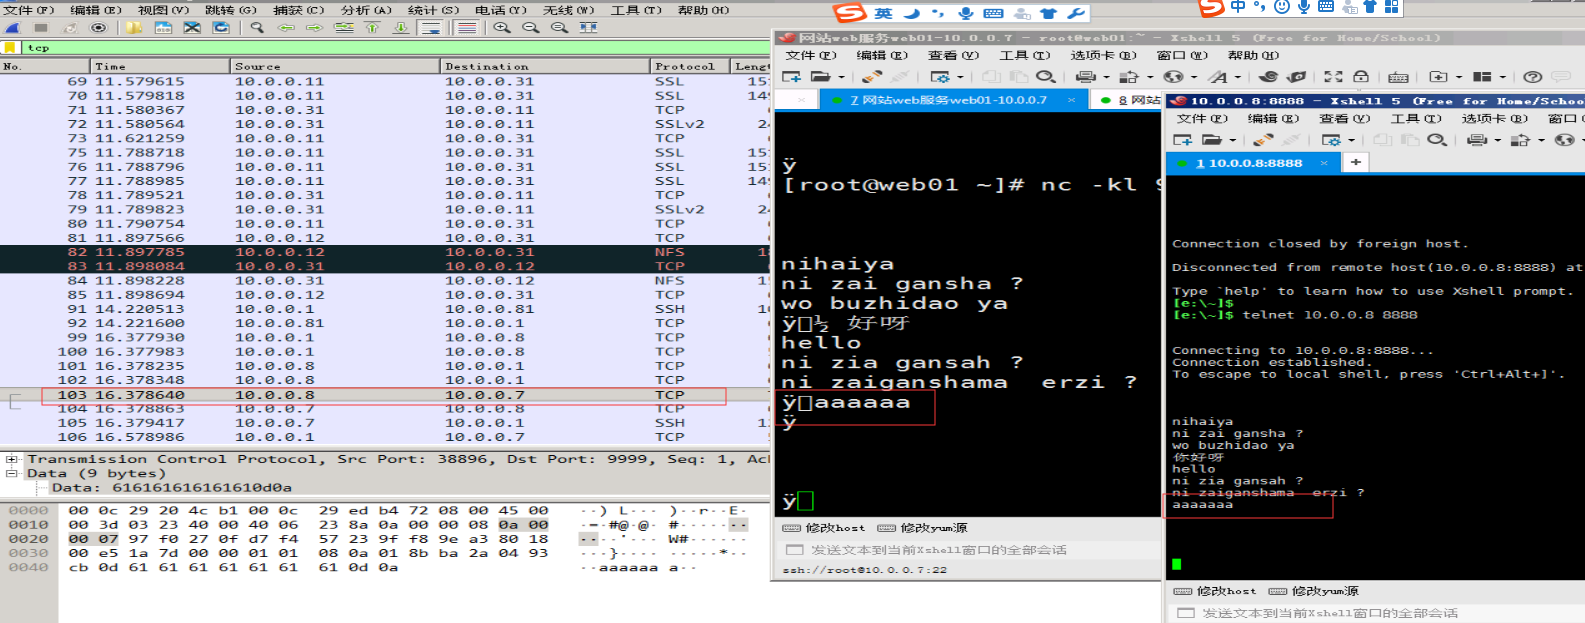
nginx4层 stream
环境准备:
web02 (lb)
web01 9999  #nc -kl  9999
db01  6666  #nc -kl  6666


stream {
    upstream  ports {
    server 10.0.0.7:9999;
    server 10.0.0.61:6666;
    }

    server {
    listen 8888;
    proxy_pass ports;
    }

}
proxy_cache 缓存模块
proxy_cache_path /soft/cache levels=1:2 keys_zone=code_cache:10m max_size=10g inactive=60m use_temp_path=0ff;
#use_temp_path 临时文件,会影响性能,建议关闭

#proxy_cache 开启缓存
#proxy_cache_valid 状态码200|304的过期为12h,其余状态码10分钟过期
#proxy_cache_key 缓存key
#add_header  增加头信息,观察客户端respoce是否命中 nginx—cache
"$upstream_cache_status";   缓存命中情况的信息
#proxy_next_upstream 出现502-504或错误,会跳过此台服务器访问下台
nginx优化
一:并发优化(nginx工作模式:主进程+工作进程) 性能优化
修改nginx软件work_processes进程数量
保持与cpu核心总数一致或2倍

1颗cpu 6核心 12线程 1个核心处理1个请求 Intel超线程技术 1个核心处理2个请求
命令: 查看cpu 核心
lscpu  ----> socket:(接口)
/proc/cpuinfo
top 按 1

查看nginx,制定绑定CPU的核心数,具体跑在哪个CPU上面。
watch -n 0.5 'ps axo cmd,pid,psr |grep nginx '


启动工作进程数量
worker_processes  4;

优化nginx均匀分分配到不同cpu进行处理  用户请求平均分布到每个核心上面 cpu的亲和力
#指定运行的核的编号,采用掩码的方式设置编号-->bitmask
worker_cpu_affinity   0001 0010 0100 1000;  ---> 4核心     worker_processes  4;
worker_cpu_affinity 0101 1010; -----> 2核心 worker_processes 2;
worker_cpu_affinity auto;
events {
单个工作进程维护的请求队列长度
    worker_connections  1024;
}
二:长连接(减少服务器维护因为与客户端建立http连接产生的大量tcp三次握手四次断开的开销)
keepalive_timeout  0;  0代表关闭
#keepalive_timeout  100;
#keepalive_requests 8192;
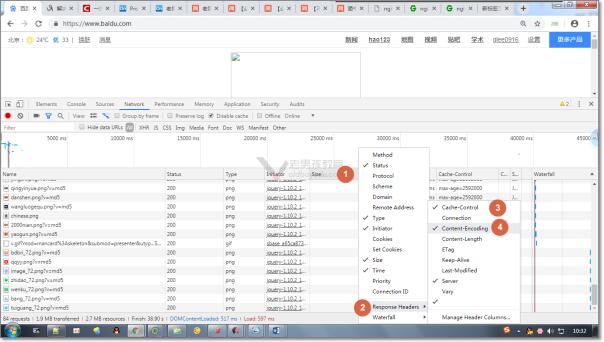
三:压缩(降低传输时间,增加用户体验度;降低公司带宽费用。) ******
gzip 压缩文件类型 .html .htm js css 图片 视频。。。
gzip  on;
gzip_proxied any;
gzip_min_length 1k;
gzip_buffers 4 8k;
gzip_comp_level 6;
gzip_types text/plain text/css application/x-javascript application/javascript application/xml;

详解:

  # 开启gzip
    gzip off;

    # 启用gzip压缩的最小文件,小于设置值的文件将不会压缩
    gzip_min_length 1k;

    # gzip 压缩级别,1-9,数字越大压缩的越好,也越占用CPU时间
    gzip_comp_level 2;

    # 进行压缩的文件类型。javascript有多种形式。其中的值可以在 mime.types 【媒体类型】文件中找到。
    gzip_types text/plain application/javascript application/x-javascript text/css application/xml text/javascript application/x-httpd-php image/jpeg image/gif image/png application/vnd.ms-fontobject font/ttf font/opentype font/x-woff image/svg+xml;

    # 是否在http header中添加Vary: Accept-Encoding,建议开启
    gzip_vary on;

    # 禁用IE 6 gzip
    gzip_disable "MSIE [1-6]\.";

    # 设置压缩所需要的缓冲区大小
    gzip_buffers 32 4k;

    # 设置gzip压缩针对的HTTP协议版本
    gzip_http_version 1.0;
四,静态缓存 ********
将部分数据缓存在用户本地磁盘,用户加载时,如果本地和服务器的数据一致,则从本地加载。提升用户访问速度,提升体验度。节省公司带宽成本。

expires指令:开启缓存并指定静态缓存时间

location ~*  \.(png|gif)$ {
      expires 1h;
}
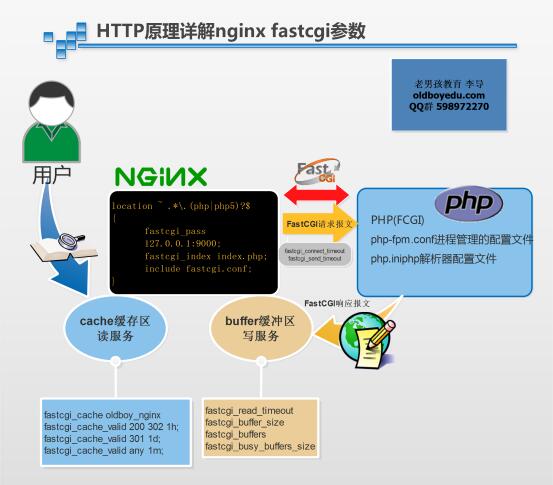
优化nginx 服务 与 FASTCGI 连接缓冲与缓存的参数
五, Nginx图片及目录防盗链解决方案
盗链: 别人把你网站的链接 复制下来 写入网站页面中 别人可以正常查看链接(图片,视频)但是消耗的是你的资源

预防:
1. 资源加上水印
2. 配置 $http_referer 正常访问不影响,盗链 通过其他人网站 跳转到你的网站

if ( $http_referer !~* "baidu.com|google.com|360.com|souhu.com"
 ) {
    return 403;

}
3.根据cookie 防盗链
https://www.cnblogs.com/zhanghongqi/p/11215546.html

4.ngx_http_referer_module模块:

用来阻止Referer首部无有效值的请求访问,可防止盗链
1、 valid_referers none|blocked|server_names|string ...;
定义referer首部的合法可用值,不能匹配的将是非法值
none:请求报文首部没有referer首部
blocked:请求报文有referer首部,但无有效值
server_names:参数,其可以有值作为主机名或主机名模式
arbitrary_string:任意字符串,但可使用*作通配符
regular expression:被指定的正则表达式模式匹配到的字符
串,要使用~开头,例如: ~.*\.9527edu\.com

ngx_http_referer_module
v 示例:
valid_referers none block server_names *.9527edu.org
*.9527edu.org 9527edu.* 9527edu.* ~\.9527edu\.;
if ($invalid_referer) {
return 403 http://www.9527edu.org;
}
https://nginx.org/en/docs/http/ngx_http_referer_module.html#valid_referers
六 nginx站点目录文件及目录权限优化
| 网站 | root | root | file | 644 | dir | 755 |
| 上传 | www | www | file | 644 | dir | 755 |
七: 利用nginx限制请求访问
让用户 只能下载(GET) 不能上传(POST)
location /static {
    if ( $request_method ~* "POST" ) {
        return 403;
    }
}
八: 使用普通用户启动nginx(nginx 监牢模式 keep in jail)
https://blog.51cto.com/13673885/2300280
https://blog.51cto.com/13673885/2300274
九:控制并发连接数
limit_conn_zone connection 连接数量
十: 控制客户端请求nginx速率
limit_req_zone request
