AQS
1、Lock规范用法
Lock lock = new ReentrantLock();
//加锁
lock.lock();
try{
    doSomething();
}finally {
    //解锁
    lock.unlock();
}
2、AQS
AQS:Abstract Queued Sychronized

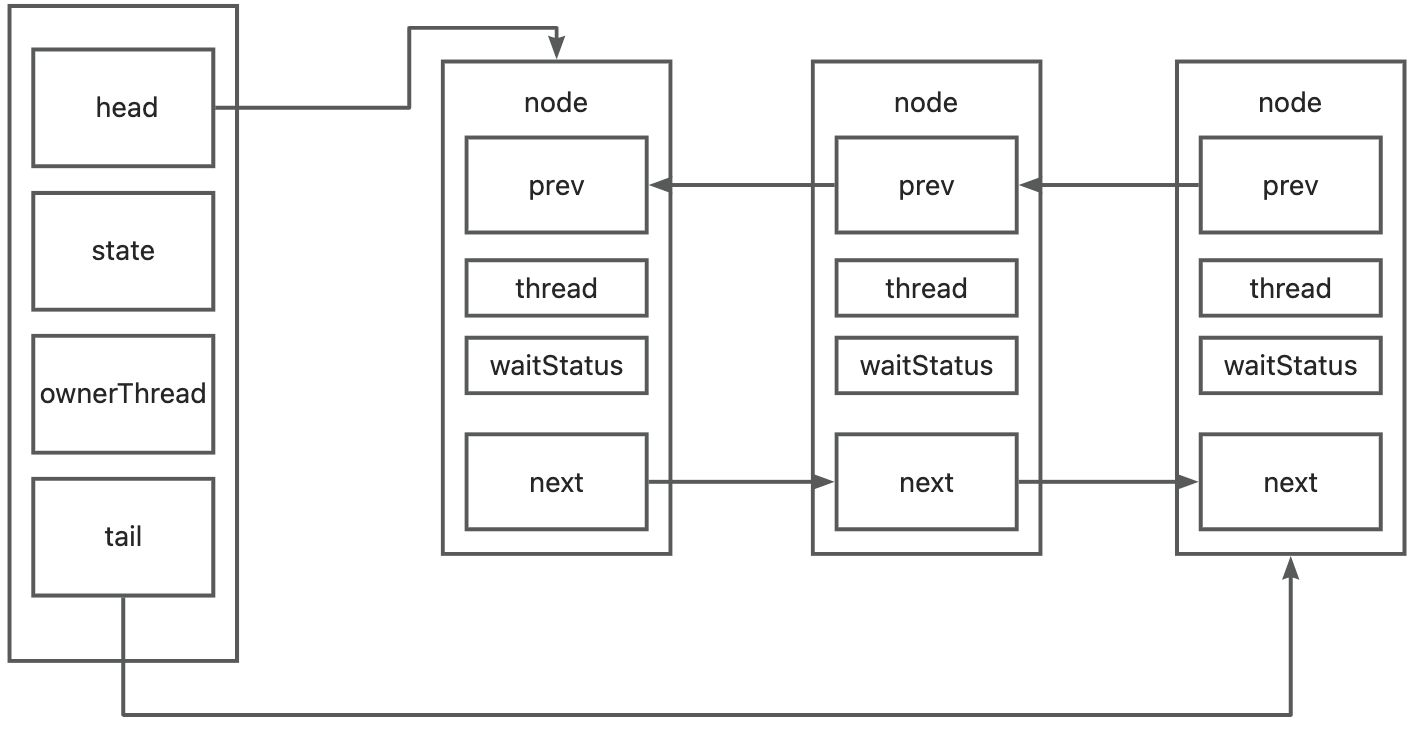
可以看到整个结构的关键就是node
//此处是 Node 的部分属性
static final class Node {

 //排他锁标识
 static final Node EXCLUSIVE = null;

 //如果带有这个标识,证明是失效了
 static final int CANCELLED =  1;

 //具有这个标识,说明后继节点需要被唤醒
 static final int SIGNAL = -1;

 //Node对象存储标识的地方
 volatile int waitStatus;

 //指向上一个节点
 volatile Node prev;

 //指向下一个节点
 volatile Node next;

 //当前Node绑定的线程
 volatile Thread thread;

 //返回前驱节点即上一个节点,如果前驱节点为空,抛出异常
 final Node predecessor() throws NullPointerException {
  Node p = prev;
  if (p == null)
   throw new NullPointerException();
  else
   return p;
 }
}
node的状态,node的状态来控制线程队列的唤醒逻辑
| 状态值 | |
|---|---|
| 1(CANCELLED) | 当前节点取消获取锁。等待超时或者被中断,会变更为该状态,进入该状态节点状态不再进行变化 |
| -1(SIGNAL) | 后面节点等待当前节点唤醒 |
| -2(CONDITION) | 当前线程阻塞在Condition,如果其他线程调用了Condition的signal方法,这个节点将从等待队列转移到同步队列队尾,等待获取同步锁 |
| -3(PROPAGATE) | 共享模式,前置节点唤醒后面节点后,唤醒操作无条件传播下去 |
| 0(中间状态) | 当前节点后面的节点已经唤醒,但是当前节点线程还是没有执行下去 |
3、加锁
前提:现在有2个线程,线程1,线程2进入加锁逻辑。
加锁代码:
        //公平锁
		final void lock() {
            acquire(1);
        }

		//非公平锁
        final void lock() {
            if (compareAndSetState(0, 1))
                setExclusiveOwnerThread(Thread.currentThread());
            else
                acquire(1);
        }
非公平锁:CAS设置AQS的state属性,如果设置成功,设置AQS的ownerThread为当前线程,否则进入acquire方法进行尝试。线程1 cas 设置state = 1,设置成功,设置ownerThread为线程1,返回。线程2进入lock,cas设置state = 1,设置失败,失败后进入acquire。
    public final void acquire(int arg) {
        if (!tryAcquire(arg) &&
            acquireQueued(addWaiter(Node.EXCLUSIVE), arg))
            selfInterrupt();
    }
可以被描述为:
- tryAcquire:当前线程尝试获取,尝试成功,返回,否则进入下一步
- addWaiter:将当前线程包装为AQS的node
- acquireQueued:将当前节点加入争抢线程的逻辑中
- selfInterrupt:线程自我中断
3.1、tryAcquire
查看非公平锁的tryAcquire实现
  final boolean nonfairTryAcquire(int acquires) {
            final Thread current = Thread.currentThread();
        	//获取AQS的状态
            int c = getState();
        	//当前锁可以重新获取
            if (c == 0) {
                //cas设置state
                if (compareAndSetState(0, acquires)) {
                    //case设置state成功,设置ownerThread为当前线程
                    setExclusiveOwnerThread(current);
                    //获取成功
                    return true;
                }
            }
                //如果当前线程是onwerThread
            else if (current == getExclusiveOwnerThread()) {
                //设置state,重入锁的实现
                int nextc = c + acquires;
                if (nextc < 0) // overflow
                    throw new Error("Maximum lock count exceeded");
                //设置state的新值
                setState(nextc);
                //获取成功
                return true;
            }
        	//获取锁失败
            return false;
}
3.2、addWaiter
如果队列中没有元素

如果队列中有元素,aqs设置节点为队尾成功:

aqs设置队尾失败
死循环将节点追加到队尾
3.3、acquireQueued
队列中的线程不断尝试获取锁
- 如果节点的前置节点是头节点,使用tryAcquire尝试获取
- 获取成功,设置当前节点为头节点
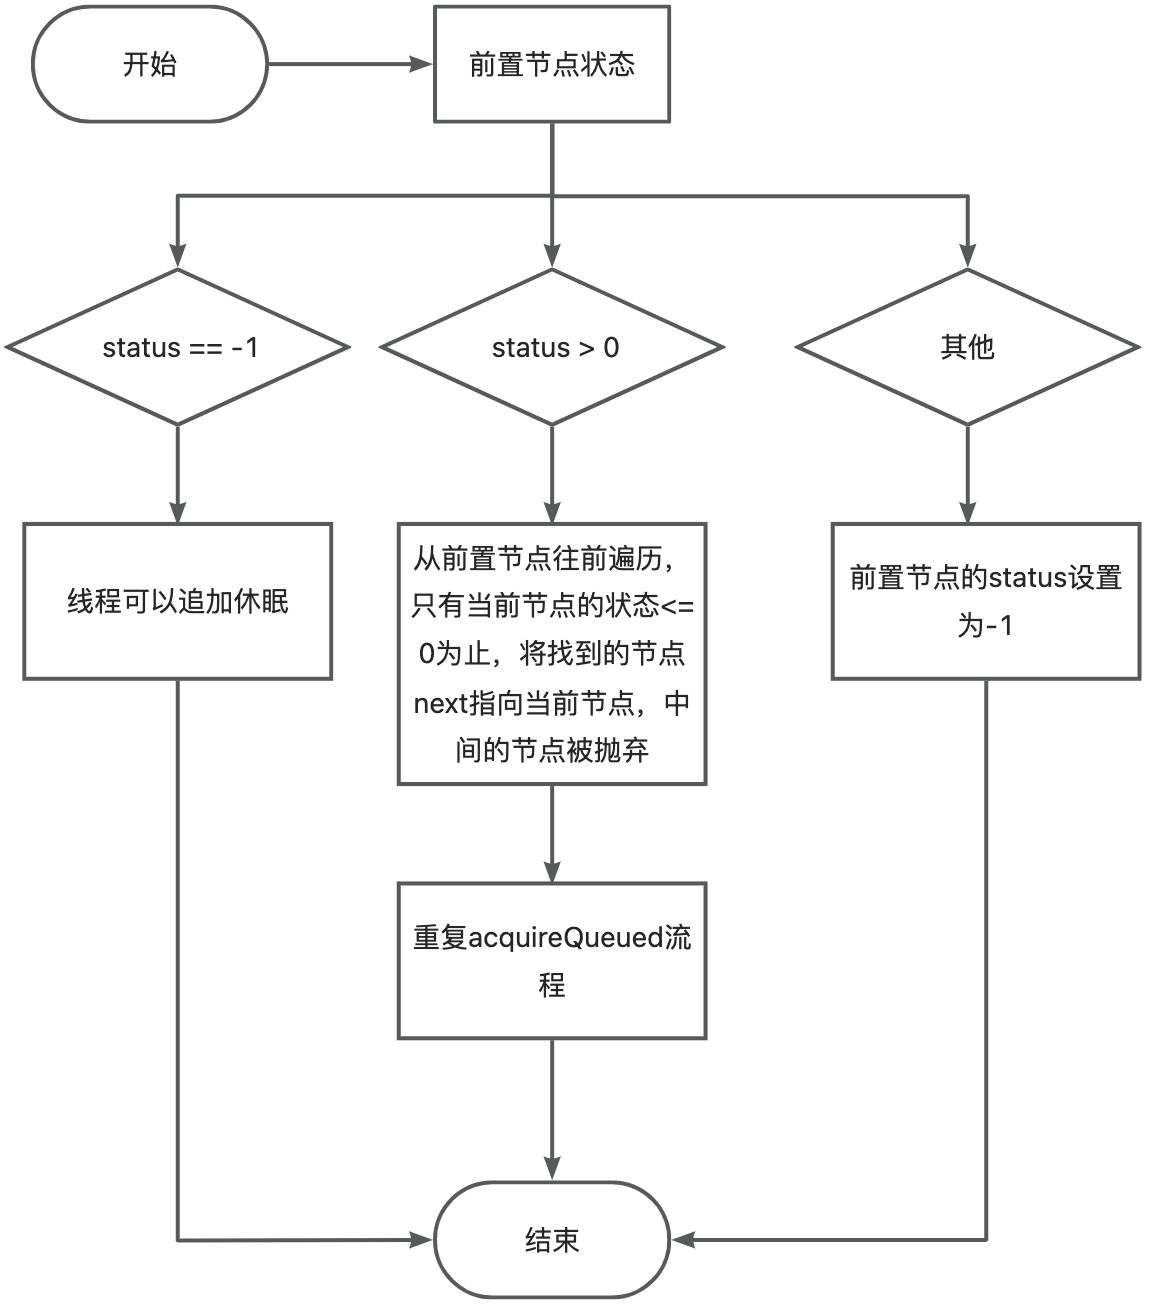
- 获取失败,调用shouldParkAfterFailedAcquire
shouldParkAfterFailedAcquire实现流程图,这个方法是用来排出队列中一些不正常状态的节点的。

parkAndCheckInterrupt,将本线程暂停。等待unpark方法执行的时候,如果该节点是头节点的下一个节点,那么线程继续执行,继续acquireQueued的无限循环,尝试获取锁。
4、解锁
 public final boolean release(int arg) {

        if (tryRelease(arg)) {
            Node h = head;
            if (h != null && h.waitStatus != 0)
                unparkSuccessor(h);
            return true;
        }
        return false;
    }
tryRelease
 protected final boolean tryRelease(int releases) {
            //state减1
            int c = getState() - releases;
        	//当前线程!=ownerThread,抛出异常
            if (Thread.currentThread() != getExclusiveOwnerThread())
                throw new IllegalMonitorStateException();
            boolean free = false;
        	//如果c==0代表可以解锁,清理ownerThrad
            if (c == 0) {
                free = true;
                setExclusiveOwnerThread(null);
            }
        	//设置state的值的新的值
            setState(c);
            return free;
        }
如果state设置完成,开始unpark队列中的节点
 private void unparkSuccessor(Node node) {
        /*
         * If status is negative (i.e., possibly needing signal) try
         * to clear in anticipation of signalling.  It is OK if this
         * fails or if status is changed by waiting thread.
         */
        int ws = node.waitStatus;
        if (ws < 0)
            compareAndSetWaitStatus(node, ws, 0);

        /*
         * Thread to unpark is held in successor, which is normally
         * just the next node.  But if cancelled or apparently null,
         * traverse backwards from tail to find the actual
         * non-cancelled successor.
         */
        Node s = node.next;
        if (s == null || s.waitStatus > 0) {
            s = null;
            for (Node t = tail; t != null && t != node; t = t.prev)
                if (t.waitStatus <= 0)
                    s = t;
        }
        if (s != null)
            LockSupport.unpark(s.thread);
    }
5、总结
state来标记是否可以加锁,用队列中节点封装争抢执行权的线程,用节点的waitStatus来处理节点的生命周期。
加锁有几个关键步骤:tryAcquire方法,用来判断锁是被获取,获取的线程是自己,如果不是失败。
addWaiter将节点封装为队列中的node,追加队列的队尾,如果队列中没有元素,创建一个虚拟节点作为头节点。
acquireQueued:新加入队列的节点去竞争锁,如果节点的前置节点是头节点,使用tryAcquire去竞争,如果失败,将队列中的节点重新组织,清楚失效节点,然后将当前线程阻塞住。
解锁:修改state状态以及ownerThread,寻找第一个可以被释放的节点,释放节点,acquireQueued方法无限循环继续,继续上述流程。


