k8s Pipline CI/CD
一、Pipeline介绍
pipeline是一套jenkins官方提供的插件,它可以用来在jenkins中实现和集成连续交付
用户可以利用Pipeline的许多功能:
代码:pipeline在代码中实现,通常检查到源代码控制,使团队能够编辑,审查和迭代其交付管道。
持久:pipeline可以在Jenkins master的计划内和计划外重启中存活。
Pausable:在继续pipeline运行之前,pipeline可以选择停止并等待人工输入或批准。
多功能:pipeline支持复杂的实际CD要求,包括并行分叉/连接,循环和执行工作的能力。
可扩展:Pipeline插件支持其DSL的自定义扩展 和多个与其他插件集成的选项
二、k8s实现集成/部署/交付
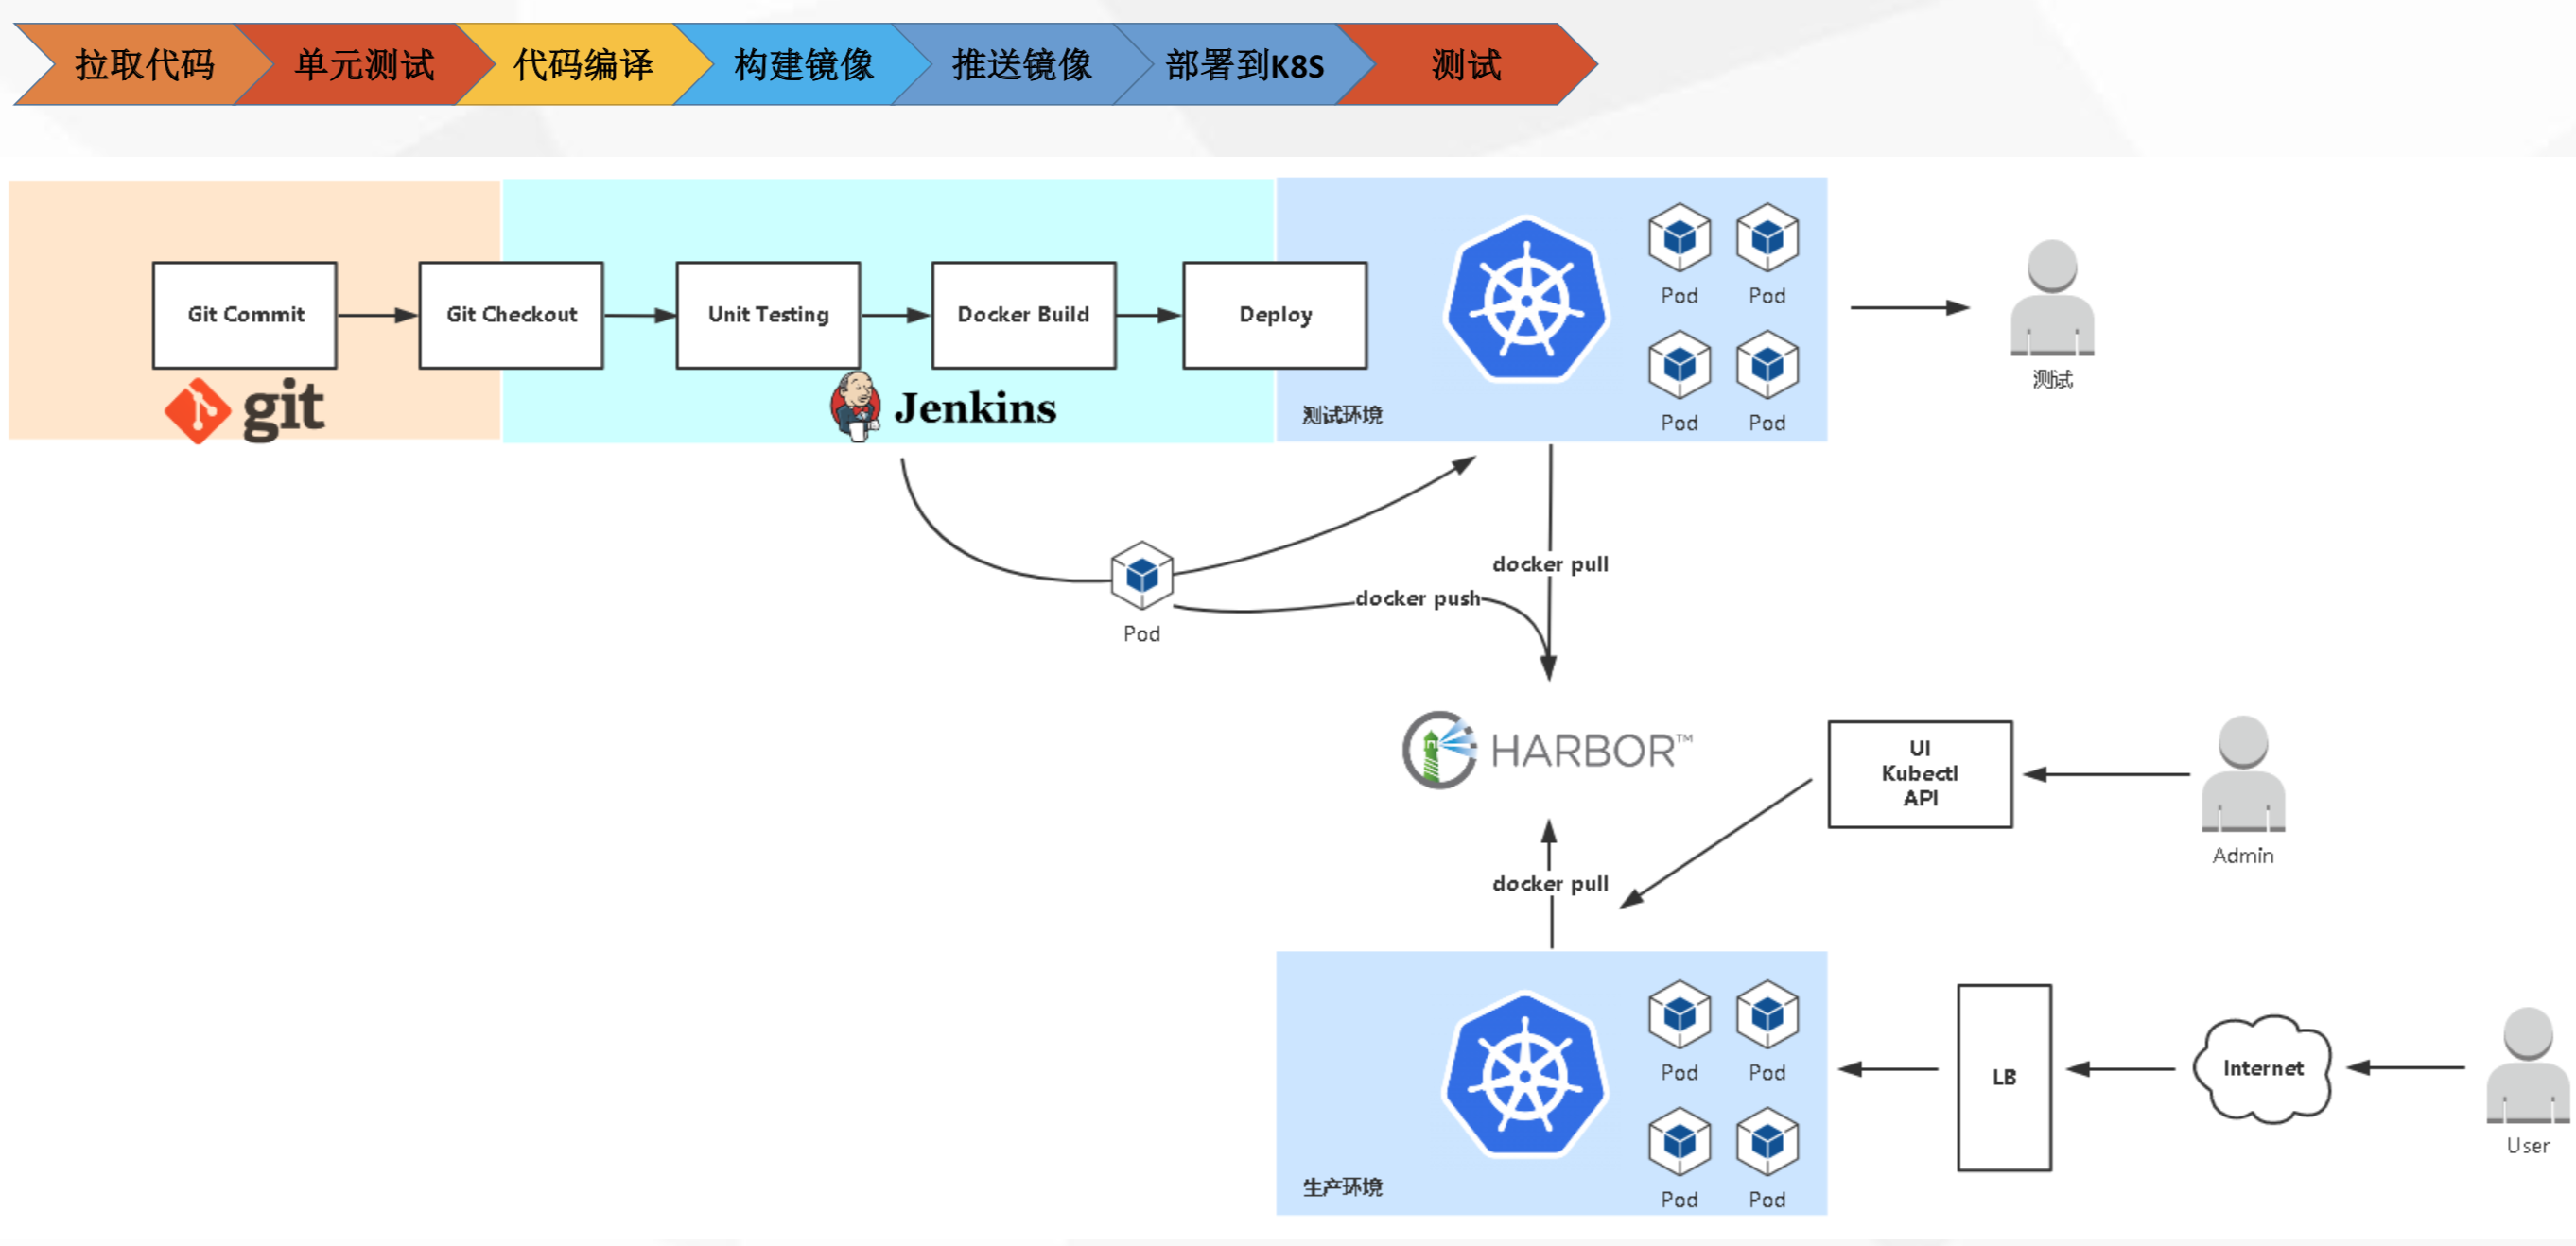
三、创建一个gitlab的测试项目(网上找的简单代码测试)
1、测试代码
代码结构
[root@node2 test1]# tree
.
├── pom.xml
└── src
    └── main
        └── java
            └── hello
                ├── Greeter.java
                └── HelloWorld.java

package hello;

public class HelloWorld {
    public static void main(String[] args) {
        Greeter greeter = new Greeter();
        System.out.println(greeter.sayHello());
    }
}

package hello;

public class Greeter {
    public String sayHello() {
        return "Hello world!";
    }
}

<?xml version="1.0" encoding="UTF-8"?>
<project xmlns="http://maven.apache.org/POM/4.0.0" xmlns:xsi="http://www.w3.org/2001/XMLSchema-instance"
    xsi:schemaLocation="http://maven.apache.org/POM/4.0.0 http://maven.apache.org/maven-v4_0_0.xsd">
    <modelVersion>4.0.0</modelVersion>
    <groupId>org.springframework</groupId>
    <artifactId>gs-maven</artifactId>
    <packaging>jar</packaging>
    <version>0.1.0</version>

    <build>
        <plugins>
            <plugin>
                <groupId>org.apache.maven.plugins</groupId>
                <artifactId>maven-shade-plugin</artifactId>
                <version>2.1</version>
                <executions>
                    <execution>
                        <phase>package</phase>
                        <goals>
                            <goal>shade</goal>
                        </goals>
                        <configuration>
                            <transformers>
                                <transformer
                                    implementation="org.apache.maven.plugins.shade.resource.ManifestResourceTransformer">
                                    <mainClass>hello.HelloWorld</mainClass>
                                </transformer>
                            </transformers>
                        </configuration>
                    </execution>
                </executions>
            </plugin>
        </plugins>
    </build>
</project>
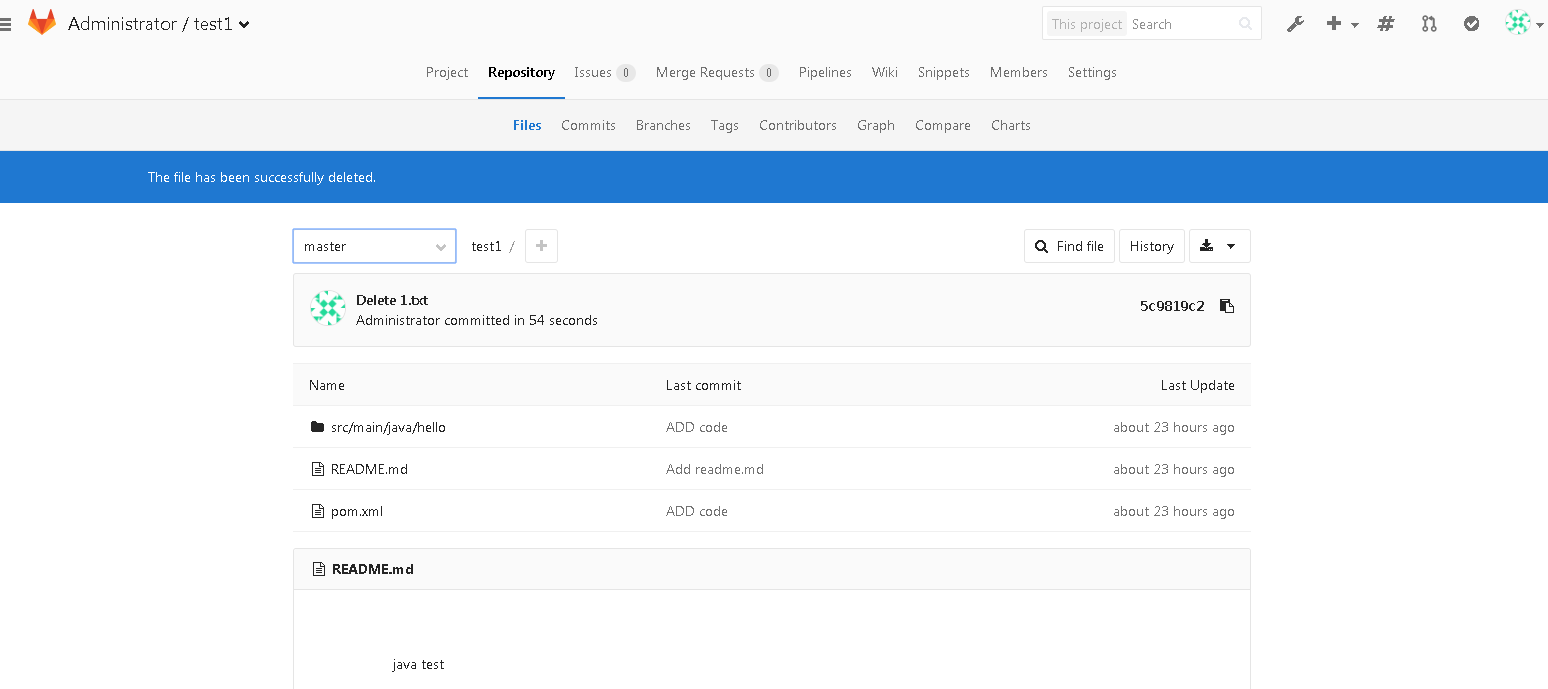
2、git的测试项目
四、jenkins配置
1、插件安装
安装好git、GitLab Plugin、Gitlab Hook Plugin、Gitlab API Plugin、Pipeline、Kubernetes plugin插件。
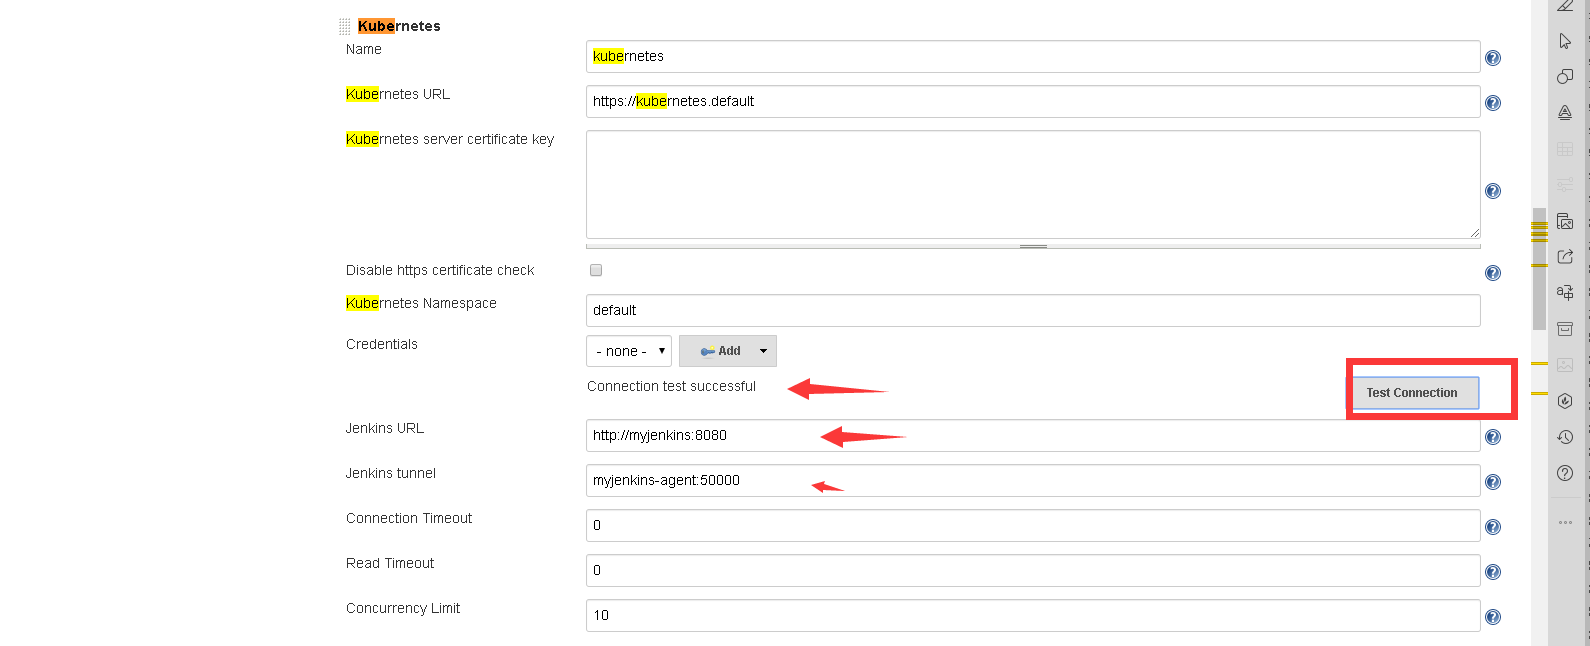
2、在jenkins中配置kubernetes
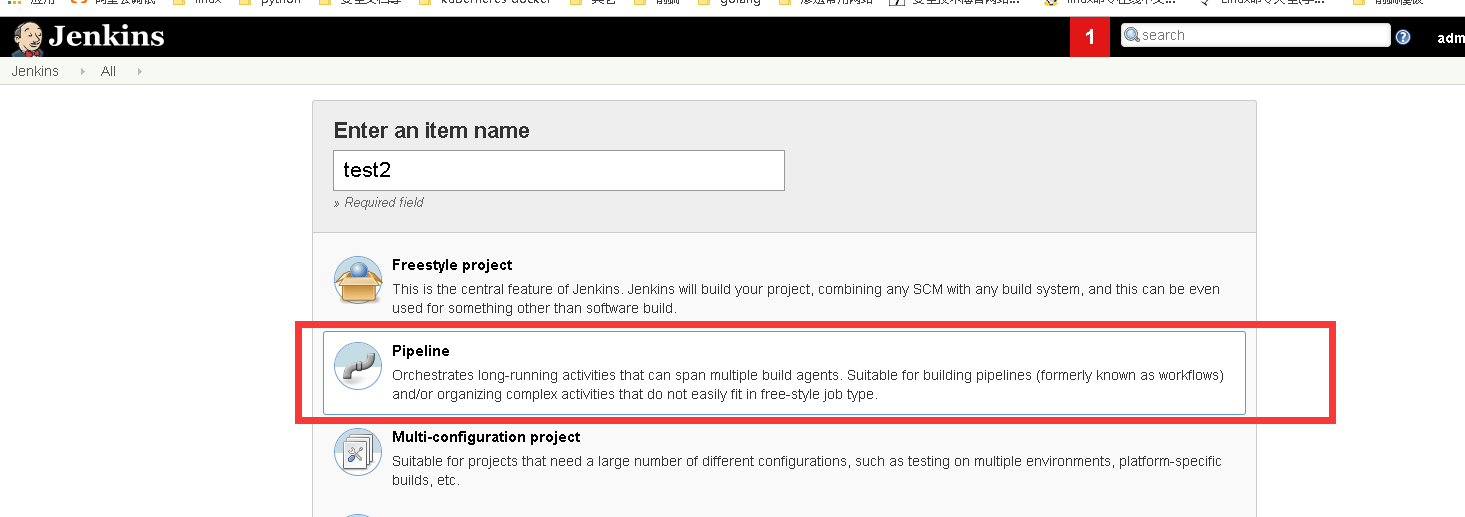
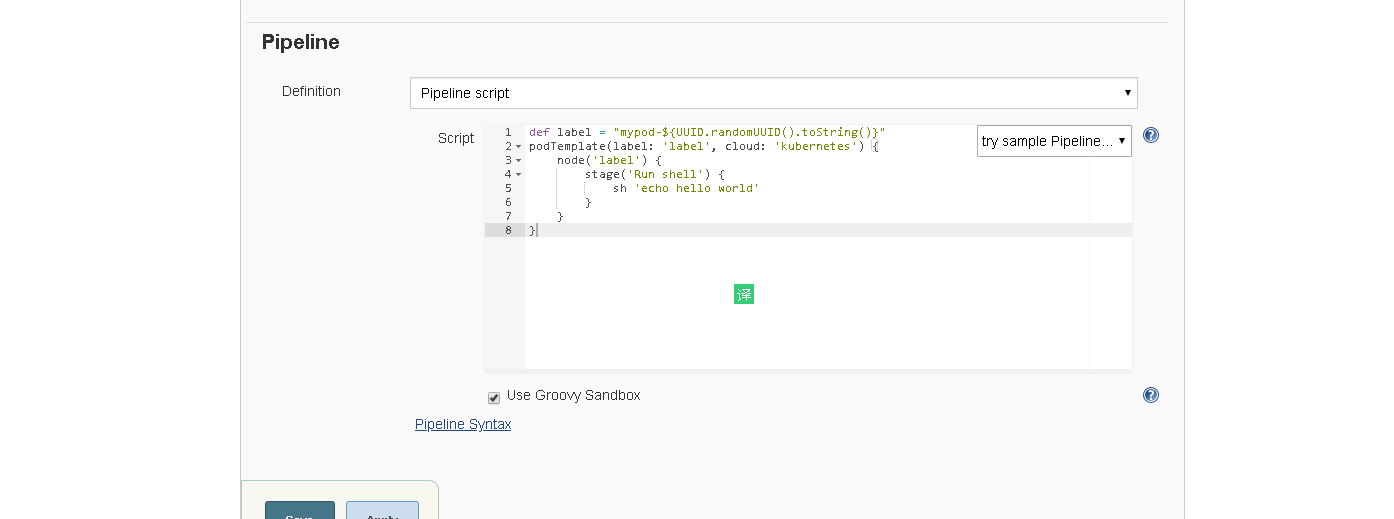
3、简单测试(创建一个Pipline项目)
测试的Pipline脚本
def label = "mypod-${UUID.randomUUID().toString()}"
podTemplate(label: 'label', cloud: 'kubernetes') {
    node('label') {
        stage('Run shell') {
            sh 'echo hello world'
        }
    }
}


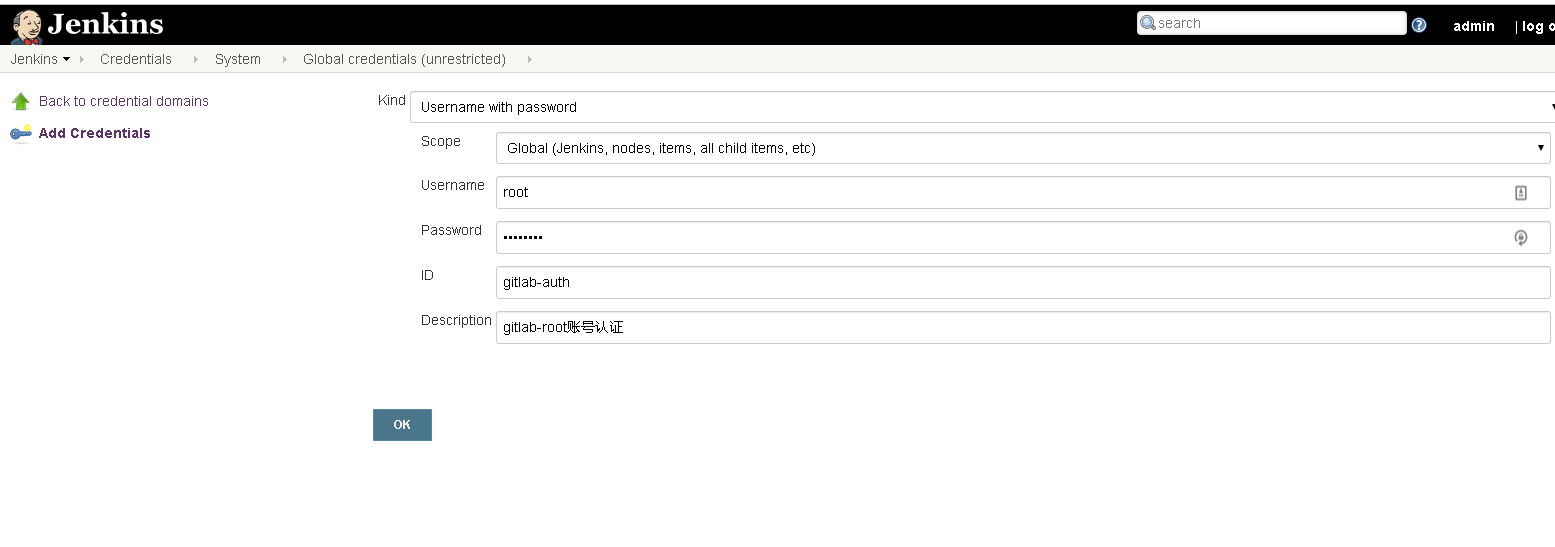
4、pipline中配置gi凭证
创建凭证,username是gitlab的账号,password是gitlab账号对应的密码。
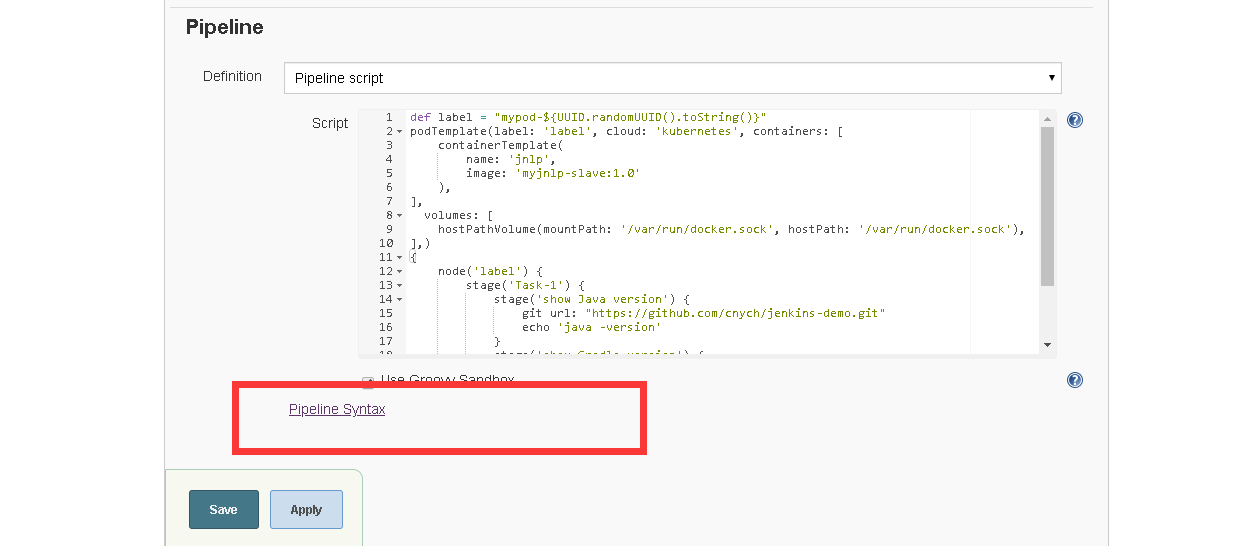
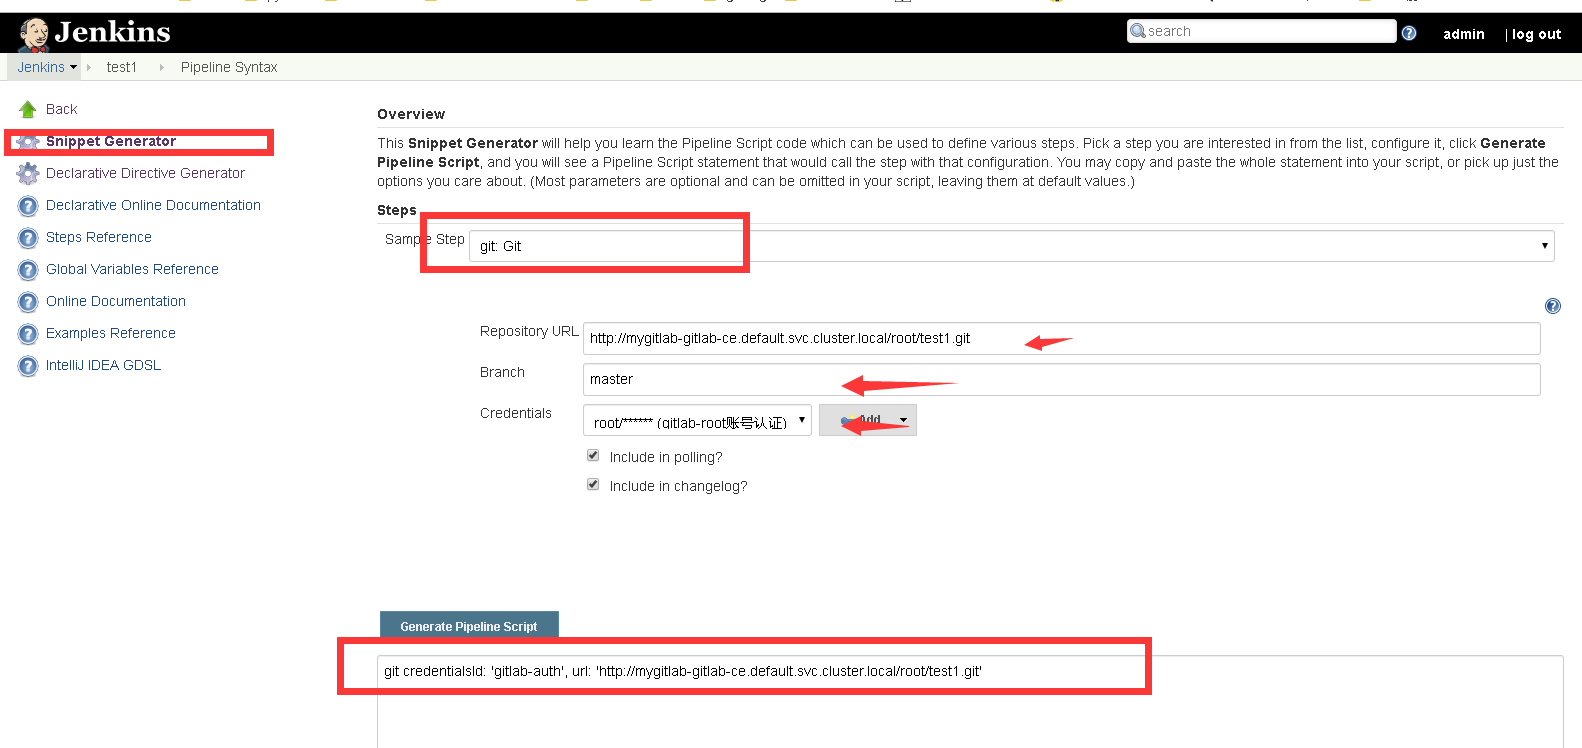
5、Pipline中视图git凭证
6、重新构建jnlp-slave镜像(添加maven)
mkdir myjenkins
cd myjenkins/
wget https://mirrors.tuna.tsinghua.edu.cn/apache/maven/maven-3/3.5.4/binaries/apache-maven-3.5.4-bin.tar.gz
tar xf apache-maven-3.5.4-bin.tar.gz

[root@node2 myjenkins]# cat Dockerfile
FROM jenkins/jnlp-slave:3.27-1
LABEL maintainer="maven@qq.com"
ENV MAVEN_HOME /usr/local/maven
ENV PATH=$PATH:$MAVEN_HOME/bin

COPY apache-maven-3.5.4  /usr/local/maven
[root@node2 myjenkins]# docker build  -t myjnlp-slave:1.0 ./
7、配置好镜像仓库(我使用的aliyun)
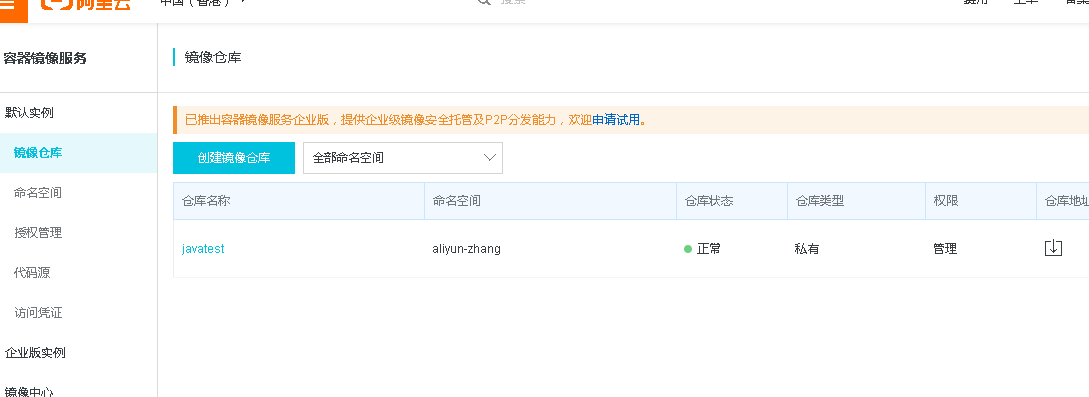
8、把dokcer组的gid改成10000(容器中jenkins账号的ugid)
groupmod  -g10000  docker
chown root.docker   /var/run/docker.sock
9、配置gitlab和jenkins的交互(我使用的webhook方式,并设置提交tag就触发构建)
10、重新更改Pipline脚本,使执行jenkins构建后能直接创建镜像并提交到镜像仓库
Pipline脚本
def label = "mypod-${UUID.randomUUID().toString()}"
def registry = "registry-vpc.cn-hongkong.aliyuncs.com"
def app_name = "javatest"
def namespace = "aliyun-zhang"
def username = "xxxxxxxxxxxxxxxxxx"
def regpass = "xxxxxxxxxxxxxxxxxxx"


podTemplate(label: 'label', cloud: 'kubernetes', containers: [
    containerTemplate(
        name: 'jnlp',
        image: 'myjnlp-slave:1.0'
    ),
],
  volumes: [
    hostPathVolume(mountPath: '/var/run/docker.sock', hostPath: '/var/run/docker.sock'),
    hostPathVolume(mountPath: '/usr/bin/docker', hostPath: '/usr/bin/docker')
],)
{
    node('label') {
        stage('Task') {
            stage('拉取代码') {
                git credentialsId: 'gitlab-auth', url: 'http://mygitlab-gitlab-ce.default.svc.cluster.local/root/test1.git'
                def mytag = sh returnStdout: true, script: 'git describe --always --tag'
                sh "git checkout -b $mytag"
                echo "mytag $mytag ${mytag} ----"

            }
            stage('编译打包') {
                echo "mvn clean package -Dmaven.test.skip=true"
            }

            stage('构建上传镜像') {
                def mytag = sh returnStdout: true, script: 'git describe --always --tag'
                def image_name = "${app_name}:${mytag}".minus("\n")

                echo "image_name $image_name"
                sh label: '', script: '''              echo \'
                    FROM tomcat:latest
                    ADD pom.xml /usr/local/tomcat/webapps/
                    \' > Dockerfile
                '''

                sh """
                    docker build  -t "${registry}/${namespace}/${image_name}" ./
                    docker login -u ${username} -p \"${regpass}\" ${registry}
                    docker push ${registry}/${namespace}/${image_name}

                """

            }
        }
    }
}
11、jenkins构建测试与查看


五、自动部署到k8s集群
1、jenkins下载kubernetes continuous deploy插件(官方文档:https://plugins.jenkins.io/kubernetes-cd)

2、配置kubeconfig凭证
添加 kubeconfig 文件,我选择的是直接粘贴文件内容(master端的.kube/config文件)
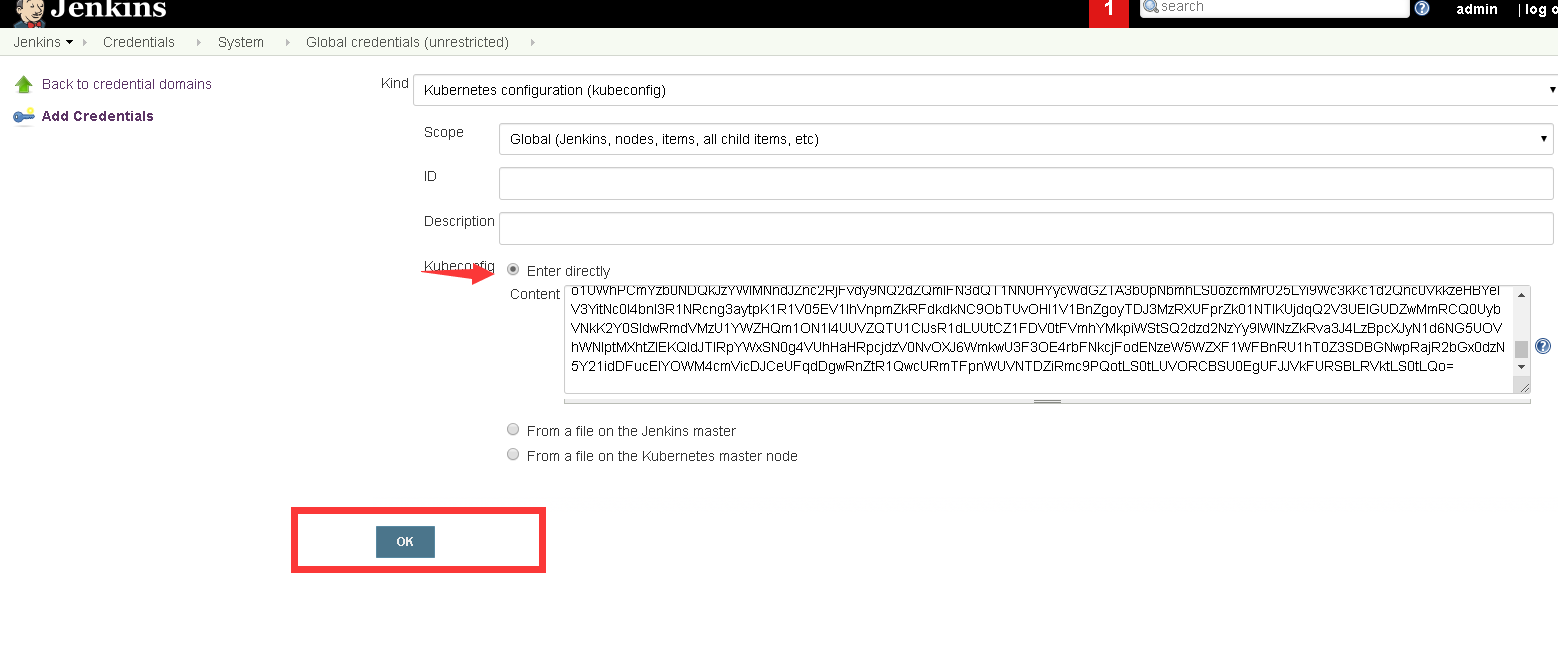
3、记录凭证ID值

4、创建一个deploy.yaml文件,并把文件上传到项目的git中
[root@k8s-m ~]# cat java-deploy.yaml
apiVersion: apps/v1
kind: Deployment
metadata:
  name: mydeploy
  namespace: default
spec:
  replicas: 2
  selector:
    matchLabels:
      test_node: k8s-node
  template:
    metadata:
      labels:
        test_node: k8s-node
    spec:
      containers:
      - name: myjava-server
        image: tomcat:latest
        ports:
        - name: http
          containerPort: 8080

5、更改Pipline脚本内容
def label = "mypod-${UUID.randomUUID().toString()}"
def registry = "registry-vpc.cn-hongkong.aliyuncs.com"
def app_name = "javatest"
def namespace = "aliyun-zhang"
def username = "xxxxxxxxxxxx"
def regpass = "xxxxxxxxx"
def k8s_auth = "5ce0993e-e2e9-4126-a910-2acd0a77fefb"


podTemplate(label: 'label', cloud: 'kubernetes', containers: [
    containerTemplate(
        name: 'jnlp',
        image: 'myjnlp-slave:1.0'
    ),
],
  volumes: [
    hostPathVolume(mountPath: '/var/run/docker.sock', hostPath: '/var/run/docker.sock'),
    hostPathVolume(mountPath: '/usr/bin/docker', hostPath: '/usr/bin/docker')
],)
{
    node('label') {
        stage('Task') {
            stage('拉取代码') {
                git credentialsId: 'gitlab-auth', url: 'http://mygitlab-gitlab-ce.default.svc.cluster.local/root/test1.git'
                def mytag = sh returnStdout: true, script: 'git describe --always --tag'
                sh "git checkout -b $mytag"
                echo "mytag $mytag ${mytag} ----"
            }
            stage('编译打包') {
                sh "mvn clean package -Dmaven.test.skip=true"
            }

            stage('构建上传镜像') {
                def mytag = sh returnStdout: true, script: 'git describe --always --tag'
                def image_name = "${app_name}:${mytag}".minus("\n")

                echo "image_name $image_name"
                sh label: '', script: '''              echo \'
                    FROM tomcat:latest
                    ADD target/*.jar /usr/local/tomcat/webapps/
                    \' > Dockerfile
                '''

                sh """
                    docker build  -t "${registry}/${namespace}/${image_name}" ./
                    docker login -u ${username} -p \"${regpass}\" ${registry}
                    docker push ${registry}/${namespace}/${image_name}

                """
            }
             stage('部署到K8S'){
                def mytag = sh returnStdout: true, script: 'git describe --always --tag'
                def image_name = "${app_name}:${mytag}".minus("\n")
                sh """
                sed -i 's#tomcat:latest#${registry}/${namespace}/${image_name}#' java-deploy.yaml
                """
                kubernetesDeploy configs: 'java-deploy.yaml', kubeconfigId: "${k8s_auth}"
      }
        }
    }
}
6、构建测试
我配置了jenkins和gitlab的webhook配置,提交tag后会自动构建到部署到k8s集群
测试
[root@node2 test1]# echo 123 >> README.md
[root@node2 test1]# git commit -a -m '123'
[master bda4c6f] 123
 1 file changed, 1 insertion(+), 1 deletion(-)
[root@node2 test1]# git tag  10.0
[root@node2 test1]# git push origin master 10.0
Username for 'http://10.101.58.237': root
Password for 'http://root@10.101.58.237':
Counting objects: 5, done.
Delta compression using up to 2 threads.
Compressing objects: 100% (2/2), done.
Writing objects: 100% (3/3), 347 bytes | 0 bytes/s, done.
Total 3 (delta 0), reused 0 (delta 0)
To http://10.101.58.237/root/test1.git
   da0fbc3..bda4c6f  master -> master
 * [new tag]         10.0 -> 10.0
jenkins构建过程
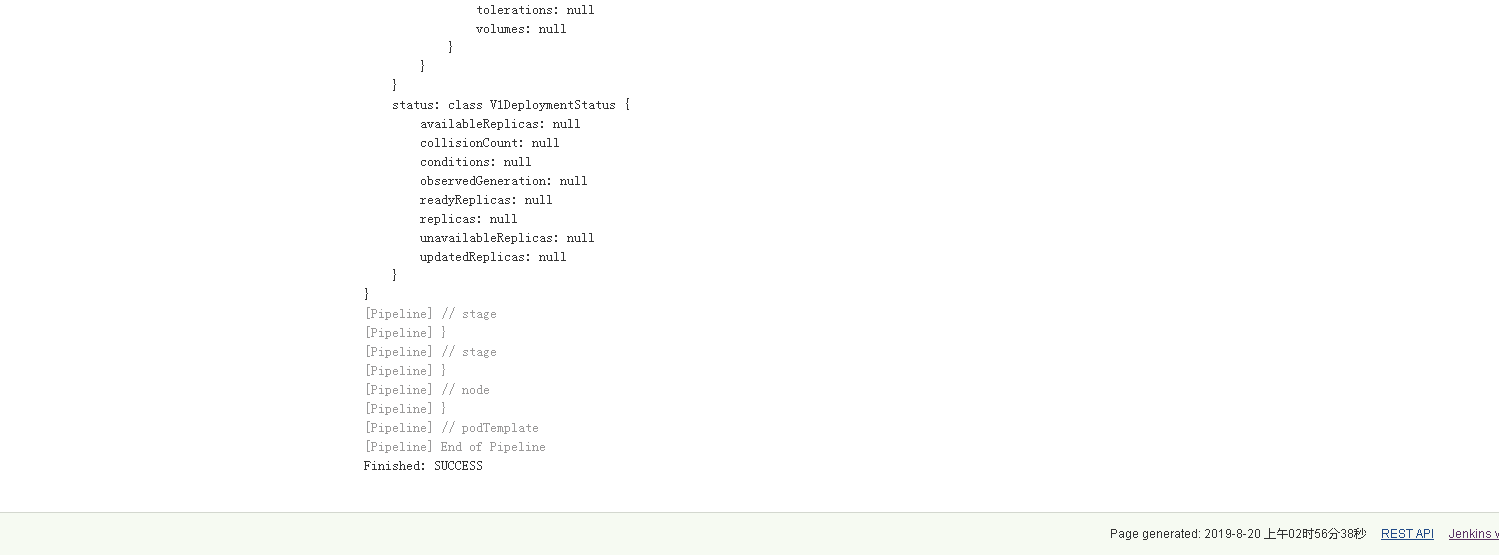
k8s集群查看
[root@k8s-m ~]# kubectl get deploy  mydeploy
NAME       READY   UP-TO-DATE   AVAILABLE   AGE
mydeploy   2/2     2            2           64s
[root@k8s-m ~]# kubectl get pod
NAME                                   READY   STATUS    RESTARTS   AGE
mydeploy-746bb8db64-4fpvz              1/1     Running   0          69s
mydeploy-746bb8db64-pp7tw              1/1     Running   0          69s

[root@k8s-m ~]# kubectl get pod mydeploy-746bb8db64-4fpvz  -o yaml|grep image:
  - image: registry-vpc.cn-hongkong.aliyuncs.com/aliyun-zhang/javatest:10.0
    image: registry-vpc.cn-hongkong.aliyuncs.com/aliyun-zhang/javatest:10.0
六、版本回滚
基于k8s镜像的回滚还是比较简单的
回滚上一个版本
kubectl rollout undo deployment/deploy-name
查看历史版本信息
#查看 deployment 升级历史
[root@k8s-m ~]# kubectl rollout history deployment/mydeploy
deployment.extensions/mydeploy
REVISION  CHANGE-CAUSE
3         <none>
4         <none>

#看历史版本更加详细的升级信息
[root@k8s-m ~]# kubectl rollout history deployment/mydeploy  --revision=3
deployment.extensions/mydeploy with revision #3
Pod Template:
  Labels:    pod-template-hash=746bb8db64
    test_node=k8s-node
  Containers:
   myjava-server:
    Image:    registry-vpc.cn-hongkong.aliyuncs.com/aliyun-zhang/javatest:10.0
    Port:    8080/TCP
    Host Port:    0/TCP
    Environment:    <none>
    Mounts:    <none>
  Volumes:    <none>
回滚指定版本
kubectl rollout undo deployment/mydeploy --to-revision=3
回滚指定版本2
直接修改delpoy中的镜像
七、Deployment升级策略
1、介绍
deployment 有 2 种策略,分别是Recreate和RollingUpdate,RollingUpdate是默认的策略
RollingUpdate也有相对应的升级策略,如果策略设置的不合理,那么升级的过程就有可能导致服务中断
Max Unavailable
最多有几个 pod 处于无法工作的状态,默认值是25%
Max Surge
升级过程中可以比预设的 pod 的数量多出的个数,默认值是25%
minReadySeconds
等待容器启动的时间,默认值是 0,单位是:秒,容器运行成功之后直接执行下一步
根据应用启动时间,设定相应的minReadySeconds,保证应用不中断
2、查看deploy的更新策略
[root@k8s-m recreate]# kubectl  explain deploy.spec.strategy.type
KIND:     Deployment
VERSION:  extensions/v1beta1

FIELD:    type <string>

DESCRIPTION:
     Type of deployment. Can be "Recreate" or "RollingUpdate". Default is
     RollingUpdate.
3、recreate策略测试
结论:recreate方式会先停止所有就版本,停止完后才部署新版本
[root@k8s-m ~]# kubectl  get pod -w
NAME                     READY   STATUS    RESTARTS   AGE
my-app-bb9cc7597-dn5bv   1/1     Running   0          3m36s
my-app-bb9cc7597-gqfx4   1/1     Running   0          3m36s
my-app-bb9cc7597-p4dfb   1/1     Running   0          3m36s
my-app-bb9cc7597-p4dfb   1/1     Terminating   0          3m44s
my-app-bb9cc7597-dn5bv   1/1     Terminating   0          3m44s
my-app-bb9cc7597-gqfx4   1/1     Terminating   0          3m44s
my-app-bb9cc7597-p4dfb   0/1     Terminating   0          3m45s
my-app-bb9cc7597-gqfx4   0/1     Terminating   0          3m45s
my-app-bb9cc7597-dn5bv   0/1     Terminating   0          3m45s
my-app-bb9cc7597-p4dfb   0/1     Terminating   0          3m57s
my-app-bb9cc7597-p4dfb   0/1     Terminating   0          3m57s
my-app-db47b56bf-kwd2c   0/1     Pending       0          0s
my-app-db47b56bf-kwd2c   0/1     Pending       0          0s
my-app-db47b56bf-xkqdz   0/1     Pending       0          0s
my-app-db47b56bf-5v4r5   0/1     Pending       0          0s
my-app-db47b56bf-xkqdz   0/1     Pending       0          0s
my-app-db47b56bf-kwd2c   0/1     ContainerCreating   0          0s
4、RollingUpdate策略测试
结论: 一个接一个地以滚动更新方式发布新版本,滚动的方式可以定义,即先删除多少pod在添加多少pod,或者是闲添加在删除。
[root@k8s-m ~]# kubectl get pod  -w
NAME                     READY   STATUS    RESTARTS   AGE
my-app-db47b56bf-2c2c6   1/1     Running   0          19s
my-app-db47b56bf-k7k5z   1/1     Running   0          19s
my-app-db47b56bf-mclj8   1/1     Running   0          19s
my-app-bb9cc7597-hgz6r   0/1     Pending   0          0s
my-app-bb9cc7597-hgz6r   0/1     Pending   0          0s
my-app-bb9cc7597-hgz6r   0/1     ContainerCreating   0          1s
my-app-bb9cc7597-hgz6r   0/1     ContainerCreating   0          1s
my-app-bb9cc7597-hgz6r   0/1     Running             0          5s
my-app-bb9cc7597-hgz6r   1/1     Running             0          6s
my-app-db47b56bf-mclj8   1/1     Terminating         0          29s
my-app-bb9cc7597-84ngs   0/1     Pending             0          0s
my-app-bb9cc7597-84ngs   0/1     Pending             0          0s
my-app-bb9cc7597-84ngs   0/1     ContainerCreating   0          1s
my-app-bb9cc7597-84ngs   0/1     ContainerCreating   0          2s
my-app-db47b56bf-mclj8   0/1     Terminating         0          31s
my-app-db47b56bf-mclj8   0/1     Terminating         0          34s
my-app-db47b56bf-mclj8   0/1     Terminating         0          34s
my-app-bb9cc7597-84ngs   0/1     Running             0          6s
my-app-bb9cc7597-84ngs   1/1     Running             0          7s
[root@k8s-m recreate]# kubectl  explain deploy.spec.strategy.rollingUpdate
KIND:     Deployment
VERSION:  extensions/v1beta1

RESOURCE: rollingUpdate <Object>

DESCRIPTION:
     Rolling update config params. Present only if DeploymentStrategyType =
     RollingUpdate.

     Spec to control the desired behavior of rolling update.

FIELDS:
   maxSurge    <string>
     The maximum number of pods that can be scheduled above the desired number
     of pods. Value can be an absolute number (ex: 5) or a percentage of desired
     pods (ex: 10%). This can not be 0 if MaxUnavailable is 0. Absolute number
     is calculated from percentage by rounding up. By default, a value of 1 is
     used. Example: when this is set to 30%, the new RC can be scaled up
     immediately when the rolling update starts, such that the total number of
     old and new pods do not exceed 130% of desired pods. Once old pods have
     been killed, new RC can be scaled up further, ensuring that total number of
     pods running at any time during the update is at most 130% of desired pods.

   maxUnavailable    <string>
     The maximum number of pods that can be unavailable during the update. Value
     can be an absolute number (ex: 5) or a percentage of desired pods (ex:
     10%). Absolute number is calculated from percentage by rounding down. This
     can not be 0 if MaxSurge is 0. By default, a fixed value of 1 is used.
     Example: when this is set to 30%, the old RC can be scaled down to 70% of
     desired pods immediately when the rolling update starts. Once new pods are
     ready, old RC can be scaled down further, followed by scaling up the new
     RC, ensuring that the total number of pods available at all times during
     the update is at least 70% of desired pods.


