Cobbler自动化部署
一:PXE、Kickstart与Cobbler的概念:
PXE(preboot execute environment,预启动执行环境)是由Intel公司开发的技术,需要网卡的硬件支持,工作于C/S的网络模式,支持客户端通过网络从服务器下载映像,并支持客户端机器通过网络启动操作系统,在启动过程中,客户端需要从服务器分配IP地址、掩码、网关以及相关的配置文件路径,再用TFTP(trivial file transfer protocol)协议从服务器下载一个启动软件包到本机内存中执行,由这个启动软件包完成客户端的基本软件设置,从而引导预先安装在服务器中的终端操作系统,PXE可以引导多种操作系统,如:centos、redhat、windows 7等,所以说PXE是一直引导启动方式,用于引导PC或服务器的启动。
Kickstart是一种实现操作系统无人值守的安装方式,需要先定义一个配置文件,里面定义好root密码、分区、安装的包等等参数,此文件一般称为ks.cfg,客户端根据ks.cfg定义的ISO下载内核vmlinux和安装包,进行磁盘的分区与格式化,定义好的rpm包的安装,甚至是系统的参数优化等。
Cobbler翻译为中文是补鞋匠,但是在linux方面则是一个免费的用于系统安装部署的开源软件,cobbler是对PXE技术的二次基于python的开发,提供了CLI(命令行)和Web的管理方式,另外还提供了API(应用程序编程接口)接口,方便二次开发使用,相比PXE,cobbler支持多系统同时引导,而PXE只能一次引导一个系统的安装,cobbler通常与开源软件puppet、saltstack配合使用,进行操作系统的批量安装与部署优化,从而实现大批量linux系统的无人值守安装与服务部署,大大提升运维的工作效率,Cobbler是一种更高级的无人值守的系统安装方式,因为其可以同时引导多个不同的操作系统的安装与部署,但是Kickstart只能引导一个。
1.1、Kickstart流程:
- 1):客户端根据本地BIOS设置的的启动顺序,如果是从网卡启动就发出先基于RARP反向地址解析协议(Reverse Address Resolution Protocol)的协议报文,报文中包含自己的MAC地址,但是没有IP地址。
- 2):DHCP服务器收到请求后,返回给客户端IP地址、掩码、网关,另外还包含一个基于TFTP协议的文件服务器地址和要或获取的文件名称。
- 3):找TFTP服务器获取文件,一般是pxelinux.0 。
- 4):根据pxelinux.0指定的d地址下载efault文件。
- 5): 根据default文件指定的地址下载initrd.img、vmlinux和cfg文件。
- 6):将下载的内核解压在内存运行,这个过程相当于从硬盘当中加载的bootloader过程。
- 7):加载内核vmlinux和initrd.img,并将系统的引导交于内核。
- 7):启动anaconda安装程序进行系统安装。
二:Cobbler组件:
1、distro:定义安装的系统发行版,比如centos6.7是一个发行版,还可以根据不同的kickstack文件安装出不同业务场景的系统。
2.profile:定义配置文件,结合distro可以实现安装不同环境的操作系统。
3.system:为指定的主机配置特有的信息,比如主机名等。
4.repos:定义yum源。
5.images:定义在虚拟化环境中定义虚拟机的磁盘。
三:cobbler安装与配置:
1、安装cobbler:
[root@linux-node1 ~]# yum install cobbler cobbler-web pykickstart httpd
cobbler  #cobbler服务的主程序包
cobbler-web  #web管理界面
pykickstart  #检查语法是否正确
httpd     #http服务器
2、启动服务:
[root@linux-node1 ~]# systemctl  start httpd
[root@linux-node1 ~]# systemctl  start cobblerd
[root@linux-node1 ~]# systemctl enable httpd
Created symlink from /etc/systemd/system/multi-user.target.wants/httpd.service to /usr/lib/systemd/system/httpd.service.
[root@linux-node1 ~]# systemctl enable cobblerd
Created symlink from /etc/systemd/system/multi-user.target.wants/cobblerd.service to /usr/lib/systemd/system/cobblerd.service.
3、检查配置文件:
[root@linux-node1 ~]# cobbler check
The following are potential configuration items that you may want to fix:

1 : The 'server' field in /etc/cobbler/settings must be set to something other than localhost, or kickstarting features will not work.  This should be a resolvable hostname or IP for the boot server as reachable by all machines that will use it.
2 : For PXE to be functional, the 'next_server' field in /etc/cobbler/settings must be set to something other than 127.0.0.1, and should match the IP of the boot server on the PXE network.
3 : change 'disable' to 'no' in /etc/xinetd.d/tftp
4 : some network boot-loaders are missing from /var/lib/cobbler/loaders, you may run 'cobbler get-loaders' to download them, or, if you only want to handle x86/x86_64 netbooting, you may ensure that you have installed a *recent* version of the syslinux package installed and can ignore this message entirely.  Files in this directory, should you want to support all architectures, should include pxelinux.0, menu.c32, elilo.efi, and yaboot. The 'cobbler get-loaders' command is the easiest way to resolve these requirements.
5 : enable and start rsyncd.service with systemctl
6 : debmirror package is not installed, it will be required to manage debian deployments and repositories
7 : The default password used by the sample templates for newly installed machines (default_password_crypted in /etc/cobbler/settings) is still set to 'cobbler' and should be changed, try: "openssl passwd -1 -salt 'random-phrase-here' 'your-password-here'" to generate new one
8 : fencing tools were not found, and are required to use the (optional) power management features. install cman or fence-agents to use them
4.错误修正:
1.[root@linux-node1 ~]# vim /etc/cobbler/settings
next_server: 192.168.56.11
server: 192.168.56.11
2.
yum install xinetd
systemctl  enable xinetd
systemctl  start rsyncd.service
systemctl   restart cobblerd.service
systemctl enable rsyncd.service
cobbler check
3.准备启动文件:
cp /usr/share/syslinux/pxelinux.0 /usr/share/syslinux/menu.c32 /var/lib/cobbler/loaders/
4.修改默认密码
[root@linux-node1 ~]# openssl passwd -1 -salt $(openssl rand -hex 4)
5.安装配置dhcp
yum install dhcp
cp /usr/share/doc/dhcp-4.2.5/dhcpd.conf.example /etc/dhcp/dhcpd.conf
[root@linux-node1 cobbler]# cat /etc/dhcp/dhcpd.conf | grep -v "#" | grep -v "^$"
option domain-name "jack.com";
option domain-name-servers 192.168.56.11;
default-lease-time 600;
max-lease-time 7200;
log-facility local7;
subnet 192.168.56.0 netmask 255.255.255.0 {
range 192.168.56.100 192.168.56.200;
option routers 192.168.56.2;
next-server 192.168.56.11;
filename "pxelinux.0";
}
6.同步:
[root@linux-node1 ~]# cobbler sync
task started: 2016-05-23_121731_sync
task started (id=Sync, time=Mon May 23 12:17:31 2016)
running pre-sync triggers
cleaning trees
removing: /var/lib/tftpboot/grub/images
copying bootloaders
trying hardlink /var/lib/cobbler/loaders/pxelinux.0 -> /var/lib/tftpboot/pxelinux.0
trying hardlink /var/lib/cobbler/loaders/menu.c32 -> /var/lib/tftpboot/menu.c32
trying hardlink /var/lib/cobbler/loaders/yaboot -> /var/lib/tftpboot/yaboot
trying hardlink /usr/share/syslinux/memdisk -> /var/lib/tftpboot/memdisk
trying hardlink /var/lib/cobbler/loaders/grub-x86.efi -> /var/lib/tftpboot/grub/grub-x86.efi
trying hardlink /var/lib/cobbler/loaders/grub-x86_64.efi -> /var/lib/tftpboot/grub/grub-x86_64.efi
copying distros to tftpboot
copying images
generating PXE configuration files
generating PXE menu structure
rendering TFTPD files
7、配置distro:
查看帮助:
[root@linux-node1 ~]# cobbler --help
usage
=====
cobbler <distro|profile|system|repo|image|mgmtclass|package|file> ...
        [add|edit|copy|getks*|list|remove|rename|report] [options|--help]
cobbler <aclsetup|buildiso|import|list|replicate|report|reposync|sync|validateks|version|signature|get-loaders|hardlink> [options|--help]
[root@linux-node1 ~]# cobbler distro --help
[root@linux-node1 ~]# cobbler distro add --help
导入:
cobbler import --path=/mnt/ --name="Centos-7.2-x86_64" --kickstart=/var/lib/cobbler/kickstarts/cobbler-centos-7.2-x86_64.cfg
重启测试:
8.web管理:cobbler-web
[root@linux-node1 ~]# vim /etc/cobbler/modules.conf
module = authn_configfile #认证,默认是虚拟用户认证
9、生成密码:
[root@linux-node1 ~]# htdigest -c /etc/cobbler/users.digest Cobbler tom #添加一个叫tom的用户,放在Cobbler组
Adding password for cblradmin in realm cobbler.
New password:
Re-type new password:
[root@linux-node1 ~]#
10.使用https访问web,如:https://192.168.56.11/cobbler_web
三:自定义Centos 7的kickstack文件:
1、需要图形界面下安装system-config-kickstack命令启动图形进行自定义安装包,如下:
[root@localhost ~]# yum install system-config-kickstack -y
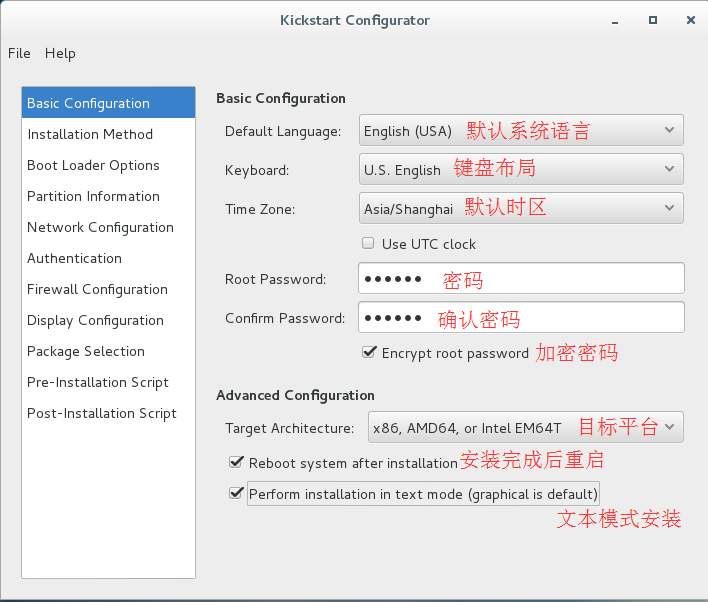
2、打开配置界面,开始自定义kickstack应答文件:
基础配置:

2、http 跳过
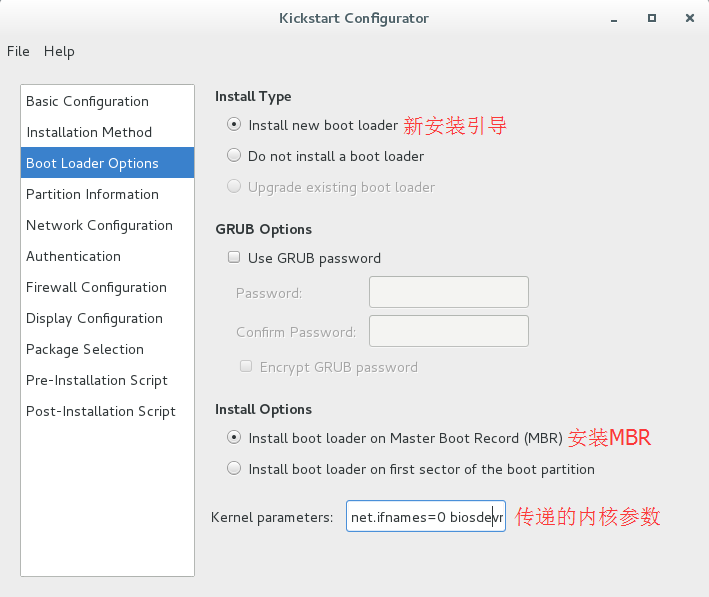
3、配置引导安装:

4、分区部分:

5、网络设置,暂不需要
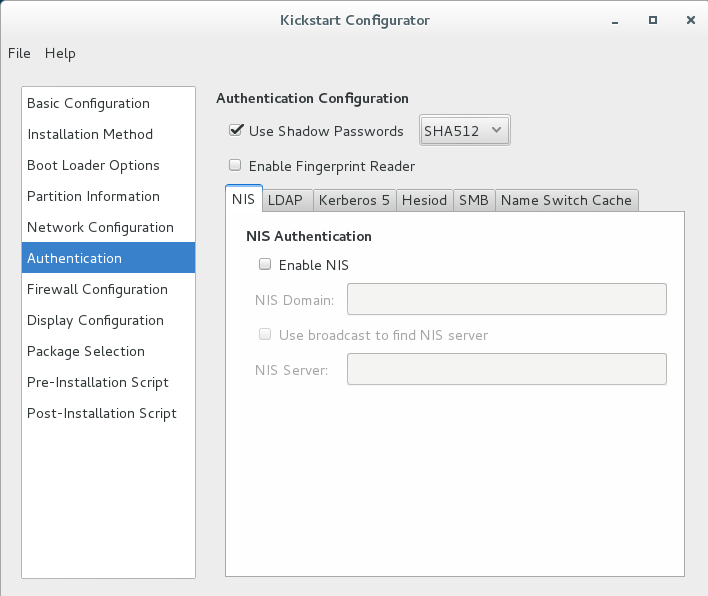
6、认证,默认即可:

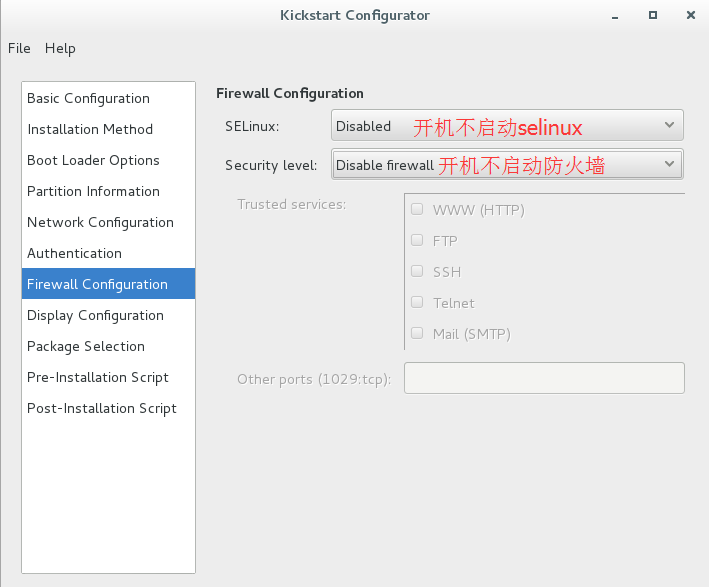
7、安全设置:

8、安装界面:
9、安装包包选择,可以自定义,一般选择最小化安装,最后保存为一个文件,内容如下:


