
etree和协程爬明朝那些事、协程和解密爬网吧电影、scrapy爬4399游戏、
1、etree和协程爬明朝那些事
import requests
from lxml import etree
import asyncio
import aiohttp
import aiofiles
import os
# 1. 拿到主页面的源代码 (不需要异步)
# 2. 拿到页面源代码之后. 需要解析出 <卷名>, <章节, href>
headers = {
    "user-agent": "Mozilla/5.0 (Windows NT 10.0; Win64; x64) AppleWebKit/537.36 (KHTML, like Gecko) Chrome/100.0.4896.75 Safari/537.36"
}
def get_chaptor_info(url):
    resp = requests.get(url, headers=headers)
    resp.encoding = "UTF-8"
    page_source = resp.text
    # 开始解析
    tree = etree.HTML(page_source)
    # 作业, 请解释出每个循环在这里的作用?
    result = []
    divs = tree.xpath("//div[@class='mulu']")  # 每一个div就是一卷
    for div in divs:
        trs = div.xpath(".//table/tr")  # 一堆tr
        juan_name = trs[0].xpath(".//a/text()")
        juan_name = "".join(juan_name).strip().replace(":", "_")
        for tr in trs[1:]:  # 93
            tds = tr.xpath("./td")
            for td in tds:
                txt = td.xpath(".//text()")
                href = td.xpath(".//@href")
                txt = "".join(txt).replace(" ", "").strip()
                href = "".join(href)
                dic = {
                    "chapter_name": txt,
                    "chapter_url": href,
                    "juan_name": juan_name
                }
                result.append(dic)
    return result
async def download_one(url, file_path):
    print("我要下載文章了")
    async with aiohttp.ClientSession() as session:
        async with session.get(url, headers=headers) as resp:
            page_source = await resp.text(encoding="utf-8")
            # 拿到文章
            tree = etree.HTML(page_source)
            content = tree.xpath("//div[@class='content']//p//text()")
            content = "".join(content).replace("\n", "").replace("\r", "").replace(" ", "").strip()
            # 寫入文件
            async with aiofiles.open(file_path, mode="w", encoding="utf-8") as f:
                await f.write(content)
    print("恭喜你。 下載了一篇文章!", file_path)
async def download_chapter(chaptor_list):
    tasks = []
    for chaptor in chaptor_list:  # {juan: xxx, name:xxx, href: xxx}
        juan = chaptor['juan_name']  # 文件夹名
        name = chaptor['chapter_name']  # 文件名  前言.txt
        url = chaptor['chapter_url']  # 用来下载 -> 异步任务
        if not os.path.exists(juan):  # 判斷文件夾是否存在
            os.makedirs(juan)  # 如果不存在就創建
        # 給出文件的真正的保存路徑
        file_path = f"{juan}/{name}.txt"  # 74
        f = download_one(url, file_path)
        t = asyncio.create_task(f)
        tasks.append(t)
        break  # 测试的时候
    await asyncio.wait(tasks)
def main():
    url = "https://www.mingchaonaxieshier.com/"
    chaptor_list = get_chaptor_info(url)
    # print(chaptor_list)
    # 开始上协程. 进行异步下载
    asyncio.run(download_chapter(chaptor_list))
if __name__ == '__main__':
    main()
2、协程和解密爬网吧电影
#EXTM3U
#EXT-X-STREAM-INF:PROGRAM-ID=1,BANDWIDTH=1263000,RESOLUTION=1280x528(不加密的m3u8)
/20211030/89ZfL7VX/hls/index.m3u8
#EXTM3U
#EXT-X-VERSION:3
#EXT-X-TARGETDURATION:4
#EXT-X-PLAYLIST-TYPE:VOD
#EXT-X-MEDIA-SEQUENCE:0
#EXT-X-KEY:METHOD=AES-128,URI="https://vo1.123188kk.com/20211030/89ZfL7VX/hls/key.key"(加密的m3u8)
#EXTINF:2.44,
https://vo1.123188kk.com/20211030/89ZfL7VX/hls/3YKZ9LsK.ts
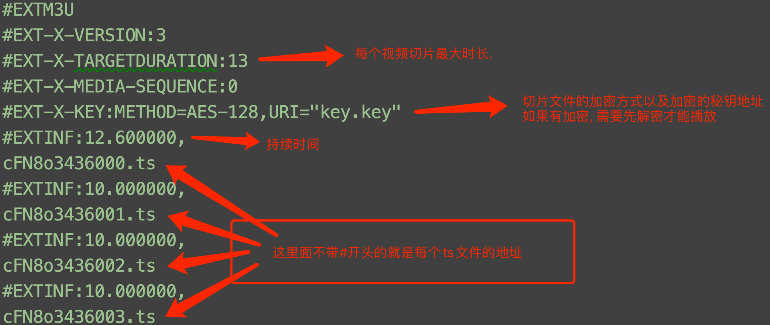
# 整体步骤 => 网吧电影
1. 想办法找到M3U8文件
2. 判别(人工)是否需要下载第二层M3U8
3. 提取ts文件的下载路径
4. 下载
5. 判别是否需要解密
6. 如果需要解密, 拿到秘钥
7. 解密
8. 根据M3U8的正确顺序来合并所有的ts文件 => MP4
import requests
from lxml import etree
import re
from urllib.parse import urljoin
import os # 执行cmd/控制台上的命令
import asyncio
import aiohttp
import aiofiles
from Crypto.Cipher import AES # pip install pycryptodome
headers = {
"User-Agent": "Mozilla/5.0 (Windows NT 10.0; Win64; x64) AppleWebKit/537.36 (KHTML, like Gecko) Chrome/100.0.4896.75 Safari/537.36"
}
def get_iframe_src(url): # 拿到iframe的src
resp = requests.get(url, headers=headers)
tree = etree.HTML(resp.text)
src = tree.xpath("//iframe/@src")[0]
return src
def get_m3u8_url(url):
resp = requests.get(url, headers=headers)
obj = re.compile(r'url: "(?P<m3u8>.*?)"', re.S)
m3u8 = obj.search(resp.text).group("m3u8") # B
return m3u8
def download_m3u8(url): # https://a.ak-kk.com/20211030/89ZfL7VX/index.m3u8
resp = requests.get(url, headers=headers)
with open("first.m3u8", mode="w", encoding="utf-8") as f:
f.write(resp.text)
# 这个位置的错误. 价值5分钟
with open("first.m3u8", mode='r', encoding="utf-8") as f2:
for line in f2: # 一行一行的读
if line.startswith("#"): # 以#开头
continue # 拜拜
# 此时的line就是第二层M3U8的地址
line = line.strip() # 注意要strip() 否则会有意想不到的收获
line = urljoin(url, line) # 拼接一下
# 下载第二层M3U8
resp = requests.get(line, headers=headers)
with open("second.m3u8", mode="w", encoding="utf-8") as f3:
f3.write(resp.text)
break # 可以加, 也可以不加
async def download_one(url, sem):
async with sem: # 使用信号量控制访问频率
file_name = url.split("/")[-1]
file_path = "./解密前/" + file_name
print(file_name, "开始工作了!")
for i in range(10): # 重试10次
try:
async with aiohttp.ClientSession() as session:
async with session.get(url, headers=headers) as resp:
content = await resp.content.read()
# 写入文件
async with aiofiles.open(file_path, mode="wb") as f:
await f.write(content)
print(file_name, "下载完成!")
break
except Exception as e:
print(file_name, "出错了, 马上重试", e) # 给个提示. 看到错误信息
async def download_all_videos():
# 信号量, 用来控制协程的并发量
sem = asyncio.Semaphore(100) # 网吧电影中极个别电影需要控制在5左右
# 1. 读取文件
tasks = []
with open("second.m3u8", mode="r", encoding="utf-8") as f:
for line in f:
if line.startswith("#"):
continue
line = line.strip() # 不写. 你会得到意想不到的收获
# 此时line就是下载地址
# 2. 创建任务
t = asyncio.create_task(download_one(line, sem))
tasks.append(t)
# 3. 统一等待
await asyncio.wait(tasks)
def get_key():
with open("second.m3u8", mode="r", encoding="utf-8") as f:
file_content = f.read() # 读取到所有内容
obj = re.compile(r'URI="(?P<key_url>.*?)"')
key_url = obj.search(file_content).group("key_url")
resp = requests.get(key_url, headers=headers) # 发请求, 拿秘钥
return resp.content # 直接拿字节. 为了解密的时候. 直接丢进去就可以了.
async def desc_one(file_path, key):
file_name = file_path.split("/")[-1]
new_file_path = "./解密后/" + file_name
# 解密
async with aiofiles.open(file_path, mode="rb") as f1, \
aiofiles.open(new_file_path, mode="wb") as f2:
content = await f1.read()
# 解密
# 固定逻辑, 创建一个加密器
aes = AES.new(key=key, mode=AES.MODE_CBC, IV=b"0000000000000000")
new_content = aes.decrypt(content)
await f2.write(new_content) # 写入新文件
print(new_file_path, "解密成功")
# 解密的协程逻辑
# 读M3U8文件. 拿到文件名称和路径
# 每个ts文件一个任务
# 在每个任务中. 解密即可
async def desc_all(key):
tasks = []
with open("second.m3u8", mode="r", encoding="utf-8") as f:
for line in f:
if line.startswith("#"):
continue
line = line.strip()
file_name = line.split("/")[-1]
file_path = "./解密前/" + file_name
# 创建任务. 去解密
t = asyncio.create_task(desc_one(file_path, key))
tasks.append(t)
await asyncio.wait(tasks)
def merge():
# 视频片段合成
# B站视频. 不适用这个.
# 需要一个命令
# windows: copy /b a.ts+b.ts+c.ts xxx.mp4
# linux/mac: cat a.ts b.ts c.ts > xxx.mp4
# 共同的坑:
# 1. 执行命令 太长了不行. 需要分段合并
# 2. 执行命令的时候. 容易出现乱码. 采用popen来执行命令. 就可以避免乱码
# 3. 你只需要关注. 是否合并成功了
# os.system("dir") # 会有乱码
# r = os.popen("dir")
# print(r.read()) # 可以暂时性的避免乱码
# 拿到所有文件名.和正确的合并顺序
file_list = []
with open("second.m3u8", mode="r", encoding="utf-8") as f:
for line in f:
if line.startswith("#"):
continue
line = line.strip()
file_name = line.split("/")[-1]
file_list.append(file_name)
# 进入到文件夹内
os.chdir("./解密后") # 更换工作目录
# file_list 所有文件名称
# 分段合并
n = 1
temp = [] # [a.ts, b.ts, c.ts] =?=> a.ts+b.ts+c.ts
for i in range(len(file_list)):
# 每 20 个合并一次
file_name = file_list[i]
temp.append(file_name)
if i != 0 and i % 20 == 0: # 20和一次(第一次合并有21个)
# 可以合并一次了
cmd = f"copy /b {'+'.join(temp)} {n}.ts"
r = os.popen(cmd)
print(r.read())
temp = [] # 新列表
n = n + 1
# 需要把剩余的ts进行合并
cmd = f"copy /b {'+'.join(temp)} {n}.ts"
r = os.popen(cmd)
print(r.read())
n = n + 1
# 第二次大合并 1.ts + 2.ts + 3.ts xxx.mp4
last_temp = []
for i in range(1, n):
last_temp.append(f"{i}.ts")
# 最后一次合并
cmd = f"copy /b {'+'.join(last_temp)} 春夏秋冬又一春.mp4"
r = os.popen(cmd)
print(r.read())
# 回来
os.chdir("../") # ../ 上层文件夹
def main():
# url = "http://www.wbdy.tv/play/63690_1_1.html"
# # 1.拿到iframe的src属性值
# src = get_iframe_src(url)
# print(src)
# # 2. 发送请求到iframe的src路径. 获取到M3U8地址
# src = urljoin(url, src)
# m3u8_url = get_m3u8_url(src)
# print(m3u8_url)
# # 3. 下载m3u8文件
# download_m3u8(m3u8_url)
# # 4. 下载视频. 上协程下载视频
# event_loop = asyncio.get_event_loop()
# event_loop.run_until_complete(download_all_videos())
# # 5. 拿秘钥
# key = get_key()
# # 6. 解密
# event_loop = asyncio.get_event_loop()
# event_loop.run_until_complete(desc_all(key))
# print("全部完成")
# 合成
merge()
if __name__ == '__main__':
main()
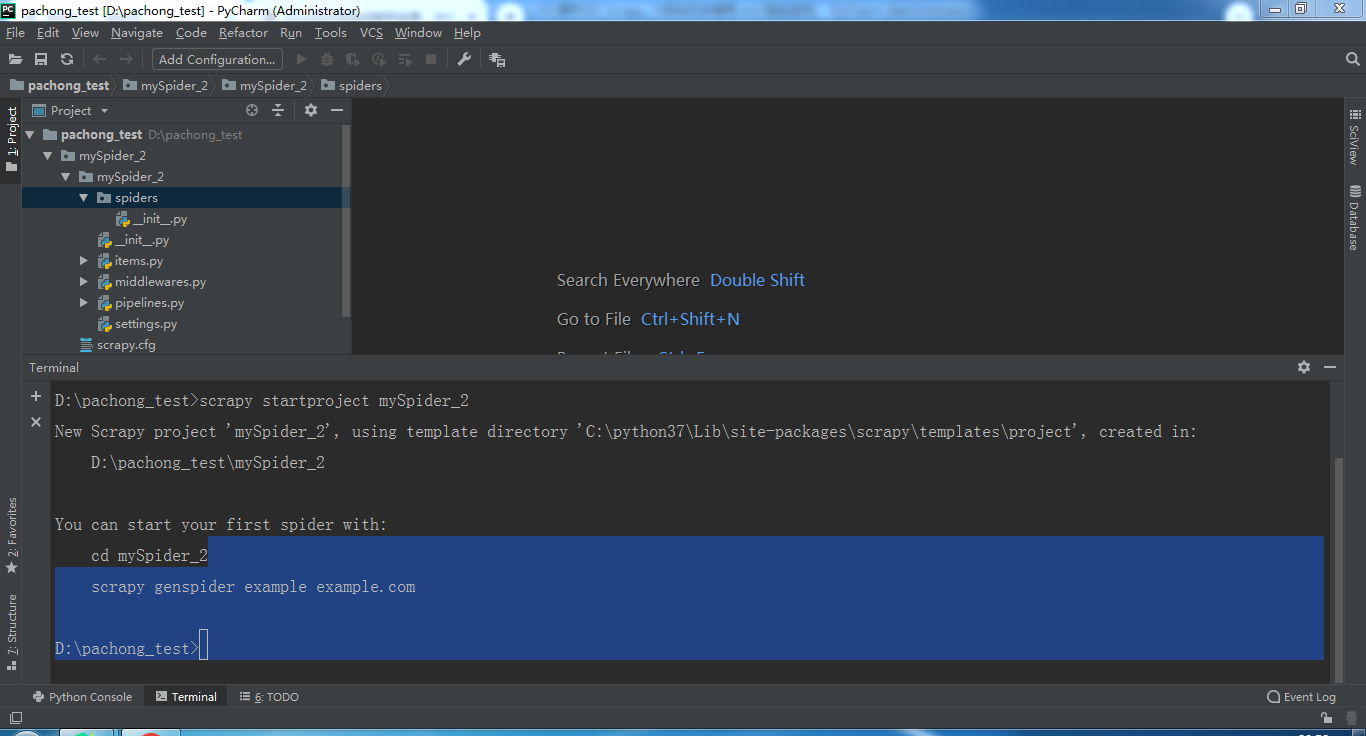
3、scrapy爬4399游戏
创建爬虫项目:scrapy startproject mySpider_2
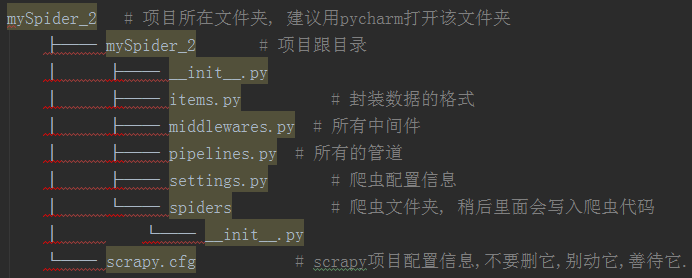
目录结构说明图如下:
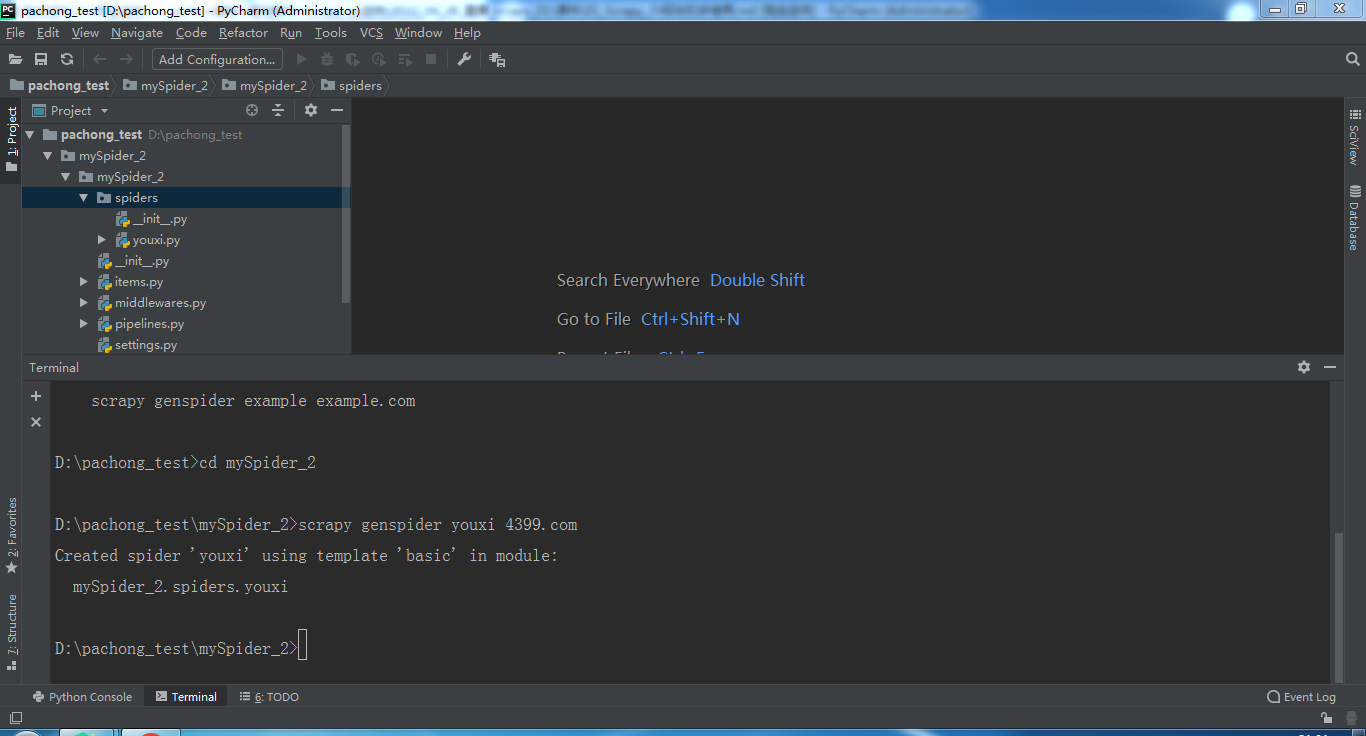
进入项目所在文件夹并创建虫子
cd mySpider_2
scrapy genspider youxi 4399.com
完善虫子youxi.py中的内容
import scrapy
class ChongchongSpider(scrapy.Spider):  # 继承scrapy的Spider
    name = 'chongchong'  # 该名字非常关键, 我们在启动该爬虫的时候需要这个名字
    allowed_domains = ['4399.com']  # 爬虫抓取的域.限制该spider抓取的域名, 只要不符合该域名的一概过掉
    # 起始页,起始url, 在引擎开始工作的时候. 自动的包装成一个请求对象
    # 引擎进行调度. 交给下载器获取页面源代码,帮你封装成响应对象
    # 引擎把响应对象交给spider进行解析, 解析函数就是 下面的parse
    start_urls = ['http://www.4399.com/flash/game100.htm']
    # 解析start_urls返回的响应,不能乱改,参数**kwargs 根据你的喜好进行增加 # 形参 => 变量
    # 不是我调用的. 是引擎自动调用.参数也是引擎自动传递
    def parse(self, response, **kwargs):
        # response.text  # 页面源代码
        # response.xpath()  # 通过xpath方式提取
        # response.css()  # 通过css方式提取
        # response.json() # 提取json数据
        # 用我们最熟悉的方式: xpath提取游戏名称, 游戏类别, 发布时间等信息
        li_list = response.xpath("//*[@id='list']/li")
        result = []
        for li in li_list:
            # extract_first()  提取第一个, 它的好处是. 不会越界. 如果没有东西. 这里获取到的是None
            name = li.xpath("./div[1]/a//text()").extract_first()
            leibie = li.xpath("./span[1]/a/text()").extract_first()
            shijian = li.xpath("./span[2]/text()").extract_first()
            # print(name, leibie, shijian)
            # yield 相当于临时的返回一个数据, 函数继续运行,生成器函数
            # yield返回只能是以下内容:
            # 字典, item, 是数据,  去pipeline保存数据
            # request, 继续请求  去调度器的请求队列
            # None  结束,其他内容一律报错
            yield {"name": name, "leibie": leibie, "shijian": shijian}
运行虫子:cd D:\pachong_test\mySpider_2\mySpider_2\spiders
scrapy crawl youxi
修改settings.py文件中的pipeline信息,前面是pipeline的类名地址,后面是优先级, 优先级月低越先执行
BOT_NAME = "mySpider_2"
SPIDER_MODULES = ["mySpider_2.spiders"]
NEWSPIDER_MODULE = "mySpider_2.spiders"
# 配置日志级别
LOG_LEVEL = "WARNING"  # 最大限度的保留错误信息. 而又不会被一些乱七八糟的日志影响
# CRITICAL50=> 非常非常严重的错误. 解析器级别的
# ERROR   40=>  报错, 程序挂了
# WARNING 30=>  警告, 过时警告, 不会影响程序的执行.
# INFO    20=>  一些提示信息, print("下载成功")
# DEBUG   10=>  碎嘴子. 啥玩意都记录
USER_AGENT = 'Mozilla/5.0 (Windows NT 10.0; Win64; x64) AppleWebKit/537.36 (KHTML, like Gecko) Chrome/101.0.4951.54 Safari/537.36'
# ROBOTS: 君子协议
ROBOTSTXT_OBEY = False
# CONCURRENT_REQUESTS = 32
# DOWNLOAD_DELAY = 3
# CONCURRENT_REQUESTS_PER_DOMAIN = 16
# CONCURRENT_REQUESTS_PER_IP = 16
COOKIES_ENABLED = False  # 这个要打开。 否则下面的cookie无效的
# TELNETCONSOLE_ENABLED = False
DEFAULT_REQUEST_HEADERS = {
    'Accept': 'text/html,application/xhtml+xml,application/xml;q=0.9,*/*;q=0.8',
    'Accept-Language': 'en',
    "Cookie": "fvlid=1642167433528aCtTRzzJxa5w; sessionid=25e76ed4-ac76-4c18-86ef-9f05f56e5f71; area=110114; che_sessionid=01720F78-6018-468C-A3E8-35235321AF81%7C%7C2022-01-14+21%3A37%3A13.520%7C%7C0; listuserarea=110100; sessionip=221.218.212.121; Hm_lvt_d381ec2f88158113b9b76f14c497ed48=1652356283; sessionvisit=3d18f224-a438-45a4-849d-531c3f4587d8; sessionvisitInfo=25e76ed4-ac76-4c18-86ef-9f05f56e5f71|www.autohome.com.cn|100533; che_sessionvid=4B36F1DE-CAF9-47AF-B6E6-A4BA52B82875; userarea=110100; ahpvno=5; UsedCarBrowseHistory=0%3A43581488; Hm_lpvt_d381ec2f88158113b9b76f14c497ed48=1652357364; ahuuid=1A75FF15-842E-4369-8720-FD12B13EEB5E; showNum=8; sessionuid=25e76ed4-ac76-4c18-86ef-9f05f56e5f71; v_no=7; visit_info_ad=01720F78-6018-468C-A3E8-35235321AF81||4B36F1DE-CAF9-47AF-B6E6-A4BA52B82875||-1||-1||7; che_ref=www.autohome.com.cn%7C0%7C100533%7C0%7C2022-05-12+20%3A09%3A19.594%7C2022-05-12+20%3A05%3A10.988; carDownPrice=1"
}
# SPIDER_MIDDLEWARES = {
#    "mySpider_2.middlewares.Myspider2SpiderMiddleware": 543,
# }
# DOWNLOADER_MIDDLEWARES = {
#    "mySpider_2.middlewares.Myspider2DownloaderMiddleware": 543,
# }
# EXTENSIONS = {
#    "scrapy.extensions.telnet.TelnetConsole": None,
# }
# 前面是pipeline的类名地址,后面是优先级, 优先级越低越先执行
ITEM_PIPELINES = {
    # 后面的数字表示优先级, 数字越小, 优先级越高
    # 与引擎之间的距离
    # 'mySpider_2.pipelines.CaiPipeline': 120,
    # 'mySpider_2.pipelines.MySQLPipeline': 150,
    # 'mySpider_2.pipelines.MongoPipeline': 180,
    # "mySpider_2.pipelines.Myspider2Pipeline": 210,
    # 'mySpider_2.pipelines.TuPipeline': 240,
    # 'mySpider_2.pipelines.MyTuPipeline': 270,
    # 'mySpider_2.pipelines.ChePipeline': 300,
    # 'mySpider_2.pipelines.JiaPipeline': 330,
    'mySpider_2.pipelines.ShiPipeline': 360,
}
# 下载图片. 必须要给出一个配置:总路径配置
IMAGES_STORE = "./imgs"
# AUTOTHROTTLE_ENABLED = True
# AUTOTHROTTLE_START_DELAY = 5
# AUTOTHROTTLE_MAX_DELAY = 60
# AUTOTHROTTLE_TARGET_CONCURRENCY = 1.0
# AUTOTHROTTLE_DEBUG = False
# HTTPCACHE_ENABLED = True
# HTTPCACHE_EXPIRATION_SECS = 0ITEM_PIPELINES
# HTTPCACHE_DIR = "httpcache"
# HTTPCACHE_IGNORE_HTTP_CODES = []
# HTTPCACHE_STORAGE = "scrapy.extensions.httpcache.FilesystemCacheStorage"
REQUEST_FINGERPRINTER_IMPLEMENTATION = "2.7"
TWISTED_REACTOR = "twisted.internet.asyncioreactor.AsyncioSelectorReactor"
FEED_EXPORT_ENCODING = "utf-8"
DOWNLOAD_DELAY = 3  # 汽车之家案例。 必须加上这个。
编写管道pipeline.py对数据进行简单的保存,
这个方法的声明不能动!!! 在spider返回的数据会自动的调用这里的process_item方法,把它改了. 管道就断了
from itemadapter import ItemAdapter
import pymysql
import pymongo
import scrapy
# ImagesPipeline 图片专用的管道
from scrapy.pipelines.images import ImagesPipeline
class Myspider2Pipeline:
    # process_item: 在引擎得到数据后. 进行数据类型判断之后. 如果是数据.
    # 引擎会自动的调用pipeline中的process_item函数
    # item, 就是数据
    # spider, 数据是从哪个爬虫穿过来的???
    def process_item(self, item, spider):
        print("我是pipeline, 我接收到了", item)
        return item
class CaiPipeline:
    # 希望。 在程序跑起来的时候。打开一个w模式的文件
    # 在获取数据的时候正常写入
    # 在程序结束的时候。 关闭f
    # 仅限于pipeline固定的写法.
    # open_spider, 爬虫在开始的时候。 执行
    def open_spider(self, spider_name):
        self.f = open("xxx.csv", mode="w", encoding="utf-8")
    # close_spider, 爬虫结束的时候。 执行
    def close_spider(self, spider_name):
        self.f.close()
    # process_item 的作用就是接受spider返回的数据
    # spider每次返回一条数据. 这里都会自动的执行一次process_item
    # 数据以参数的形式传递过来. item
    def process_item(self, item, spider):
        # print(spider.name)
        # print("这里是管道", item['qi'], item['blue_ball'], item['red_ball'])
        # 存储数据,文件, mysql, mongodb, redis
        self.f.write(item['qi'])
        self.f.write(",")
        self.f.write("_".join(item['red_ball']))
        self.f.write(",")
        self.f.write(item['blue_ball'])
        self.f.write("\n")
        # self.f.close()  # 这里不能写
        return item  # return在process_item中的逻辑, 是将数据传递给一下管道
# 存MySQL
# 准备表. 创建好表.
class MySQLPipeline:
    def open_spider(self, spider_name):
        # 连接mysql
        self.conn = pymysql.connect(
            host="127.0.0.1",
            port=3306,
            database="cai",
            user="root",
            password="root"
        )
    def close_spider(self, spider_name):
        self.conn.close()
    def process_item(self, item, spider):
        # 存储数据
        try:  # 代码调试期间. 可以考虑不添加try...except...为了能看到更加完整的错误信息
            cur = self.conn.cursor()
            qi = item['qi']
            # red_ball = "_".join(item['red_ball'])
            red_ball = item['red_ball']
            blue_ball = item['blue_ball']
            sql = f"insert into ssq(qi, red_ball, blue_ball) values ('{qi}', \"{red_ball}\", '{blue_ball}')"
            cur.execute(sql)
            self.conn.commit()
        except Exception as e:
            print(e)
            if cur:
                cur.close()
            self.conn.rollback()
        return item
# 存MongoDB
class MongoPipeline:
    def open_spider(self, spider_name):
        self.conn = pymongo.MongoClient(
            host="127.0.0.1",
            port=27017
        )
        self.db = self.conn['python']
    def close_spider(self, spider_name):
        self.conn.close()
    def process_item(self, item, spider):
        self.db.ssq.insert_one({"qi": item['qi'], "red_ball": item['red_ball'], "blue_ball": item['blue_ball']})
        return item  # 给到下一个管道
class TuPipeline:
    def process_item(self, item, spider):
        print("img_src是:", item['img_src'])
        # 一个存储方案.
        # import requests
        return item
# scrapy的方案
class MyTuPipeline(ImagesPipeline):
    # 1. 发送请求(下载图片, 文件, 视频,xxx)
    def get_media_requests(self, item, info):
        url = item['img_src']
        headers = {
            "User-Agent": "Mozilla/5.0 (Windows NT 10.0; Win64; x64) AppleWebKit/537.36 (KHTML, like Gecko) Chrome/99.0.4844.82 Safari/537.36",
            "Referer": "https://desk.zol.com.cn/dongman/"
        }
        yield scrapy.Request(url=url, headers=headers, meta={"sss": url})  # 直接返回一个请求对象即可
    # 2. 图片的存储路径
    # 完整的路径: IMAGES_STORE + file_path()的返回值
    # 在这个过程中. 文件夹自动创建
    def file_path(self, request, response=None, info=None, *, item=None):
        # 可以准备文件夹
        img_path = "dongman"
        # 准备文件名字
        # 坑: response.url 没办法正常使用
        # file_name = response.url.split("/")[-1]  # 直接用响应对象拿到url
        # print("response:", file_name)
        file_name = item['img_src'].split("/")[-1]  # 用item拿到url
        print("item:", file_name)
        file_name = request.meta['sss'].split("/")[-1]
        print("meta:", file_name)
        real_path = img_path + "/" + file_name  # 文件夹路径拼接
        return real_path  # 返回文件存储路径即可
    # 3. 可能需要对item进行更新
    def item_completed(self, results, item, info):
        # print(results)
        for r in results:
            print(results)
            print("results是:", r[1]['path'])
        return item  # 一定要return item 把数据传递给下一个管道
class ChePipeline:
    def process_item(self, item, spider):
        return item
class JiaPipeline:
    def process_item(self, item, spider):
        return item
class ShiPipeline:
    def process_item(self, item, spider):
        return item
自定义数据传输结构item.py文件
import scrapy
class Myspider2Item(scrapy.Item):
    # define the fields for your item here like:
    # name = scrapy.Field()
    pass
class CaiItem(scrapy.Item):
    # 提前定义数据结构
    qi = scrapy.Field()
    blue_ball = scrapy.Field()
    red_ball = scrapy.Field()
class CheItem(scrapy.Item):
    # define the fields for your item here like:
    name = scrapy.Field()
    pass

ssq虫子获取响应的数据给管道→pipelines管道中的process_item保存数据→items定义数据结构→setting定义配置→

