Springboot 使用Mybatis对postgreSQL实现CRUD
目录结构

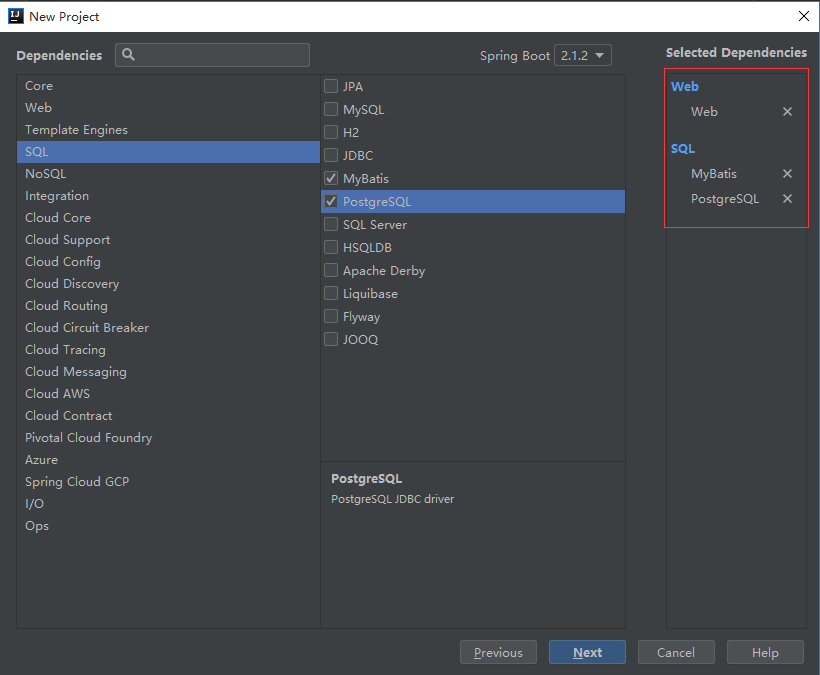
1、创建一个springboot项目
选择Web、Mabatis、postgreSQL
2、在application中写入配置文件
1 #配置数据源
2 spring.datasource.platform=postgres
3 spring.datasource.url=jdbc:postgresql://127.0.0.1:5432/postgres
4 spring.datasource.username=postgres
5 spring.datasource.password=123456
6 spring.datasource.driverClassName=org.postgresql.Driver
写入完成后,org.postgresql.Driver会报错(可以不管)。原因是postgresql这个jar包依赖类型默认是runtime(运行时生效),所以并不影响代码的运行。
修改方法:
右键点击项目——选择“open module settings”——点击“Dependencies”,找到Maven:org.postgresql:postgresql:42.2.5将runtime修改为Compile

3、创建一个实例化的实体类
首先在postgreSQL数据库中新建一个表table_one,并创建一个BeanUser的实体类。
 1 package com.example.bean;
 2
 3 public class BeanUser {
 4
 5     private Integer id;
 6     private String user_name;
 7     private String pass_word;
 8
 9     public Integer getId() {
10
11         return id;
12
13     }
14
15     public void setId(Integer id) {
16
17         this.id = id;
18
19     }
20
21     public String getUser_name() {
22
23         return user_name;
24
25     }
26
27     public void setUser_name(String user_name) {
28
29         this.user_name = user_name;
30
31     }
32
33     public String getPass_word() {
34
35         return pass_word;
36
37     }
38
39     public void setPass_word(String pass_word) {
40
41         this.pass_word = pass_word;
42
43     }
44 }
45
46
4、创建一个对表CRUD的实体类
 1 package com.example.mapper;
 2
 3 import com.example.bean.BeanUser;
 4
 5 import org.apache.ibatis.annotations.*;
 6
 7
 8
 9 //指定这是一个操作数据库的mapper
10
11 @Mapper
12
13 public interface BeanUserMapper {
14
15
16
17     //查询
18
19     @Select("select * from table_one where id=#{id}")
20
21     public BeanUser selectId(Integer id);
22
23
24
25     //删除
26
27     @Delete("delete from table_one where id=#{id}")
28
29     public int deleteId(Integer id);
30
31
32
33     //插入
34
35     @Insert("insert into table_one(id,user_name,pass_word) values(#{id},#{user_name},#{pass_word})")
36
37     public int insertBean(BeanUser beanUser);
38
39
40
41     //修改
42
43     @Update("update table_one set user_name=#{user_name},pass_word=#{pass_word} where id=#{id}")
44
45     public int UpdateBean(BeanUser beanUser);
46
47 }
5、创建一个controller控制器
接收和处理客户端的请求
 1 package com.example.controller;
 2
 3 import com.example.bean.BeanUser;
 4
 5 import com.example.mapper.BeanUserMapper;
 6
 7 import org.springframework.beans.factory.annotation.Autowired;
 8
 9 import org.springframework.web.bind.annotation.PathVariable;
10
11 import org.springframework.web.bind.annotation.RequestMapping;
12
13 import org.springframework.web.bind.annotation.RestController;
14
15
16 @RestController
17
18 public class ControllerBean {
19
20     @Autowired
21
22     BeanUserMapper beanUserMapper;
23
24     //查询
25
26     @RequestMapping("/get/{id}")
27
28     public BeanUser getBeanUser(@PathVariable("id") Integer id){
29
30         return beanUserMapper.selectId(id);
31
32     }
33     //插入
34
35     @RequestMapping("/insert")
36
37     public BeanUser insertBeanUser(BeanUser beanUser){
38
39         beanUserMapper.insertBean(beanUser);
40
41         return beanUser;
42
43     }
44     //修改
45
46     @RequestMapping("/update")
47
48     public BeanUser updateBeanUser(BeanUser beanUser){
49
50         beanUserMapper.UpdateBean(beanUser);
51
52         return beanUser;
53
54     }
55     //删除
56
57     @RequestMapping("/delete/{id}")
58
59     public String deleteBeanUser(@PathVariable("id")Integer id){
60
61          beanUserMapper.deleteId(id);
62
63          return "删除成功!";
64
65     }
66 }
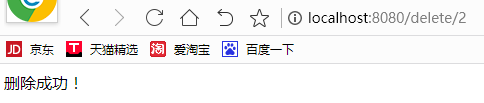
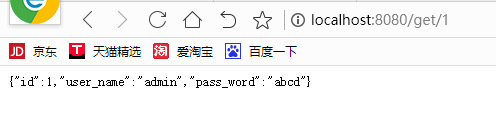
6、运行成功
查询
插入

修改

删除