模式识别实验:基于主成分分析(PCA)的人脸识别
前言
本文使用Python实现了PCA算法,并使用ORL人脸数据集进行了测试并输出特征脸,简单实现了人脸识别的功能。
1. 准备
ORL人脸数据集共包含40个不同人的400张图像,是在1992年4月至1994年4月期间由英国剑桥的Olivetti研究实验室创建。此数据集包含40个类,每个类含10张图片。所有的图像是以PGM格式存储,灰度图,图像大小为 92 x 112像素。
对于每个类,我们选择前7张(训练集总共280张)图片用于训练,后3张图片用于测试。我们将图像缩放至原来的0.5倍,以加快训练速度。最后选择100个特征向量进行降维。
import os
import cv2
import numpy as np
from typing import Union, LiteralString
import matplotlib.pyplot as plt
%matplotlib inline

scaled = 0.5 # 图像缩放至原来的scaled倍
train_num = 7   # 7张用于训练
img_num = 10    # 总共10张图片
num_k = 100 # 选择100个特征
save_path = './ORL_eigenfaces'
dataset_path = '../dataset/ORL/att_faces/'
cov_matrix_path = './PCA_ORL.npy'
2. 数据集处理
将每个类的前7张图片使用img2np转为一维向量,作为训练集。并计算每个类前7张图片的平均特征向量,用于后面的对比。
# 图像转为一维向量
def img2np(img_path: Union[str, LiteralString], scaled: float = 1.) -> np.ndarray:
    img = cv2.imread(img_path)
    h, w = img.shape[0], img.shape[1]
    img = cv2.resize(img, (int(h * scaled), int(w * scaled)))
    if img.shape[-1] > 1:
        img = cv2.cvtColor(img, cv2.COLOR_BGRA2GRAY)
    return np.array(img).flatten()
class_names = os.listdir(dataset_path)
print(f'数据集总共有 {len(class_names)} 个类')

# 列表示特征值,行表示图像
samples_data = []
avg_feature = [] # 每个类的平均特征

for class_name in class_names:
    class_path = os.path.join(dataset_path, class_name)
    img_names = os.listdir(class_path)
    class_feature = [] # 计算每个类前train_num的平均特征
    for img_name in img_names[:train_num]:  # 取前七张参与训练
        img_data = img2np(os.path.join(class_path,img_name), scaled=scaled)

        samples_data.append(img_data)
        class_feature.append(img_data)

    avg_feature.append(np.array(class_feature).mean(axis=0))
samples_data = np.array(samples_data)
avg_feature = np.array(avg_feature)

print(f'数据集特征矩阵形状: {samples_data.shape},平均特征矩阵形状:{avg_feature.shape}')
数据集总共有 40 个类
数据集特征矩阵形状: (280, 2576),平均特征矩阵形状:(40, 2576)
3. PCA降维
PCA计算时间较长,因此建议先对图像进行缩放,并保存降维后的特征矩阵,方便后续调用。
# PCA算法保留前k个特征向量
def pca(X: np.ndarray, k: int) -> np.ndarray:

    # 计算每个特征均值
    mean = np.mean(X, axis=0)
    # 数据标准化
    norm_X = X - mean
    # 计算协方差矩阵
    cov_matrix = np.cov(norm_X, rowvar=False)
    # 计算特征值与特征向量
    eig_val, eig_vec = np.linalg.eig(cov_matrix)
    abs_eig_vec = np.abs(eig_val)
    # 按照特征值的绝对值大小增序排序
    sorted_Index = np.argsort(abs_eig_vec)

    # 选择前k个特征值对应的特征向量
    selected_vectors = eig_vec[:, sorted_Index[-k :]]
    # 低维投影
    return selected_vectors
if os.path.exists(cov_matrix_path):
    pca_vectors = np.load(cov_matrix_path)
else:
    pca_vectors = pca(samples_data, num_k) # 选择100个特征向量
    np.save(cov_matrix_path, pca_vectors) # 训练时间较长,可以保存方便调用
print(f'PCA降维后的特征矩阵形状: {pca_vectors.shape}')
PCA降维后的特征矩阵形状: (2576, 100)
4. 测试
假设有C个类,每个图像的特征值数为N,降维后选取的特征向量数为K。
首先对类的平均特征矩阵进行降维,降维后的矩阵形状为(C x K)。
测试时:
- 对每张测试图片进行降维:图像特征(1 x N)与PCA降维特征向量(N x K)相乘;
- 对第一步得到的结果与平均特征矩阵的每一行(每一行大小为1 x K)进行余弦相似度比较得到C个数;
- 选择C个数中最大的下标,就是预测的类别。
pca_avg_feature = np.dot(avg_feature, pca_vectors) # 进行降维
print(f'PCA降维后的平均特征矩阵形状: {pca_avg_feature.shape}')
PCA降维后的平均特征矩阵形状: (40, 100)
# 计算余弦相似度
def cosine_similarity(vec1: np.ndarray, vec2: np.ndarray):
    # 向量点乘
    dot_product = np.dot(vec1, vec2)

    # 计算L2范数
    magnitude1 = np.linalg.norm(vec1)
    magnitude2 = np.linalg.norm(vec2)

    # 计算余弦相似度
    return dot_product / (magnitude1 * magnitude2)

test_res = []
correct = 0
wrong = 0
for i, class_name in enumerate(class_names):
    class_path = os.path.join(dataset_path, class_name)
    img_names = os.listdir(class_path)
    true_label = i
    for img_name in img_names[train_num: img_num]:
        img_data = img2np(os.path.join(class_path, img_name), scaled=scaled)
        predict_img = np.dot(img_data, pca_vectors)
        similarity = []
        for j in pca_avg_feature:
            similarity.append(cosine_similarity(j, predict_img))
        predict_label = np.argmax(similarity)
        if true_label == predict_label:
            correct += 1
        else:
            wrong += 1
        test_res.append((true_label, predict_label))
accuracy = correct / (correct + wrong)
print(f'Total samples: {correct + wrong}, correct: {correct}, wrong: {wrong}, accuracy: {accuracy:.4f}')
Total samples: 120, correct: 111, wrong: 9, accuracy: 0.9250
5. 结果展示
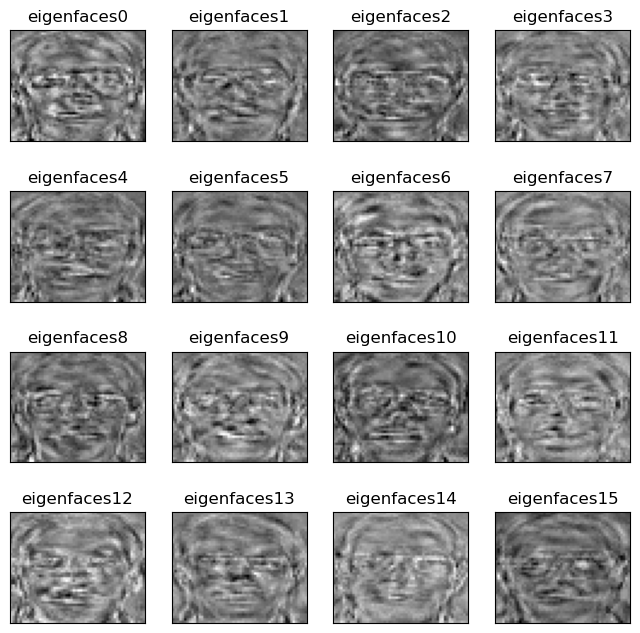
将特征向量保存为特征脸并输出。此处注意下,缩放后的图像大小为56 x 46(原始大小为112 x 92),但保存的特征脸大小为46 x 56(否则就不能显现人脸)。
# 保存前k个特征向量的特征脸
def save_eigenfaces(eigenvectors: np.ndarray,
                    k: int,
                    img_size: tuple[int, int],  # (h, w)
                    path: Union[str, LiteralString]) -> bool:
    if os.path.exists(path) is False:
        os.mkdir(path)  # 创建保存路径文件夹
    for i in range(k):
        eigenfaces = np.real(eigenvectors[:, i])

        # 对特征向量进行归一化,投影到0-255的灰度空间
        norm_eigenfaces = ((eigenfaces - np.min(eigenfaces)) /
                                 (np.max(eigenfaces) - np.min(eigenfaces)) * 255)
        norm_eigenface_uint8 = norm_eigenfaces.astype(np.uint8)
        shaped_eigenface = norm_eigenface_uint8.reshape(img_size)
        cv2.imwrite(os.path.join(path, f'eigenfaces{i}.png'), shaped_eigenface)
    return True

save_eigenfaces(pca_vectors, 100, (46, 56), save_path)  # 原大小为112 x 92,缩放后为56 x 46

plt.figure(figsize=(8, 8))
for i in range(16):
    plt.subplot(4,4,i+1)
    plt.imshow(cv2.imread(os.path.join(save_path, f'eigenfaces{i}.png')))
    plt.title(f'eigenfaces{i}')
    plt.xticks([])
    plt.yticks([])
plt.show()

6. 总结
PCA可以实现简单的人脸识别。
环境配置:
matplotlib==3.7.2
numpy==1.25.2
opencv_python==4.8.1.78


