Nginx加载Lua环境
Nginx加载Lua环境
开源配置
也可以直接部署春哥的开源项⽬OpenResty : http://openresty.org/cn/
# 安装依赖包
[root@linuxprobe]# yum install -y readline-devel pcre-devel openssl-devel
[root@linuxprobe]# cd /soft/src
# 下载并编译安装openresty
[root@linuxprobe src]# wget https://openresty.org/download/ngx_openresty-1.9.3.2.tar.gz
[root@linuxprobe src]# tar zxf ngx_openresty-1.9.3.2.tar.gz
[root@linuxprobe src]# cd ngx_openresty-1.9.3.2
[root@linuxprobe ngx_openresty-1.9.3.2]# ./configure --prefix=/soft/openresty-1.9.3.2 \
--with-luajit --with-http_stub_status_module \
--with-pcre --with-pcre-jit
[root@linuxprobe ngx_openresty-1.9.3.2]# gmake && gmake install
[root@linuxprobe ngx_openresty-1.9.3.2]# ln -s /soft/openresty-1.9.3.2/ /soft/openresty
#配置
[root@180-143 conf]# cd /soft/openresty-1.9.3.2/nginx/conf
[root@180-143 conf]# cat nginx.conf
worker_processes 1;
events {
worker_connections 1024;
}
http {
include mime.types;
default_type application/octet-stream;
sendfile on;
keepalive_timeout 65;
include ./conf.d/*.conf ;
}
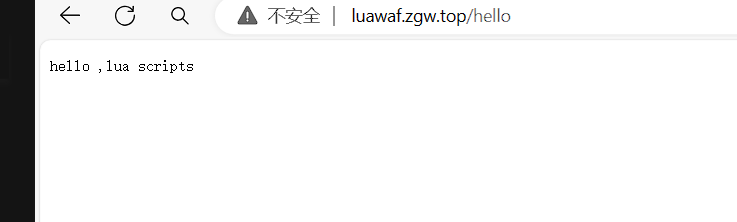
# 测试openresty安装
# vim /soft/openresty/nginx/conf/nginx.conf
server {
listen 80;
server_name www.yuansredevsecops.top;
location /hello {
default_type text/html;
content_by_lua 'ngx.say("hello ,lua scripts")';
}
}
# 启动openresty
[root@nginx-php-k-1 conf.d]# /soft/openresty/nginx/sbin/nginx
Nginx调⽤Lua指令
Nginx调⽤ Lua 模块指令,Nginx的可插拔模块加载执⾏
| 语法 | |
|---|---|
set_by_lua set_by_lua_file |
设置Nginx变量,可以实现负载的赋值逻辑 |
access_by_lua access_by_lua_file |
请求访问阶段处理, ⽤于访问控制 |
content_by_lua content_by_lua_file |
内容处理器, 接受请求处理并输出响应 |
Nginx 调⽤ Lua API
| 变量 | |
|---|---|
| ngx.var | nginx变量 |
| ngx.req.get_headers | 获取请求头 |
| ngx.req.get_uri_args | 获取url请求参数 |
| ngx.redirect | 重定向 |
| ngx.print | 输出响应内容体 |
| ngx.say | 输出响应内容体,最后输出⼀个换⾏符 |
| ngx.header | 输出响应头 |
set_by_lua 和 set_by_lua_file
set_by_lua 和 set_by_lua_file :这两个模块都⽤于设置 Nginx 变量。 set_by_lua 通过 inline Lua 代码设置变量的值, set_by_lua_file 则可以通过引⼊ Lua 脚本⽂件来设置变量。这两个模块通常⽤于实现负载的赋值逻辑,如根据请求的 headers 头部信息等进⾏动态变量设置。
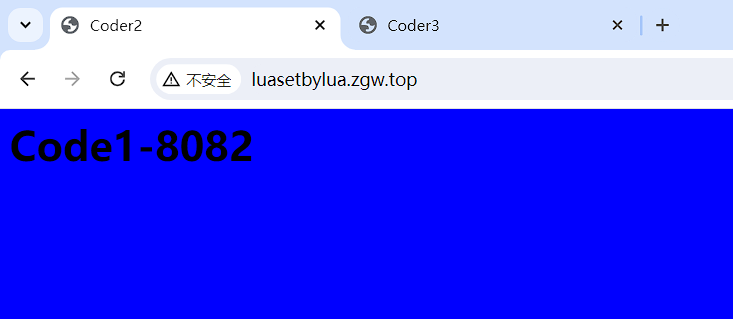
/soft/openresty-1.9.3.2/nginx/conf/conf.d/luasetbylua.conf
upstream backend {
server 192.168.1.152:8081 weight=1;
server 192.168.1.152:8082 weight=1;
}

server {
listen 80;
server_name luasetbylua.yuansredevsecops.top;
location /hello {
default_type text/html;
content_by_lua_block {
ngx.say("HelloWorld")
}
}

location / {
set $backend 'backend';
set_by_lua_file $backend_lua_file /soft/openresty-1.9.3.2/nginx/conf/lua/backend.lua;
proxy_pass http://$backend;
}
}
/soft/openresty-1.9.3.2/nginx/conf/lua/backend.lua
# cat /soft/openresty-1.9.3.2/nginx/conf/lua/backend.lua
-- backend.lua
if ngx.var.remote_addr == '127.0.0.1' then
-- Use 10.1.106.66:8081 for local requests
ngx.var.backend = '192.168.1.152:8081';
else
-- Use 10.1.106.66:8082 for remote requests
ngx.var.backend = '192.168.1.152:8082';
end
//上述脚本内容是判断ngx.var.remote_addr请求地址是否等于127.0.0.1,是则返回8081,否则返回8082
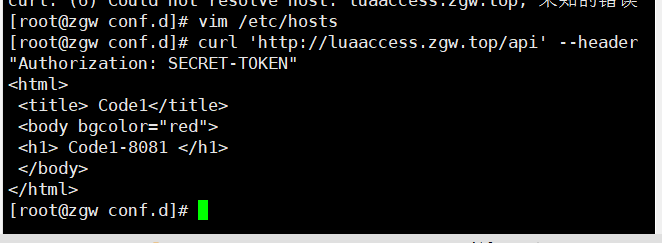
[root@nginx-php-k-1 conf.d]# cat /etc/hosts
127.0.0.1 luasetbylua.yuansredevsecops.top
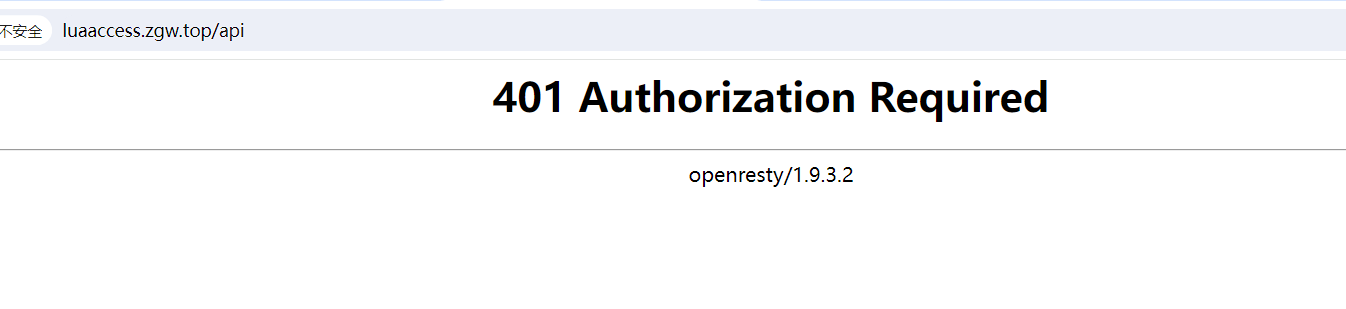
access_by_lua 和 access_by_lua_file
access_by_lua 和 access_by_lua_file :这两个模块⽤于在 Nginx 处理请求的访问阶段(access phase)执⾏ Lua代码,⼀般⽤于请求的认证和访问控制。例如,可以使⽤ Lua 脚本从请求的 headers 中提取⽤户凭证,然后进⾏⽤户认证并判断权限,以决定是否允许请求继续执⾏。
假设我们有⼀个 API,需要进⾏鉴权,只有拥有正确的 token 的请求才能访问。
我们可以使⽤ access_by_lua 或 access_by_lua_file 在 Nginx 的 access 阶段进⾏鉴权逻辑的实现,例如:
192.168.1.170
[root@180-143 conf.d]# cat luaaccess.conf
upstream backend1 {
server 192.168.1.152:8081;
}

server {
listen 80;
server_name luaaccess.yuansredevsecops.top;

location /api {
# 鉴权
access_by_lua '
local token = ngx.var.http_authorization
if token ~= "SECRET-TOKEN" then
return ngx.exit(ngx.HTTP_UNAUTHORIZED)
end
';

# 路由到 backend1
set $backend "backend1";
proxy_pass http://$backend/;
}
}
在这个例⼦中,我们使⽤ access_by_lua 进⾏鉴权,如果请求头中的 Authorization 值不为 "SECRETTOKEN" ,我们返回 HTTP 401 错误,不继续处理请求。
如果鉴权通过,我们设置 $backend 变量的值为backend1,并将请求转发给http://backend1.example.com。
这样,我们就可以使⽤ access_by_lua 或 access_by_lua_file实现访问控制和 API 鉴权的逻辑。