Unity3D中AssetBundle应用
工程中的模型等资源转化为Prefab后,打包成AssetBundle,可以大幅降低资源的空间占有度,并且提高资源加载的效率。
一、AssetBundle的打包
先看下打包Prefab的脚本代码,这段脚本可以将一个或多个选中的Prefab打包成对应名称的.assetbundle文件:
using System.Collections;
using System.Collections.Generic;
using UnityEngine;
using UnityEditor;
public class CreateAssetBundlesMainClass : MonoBehaviour {
    [MenuItem("Custom Editor/Create AssetBunldes Main")]
    static void CreateAssetBundlesMain()
    {
        //获取在Project视图中选择的所有游戏对象
        Object[] SelectedAsset = Selection.GetFiltered(typeof(Object), SelectionMode.DeepAssets);

        //遍历所有的游戏对象
        foreach (Object obj in SelectedAsset)
        {
            string sourcePath = AssetDatabase.GetAssetPath(obj);
            //本地测试:建议最后将Assetbundle放在StreamingAssets文件夹下,如果没有就创建一个,因为移动平台下只能读取这个路径
            //StreamingAssets是只读路径,不能写入
            //服务器下载:就不需要放在这里,服务器上客户端用www类进行下载。
            string targetPath = Application.dataPath + "/StreamingAssets/" + obj.name + ".assetbundle";
            if (BuildPipeline.BuildAssetBundle(obj, null, targetPath,
                BuildAssetBundleOptions.CollectDependencies, BuildTarget.StandaloneWindows64))
            {
                Debug.Log(obj.name + "资源打包成功");
            }
            else
            {
                Debug.Log(obj.name + "资源打包失败");
            }
        }
        //刷新编辑器
        AssetDatabase.Refresh();

    }
}
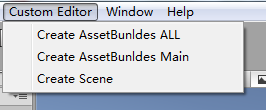
以上脚本不用挂在到场景中的游戏对象,只需要保存在Project中就可以。在菜单栏会生成一系列选项(All是打包所有Prefab、Main是打包选定的Prefab、Scene是打包场景;上述代码是打包单个Prefab):
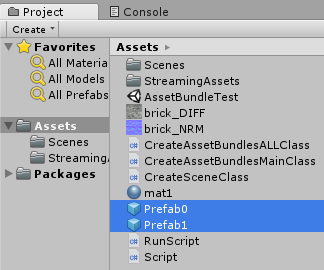
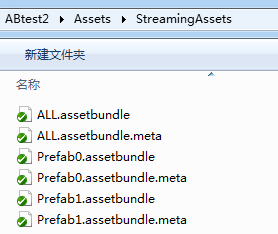
在Project中选中要打包的Prefab,一个或多个,点击Create AssetBundles Main,就可以打包出对应的AB。比如选中了Prefab0和Prefab1再点击Create AssetBundles Main,就会生成出Prefab0.assetbundle和Prefab1.assetbundle,打包出的文件会保存在StreamingAssetes文件夹中:
打包所有Prefab的代码:
using System.Collections;
using System.Collections.Generic;
using UnityEngine;
using UnityEditor;

public class CreateAssetBundlesALLClass : MonoBehaviour {

    [MenuItem("Custom Editor/Create AssetBunldes ALL")]
    static void CreateAssetBundlesALL()
    {

        Caching.ClearCache();

        string Path = Application.dataPath + "/StreamingAssets/ALL.assetbundle";

        Object[] SelectedAsset = Selection.GetFiltered(typeof(Object), SelectionMode.DeepAssets);

        foreach (Object obj in SelectedAsset)
        {
            Debug.Log("Create AssetBunldes name :" + obj);
        }


        //这里注意第二个参数就行
        if (BuildPipeline.BuildAssetBundle(null, SelectedAsset, Path,
            BuildAssetBundleOptions.CollectDependencies, BuildTarget.StandaloneWindows64))
        {
            AssetDatabase.Refresh();
        }
        else
        {

        }
    }
}
选中Prefab0和Prefab1再点击Create AssetBundles All,就会将Prefab0和Prefab1合在一起打包为一个文件——ALL.assetbundle。
二、AssetBundle的加载
下面是加载AB的脚本,这个文件需要挂在到场景中的游戏对象上才能有效。
using UnityEngine;
using System.Collections;

public class RunScript : MonoBehaviour
{
    public static string PathURL;

    private void OnEnable()
    {
        PathURL = "file://" + Application.dataPath + "/StreamingAssets/";
    }

    void OnGUI()
    {
        if (GUILayout.Button("Load One Assetbundle"))
        {
            StartCoroutine(LoadMainGameObject(PathURL + "Prefab0.assetbundle"));
            //StartCoroutine(LoadMainGameObject(PathURL + "Prefab1.assetbundle"));
        }

        if (GUILayout.Button("Load All Assetbundle"))
        {
            StartCoroutine(LoadALLGameObject(PathURL + "ALL.assetbundle"));
        }

    }

    //读取一个资源

    private IEnumerator LoadMainGameObject(string path)
    {
        WWW bundle = new WWW(path);

        yield return bundle;

        //加载到游戏中
        yield return Instantiate(bundle.assetBundle.mainAsset);

        bundle.assetBundle.Unload(false);
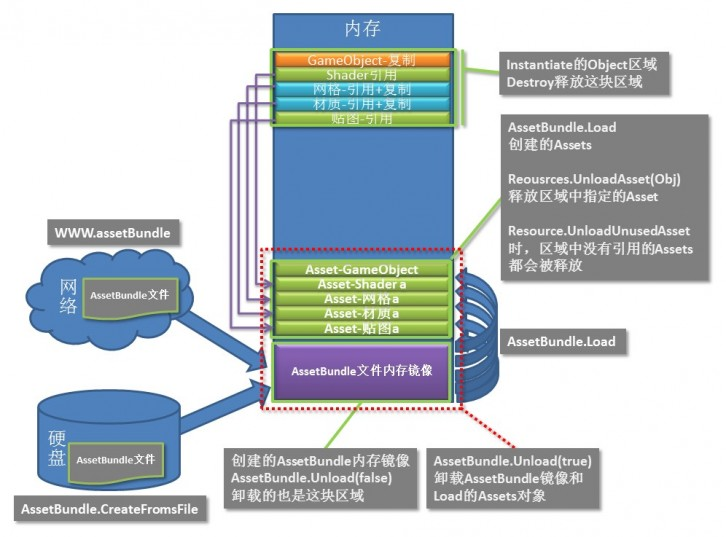
        //AssetBundle.Unload(false):释放AssetBundle文件内存镜像
        //AssetBundle.Unload(true):释放AssetBundle文件内存镜像同时销毁所有已经Load的Assets内存对象

    }

    //读取全部资源

    private IEnumerator LoadALLGameObject(string path)
    {
        WWW bundle = new WWW(path);

        yield return bundle;

        //通过Prefab的名称把他们都读取出来
        Object obj0 = bundle.assetBundle.LoadAsset("Prefab0");
        Object obj1 = bundle.assetBundle.LoadAsset("Prefab1");

        //加载到游戏中
        yield return Instantiate(obj0);
        yield return Instantiate(obj1);
        bundle.assetBundle.Unload(false);
    }

}
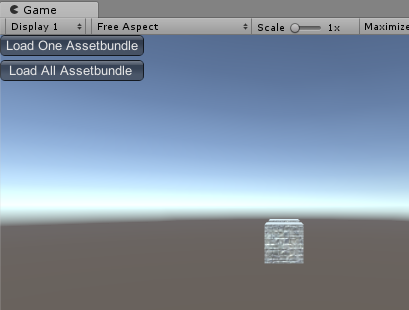
游戏运行后脚本使游戏左上角生成两个加载按钮,点击后会从之前保存AB的路径将其加载进来,如点击Load ALL Assetbundle,就会加载ALL.assetbundle,从而把两个Prefab都加载进来:
加载脚本中使用了协程,主要原因是为了将AB的下载和Prefab的加载分离到两个逻辑帧中进行,避免下载和读取的冲突。使用yield return,可以起到检查当前返回的异步对象是否能够顺利进入到下一帧的作用。

附一张AB的生命周期图:


 浙公网安备 33010602011771号