


window 服务
c#写windows服务
序言
前段时间做一个数据迁移项目,刚开始用B/S架构做的项目,但B/S要寄存在IIs中,而IIs又不稳定因素,如果重启IIs就要打开页面才能运行项目。有不便之处,就改用Windows服务实现。这篇就总结下,windows服务的编写,调试,安装卸载。
Windows服务介绍
Microsoft Windows 服务能够创建在它们自己的 Windows 会话中可长时间运行的可执行应用程序。这些服务可以在计算机启动时自动启动,可以暂停和重新启动而且不显示任何用户界面。这使服务非常适合在服务器上使用,或任何时候,为了不影响在同一台计算机上工作的其他用户,需要长时间运行功能时使用。还可以在不同于登录用户的特定用户帐户或默认计算机帐户的安全上下文中运行服务。本文就向大家介绍如何运用Visual C#来一步一步创建一个文件监视的Windows服务程序,然后介绍如何安装、测试和调试该Windows服务程序。
创建Windows服务

创建好项目之后 --- >> 双击 Service1.cs ---- >> 出现一个设计界面 ---->> 右键界面 --- >> 弹出对话框选择添加安装程序
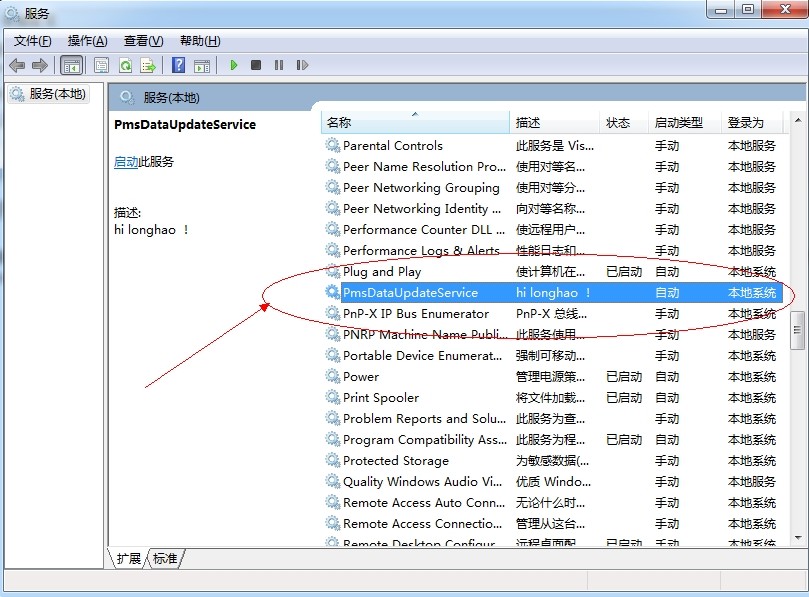
上面一系列操作完成后,就可以对windows服务名称描述以及启动方式等进行修改。


修改好后回头,写入自己想要的操作。Service1.cs出现设计界面,双击设计界面进入cs代码页。可以重写这些方法。
除此之外还有一个Program.cs文件:打开看下。
使得一个Windows服务程序能够正常运行,我们需要像创建一般应用程序那样为它创建一个程序的入口点。在Windows服务程序中,我们也是在Main()函数中完成这个操作的。首先我们在Main()函数中创建一个Windows服务的实例,该实例应该是ServiceBase类的某个子类的对象,然后我们调用由基类ServiceBase类定义的一个Run()方法。然而Run()方法并不就开始了Windows服务程序,我们必须通过前面提到的服务控制管理器调用特定的控制功能来完成Windows服务程序的启动,也就是要等到该对象的OnStart()方法被调用时服务才真正开始运行。如果你想在一个Windows服务程序中同时启动多个服务,那么只要在Main()函数中定义多个ServiceBae类的子类的实例对象就可以了,方法就是创建一个ServiceBase类的数组对象,使得其中的每个对象对应于某个我们已预先定义好的服务。
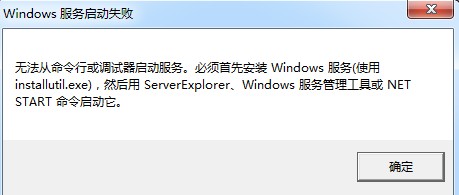
如果你在你需要的函数里面写过你需要的方法后,点运行则不可运行。
安装卸载windows服务
1、安装需要用 ,这个小玩意可以在网上下载到的。
2、把他放到你编写好的服务程序/bin/Debug文件夹下。
3、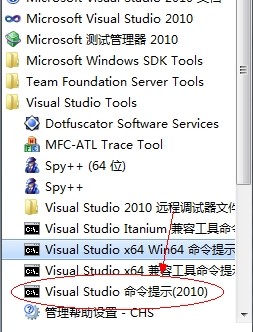 打开
打开
4、用命令读到你服务.exe文件夹下。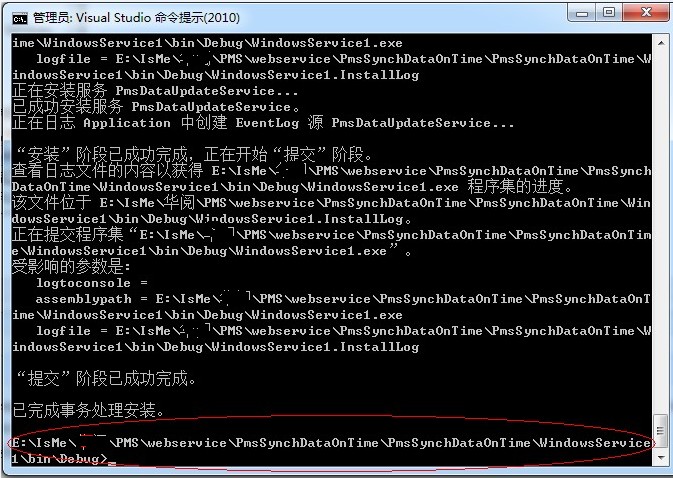
5、运行 installutil.exe
6、安装服务命令: installutil yourservices.exe
7、卸载服务命令: installutil /u yourservices.exe
注意的是:安装跟卸载需要保证程序是一样的,没有变更过的,要不会提示卸载不干净。也就是在已安装过服务的时候,不要在vs中修改你的程序。
调试windows服务
保证你的服务已安装成功,且处于启动模式。
点调试--->> 附加到进程

即可。
注意的是:

打开任务管理器: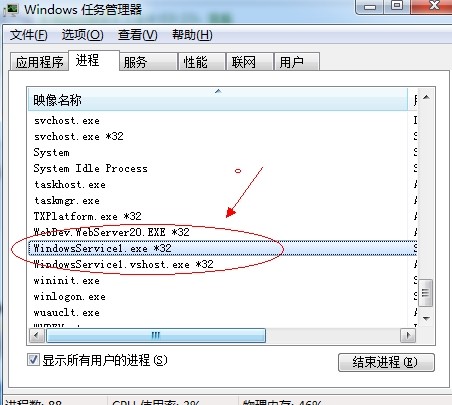 结束进程。
结束进程。
1 2 3 4 5 6 7 8 9 10 11 12 13 14 15 16 17 18 19 20 21 22 23 24 25 26 27 28 29 30 31 32 33 34 35 36 37 38 39 40 41 42 43 44 45 46 47 48 49 50 51 52 53 54 55 56 57 58 59 60 61 62 63 64 65 66 67 68 69 70 71 72 73 74 75 76 77 78 79 80 81 82 83 84 85 86 87 88 89 90 91 92 93 94 95 96 97 98 99 100 101 102 103 104 105 106 107 108 109 110 111 112 113 114 115 116 117 118 119 120 121 122 123 124 125 126 127 128 129 130 131 132 133 134 135 136 137 138 139 140 141 142 143 144 145 146 147 148 149 150 151 152 153 154 155 156 157 158 159 160 161 162 163 164 165 166 167 168 169 170 171 172 173 174 175 176 177 178 179 180 181 182 183 184 185 186 187 | [RunInstaller(true)] public class Installer1 : System.Configuration.Install.Installer { /// <summary> /// 必需的设计器变量。 /// </summary> private System.ComponentModel.Container components = null; private System.ServiceProcess.ServiceProcessInstaller spInstaller; private System.ServiceProcess.ServiceInstaller sInstaller; public Installer1() { // 该调用是设计器所必需的。 InitializeComponent(); // TODO: 在 InitComponent 调用后添加任何初始化 } #region Component Designer generated code /// <summary> /// 设计器支持所需的方法 - 不要使用代码编辑器修改 /// 此方法的内容。 /// </summary> private void InitializeComponent() { components = new System.ComponentModel.Container(); // 创建ServiceProcessInstaller对象和ServiceInstaller对象 this.spInstaller = new System.ServiceProcess.ServiceProcessInstaller(); this.sInstaller = new System.ServiceProcess.ServiceInstaller(); // 设定ServiceProcessInstaller对象的帐号、用户名和密码等信息 this.spInstaller.Account = System.ServiceProcess.ServiceAccount.LocalSystem; this.spInstaller.Username = null; this.spInstaller.Password = null; // 设定服务名称 this.sInstaller.ServiceName = "PmsDataUpdateService"; //服务描述 this.sInstaller.Description = "hi longhao !"; // 设定服务的启动方式 this.sInstaller.StartType = System.ServiceProcess.ServiceStartMode.Automatic; this.Installers.AddRange( new System.Configuration.Install.Installer[] { this.spInstaller, this.sInstaller }); } #endregion } protected override void OnStart(string[] args) { //服务开启执行代码 } protected override void OnStop() { //服务结束执行代码 } protected override void OnPause() { //服务暂停执行代码 base.OnPause(); } protected override void OnContinue() { //服务恢复执行代码 base.OnContinue(); } protected override void OnShutdown() { //系统即将关闭执行代码 base.OnShutdown(); } /// <summary> /// 应用程序的主入口点。 /// </summary> static void Main() { ServiceBase[] ServicesToRun; ServicesToRun = new ServiceBase[] { new Service1(), new Service2() }; ServiceBase.Run(ServicesToRun); }<br><br><br><br><br><br><br>using System;using System.Collections.Generic;using System.ComponentModel;using System.Data;using System.Diagnostics;using System.IO;using System.Linq;using System.ServiceProcess;using System.Text;using System.Threading;using System.Threading.Tasks;namespace clockDemo{ public partial class Service1 : ServiceBase { public Service1() { InitializeComponent(); } protected override void OnStart(string[] args) { ScheduledTask.Instance().Start(); } protected override void OnStop() { ScheduledTask.Instance().Stop(); } } public class ScheduledTask { private static readonly ScheduledTask _ScheduledTask = null; private System.Threading.Timer UpdateTimer = null; private int Interval = 1 * 10000;//间隔时间,这里设置为15分钟 private int _IsRunning;//上一个时间间隔触发的任务是否运行完成 static ScheduledTask() { _ScheduledTask = new ScheduledTask(); } public static ScheduledTask Instance() { return _ScheduledTask; } /// <summary> /// timer启动 /// </summary> public void Start() { if (UpdateTimer == null) { UpdateTimer = new System.Threading.Timer(new TimerCallback(UpdateTimerCallback), null, Interval, Interval); } } /// <summary> /// 时钟callback事件 /// </summary> /// <param name="sender"></param> private void UpdateTimerCallback(object sender) { if (Interlocked.Exchange(ref _IsRunning, 1) == 0) { try { File.ReadAllText("c:\\a.txt"); File.AppendText("c:\\a.txt"); } catch (Exception ex) { } finally { Interlocked.Exchange(ref _IsRunning, 0); } } } /// <summary> ///timer停止 /// </summary> public void Stop() { if (UpdateTimer != null) { UpdateTimer.Dispose(); UpdateTimer = null; } } }} |
ASP.NET实现WEB站点的后台定时任务
在ASP.net的WEB开发中经常会碰到这样的一个问题:即用户操作响应慢的情况。这时候就可以用后台定时任务来提前实现,并且将结果存放好或分解成响应快的任务。
可以采用Asp.net的定时处理方式,直接在WEB服务器层来进行处理。
关于C#中timer类,在C#里关于定时器类就有3个,分别是System.Windows.Forms,System.Timers.Timer和System.Threading.Timer.在这里我们主要使用System.Threading.Timer,因为它是一个使用回调方法的计时器,而且由线程池线程服务,简单且对资源要求不高。
public class ScheduledTask
{
private static readonly ScheduledTask _ScheduledTask = null;
private System.Threading.Timer UpdateTimer = null;
private int Interval = 1 * 60000;//间隔时间,这里设置为15分钟
private int _IsRunning;//上一个时间间隔触发的任务是否运行完成
static ScheduledTask()
{
_ScheduledTask = new ScheduledTask();
}
public static ScheduledTask Instance()
{
return _ScheduledTask;
}
/// <summary>
/// timer启动
/// </summary>
public void Start()
{
if (UpdateTimer == null)
{
UpdateTimer = new System.Threading.Timer(new TimerCallback(UpdateTimerCallback), null, Interval, Interval);
}
}
/// <summary>
/// 时钟callback事件
/// </summary>
/// <param name="sender"></param>
private void UpdateTimerCallback(object sender)
{
if (Interlocked.Exchange(ref _IsRunning, 1) == 0)
{
try
{
//要处理后台任务
}
catch (Exception ex)
{
}
finally
{
Interlocked.Exchange(ref _IsRunning, 0);
}
}
}
/// <summary>
///timer停止
/// </summary>
public void Stop()
{
if (UpdateTimer != null)
{
UpdateTimer.Dispose();
UpdateTimer = null;
}
}
}
建议在Application_Start中调用这个类,具体调用方法如下
public class Global : System.Web.HttpApplication
{
protected void Application_Start(object sender, EventArgs e)
{
ScheduledTask.Instance().Start();
}
protected void Application_End(object sender, EventArgs e)
{
ScheduledTask.Instance().Stop();
}
}
其中_IsRunning是一个标志,它代表上一个时间间隔触发的任务是否运行完成。因为,如果我们执行的任务时间很长,就可能造成上一个时间段触发的任务还没有执行完成,下一个任务又开始了,这样就会造成重入的问题。为了解决这个问题,我们用_IsRunning作为一个标志,表示上次的任务是否完成了,如果完成了,我们就执行新的任务,如果没完成就跳过这次的任务继续执行上次的任务。
所以在程序中,我使用了Interlocked.Exchange这个方法。该方法的作用是保证多线程下给对象赋值的安全性。因为在多线程下,我们直接给_IsRunning赋值是不安全的,所以在这种情况下Interlocked.Exchange就派上了用场


【推荐】国内首个AI IDE,深度理解中文开发场景,立即下载体验Trae
【推荐】编程新体验,更懂你的AI,立即体验豆包MarsCode编程助手
【推荐】抖音旗下AI助手豆包,你的智能百科全书,全免费不限次数
【推荐】轻量又高性能的 SSH 工具 IShell:AI 加持,快人一步
· Linux系列:如何用heaptrack跟踪.NET程序的非托管内存泄露
· 开发者必知的日志记录最佳实践
· SQL Server 2025 AI相关能力初探
· Linux系列:如何用 C#调用 C方法造成内存泄露
· AI与.NET技术实操系列(二):开始使用ML.NET
· 被坑几百块钱后,我竟然真的恢复了删除的微信聊天记录!
· 【自荐】一款简洁、开源的在线白板工具 Drawnix
· 没有Manus邀请码?试试免邀请码的MGX或者开源的OpenManus吧
· 园子的第一款AI主题卫衣上架——"HELLO! HOW CAN I ASSIST YOU TODAY
· 无需6万激活码!GitHub神秘组织3小时极速复刻Manus,手把手教你使用OpenManus搭建本
2016-06-29 asp.net mvc 部分视图加载区别