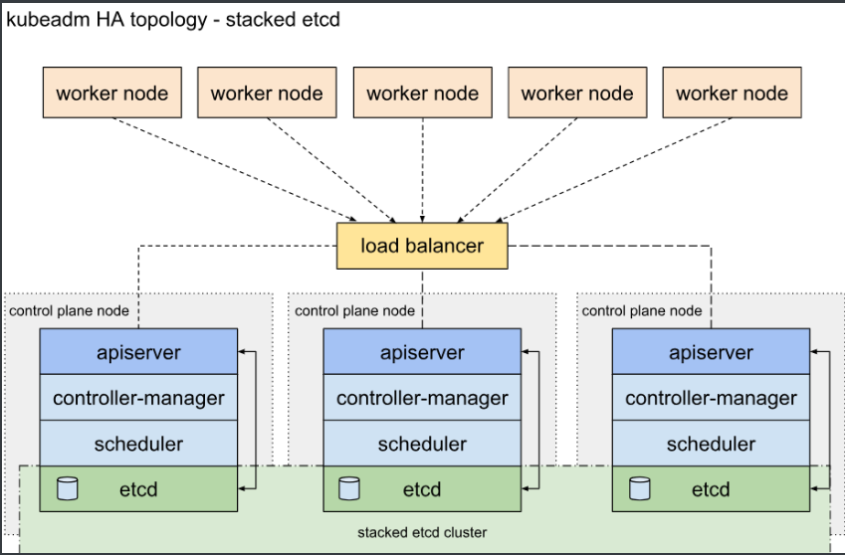
K8s(Kubernetes)-1.22.8高可用集群部署
Master 的节点堆叠方式部署,也是Kubenetes的默认方式
#服务器规划:(ubuntu系统2004版本配置:2G 2核 内存最低2G以上)各节点子网段为24

IP	               主机名	         角色

10.0.0.102	K8S-Master01	 K8S集群主节点1,Master和etcd
10.0.0.103	K8SMaster02	     K8S集群主节点2,Master和etcd
10.0.0.104	K8sMaster03	     K8S集群主节点3,Master和etcd
10.0.0.105	K8s-Worker01     K8S集群工作节点1
10.0.0.106	K8s-Worker02     K8S集群工作节点2

10.0.0.110  keepalived-VIP, VIP地址:在HA01和HA02主机实现
10.0.0.107  K8S-HA01	K8S主节点访问入口1,提供高可用及负载均衡
10.0.0.108	K8S-HA02	K8S主节点访问入口2,提供高可用及负载均衡
[15:51:16 root@ubuntu2004 ~]#hostnamectl set-hostname K8S-Master01
[15:52:09 root@ubuntu2004 ~]#hostnamectl set-hostname K8S-Master02
[15:52:16 root@ubuntu2004 ~]#hostnamectl set-hostname K8S-Master03
(2)K8S集群节点都进行解析:
10.0.0.102	K8S-Master01
10.0.0.103	K8S-Master02
10.0.0.104	K8s-Master03
10.0.0.105	K8s-Worker01
10.0.0.106	K8s-Worker02
10.0.0.107  K8S-HA01
10.0.0.108	K8S-HA02

[15:59:15 root@K8S-Master01 ~]#cat /etc/hosts
127.0.0.1 localhost
127.0.1.1 ubuntu2004

# The following lines are desirable for IPv6 capable hosts
::1     ip6-localhost ip6-loopback
fe00::0 ip6-localnet
ff00::0 ip6-mcastprefix
ff02::1 ip6-allnodes
ff02::2 ip6-allrouters

10.0.0.102	K8S-Master01
10.0.0.103	K8S-Master02
10.0.0.104	K8s-Master03
10.0.0.105	K8s-Worker01
10.0.0.106	K8s-Worker02
10.0.0.107  K8S-HA01
10.0.0.108	K8S-HA01

#注意每个节点都是需要配置解析(可以scp直接拷贝即可)
[16:13:06 root@K8S-Master01 ~]#scp /etc/hosts 10.0.0.103:/etc/hosts
[16:13:06 root@K8S-Master01 ~]#scp /etc/hosts 10.0.0.104:/etc/hosts
[16:13:06 root@K8S-Master01 ~]#scp /etc/hosts 10.0.0.105:/etc/hosts
[16:13:06 root@K8S-Master01 ~]#scp /etc/hosts 10.0.0.106:/etc/hosts
[16:13:06 root@K8S-Master01 ~]#scp /etc/hosts 10.0.0.107:/etc/hosts
[16:13:06 root@K8S-Master01 ~]#scp /etc/hosts 10.0.0.108:/etc/hosts

(3)临时禁用swap/永久禁用
[16:13:33 root@K8S-Master01 ~]#swapoff -a

#若需要重启后也生效,在禁用swap后还需修改配置文件/etc/fstab,注释swap(永久生效)
[16:13:33 root@K8S-Master01 ~]#sed -i.bak '/swap/s/^/#/' /etc/fstab

#所有节点都是需要的:master和worker节点

(4)禁用Selinu:
#UBUNTU默认没有安装SELINUX 如果是centos系列/rocky需要关闭selinux
[16:28:41 root@K8S-Master01 ~]#getenforce

Command 'getenforce' not found, but can be installed with:

apt install selinux-utils

#参考命令:
# getenforce
# setenforce 0
# sed -i ‘s/SELINUX=enforcing/SELINUX=disabled/g’ /etc/selinux/config

(5)关闭firewalld、iptables、NetworkManager(centos/ubuntu有些区别)

[16:33:26 root@K8S-Master02 selinux]#systemctl status ufw
● ufw.service - Uncomplicated firewall
     Loaded: loaded (/lib/systemd/system/ufw.service; enabled; vendor preset: enabled)
     Active: active (exited) since Wed 2022-08-17 15:35:50 CST; 58min ago
       Docs: man:ufw(8)
   Main PID: 515 (code=exited, status=0/SUCCESS)
      Tasks: 0 (limit: 2236)
     Memory: 0B
     CGroup: /system.slice/ufw.service

Warning: journal has been rotated since unit was started, output may be incomplete.
#现在关闭并且设置为开机关闭防火墙
LInux原始的防火墙工具iptables由于过于繁琐,所以ubuntu系统默认提供了一个基于iptable之上的防火墙工具ufw(一般默认都安装了,将其关闭即可)
[16:33:54 root@K8S-Master01 selinux]#systemctl disable --now ufw.service
Synchronizing state of ufw.service with SysV service script with /lib/systemd/systemd-sysv-install.
Executing: /lib/systemd/systemd-sysv-install disable ufw
Removed /etc/systemd/system/multi-user.target.wants/ufw.service.
#在各节点确认处于关闭状态:
[16:36:58 root@K8S-Master01 selinux]#systemctl status ufw.service
● ufw.service - Uncomplicated firewall
     Loaded: loaded (/lib/systemd/system/ufw.service; disabled; vendor preset: enabled)
     Active: inactive (dead)
       Docs: man:ufw(8)

(6)配置正确的时区和时间同步:
#查看一下各节点时间是否同步,不同步需要配置一下:
[16:42:19 root@K8S-Master01 selinux]#date
2022年 08月 17日 星期三 16:42:23 CST
命令参考:

# timedatectl set-timezone Asia/Shanghai

# systemctl start chronyd.service
# systemctl status chronyd.service

(7)内核参数优化
[16:44:58 root@K8S-Master01 selinux]#cat <<EOF >  /etc/sysctl.d/k8s.conf
> net.bridge.bridge-nf-call-ip6tables = 1
> net.bridge.bridge-nf-call-iptables = 1
> EOF
[16:47:04 root@K8S-Master01 selinux]#modprobe  br_netfilter
[16:47:17 root@K8S-Master01 selinux]#sysctl -p /etc/sysctl.d/k8s.conf
net.bridge.bridge-nf-call-ip6tables = 1
net.bridge.bridge-nf-call-iptables = 1

#在所有节点都是需要配置的(Master和worker节点)[16:58:33 root@K8S-HA01 ~]#apt -y install keepalived
[16:57:52 root@K8S-HA02 ~]#apt -y install keepalived
#修改keepalived.conf配置:
[17:07:43 root@K8S-HA01 keepalived]#pwd
/etc/keepalived
[17:07:44 root@K8S-HA01 keepalived]#ls
#默认没有配置文件,需要我们自己配置:
[17:25:14 root@K8S-HA01 keepalived]#cat /etc/keepalived/keepalived.conf
! Configuration File for keepalived
global_defs {
notification_email {
zeng@qq.com
}
notification_email_from zeng@qq.com
smtp_server smtp.qq.com
smtp_connect_timeout 30
router_id K8S-HA01 #指定route_id HA02为K8S-HA02
}
vrrp_instance VI_1 {
state MASTER #在HA02上为BACKUP
interface eth0
garp_master_delay 10
smtp_alert
virtual_router_id 66 #指定虚拟路由ID,HA01和HA02此值必须相同
priority 100 #在K8S-HA02上为80
advert_int 1
authentication {
auth_type PASS
auth_pass 123456 #指定验证的密码,HA01和HA02此值必须相同
}
virtual_ipaddress {
10.0.0.110/24 dev eth0 label eth0:1 #指定vip,K8S-HA01和K8S-HA02此值相同
}
}
[17:35:03 root@K8S-HA02 keepalived]#cat /etc/keepalived/keepalived.conf
! Configuration File for keepalived
global_defs {
notification_email {
zeng@qq.com
}
notification_email_from zeng@qq.com
smtp_server smtp.qq.com
smtp_connect_timeout 30
router_id K8S-HA02
}
vrrp_instance VI_1 {
state BACKUP
interface eth0
garp_master_delay 10
smtp_alert
virtual_router_id 66
priority 80
advert_int 1
authentication {
auth_type PASS
auth_pass 123456
}
virtual_ipaddress {
10.0.0.110/24 dev eth0 label eth0:1
}
}
#启动keepalived:
[17:35:18 root@K8S-HA01 keepalived]#systemctl enable --now keepalived
Synchronizing state of keepalived.service with SysV service script with /lib/systemd/systemd-sysv-install.
Executing: /lib/systemd/systemd-sysv-install enable keepalived
[17:39:17 root@K8S-HA02 keepalived]#systemctl enable --now keepalived
#查看VIP是否在K8S-HA01上:
[17:41:31 root@K8S-HA01 keepalived]#hostname -I
10.0.0.107 10.0.0.110
[17:41:13 root@K8S-HA02 keepalived]#hostname -I
10.0.0.108
#查看ip地址:
[17:43:19 root@K8S-HA01 keepalived]#ip a
1: lo: <LOOPBACK,UP,LOWER_UP> mtu 65536 qdisc noqueue state UNKNOWN group default qlen 1000
link/loopback 00:00:00:00:00:00 brd 00:00:00:00:00:00
inet 127.0.0.1/8 scope host lo
valid_lft forever preferred_lft forever
inet6 ::1/128 scope host
valid_lft forever preferred_lft forever
2: eth0: <BROADCAST,MULTICAST,UP,LOWER_UP> mtu 1500 qdisc fq_codel state UP group default qlen 1000
link/ether 00:0c:29:df:75:e7 brd ff:ff:ff:ff:ff:ff
inet 10.0.0.107/24 brd 10.0.0.255 scope global eth0
valid_lft forever preferred_lft forever
inet 10.0.0.110/24 scope global secondary eth0:1 #我们配置的VIP地址
valid_lft forever preferred_lft forever
inet6 fe80::20c:29ff:fedf:75e7/64 scope link
valid_lft forever preferred_lft forever[17:43:51 root@K8S-HA01 keepalived]#cat >> /etc/sysctl.conf << EOF
> net.ipv4.ip_nonlocal_bind = 1
> EOF
[17:45:00 root@K8S-HA02 keepalived]#cat >> /etc/sysctl.conf << EOF
> net.ipv4.ip_nonlocal_bind = 1
> EOF
[17:47:50 root@K8S-HA01 keepalived]#sysctl -p
net.ipv4.ip_nonlocal_bind = 1
[17:48:55 root@K8S-HA02 keepalived]#sysctl -p
net.ipv4.ip_nonlocal_bind = 1
@#安装haproxy:
[17:50:08 root@K8S-HA01 keepalived]#apt -y install haproxy
[17:50:30 root@K8S-HA02 keepalived]#apt -y install haproxy
#K8S-HA两个节点都配置haproxy:
[18:03:06 root@K8S-HA01 haproxy]#cat haproxy.cfg
global
log /dev/log local0
log /dev/log local1 notice
chroot /var/lib/haproxy
stats socket /run/haproxy/admin.sock mode 660 level admin expose-fd listeners
stats timeout 30s
user haproxy
group haproxy
daemon
# Default SSL material locations
ca-base /etc/ssl/certs
crt-base /etc/ssl/private
# See: https://ssl-config.mozilla.org/#server=haproxy&server-version=2.0.3&config=intermediate
ssl-default-bind-ciphers ECDHE-ECDSA-AES128-GCM-SHA256:ECDHE-RSA-AES128-GCM-SHA256:ECDHE-ECDSA-AES256-GCM-SHA384:ECDHE-RSA-AES256-GCM-SHA384:ECDHE-ECDSA-CHACHA20-POLY1305:ECDHE-RSA-CHACHA20-POLY1305:DHE-RSA-AES128-GCM-SHA256:DHE-RSA-AES256-GCM-SHA384
ssl-default-bind-ciphersuites TLS_AES_128_GCM_SHA256:TLS_AES_256_GCM_SHA384:TLS_CHACHA20_POLY1305_SHA256
ssl-default-bind-options ssl-min-ver TLSv1.2 no-tls-tickets
defaults
log global
mode http
option httplog
option dontlognull
timeout connect 5000
timeout client 50000
timeout server 50000
errorfile 400 /etc/haproxy/errors/400.http
errorfile 403 /etc/haproxy/errors/403.http
errorfile 408 /etc/haproxy/errors/408.http
errorfile 500 /etc/haproxy/errors/500.http
errorfile 502 /etc/haproxy/errors/502.http
errorfile 503 /etc/haproxy/errors/503.http
errorfile 504 /etc/haproxy/errors/504.http
listen stats
mode http
bind 0.0.0.0:8888
stats enable
log global
stats uri /status
stats auth admin:123456
listen kubernetes-api-6443
bind 10.0.0.110:6443 #vip配置
mode tcp
server K8S-Master01 10.0.0.102:6443 check inter 3s fall 3 rise 3
server K8S-Master02 10.0.0.103:6443 check inter 3s fall 3 rise 3
server K8s-Master03 10.0.0.104:6443 check inter 3s fall 3 rise 3
[18:00:29 root@K8S-HA01 haproxy]#scp /etc/haproxy/haproxy.cfg 10.0.0.108:/etc/haproxy/
#设置haproxy为开机自启,并且现在启动:
[18:04:29 root@K8S-HA01 haproxy]#systemctl enable --now haproxy
Synchronizing state of haproxy.service with SysV service script with /lib/systemd/systemd-sysv-install.
Executing: /lib/systemd/systemd-sysv-install enable haproxy
[18:04:06 root@K8S-HA02 keepalived]#systemctl enable --now haproxy
Synchronizing state of haproxy.service with SysV service script with /lib/systemd/systemd-sysv-install.
Executing: /lib/systemd/systemd-sysv-install enable haproxy
[18:16:19 root@K8S-HA01 haproxy]#systemctl restart haproxy.service
[18:18:11 root@K8S-HA01 haproxy]#ss -ntl
State Recv-Q Send-Q Local Address:Port Peer Address:Port Process
LISTEN 0 490 0.0.0.0:8888 0.0.0.0:*
LISTEN 0 128 127.0.0.1:6010 0.0.0.0:*
LISTEN 0 490 10.0.0.110:6443 0.0.0.0:*
LISTEN 0 4096 127.0.0.53%lo:53 0.0.0.0:*
LISTEN 0 128 0.0.0.0:22 0.0.0.0:*
LISTEN 0 128 [::1]:6010 [::]:*
LISTEN 0 128 [::]:22 [::]:*#可以看到haproxy已经打开8888端口了,可以拿这个端口访问状态信息,因为我们上面部署了keepalived,所以有vip地址,拿vip地址和该端口进行访问即可。
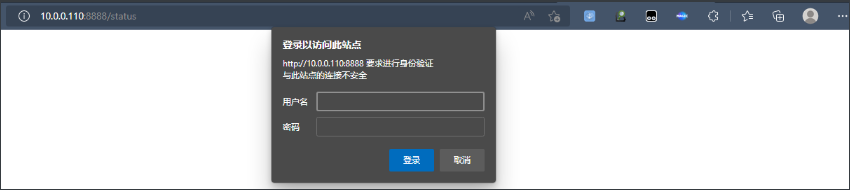
haproxy-key(点击此处)
账号:admin

密码:123456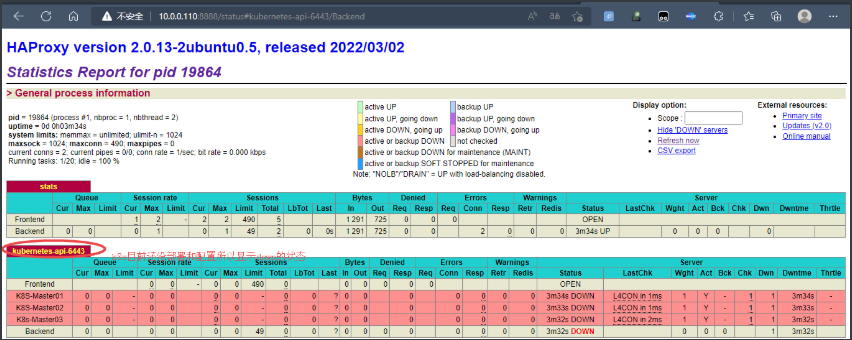

#我这边直接跑脚本安装比较方便(也可以自己安装Docker-ce镜像源):
#每个节点都跑一便即可:
[18:57:59 root@K8S-Master01 ~]#cat online_install_docker-v1.sh
#
#********************************************************************
#Author:            Programmer
#QQ:                7654321
#Date:              2022-08-17
#FileName           online_install_docker-v1.sh
#URL:               http://www.programmer.com
#Description        The test script
#Copyright (C):     2022 All rights reserved
#********************************************************************

DOCKER_VERSION=20.10.10
URL=https://repo.huaweicloud.com

prepare () {
    if [ ! -e docker-${DOCKER_VERSION}.tgz ];then
        wget ${URL}/docker-ce/linux/static/stable/x86_64/docker-${DOCKER_VERSION}.tgz
    fi
    [ $? -ne 0  ] && { echo "文件下载失败"; exit; }
}

install_docker () {
    tar xf docker-${DOCKER_VERSION}.tgz -C /usr/local/
    cp /usr/local/docker/* /usr/bin/
    cat > /lib/systemd/system/docker.service <<-EOF
[Unit]
Description=Docker Application Container Engine
Documentation=https://docs.docker.com
After=network-online.target firewalld.service
Wants=network-online.target

[Service]
Type=notify
# the default is not to use systemd for cgroups because the delegate issues still
# exists and systemd currently does not support the cgroup feature set required
# for containers run by docker
ExecStart=/usr/bin/dockerd -H unix://var/run/docker.sock
ExecReload=/bin/kill -s HUP \$MAINPID
# Having non-zero Limit*s causes performance problems due to accounting overhead
# in the kernel. We recommend using cgroups to do container-local accounting.
LimitNOFILE=infinity
LimitNPROC=infinity
LimitCORE=infinity
# Uncomment TasksMax if your systemd version supports it.
# Only systemd 226 and above support this version.
#TasksMax=infinity
TimeoutStartSec=0
# set delegate yes so that systemd does not reset the cgroups of docker containers
Delegate=yes
# kill only the docker process, not all processes in the cgroup
KillMode=process
# restart the docker process if it exits prematurely
Restart=on-failure
StartLimitBurst=3
StartLimitInterval=60s

[Install]
WantedBy=multi-user.target
EOF
    systemctl daemon-reload
}

start_docker (){
    systemctl enable --now docker
    docker version
}
prepare
install_docker
start_docker

[19:00:08 root@K8S-Master01 ~]#bash online_install_docker-v1.sh   #所以节点都是需要跑一遍,确保docker正在运行!

#复制改配置文件到node节点:
[19:36:04 root@K8S-Master01 ~]#scp /etc/docker/daemon.json 10.0.0.103:/etc/docker/
[19:36:04 root@K8S-Master01 ~]#scp /etc/docker/daemon.json 10.0.0.104:/etc/docker/
[19:36:04 root@K8S-Master01 ~]#scp /etc/docker/daemon.json 10.0.0.105:/etc/docker/
[19:36:04 root@K8S-Master01 ~]#scp /etc/docker/daemon.json 10.0.0.106:/etc/docker/

[19:36:04 root@K8S-Master01 ~]#systemctl restart docker.service

#所有节点设置kubernetes源:

[19:37:59 root@K8S-Master01 ~]#cat <<EOF > /etc/apt/sources.list.d/kubernetes.list
> deb https://repo.huaweicloud.com/kubernetes/apt/ kubernetes-xenial main
> EOF


#aliyun k8s镜像源:
(参考)
apt-get update && apt-get install -y apt-transport-https
curl https://mirrors.aliyun.com/kubernetes/apt/doc/apt-key.gpg | apt-key add -
cat <<EOF >/etc/apt/sources.list.d/kubernetes.list
deb https://mirrors.aliyun.com/kubernetes/apt/ kubernetes-xenial main
EOF
apt-get update
apt-get install -y kubelet kubeadm kubectl

#同样将该配置文件复制一份到各个节点--》》master和worker节点(SCP进行复制)

#添加kubernetes的key:
[19:52:35 root@K8S-Master01 ~]#curl -s https://repo.huaweicloud.com/kubernetes/apt/doc/apt-key.gpg | sudo apt-key add -
OK

@#其他节点同样要导入进去!
Master节点安装kubeadm、kubelet、kubectl
#三个master节点都是需要安装部署:
apt-get install -y kubelet=1.22.8-00 kubeadm=1.22.8-00 kubectl=1.22.8-00
Node节点安装kubeadm、kubelet:

[20:50:06 root@K8s-Worker01 ~]#apt-get install -y kubelet=1.22.8-00 kubeadm=1.22.8-00
#两个worker节点都是需要安装(选装kubectl)[21:16:43 root@K8S-Master01 ~]#kubeadm config images list --kubernetes-version=v1.22.8
k8s.gcr.io/kube-apiserver:v1.22.8
k8s.gcr.io/kube-controller-manager:v1.22.8
k8s.gcr.io/kube-scheduler:v1.22.8
k8s.gcr.io/kube-proxy:v1.22.8
k8s.gcr.io/pause:3.5
k8s.gcr.io/etcd:3.5.0-0
k8s.gcr.io/coredns/coredns:v1.8.4
#在master的三个节点和node3个节点提前下载镜像,node只需要下载pause和kube-proxy镜像
#参考:(国内阿里云的镜像仓库地址)
--image-repository registry.aliyuncs.com/google_containers
#vim k8s_image_v1.22.8.sh
#!/bin/bash
docker pull registry.cn-hangzhou.aliyuncs.com/google_containers/kube-apiserver:v1.22.8
docker pull registry.cn-hangzhou.aliyuncs.com/google_containers/kube-controller-manager:v1.22.8
docker pull registry.cn-hangzhou.aliyuncs.com/google_containers/kube-scheduler:v1.22.8
docker pull registry.cn-hangzhou.aliyuncs.com/google_containers/kube-proxy:v1.22.8
docker pull registry.cn-hangzhou.aliyuncs.com/google_containers/pause:3.5
docker pull registry.cn-hangzhou.aliyuncs.com/google_containers/etcd:3.5.0-0
docker pull registry.cn-hangzhou.aliyuncs.com/google_containers/coredns:v1.8.4
[21:16:43 root@K8S-Master01 ~]#bash k8s_image_v1.22.8.sh
#初始化命令参考:
kubeadm init --control-plane-endpoint 10.0.0.110:6443 --kubernetes-version=v1.22.8 --pod-network-cidr 172.16.0.0/16 --service-cidr 10.96.0.0/12 --service-dns-domain cluster.local --image-repository registry.cn-hangzhou.aliyuncs.com/google_containers --token-ttl=0
[21:27:29 root@K8S-Master01 ~]#kubeadm init --control-plane-endpoint 10.0.0.110:6443 --kubernetes-version=v1.22.8 --pod-network-cidr 172.16.0.0/16 --service-cidr 10.96.0.0/12 --service-dns-domain cluster.local --image-repository registry.cn-hangzhou.aliyuncs.com/google_containers --token-ttl=0
#镜像情况:
[21:54:22 root@K8S-Master01 ~]#docker images
REPOSITORY TAG IMAGE ID CREATED SIZE
registry.cn-hangzhou.aliyuncs.com/google_containers/kube-apiserver v1.22.8 c0d565df2c90 5 months ago 128MB
registry.cn-hangzhou.aliyuncs.com/google_containers/kube-proxy v1.22.8 c1cfbd59f774 5 months ago 104MB
registry.cn-hangzhou.aliyuncs.com/google_containers/kube-controller-manager v1.22.8 41ff05350898 5 months ago 122MB
registry.cn-hangzhou.aliyuncs.com/google_containers/kube-scheduler v1.22.8 398b2c18375d 5 months ago 52.7MB
registry.cn-hangzhou.aliyuncs.com/google_containers/etcd 3.5.0-0 004811815584 14 months ago 295MB
registry.cn-hangzhou.aliyuncs.com/google_containers/coredns v1.8.4 8d147537fb7d 14 months ago 47.6MB
registry.cn-hangzhou.aliyuncs.com/google_containers/pause 3.5 ed210e3e4a5b 17 months ago 683kB
Calico:172.16.0.0/16
############整个初始化过程############################################需要开启keepalived那台节点(vip地址:10.0.0.110-》集群初始化之后的节点为10.0.0.110 端口号为6443 统一访问入口)各节点hosts域名解析不能错!,尤其是vip节点服务器ip地址对应的域名
[22:48:15 root@K8S-Master01 ~]#kubeadm init --control-plane-endpoint 10.0.0.110:6443 --kubernetes-version=v1.22.8 --pod-network-cidr 172.16.0.0/16 --service-cidr 10.96.0.0/12 --service-dns-domain cluster.local --image-repository registry.cn-hangzhou.aliyuncs.com/google_containers --token-ttl=0
[init] Using Kubernetes version: v1.22.8
[preflight] Running pre-flight checks
[preflight] Pulling images required for setting up a Kubernetes cluster
[preflight] This might take a minute or two, depending on the speed of your internet connection
[preflight] You can also perform this action in beforehand using 'kubeadm config images pull'
[certs] Using certificateDir folder "/etc/kubernetes/pki"
[certs] Generating "ca" certificate and key
[certs] Generating "apiserver" certificate and key
[certs] apiserver serving cert is signed for DNS names [k8s-master01 kubernetes kubernetes.default kubernetes.default.svc kubernetes.default.svc.cluster.local] and IPs [10.96.0.1 10.0.0.102 10.0.0.110]
[certs] Generating "apiserver-kubelet-client" certificate and key
[certs] Generating "front-proxy-ca" certificate and key
[certs] Generating "front-proxy-client" certificate and key
[certs] Generating "etcd/ca" certificate and key
[certs] Generating "etcd/server" certificate and key
[certs] etcd/server serving cert is signed for DNS names [k8s-master01 localhost] and IPs [10.0.0.102 127.0.0.1 ::1]
[certs] Generating "etcd/peer" certificate and key
[certs] etcd/peer serving cert is signed for DNS names [k8s-master01 localhost] and IPs [10.0.0.102 127.0.0.1 ::1]
[certs] Generating "etcd/healthcheck-client" certificate and key
[certs] Generating "apiserver-etcd-client" certificate and key
[certs] Generating "sa" key and public key
[kubeconfig] Using kubeconfig folder "/etc/kubernetes"
[kubeconfig] Writing "admin.conf" kubeconfig file
[kubeconfig] Writing "kubelet.conf" kubeconfig file
[kubeconfig] Writing "controller-manager.conf" kubeconfig file
[kubeconfig] Writing "scheduler.conf" kubeconfig file
[kubelet-start] Writing kubelet environment file with flags to file "/var/lib/kubelet/kubeadm-flags.env"
[kubelet-start] Writing kubelet configuration to file "/var/lib/kubelet/config.yaml"
[kubelet-start] Starting the kubelet
[control-plane] Using manifest folder "/etc/kubernetes/manifests"
[control-plane] Creating static Pod manifest for "kube-apiserver"
[control-plane] Creating static Pod manifest for "kube-controller-manager"
[control-plane] Creating static Pod manifest for "kube-scheduler"
[etcd] Creating static Pod manifest for local etcd in "/etc/kubernetes/manifests"
[wait-control-plane] Waiting for the kubelet to boot up the control plane as static Pods from directory "/etc/kubernetes/manifests". This can take up to 4m0s
[kubelet-check] Initial timeout of 40s passed.
[apiclient] All control plane components are healthy after 44.635154 seconds
[upload-config] Storing the configuration used in ConfigMap "kubeadm-config" in the "kube-system" Namespace
[kubelet] Creating a ConfigMap "kubelet-config-1.22" in namespace kube-system with the configuration for the kubelets in the cluster
[upload-certs] Skipping phase. Please see --upload-certs
[mark-control-plane] Marking the node k8s-master01 as control-plane by adding the labels: [node-role.kubernetes.io/master(deprecated) node-role.kubernetes.io/control-plane node.kubernetes.io/exclude-from-external-load-balancers]
[mark-control-plane] Marking the node k8s-master01 as control-plane by adding the taints [node-role.kubernetes.io/master:NoSchedule]
[bootstrap-token] Using token: 4ottsd.22os1mxxtxmnyrz0
[bootstrap-token] Configuring bootstrap tokens, cluster-info ConfigMap, RBAC Roles
[bootstrap-token] configured RBAC rules to allow Node Bootstrap tokens to get nodes
[bootstrap-token] configured RBAC rules to allow Node Bootstrap tokens to post CSRs in order for nodes to get long term certificate credentials
[bootstrap-token] configured RBAC rules to allow the csrapprover controller automatically approve CSRs from a Node Bootstrap Token
[bootstrap-token] configured RBAC rules to allow certificate rotation for all node client certificates in the cluster
[bootstrap-token] Creating the "cluster-info" ConfigMap in the "kube-public" namespace
[kubelet-finalize] Updating "/etc/kubernetes/kubelet.conf" to point to a rotatable kubelet client certificate and key
[addons] Applied essential addon: CoreDNS
[addons] Applied essential addon: kube-proxy
Your Kubernetes control-plane has initialized successfully!
To start using your cluster, you need to run the following as a regular user:
mkdir -p $HOME/.kube
sudo cp -i /etc/kubernetes/admin.conf $HOME/.kube/config
sudo chown $(id -u):$(id -g) $HOME/.kube/config
Alternatively, if you are the root user, you can run:
export KUBECONFIG=/etc/kubernetes/admin.conf
You should now deploy a pod network to the cluster.
Run "kubectl apply -f [podnetwork].yaml" with one of the options listed at:
https://kubernetes.io/docs/concepts/cluster-administration/addons/
You can now join any number of control-plane nodes by copying certificate authorities
and service account keys on each node and then running the following as root:
kubeadm join 10.0.0.110:6443 --token 4ottsd.22os1mxxtxmnyrz0 \
--discovery-token-ca-cert-hash sha256:e1b5998c1e5cf33c092d2fb9ea792bc33acaca2614e758532d435452d9875188 \
--control-plane
Then you can join any number of worker nodes by running the following on each as root:
kubeadm join 10.0.0.110:6443 --token 4ottsd.22os1mxxtxmnyrz0 \
--discovery-token-ca-cert-hash sha256:e1b5998c1e5cf33c092d2fb9ea792bc33acaca2614e758532d435452d9875188
[22:50:36 root@K8S-Master01 ~]#mkdir -p $HOME/.kube
[22:54:40 root@K8S-Master01 ~]# sudo cp -i /etc/kubernetes/admin.conf $HOME/.kube/config
[22:54:45 root@K8S-Master01 ~]# sudo chown $(id -u):$(id -g) $HOME/.kube/config
[22:54:49 root@K8S-Master01 ~]#kubectl get node
NAME           STATUS     ROLES                  AGE     VERSION
k8s-master01 NotReady control-plane,master 5m21s v1.22.8[23:02:03 root@K8S-Master01 ~]#wget https://docs.projectcalico.org/v3.8/manifests/calico.yaml
--2022-08-17 23:02:13-- https://docs.projectcalico.org/v3.8/manifests/calico.yaml
正在解析主机 docs.projectcalico.org (docs.projectcalico.org)... 34.87.59.92, 34.142.149.67, 2406:da18:880:3802:371c:4bf1:923b:fc30, ...
正在连接 docs.projectcalico.org (docs.projectcalico.org)|34.87.59.92|:443... 已连接。
已发出 HTTP 请求,正在等待回应... 200 OK
长度: 20824 (20K) [text/yaml]
正在保存至: “calico.yaml”
calico.yaml 100%[=========================================================>] 20.34K --.-KB/s 用时 0.1s
2022-08-17 23:02:14 (136 KB/s) - 已保存 “calico.yaml” [20824/20824])
[23:02:49 root@K8S-Master01 ~]#ll calico.yaml
-rw-r--r-- 1 root root 20824 8月 17 23:02 calico.yaml
[23:06:38 root@K8S-Master01 ~]#kubectl apply -f calico.yaml
configmap/calico-config unchanged
clusterrole.rbac.authorization.k8s.io/calico-kube-controllers unchanged
clusterrolebinding.rbac.authorization.k8s.io/calico-kube-controllers unchanged
clusterrole.rbac.authorization.k8s.io/calico-node unchanged
clusterrolebinding.rbac.authorization.k8s.io/calico-node unchanged
daemonset.apps/calico-node configured
serviceaccount/calico-node unchanged
deployment.apps/calico-kube-controllers unchanged
serviceaccount/calico-kube-controllers unchanged
unable to recognize "calico.yaml": no matches for kind "CustomResourceDefinition" in version "apiextensions.k8s.io/v1beta1"
unable to recognize "calico.yaml": no matches for kind "CustomResourceDefinition" in version "apiextensions.k8s.io/v1beta1"
....
#calico版本不支持k8s版本1.22.8
#需要重新下载高版本calico即可:
[23:33:08 root@K8S-Master01 ~]#wget https://docs.projectcalico.org/archive/v3.22/manifests/calico.yaml
正在连接 projectcalico.docs.tigera.io (projectcalico.docs.tigera.io)|34.124.186.36|:443... 已连接。
已发出 HTTP 请求,正在等待回应... 200 OK
长度: 223708 (218K) [text/yaml]
正在保存至: “calico.yaml”
calico.yaml 100%[========================================================>] 218.46K 19.1KB/s 用时 11s
2022-08-17 23:33:48 (19.1 KB/s) - 已保存 “calico.yaml” [223708/223708])
#重新加载插件:
[23:39:26 root@K8S-Master01 ~]#kubectl apply -f calico.yaml
configmap/calico-config configured
customresourcedefinition.apiextensions.k8s.io/bgpconfigurations.crd.projectcalico.org created
customresourcedefinition.apiextensions.k8s.io/bgppeers.crd.projectcalico.org created
customresourcedefinition.apiextensions.k8s.io/blockaffinities.crd.projectcalico.org created
customresourcedefinition.apiextensions.k8s.io/caliconodestatuses.crd.projectcalico.org created
customresourcedefinition.apiextensions.k8s.io/clusterinformations.crd.projectcalico.org created
customresourcedefinition.apiextensions.k8s.io/felixconfigurations.crd.projectcalico.org created
customresourcedefinition.apiextensions.k8s.io/globalnetworkpolicies.crd.projectcalico.org created
customresourcedefinition.apiextensions.k8s.io/globalnetworksets.crd.projectcalico.org created
customresourcedefinition.apiextensions.k8s.io/hostendpoints.crd.projectcalico.org created
customresourcedefinition.apiextensions.k8s.io/ipamblocks.crd.projectcalico.org created
customresourcedefinition.apiextensions.k8s.io/ipamconfigs.crd.projectcalico.org created
customresourcedefinition.apiextensions.k8s.io/ipamhandles.crd.projectcalico.org created
customresourcedefinition.apiextensions.k8s.io/ippools.crd.projectcalico.org created
customresourcedefinition.apiextensions.k8s.io/ipreservations.crd.projectcalico.org created
customresourcedefinition.apiextensions.k8s.io/kubecontrollersconfigurations.crd.projectcalico.org created
customresourcedefinition.apiextensions.k8s.io/networkpolicies.crd.projectcalico.org created
customresourcedefinition.apiextensions.k8s.io/networksets.crd.projectcalico.org created
clusterrole.rbac.authorization.k8s.io/calico-kube-controllers configured
clusterrolebinding.rbac.authorization.k8s.io/calico-kube-controllers unchanged
clusterrole.rbac.authorization.k8s.io/calico-node configured
clusterrolebinding.rbac.authorization.k8s.io/calico-node unchanged
daemonset.apps/calico-node configured
serviceaccount/calico-node unchanged
deployment.apps/calico-kube-controllers configured
serviceaccount/calico-kube-controllers unchanged
Warning: policy/v1beta1 PodDisruptionBudget is deprecated in v1.21+, unavailable in v1.25+; use policy/v1 PodDisruptionBudget
poddisruptionbudget.policy/calico-kube-controllers created
[23:35:29 root@K8S-Master01 ~]#kubectl get nodes
NAME STATUS ROLES AGE VERSION
k8s-master01 Ready control-plane,master 46m v1.22.8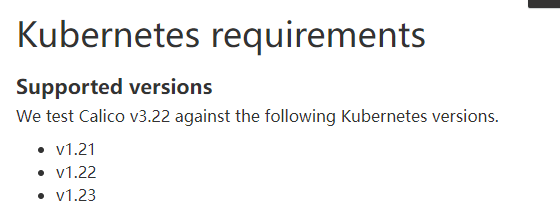
#worker(node)节点加入集群:

[21:57:32 root@K8s-Worker01 ~]#kubeadm join 10.0.0.110:6443 --token 4ottsd.22os1mxxtxmnyrz0 \
> --discovery-token-ca-cert-hash sha256:e1b5998c1e5cf33c092d2fb9ea792bc33acaca2614e758532d435452d9875188
[preflight] Running pre-flight checks
[preflight] Reading configuration from the cluster...
[preflight] FYI: You can look at this config file with 'kubectl -n kube-system get cm kubeadm-config -o yaml'
[kubelet-start] Writing kubelet configuration to file "/var/lib/kubelet/config.yaml"
[kubelet-start] Writing kubelet environment file with flags to file "/var/lib/kubelet/kubeadm-flags.env"
[kubelet-start] Starting the kubelet
[kubelet-start] Waiting for the kubelet to perform the TLS Bootstrap...

This node has joined the cluster:
* Certificate signing request was sent to apiserver and a response was received.
* The Kubelet was informed of the new secure connection details.

Run 'kubectl get nodes' on the control-plane to see this node join the cluster.


#同理worker02节点也是加入到集群:
[21:54:34 root@K8s-Worker02 ~]#kubeadm join 10.0.0.110:6443 --token 4ottsd.22os1mxxtxmnyrz0 \
> --discovery-token-ca-cert-hash sha256:e1b5998c1e5cf33c092d2fb9ea792bc33acaca2614e758532d435452d9875188


@#Master02、Master03加入集群:
[22:18:47 root@K8S-Master01 ~]#kubeadm init phase upload-certs --upload-certs
W0818 22:21:32.034889  344556 version.go:103] could not fetch a Kubernetes version from the internet: unable to get URL "https://dl.k8s.io/release/stable-1.txt": Get "https://storage.googleapis.com/kubernetes-release/release/stable-1.txt": context deadline exceeded (Client.Timeout exceeded while awaiting headers)
W0818 22:21:32.035022  344556 version.go:104] falling back to the local client version: v1.22.8
[upload-certs] Storing the certificates in Secret "kubeadm-certs" in the "kube-system" Namespace
[upload-certs] Using certificate key:
e8487e95f2baa4f22d294845f82fa26643b6d99b24c5fe03a449e4e191b832dc

[22:18:47 root@K8S-Master02 ~]kubeadm join 10.0.0.110:6443 --token 4ottsd.22os1mxxtxmnyrz0 --discovery-token-ca-cert-hash sha256:e1b5998c1e5cf33c092d2fb9ea792bc33acaca2614e758532d435452d9875188 --control-plane  --certificate-key e8487e95f2baa4f22d294845f82fa26643b6d99b24c5fe03a449e4e191b832dc

[22:18:47 root@K8S-Master03 ~]kubeadm join 10.0.0.110:6443 --token 4ottsd.22os1mxxtxmnyrz0 --discovery-token-ca-cert-hash sha256:e1b5998c1e5cf33c092d2fb9ea792bc33acaca2614e758532d435452d9875188 --control-plane  --certificate-key e8487e95f2baa4f22d294845f82fa26643b6d99b24c5fe03a449e4e191b832dc

#查看集群状态:
[23:16:37 root@K8S-Master01 net.d]#kubectl get nodes
NAME           STATUS     ROLES                  AGE   VERSION
k8s-master01   Ready      control-plane,master   24h   v1.22.8
k8s-master02   NotReady   control-plane,master   12m   v1.22.8
k8s-master03   NotReady   control-plane,master   15m   v1.22.8
k8s-worker01   NotReady   <none>                 80m   v1.22.8
k8s-worker02   NotReady   <none>                 79m   v1.22.8
#解决方案:
#拷贝网络插件的配置文件到各个节点即可:

scp -r /etc/cni 10.0.0.103:/etc/cni

scp /opt/cni/bin/* 10.0.0.103:/opt/cni/bin/


systemctl restart kubelet


#等一会时间,master02,master03,worker01,worker02正常都会会变为Ready状态(worker节点加入到主节点正常就会变为Ready状态,worker节点无需配置):
[18:00:02 root@K8S-Master01 ~]#kubectl get nodes
NAME           STATUS   ROLES                  AGE   VERSION
k8s-master01   Ready    control-plane,master   43h   v1.22.8
k8s-master02   Ready    control-plane,master   18h   v1.22.8
k8s-master03   Ready    control-plane,master   19h   v1.22.8
k8s-worker01   Ready    <none>                 20h   v1.22.8
k8s-worker02   Ready    <none>                 20h   v1.22.8
本文来自博客园,作者:一念6,转载请注明原文链接:https://www.cnblogs.com/zeng666/p/16603268.html

 浙公网安备 33010602011771号