温故知新(1)——装饰者模式
有些基础知识很早就学习过了,但可能当时理解不深刻,或者工作中没有应用到,以致渐渐淡忘了。这个系列就是对这些淡忘知识的一个复习,也希望复习的同时可以加深理解,故取名温故知新。
概述
装饰者模式是GOF23种设计模式的一个,属于结构型的设计模式。主要意图是:动态的给一个对象添加一些额外的职责。“动态”和“给一个对象”的表述说明了这种“添加额外职责”是在运行期决定的,而不是由静态的父子类继承实现。因此应用装饰着模式提供了较大的灵活性,由组合替代了继承,避免了子类的数量上的爆炸。
下面引用了一个论坛帖子(http://bbs.m.the9.com/forum.php?mod=viewthread&tid=700)中对装饰者模式应用场景、优点与缺点的描述:
装饰者模式的应用场景:
1、 想透明并且动态地给对象增加新的职责的时候。
2、 给对象增加的职责,在未来存在增加或减少可能。
3、 用继承扩展功能不太现实的情况下,应该考虑用组合的方式。
装饰者模式的优点:
1、 通过组合而非继承的方式,实现了动态扩展对象的功能的能力。
2、 有效避免了使用继承的方式扩展对象功能而带来的灵活性差,子类无限制扩张的问题。
3、 充分利用了继承和组合的长处和短处,在灵活性和扩展性之间找到完美的平衡点。
4、 装饰者和被装饰者之间虽然都是同一类型,但是它们彼此是完全独立并可以各自独立任意改变的。
5、 遵守大部分GRASP原则和常用设计原则,高内聚、低偶合。
装饰者模式的缺点:
1、 装饰链不能过长,否则会影响效率。
2、 因为所有对象都是Component,所以如果Component内部结构发生改变,则不可避免地影响所有子类(装饰者和被装饰者),也就是说,通过继承建立的关系总是脆弱地,如果基类改变,势必影响对象的内部,而通过组合(Decoator HAS A Component)建立的关系只会影响被装饰对象的外部特征。
3、只在必要的时候使用装饰者模式,否则会提高程序的复杂性,增加系统维护难度。
结构
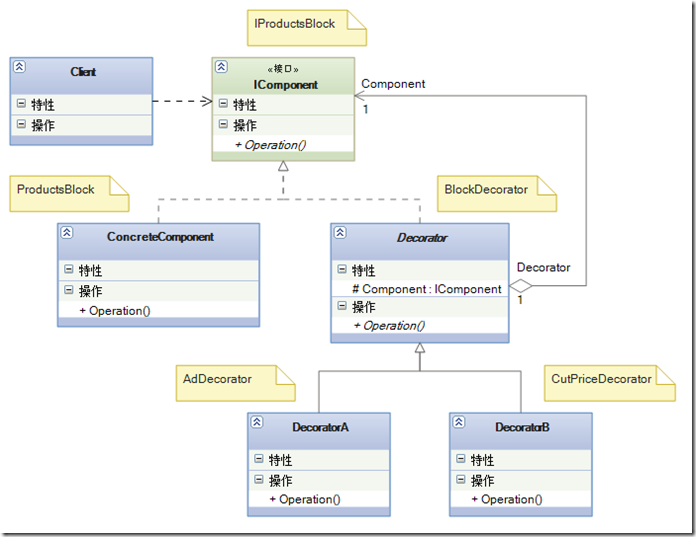
装饰者模式的实现类图:
从图中可以看出装饰着模式包含如下参与者:
1、一个被包装类和包装类均需遵守的接口——IComponent;
2、被包装类——ConcreteComponent;
3、包装类的抽象类——Decorator;
4、包装类的具体实现——DecoratorA、DecoratorB;
5、发起调用的客户端程序——Client。
示例
示例的业务场景:某网页上有一个产品列表的模块,这个模块展示一系列产品。后来随着业务的发展,允许厂商付费推广的产品,这些推广的产品需要附加在普通产品的前面。
经过分析,产品的列表的产生逻辑是易于变化的部分,可能加入新的规则,也可能去掉旧的规则。这些规则构成了对原有对象的“包装”,因此采用装饰者模式进行实现。
下面代码与上面类图的对应关系已经用注释标出:
1、首先定义一个表示产品的模型类Product。
1: using System;
2: 3: namespace DesignPatterns.Decorator
4: {5: /// <summary>
6: /// 商品类
7: /// </summary>
8: public class Product
9: {
10: public int Id { get; set; }
11: public string Name { get; set; }
12: }13: }14: 2、IProductsBlock接口。
1: using System;
2: using System.Collections.Generic;
3: 4: namespace DesignPatterns.Decorator
5: {6: /// <summary>
7: /// 产品块接口-被包装对象和包装对象均实现此接口
8: /// </summary>
9: public interface IProductsBlock
10: {
11: List<Product> GetProductsBlock();
12: }13: }14: 3、基本商品块ProductsBlock。
1: using System;
2: using System.Collections.Generic;
3: 4: namespace DesignPatterns.Decorator
5: {6: /// <summary>
7: /// 基本商品块-被包装的基础对象
8: /// </summary>
9: public class ProductsBlock : IProductsBlock
10: {
11: public List<Product> GetProductsBlock()
12: {13: List<Product> products = new List<Product>() {
14: new Product() { Id = 11, Name = "一般商品1" },
15: new Product() { Id = 12, Name = "一般商品2" },
16: new Product() { Id = 13, Name = "一般商品3" }
17: };18: 19: return products;
20: }21: }22: }23: 4、包装类的抽象类BlockDecorator。
1: using System;
2: using System.Collections.Generic;
3: 4: namespace DesignPatterns.Decorator
5: {6: /// <summary>
7: /// 包装类的抽象父类
8: /// </summary>
9: public abstract class BlockDecorator : IProductsBlock
10: {
11: protected IProductsBlock block;
12: 13: public BlockDecorator(IProductsBlock block)
14: {15: this.block = block;
16: }17: 18: public abstract List<Product> GetProductsBlock();
19: }20: }21: 5、附加广告商品的包装器实现类AdDecorator。
1: using System;
2: using System.Collections.Generic;
3: 4: namespace DesignPatterns.Decorator
5: {6: /// <summary>
7: /// 附加广告商品的包装器实现
8: /// </summary>
9: public class AdDecorator : BlockDecorator
10: {
11: public AdDecorator(IProductsBlock block)
12: : base(block)
13: { }14: 15: public override List<Product> GetProductsBlock()
16: {17: List<Product> adProducts = new List<Product>() {
18: new Product() { Id = 11, Name = "广告商品1" },
19: new Product() { Id = 12, Name = "广告商品2" }
20: };21: var list = this.block.GetProductsBlock();
22: list.InsertRange(0, adProducts);23: 24: return list;
25: }26: }27: }28: 6、最后完成客户端代码。
1: using System;
2: using System.Collections.Generic;
3: 4: namespace DesignPatterns.Decorator
5: {6: class Program
7: {
8: static void Main(string[] args)
9: {10: //组装过程
11: IProductsBlock block = new ProductsBlock();
12: block = new AdDecorator(block);
13: 14: //对客户程序来说,包装是透明的
15: var products = block.GetProductsBlock();
16: 17: foreach (var p in products)
18: {19: Console.WriteLine(p.Name);
20: }21: Console.WriteLine("按任意键结束...");
22: Console.ReadKey();
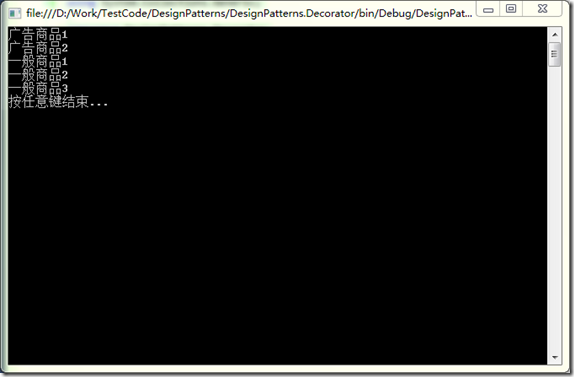
23: }24: }25: }26: 7、查看结果。可以看到广告产品已经插入到一般产品前面了。
变化出现了,假设为了吸引用户,需要在广告产品和一般产品之间插入一些降价产品,应该怎么实现呢?
8、增加一个包装类的实现CutPriceDecorator。
1: using System;
2: using System.Collections.Generic;
3: 4: namespace DesignPatterns.Decorator
5: {6: /// <summary>
7: /// 附加降价商品的包装类实现
8: /// </summary>
9: public class CutPriceDecorator : BlockDecorator
10: {
11: public CutPriceDecorator(IProductsBlock block)
12: : base(block)
13: { }14: 15: public override List<Product> GetProductsBlock()
16: {17: List<Product> adProducts = new List<Product>() {
18: new Product() { Id = 21, Name = "降价商品1" },
19: new Product() { Id = 22, Name = "降价商品2" }
20: };21: var list = this.block.GetProductsBlock();
22: list.InsertRange(0, adProducts);23: 24: return list;
25: }26: }27: }28: 9、稍微修改一下客户端程序中的组装过程。(第12行)
1: using System;
2: using System.Collections.Generic;
3: 4: namespace DesignPatterns.Decorator
5: {6: class Program
7: {
8: static void Main(string[] args)
9: {10: //组装过程
11: IProductsBlock block = new ProductsBlock();
12: block = new CutPriceDecorator(block); //添加降价商品
13: block = new AdDecorator(block);
14: 15: //对客户程序来说,包装是透明的
16: var products = block.GetProductsBlock();
17: 18: foreach (var p in products)
19: {20: Console.WriteLine(p.Name);
21: }22: Console.WriteLine("按任意键结束...");
23: Console.ReadKey();
24: }25: }26: }27: 10、再次查看运行结果。降价产品已经插入到结果中了。
通过代码可以发现包装器的组装是有次序的,次序不同结果可能也不相同。所以可以通过建立不同的包装类,调整包装类不同的组装顺序,为基础对象附加不同的职责。


