spring-cloud-part 7 : 高可用的服务配置中心(spring - cloud - config)
前面spring - cloud - config : 从远程 git 仓库中读取文件(config-client-dev.properties), 然后 config - client 从config - service 中读取文件。即一个服务如何从配置中心读取文件,配置中心如何从远程git读取配置文件;
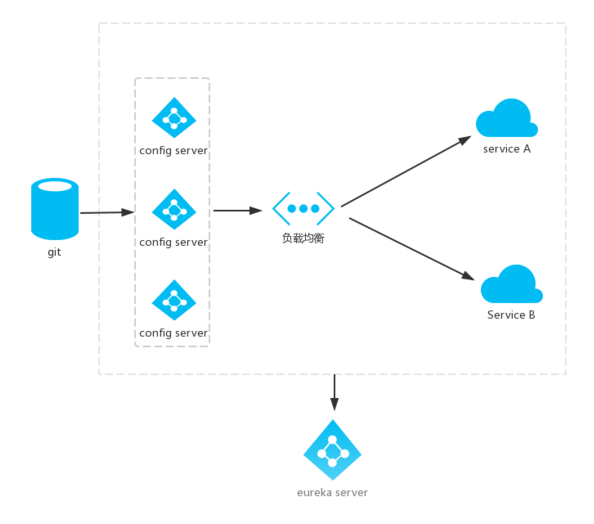
在微服务架构中,宗旨就是要实现服务的高可用,配置中心也必须满足这个条件;所以我们将配置中心也注册到注册中心,这样,服务端就可以以调用服务的方式来访问配置中心的配置了。
当服务实例很多时,都从配置中心读取文件,这时可以考虑将配置中心做成一个微服务,将其集群化,从而达到高可用。

案例练习
一 在上一篇的基础上,加入服务注册和发现组件eureka(创建注册中心 eureka-server)
1. 新建一个spring boot 的 module,命名为 eureka-server;(导包eureka-server ; web )
2. 在程序的主入口类上加上注解@EnableEurekaServer
3. 配置文件的配置(端口号:8761;register-with-eureka:false;fetch-register:false;等)
二 修改config-server(将配置中心注册到注册中心)
1. 将config - server 注册到eureka上去,这里的config-server就是一个eureka-client 了;新加包 spring - cloud - starter - eureka
2. 在程序的注入口类上加上注解@EnableDiscoveryClient ;
@SpringBootApplication
@EnableEurekaClient
@EnableConfigServer
public class ConfigServerApplication {
	public static void main(String[] args) {
		SpringApplication.run(ConfigServerApplication.class, args);
	}
}
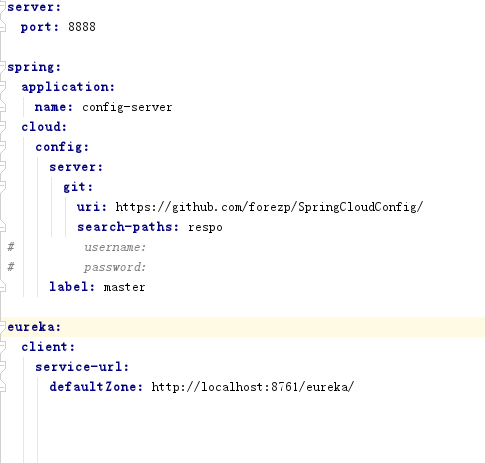
3. 配置配置文件:---将其注册到eureka服务上去;

三 改造 config - client(将客户端注册到注册中心,并且以服务的形式访问配置中心)
1. 导包 spring - cloud - starter - eureka
2. 主类上加上注解 @EnableEurekaClient
@SpringBootApplication
@EnableEurekaClient
@RestController
public class ConfigClientApplication {

	@Value("${foo}")
	private String foo;

	@RequestMapping("/hi")
	public String getHi(){
		return foo;
	}

	public static void main(String[] args) {
		SpringApplication.run(ConfigClientApplication.class, args);
	}

}
3. 修改配置文件
server:
  port: 8881

spring:
  application:
    name: config-client
  cloud:
    config:
      label: master
      profile: dev
      discovery:
        enabled: true                # spring.cloud.discovery.enabled  从配置中心读取文件
        service-id: config-server   #  配置中心的serviceId, 即服务名

eureka:
  client:
    service-url:
      defaultZone: http://localhost:8761/eureka/
## 这时发现,在读取配置文件不再写ip地址,而是服务名,这时如果配置服务部署多份,通过负载均衡,从而高可用。
四 依次启动 eureka-server,config-server;config-client;
访问 http://localhost:8761 有两个服务注册到eureka上面去了
访问 http://localhost:8881/hi 页面显示得到 foo version 2


