ssh简化后之事务管理
为了能让大家更好的了解,所以今天跟大家分享整个项目。ps:ssh环境的搭建我就不一一讲解了,请大家参考 http://www.cnblogs.com/zczc1996/p/5842367.html。
这里以新闻发布系统为例,项目名称就叫news
下面我们开始第一步:建四个架包,如下:

这里的命名是比较规范的,也建议这样取名。
首先我们完成实体类类以及映射文件的编写,如下:
package news.entity;

import java.util.Date;

public class News {

    private Integer id;
    private String title;
    private String content;
    private Date begintime;
    private String username;
    public Integer getId() {
        return id;
    }
    public void setId(Integer id) {
        this.id = id;
    }
    public String getTitle() {
        return title;
    }
    public void setTitle(String title) {
        this.title = title;
    }
    public String getContent() {
        return content;
    }
    public void setContent(String content) {
        this.content = content;
    }
    public Date getBegintime() {
        return begintime;
    }
    public void setBegintime(Date begintime) {
        this.begintime = begintime;
    }
    public String getUsername() {
        return username;
    }
    public void setUsername(String username) {
        this.username = username;
    }

}
映射文件如下:
<?xml version="1.0" encoding="utf-8"?>
<!DOCTYPE hibernate-mapping PUBLIC "-//Hibernate/Hibernate Mapping DTD 3.0//EN"
"http://hibernate.sourceforge.net/hibernate-mapping-3.0.dtd">
<hibernate-mapping package="news.entity">
    <class name="News" table="news">
        <id name="id">
            <generator class="native"/>
        </id>
        <property name="title" type="string" length="50" />
        <property name="content" type="string" length="500" />
        <property name="begintime" type="java.util.Date" length="20" />
        <property name="username" type="string" length="20" />
    </class>

</hibernate-mapping>
这里顺路把struts.xml和web.xml也放出来把。不懂的可以参考上面的链接~.~
<?xml version="1.0" encoding="UTF-8" ?> <!DOCTYPE struts PUBLIC "-//Apache Software Foundation//DTD Struts Configuration 2.3//EN" "http://struts.apache.org/dtds/struts-2.3.dtd"> <struts> <constant name="struts.objectFactory" value="spring" /> <constant name="struts.devMode" value="true" /> <package name="mypck001" extends="struts-default"> <action name="NewsAction_*" class="newsAction" method="{1}"> <result name="show">/WEB-INF/jsp/index.jsp</result> <result name="OK" type="redirect">NewsAction_showAll?message=${message}&id=${id}</result> </action> </package> </struts>
<?xml version="1.0" encoding="UTF-8"?>
<web-app xmlns:xsi="http://www.w3.org/2001/XMLSchema-instance" xmlns="http://java.sun.com/xml/ns/javaee" xsi:schemaLocation="http://java.sun.com/xml/ns/javaee http://java.sun.com/xml/ns/javaee/web-app_3_0.xsd" id="WebApp_ID" version="3.0">
  <display-name>news1</display-name>
  <welcome-file-list>
    <welcome-file>index.html</welcome-file>
  </welcome-file-list>
  <filter>
    <filter-name>struts2</filter-name>
    <filter-class>org.apache.struts2.dispatcher.ng.filter.StrutsPrepareAndExecuteFilter</filter-class>
  </filter>
  <filter-mapping>
    <filter-name>struts2</filter-name>
    <url-pattern>/*</url-pattern>
  </filter-mapping>
  <context-param>
    <param-name>contextConfigLocation</param-name>
    <param-value>classpath:applicationContext.xml</param-value>
  </context-param>
  <listener>
    <listener-class>org.springframework.web.context.ContextLoaderListener</listener-class>
  </listener>
</web-app>
再则我们先创建一个NewsAction,如下:
package news.action;

import java.util.List;

import org.springframework.beans.factory.annotation.Autowired;
import org.springframework.context.annotation.Scope;
import org.springframework.stereotype.Controller;

import com.opensymphony.xwork2.ActionSupport;

import news.entity.News;
import news.service.NewsService;
@Controller
@Scope("prototype")
public class NewsAction extends ActionSupport {
    private Integer id;
    private String message;
    private List<News> listAllNews;
    @Autowired
    private NewsService ns;

    public Integer getId() {
        return id;
    }
    public void setId(Integer id) {
        this.id = id;
    }
    public String getMessage() {
        return message;
    }
    public void setMessage(String message) {
        this.message = message;
    }
    public List<News> getListAllNews() {
        return listAllNews;
    }
    public void setListAllNews(List<News> listAllNews) {
        this.listAllNews = listAllNews;
    }
    public String showAll(){
        listAllNews=ns.showAll();
        return "show";
    }
    public String delSingleNews(){
        message=ns.delSingleNews(id);
        return message;
    }
}
接着我们先创建一个NewsService接口,如下:
package news.service;

import java.util.List;

import news.entity.News;

public interface NewsService {
    public List<News> showAll();
    public String delSingleNews(Integer id);
}
接着我们创建一个NewsService接口的实现类NewsServiceImpl,如下:
package news.service;

import java.util.List;

import org.springframework.beans.factory.annotation.Autowired;
import org.springframework.context.annotation.Scope;
import org.springframework.stereotype.Service;

import news.dao.Newsdao;
import news.entity.News;
@Service
@Scope("prototype")
public class NewsServiceImpl implements NewsService {
    @Autowired
    private Newsdao nd;
    public List<News> showAll(){
        List<News> listAllNews=nd.showAll();
        return listAllNews;
    }
    public String delSingleNews(Integer id){
        String deleteList=nd.delSingleNews(id);
        return deleteList;
    }
}
在NewsServiceImpl中我们需要注入NewsDao,所以我们创建一个NewsDao的接口,如下:
package news.dao;

import java.util.List;

import news.entity.News;

public interface Newsdao {
    public List<News> showAll();
    public String delSingleNews(Integer id);
}
接着我们创建一个NewsDao的实现类NewsDaoImpl,如下:
package news.dao;

import java.util.List;

import javax.persistence.Query;

import org.hibernate.Session;
import org.hibernate.SessionFactory;
import org.springframework.beans.factory.annotation.Autowired;
import org.springframework.context.annotation.Scope;
import org.springframework.stereotype.Repository;

import news.entity.News;
@Repository
@Scope("prototype")
public class NewsDaoImpl implements Newsdao {
    @Autowired
    private SessionFactory sf;

    @Override
    public List<News> showAll() {
        Session session=sf.getCurrentSession();
        Query query =session.createQuery("from News");
        List<News> listAllNews=query.getResultList();
        return listAllNews;
    }

    @Override
    public String delSingleNews(Integer id) {
        Session session=sf.getCurrentSession();
        Query query =session.createQuery("from News where id=:myid");
        query.setParameter("myid", id);
        List<News> deleteList=query.getResultList();
        if(deleteList.size()==1){
            News news=deleteList.get(0);
            session.delete(news);
        }
        return "OK";
    }

}
这次的都是采用注解的方式来写的代码,所以配置文件那边少了很多代码,这不仅提升了运行速度,而且还可以减少出错。applicationContext.xml文件如下:
<?xml version="1.0" encoding="UTF-8"?>
<beans xmlns="http://www.springframework.org/schema/beans"
        xmlns:xsi="http://www.w3.org/2001/XMLSchema-instance"
        xmlns:p="http://www.springframework.org/schema/p"
        xmlns:aop="http://www.springframework.org/schema/aop"
        xmlns:context="http://www.springframework.org/schema/context"
        xmlns:jee="http://www.springframework.org/schema/jee"
        xmlns:tx="http://www.springframework.org/schema/tx"
        xsi:schemaLocation="
            http://www.springframework.org/schema/aop http://www.springframework.org/schema/aop/spring-aop-4.2.xsd
            http://www.springframework.org/schema/beans http://www.springframework.org/schema/beans/spring-beans-4.2.xsd
            http://www.springframework.org/schema/context http://www.springframework.org/schema/context/spring-context-4.2.xsd
            http://www.springframework.org/schema/jee http://www.springframework.org/schema/jee/spring-jee-4.2.xsd
            http://www.springframework.org/schema/tx http://www.springframework.org/schema/tx/spring-tx-4.2.xsd">
    <!-- 类似于财务部门一样,类就是钱,所有需要类的实例都由srping去管理 -->
    <!-- <context:component-scan>:
        有一个use-default-filters属性,该属性默认为true,
        这就意味着会扫描指定包下的全部的标有注解的类,并注册成bean.
        可以发现这种扫描的粒度有点太大,如果你只想扫描指定包下面的Controller,
        该怎么办?此时子标签<context:incluce-filter>就起到了勇武之地。如下所示
        <context:component-scan base-package="news" use-default-filters="false">
            <context:exclude-filter type="annotation" expression="org.springframework.stereotype.Controller"/>
        </context:component-scan>
        如果use-dafault-filters在上面并没有指定,默认就为true,
        也就意味着你现在加<context:exclude-filter/>跟没加是一样的
        所有你要记住,你若想要用到<context:component-scan>的子标签,
        必须要把use-dafault-filters的值改为false
        当然还有一个是与之相反的而已这里就不啰嗦了
        上面这一对解释换成一句话就是:
            Use-dafault-filters=”false”的情况下:<context:exclude-filter>指定的不扫描,<context:include-filter>指定的扫描
    <context:component-scan>的base-package属性作用:设置要被扫描的包 -->

    <!-- (本案例不用到,只是用了一个全盘扫描,以上内容只是为了让大家了解它) -->

    <context:component-scan base-package="news.."/>
    <context:property-placeholder location="classpath:jdbc.properties"/>
    <!-- <tx:annotation-driven transaction-manager="transactionManager"/> -->

    <bean id="myDataSource" class="com.mchange.v2.c3p0.ComboPooledDataSource">
        <property name="driverClass" value="${jdbc.driver}"/>
        <property name="jdbcUrl" value="${jdbc.url}"/>
        <property name="user" value="${jdbc.user}"/>
        <property name="password" value="${jdbc.password}"/>
        <!-- 每300秒检查所有连接池中的空闲连接 -->
        <property name="idleConnectionTestPeriod" value="300"/>
        <!-- 最大空闲时间,900秒内未使用则连接被丢弃。若为0则永不丢弃 -->
        <property name="maxIdleTime" value="900"/>
        <!-- 最大连接数 -->
        <property name="maxPoolSize" value="2"/>
    </bean>

    <bean id="sessionFactory" class="org.springframework.orm.hibernate5.LocalSessionFactoryBean">
        <property name="dataSource" ref="myDataSource"/>
        <property name="hibernateProperties">
            <props>
                <prop key="hibernate.show_sql">true</prop>
                <prop key="hibernate.format_sql">true</prop>
                <prop key="hibernate.dialect">org.hibernate.dialect.MySQL5Dialect</prop>
                <prop key="hibernate.connection.autocommit">false</prop>
                <prop key="hibernate.hbm2ddl.auto">update</prop>
            </props>
        </property>
        <!-- <property name="packagesToScan">
            <list>
                这里value值添实体类所在的包
                <value>news.entity</value>
            </list>
        </property> -->
        <property name="mappingResources">
            <list>
                <value>news/entity/News.hbm.xml</value>
            </list>
        </property>
    </bean>

    <bean id="transactionManager"
        class="org.springframework.orm.hibernate5.HibernateTransactionManager">
         <!--  创建事务管理器, 管理sessionFactory(因为所有的session都是从sessionFactory获取的) -->
         <property name="sessionFactory" ref="sessionFactory" />
     </bean>
    <!--  配置通知, 哪些方法需要切入什么类型的事务 -->
    <tx:advice id="advice" transaction-manager="transactionManager">
         <tx:attributes>
             <tx:method name="add*" propagation="REQUIRED"/>
             <tx:method name="del*" propagation="REQUIRED"/>
             <tx:method name="update*" propagation="REQUIRED"/>
             <tx:method name="*" propagation="SUPPORTS" read-only="true"/>
         </tx:attributes>
    </tx:advice>

     <!-- 配置切面表达式, 并且让 tx与切面表达式合二为一 -->
     <aop:config>
         <!-- 表达式, 定义哪个包的哪些类需要切入事务,但是此处并且没有制定类中哪些方法,需要切入什么样 事务 -->
         <aop:pointcut expression="execution(* news.service.*.*(..))" id="pointcut" />
         <aop:advisor advice-ref="advice" pointcut-ref="pointcut"/>
     </aop:config>
</beans>
为了方便跳转,我们来写一个默认的jsp,如下:
<%@ page language="java" contentType="text/html; charset=UTF-8"
    pageEncoding="UTF-8"%>
<!DOCTYPE html PUBLIC "-//W3C//DTD HTML 4.01 Transitional//EN" "http://www.w3.org/TR/html4/loose.dtd">
<%
    response.sendRedirect("NewsAction_showAll.action");
%>
接着我们写显示页面,如下:
<%@ page language="java" contentType="text/html; charset=UTF-8"
    pageEncoding="UTF-8"%>
    <%@ taglib prefix="s" uri="/struts-tags"%>
<!DOCTYPE html PUBLIC "-//W3C//DTD HTML 4.01 Transitional//EN" "http://www.w3.org/TR/html4/loose.dtd">
<html>
<head>
<meta http-equiv="Content-Type" content="text/html; charset=UTF-8">
<title>Insert title here</title>
</head>
<body>
<s:if test="%{id!=null}">
    删除信息:<s:property value="message"/><br>
    删除标号:<s:property value="id"/><br><br>
</s:if>
<s:iterator value="listAllNews">
    <s:property value="id"/>
    <s:property value="title"/>
    <s:a href="NewsAction_delSingleNews.action?id=%{id}">删除</s:a><br>
</s:iterator>
</body>
</html>
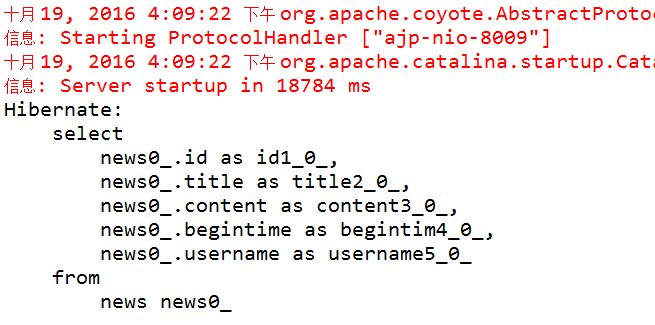
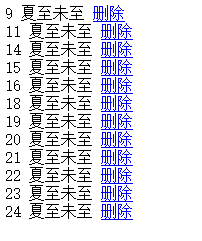
我们来运行下,结果如下:


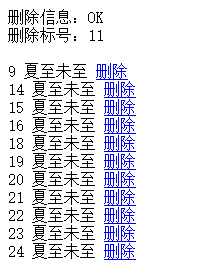
实现功能了如下:


这个项目到这里就结束了,欢迎大家给予我意见,谢谢。~


