

Ubuntu中Postgresql配置安装
一:Postgresql配置安装
1:pgsql下载:
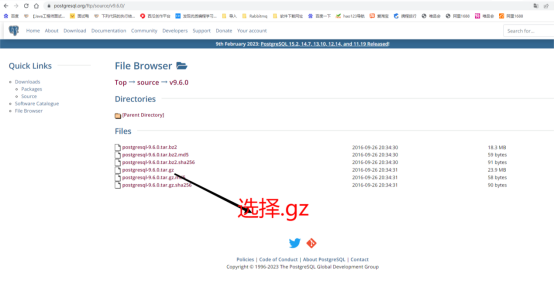
2:将文件下载到ubuntu里并解压
tar -zxf postgresql-9.6.0.tar.gz
3:导入pgsql所需依赖
apt-get install libreadline-dev apt-get install zlib1g apt-get install zlib1g.dev
4:进入到postgresql-9.6.0下
执行编译命令:
./configure
可能无法执行:修改configure文件的权限为可执行文件
如果执行报错执行下这个:
sudo apt-get install libreadline6-dev
5:执行编译命令:
sudo make && make install
报错提示:
/usr/include/unistd.h:1107:9: note: previous declaration of ‘copy_file_range’ was here 1107 | ssize_t copy_file_range (int __infd, __off64_t *__pinoff,
报错处理:
sed -i "s/copy_file_range/copy_file_chunk/g" /home/zcx/Desktop/XQ/RSP/postgresql-9.6.0/src/bin/pg_rewind/copy_fetch.c 为下载解压的pgsql目录下的文件
注意pgsql所在位置
如果出现
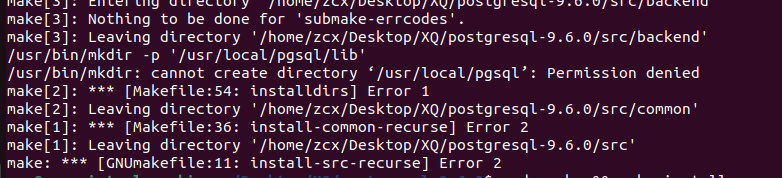
这是没有权限的提示:
先创建pgsql目录
sudo mkdir pgsql 创建pgsql目录 sudo chown -R user pgsql 修改pgsql目录用户为普通用户
成功提示:

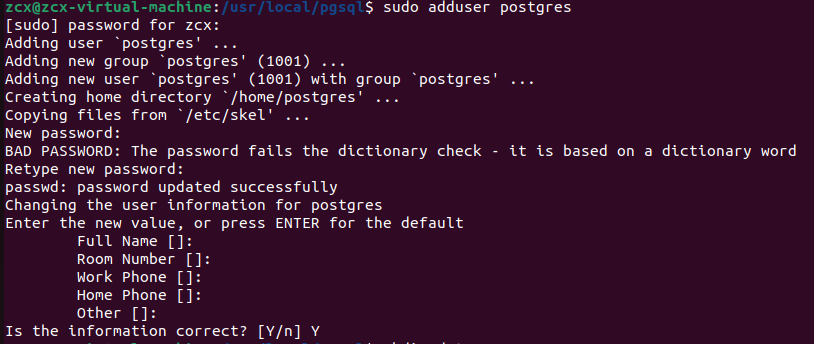
6:新增pgsql用户,进入到/usr/loacl/pgsql创建data,并赋予权限
adduser postgres 设置密码然后回车 cd /usr/local/pgsql mkdir data chown postgres /usr/local/pgsql/data su postgres
7:初始化数据库
/usr/local/pgsql/bin/initdb -D /usr/local/pgsql/data
8:设置日志文件
/usr/local/pgsql/bin/postgres -D su root /usr/local/pgsql/data >logfile 2>&1 &
9:进入bin目录启动pgsql
cd /usr/loacl/pgsql/bin su postgres ./pg_ctl start -D /usr/local/pgsql/data 为数据库创建软连接 ln -s /usr/local/pgsql/bin/pg_ctl /usr/bin/pg_ctl ./psql
10: 修改postgres用户密码
ALTER USER postgres WITH PASSWORD 'atlas123';
关于pgsql常用命令:
\q 退出 \l 查看所有表 \du 查看pgsql用户 CREATE USER my_user WITH PASSWORD 'my_password'; 创建用户并设置密码 DROP USER my_user; psql -U my_user -d my_db 使用my_user用户登录 CREATE DATABASE my_db OWNER my_user; 创建数据库并指定所有者 select current_database(); \c - next_db; 切换用户
远程连接配置:
1:关闭防火墙(ubuntu的防火墙不止一个可能)
2:pg_hba.conf配置(trust代表不需要密码,md5代表需要密码)
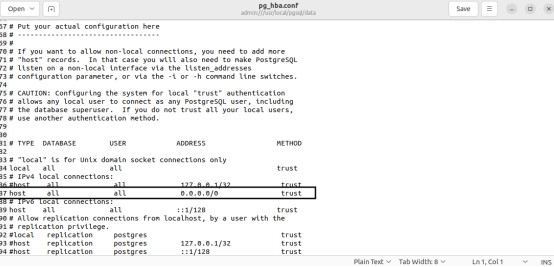
host all all 0.0.0.0/0 trust host all all 0.0.0.0/0 md5
3:配置postgresql.conf

4:环境变量配置
vi /etc/profile (打开配置文件) PG_HOME=/usr/local/pgsql LD_LIBRARY_PATH=$PG_HOME/lib:$LD_LIBRARY_PATH PATH=$PG_HOME/bin:$PATH PKG_CONFIG_PATH=$PG_HOME/lib/pkgconfig:$PKG_CONFIG_PATH export PKG_CONFIG_PATH LD_LIBRARY_PATH source /etc/profile (使配置文件生效)
文件修改用户及权限:
将share目录及目录下的文件所属用户组改为zcx: sudo chown -R zcx share
5:配置pgsql开机自启
[Unit] Description=PostgreSQL database server After=network.target [Service] Type=forking User=postgres Group=postgres \# Port number for server to listen on Environment=PGPORT=5432 \# Location of database directory Environment=PGDATA=/usr/local/pgsql/data \# Where to send early-startup messages from the server (before the logging \# options of postgresql.conf take effect) \# This is normally controlled by the global default set by systemd \# StandardOutput=syslog \# Disable OOM kill on the postmaster OOMScoreAdjust=-1000 \#ExecStartPre=/usr/local/pgsql/bin/postgresql-check-db-dir ${PGDATA} ExecStart=/usr/local/pgsql/bin/pg_ctl start -D ${PGDATA} -s -o "-p ${PGPORT}" -w -t 300 ExecStop=/usr/local/pgsql/bin/pg_ctl stop -D ${PGDATA} -s -m fast ExecReload=/usr/local/pgsql/bin/pg_ctl reload -D ${PGDATA} -s \# Give a reasonable amount of time for the server to start up/shut down TimeoutSec=300 [Install] WantedBy=multi-user.target
进入root用户使之生效


【推荐】国内首个AI IDE,深度理解中文开发场景,立即下载体验Trae
【推荐】编程新体验,更懂你的AI,立即体验豆包MarsCode编程助手
【推荐】抖音旗下AI助手豆包,你的智能百科全书,全免费不限次数
【推荐】轻量又高性能的 SSH 工具 IShell:AI 加持,快人一步
· 开源Multi-agent AI智能体框架aevatar.ai,欢迎大家贡献代码
· Manus重磅发布:全球首款通用AI代理技术深度解析与实战指南
· 被坑几百块钱后,我竟然真的恢复了删除的微信聊天记录!
· 没有Manus邀请码?试试免邀请码的MGX或者开源的OpenManus吧
· 园子的第一款AI主题卫衣上架——"HELLO! HOW CAN I ASSIST YOU TODAY