
前端相关知识
html
HTML: Hyper Text Markup Language (超文本标记语言) 超文本指包括文字、图片、音频、视频、动画等
W3C:World Wide Web Consortium(万维网联盟) [kənˈsɔːrtiəm]:联盟
W3C标准包括:结构化标准语言(HTML、XML)、表现标准语言(CSS)、行为标准(DOM、ECMAScript)
开放标签: 如<hr/>
闭合标签: 如<body></body>
<html>
	<head>                               网页头部
		<title>第一个demo</title>
	</head>
	<body>                               主体部分
		第一个前端网页demo
	</body>
</html>
<!-- doctype告诉浏览器,我们要使用什么规范 -->
<!doctype html>
<html lang = "en">

	<!-- head标签代表网页头部 -->
	<head>

		<!-- meta描述性标签,用来描述我们网页的一些信息-->
		<!-- meta一般用来做SEO-->


		<!-- title网页标题 -->
		<title>第一个demo</title>
	</head>

	<!-- body标签代表网页主体 -->
	<body>
		第一个前端网页demo
	</body>
</html>
1. 基本标签
<!-- 标题标签 -->
<h1>一级标签</h1>
<h2>二级标签</h2>
<h3>三级标签</h3>
<h4>四级标签</h4>
<h5>五级标签</h5>
<h6>六级标签</h6>
<!-- 段落标签 -->
<p></p>
<!-- 水平线标签 -->
<hr/>
<!-- 换行标签 -->
<br/>
<!-- 字体样式标签 -->
粗体: <strong></strong>
斜体: <em></em>
<!-- 特殊字符 -->
空格:
大于: >
小于: <
版权所有: ©
2. 图像标签
<img src = "path" alt = "text" title = "text" width="x" height= "y"/>

alt: 图像的替代文字
title: 鼠标悬浮提示文字
3. 链接标签
<a href = "path" target = "目标窗口位置"> 链接文本或图像 </a>
target:链接在哪个窗口打开,常用值为_self、_blank

锚链接: 1.需要一个锚标记 2.跳转到标记  使用#
<a name = "top"></a>
<a href = "#top">回到顶部</a>

功能性链接:
邮件链接:mailto
QQ链接(QQ推广)
<a href = "mailto:1445834501@qq.com"> 点击联系我 </a>

<a target="_blank" href="http://wpa.qq.com/msgrd?v=3&uin=&site=qq&menu=yes"><img border="0" src="http://wpa.qq.com/pa?p=2::51" alt="点击我" title="点击我"/></a>
4. 列表
<!-- 有序列表
		应用范围: 考试试卷,问答
	-->
	<ol>
		<li>java</li>
		<li>python</li>
		<li>go</li>
		<li>js</li>
	</ol>

	<!-- 无序列表
		应用范围: 导航,侧边栏
	-->
	<ul>
		<li>xxx</li>
		<li>yyy</li>
		<li>zzz</li>

	</ul>

	<!-- 自定义列表
		dl: 标签
		dt: 列表标题
		dd: 列表内容

		应用范围: 公司网站底部
	-->
	<dl>
		<dt>语言</dt>
		<dd>java</dd>
		<dd>python</dd>
		<dd>go</dd>

		<dt>地区</dt>
		<dd>重庆</dd>
		<dd>成都</dd>
		<dd>西安</dd>

	</dl>
5. 表格
<!-- table
		tr: 行 rows
		td: 列
	-->

	<table border = "1px">
		<tr>
			<td>1-1</td>
			<td>1-2</td>
			<td>1-3</td>
			<td>1-4</td>
		</tr>
		<tr>
			<td>2-1</td>
			<td>2-2</td>
			<td>2-3</td>
			<td>2-4</td>
		</tr>
		<tr>
			<td>3-1</td>
			<td>3-2</td>
			<td>3-3</td>
			<td>3-4</td>
		</tr>
	</table>

	<hr />

	<table border= "1px">
		<tr>
			<!-- colspan 跨列-->
			<td colspan="4" align="center">成绩</td>
		</tr>
		<tr >
			<td rowspan= "2">张三</td>
			<td>语文</td>
			<td>数学</td>
			<td>英语</td>

		</tr>
		<tr>
			<td>语文</td>
			<td>数学</td>
			<td>英语</td>
		</tr>
		<tr >
			<!-- rowspan 跨行-->
			<td rowspan= "2">李四</td>
			<td>语文</td>
			<td>数学</td>
			<td>英语</td>

		</tr>
		<tr>
			<td>语文</td>
			<td>数学</td>
			<td>英语</td>
		</tr>
	</table>
6. 媒体元素
<video src = "path" controls autoplay> </video>
src: 资源路径
controls: 控制条
autoplay: 自动播放

<audio src = "path" controls autoplay></audio>
7. 页面结构分析
header 标题头部区域的内容(用于页面或页面中的一块区域)
footer 标记脚部区域的内容(用于整个页面或页面中一块区域)
section Web页面中一块独立区域
article 独立的文章内容
aside 相关内容或应用(常用于侧边栏)
nav 导航类辅助内容
8. iframe内联框架
<iframe src = "path" name = "mainFrame"></iframe>
src: 引用页面地址
name: 框架标识名
<iframe src = "" name = "hello" frameborder = "0" width = "500px" height = "500px"></iframe>
<a href = "demo01.html" target = "hello">点击跳转</a>
9. 表单
<!-- 表单form
		action: 表单提交的位置,可以是网站,也可以是一个请求处理地址
		method: post get 提交方式
		get 方式: 可以在url中看到我们提交的信息,不安全,高效
		post: 比较安全,传输大文件
	-->

	<form action = "demo01.html" method = "post">

		<!-- 文本输入框: input type = "text"-->
		<p>名字: <input type = "text" name = "username"> </p>


		<!-- 密码框: input type = "password"-->
		<p>密码: <input type = "password" name = "pwd"></p>

		<p>
			<input type = "submit">
			<input type = "reset">
		</p>
	</form>
- type类型有: text、password、checkbox、radio、submit、reset、file、hidden、image、button,默认为text
- name: 指定表单元素的名称
- value: 元素的初始值。type为radio时必须指定一个值
- size: 指定表单元素的初始宽度。当type为text或password时,表单元素的大小以字符为单位。对于其他类型,宽度以像素为单位。
- maxlength: type为text或password时,输入的最大字符数
- checked: type为radio或checkbox时,指定按钮是否被选中
<form action = "demo01.html" method = "get">
		<h2>注册</h2>

		<p>姓名: <input type = "text" name = "username" value = "张三" maxlength = "8" /></p>
		<p>密码: <input type = "password" name = "pws" value = "000000" maxlength = "6"/></p>

		<p>性别:
			<!-- 单选框 value值不一样就是多选-->
			<input type = "radio" name = "gender" value = "boy" checked/>男
			<input type = "radio" name = "gender" value = "girl"/>女
		</p>

		<p>爱好:
			<!-- 多选框 -->
			<input type = "checkbox" name = "hobby" value = "sleep">睡觉
			<input type = "checkbox" name = "hobby" value = "chat" checked/>聊天
			<input type = "checkbox" name = "hobby" value = "code"/>编码
			<input type = "checkbox" name = "hobby" value = "game">游戏
		</p>

		<p>
			<!--按钮:
				input type = "button"    普通按钮
				input type = "image"     图像按钮
				input type = "submit"    提交按钮
				input type = "reset"     重置按钮
			 -->
			<input type = "button" name = "btn" value = "确定">
			<input type = "image" src = "path">
		</p>


		<p>
			<input type = "submit"/>
			<input type = "reset"/>
		</p>
	</form>
<form method = "get" action = "demo01.html">


		<!-- 可选框-->
		<p>国籍:
			<select name = "country">
				<option value = "china">中国</option>
				<option value = "USA">美国</option>
				<option value = "korea">韩国</option>
				<option value = "japan" selected>日本</option>
			</select>
		</p>

		<!--- 文本域-->
		<p>反馈:
			<textarea name = "textarea" rows = "10" cols = "40" readonly>反馈内容...</textarea>
		</p>


		<!-- 文件域-->
		<p>
			<input type = "file" name = "files">
			<input type = "button" name = "upload" value = "上传文件">
		</p>


		<!-- 邮件验证-->
		<p>邮箱地址:
			<input type = "email" name = "email">
		</p>


		<!-- URL-->
		<p>链接:
			<input type = "url" name = "url">
		</p>


		<!-- 数字-->
		<p>数字选择:
			<input type = "number" name = "num" value = "0" max = "100" min = "0" step = "2">
		</p>


		<!-- 滑块-->
		<p>音量:
			<input type = "range" name = "voice" min = "0" max = "100">
		</p>


		<!-- 搜索框-->
		<p>搜索:
			<input type = "search" name = "search" id = "search01">
		</p>


    	<!-- 增强鼠标可用性-->
		<p>
			<label for = "search01">你点我试试</label>
		</p>

		<p>
			<input type = "submit" name="提交">
			<input type= "reset" name = "重置">
		</p>
	</form>
影藏域:hidden
只读: readonly
失效:disabled
提示信息:placeholder
非空:required
正则表达式:pattern
CSS
1. 什么是CSS
Cascading Style Sheets 层叠级联样式表
CSS: 表现(美化网页)
字体、颜色、边距、高度、宽度、背景图片、网页定位、网页浮动
<!DOCTYPE html>
<html lang="en">
<head>


	<title>Document</title>

    <!--语法:
		选择器{
			声明1;
			声明2;
			...
		};
	-->

	<!-- <style type="text/css">
		h1{
			color: red;
		}
	</style> -->

	<link rel="stylesheet" href="css/style01.css">

</head>
<body>

	<h1>哈哈</h1>

</body>
</html>
CSS的优势:
- 内容和表现分离
- 网页结构表现统一,可以实现复用
- 样式十分丰富
- 建议使用独立于html的css文件
- 利用seo,容易被搜索引擎收录
<!DOCTYPE html>
<html lang="en">
<head>


	<title>Document</title>

	<link rel="stylesheet" type="text/css" href="css/style01.css">

	<!--内部样式-->
	<style type="text/css">
		h1{
			color: green;
		}

	</style>


</head>
<body>

	<!-- 样式优先级: 遵循就近原则 -->

	<!--行内样式-->
	<!-- <h1 style = "color: yellow;">保留</h1> -->
	<h1>你的样子</h1>

</body>
</html>
2. 选择器
作用:选择页面上的某一个或者某一类元素
2.1 基本选择器
- 标签选择器:选择一类标签 --- 标签{}
- 类 选择器 class: 选择所有class 属性一致的标签,跨标签----.class名{}
- id 选择器: 全局唯一!---- #id名{}
优先级: id > class > 标签
<!DOCTYPE html>
<html lang="en">
<head>


	<title>Document</title>

	<style type="text/css">
		h1{
			color: red;
		}

		.title_one{
			color: blue;
		}

		#one_t{
			color: green;
		}

	</style>

</head>

<body>

	<h1 class = "title_one" id = "one_t">标题一</h1>
	<h1 class = "title_one" >标题二</h1>
	<h1>标题三</h1>

</body>
</html>
2.2 层次选择器
-
后代选择器: 在某个元素的后面
body p { background: #FFA07A; } -
子选择器
/*子选择器*/ body > p { background: #EE82EE; } -
相邻兄弟选择器
/*相邻选择器 只有一个 相邻(向下)*/ .water + p { background: #66CDAA; } -
通用选择器
/*通用选择器 当前选中元素的所有的兄弟元素*/
		.water~p {
			background: #B0E0E6;
		}
2.3 结构伪类选择器
<!DOCTYPE html>
<html lang="en">
<head>


	<title>Document</title>

	<style type="text/css">
		/*ul的第一个子元素*/
		ul li:first-child {
			background: #B0C4DE;
		}

		/*ul的最后一个元素*/
		ul li:last-child {
			background: #FFEBCD;
		}

		/*按照顺序*/
		/*p:nth-child(2) {
			background: #A9A9A9;
		}*/

		/*按照标签名*/
		p:nth-of-type(1) {
			background: #87CEEB;
		}


		a:hover {
			background: rgba(102, 205, 170);
		}

	</style>
</head>
<body>
	<a href = ""> www</a>
	<div>divblock</div>
	<p>p1</p>
	<p>p2</p>
	<p>p3</p>
	<p>p4</p>
	<ul>
		<li>L1</li>
		<li>L2</li>
		<li>L3</li>
		<li>L4</li>
	</ul>

</body>
</html>
2.4 属性选择器(常用)
class + id
<!DOCTYPE html>
<html lang="en">
<head>


	<title>Document</title>

	<style type="text/css">
		p a {
			float: left;
			display: block;
			width: 50px;
			height: 50px;
			background: #D0ECE7;
			font-size: 16px;
			text-align: center;
			text-decoration: none;        /*去除下划线*/
			color: #F8C471;
			border-radius: 10px;
			line-height: 45px;
			margin-right: 5px;
		}

		/*
        存在id的属性    a[]{}
		= 绝对等于
		*= 包含这个元素
		^= 以……开头
		$= 以……结尾
				*/

		/*a[id]{
			background: #E5E7E9;
		}*/

		/*a[id = first]{
			background: #E8DAEF ;
		}*/

		/*a[class = "links item demo"]{
			background: #F2D7D5;
		}*/

		/*a[class *= "links"]{
			background: #D6EAF8;
		}*/

		/*a[href ^= http]{
			background: #FDF2E9;
		}*/

		a[href $= jpg]{
			background: #FDF2E9;
		}


	</style>
</head>

<body>
	<p>
		<a href = "http://www.baidu.com/" class = "links item demo" id = "first"> A </a>
		<a href = "https://htmlcolorcodes.com" class = "links item active" target = "_blank" title = "test"> B </a>
		<a href = "https://zhuanlan.zhihu.com"> C </a>
		<a href = "image/jd.png" class = "links item"> D </a>
		<a href = "image/al.jpg" class = "links item"> E </a>
		<a href = "image/wy.gif" class = "links item"> F </a>
		<a href = "abc" class = "links item"> G </a>
		<a href = "files/123.pdf" class = "links item"> H </a>
		<a href = "files/resume.pdf" class = "links item"> I </a>
		<a href = "files/simple.doc" class = "links item"> J </a>
		<a href = "files/past.doc" class = "links item last"> K </a>
	</p>

</body>
</html>
3. 美化网页元素
3.1 样式
<!DOCTYPE html>
<html lang="en">
<head>


	<title>Document</title>

	<style>
		body {
			/*rgba是在rgb的基础上加了一个透明度*/
			color: #F6DDCC;
			font-family: "Times New Roman", 楷体, Serif ;
		}

		p {
			font-size: 30px;
			text-indent: 60px;
		}

		span {
			font-weight: 600;
		}

	</style>
</head>

<body>
	<p class = "first">And events marking the 70th anniversary of the 1949 Geneva Conventions are underway, the International Committee of the Red Cross says these four landmark treaties delineating the law of war are as relevant today as they were when they came into force August 12, 1949. Lisa Schlein reports for VOA, from ICRC headquarters in GENEVA.</p>

	<p >在 flex 容器中默认存在两条轴,水平主轴<span>(main axis)</span> 和垂直的交叉轴(cross axis),这是默认的设置,当然你可以通过修改使垂直方向变为主轴,水平方向变为交叉轴,这个我们后面再说。</p>

	<p>在容器中的每个单元块被称之为 flex item,每个项目占据的主轴空间为 (main size), 占据的交叉轴的空间为 (cross size)。</p>
</body>
</html>
<!DOCTYPE html>
<html lang="en">
<head>


	<title>Document</title>
	<style type="text/css">
		p {
			font: italic bold 12px/20px arial,sans-serif;     /*font-style字体样式 font-variant font-weight  font-size/line-height font-family字体系列*/
		}
	</style>
</head>

<body>
	<p>《1949年日内瓦公约》70周年纪念活动正在进行当中。国际红十字会表示,这4条具有里程碑意义的公约划定了战争法。时至今日,它仍然跟1949年8月12日生效之际具有同样的现实意义。美国之音的丽莎· 施莱茵从国际红十字会日内瓦总部发来报道。</p>

</body>
</html>
3.2 文本阴影和超链接
<!DOCTYPE html>
<html lang="en">
<head>


	<title>Document</title>


	<style type="text/css">
		img {
			width: 80px;
			height: 80px;
		}

		a {
			text-decoration: none;
		}


		/*a:hover 必须在 CSS 定义中的 a:link 和 a:visited 之后,才能生效!a:active 必须在 CSS 定义中的 a:hover 之后才能生效!伪类名称对大小写不敏感。*/

		/* 未访问的链接 */
		a:link {
			color: #F1948A;
		}

		/* 已访问的链接 */
		a:visited {
			color: #C39BD3
		}

		/* 鼠标悬停链接 */
		a:hover {
			color: rgb(115, 198, 182);
			font-size: 18px;
		}

		/* 已选择的链接 */
		a:active {
		  color: #0000FF;
		}

		/*h-shadow 水平阴影距离   v-shadow 垂直阴影距离   blur 模糊距离   color;*/
		.lang {
			text-shadow: 5px 5px 5px #F5B041;
		}
	</style>

</head>
<body>
	<!-- href = “#” 即可实现空链接,即点击没有反应 -->
	<div class = "director">
		<a href = "#">导演: 简·坎皮恩</a>
	</div>

	<div class = "lang">
		<a href = "">语言: 英语</a>
	</div>

	<div>

	</div>


</body>
</html>
3.3 背景
	div {
			height: 300px;
			width: 800px;
			border: 1px solid rgb(208, 236, 231);
			background-image: url("images/rabbit.png");    /* 默认全部平铺*/
		}

		.div01 {
			background-repeat: repeat-y;     /*纵向方向平铺*/
		}

		.div02 {
			background-repeat: repeat-x;      /*横向平铺平铺*/
		}

		.div03 {
			background-repeat:  no-repeat;
		}
背景渐变:https://uigradients.com/ https://www.grabient.com/
3.4 盒子模型
margin:外边距 (上下左右)
padding: 内边距 (上下左右)
border: 边框
盒子的计算方式:margin + border + padding + 内容宽度
3.5 圆角边框
	div {
			width: 100px;
			height: 100px;
			border: 3px solid #F0B27A;
			/*border-radius: 10px 10px 0px 0px;        /* 左上 右上 右下 左下*/
			border-radius: 50px;                      /*变成圆*/
		}
	div {
			width: 100px;
			height: 50px;
			border: 3px dashed #ABEBC6;
			border-radius: 50px 50px 0px 0px;       /*半圆*/
		}
3.6 盒子阴影
	div {
			width: 100px;
			height: 100px;
			border: 5px solid rgb(210, 180, 222);
			box-shadow: 10px 10px 2px rgb(178, 186, 187);
		}
4. 浮动
块级元素:独占一行
行内元素:不独占一行
行内元素可以被包含在块级元素中,反之不可以。
4.1 display
<style type="text/css">

		/*
		block 块元素
		inline 行内元素
		inline-block 是块元素,但也可以内联在一起
		none
		*/

		div {
			border: 3px solid red;
			width: 100px;
			height: 100px;
			/*display: block;             */
            display: inline-block;
		}

		span {
			border: 3px solid yellow;
			display: inline-block;                  /*当display设置为block时,下面的width和height才有效*/
			width: 100px;
			height: 100px;
		}
	</style>
4.2 float:左右浮动
<!DOCTYPE html>
<html lang="en">
<head>


	<title>Document</title>
	<style type="text/css">
		.father {
			width: 1000px;
			margin: 0px auto;
			border: 2px solid black;

		}

		#div01 {
			height: 40px;
			width: 40px;
			border: 3px solid red;
			display: inline-block;
			float: right;
		}

		#div02 {
			height: 40px;
			width: 40px;
			border: 3px solid blue;
			display: inline-block;
			float: right;
		}

		#div03 {
			height: 40px;
			width: 40px;
			border: 3px solid yellow;
			display: inline-block;
			float: right;
		}

	</style>

</head>

<body>
	<div class = "father">
		<div id = "div01"> div01 </div>
		<div id = "div02"> div02 </div>
		<div id = "div03"> div03 </div>
		<span>sxaCDASFVDSFA</span>
	</div>

</body>
</html>
4.3 父级边框塌陷问题
clear: left 左侧不允许有浮动 right: 右侧不允许有浮动 both: 两侧都不允许有浮动 none
解决方案:
- 增加父级元素的高度: 简单,但是高度是固定的
.father {
			width: 1000px;
			margin: 0px auto;
			border: 2px solid black;
			height: 600px;

		}
-
在其后面增加一个空的div,清除浮动: 简单,但是增加一个空的div
<body> <div class = "father"> <div id = "div01"> div01 </div> <div id = "div02"> div02 </div> <div id = "div03"> div03 </div> <span>sxaCDASFVDSFA</span> <div class = "clear"></div> </div> </body> <style> .clear { clear: both; margin: 0; padding: 0; } </style> -
在父级元素中添加overflow 其主要解决溢出问题: 简答, 下拉的一些场景避免使用
<!DOCTYPE html> <html lang="en"> <head> <title>Document</title> <style type = "text/css"> div { height: 200px; width: 200px; /*overflow: hidden;*/ /*auto*/ overflow: scroll; } </style> </head> <body> <div> <img src = "images/a.jpg" alt = ""> <span>去向往的地方</span> </div> </body> </html> -
父类中添加一个伪类: 推荐使用
.father:after {
	content: "";
	display: block;
	clear: both;
}
display: 方向不可以控制
float: 浮动起来脱离了标准文档流,要解决父级边框塌陷的问题
5. 定位
5.1 相对定位
相对定位:position:relative 相对于原来的位置,进行指定偏移
它仍然在标准文档流中,原来的位置会被保留
position: relative
top: 10px
bottom: -10px
right: 10px
left: 10px
5.2 绝对定位
定位: 基于xxx定位,上下左右
-
没有父级元素定位的前提下,相对于浏览器定位
-
假设父级元素存在定位,我们通常会相对于父级元素进行偏移
-
在父级元素范围内移动
相对于父级或浏览器的位置,进行指定偏移,它不在标准文档流中,原来的位置不会被保留
5.3 固定定位 fixed
<!DOCTYPE html>
<html lang="en">
<head>


	<title>Document</title>

	<style type="text/css">
		body{
			height: 1000px;
		}

		div:nth-of-type(1){              /*绝对定位*/
			background: gray;
			width: 100px;
			height: 100px;
			position: absolute;
			bottom: 0;
			right: 0;

		}

		div:nth-of-type(2){                  /* 固定定位*/
			background: red;
			width: 50px;
			height: 50px;
			position: fixed;
			bottom: 0px;
			right: 0px;
		}
	</style>
</head>
<body>
	<div>dav01</div>
	<div>div02</div>

</body>
</html>
5.4 z-index: 图层
opacity: 0到1, 背景透明度
6. 动画
less Canvas动画
7. flex布局
Flex是Flexible Box的缩写,意为”弹性布局”
flex布局通过修改父div的display属性,让父元素成为一个flex容器,从而可以自由的操作容器中子元素(项目)的排列方式:flex布局属性主要由容器属性和项目属性构成
.box{
  display: flex;
}
行内元素也可以使用Flex布局。
.box{
  display: inline-flex;
}
Webkit内核的浏览器,必须加上-webkit前缀。
.box{
  display: -webkit-flex; /* Safari */
  display: flex;
}

容器默认存在两根轴:水平的主轴(main axis)和垂直的交叉轴(cross axis)。主轴的开始位置(与边框的交叉点)叫做main start,结束位置叫做main end;交叉轴的开始位置叫做cross start,结束位置叫做cross end。项目默认沿主轴排列。单个项目占据的主轴空间叫做main size,占据的交叉轴空间叫做cross size。
Flex布局以后,子元素的float、clear和vertical-align属性将失效
7.1 容器属性:
	<div class = "upOnLevel">
		<div class = "item01">item01</div>
		<div class = "item02">item02</div>
		<div class = "item03">item03</div>
		<div class = "item04">item04</div>
		<div class = "item05">item05</div>
	</div>
-
flex-direction:决定主轴的方向(即项目的排列方向)
.box {
  flex-direction: row | row-reverse | column | column-reverse;
}
.upOnLevel { display: flex; flex-direction: column-reverse; width: 400px; height: 400px; border: 1px solid #D5D8DC; }row(默认值):主轴为水平方向,起点在左端。 row-reverse:主轴为水平方向,起点在右端。 column:主轴为垂直方向,起点在上沿。 column-reverse:主轴为垂直方向,起点在下沿。 -
flex-wrap:是否换行
.box{
  flex-wrap: nowrap | wrap | wrap-reverse;
}
nowrap(默认):不换行。即使父div宽度不够也不换,会对子div宽度进行压缩 wrap:换行,第一行在上方。 wrap-reverse:换行,第一行在下方。.upOnLevel { display: flex; flex-wrap: wrap-reverse; width: 400px; height: 400px; border: 1px solid #D5D8DC; } -
flex-flow:flex-flow属性是flex-direction属性和flex-wrap属性的简写形式,默认值为row nowrap
.box {
  flex-flow: <flex-direction> <flex-wrap>;
}
.upOnLevel { display: flex; flex-flow: row wrap; width: 400px; height: 400px; border: 1px solid #D5D8DC; } -
justify-content:定义项目在主轴上的对齐方式(当父div宽度不够时,没效果。除非和flex-flow一起使用)
flex-start(默认值):左对齐
flex-end:右对齐
center: 居中
space-between:两端对齐,项目之间的间隔都相等。
space-around:每个项目两侧的间隔相等。所以,项目之间的间隔比项目与边框的间隔大一倍。
.box { justify-content: flex-start | flex-end | center | space-between | space-around; }.upOnLevel { display: flex; flex-flow: row wrap; justify-content: center; width: 400px; height: 400px; border: 1px solid #D5D8DC; } -
align-items: 定义项目在交叉轴上如何对齐,如果项目没设置高度,或高度为auto,则占满整个容器
.box { align-items: flex-start | flex-end | center | baseline | stretch; }flex-start:交叉轴的起点对齐。 flex-end:交叉轴的终点对齐。 center:交叉轴的中点对齐。 baseline: 项目的第一行文字的基线对齐。 stretch(默认值):如果项目未设置高度或设为auto,将占满整个容器的高度。.upOnLevel { display: flex; flex-flow: column wrap; align-items: flex-end; width: 400px; height: 400px; border: 1px solid #D5D8DC; } -
align-content:定义了多根轴线的对齐方式。如果项目只有一根轴线,该属性不起作用
flex-start:与交叉轴的起点对齐。
flex-end:与交叉轴的终点对齐。
center:与交叉轴的中点对齐。
space-between:与交叉轴两端对齐,轴线之间的间隔平均分布。
space-around:每根轴线两侧的间隔都相等。所以,轴线之间的间隔比轴线与边框的间隔大一倍。
stretch(默认值):轴线占满整个交叉轴。
.box {
  align-content: flex-start | flex-end | center | space-between | space-around | stretch;
}
.upOnLevel {
	display: flex;
	flex-flow: row wrap;
	align-content: space-evenly;
	width: 400px;
	height: 400px;
	border: 1px solid #D5D8DC;
}
7.2 项目属性
-
order: 定义项目的排列顺序。数值越小,排列越靠前,默认为0
	<div class = "box">
		<div class = "one">1</div>
		<div class = "two">2</div>
		<div class = "three">3</div>
	</div>
.box { display: flex; border: 1px solid gray; width: 300px; height: 300px; } .one { background-color: blue; width: 50px; height: 50px; color: #FFFFFF; order: 2; } .two { background-color: red; width: 50px; height: 50px; color: #FFFFFF; order: -1; } .three { background-color: yellow; width: 50px; height: 50px; color: #FFFFFF; order: 0; } -
flex-grow :定义项目的放大比例,默认为0
.box { display: flex; border: 1px solid gray; width: 300px; height: 300px; } .one { background-color: blue; width: 50px; height: 50px; color: #FFFFFF; order: 2; flex-grow: 3; } .two { background-color: red; width: 50px; height: 50px; color: #FFFFFF; order: -1; flex-grow: 1; } .three { background-color: yellow; width: 50px; height: 50px; color: #FFFFFF; order: 0; flex-grow: 1; } -
flex-shrink: 定义了项目的缩小比例
-
flex-basis: 定义了在分配多余空间之前,项目占据的主轴空间(main size) 权重会width属性高
-
flex: flex-grow, flex-shrink 和 flex-basis的简写,默认值为0 1 auto 该属性有两个快捷键值,分别是auto(1 1 auto)等分放大缩小,与none(0 0 auto)不放大不缩小。
-
align-self: 允许单个项目有与其他项目不一样的对齐方式,可覆盖align-items属性。默认值为auto,表示继承父元素的align-items属性,如果没有父元素,则等同于stretch。
.item {
  align-self: auto | flex-start | flex-end | center | baseline | stretch;
}
Javascript
是一门脚本语言,ECMAScript可以理解是JavaScript的一个标准,最新版本为ES6。JS的解释器被称为JavaScript引擎,是浏览器的一部分,即:JavaScript是由客户端的浏览器解释执行的。
1. 入门
<!DOCTYPE html>
<html lang="en">
<head>


	<title>Document</title>


	<!-- script标签,写javaScript的代码 -->
	<script type="text/javascript">
		alert("Hello world")
	</script>
</head>
<body>


	<!-- 这里也可以写script标签 -->
</body>
</html>
<!DOCTYPE html>
<html lang="en">
<head>


	<title>Document</title>


	<!-- script标签,写javaScript的代码 -->
	<!-- <script type="text/javascript">
		alert("Hello world")
	</script> -->

	<!-- 外部引入  不用显示type,默认也是javascript -->
	<script src="js/demo01.js"></script>
</head>
<body>


	<!-- 这里也可以写script标签 -->
</body>
</html>
1.1 基础语法
<!DOCTYPE html>
<html lang="en">
<head>
<title>Document</title>
<!-- javascript严格区分大小写 -->
<script>
// 定义变量 变量类型 变量名 = 变量初始值;
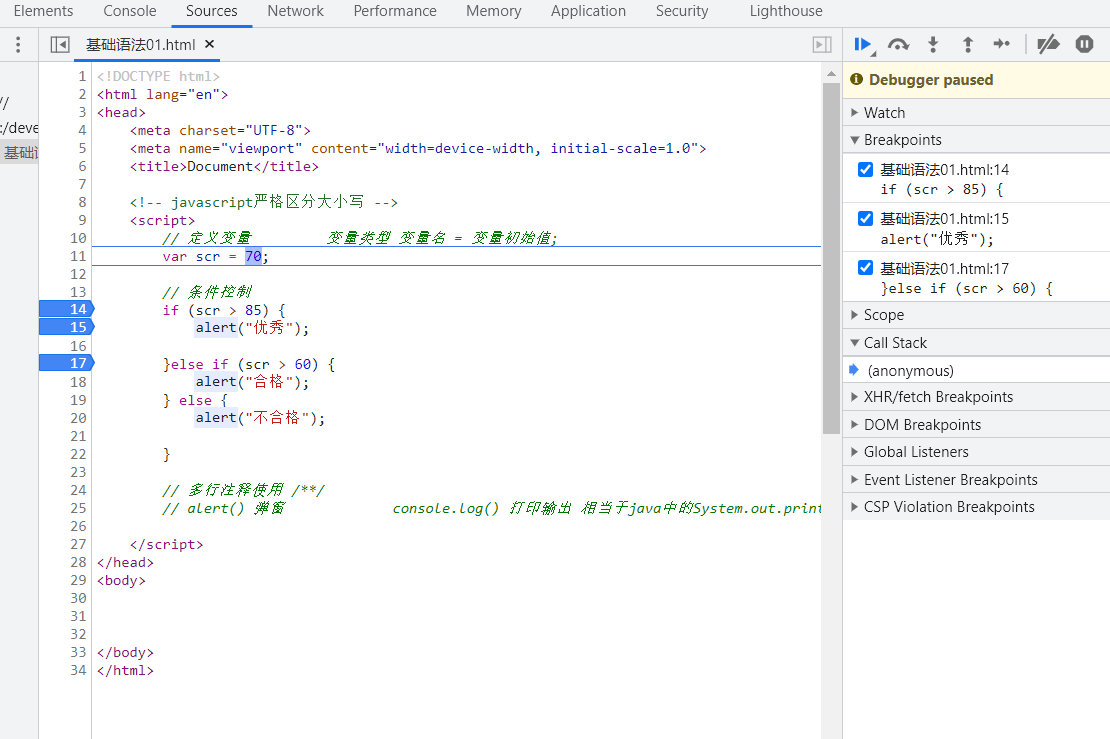
var scr = 70;
// 条件控制
if (scr > 85) {
alert("优秀");
}else if (scr > 60) {
alert("合格");
} else {
alert("不合格");
}
// 多行注释使用 /**/
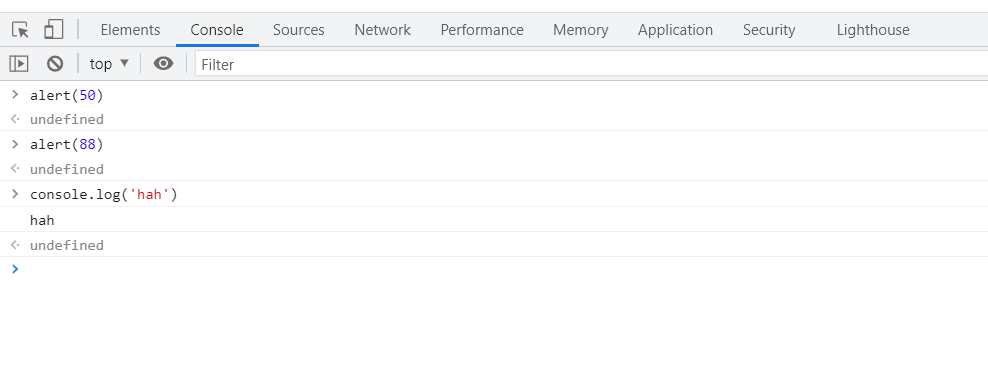
// alert() 弹窗 console.log() 打印输出 相当于java中的System.out.println()
</script>
</head>
<body>
</body>
</html>
1.2 数据类型
数值、文本、图像、音频、视频...
变量
var $n = 455; // 命名不能以数字、#开头
number
js不区分小数和整数
123   // 整数123
1.34  // 浮点数
1.235e3  // 科学计数法
-65  // 负数
NaN     // not a number
Infinity    //无穷数
字符串
'abc'
"hahha"
"你好"
布尔值
true, false
逻辑运算
&&

||

!
比较运算符
=  赋值运算
== 等于(类型不一样,值一样,也会判断为true)
=== 绝对等于(类型一样, 值一样,结果为true)
须知:
- NaN === NaN,为false,这个与所有的数字都不相等,包括自己
- isNaN(NaN),为true
浮点数问题:
- 1/3 === (1-2/3) 为fasle,尽量避免使用浮点数进行运算
- Math.abs((1/3) - (1 - (2/3))) < 0.00000000001 为true
null 和 undefined
- null 空
- undefined 未定义
数组
java数组必须是相同类型的对象, js则不需要
// 保证代码的可读性,尽量使用 []
		var arr = [1, 2, 3, "hello", null, true];
		var a = new Array(4, 6, 8, "hah", null, true)
取数组下标,如果越界了,则会undefined
对象 Object
对象使用{}, 数组使用[]。
每个属性之间使用逗号隔开,最后一个不需要添加
// java中 Person p = new Person()
		var oj = {
			name: "jack",
			age: 11,
			profession: "doctor"
		}
1.3 严格检查模式
<!DOCTYPE html>
<html lang="en">
<head>


	<title>Document</title>

	<!--
		前提: 在IDEA中需要设置支持 ES6 语法
		use strict: 严格检查模式,预防JavaScript的随意性导致产生的一些问题,放在第一行
		局部变量建议使用 let
	-->
	<script>
		"use strict";
		// 全局变量
		let i = 10;

		// ES6中的 局部变量使用let
	</script>
</head>
<body>

</body>
</html>
2. 数据类型
2.1 字符串
-
字符串一般使用单引号(‘ ’) 或者双引号(“ ”)
<script> "use strict"; var a = 'aa'; var b = "bb"; </script> -
注意转义字符
<script> "use strict"; var c = "I\'m" var d = 'xxx\nyyy'; var e = 'hah\thah'; var f = "\u4e2d"; // \u#### unicode字符 var g = '\x41'; // Ascll字符 </script> -
多行字符编写
<script> "use strict"; // 使用tab键上面的键 var msg = `hello, Ethan, ahahh ` </script> -
模板字符串
<script> "use strict"; let a = 'aa'; var msgg = `hello, ${a}` </script> -
字符串长度
str.length -
字符串的可变性、不可变性
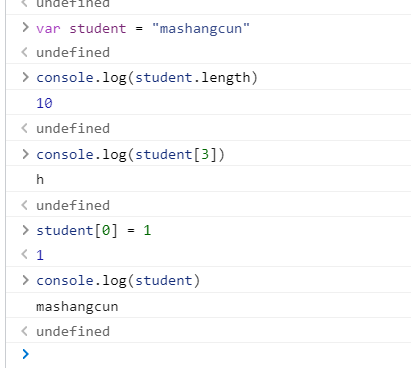
-
大小写转换
student.toUpperCase(); student.toLowerCase(); -
获取索引
student.indexOf('s') -
截取子串
student.substring(1, 4);
student.substring(3)
2.2 数组
-
Array可以包含任意的数据类型
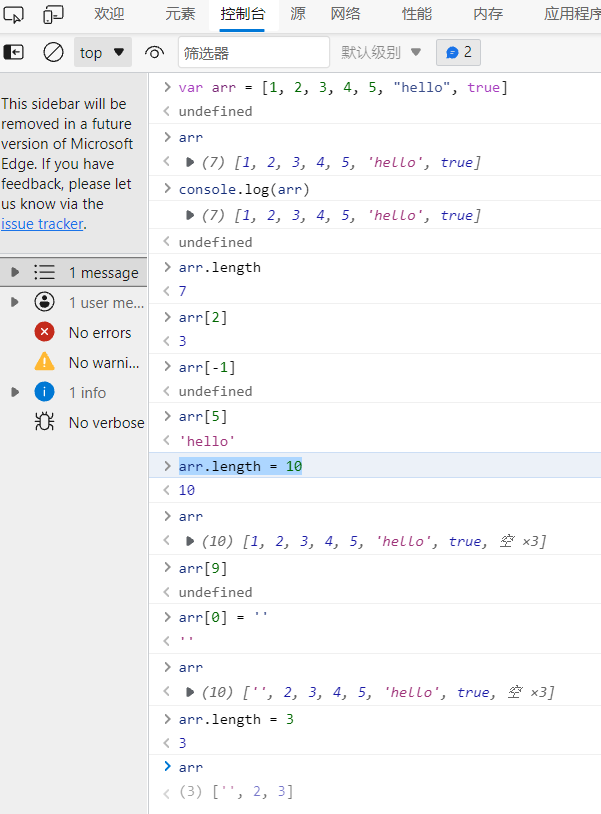
var arr = [1, 2, 3, 4, 5, "hello", true]
// 获取数组中的某个元素
arr[2]
// 获取数组的长度
arr.length
// 修改数组的长度
arr.length = 10
-
获取某个元素的下标索引 indexOf()
arr.indexOf(2) -
截取数组中的部分元素,返回一个新的数组 slice()
var arr = [1, 2, 3, 4, 5, "hello", true] arr.slice(3) > (4) [4, 5, 'hello', true] arr > (7) [1, 2, 3, 4, 5, 'hello', true] arr.slice(2, 7) > (5) [3, 4, 5, 'hello', true] var arr01 = arr.slice(2, 6) arr > (7) [1, 2, 3, 4, 5, 'hello', true] -
往尾部添加、删除元素 push()、pop()
arr > (7) [1, 2, 3, 4, 5, 'hello', true] arr.push('1', 50) > 9 arr > (9) [1, 2, 3, 4, 5, 'hello', true, '1', 50] arr.pop() > 50 arr > (8) [1, 2, 3, 4, 5, 'hello', true, '1'] var res = arr.pop() res > '1' -
往头部添加、删除元素 unshift()、shift()
arr > (7) [1, 2, 3, 4, 5, 'hello', true] arr.unshift('a', 15) > 9 arr > (9) ['a', 15, 1, 2, 3, 4, 5, 'hello', true] arr.shift() > 'a' arr > (8) [15, 1, 2, 3, 4, 5, 'hello', true] -
排序 sort()
var arr = [] > undefined arr > [] arr.push('a') > 1 arr > ['a'] arr.unshift('b') > 2 arr.push('c') > 3 arr > (3) ['b', 'a', 'c'] arr.sort() > (3) ['a', 'b', 'c'] -
反转 reverse()
arr.reverse() > (3) ['c', 'b', 'a'] -
拼接 concat(), 返回一个新的数组
arr.concat(1, 2, 3) > (6) ['c', 'b', 'a', 1, 2, 3] arr > (3) ['c', 'b', 'a'] -
数组变成字符串 join()
arr > (3) ['c', 'b', 'a'] arr.join('-') > 'c-b-a' arr > (3) ['c', 'b', 'a'] -
多维数组
var arr = [[1,2], [3, true], ['a', 4]]
> undefined

arr
> (3) [Array(2), Array(2), Array(2)]

arr[1][1]
> true

arr.length
> 3
3. 对象
若干键值对 {}, javascript中的所有键都是字符串,值是任意对象 JavaScript 中所有变量都可以当作对象使用,除了两个例外 null和undefined
var 对象名 = {
    属性名:属性值,
    属性名:属性值
}
var oj = {
			name: "jack",
			age: 11,
			profession: "doctor",
			hobby: "dancing"
		}
-
获取对象
oj > {name: 'jack', age: 11, profession: 'doctor', hobby: 'dancing'} oj.name > 'jack' oj.sss > undefined // 并未报错 -
对象属性赋值
oj.name = "alex" > 'alex' oj > {name: 'alex', age: 11, profession: 'doctor', hobby: 'dancing'} -
删除对象属性 delete
delete oj.age > true oj > {name: 'alex', profession: 'doctor', hobby: 'dancing'} -
添加对象属性值
oj > {name: 'alex', profession: 'doctor', hobby: 'dancing'} oj.age = 15 > 15 oj > {name: 'alex', profession: 'doctor', hobby: 'dancing', age: 15} -
判断属性值是否在对象中 xxx in xxx
oj['name']
> 'alex'

'mame' in oj
> false

'name' in oj
> true

// 继承父类
'toString' in oj
> true
- 判断一个属性是否是这个对象拥有的 hasOwnProperty
oj.hasOwnProperty("toString")
> false

oj.hasOwnProperty('hobby')
> true
3. 流程控制
3.1 if 语句
	<script>
		var num = 4;

		if (num > 75) {
			alert(">75");

		}else if (num > 50) {
			alert("大于50,小于75");

		}else {
			alert("小于50");
		}
	</script>
3.2 switch 语句
	var cas = 1;
		switch (cas) {
			case 0:
				console.log('0');
				break;
			case 1:
				console.log('1');
				break;
			case 2:
				console.log('2');
				break;
			default:
				console.log('others');
		}
3.3 循环语句
for循环
	for (let i = 0; i < 100; i++) {
			i++;
			console.log(i)
		}


	let i = 40;
		for (; i < 100; i++) {
			i++;
			console.log(i)
		}
while循环
	let i = 10;
		while (i < 100) {
			i++;
			console.log(i)
		}

		let i = 60
		do{
			console.log(i)
		}while(i < 50)
forEach
		var arr = [11, 22, 44, true, "hello"];
		arr.forEach(function(arg){
			console.log(arg)
		})
for...in
		for (var index in arr){
			console.log(index);           // 输出索引
			console.log(arr[index])

		}
3.4 Map和Set
ES6增加的特性
map
	<script>
		// ES6中新增
		var map = new Map([["tom", 86], ["alex", 56], ["ethan", 88]]);
		var item01 = map.get('tom');                                        // 通过key获取value\
		console.log(item01);

		map.set("sandro", 75);               // 修改或者新增元素
		console.log(map);

		map.set("sandro", 70);
		console.log(map);

		map.delete("sandro");                // 删除
		console.log(map)


	</script>
set: 无序不重复的集合
var set = new Set([1, 5, 3, 3, 3, 2, 2]);      // Set可以去重
		console.log(set);

		set.add(4);                        // 添加
		console.log(set);

		set.delete(5);                     // 删除
		console.log(set)

		console.log(set.has(2))              // 是否存在
3.5 iterator
for(... of ...){}
针对数组
	var arr = [5, 4, 3, true, 'hello'];
		for (let item of arr) {
			console.log(item);
		};
针对map
	var map = new Map([["alex", "hah"], ["ethan", 11], ["sandro", 21]]);
		for (let i of map) {
			console.log(i);
		}
针对set
	var set = new Set([0, 9, 8, false, "hah"]);
		for (let item of set) {
			console.log(item)
		}
4. 函数
4.1 定义函数
定义方式一
绝对值函数
	function abs (x){
			if (x >= 0) {
				return x;
			} else {
				return -x;
			}
		}
一旦执行到return,代表函数结束,返回结果
如果没有执行return,函数执行完也会返回结果,结果就是undefined
定义方式二
	var abs = function(x){
			if (x >= 0) {
				return x;
			}	else {
				return -x;
			}
		}
function(x){...}是一个匿名函数,但是可以把结果赋值给abs,通过abs就可以调用函数。
调用函数
abs(10)
> 10

abs(0)
> 0

abs(-5)
> 5

abs()
> NaN
参数问题:javascript可以传递任意个参数,也可以不传递参数
参数进来是否存在问题?
假设不存在参数?如何规避?
	var abs = function(x){
			// 手动抛出异常
			if(typeof(x) !== 'number'){
				throw 'not a number';
			};

			if (x >= 0) {
				return x;
			}	else {
				return -x;
			}
		}
arguments
arguments是一个JS免费赠送的关键字,代表传递进来的所有参数,是一个数组
	var abs = function(x){

			console.log("x>>" + x);
			for(var i = 0; i < arguments.length; i++){
				console.log(arguments[i]);
			}

			if (x >= 0) {
				return x;
			} else {
				return -x;
			}

		}
问题: arguments包含所有的参数,有时我们只想取其中的某部分参数时
rest
以前:
<script>
		"use strict";
		function mulArg(a, b){

			console.log("a>>" + a);
			console.log("b>>" + b);

			if (arguments.length > 1) {
				for (let i = 1; i < arguments.length; i++) {
					// ...
				}
			}

		}
	</script>
ES6引入的新特性,获取除了已经定义的参数之外的所有参数
<script>
		"use strict";
		function mulArg(a, b, ...rest){
			console.log("a>>" + a);
			console.log("b>>" + b);
			console.log(rest);

		}
	</script>
rest参数只能写在最后,必须使用...进行标识
4.2 变量
Js中,使用var声明的变量是有作用域的,比如在函数体内声明的,则在函数体外不可以使用(可以使用闭包解决,闭包:http://www.ruanyifeng.com/blog/2009/08/learning_javascript_closures.html)
		function trial01(){
			var x = 1;
			x = x + 1;
		}

		x = x * 3;             // ReferenceError: x is not defined
当两个函数体内使用了相同的变量名时,并不影响
		function trial01 (){
			var x = 1;
			x = x + 1;
		}

		function trial02 (){
			var x = 'a';
			x = x + 'b';
		}
内部函数可以访问外部函数所声明的成员,但是反之不可以
	function trial03() {
			var a = 3;

			// 内部函数可以访问外部函数所声明的成员,但是反之不可以
			function innerF () {
				var b = a + 1;
			};

			var c = b + 1;          // Uncaught ReferenceError: b is not defined

		}
	function test01() {
			var x = 'a';

			function innerTest(){
				var x = 'b';
				console.log("inner>>" + x);
			};
			console.log("outer>>" + x);              // 输出
			// innerTest();
		}

		test01();
在JS中,函数查找变量从自身函数开始。
提升变量的作用域
	function test02(){
			var x = 'a ' + y;
			console.log(x);
			var y = 'b';
		}
test02()
> a undefined
说明:JS执行引擎,自动提升了变量y的声明,但是不会提升y的赋值
	function test03() {
			// var x, y, z,...   定义多个变量
			var y;
			var x = 'a ' + y;
			console.log(x);
			y = 'b';
		}
全局作用域
		// 全局变量
		var global_viriable = 12;
		function test04(){
			console.log(global_viriable);
		};
		test04();
		console.log(global_viriable);
全局对象 window
var x = 'hello';
alert(x);
alert(window.x)          // 默认所有的全局变量,都会自动绑定在window对象上
alert()函数本身也归属于window对象
window.alert(x);
window.alert(window.x)
		var x = 'hello';

		window.alert(x);
		var old_alert = window.alert;
		// old_alert(x);

		window.alert = function(){
		};

		// // alert()失效
		window.alert(123);

		// 恢复
		window.alert = old_alert;
		window.alert(345);
JS中实际上只有一个全局作用域,任何变量(函数也可以视为变量),假设没有在函数作用范围内找到,就会向外查找。如果在全局作用域中找不到,就会报Uncaught ReferenceError
规范
由于我们所有的全局变量都会绑定在window对象上,如果不同的JS文件,使用了相同的全局变量就会造成冲突 ----》 解决方法:将自己的代码全部放入自己定义的唯一空间名字中。
		// 唯一的全局变量
		var glo_v = {};

		// 定义全局变量
		glo_v.name = "alex";
		glo_v.add = function (a, b) {
			return a + b;
		}
局部作用域
		function test01(){
			for (var i = 0; i < 100; i++) {
				console.log(i);
			}
			console.log(i + 2);   // 问题? i出了for循环这个作用域还可以使用
		}
ES6中出现了let关键字,解决局部作用域冲突的问题
		function test02() {
			for(let i = 0; i < 100; i++){
				console.log(i);

			}
			console.log(i);         // Uncaught ReferenceError: i is not defined
		}
建议都使用let去定义局部作用域的变量
常量 const
在ES6Z之前,常量的声明:使用全部是大写的字母,建议不要修改值
		// ES6之前 常量的声明
		var PI = 3.14;
		console.log(PI);
		PI = 345;                   // 可以修改值
		console.log(PI);
ES6之后引入const关键字
		// ES6
		const PI = 3.14;
		console.log(PI);
		PI = 67;
		console.log(PI)             // Uncaught TypeError: invalid assignment to const 'PI'
4.3 方法
定义方法
方法就是把函数放在对象里面,对象只有属性和方法
		var alex = {
			name: "jack",
			birth: 1995,
			age: function(){
				var now = new Date().getFullYear();
				return now - this.birth;
			}
		}
// 调用方法
alex.age()
> 26

// 调用属性
alex.name
> "jack"
this代表什么,拆开上面代码
		function getAge(){
			var now = new Date().getFullYear();
			return now - this.birth;
		}

		var someBody = {
			name: "ethan",
			birth: 2000,
			age: getAge
		}

        someBody.age()    this代表someBody
        getAge() 返回NaN    此时this代表window
this代表着调用它的那个对象
apply
在JS中可以控制 this 指向 主动调用
console.log(getAge.apply(someBody, []) ) // this指向someBody, 参数为空
5. 内部对象
标准对象
typeof(123)
> 'number'

typeof("")
> 'string'

typeof('123')
> 'string'

typeof(true)
> 'boolean'

typeof(NaN)
> 'number'

typeof []
> 'object'

typeof({})
> 'object'

typeof Math.abs
> 'function'

typeof Math
> 'object'

typeof undefined
> 'undefined'
undefined和null的区别:https://www.ruanyifeng.com/blog/2014/03/undefined-vs-null.html
5.1 Date
		var date = new Date();           // Date Wed Sep 29 2021 21:41:13 GMT+0800 (中国标准时间)
		date.getFullYear();               // 年
		date.getMonth();                  // 月   从0开始,使用时候要+1
		date.getDate();                   // 日
		date.getDay();                   // 星期几
		date.getHours();                 // 小时
		date.getMinutes();               // 分
		date.getSeconds();               // 秒

		date.getTime()              // 1632923041909 得到的是时间戳

		console.log(new Date(1632923041909))     // 将时间戳转为 Wed Sep 29 2021 21:44:01 GMT+0800 (中国标准时间)
转换
		var now = new Date(1632923041909);
 		now.toLocaleString();                           // "2021/9/29 下午9:44:01"
 		now.toDateString();                             // "Wed Sep 29 2021"
 		now.toTimeString();                              // "21:44:01 GMT+0800 (中国标准时间)"
 		now.toUTCString();                               // "Wed, 29 Sep 2021 13:44:01 GMT"
5.2 JSON
- JSON(JavaScript Object Notation(符号;乐谱;注释;记号法), JS 对象简谱) 是一种轻量级的数据交换格式
- 简洁和清晰的层次结构使得 JSON 成为理想的数据交换语言
- 易于人阅读和编写,同时也易于机器解析和生成,并有效地提升网络传输效率
在javascript中一切皆为对象,任何JS支持的类型都可以用JSON表示
格式:
- 对象{}
- 数组[]
- 键值对 key:value
JSON字符串和JS对象的转换
		var user = {
			name: "alex",
			age: 22,
			gender: "男"
		}

		// 将对象转为json字符串
		var jsonUser = JSON.stringify(user);    // '{"name":"alex","age":22,"gender":"男"}'

		//将json字符串转为JS对象
		var oj = JSON.parse('{"name":"alex","age":22,"gender":"男"}')      // {name: 'alex', age: 22, gender: '男'}
JSON和JS对象区别
JSON字符串: '{"name":"alex","age":22,"gender":"男"}'
JS对象: {name: 'alex', age: 22, gender: '男'}
5.3 Ajax
- 原生的JS写法:xhr(代表Ajax异步请求)
- jQuery封装好的方法: $("#id").ajax("")
- axios请求
6. 面向对象编程
- 类: 模板 就是原型对象
- 对象:具体的实例
在javascript中有些区别:
- 原型对象:
		var student = {
				name: "贰万",
				age: 22,
				run: function(){
					return this.name + " running..."
				}
			};

			var xiaoming = {
				name: "xiaoming"
			};


			// 原型对象  xiaoming的原型是student
			xiaoming.__proto__ = student;


			// var bird = {
			// 	fly: function () {
			// 		return " fly..."
			// 	}
			// };

			// xiaoming.__proto__ = bird;
		// ES6之前
		function Student(name) {
			this.name = name;
		}

		// 给student新增一个hello方法
		Student.prototype.hello = function (){
			alert("hello");
		}
class继承
class关键字是在ES6中引入
- 定义一个类,属性、方法
		// ES6之后
		// 定义一个学生类
		class Student{
			// 属性
			constructor(name){
				this.name = name;
			};
			// 方法
			hello(){
				alert("hello")
			}

		}

		var xm = new Student("xiaoming");
		var hg = new Student("huangta");
xm.name
> 'xiaoming'
hg.name
> 'huangta'
- 继承
class Student{
constructor(name){
this.name = name;
}
hello () {
alert("hello");
}
};
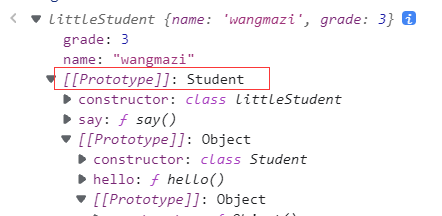
class littleStudent extends Student {
constructor(name, grade){
super(name);
this.grade = grade;
}
say () {
alert("我是一名小学生")
}
};
var zhangsan = new Student("zhangsan");
var wangmazi = new littleStudent("wangmazi", 3)
本质: 查看原型对象
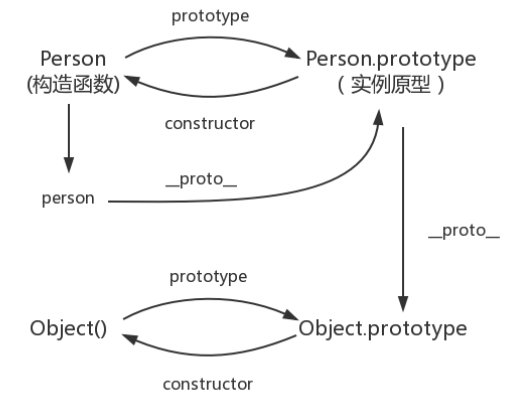
原型链
原型:每一个javascript对象(除null外)创建的时候,就会与之关联另一个对象,这个对象就是我们所说的原型,每一个对象都会从原型中“继承”属性。
function Person(age) {
    this.age = age
}
Person.prototype.name = 'kavin'
var person1 = new Person()
var person2 = new Person()
console.log(person1.name) //kavin
console.log(person2.name)  //kavin
function Person() {

}
var person = new Person();
console.log(person.__proto__ === Person.prototype); // true

console.log(Person===Person.prototype.constructor)  //true

console.log(person.__proto__ == Person.prototype) // true
console.log(Person.prototype.constructor == Person) // true
console.log(person.constructor === Person); // true
function Person() {

}

Person.prototype.name = 'Kevin';

var person = new Person();

person.name = 'Daisy';
console.log(person.name) // Daisy

delete person.name;
console.log(person.name) // Kevin
原型链:
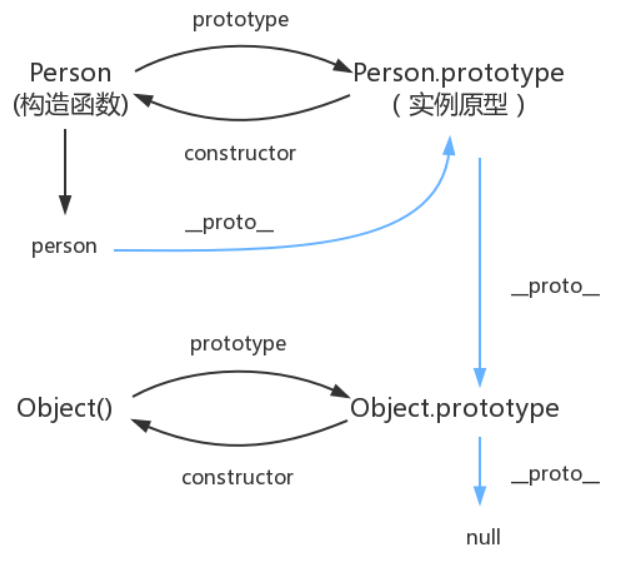
console.log(Object.prototype.__proto__ === null) // true
7. 操作BOM对象
BOM(Browser Object Model) 是指浏览器对象模型
html是主体,装载各种dom元素;css用来装饰dom元素;javascript控制dom元素。
window
全局对象、浏览器窗口
window.alert(456)

window.Date()
> 'Thu Sep 30 2021 09:20:43 GMT+0800 (中国标准时间)'

window.innerHeight
> 750

window.innerWidth
> 242

window.outerHeight
> 836
Navigator
封装了浏览器的信息
navigator.appName
> 'Netscape'

navigator.language
> 'zh-CN'

navigator.appVersion
> '5.0 (Windows NT 10.0; Win64; x64) AppleWebKit/537.36 (KHTML, like Gecko) Chrome/94.0.4606.61 Safari/537.36 Edg/94.0.992.31'

navigator.userAgent
> 'Mozilla/5.0 (Windows NT 10.0; Win64; x64) AppleWebKit/537.36 (KHTML, like Gecko) Chrome/94.0.4606.61 Safari/537.36 Edg/94.0.992.31'

navigator.platform
> 'Win32'
大多情况,不建议使用 navigator 对象,因为会被人修改!不建议使用这些属性进行判断和编写代码
screen
屏幕大小
screen.width
> 1536
screen.height
> 864
location
代表当前页面的URL信息
locatoion
> host: "www.baidu.com"
> hostname: "www.baidu.com"
> href: "https://www.baidu.com/"
> origin: "https://www.baidu.com"
> protocol: "https:"
> reload: ƒ reload()                  // 刷新页面
// 设置新的链接
location.assign('https://www.sina.com.cn/')
document
代表当前的页面,HTML DOM文档树
document.title
> '百度一下,你就知道'
document.title = "hah"
> 'hah'
document.URL
> 'https://www.baidu.com/'
获取具体的文档树节点
	<dl id = "define">
		<dt>科目</dt>
		<dd>马术</dd>
		<dd>射击</dd>
		<dd>球类</dd>
	</dl>

	<script>
		var d = document.getElementById("define");
	</script>
获取cookie
document.cookie
> 'BAIDUID_BFESS=22AACD56DFB0C1ED1AC848B8FDD48CF9:FG=1; BIDUPSID=247D4B9EA9E42AD2A50DE1381E19D85D; PSTM=1627260089; BAIDUID=247D4B9EA9E42AD2433B7B3CD0353BD7:FG=1; COOKIE_SESSION=3_1_5_5_3_9_0_0_3_4_0_0_3137994_0_3_0_1630398226_1627260104_1630398223%7C5%230_1_1627260100%7C1; BDUSS=RVLTZRVEp2cnNHOXpXQWdKeVJxMkJLNGJIdmdxaVZrYk5OWDNsTWFMUkMtbmxoSVFBQUFBJCQAAAAAAAAAAAEAAABHm3UY19O1rzMwMwAAAAAAAAAAAAAAAAAAAAAAAAAAAAAAAAAAAAAAAAAAAAAAAAAAAAAAAAAAAAAAAAAAAAAAAAAAAEJtUmFCbVJhTz; BD_HOME=1; H_PS_PSSID=34649_34529_34067_31254_34550_34712_34584_34518_26350_34424_34683; BD_UPN=12314753; sugstore=1; BA_HECTOR=8l0h0g202485a0007i1gla5k90q'
劫持cookie
例如同时打开淘宝和天猫,登录淘宝,天猫根据cookie也会登录
<script src = "xx.js"></script>
<!--恶意人员,获取你的cookie上传到他的服务器-->
服务器端可以设置cookie:httpOnly
history
浏览器的历史纪录(不建议使用)
history.back()          // 后退
history.forward()       // 前进
8. 操作DOM对象
文档对象模型(Document Object Model,简称DOM)
核心
浏览器网页就是一个Dom树形结构!
- 更新:更新Dom节点
- 遍历dom节点:得到dom节点
- 删除:删除dom节点
- 添加:添加新的节点
要操作一个dom节点,就必须要先获得这个dom节点
获得dom节点
	<div id = "div_block">
		<h1>title</h1>
		<p id = "first">p1</p>
		<p class = "second">p2</p>
	</div>


	<script>
		var block = document.getElementById('div_block');
		var headline = document.getElementsByTagName('h1');
		var fir = document.getElementById('first');
		var sec = document.getElementsByClassName("second")

		var childrens = block.children;           // class没有这个属性

		// fir.nextElementSibling
		// block.firstElementChild
		// block.children

	</script>
更新节点
	<div id = 'hah'>天气</div>
	<script>
		var ha = document.getElementById('hah');
	</script>
ha
> <div id="hah">天气</div>
ha.innerText
> '天气'
ha.innerText = "晴朗"
> '晴朗'
ha.innerHTML = "<strong>草</strong>"
> '<strong>草</strong>'
ha.innerHTML = '<em>走开</em>'
> '<em>走开</em>'
ha.style.color = 'blue'
> 'blue'
ha.style.fontSize = 20px
> VM615:1 Uncaught SyntaxError: Invalid or unexpected token
ha.style.fontSize = '20px'
> '20px'
删除节点
步骤:先获取父节点,再通过父节点删除自己
	<div id = "box">
		<div id = "first">1</div>
		<div class = "second">2</div>
		<div>3</div>
	</div>

	<script>
		var self = document.getElementById("first");
		var parent = first.parentElement;
		parent.removeChild(self)

		// 动态的删除
		parent.removeChild(parent.children[0])
		parent.removeChild(parent.children[0])
		parent.removeChild(parent.children[1])

	</script>
注意: 删除多个节点的时候,children[i]是在时刻变化的,删除节点时需注意
插入节点
获得某个dom节点,假设这个dom节点为空,可以通过innerText或innerHTML增加元素。但是这个dom节点已经存在元素,就不能这样操作,因为会被覆盖
追加
	<div id = js>javascript</div>
	<div id = 'list'>
		<div id = 'ee'>javaEE</div>
		<div id = 'se'>javaSE</div>
		<div id = 'me'>javaME</div>
	</div>

	<script>
		var
			js = document.getElementById('js'),
			lis = document.getElementById('list');
			lis.appendChild(js)   // 追加
	</script>
创建一个新的标签,实现插入
	<div id = js>javascript</div>
	<div id = 'list'>
		<div id = 'ee'>javaEE</div>
		<div id = 'se'>javaSE</div>
		<div id = 'me'>javaME</div>
	</div>

	<script>
		var
			js = document.getElementById('js'),
			lis = document.getElementById('list');
			// lis.appendChild(js)   // 追加


			// 创建一个新的节点div
			var newDiv = document.createElement("div");
			newDiv.id = "nd";
			newDiv.innerText = "hello, man";
			lis.appendChild(newDiv)

			// 创建一个标签节点
			var myScript = document.createElement("script");
			myScript.setAttribute('type', 'text/javascript');


			// 创建一个style标签
			var myStyle = document.createElement("style");
			myStyle.setAttribute("type", "text/css");
			myStyle.innerHTML = "body{background-color: gray;}";                           // 设置标签内容

			document.getElementsByTagName("head")[0].appendChild(myStyle)

	</script>
insert
	<div id = "js">javascript</div>
	<div id = "list">
		<div id = "se">javase</div>
		<div id = "ee">javaee</div>
		<div id = "me">javame</div>
	</div>

	<script>

		var js = document.getElementById("js");
		var se = document.getElementById("se");
		var lis = document.getElementById("list");

		lis.insertBefore(js, se)

	</script>
9. 操作表单
表单 form DOM树
文本框 text
下拉框 select
单选框 radio
多选框 checkbox
影藏域 hidden
密码框 password
表单目的:提交信息
提交表单
<form method="post">
		<span>用户名: </span><input type = "text" name = "username" id = "name">


		<div>
			<span>性别: </span>
			<input type="radio" name = "gender" value = "male" id = "boy" checked>男
			<input type="radio" name = "gender" value = "female" id = "girl">女

		</div>
	</form>


	<script>
		var username = document.getElementById('name')

		// 通过username.value获取值
		username.value;
		// 通过username.value修改值
		username.value = "csac";


		var
			male = document.getElementById('boy'),
			female = document.getElementById('girl');

		// 对于单选框还是多选框使用male.value 或者female.value只能获取单前本身的值,
		female.checked;                   // 查看返回的结果,是否为true,即是否被选中
		female.checked = true;

	</script>
验证表单和加密(MD5)
<script src="https://cdn.bootcss.com/blueimp-md5/2.10.0/js/md5.min.js"></script>
<form action = "#" method = "post">

		<div><span>用户名: </span><input type = "text" name = "username" id="username"></div>
		<div><span>密码: </span><input type= "password" name="pwd" id = "pwd"></div>

		<!-- 绑定事件 onclick被点击 -->
		<!-- <div><input type = "submit" name = "提交" onclick = "trigger()"></div> -->
		<button type = "submit" onclick  ="trigger()">提交</button>

	</form>

	<script type="text/javascript">
			function trigger(){
				var username = document.getElementById("username");
				var pwd = document.getElementById('pwd');

				// MD5算法
				pwd.value = md5(pwd.value)

			}

	</script>
<!DOCTYPE html>
<html lang="en">
<head>


	<title>Document</title>

	<script src="https://cdn.bootcss.com/blueimp-md5/2.10.0/js/md5.min.js"></script>
</head>
<body>
	<!-- 表单绑定提交事件
	onsubmit = 绑定一个提交检测的函数:true或false,将这个结果返回给表单,使用onsubmit接受 -->
	<form action = "#" method = "post" accept-charset = "utf-8" onsubmit = "return trigger()">
		<div>
			<span>用户名:</span><input type = "text" name = "username" id = "username">
		</div>
		<div>
			<span>密码:</span><input type = "password" id = "ipwd">
		</div>
		<input type = "hidden" name = "pwd" id = "hpwd">
		<button type = "submit">提交</button>

	</form>

	<script>
		function trigger(){
			var
				username = document.getElementById('username'),
				input_pwd = document.getElementById('ipwd'),
				hidden_pwd = document.getElementById("hpwd");

				// input_pwd.value = md5(input_pwd.value);
				hidden_pwd.value = md5(input_pwd.value);

				// 可以校验判断表单的内容,true就是通过提交,false就是不通过
				return true;

		}
	</script>

</body>
</html>
10. jQuery
javascript
jQuery库,里面存在大量的javascript函数
获取jQuery
<!DOCTYPE html>
<html lang="en">
<head>


	<title>Document</title>
	<!-- cdn 引入 -->
	<script src="http://code.jquery.com/jquery-migrate-1.2.1.min.js"></script>
</head>
<body>

</body>
</html>
<!DOCTYPE html>
<html lang="en">
<head>


	<title>Document</title>
	<!-- cdn 引入 -->
	<script crossorigin="anonymous" integrity="sha512-n/4gHW3atM3QqRcbCn6ewmpxcLAHGaDjpEBu4xZd47N0W2oQ+6q7oc3PXstrJYXcbNU1OHdQ1T7pAP+gi5Yu8g==" src="https://lib.baomitu.com/jquery/3.6.0/jquery.js"></script>
</head>
<body>

	<!-- 公式:
		$(selector).action()
	 -->


	 <a href="#" id = "test_jQuery">点我</a>

	 <script type="text/javascript">
	 	// 选择器就是css中的选择器:标签选择器、类选择器、id选择器
	 	$('#test_jQuery').click(function(){
	 		alert("hello")
	 	})
	 </script>

</body>
</html>
相关文档: https://jquery.cuishifeng.cn/
选择器
<script type="text/javascript">
		// 原生js,选择器少
		// 标签
		document.getElementsByTagName();
		// id
		document.getElementById();
		// 类
		document.getElementsByClassName();


		// jQuery css中选择器
		$('div').click();
		$('#div').click();
		$('.div').click();
	</script>
事件
鼠标事件、键盘事件、其他事件
<!DOCTYPE html>
<html lang="en">
<head>


	<title>Document</title>

	<script crossorigin="anonymous" integrity="sha512-n/4gHW3atM3QqRcbCn6ewmpxcLAHGaDjpEBu4xZd47N0W2oQ+6q7oc3PXstrJYXcbNU1OHdQ1T7pAP+gi5Yu8g==" src="https://lib.baomitu.com/jquery/3.6.0/jquery.js"></script>

	<style type="text/css">
		#divMove {
			width: 300px;
			height: 300px;
			border: 1px solid blue;

		}
	</style>
</head>
<body>

	mouse: <span id = "mouseMove"></span>

	<div id = "divMove">
		在这里移动鼠标试试
	</div>


	<script type="text/javascript">
		// 当网页元素加载完毕之后,响应事件
		// $(document).ready(function () {

		// })

		$(function(){
			$('#divMove').mousemove(function(e){
				$('#mouseMove').text('x:' + e.pageX + 'y:' + e.pageY)
				// console.log(e.pageX)
			})
		})

	</script>
</body>
</html>
操作dom
<!DOCTYPE html>
<html lang="en">
<head>


	<title>Document</title>

	<script crossorigin="anonymous" integrity="sha512-n/4gHW3atM3QqRcbCn6ewmpxcLAHGaDjpEBu4xZd47N0W2oQ+6q7oc3PXstrJYXcbNU1OHdQ1T7pAP+gi5Yu8g==" src="https://lib.baomitu.com/jquery/3.6.0/jquery.js"></script>
</head>
<body>

	<ul id = "test-ul">
		<li class = "js">javascript</li>
		<li name = "python">python</li>
	</ul>

	<script type="text/javascript">
		$('#test-ul li[name = python]').text();
		$('#test-ul').html();
	</script>

</body>
</html>
Vue
网络通信:axios
页面跳转:vue-router
状态管理:vuex
Vue-UI: ICE
Webpack
它是一个静态模块打包器
export: 导出 显示的暴露接口
require: 同步加载所需依赖的其他模块
安装:
npm install webpack -g
npm install webpack-cli -g

测试安装成功与否:
webpack -v
webpack-cli -v
配置:
创建 webpack.config.js 文件
entry: 入口文件, 指定webpack用哪个文件作为项目的入口
output: 输出, 指定webpack把处理完成的文件放置到指定路径
module: 模块 ,用于处理各种类型的文件
plugins: 插件, 如热更新、代码重用等
resolve: 设置路径指向
watch: 监听,用于设置文件改动后直接打包
使用
-
创建一个webpack项目
-
创建一个名为 modules 的目录,用于放置JS模块等资源文件
-
在modules下创建模块文件,如 hello.js, 用于编写JS模块相关代码
-
在modules下创建一个名为 main.js 的入口文件,用于打包时设置entry属性
-
在项目目录下创建webpack.config.js配置文件,使用webpack命令打包


【推荐】国内首个AI IDE,深度理解中文开发场景,立即下载体验Trae
【推荐】编程新体验,更懂你的AI,立即体验豆包MarsCode编程助手
【推荐】抖音旗下AI助手豆包,你的智能百科全书,全免费不限次数
【推荐】轻量又高性能的 SSH 工具 IShell:AI 加持,快人一步
· 震惊!C++程序真的从main开始吗?99%的程序员都答错了
· 【硬核科普】Trae如何「偷看」你的代码?零基础破解AI编程运行原理
· 单元测试从入门到精通
· 上周热点回顾(3.3-3.9)
· Vue3状态管理终极指南:Pinia保姆级教程