
sonarqube7.9.6 + postgresql搭建教程
sonarqube7.9.6 + postgresql搭建教程
1.下载软件包并解压
[root@sonar ~]# ll
total 386836
-rw-------. 1 root root      1488 Feb 11  2020 anaconda-ks.cfg
-rw-r--r--  1 root root       507 Apr 26  2020 hostname_ip.sh
-rw-r--r--  1 root root 187513052 Aug 24 21:38 openjdk-11.0.2_linux-x64_bin.tar.gz  #jdk需要11版本
-rw-r--r--  1 root root 208595927 Aug 24 21:38 sonarqube-7.9.6.zip
[root@sonar ~]# unzip sonarqube-7.9.6.zip -d /usr/local/
2.配置jdk
[root@sonar ~]# tar xvf openjdk-11.0.2_linux-x64_bin.tar.gz -C /usr/local/
#sonarqube不支持root用户启动,创建启动用户
[root@sonar ~]#useradd sonarqube
[root@sonar ~]#echo '123456'|passwd --stdin sonarqube
Last login: Tue Aug 24 23:00:24 +08 2021 on pts/0
[root@sonar ~]# vim /home/sonarqube/.bash_profile
export JAVA_HOME=/usr/local/jdk-11.0.2
export PATH=$JAVA_HOME/bin:$PATH
[root@sonar ~]# su - sonarqube
[sonarqube@sonar ~]$ java -version
openjdk version "11.0.2" 2019-01-15
OpenJDK Runtime Environment 18.9 (build 11.0.2+9)
OpenJDK 64-Bit Server VM 18.9 (build 11.0.2+9, mixed mode)
3.优化系统参数
#临时生效                                               #永久生效将这几个配置写入配置文件,并重启
[root@sonar ~]# sysctl -w  vm.max_map_count=262144          #写入/etc/sysctl.conf
[root@sonar ~]# sysctl -w fs.file-max=65536                #写入/etc/sysctl.conf
[root@sonar ~]# ulimit -u 4096 sonarqube                   #写入/etc/security/limit.conf
[root@sonar ~]# ulimit -n 65536 sonarqube                  #写入/etc/security/limit.conf
4.配置文件配置
[root@sonar ~]# chown -R sonarqube.sonarqube /usr/local/sonarqube-7.9.6/
[root@sonar ~]# grep '^[a-z]' /usr/local/sonarqube-7.9.6/conf/sonar.properties
sonar.jdbc.username=sonarqube
sonar.jdbc.password=123456
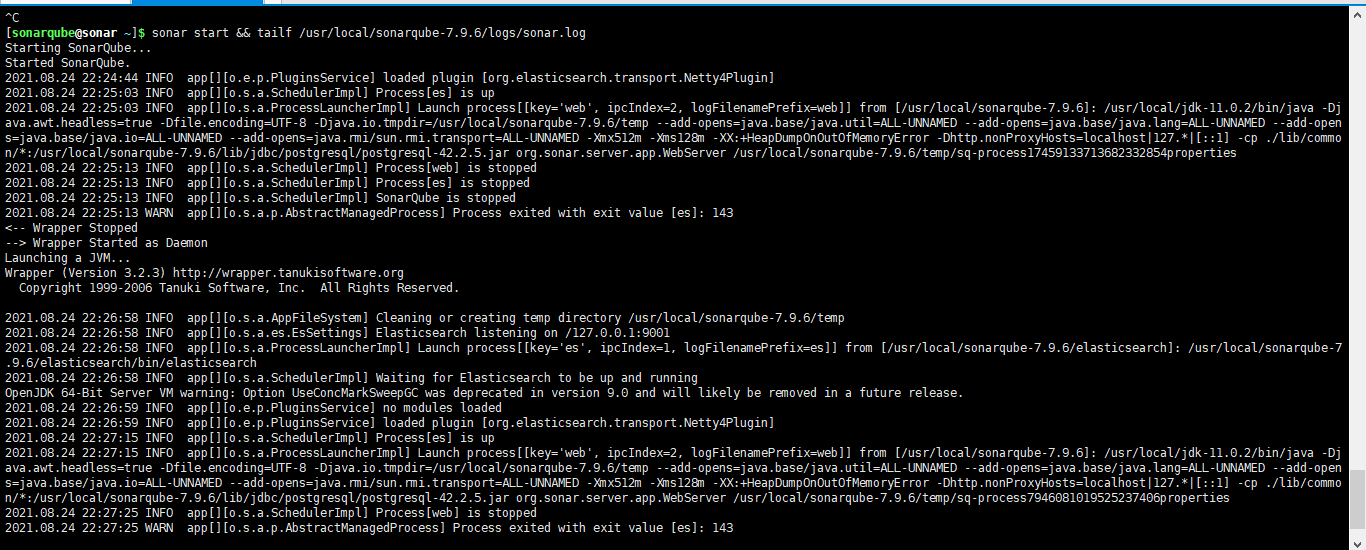
sonar.jdbc.url=jdbc:postgresql://127.0.0.1/sonarqube #这一行一定要改,否者会出现启动报错
sonar.jdbc.url=jdbc:postgresql://127.0.0.1/sonarqube 要是没这样改启动就会遇到如下报错
5.安装PostgreSQL#下载pg9.6 源 #7.9版本支持的postgresql数据库版本是9版本以上
[root@sonar ~]# yum install -y https://download.postgresql.org/pub/repos/yum/reporpms/EL-7-x86_64/pgdg-redhat-repo-latest.noarch.rpm
[root@sonar ~]# yum install -y postgresql96-server
[root@sonar ~]# /usr/pgsql-9.6/bin/postgresql96-setup initdb
[root@sonar ~]# systemctl enable postgresql-9.6
[root@sonar ~]# systemctl start postgresql-9.6
[root@sonar ~]# su - postgres
[postgres@sonar ~]$ psql
psql (9.6.23)
Type "help" for help.
postgres=#
#创建sonarqube用户
postgres=# create user sonarqube with password '123456';
postgres=# create database sonarqube owner sonarqube;
postgres=# grant all on database sonarqube to sonarqube;
#开启远程访问
[postgres@sonar ~]$ vim /var/lib/pgsql/9.6/data/postgresql.conf
listen_addresses = '*'
[postgres@sonar ~]$ vi /var/lib/pgsql/9.6/data/pg_hba.conf
.......
# IPv4 local connections:
host all all 0.0.0.0/0 trust
# IPv6 local connections:
host all all ::1/128 ident
# Allow replication connections from localhost, by a user with the
# replication privilege.
#local replication postgres peer
#host replication postgres 127.0.0.1/32 ident
#host replication postgres ::1/128 ident
host all all 0.0.0.0/0 ident
6.添加系统服务
[postgres@sonar ~]$ ln -s /home/sonarqube/sonarqube-7.9.1/bin/linux-x86-64/sonar.sh  /usr/bin/sonar
 [postgres@sonar ~]$ vim /etc/init.d/sonarqube
 #!/bin/sh
#
# rc file for SonarQube
#
# chkconfig: 345 96 10
# description: SonarQube system (www.sonarsource.org)
#
### BEGIN INIT INFO
# Provides: sonar
# Required-Start: $network
# Required-Stop: $network
# Default-Start: 3 4 5
# Default-Stop: 0 1 2 6
# Short-Description: SonarQube system (www.sonarsource.org)
# Description: SonarQube system (www.sonarsource.org)
### END INIT INFO

/usr/bin/sonar $*

chkconfig --add sonarqube
chkconfig sonarqube on

service sonarqube status
7启动服务
[sonarqube@sonar ~]$ sonar start
[sonarqube@sonar ~]$ netstat -lntp
(Not all processes could be identified, non-owned process info
 will not be shown, you would have to be root to see it all.)
Active Internet connections (only servers)
Proto Recv-Q Send-Q Local Address           Foreign Address         State       PID/Program name
tcp        0      0 0.0.0.0:111             0.0.0.0:*               LISTEN      -
tcp        0      0 0.0.0.0:22              0.0.0.0:*               LISTEN      -
tcp        0      0 0.0.0.0:5432            0.0.0.0:*               LISTEN      8174/postmaster
tcp        0      0 127.0.0.1:25            0.0.0.0:*               LISTEN      -
tcp        0      0 127.0.0.1:32000         0.0.0.0:*               LISTEN      -
tcp6       0      0 :::9000                 :::*                    LISTEN      -
tcp6       0      0 127.0.0.1:9001          :::*                    LISTEN      -
tcp6       0      0 :::111                  :::*                    LISTEN      -
tcp6       0      0 :::22                   :::*                    LISTEN      -
tcp6       0      0 :::5432                 :::*                    LISTEN      8174/postmaster
tcp6       0      0 ::1:25                  :::*                    LISTEN      -
tcp6       0      0 127.0.0.1:7488          :::*                    LISTEN      -

 浙公网安备 33010602011771号