
Eth-Trunk 学习总结 2023-8-22
知识点
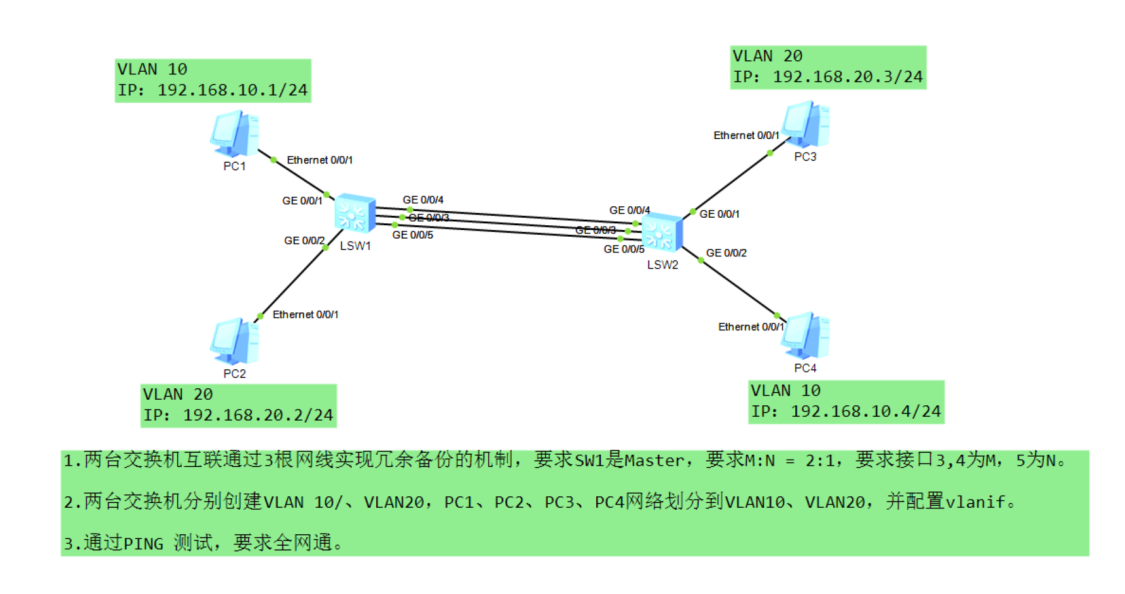
图片来源于泰克袁浩义老师!
我的实验
实验是个人根据自己所学知识点原创!
拓扑图
https://www.123pan.com/s/CFlUVv-O4Bs3.html 提取码:Vytt
SW1
sys sys SW1 vlan batch 10 20 int vlanif 10 ip add 192.168.10.254 24 int vlanif 20 ip add 192.168.20.254 24 lacp pr 100 int eth 1 mode lacp-s lacp pree en max active 2 p l t p t a v 10 20 q int g0/0/3 eth 1 lacp pr 300 int g0/0/4 eth 1 lacp pr 400 int g0/0/5 eth 1 lacp pr 500 int g0/0/1 p l a p d v 10 int g0/0/2 p l a p d v 20 q
SW2
sys sys SW2 vlan batch 10 20 int vlanif 10 ip add 192.168.10.254 24 int vlanif 20 ip add 192.168.20.254 24 lacp pr 200 int eth 1 mode lacp-s lacp pree en p l t p t a v 10 20 q int g0/0/3 eth 1 lacp pr 300 int g0/0/4 eth 1 lacp pr 400 int g0/0/5 eth 1 lacp pr 500 int g0/0/1 p l a p d v 20 int g0/0/2 p l a p d v 10 q
命令解析 SW1
# 切换到系统视图 sys # 设备重命名 sys SW1 # 批量创建vlan vlan batch 10 20 # 切换到vlanif接口并配置相应的地址 int vlanif 10 ip add 192.168.10.254 24 int vlanif 20 ip add 192.168.20.254 24 # 设置SW1 设备的lacp 优先级,使SW1 设备为lacp Master lacp pr 100 # 切换到链路聚合接口Eth-Trunk 1 int eth 1 # 配置Eth-Trunk 模式为动态lacp 模式 mode lacp-s # 开启lacp 抢占功能 lacp pree en # 设置M:N M代表主链路最大为2条,N代表备份链路。 max active 2 # 配置vlan 为trunk模式 p l t # 配置允许通过vlan 标签10 20 p t a v 10 20 q # 切换到3接口 int g0/0/3 # 将3接口加入到Eth-Trunk 1 中 eth 1 # 配置3接口lacp 优先级为300 lacp pr 300 # 切换到4接口 int g0/0/4 # 将4接口加入到Eth-Trunk 1 中 eth 1 # 配置4接口lacp 优先级为400 lacp pr 400 # 切换到5接口 int g0/0/5 # 将5接口加入到Eth-Trunk 1 中 eth 1 # 配置5接口lacp 优先级为500 lacp pr 500 # 切换到1接口 int g0/0/1 # 配置vlan 为access 模式 p l a # 配置access 可以通过的默认标签为 vlan 10 p d v 10 # 切换到2接口 int g0/0/2 # 配置vlan 为access 模式 p l a # 配置access 可以通过的默认标签为 vlan 20 p d v 20 q
实验验证
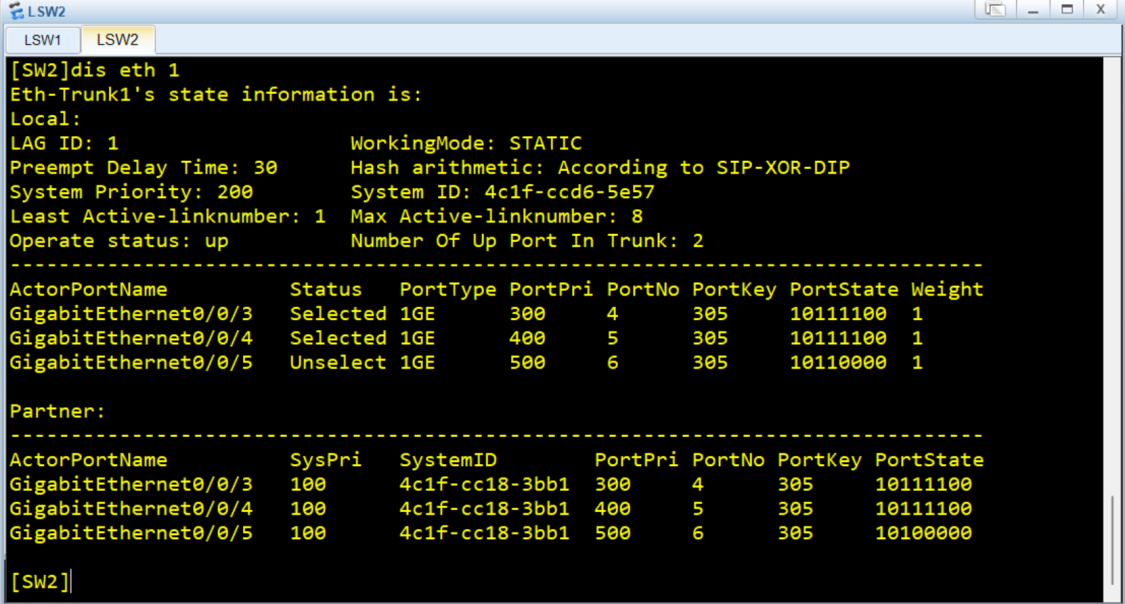
验证eth 1
dis eth 1

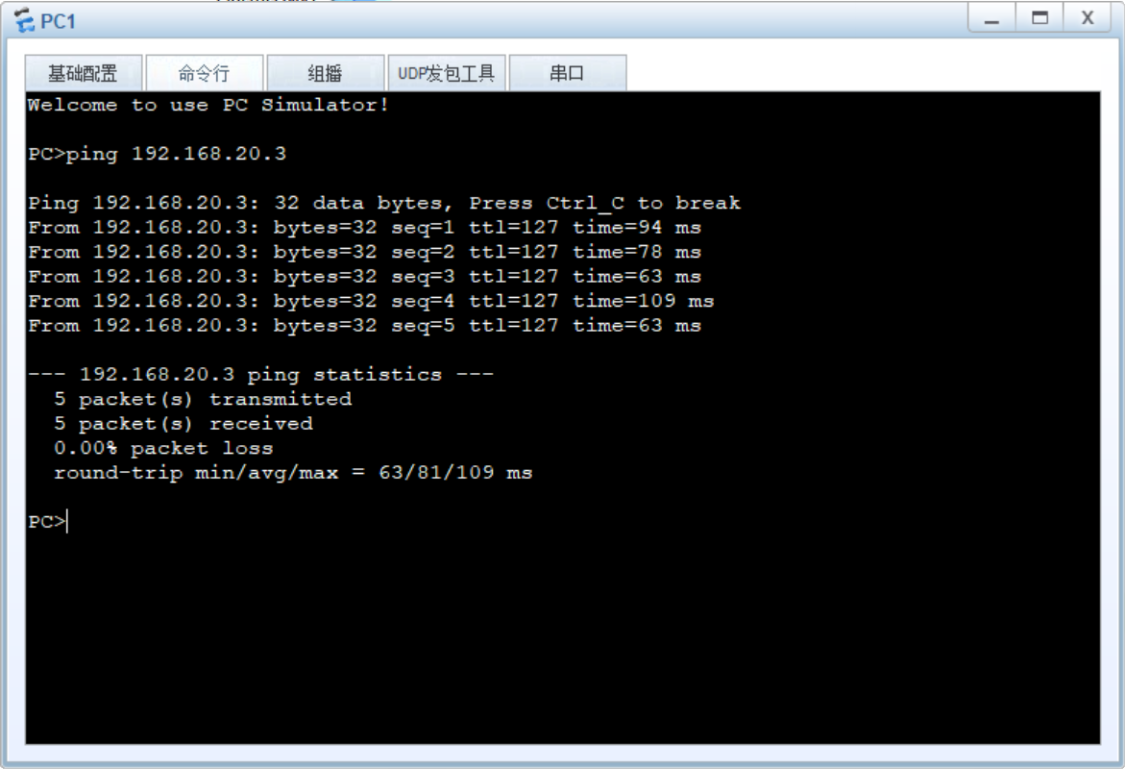
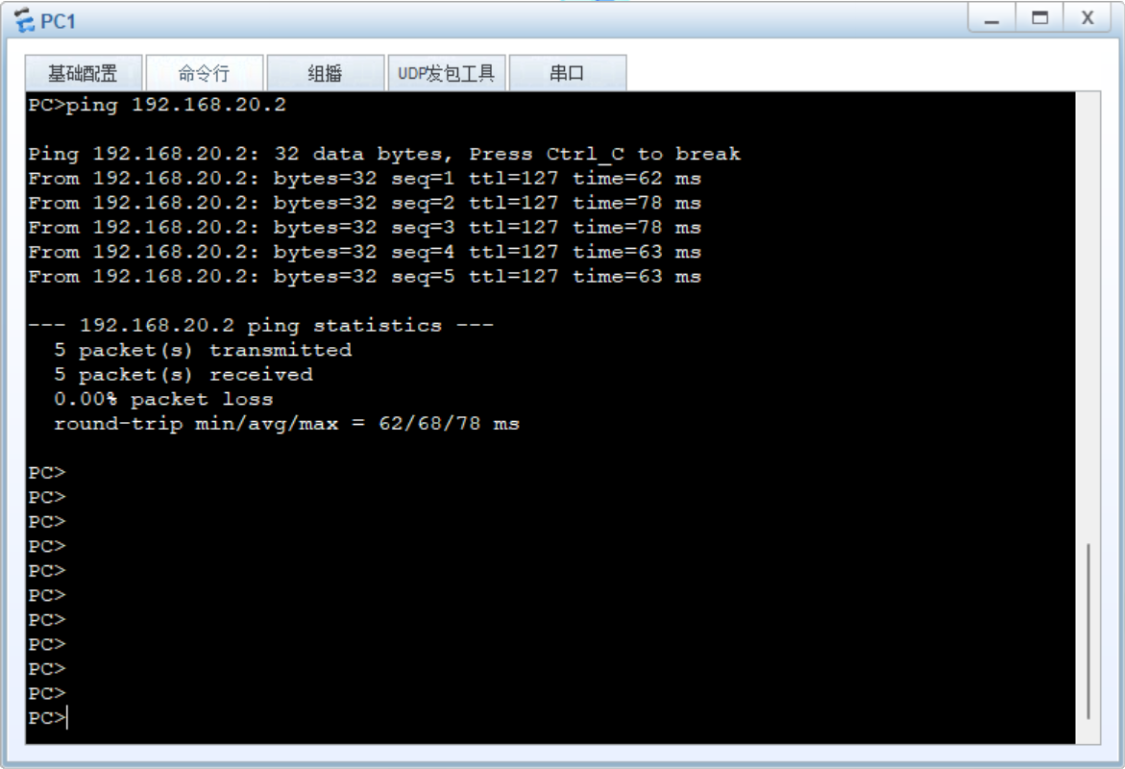
PING测试
1→3
1→2
1→4


【推荐】国内首个AI IDE,深度理解中文开发场景,立即下载体验Trae
【推荐】编程新体验,更懂你的AI,立即体验豆包MarsCode编程助手
【推荐】抖音旗下AI助手豆包,你的智能百科全书,全免费不限次数
【推荐】轻量又高性能的 SSH 工具 IShell:AI 加持,快人一步
· 地球OL攻略 —— 某应届生求职总结
· 周边上新:园子的第一款马克杯温暖上架
· Open-Sora 2.0 重磅开源!
· 提示词工程——AI应用必不可少的技术
· .NET周刊【3月第1期 2025-03-02】