一比一还原axios源码(五)—— 拦截器
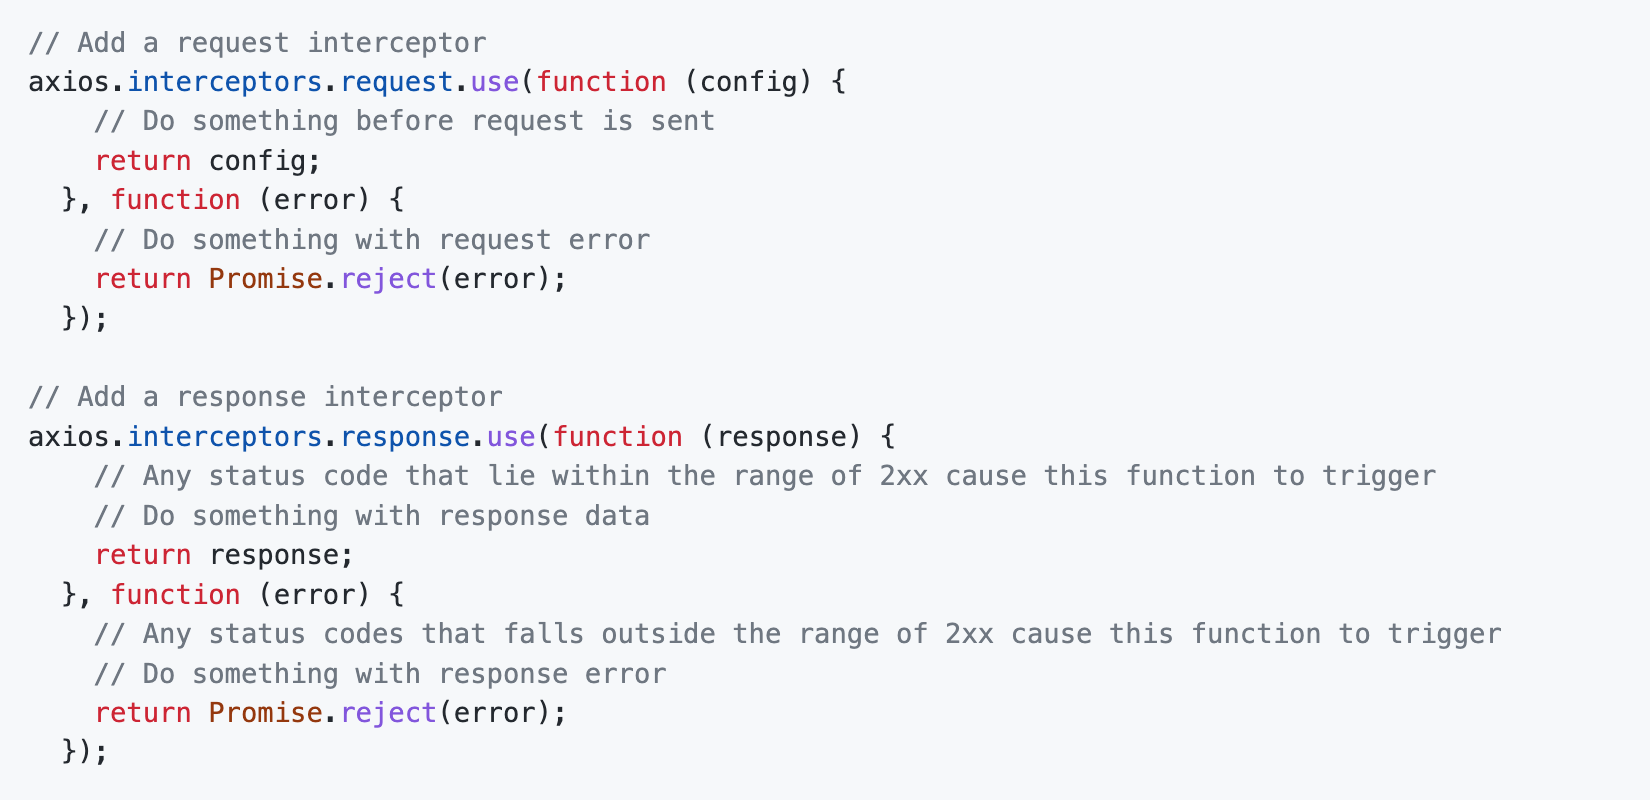
上一篇,我们扩展了Axios,构建了一个Axios类,然后通过这个Axios工厂类,创建真正的axios实例。那么今天,我们来实现下Axios的拦截器也就是interceptors。我们来简单看下Axios的interceptors的API:

首先我们来看,axios上有一个interceptors属性,该属性上还有两个属性,分别对应request和response,并且都有一个一样的use方法,该方法目前有两个参数,分别对应着Promise中的resolve和reject。

另外,你还可以通过对应拦截器的eject方法,移除某个拦截器。

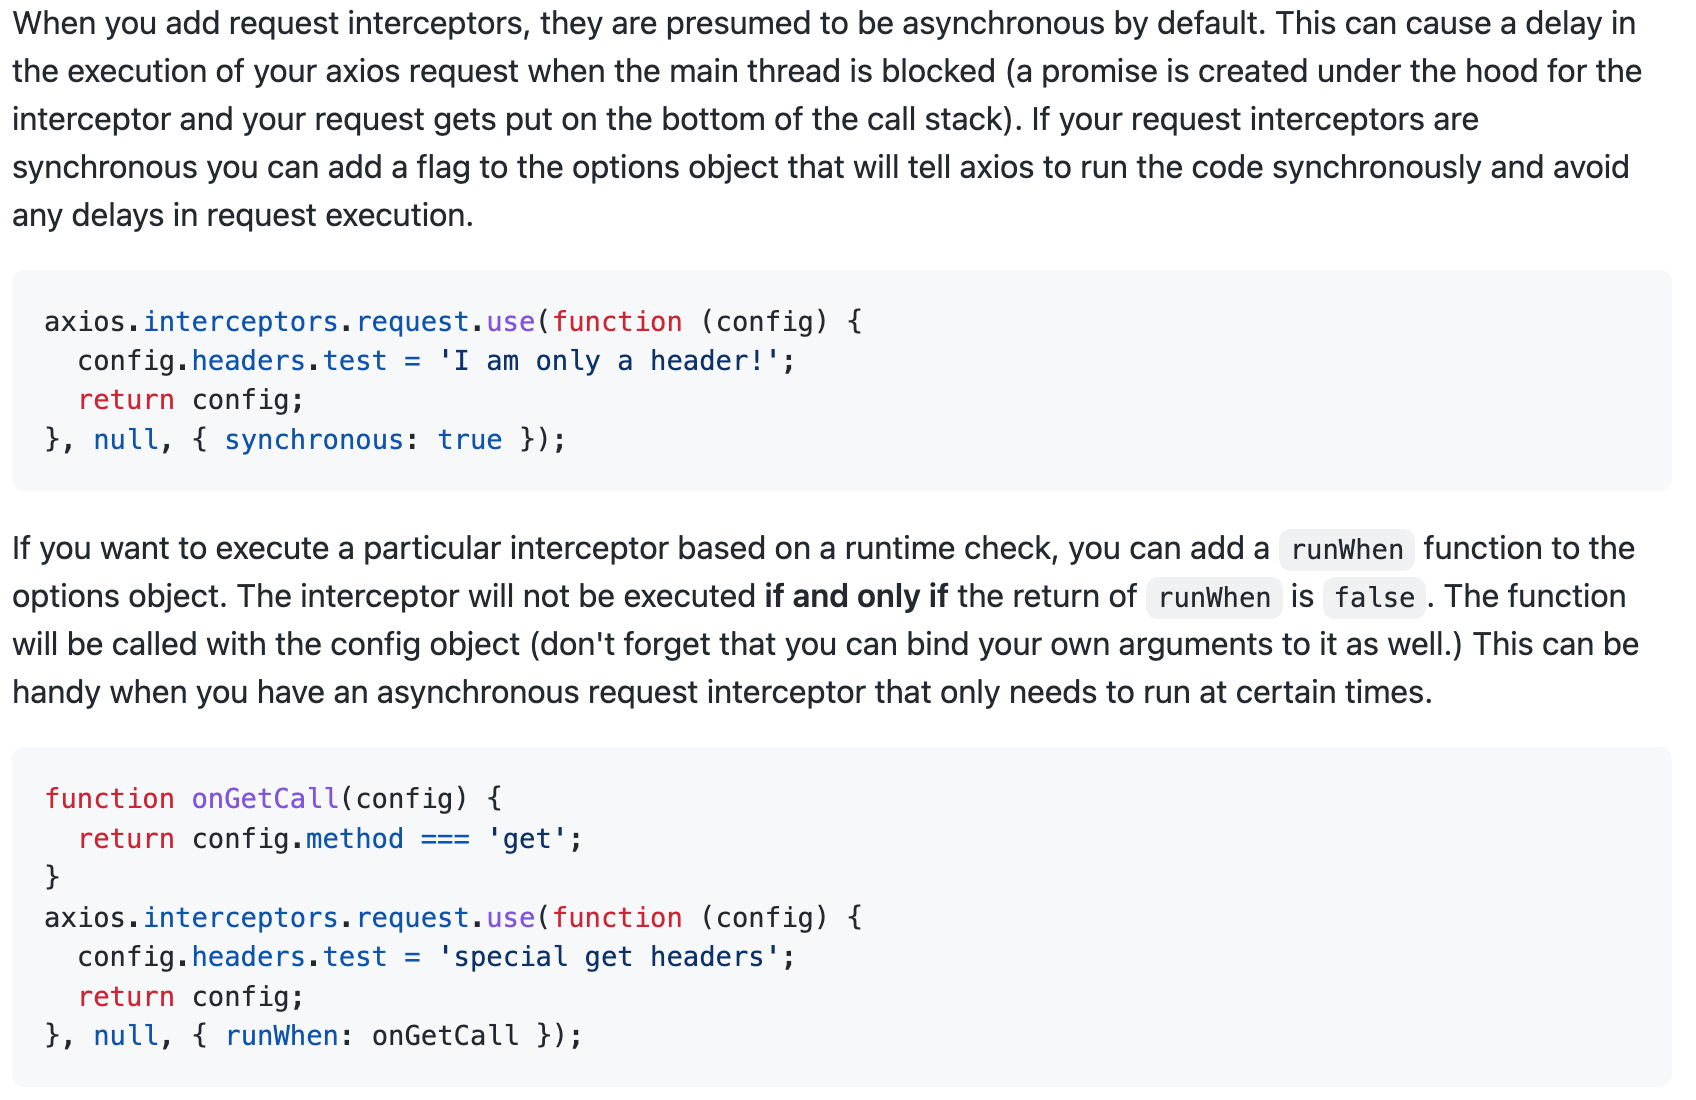
最后,我们还可以通过配置第三个参数,确定执行拦截器的条件、是否异步等。最后的最后,我们还需要知道拦截器的执行顺序,我们先来看一段代码:
axios.interceptors.request.use((config) => {
  config.headers.test += "1";
  return config;
});
axios.interceptors.request.use((config) => {
  config.headers.test += "2";
  return config;
});
axios.interceptors.request.use((config) => {
  config.headers.test += "3";
  return config;
});

axios.interceptors.response.use((res) => {
  res.data += "1";
  return res;
});
let c5 = axios.interceptors.response.use((res) => {
  res.data += "2";
  return res;
});
axios.interceptors.response.use((res) => {
  res.data += "3";
  return res;
});

axios.interceptors.response.eject(c5);

axios({
  url: "/c5/get",
  method: "get",
  headers: {
    test: "",
  },
}).then((res) => {
  console.log(res.data);
});
这是我们最终demo里的代码,它的结果是什么样子呢?我得在这里就给出大家答案,不然有个核心的点大家可能就不理解了。其中request的header中的tes的值是321,打印的response的结果是13。OK,依照此我们可以得出结论,就是越靠近请求的拦截器越先执行,什么意思呢?就是我们文档流中写在后面的请求拦截器最先执行,写在前面的响应拦截器最先执行。它是一种以中心向外散射的一种模型。
那么我们接下来看怎么来实现这个拦截器吧:
"use strict";

import utils from "./../utils";

function InterceptorManager() {
  this.handlers = [];
}

/**
 * Add a new interceptor to the stack
 *
 * @param {Function} fulfilled The function to handle `then` for a `Promise`
 * @param {Function} rejected The function to handle `reject` for a `Promise`
 *
 * @return {Number} An ID used to remove interceptor later
 */
InterceptorManager.prototype.use = function use(fulfilled, rejected, options) {
  this.handlers.push({
    fulfilled: fulfilled,
    rejected: rejected,
    synchronous: options ? options.synchronous : false,
    runWhen: options ? options.runWhen : null,
  });
  return this.handlers.length - 1;
};

/**
 * Remove an interceptor from the stack
 *
 * @param {Number} id The ID that was returned by `use`
 */
InterceptorManager.prototype.eject = function eject(id) {
  if (this.handlers[id]) {
    this.handlers[id] = null;
  }
};

/**
 * Iterate over all the registered interceptors
 *
 * This method is particularly useful for skipping over any
 * interceptors that may have become `null` calling `eject`.
 *
 * @param {Function} fn The function to call for each interceptor
 */
InterceptorManager.prototype.forEach = function forEach(fn) {
  utils.forEach(this.handlers, function forEachHandler(h) {
    if (h !== null) {
      fn(h);
    }
  });
};

export default InterceptorManager;
首先,我们在core文件夹下创建一个InterceptorManager.js,代码如上,在文件内我们构建一个InterceptorManager类,这个类上只有一个数组作为存储具体拦截器的容器。
然后呢,我们在它的原型上挂载一个use方法,这个前面说过了,就是要把具体的拦截器放置到容器内,以待最后的使用,其中放置的是一个包含了resolve和reject函数以及两个参数的对象,这个方法返回了一个对应拦截器在容器内的下标作为id。
再然后呢,就是一个eject方法,使用use方法中返回的下标,直接设置为null即可,提问!为啥这里不直接移除(splice啥的)容器内的拦截器,而是把对应位置的拦截器设置为null呢?
最后,我们提供一个forEach方法,循环执行容器内的拦截器即可。那么到现在为止,整个拦截器管理类就实现了。下面我们看看如何使用。
Axios.prototype.request = function (configOrUrl, config) {
  if (typeof configOrUrl === "string") {
    if (!config) {
      config = {};
    }
    config.url = configOrUrl;
  } else {
    config = configOrUrl;
  }
  // 请求拦截器调用链
  var requestInterceptorChain = [];
  // 是否同步
  var synchronousRequestInterceptors = true;
  // 通过拦截器的forEach方法,通过回调函数的方式,把所有的请求拦截放到requestInterceptorChain数组里
  this.interceptors.request.forEach(function unshiftRequestInterceptors(
    interceptor
  ) {
    if (
      // 判断下如果runWhen是false就return掉了
      typeof interceptor.runWhen === "function" &&
      interceptor.runWhen(config) === false
    ) {
      return;
    }
    // 判断是否是同步执行
    synchronousRequestInterceptors =
      synchronousRequestInterceptors && interceptor.synchronous;
    // 把两个回调函数放到数组的头部
    // 注意这里不是unshift一个数组,而是独立的,就是这样[interceptor.fulfilled,interceptor.rejected]
    // [3,2,1]
    requestInterceptorChain.unshift(
      interceptor.fulfilled,
      interceptor.rejected
    );
  });
  // 响应拦截器调用链
  var responseInterceptorChain = [];
  // response这个比较简单,直接push进数组就完事了
  this.interceptors.response.forEach(function pushResponseInterceptors(
    interceptor
  ) {
    responseInterceptorChain.push(interceptor.fulfilled, interceptor.rejected);
  });
  // 定一个promise变量,后面用
  var promise;
  // 如果不是同步的
  if (!synchronousRequestInterceptors) {
    var chain = [dispatchRequest, undefined];
    // 这块呢,就把整个requestInterceptorChain放到chain的前面
    Array.prototype.unshift.apply(chain, requestInterceptorChain);
    // 这个就是把responseInterceptorChain放到[requestInterceptorChain,chain]后面
    chain = chain.concat(responseInterceptorChain);
    // 额外要说的是到了这里,这个chain数组是什么样的呢
    // 我们打印下,以我们之前的例子代码为例:
    // 它实际上是这样的[fn,undefined,fn,undefined,fn,undefined,fn,undefined,fn,undefined,fn,undefined]
    // 具体点,[requestInterceptorChain,chain,responseInterceptorChain]
    // 再具体点:[requestResolve3,undefined,requestResolve2,undefined,requestResolve1,undefined,dispatchRequest, undefined,responseResolve1,undefined,responseResolve3,undefined]
    console.log(chain, "chian");
    // 这块可能就优点疑惑了,首先promise变量变成了一个已经resolved的Promise,resolve出去的就是config配置
    promise = Promise.resolve(config);
    while (chain.length) {
      // 所以这里的then里面就是这样(resolve,reject)
      // 注意then方法的第二个参数就是reject的。
      // 换句话说,这里就形成了一个一个的链式调用,源头是一个已经resolved的promise。
      promise = promise.then(chain.shift(), chain.shift());
    }
    // 返回咯
    return promise;
  }
  // 那如果是同步的话,走下面的代码
  // 很简单,就是同步执行罢了,我就不说了哦。
  var newConfig = config;
  while (requestInterceptorChain.length) {
    var onFulfilled = requestInterceptorChain.shift();
    var onRejected = requestInterceptorChain.shift();
    try {
      // 新的config就是onFulfilled同步函数执行的结果,一步一步往下传
      newConfig = onFulfilled(newConfig);
    } catch (error) {
      onRejected(error);
      break;
    }
  }
  // 执行dispatchRequest返回个promise,dispatchRequest本身就会返回promise,对吧?
  try {
    promise = dispatchRequest(newConfig);
  } catch (error) {
    return Promise.reject(error);
  }
  // 循环执行responseInterceptorChain链。
  while (responseInterceptorChain.length) {
    promise = promise.then(
      responseInterceptorChain.shift(),
      responseInterceptorChain.shift()
    );
  }
  // 返回,结束
  return promise;
};
上面是完整的request方法的注释,还算清晰,大家也可以去gitHub上查看。那,简单回顾下,整个执行的核心其实分为了同步和异步,但是其实整体的代码都不复杂,就是调用的时候会稍微绕一点。requestInterceptorChain通过unshift后添加的就变成的数组的头部,先添加的就变成了数组的尾部。通过while循环,每次都shift出去对应的回调函数并执行返回promise,这是异步的做法,同步的做法就比较简单,同步执行requestInterceptorChain,然后在调用request的时候,返回promise,包括后面的responseInterceptorChain也是promise,因为最后要抛出promise供axios实例使用。
好了,今天的逻辑稍微复杂些,但是本身并不是很难,例子已经在gitHub上了,大家可以亲自去体验下。
本文来自博客园,作者:Zaking,转载请注明原文链接:https://www.cnblogs.com/zaking/p/15954286.html


 浙公网安备 33010602011771号