

爬虫
1.requests模块的其他用法
2.bs4的简单使用
3.bs4的详细用法
4.selenium的简单使用
一.requests模块的其他用法
解析json,SSL,使用代理,超时设置,认证设置,异常处理,上传文件


 1 # json解析
 2 #解析json
 3 # import requests
 4 # response=requests.get('http://httpbin.org/get')
 5 #
 6 # import json
 7 # res1=json.loads(response.text) #太麻烦
 8 #
 9 # res2=response.json() #直接获取json数据
10 #
11 # print(res1 == res2) #True
12
13 #SSL 这个就是  https=http+ssl
14 # ssl就是一个证书
15 #证书验证(大部分网站都是https)但是现在已经没有人去用这个了
16 # import requests
17 # respone=requests.get('https://www.12306.cn',
18 #                      cert=('/path/server.crt',
19 #                            '/path/key'))
20 # print(respone.status_code)
21
22 # 使用代理
23 #官网链接: http://docs.python-requests.org/en/master/user/advanced/#proxies
24
25 #代理设置:先发送请求给代理,然后由代理帮忙发送(封ip是常见的事情)
26 # import requests
27 # proxies={
28 #     'http':'http://egon:123@localhost:9743',#带用户名密码的代理,@符号前是用户名与密码
29 #     'http':'http://localhost:9743',
30 #     'https':'https://localhost:9743',
31 #     'http':'http://124.205.155.148:9000'
32 # }
33 # respone=requests.get('https://www.12306.cn',
34 #                      proxies=proxies)
35 #
36 # print(respone.status_code)
37
38 # 超时设置
39 #两种超时:float or tuple
40 #timeout=0.1 #代表接收数据的超时时间
41 #timeout=(0.1,0.2)#0.1代表链接超时  0.2代表接收数据的超时时间
42 # import requests
43 # respone=requests.get('https://www.baidu.com',
44 #                      timeout=0.0001)
45
46
47
48 # 认证设置
49 #官网链接:http://docs.python-requests.org/en/master/user/authentication/
50
51 #认证设置:登陆网站是,弹出一个框,要求你输入用户名密码(与alter很类似),此时是无法获取html的
52 # 但本质原理是拼接成请求头发送
53 #         r.headers['Authorization'] = _basic_auth_str(self.username, self.password)
54 # 一般的网站都不用默认的加密方式,都是自己写
55 # 那么我们就需要按照网站的加密方式,自己写一个类似于_basic_auth_str的方法
56 # 得到加密字符串后添加到请求头
57 #         r.headers['Authorization'] =func('.....')
58
59 #看一看默认的加密方式吧,通常网站都不会用默认的加密设置
60 # import requests
61 # from requests.auth import HTTPBasicAuth
62 # r=requests.get('xxx',auth=HTTPBasicAuth('user','password'))
63 # print(r.status_code)
64 #
65 # #HTTPBasicAuth可以简写为如下格式
66 # import requests
67 # r=requests.get('xxx',auth=('user','password'))
68 # print(r.status_code)
69
70 # 异常处理
71 #异常处理
72 # import requests
73 # from requests.exceptions import * #可以查看requests.exceptions获取异常类型
74 #
75 # try:
76 #     r=requests.get('http://www.baidu.com',timeout=0.00001)
77 # except ReadTimeout:
78 #     print('===:')
79 # # except ConnectionError: #网络不通
80 # #     print('-----')
81 # # except Timeout:
82 # #     print('aaaaa')
83 #
84 # except RequestException:
85 #     print('Error')
86
87 # 上传文件
88 # import requests
89 # files={'file':open('a.jpg','rb')}
90 # respone=requests.post('http://httpbin.org/post',files=files)
91 # print(respone.status_code)
92
93 # 一个压力测试的工具 jmter
二.bs4的简单使用
什么是bs4

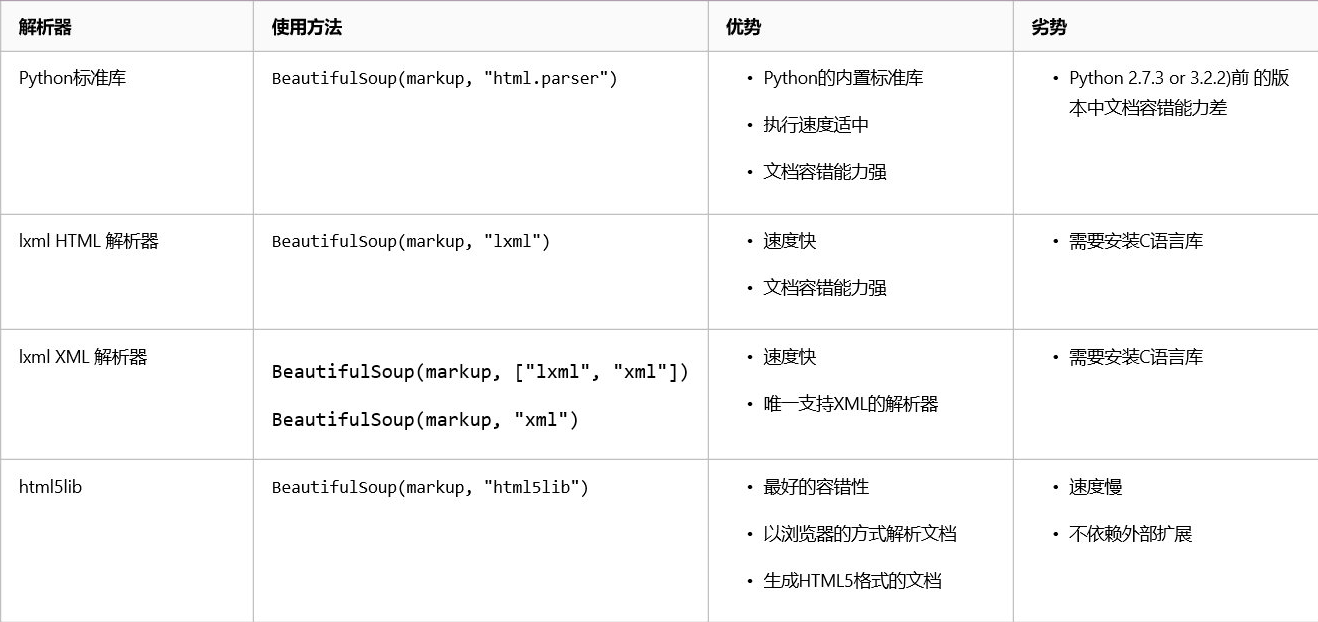
#安装 Beautiful Soup
pip install beautifulsoup4

#安装解析器
Beautiful Soup支持Python标准库中的HTML解析器,还支持一些第三方的解析器,其中一个是 lxml .根据操作系统不同,可以选择下列方法来安装lxml:

$ apt-get install Python-lxml

$ easy_install lxml

$ pip install lxml

另一个可供选择的解析器是纯Python实现的 html5lib , html5lib的解析方式与浏览器相同,可以选择下列方法来安装html5lib:

$ apt-get install Python-html5lib

$ easy_install html5lib

$ pip install html5lib
下面列出了主要的解析器,以及他们的优缺点,官网推荐使用xml作为解析器,因为效率更高,在python2.7.3之前的版本和python3中的3.22之前的版本,必须安装lxml或htmlSlib,因为那些python版本的标准库中内置的html解析方法不够稳定。
案例:
在学bs4之前先通过一个小案例了解一下bs4,
爬取汽车之家的新闻网站
 1 # 在说bs4之前先用一个小例子来说一下
 2 # 爬一个汽车之家新闻网页,把这个网站数据给解析出来
 3 # 需要爬取的地址
 4 # https://www.autohome.com.cn/news/1/#liststart
 5 import requests
 6 from bs4 import BeautifulSoup
 7 url = 'https://www.autohome.com.cn/news/1/#liststart'
 8 res = requests.get(url)
 9 # print(res.text)
10 # 生成一个bs4对象
11 # 传一个你需要解析的参数,再传一个解析器
12 # 这样就可以得到一个bs4对象
13 soup = BeautifulSoup(res.text,'lxml')
14 # find 可以根据id 名字 class去找
15 # 'auto-channel-lazyload-article': 就是所有的新闻,我们需要解析,一步一步的把里面的新闻拿出来
16 # div 是一个对象
17 div = soup.find(id='auto-channel-lazyload-article')
18 # 使用find_all 就是查询多个结果,通过名字等于ul来找
19 ul = div.find(name='ul')# 我们只需要找第一个ul标签
20 # 因为class是一个关键字,我们需要这样写class_
21 # ul_list = div.find_all(class_='article')# 找出下面所有类名为article的标签
22 # print(len(ul_list))
23 li_list = ul.find_all(name='li')
24 print(len(li_list))
25 # 起一个for循环,一个个循环出啦
26 for li in li_list:
27     # h3就是新闻标题,一个个取出来
28     h3 = li.find(name='h3')
29     # 在这里判断一下,如果有值,就把h3文字标题取出来
30     if h3:
31         title = h3.text
32         print(title)
33     # 现在把a标签里面的新闻的链接取出来
34     a = li.find(name='a')
35     # 如果a标签存在,就把里面的href属性取出来
36     if a:
37         article_url = a.get('href')# 取出a标签中的href属性
38         print('https:'+ article_url)
39
40     # 在把img标签里面的图片取出来
41     img = li.find(name='img')
42     if img:
43         img_url = img.get('src')
44         print('https:'+ img_url)
45
46     # 再把摘要拿出来
47     p = li.find(name='p')
48     if p:
49         content = p.text
50         print(content)
三.bs4的详细用法
html_doc = """
<html><head><title>The Dormouse's story</title></head>
<body>
<p class="title"><b>The Dormouse's story</b></p>

<p class="story">Once upon a time there were three little sisters; and their names were
<a href="http://example.com/elsie" class="sister" id="link1">Elsie</a>,
<a href="http://example.com/lacie" class="sister" id="link2">Lacie</a> and
<a href="http://example.com/tillie" class="sister" id="link3">Tillie</a>;
and they lived at the bottom of a well.</p>

<p class="story">...</p>
"""

#基本使用:容错处理,文档的容错能力指的是在html代码不完整的情况下,使用该模块可以识别该错误。使用BeautifulSoup解析上述代码,能够得到一个 BeautifulSoup 的对象,并能按照标准的缩进格式的结构输出
from bs4 import BeautifulSoup
soup=BeautifulSoup(html_doc,'lxml') #具有容错功能
res=soup.prettify() #处理好缩进,结构化显示
print(res)
遍历上面我写的HTML代码:遍历文档树
#遍历文档树:即直接通过标签名字选择,特点是选择速度快,但如果存在多个相同的标签则只返回第一个
#1、用法
#2、获取标签的名称
#3、获取标签的属性
#4、获取标签的内容
#5、嵌套选择
#6、子节点、子孙节点
#7、父节点、祖先节点
#8、兄弟节点
 1 #遍历文档树:即直接通过标签名字选择,特点是选择速度快,但如果存在多个相同的标签则只返回第一个
 2 html_doc = """
 3 <html><head><title>The Dormouse's story</title></head>
 4 <body>
 5 <p id="my p" class="title"><b id="bbb" class="boldest">The Dormouse's story</b></p>
 6
 7 <p class="story">Once upon a time there were three little sisters; and their names were
 8 <a href="http://example.com/elsie" class="sister" id="link1">Elsie</a>,
 9 <a href="http://example.com/lacie" class="sister" id="link2">Lacie</a> and
10 <a href="http://example.com/tillie" class="sister" id="link3">Tillie</a>;
11 and they lived at the bottom of a well.</p>
12
13 <p class="story">...</p>
14 """
15
16 #1、用法
17 from bs4 import BeautifulSoup
18 soup=BeautifulSoup(html_doc,'lxml')
19 # soup=BeautifulSoup(open('a.html'),'lxml')
20
21 print(soup.p) #存在多个相同的标签则只返回第一个
22 print(soup.a) #存在多个相同的标签则只返回第一个
23
24 #2、获取标签的名称
25 print(soup.p.name)
26
27 #3、获取标签的属性
28 print(soup.p.attrs)
29
30 #4、获取标签的内容
31 print(soup.p.string) # p下的文本只有一个时,取到,否则为None
32 print(soup.p.strings) #拿到一个生成器对象, 取到p下所有的文本内容
33 print(soup.p.text) #取到p下所有的文本内容
34 for line in soup.stripped_strings: #去掉空白
35     print(line)
36
37 '''
38 如果tag包含了多个子节点,tag就无法确定 .string 方法应该调用哪个子节点的内容, .string 的输出结果是 None,如果只有一个子节点那么就输出该子节点的文本,比如下面的这种结构,soup.p.string 返回为None,但soup.p.strings就可以找到所有文本
39 <p id='list-1'>
40     哈哈哈哈
41     <a class='sss'>
42         <span>
43             <h1>aaaa</h1>
44         </span>
45     </a>
46     <b>bbbbb</b>
47 </p>
48 '''
49
50 #5、嵌套选择
51 print(soup.head.title.string)
52 print(soup.body.a.string)
53
54 #6、子节点、子孙节点
55 print(soup.p.contents) #p下所有子节点
56 print(soup.p.children) #得到一个迭代器,包含p下所有子节点
57
58 for i,child in enumerate(soup.p.children):
59     print(i,child)
60
61 print(soup.p.descendants) #获取子孙节点,p下所有的标签都会选择出来
62 for i,child in enumerate(soup.p.descendants):
63     print(i,child)
64
65 #7、父节点、祖先节点
66 print(soup.a.parent) #获取a标签的父节点
67 print(soup.a.parents) #找到a标签所有的祖先节点,父亲的父亲,父亲的父亲的父亲...
68
69 #8、兄弟节点
70 print('=====>')
71 print(soup.a.next_sibling) #下一个兄弟
72 print(soup.a.previous_sibling) #上一个兄弟
73
74 print(list(soup.a.next_siblings)) #下面的兄弟们=>生成器对象
75 print(soup.a.previous_siblings) #上面的兄弟们=>生成器对象
搜索文档树:
1.五种过滤器
 1 #搜索文档树:BeautifulSoup定义了很多搜索方法,这里着重介绍2个: find() 和 find_all() .其它方法的参数和用法类似
 2 html_doc = """
 3 <html><head><title>The Dormouse's story</title></head>
 4 <body>
 5 <p id="my p" class="title"><b id="bbb" class="boldest">The Dormouse's story</b>
 6 </p>
 7
 8 <p class="story">Once upon a time there were three little sisters; and their names were
 9 <a href="http://example.com/elsie" class="sister" id="link1">Elsie</a>,
10 <a href="http://example.com/lacie" class="sister" id="link2">Lacie</a> and
11 <a href="http://example.com/tillie" class="sister" id="link3">Tillie</a>;
12 and they lived at the bottom of a well.</p>
13
14 <p class="story">...</p>
15 """
16
17 from bs4 import BeautifulSoup
18 soup=BeautifulSoup(html_doc,'lxml')
19
20 #1、五种过滤器: 字符串、正则表达式、列表、True、方法
21 #1.1、字符串:即标签名
22 print(soup.find_all('b'))
23
24 #1.2、正则表达式
25 import re
26 print(soup.find_all(re.compile('^b'))) #找出b开头的标签,结果有body和b标签
27
28 #1.3、列表:如果传入列表参数,Beautiful Soup会将与列表中任一元素匹配的内容返回.下面代码找到文档中所有<a>标签和<b>标签:
29 print(soup.find_all(['a','b']))
30
31 #1.4、True:可以匹配任何值,下面代码查找到所有的tag,但是不会返回字符串节点
32 print(soup.find_all(True))
33 for tag in soup.find_all(True):
34     print(tag.name)
35
36 #1.5、方法:如果没有合适过滤器,那么还可以定义一个方法,方法只接受一个元素参数 ,如果这个方法返回 True 表示当前元素匹配并且被找到,如果不是则反回 False
37 def has_class_but_no_id(tag):
38     return tag.has_attr('class') and not tag.has_attr('id')
39
40 print(soup.find_all(has_class_but_no_id))
2.find_all(name,attrs,recursive,text,**kwargs)
 1 #2、find_all( name , attrs , recursive , text , **kwargs )
 2 #2.1、name: 搜索name参数的值可以使任一类型的 过滤器 ,字符窜,正则表达式,列表,方法或是 True .
 3 print(soup.find_all(name=re.compile('^t')))
 4
 5 #2.2、keyword: key=value的形式,value可以是过滤器:字符串 , 正则表达式 , 列表, True .
 6 print(soup.find_all(id=re.compile('my')))
 7 print(soup.find_all(href=re.compile('lacie'),id=re.compile('\d'))) #注意类要用class_
 8 print(soup.find_all(id=True)) #查找有id属性的标签
 9
10 # 有些tag属性在搜索不能使用,比如HTML5中的 data-* 属性:
11 data_soup = BeautifulSoup('<div data-foo="value">foo!</div>','lxml')
12 # data_soup.find_all(data-foo="value") #报错:SyntaxError: keyword can't be an expression
13 # 但是可以通过 find_all() 方法的 attrs 参数定义一个字典参数来搜索包含特殊属性的tag:
14 print(data_soup.find_all(attrs={"data-foo": "value"}))
15 # [<div data-foo="value">foo!</div>]
16
17 #2.3、按照类名查找,注意关键字是class_,class_=value,value可以是五种选择器之一
18 print(soup.find_all('a',class_='sister')) #查找类为sister的a标签
19 print(soup.find_all('a',class_='sister ssss')) #查找类为sister和sss的a标签,顺序错误也匹配不成功
20 print(soup.find_all(class_=re.compile('^sis'))) #查找类为sister的所有标签
21
22 #2.4、attrs
23 print(soup.find_all('p',attrs={'class':'story'}))
24
25 #2.5、text: 值可以是:字符,列表,True,正则
26 print(soup.find_all(text='Elsie'))
27 print(soup.find_all('a',text='Elsie'))
28
29 #2.6、limit参数:如果文档树很大那么搜索会很慢.如果我们不需要全部结果,可以使用 limit 参数限制返回结果的数量.效果与SQL中的limit关键字类似,当搜索到的结果数量达到 limit 的限制时,就停止搜索返回结果
30 print(soup.find_all('a',limit=2))
31
32 #2.7、recursive:调用tag的 find_all() 方法时,Beautiful Soup会检索当前tag的所有子孙节点,如果只想搜索tag的直接子节点,可以使用参数 recursive=False .
33 print(soup.html.find_all('a'))
34 print(soup.html.find_all('a',recursive=False))
35
36 '''
37 像调用 find_all() 一样调用tag
38 find_all() 几乎是Beautiful Soup中最常用的搜索方法,所以我们定义了它的简写方法. BeautifulSoup 对象和 tag 对象可以被当作一个方法来使用,这个方法的执行结果与调用这个对象的 find_all() 方法相同,下面两行代码是等价的:
39 soup.find_all("a")
40 soup("a")
41 这两行代码也是等价的:
42 soup.title.find_all(text=True)
43 soup.title(text=True)
44 '''
3.find(name,attrs,recursive,text,**kwargs)
 1 #3、find( name , attrs , recursive , text , **kwargs )
 2 find_all() 方法将返回文档中符合条件的所有tag,尽管有时候我们只想得到一个结果.比如文档中只有一个<body>标签,那么使用 find_all() 方法来查找<body>标签就不太合适, 使用 find_all 方法并设置 limit=1 参数不如直接使用 find() 方法.下面两行代码是等价的:
 3
 4 soup.find_all('title', limit=1)
 5 # [<title>The Dormouse's story</title>]
 6 soup.find('title')
 7 # <title>The Dormouse's story</title>
 8
 9 唯一的区别是 find_all() 方法的返回结果是值包含一个元素的列表,而 find() 方法直接返回结果.
10 find_all() 方法没有找到目标是返回空列表, find() 方法找不到目标时,返回 None .
11 print(soup.find("nosuchtag"))
12 # None
13
14 soup.head.title 是 tag的名字 方法的简写.这个简写的原理就是多次调用当前tag的 find() 方法:
15
16 soup.head.title
17 # <title>The Dormouse's story</title>
18 soup.find("head").find("title")
19 # <title>The Dormouse's story</title>
4.其他方法
去百度自己查官方文档(可以用'必应')百度搜索必应
5.CSS选择器(重要)
 1 #该模块提供了select方法来支持css,详见官网:https://www.crummy.com/software/BeautifulSoup/bs4/doc/index.zh.html#id37
 2 html_doc = """
 3 <html><head><title>The Dormouse's story</title></head>
 4 <body>
 5 <p class="title">
 6     <b>The Dormouse's story</b>
 7     Once upon a time there were three little sisters; and their names were
 8     <a href="http://example.com/elsie" class="sister" id="link1">
 9         <span>Elsie</span>
10     </a>
11     <a href="http://example.com/lacie" class="sister" id="link2">Lacie</a> and
12     <a href="http://example.com/tillie" class="sister" id="link3">Tillie</a>;
13     <div class='panel-1'>
14         <ul class='list' id='list-1'>
15             <li class='element'>Foo</li>
16             <li class='element'>Bar</li>
17             <li class='element'>Jay</li>
18         </ul>
19         <ul class='list list-small' id='list-2'>
20             <li class='element'><h1 class='yyyy'>Foo</h1></li>
21             <li class='element xxx'>Bar</li>
22             <li class='element'>Jay</li>
23         </ul>
24     </div>
25     and they lived at the bottom of a well.
26 </p>
27 <p class="story">...</p>
28 """
29 from bs4 import BeautifulSoup
30 soup=BeautifulSoup(html_doc,'lxml')
31
32 #1、CSS选择器
33 print(soup.p.select('.sister'))
34 print(soup.select('.sister span'))
35
36 print(soup.select('#link1'))
37 print(soup.select('#link1 span'))
38
39 print(soup.select('#list-2 .element.xxx'))
40
41 print(soup.select('#list-2')[0].select('.element')) #可以一直select,但其实没必要,一条select就可以了
42
43 # 2、获取属性
44 print(soup.select('#list-2 h1')[0].attrs)
45
46 # 3、获取内容
47 print(soup.select('#list-2 h1')[0].get_text())
总结:
# 总结:
#1、推荐使用lxml解析库
#2、讲了三种选择器:标签选择器,find与find_all,css选择器
    1、标签选择器筛选功能弱,但是速度快
    2、建议使用find,find_all查询匹配单个结果或者多个结果
    3、如果对css选择器非常熟悉建议使用select
#3、记住常用的获取属性attrs和文本值get_text()的方法
四.selenium的简单使用
什么是selenium:
selenium最初是一个自动化测试工具,而爬虫中使用它主要是为了解决requests无法直接执行JavaScript代码的问题

selenium本质是通过驱动浏览器,完全模拟浏览器的操作,比如跳转、输入、点击、下拉等,来拿到网页渲染之后的结果,可支持多种浏览器

from selenium import webdriver
browser=webdriver.Chrome()
browser=webdriver.Firefox()
browser=webdriver.PhantomJS()
browser=webdriver.Safari()
browser=webdriver.Edge()
安装:
1.有界面浏览器
#安装:selenium+chromedriver
pip3 install selenium
下载chromdriver.exe放到python安装路径的scripts目录中即可,注意最新版本是2.38,并非2.9
国内镜像网站地址:http://npm.taobao.org/mirrors/chromedriver/2.38/
最新的版本去官网找:https://sites.google.com/a/chromium.org/chromedriver/downloads

#验证安装
C:\Users\Administrator>python3
Python 3.6.1 (v3.6.1:69c0db5, Mar 21 2017, 18:41:36) [MSC v.1900 64 bit (AMD64)] on win32
Type "help", "copyright", "credits" or "license" for more information.
>>> from selenium import webdriver
>>> driver=webdriver.Chrome() #弹出浏览器
>>> driver.get('https://www.baidu.com')
>>> driver.page_source

#注意:
selenium3默认支持的webdriver是Firfox,而Firefox需要安装geckodriver
下载链接:https://github.com/mozilla/geckodriver/releases

selenium+chromedriver
2.无界面浏览器,谷歌也支持了
#selenium:3.12.0
#webdriver:2.38
#chrome.exe: 65.0.3325.181(正式版本) (32 位)

from selenium import webdriver
from selenium.webdriver.chrome.options import Options
chrome_options = Options()
chrome_options.add_argument('window-size=1920x3000') #指定浏览器分辨率
chrome_options.add_argument('--disable-gpu') #谷歌文档提到需要加上这个属性来规避bug
chrome_options.add_argument('--hide-scrollbars') #隐藏滚动条, 应对一些特殊页面
chrome_options.add_argument('blink-settings=imagesEnabled=false') #不加载图片, 提升速度
chrome_options.add_argument('--headless') #浏览器不提供可视化页面. linux下如果系统不支持可视化不加这条会启动失败
chrome_options.binary_location = r"C:\Program Files (x86)\Google\Chrome\Application\chrome.exe" #手动指定使用的浏览器位置


driver=webdriver.Chrome(chrome_options=chrome_options)
driver.get('https://www.baidu.com')

print('hao123' in driver.page_source)

driver.close() #切记关闭浏览器,回收资源

selenium+谷歌浏览器headless模式
基本使用:
from selenium import webdriver
from selenium.webdriver import ActionChains
from selenium.webdriver.common.by import By #按照什么方式查找,By.ID,By.CSS_SELECTOR
from selenium.webdriver.common.keys import Keys #键盘按键操作
from selenium.webdriver.support import expected_conditions as EC
from selenium.webdriver.support.wait import WebDriverWait #等待页面加载某些元素

browser=webdriver.Chrome()
try:
    browser.get('https://www.baidu.com')

```
input_tag=browser.find_element_by_id('kw')
input_tag.send_keys('美女') #python2中输入中文错误,字符串前加个u
input_tag.send_keys(Keys.ENTER) #输入回车
```


    wait=WebDriverWait(browser,10)
    wait.until(EC.presence_of_element_located((By.ID,'content_left'))) #等到id为content_left的元素加载完毕,最多等10秒

```
print(browser.page_source)
print(browser.current_url)
print(browser.get_cookies())
```

finally:
    browser.close()
小案例:
 1 from selenium import webdriver
 2 from selenium.webdriver.common.keys import Keys #键盘按键操作
 3 import time
 4
 5 # 这个就是无界面浏览器,这样不会弹出你请求的浏览器,就是可以隐藏浏览器
 6 # from selenium.webdriver.chrome.options import Options
 7 # chrome_options = Options()
 8 # chrome_options.add_argument('window-size=1920x3000') #指定浏览器分辨率
 9 # chrome_options.add_argument('--disable-gpu') #谷歌文档提到需要加上这个属性来规避bug
10 # chrome_options.add_argument('--hide-scrollbars') #隐藏滚动条, 应对一些特殊页面
11 # chrome_options.add_argument('blink-settings=imagesEnabled=false') #不加载图片, 提升速度
12 # chrome_options.add_argument('--headless') #浏览器不提供可视化页面. linux下如果系统不支持可视化不加这条会启动失败
13 # chrome_options.binary_location = r"C:\Program Files (x86)\Google\Chrome\Application\chrome.exe" #手动指定使用的浏览器位置
14 # 拿到一个对象,这个对象就相当于浏览器
15 # bro = webdriver.Chrome(chrome_options=chrome_options)
16 bro = webdriver.Chrome()
17 bro.get('https://www.baidu.com')
18 # print(bro.page_source)# 把js渲染完成的页面打印到控制台上
19
20 # time.sleep(3)
21 # 取到百度搜索的框
22 inp = bro.find_element_by_id('kw')
23 # 往框里写字
24 inp.send_keys('美女')
25 # 输入回车
26 inp.send_keys(Keys.ENTER)
27 # 另一种方式:取出按钮,根据su点击
28 time.sleep(3)
29 bro.close() # 关闭浏览器
