ansible常用模块及练习题
ansible 和saltstack对比
错误回答:ansible比较轻量级,不需要安装客户端
SaltStack 底层有一个消息队列:Zero-MQ(message queue)
1.ansible是基于ssh协议来工作的,但是saltstack也有支持ssh协议的模式
2.但是一般来说,选择saltstack就是为了使用客户端和服务端的方式(速度快)
3.因为saltstack底层有一个zmq做消息队列
4.ansible基于ssh,如果ssh服务挂了,ansible也不能工作,saltstack可以,会起两个端口4505,4506
ansible的模块
command
shell
script
软件管理模块
- yum
name: 服务名
state:
	present:安装
	absent:卸载
	latest:安装最新版本
- yum_repository
name:指定仓库名字,如果没有配置file,则文件名和仓库名一致
file:指定文件名
baseurl:指定源
gpgcheck:指定是否检查秘钥
	yes:检查
	no:不检查
description:指定对仓库的描述,也就是repo文件中的name
enabled:是否开启仓库
	yes:开启
	no:不开启
state:
	present:添加仓库
	absent:删除仓库
ansible文件管理模块
copy
[root@m01 ~]# ansible backup -m copy -a 'src=/root/zls_xxx.conf dest=/etc/rsyncd.conf owner=root group=root mode=0644'

src:指定源文件位置(管理机上的文件)
dest:指定你要推送到主机的目标位置
owner:指定属主
group:指定属组
mode:指定权限
backup:是否备份,第一次推,没有每份,对端机器存在该文件,并且内容不一致,才会做备份
	yes:推送之前,先备份目标主机的源文件
	no:不备份
remote_src:源文件是否在远端的机器上
	yes:是
	no:否
content:往指定目标文件中写入内容
file
作用:
-
授权
-
创建目录
-
创建文件
-
创建软连接
-
删除目录,文件,软连接
[root@m01 ~]# ansible all -m file -a 'path=/opt/test/zls owner=www group=www mode=0722 state=directory'
[root@m01 ~]# ansible all -m file -a 'path=/code owner=www group=www recurse=yes'

path:指定文件或目录的路径
owner:指定属主
group:指定数组
mode:指定权限
src:做 软/硬 链接的时候使用,指定源文件
recurse:是否递归授权
	yes:递归授权
	no:仅授权当前目录
state:
	directory:创建目录
	touch:创建文件
	link:做软链接
	hard:做硬链接
	absent:删除
	file:配合 modification_time  access_time  修改文件的属性,stat
get_url
类似于:wget
[root@m01 ~]# ansible backup -m get_url -a 'url=http://test.driverzeng.com/Nginx_File/nginx.txt dest=/root checksum=md5:8f8dd0f79bc6ef2148ca3494070a86a1'

url:指定下载文件的地址
dest:指定下载的路径
checksum:指定加密的算法
	sha256
	md5
ansible服务管理模块
service、systemd
[root@m01 ~]# ansible 'c6,backup' -m service -a 'name=crond state=stopped'
name:指定服务名称
state:
	started:启动服务
	stopped:停止服务
	restarted:重启服务
	reloaded:重新加载服务
ansible用户管理模块
user
[root@m01 ~]# ansible all -m user -a 'name=zlsqqq uid=10201 group=root shell=/sbin/nologin create_home=false'

name:指定用户名
uid:指定uid       -u
group:只能指定组名,不能指定gid     -g
shell:指定登录的方式   -s
create_home:是否创建家目录
	true,yes:创建
	false,no:不创建
comment:指定注释   -c
groups:指定附加组(配合append,如果不加append覆盖) -G
append:创建附加组的时候,追加 -a
remove:删除用户的时候,是否同时删除家目录和邮件文件
	true,yes:删除
	fasle,no:不删除
state
	present:创建
	absent:删除

generate_ssh_key:是否创建秘钥对
	yes:创建
	no:不创建
ssh_key_bits:指定秘钥对加密长度
ssh_key_file:指定私钥文件的位置
system:是否是系统用户  -r
	yes:是系统用户
	no:不是系统用户
group
[root@m01 ~]# ansible all -m group -a 'name=xxxx gid=10010 state=present'

name:指定组名
gid:指定组id
state:
	present:创建
	absent:删除
ansible定时任务模块
cron
#### 创建
[root@m01 ~]# ansible all -m cron -a "name='sync time' minute=*/5 job='ntpdate time1.aliyun.com &>/dev/null'"

#### 删除(删除是根据注释来删除的 name)
[root@m01 ~]# ansible all -m cron -a "name='time'  state=absent"

name:指定定时任务的名字(添加一个备注)
state:
	present:创建定时任务
	absent:删除定时任务

minute:分 (0-59) */5     10-20     10,20
hour:时(0-23)
day:日(1-31)
month:月(1-12)
weekday:周(0-6)
ansible磁盘挂载模块
mount
[root@m01 ~]# ansible web_group -m mount -a 'path=/mnt src=10.0.0.31:/web_data fstype=nfs state=mounted'

path:挂载到本地的目录
src:对端目录
fstype:文件系统类型
	nfs
	ext4
	ext3
state:
	present:只写入开机自动挂载的文件中,不挂载
	mounted:既写入文件,又挂载

	absent:卸载设备,并且清理开机自动挂载文件
	unmounted:只卸载不清理文件

推荐:
	- 挂载的时候:mounted
	- 卸载的时候:absent
ansible关闭selinux模块
[root@m01 ~]# ansible all -m selinux -a 'state=disabled'
state:
	enforcing
	permisive
	disabled
ansible防火墙模块
[root@m01 ~]# ansible all -m firewalld -a 'port=443/tcp permanent=no state=enabled'
[root@m01 ~]# ansible all -m firewalld -a 'service=http permanent=no state=enabled'
web01 web02 backup
安装rsync
打开防火墙
打开873端口
关闭selinux
安装nfs
并且web01 02 挂载到nfs
统一使用www用户uid gid 666
环境准备
| 服务器 | 内网IP | 外网IP | 安装服务 | 角色 |
|---|---|---|---|---|
| web01 | 172.16.1.7 | 10.0.0.7 | 被控端 | |
| web02 | 172.16.1.8 | 10.0.0.8 | 被控端 | |
| nfs | 172.16.1.31 | 10.0.0.31 | 被控端 | |
| backup | 172.16.1.41 | 10.0.0.41 | 被控端 | |
| m01 | 172.16.1.61 | 10.0.0.61 | ansible | 控制端 |
m01部署
# 下载ansible
[root@m01 ~]# yum install -y ansible
# 修改ansible配置文件
[root@m01 ~]# vim /etc/ansible/ansible.cfg
# 开启ansible的日志
log_path = /var/log/ansible.log
# 默认模块由command改成shell
module_name = shell
# 检查对应服务器的主机密钥,打开注释
host_key_checking = False
# 添加主机清单
[root@m01 ~]# !v
vim /etc/ansible/hosts

[web_group]
web01 ansible_ssh_host=10.0.0.7
web02 ansible_ssh_host=10.0.0.8
web03 ansible_ssh_host=10.0.0.9
[backup_group]
backup ansible_ssh_host=10.0.0.41
[nfs_group]
nfs ansible_ssh_host=10.0.0.31
[rsync:children]
backup_group
nfs_group
~
# 生成密钥
[root@m01 ~]# ssh-keygen
# 把公钥发送给被控端服务器
[root@m01 ~]# ssh-copy-id -i /root/.ssh/id_rsa.pub root@10.0.0.31
[root@m01 ~]# ssh-copy-id -i /root/.ssh/id_rsa.pub root@10.0.0.41
[root@m01 ~]# ssh-copy-id -i /root/.ssh/id_rsa.pub root@10.0.0.9
[root@m01 ~]# ssh-copy-id -i /root/.ssh/id_rsa.pub root@10.0.0.8
[root@m01 ~]# ssh-copy-id -i /root/.ssh/id_rsa.pub root@10.0.0.7

# 创建www用户组制定gid666
[root@m01 ~]# ansible all -m group -a 'name=www gid=666 state=present'
# 创建www用户指定uid666 gid666 ,不让登陆,不创建家目录
[root@m01 ~]# ansible all -m user -a "name=www uid=666 group=666 shell=/sbin/nologin create_home=no"
# 编辑backuprsync的配置文件
[root@m01 ~]# vim /etc/rsyncd.conf

uid = www
gid = www
port = 873
fake super = yes
use chroot = no
max connections = 200
timeout = 600
ignore errors
read only = false
list = false
auth users = nfs_bak
secrets file = /etc/rsync.passwd
log file = /var/log/rsyncd.log
#####################################
[nfs]
comment = welcome to oldboyedu backup!
path = /backup
# 把配置文件传送到backup服务器
[root@m01 ~]# ansible backup -m copy -a 'src=/etc/rsyncd.conf dest=/etc/rsyncd.conf owner=root group=root mode=0644'
# 编辑密码文件
[root@m01 ~]# vim /etc/rsync.passwd

nfs_bak:123
# 把密码文件传送到backup
[root@m01 ~]# ansible backup -m copy -a 'src=/etc/rsync.passwd dest=/etc/rsync.pwaawd owner=root group=root mode=0600'
# 创建备份目录
[root@m01 ~]#  ansible backup -m file -a 'path=/backup owner=www group=www mode=0755 state=directory'
# 配置yum仓库
[root@m01 ~]# ansible all -m yum_repository -a 'name=rsync file=rsync description=rsync baseurl=http://http://mirrors.aliyun.com/epel/7/$basearch  gpgcheck=no enabled=yes'
# 安装rsync
[root@m01 ~]# ansible backup -m yum -a 'name=rsync state=present'
#安装nfs
[root@m01 ~]# ansible nfs -m yum -a 'name=nfs-utils state=present'
# 启动rsync
[root@m01 ~]#  ansible backup -m service -a 'name=rsyncd state=started'
# 打开防火墙
[root@m01 ~]# ansible all -m service -a 'name=firewalld state=started'
# 打开873端口
[root@m01 ~]# ansible all -m firewalld -a "port=873/tcp permanent=no state=enabled"
# 关闭selinux
[root@m01 ~]# ansible all -m selinux -a 'state=disabled'
# 编辑nfs挂载文件
[root@m01 ~]# ansible nfs -m copy -a 'content="/test_data 172.16.1.0/24(rw,sync,all_squash,anonuid=666,anongid=666)\n" dest=/etc/exports'

# 创建nfs挂载目录
[root@m01 ~]# ansible nfs -m file -a 'path=/test_data owner=www group=www mode=0755 state=directory'
# 启动nfs服务
[root@m01 ~]# ansible nfs -m service -a 'name=nfs-server state=started'
# 关闭防火墙
[root@m01 ~]# ansible all -m service -a 'name=firewalld state=stopped'

# 挂载目录
[root@m01 ~]# ansible web_group -m mount -a 'path=/mnt src=172.16.1.31:/test_data fstype=nfs state=mounted'

# 查看挂载
[root@m01 ~]# ansible web_group -m shell -a 'df -h'
web02 | CHANGED | rc=0 >>
Filesystem              Size  Used Avail Use%
172.16.1.31:/test_data   19G  1.3G   18G   8% /mnt
web03 | CHANGED | rc=0 >>
Filesystem              Size  Used Avail Use% Mounted on

172.16.1.31:/test_data   19G  1.3G   18G   8% /mnt
1.web01 web02 安装nginx
2.自己写一个前端页面(xxx_web01_page)
3.安装nfs
4.web01和web02随便挂载目录到nfs
5.nfs将共享目录的数据,推送到backup
6.rsync
环境准备
| 服务器名称 | 外网IP | 内网IP | 角色 |
|---|---|---|---|
| web01 | 10.0.0.7 | 172.16.1.7 | 被控端 |
| web02 | 10.0.0.8 | 172.16.1.8 | 被控端 |
| nfs | 10.0.0.31 | 172.16.1.31 | 被控端 |
| backup | 10.0.0.41 | 172.16.1.41 | 被控端 |
| m01 | 10.0.0.61 | 172.16.1.61 | 控制端 |
作业规划
服务器准备
配置m01主机清单
编辑playbook
m01部署
# 下载ansible
[root@m01 ~]# yum install -y ansible
# ansible配置文件优化
[root@m01 ~]# vim /etc/ansible/ansible.cfg
host_key_checking = False
log_path = /var/log/ansible.log
module_name = shell

# 生成密钥对
[root@m01 ~]# ssh-keygen
# 把公钥发送给要管理的机器
[root@m01 ~]# ssh-copy-id -i /root/.ssh/id_rsa.pub root@10.0.0.41
[root@m01 ~]# ssh-copy-id -i /root/.ssh/id_rsa.pub root@10.0.0.31
[root@m01 ~]# ssh-copy-id -i /root/.ssh/id_rsa.pub root@10.0.0.9
[root@m01 ~]# ssh-copy-id -i /root/.ssh/id_rsa.pub root@10.0.0.8
[root@m01 ~]# ssh-copy-id -i /root/.ssh/id_rsa.pub root@10.0.0.7
# 配置主机清单
[web_group]
web01 ansible_ssh_host=10.0.0.7
web02 ansible_ssh_host=10.0.0.8
# web03 ansible_ssh_host=10.0.0.9
[backup_group]
backup ansible_ssh_host=10.0.0.41
[nfs_group]
nfs ansible_ssh_host=10.0.0.31
[rsync:children]
backup_group
nfs_group

# 编写ansible-playbook剧本
ansible-playbook
[root@m01 ~]# cat  nginx_rsync.yml
- hosts: web_group
  tasks:
    - name: install nginx server
      yum:
        name: nginx
        state: present
    - name: nginx_page
      copy:
        src: /etc/ansible/nginx.conf
        dest: /etc/nginx/conf.d/
        owner: root
        group: root
        mode: 0755
    - name: create zhandian yemian
      file:
        path: /code/
        owner: root
        group: root
        mode: 0755
        state: directory

    - name: bianjipage
      copy:
        src: /root/a.html
        dest: /code/
        owner: root
        group: root
        mode: 0644
    - name: start nginx
      service:
        name: nginx
        state: restarted
        enabled: yes
- hosts: nfs
  tasks:
    - name: install nfs-server
      yum:
        name: nfs-utils
        state: present
    - name: bianjipeizhi
      copy:
        content: /data 172.16.1.0/24(rw,sync,all_squash,anonuid=0,anongid=0)
        dest: /etc/exports
        owner: root
        group: root
        mode: 0644
    - name: create data
      file:
        path: /data/
        owner: root
        group: root
        mode: 0755
        state: directory
    - name: start  server
      service:
        name: nfs-server
        state: restarted
        enabled: yes
- hosts: web_group
  tasks:
    - name: mount nfs
      mount:
        path: /mnt
        src: 172.16.1.31:/data
        fstype: nfs
        state: mounted
- hosts: backup
  tasks:
    - name: install rsync
      yum:
        name: rsync
        state: present
    - name: rsync_page
      copy:
        src: /root/rsync
        dest: /etc/rsyncd.conf
    - name: pass_page
      copy:
        content: nfs_bak:123
        dest: /etc/rsync.passwd
    - name: create dir
      file:
        path: /backup
        owner: root
        group: root
        mode: 0755
        state: directory

    - name: start rsync
      service:
        name:  rsyncd
        state: restarted
        enabled: yes
- hosts: nfs
  tasks:
    - name: install rsync
      yum:
        name: rsync
        state: present
    - name: start rsync
      service:
        name: rsyncd
        state: restarted
        enabled: yes
    - name: rsync beifei
      copy:
        src: /root/bf.sh
        dest: /root/bf.sh
    - name: cron backup
      cron:
        minute: "*/1"
        job: "/bin/sh /root/bf.sh &>/dev/null"
备份脚本
[root@nfs ~]# cat bf.sh
export RSYNC_PASSWORD=123
#设置普通变量
D=$(date +%F)
IP=$(ifconfig eth1|awk 'NR==2 {print $2}')
H=$(hostname)
bk_dir=/backup
local_dir=/data
#判断目录存在如果不存在则创建
if [ ! -d $local_dir ] ; then
mkdir -p $local_dir
fi
#客户端本地打包备份至上面创建的目录下
tar zcPf ${local_dir}/${D}_data.tar.gz /data
#将备份的数据推送到本地服务器目录
rsync -avz $local_dir nfs_bak@10.0.0.41::nfs
#只保留七天内的备份数据其他删除
cd / && \
find /backup/ -type d ! -mtime -7 ! -name 'backup'  |xargs rm -rf
nginx配置文件
root@web03 code]# cd /etc/nginx/conf.d/
[root@web03 conf.d]# ll
total 4
-rwxr-xr-x 1 root root 80 Jun 10 22:32 nginx.conf
[root@web03 conf.d]# cat nginx.conf
server {
	listen 80;
	server_name test.nginx.com;
	root /code;
	index a.html;
}
自定义站点页面
[root@web03 ~]# cd /code
[root@web03 code]# cat a.html
<!DOCTYPE html>
<html lang="en">
<head>
    <meta charset="UTF-8">
    <title>my website</title>
</head>
<body>
<article>
  <header>
    <h1>被钓鱼网站</h1>
    <p>创建时间:<time pubdate="pubdate">2020/6/4</time></p>
  </header>
  <p>
    <b>标题:</b>啥也不是
  </p>
  <footer>
    <p><small>太难了</small></p>
  </footer>
</article>
</body>
</html>

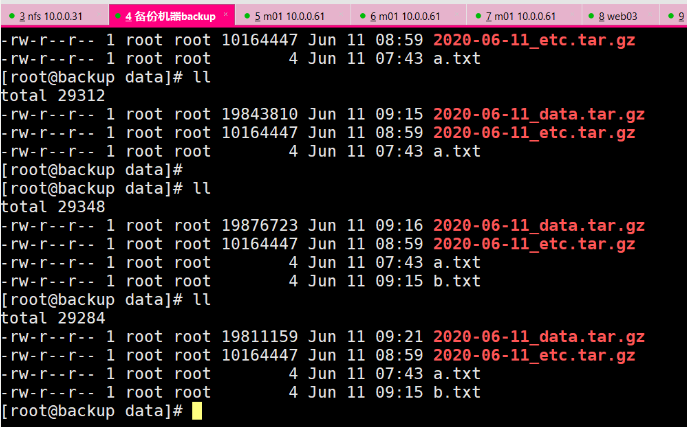
每分钟备份一次data目录
ansible
ansible是新出现的自动化运维工具,基于Python开发,集合了众多运维工具(puppet、cfengine、chef、func、fabric)的优点,实现了批量系统配置、批量程序部署、批量运行命令等功能。
Options:
-a MODULE_ARGS, --args=MODULE_ARGS
#module arguments
#指定执行模块使用的参数
--ask-vault-pass
#ask for vault password
#加密playbook文件时提示输入密码
-B SECONDS, --background=SECONDS
#run asynchronously, failing after X seconds(default=N/A)
#后台运行超时时间,异步运行,X秒之后失败
-C, --check
#don't make any changes; instead, try to predict some of the changes that may occur
#模拟执行,不会真正在机器上执行(查看执行会产生什么变化)
-D, --diff
#when changing (small) files and templates, show the differences in those files; works great with --check
#当更新的文件数及内容较少时,该选项可显示这些文件不同的地方,该选项结合-C用会有较好的效果
-e EXTRA_VARS, --extra-vars=EXTRA_VARS
#set additional variables as key=value or YAML/JSON
#执行命令时添加额外参数变量
-f FORKS, --forks=FORKS
#specify number of parallel processes to use(default=5)
#并行任务数。FORKS被指定为一个整数,默认是5
-h, --help
#show this help message and exit
#打开帮助文档API
-i INVENTORY, --inventory-file=INVENTORY
#specify inventory host path(default=/etc/ansible/hosts) or comma separated host list.
#指定要读取的Inventory文件
-l SUBSET, --limit=SUBSET
#further limit selected hosts to an additional pattern
#限定执行的主机范围
--list-hosts
#outputs a list of matching hosts; does not execute anything else
#列出执行匹配到的主机,但并不会执行
-m MODULE_NAME, --module-name=MODULE_NAME
#module name to execute (default=command)
#指定执行使用的模块,默认使用 command 模块
-M MODULE_PATH, --module-path=MODULE_PATH
#specify path(s) to module library (default=None)
#要执行的模块的路径
--new-vault-password-file=NEW_VAULT_PASSWORD_FILE
#new vault password file for rekey
-o, --one-line
#condense output
#压缩输出,摘要输出.尝试一切都在一行上输出
--output=OUTPUT_FILE
#output file name for encrypt or decrypt; use - for stdout
#
-P POLL_INTERVAL, --poll=POLL_INTERVAL
#set the poll interval if using -B (default=15)
#设置轮询间隔,每隔数秒。需要- B
--syntax-check
#perform a syntax check on the playbook, but do not execute it
#检查Playbook中的语法书写
-t TREE, --tree=TREE
#log output to this directory
#将日志内容保存在该输出目录,结果保存在一个文件中在每台主机上
--vault-password-file=VAULT_PASSWORD_FILE
#vault password file
#
-v, --verbose
#verbose mode (-vvv for more, -vvvv to enable connection debugging)
#执行详细输出
--version
#show program's version number and exit
#显示版本
Connection Options:
control as whom and how to connect to hosts
-k, --ask-pass
         ask for connection password

--private-key=PRIVATE_KEY_FILE, --key-file=PRIVATE_KEY_FILE
         use this file to authenticate the connection

-u REMOTE_USER, --user=REMOTE_USER
         connect as this user (default=None)
         指定远程主机以USERNAME运行命令
-c CONNECTION, --connection=CONNECTION
         connection type to use (default=smart)
         指定连接方式,可用选项paramiko (SSH)、ssh、local,local方式常用于crontab和kickstarts
-T TIMEOUT, --timeout=TIMEOUT
         override the connection timeout in seconds(default=10)
         SSH连接超时时间设定,默认10s
--ssh-common-args=SSH_COMMON_ARGS
         specify common arguments to pass to sftp/scp/ssh (e.g.ProxyCommand)

--sftp-extra-args=SFTP_EXTRA_ARGS
         specify extra arguments to pass to sftp only (e.g. -f, -l)

--scp-extra-args=SCP_EXTRA_ARGS
         specify extra arguments to pass to scp only (e.g. -l)

--ssh-extra-args=SSH_EXTRA_ARGS
         specify extra arguments to pass to ssh only (e.g. -R)
Privilege Escalation Options:
control how and which user you become as on target hosts
-s, --sudo
         run operations with sudo (nopasswd) (deprecated, use become)
         相当于Linux系统下的sudo命令
-U SUDO_USER, --sudo-user=SUDO_USER
         desired sudo user (default=root) (deprecated, use become)
         使用sudo,相当于Linux下的sudo命令
-S, --su
         run operations with su (deprecated, use become)

-R SU_USER, --su-user=SU_USER
         run operations with su as this user (default=root) (deprecated, use become)
   -b, --become
             run operations with become (does not imply password prompting)

    --become-method=BECOME_METHOD
             privilege escalation method to use (default=sudo),valid choices: [ sudo | su | pbrun | pfexec | doas |dzdo | ksu | runas ]

    --become-user=BECOME_USER
             run operations as this user (default=root)

    --ask-sudo-pass
             ask for sudo password (deprecated, use become)

    --ask-su-pass
             ask for su password (deprecated, use become)

    -K, --ask-become-pass
             ask for privilege escalation password
Ansible是一个配置管理系统configuration management system,你只需要可以使用ssh访问你的服务器或设备就行。
1.安装软件
2.配置服务
Ansible能做什么
ansible可以帮助我们完成一些批量任务,或者完成一些需要经常重复的工作。
比如:同时在100台服务器上安装nfs服务,并在安装后启动服务。
比如:将某个文件一次性拷贝到100台服务器上。
比如:每当有新服务器加入工作环境时,你都要为新服务器部署某个服务,也就是说你需要经常重复的完成相同的工作。
这些场景中我们都可以使用到ansible。
Cobbler
Ansible
1.购买机器->2.配置环境->3.部署代码->4测试->5.加入集群
Ansible/Saltstack(master->minion)
Ansible软件特点
1.ansible不需要单独安装客户端,SSH相当于ansible客户端。
2.ansible不需要启动任何服务,仅需安装对应工具即可。
3.ansible依赖大量的python模块来实现批量管理。
4.ansible配置文件/etc/ansible/ansible.cfg
实现从管理机m01到其他机器的密钥认证
ansible借助公钥批量管理
利用非交换式工具实现批量分发公钥与批量管理服务器
[root@m01 ~]# ssh-copy-id -i ~/.ssh/id_rsa.pub root@172.16.1.31
[root@m01 ~]# ssh-copy-id -i ~/.ssh/id_rsa.pub root@172.16.1.41
[root@m01 ~]# ssh-copy-id -i ~/.ssh/id_rsa.pub root@172.16.1.7
1.安装ansible
[root@m01 ~]# yum install ansible -y
2.配置ansible
[root@m01 ~]# vim /etc/ansible/hosts
[oldboy]
172.16.1.31
172.16.1.41
3.验证ansible
ansible是通过ssh端口探测通信
[root@m01 ~]# ansible oldboy -m ping
172.16.1.7 | SUCCESS => {
"changed": false,
"ping": "pong"
}
172.16.1.31 | SUCCESS => {
"changed": false,
"ping": "pong"
}
172.16.1.41 | SUCCESS => {
"changed": false,
"ping": "pong"
}
批量执行命令
[root@m01 ~]# ansible oldboy -m command -a "df -h"
如果没有给对应的主机下发公钥,可以使用密码的方式进行添加
172.16.1.41 ansible_ssh_user='root' ansible_ssh_pass='1' ansible_ssh_port='22'
定义主机清单
[web]
172.16.1.7
[nfs]
172.16.1.31
[backup]
172.16.1.41
[oldboy:children]
web
nfs
backup
[root@m01 ~]# ansible web --list-hosts #web
hosts (1):
172.16.1.7
[root@m01 ~]# ansible nfs --list-hosts #nfs
hosts (1):
172.16.1.31
[root@m01 ~]# ansible backup --list-hosts #rsync
hosts (1):
172.16.1.41
[root@m01 ~]# ansible oldboy --list-hosts #集中所有的小组,用于执行一些基础的配置
hosts (3):
172.16.1.31
172.16.1.41
172.16.1.7
1、命令 -> 文件 = 脚本
2、模块 -> 文件 = 剧本
安装 配置 启动
1.command 执行命令
2.shell 执行命令
3.yum 安装软件模块
4.copy 配置模块
5.service 启动服务模块
6.user 用户管理
7.file 创建目录,创建文件,往文件写内容
8.cron 定时任务
9.mount 挂载
.command命令模块:默认模块, 执行命令
root@m01 ~]# ansible oldboy -a "hostname"
如果需要一些管道操作,则使用shell
[root@m01 ~]# ansible oldboy -m shell -a "ifconfig|grep eth0" -f 50
-f =forks /etc/ansible/ansible.cfg #结果返回的数量
yum安装模块
推送脚本文件至远程,远程执行脚本文件
[root@m01 ~]# ansible oldboy -m yum -a "name=httpd state=installed"
name ---指定要安装的软件包名称
state ---指定使用yum的方法
installed,present ---安装软件包
removed,absent ---移除软件包
latest ---安装最新软件包
copy模块推送文件模块
[root@m01 ~]# ansible oldboy -m copy -a "src=/etc/hosts dest=/tmp/test.txt owner=www group=www mode=0600"
在推送覆盖远程端文件前,对远端已有文件进行备份,按照时间信息备份
[root@m01 ~]# ansible oldboy -m copy -a "src=/etc/hosts dest=/tmp/test.txt backup=yes"
直接向远端文件内写入数据信息,并且会覆盖远端文件内原有数据信息
[root@m01 ~]# ansible oldboy -m copy -a "content='bgx' dest=/tmp/oldboy"
src --- 推送数据的源文件信息
dest --- 推送数据的目标路径
backup --- 对推送传输过去的文件,进行备份
content --- 直接批量在被管理端文件中添加内容
group --- 将本地文件推送到远端,指定文件属组信息
owner --- 将本地文件推送到远端,指定文件属主信息
mode --- 将本地文件推送到远端,指定文件权限信息
4.service服务模块
[root@m01 ~]# ansible oldboy -m service -a "name=crond state=stopped enabled=yes"
name --- 定义要启动服务的名称
state --- 指定服务状态是停止或是运行
started --- 启动
stopped --- 停止
restarted --- 重启
reloaded --- 重载
enabled --- 是否让服务开启自启动
1.安装
[root@m01 ~]# ansible web -m yum -a "name=httpd state=installed"
2.配置
[root@m01 ~]# ansible web -m copy -a "content='This is Ansible' dest=/var/www/html/index.html"
3.启动
[root@m01 ~]# ansible web -m service -a "name=httpd state=started"
yum copy service mount cron user file
1.机器还原快照(firewalld、selinux、配置好仓库)
2.推送你的公钥
3.指定backup安装rsync、配置、启动、创建目录、创建用户、准备密码文件、权限
4.指定nfs安装nfs、配置、启动
5.web挂载nfs
6.web执行脚本推送数据至bakcup,加入定时任务
3.script模块
编写脚本
[root@m01 ~]# mkdir -p /server/scripts
[root@m01 ~]# cat /server/scripts/yum.sh
!/usr/bin/bash
yum install -y iftop
在本地运行模块,等同于在远程执行,不需要将脚本文件进行推送目标主机执行
[root@m01 ~]# ansible oldboy -m script -a "/server/scripts/yum.sh"
5.file配置模块
创建目录
[root@m01 ~]# ansible oldboy -m file -a "path=/tmp/oldboy state=diretory"
创建文件
[root@m01 ~]# ansible oldboy -m file -a "path=/tmp/tt state=touch mode=555 owner=root group=root"
[root@m01 ~]# ansible oldboy -m file -a "src=/tmp/tt path=/tmp/tt_link state=link"
path --- 指定远程主机目录或文件信息
recurse --- 递归授权
state ---
directory --- 在远端创建目录
touch --- 在远端创建文件
link --- link或hard表示创建链接文件
absent --- 表示删除文件或目录
mode --- 设置文件或目录权限
owner --- 设置文件或目录属主信息
group --- 设置文件或目录属组信息
7.group模块
name --- 指定创建的组名
gid --- 指定组的gid
state
absent --- 移除远端主机的组
present --- 创建远端主机的组(默认)
创建组,指定gid
[root@m01 ~]# ansible oldboy -m group -a "name=oldgirl gid=888"
8.user模块
uid --- 指定用户的uid
group --- 指定用户组名称
groups --- 指定附加组名称
password --- 给用户添加密码
shell --- 指定用户登录shell
create_home --- 是否创建家目录
创建oldgirl,设定uid为888,并加入gid为888
[root@m01 ~]# ansible oldboy -m user -a "name=oldgirl uid=888 group=888 shell=/sbin/nologin create_home=no"
随机生成加密字符串(-1使用MD5进行加密 -stdin 非交互式 -salt 加密参数)
[root@m01 ~]# echo "bgx" | openssl passwd -1 -stdin
固定加密字符串
[root@m01 ~]# echo "123"| openssl passwd -1 -stdin -salt 'salt
创建普通用户,并配置对应的用户密码
[root@m01 ~]# echo "bgx" | openssl passwd -1 -stdin
$1\(1KmeCnsK\)HGnBE86F/XkXufL.n6sEb.
[root@m01 ~]# ansible oldboy -m user -a 'name=xlw password="$1\(765yDGau\)diDKPRoCIPMU6KEVEaPTZ0"'
crond模块
使用ansible添加一条定时任务
[root@m01 ~]# ansible oldboy -m cron -a "minute=* hour=* day=* month=* weekday=* job='/bin/sh /server/scripts/test.sh'"
[root@m01 ~]# ansible oldboy -m cron -a "job='/bin/sh /server/scripts/test.sh'"
设置定时任务注释信息,防止重复,name设定
[root@m01 ~]# ansible oldboy -m cron -a "name='cron01' job='/bin/sh /server/scripts/test.sh'"
删除相应定时任务
[root@m01 ~]# ansible oldboy -m cron -a "name='ansible cron02' minute=0 hour=0 job='/bin/sh /server/scripts/test.sh' state=absent"
注释相应定时任务,使定时任务失效
[root@m01 scripts]# ansible oldboy -m cron -a "name='ansible cron01' minute=0 hour=0 job='/bin/sh /server/scripts/test.sh' disabled=yes"
mount模块
present ---开机挂载,仅将挂载配置写入/etc/fstab
mounted ---挂载设备,并将配置写入/etc/fstab
unmounted ---卸载设备,不会清除/etc/fstab写入的配置
absent ---卸载设备,会清理/etc/fstab写入的配置
仅将挂载的配置写入/etc/fstab,并不会执行挂载操作
[root@m01 ~]# ansible oldboy -m mount -a "src=172.16.1.31:/data path=/data fstype=nfs opts=defaults state=present"
临时挂载设备,并将挂载信息写入/etc/fstab
[root@m01 ~]# ansible web -m mount -a "src=172.16.1.31:/data path=/data fstype=nfs opts=defaults state=mounted"
临时卸载,不会清理/etc/fstab
[root@m01 ~]# ansible web -m mount -a "src=172.16.1.31:/data path=/data fstype=nfs opts=defaults state=unmounted"
卸载,不仅临时卸载,同时会清理/etc/fstab
[root@m01 ~]# ansible web -m mount -a "src=172.16.1.31:/data path=/data fstype=nfs opts=defaults state=absent"
yum copy service mount cron user file
1.机器还原快照(firewalld、selinux、配置好仓库)
选择虚拟机-》快照-》恢复
2.推送你的公钥
[root@m01 ~]# sshpass -p1 ssh-copy-id -i ~/.ssh/id_rsa.pub root@172.16.1.41
3.配置Ansible的主机清单
[root@m01 ~]# cat /etc/ansible/hosts
[web]
172.16.1.7
172.16.1.8
[nfs]
172.16.1.31
[backup]
172.16.1.41
检查主机是否都ok
[root@m01 ~]# ansible all -m ping
epel、firewalld、selinux、ww
1.基础环境:
1.所有的主机都需要安装rsync和nfs-utils
2.所有的主机都需要准备对应的rsync客户端的密码文件/etc/rsync.pass
3.所有的主机都需要创建一个uid和gid为666的www用户
4.所有的主机都需要全网备份的脚本,并配置好定时任务
1.安装rsync和nfs-utils
[root@m01 ~]# ansible all -m yum -a "name=rsync,nfs-utils state=installed"
2.准备rsync的客户端密码文件
[root@m01 ~]# ansible all -m copy -a "content='1' dest=/etc/rsync.pass owner=root group=root mode=600"
3.准备对应的www用户,uid和gid都为666
[root@m01 ~]# ansible all -m group -a "name=www gid=666"
[root@m01 ~]# ansible all -m user -a "name=www uid=666 group=666 create_home=no shell=/sbin/nologin"
4.从管理上拷贝对应的脚本文件,然后将其加入定时任务
[root@m01 ~]# ansible all -m copy -a "src=./scripts/rsync_backup_md5.sh dest=/server/scripts/ mode=755"
[root@m01 ~]# ansible all -m cron -a "name='Rsync Bakcup Scripts' hour=01 minute=00 job='/bin/bash /server/scripts/rsync_backup_md5.sh &>/dev/null'"
[root@m01 ~]# pwd
/root
[root@m01 ~]# mkdir scripts
[root@m01 ~]# cat scripts/rsync_backup_md5.sh
!/usr/bin/bash
export PATH=/usr/local/sbin:/usr/local/bin:/usr/sbin:/usr/bin:/root/bin
1.定义变量
Host=\((hostname)
Addr=\)(ifconfig eth1|awk 'NR==2{print \(2}')
Date=\)(date +%F)
Dest=\({Host}_\){Addr}_${Date}
Path=/backup
2.创建备份目录
[ -d \(Path/\)Dest ] || mkdir -p \(Path/\)Dest
3.备份对应的文件
cd / &&
[ -f \(Path/\)Dest/system.tar.gz ] || tar czf \(Path/\)Dest/system.tar.gz etc/fstab etc/rsyncd.conf &&
[ -f \(Path/\)Dest/log.tar.gz ] || tar czf \(Path/\)Dest/log.tar.gz var/log/messages var/log/secure && \
4.携带md5验证信息
[ -f \(Path/\)Dest/${Date}.flag ] || md5sum \(Path/\)Dest/*.tar.gz >\(Path/\)Dest/${Date}.flag
4.推送本地数据至备份服务器
export RSYNC_PASSWORD=1
rsync -avz $Path/ rsync_backup@172.16.1.41::backup
5.本地保留最近7天的数据
find $Path/ -type d -mtime +7|xargs rm -rf
应用环境:(配置rsync服务->Backup服务器)
1.安装rsync
2.配置rsync,/etc/rsyncd.conf
3.创建目录,创建虚拟用户文件,变更权限
4.启动服务,加入开机自启动
5.配置邮箱,准备对应的脚本
1.安装rsync
[root@m01 ~]# ansible backup -m yum -a "name=rsync state=installed"
2.配置rsync,/etc/rsyncd.conf
[root@m01 ~]# ansible backup -m copy -a "src=./conf/rsyncd.conf dest=/etc/rsyncd.conf"
[root@m01 ~]# pwd
/root
[root@m01 ~]# mkdir conf
[root@m01 ~]# cat conf/rsyncd.conf
uid = www
gid = www
port = 873
fake super = yes
use chroot = no
max connections = 200
timeout = 600
ignore errors
read only = false
list = false
auth users = rsync_backup
secrets file = /etc/rsync.password
log file = /var/log/rsyncd.log
#####################################
[backup]
path = /backup
[data]
path = /data
.创建目录,变更权限,创建虚拟用户文件
[root@m01 ~]# ansible backup -m file -a "path=/backup state=directory mode=755 owner=www group=www"
[root@m01 ~]# ansible backup -m file -a "path=/data state=directory mode=755 owner=www group=www"
[root@m01 ~]# ansible backup -m copy -a "content='rsync_backup:1' dest=/etc/rsync.password mode=600 owner=root group=root"
.启动服务,加入开机自启动
[root@m01 ~]# ansible backup -m service -a "name=rsyncd state=started enabled=yes"
5.配置邮箱,准备对应的脚本
应用环境:(配置nfs服务)
1.安装nfs-utils
2.配置nfs-utils
3.创建对应的共享目录,并修改权限
4.启动nfs
1.安装nfs-utils
[root@m01 ~]# ansible nfs -m yum -a "name=nfs-utils state=installed"
2.配置nfs-utils
[root@m01 ~]# ansible nfs -m copy -a "content='/data 172.16.1.0/24(rw,sync,all_squash,anonuid=666,anongid=666)' dest=/etc/exports"
3.创建对应的共享目录,并递归修改权限
[root@m01 ~]# ansible nfs -m file -a "path=/data state=directory recurse=yes owner=www group=www mode=755"
4.启动nfs
[root@m01 ~]# ansible nfs -m service -a "name=nfs-server state=started enabled=yes"
4.应用环境:(配置web服务,挂载操作)
[root@m01 ~]# ansible web -m mount -a "src=172.16.1.31:/data path=/data fstype=nfs opts=defaults state=mounted"
playbook是由一个或多个模块组成的,使用多个不同的模块,完成一件事情。
yum
copy
service
安装一个服务,配置,并启动。
1.找谁来拍。
2.大概的任务。
3.具体怎么做。
安装httpd服务->playbook
1.安装
2.配置
3.启动
[root@m01 ~]# cat httpd_install.yaml
这是一个ansible的playbook
-空格hosts: web
    tasks: #一个tasks是分配任务,
      -空格name: Install Httpd Server
          yum:
            name:空格httpd,httpdtools
            state:空格installed
      -空格name: Configure Httpd Server
          copy:
            src:空格/httpd.conf
            dest:格/etc/httpd/conf/httpd.conf
      -空格name: Start Httpd Server
          service:
            name:httpd
            state:空格started
            enabled:空格yes
.修改本地拷贝好的httpd.conf文件
3.执行ansible-playbook httpd_install.yaml 推送
1.环境规划
角色 外网IP(NAT) 内网IP(LAN) 部署软件
m01 eth0:10.0.0.61 eth1:172.16.1.61 ansible
backup eth0:10.0.0.41 eth1:172.16.1.41 rsync
nfs eth0:10.0.0.31 eth1:172.16.1.31 nfs、Sersync
web01 eth0:10.0.0.7 eth1:172.16.1.7 httpd
1.全网备份
2.实时备份
0.目录规划
[root@m01 ~]# mkdir /etc/ansible/ansible_playbook/{file,conf,scripts} -p
[root@m01 ~]# tree /etc/ansible/ansible_playbook/
/etc/ansible/ansible_playbook/
├── conf
└── file
└── scripts
##########
1.基础环境:所有机器统一的配置
1.需要关闭firewalld以及selinux、epel仓库、ssh端口、优化基础配置
2.需要安装rsync和nfs-utils
3.准备www用户
4.需要准备/etc/rsync.pass密码文件
5.需要准备全网备份脚本
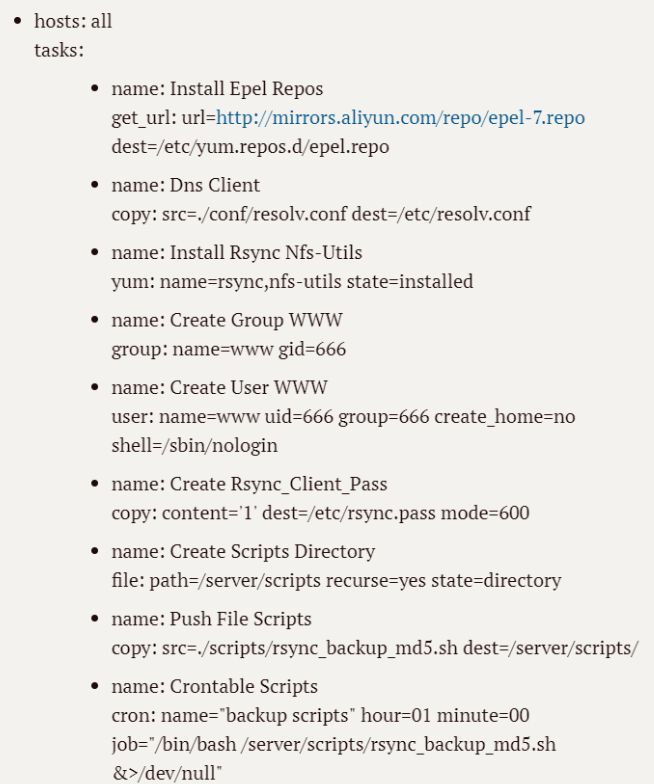
基础的playbook剧本
[root@m01 ansible_playbook]# cat base.yaml
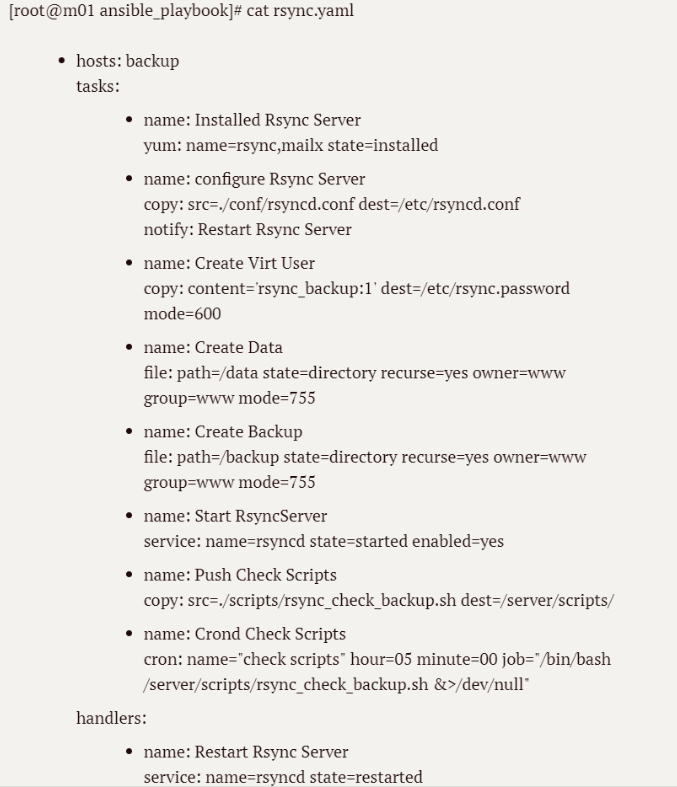
2.应用环境:Rsync
1.安装rsync
2.配置rsync(配置变更,一定要进行重载操作)
3.创建虚拟用户,权限调整
4.创建目录/data/ /backup
5.启动rsync
6.配置邮箱->邮箱的发件人->校验的脚本
.应用环境:NFS
1.安装nfs-utils
2.配置nfs (当修改了配置,触发重载操作)
3.创建目录,授权
4.启动

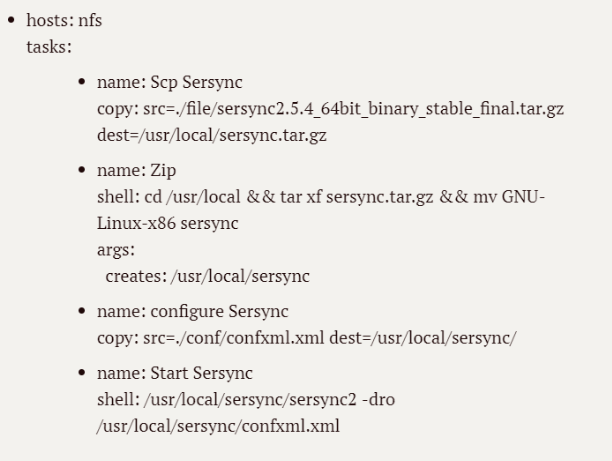
应用环境:Sersync
1.下载sersync
2.解压,改名,配置
3.启动
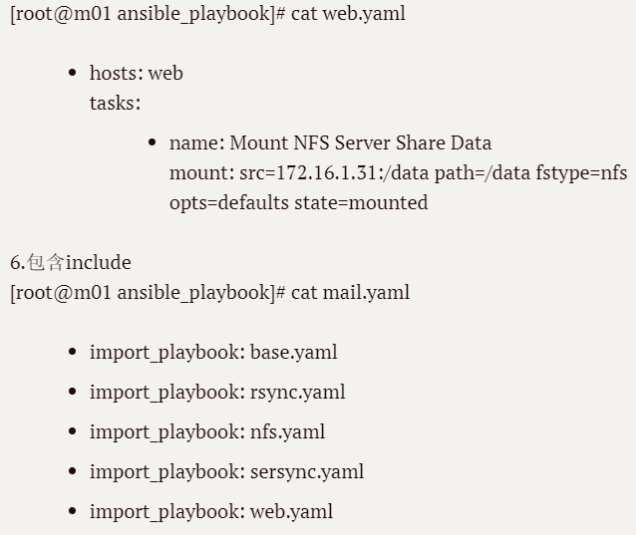
[root@m01 ansible_playbook]# cat sersync.yaml
挂载nfs共享的目录
关于palybook的网站
https://galaxy.ansible.com/
Ansiblele书写格式
| --- #注释这里的---代表yaml语法与!/bin/bash一样 |
|---|
---  注释这里的---代表yaml语法与!/bin/bash一样

remote_user: root  #注释冒号后面有空格再参数。这里是指定客户机root身份执行任务

tasks:         #注释这里就是动作了

-空name: install nginx  #注释这个是干什么用的 Shell: cat /var/log/cron  ##注释 模块名字后面跟参数
--- hosts: all  一个空格 remote_user: root 2个空格  tasks:  2个空格  - name: cat   3个空格  service: name=mysqld state=stopped  3个空格  - name: xiezai mysql  yum: name=mysql state=absent  - name: anzhuang mysql  yum: name=mysql-server,mysql  - name: kaiqimysql  service: name=mysqld state=restarted enabled=yes  - name: reboot  command: reboot~开始我也纳闷为什么我的会报错,原理通俗易懂点就是开始的命令不是一个级别的,同一级别的前面空格必须一样多不过这样确实锻炼写作水平,不管命令多么长只要字母对齐就可以了 以后shell也能些好看点。~
- host: all 选择组
Remote_user: root 选择执行的用户
tasks: ####记住回车下一行 这里是动作的标题


 浙公网安备 33010602011771号