写在前头
- 比预想时间要慢,一天多过去了,才把系统前端做出来,一个原因是以前没写过前端,对CSS,Vue,Element-ui的使用都不熟,又重新看了一遍教程,装了下开发运行环境,还有原因就是亲戚约吃饭喝酒也用了不少时间
已完成工作
- 完成了牧马场系统的前端开发
- 实现登录功能
- 做了一个登录页面,能够提交用户名密码到后端,成功登录后可以维持登录状态
- 做了一个注册页面,能够提交用户名密码到后端
- 做了登录拦截,访问特定页面,如果未登录网站,会自动跳转到登录界面
- 实现主页功能
- 登录后跳转到主页,通过主页可以进入马儿管理和马儿定制模块
- 实现马儿定制功能
- 可选择要生成马儿的名字和功能,将选项提交到后端并生成下载链接
- 实现马儿管理功能
- 实现了一个马儿列表,并可选择要监控的马儿
- 可对选择的马儿发送消息和命令,提交到后端,并提供了历史消息界面
- 可上传文件,并将文件发送给后端
结构设计
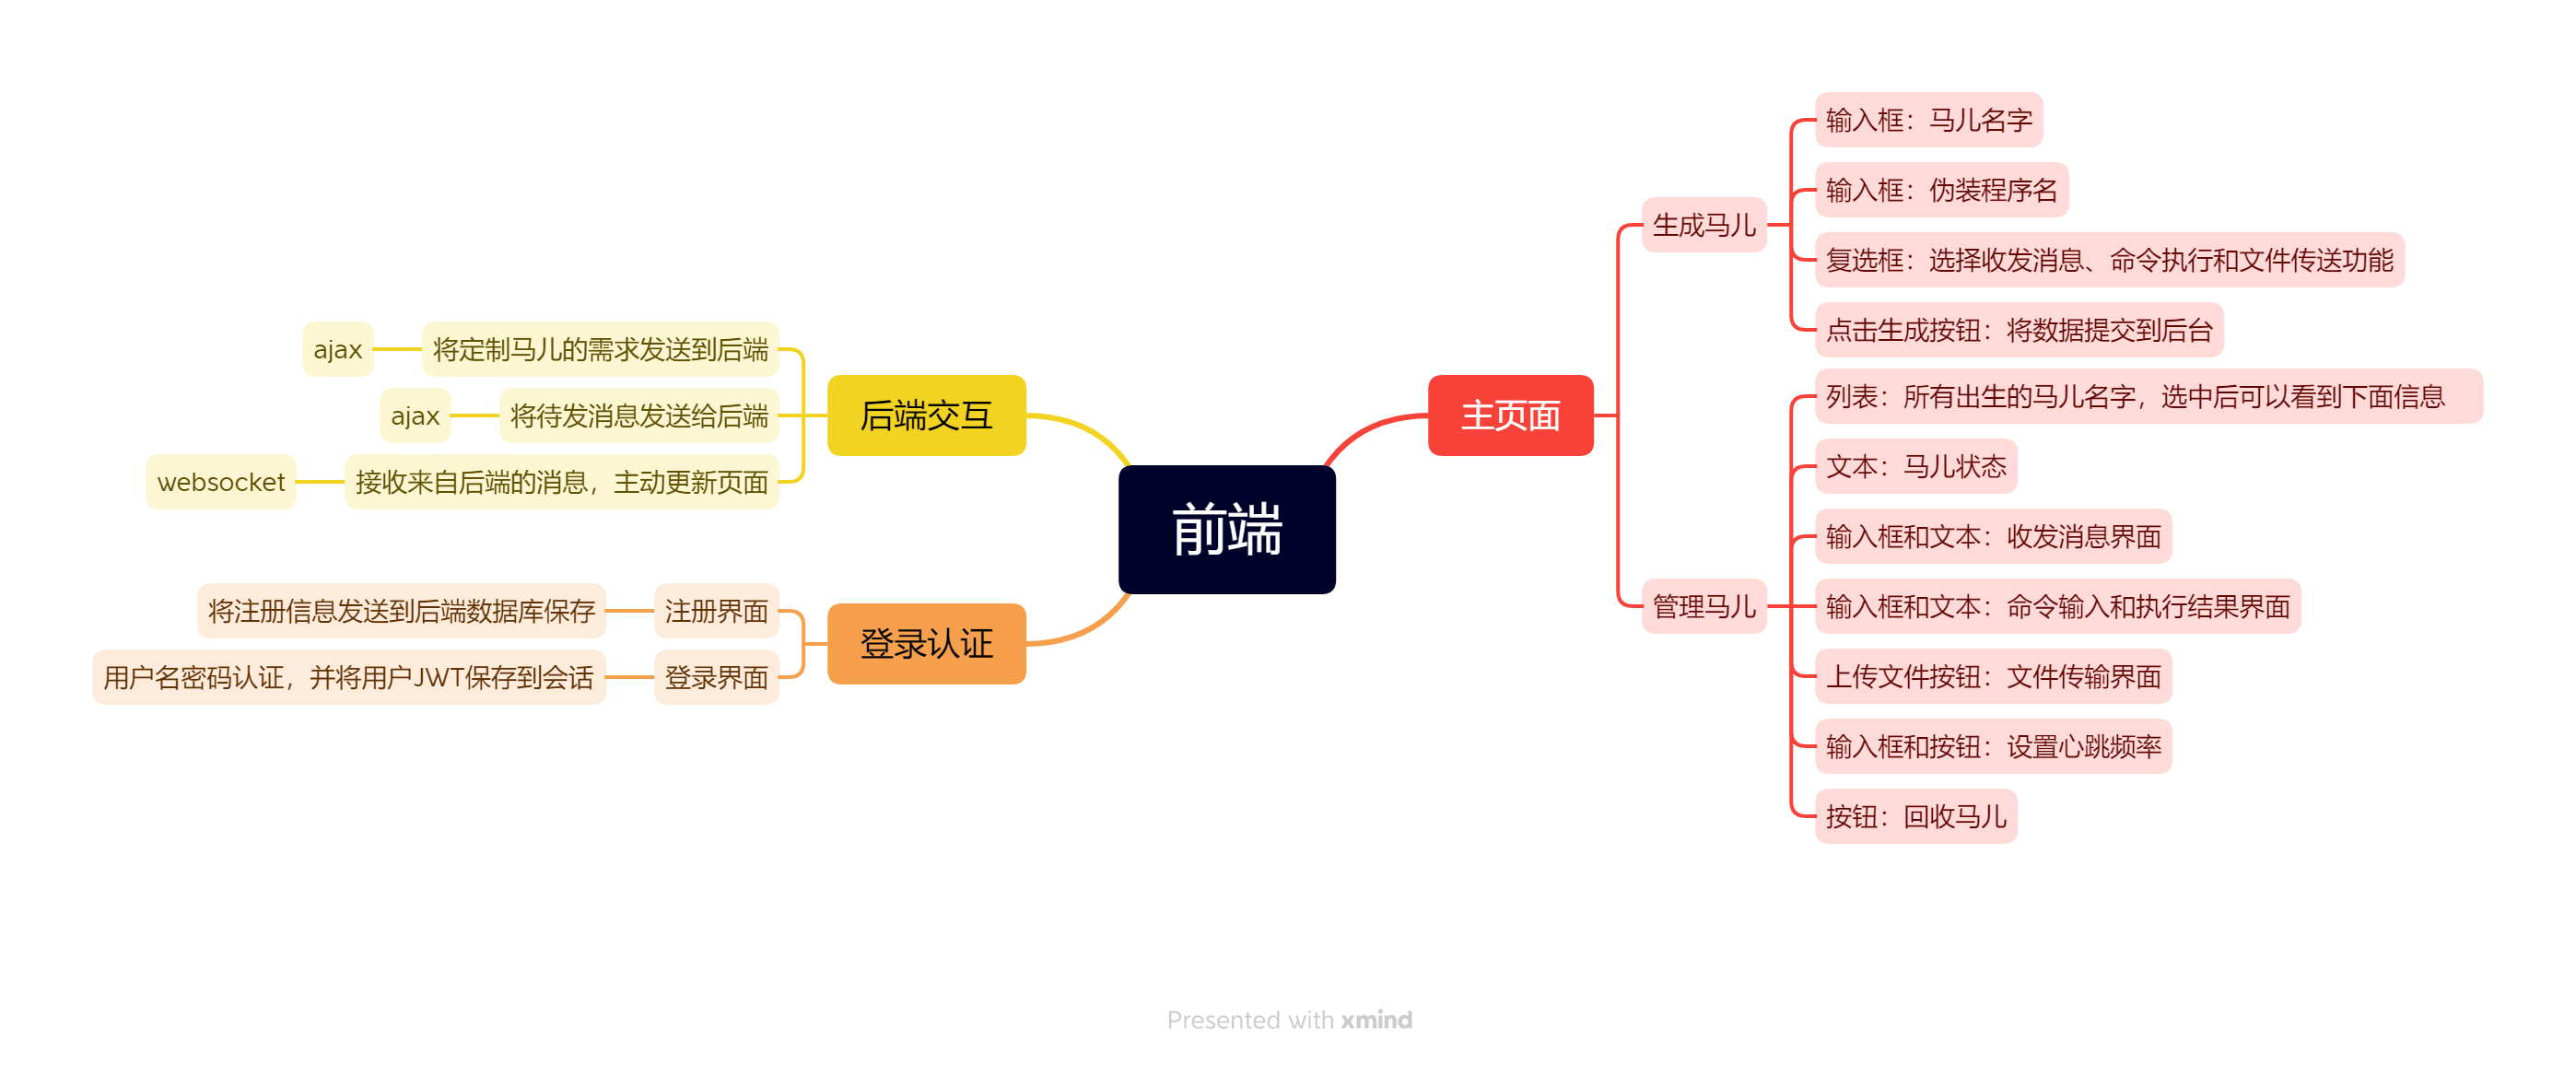
技术选型
- 开发工具:Vscode(Vscode的代码格式化插件真好用)
- 运行环境:nodeJs(nodeJs的热部署yyds,调试起来很方便)
- 调试工具:浏览器+Mock.js(模拟后端发送数据)
- 构建工具:npm+webpack(一键解决依赖问题)
- 报错提示:eslint(有点过于严格)
- js框架:Vue(组件式开发yyds)
- css框架:Element-ui(挺方便,直接到官网上找样式复制代码,能看)
- 路由:Vue-router
- 状态管理:Vuex
- 前端主动通信:axois(比ajax更方便)
- 后端主动通信:websocket(用来给前端主动更新页面,axois轮询的上位替代)
运行效果
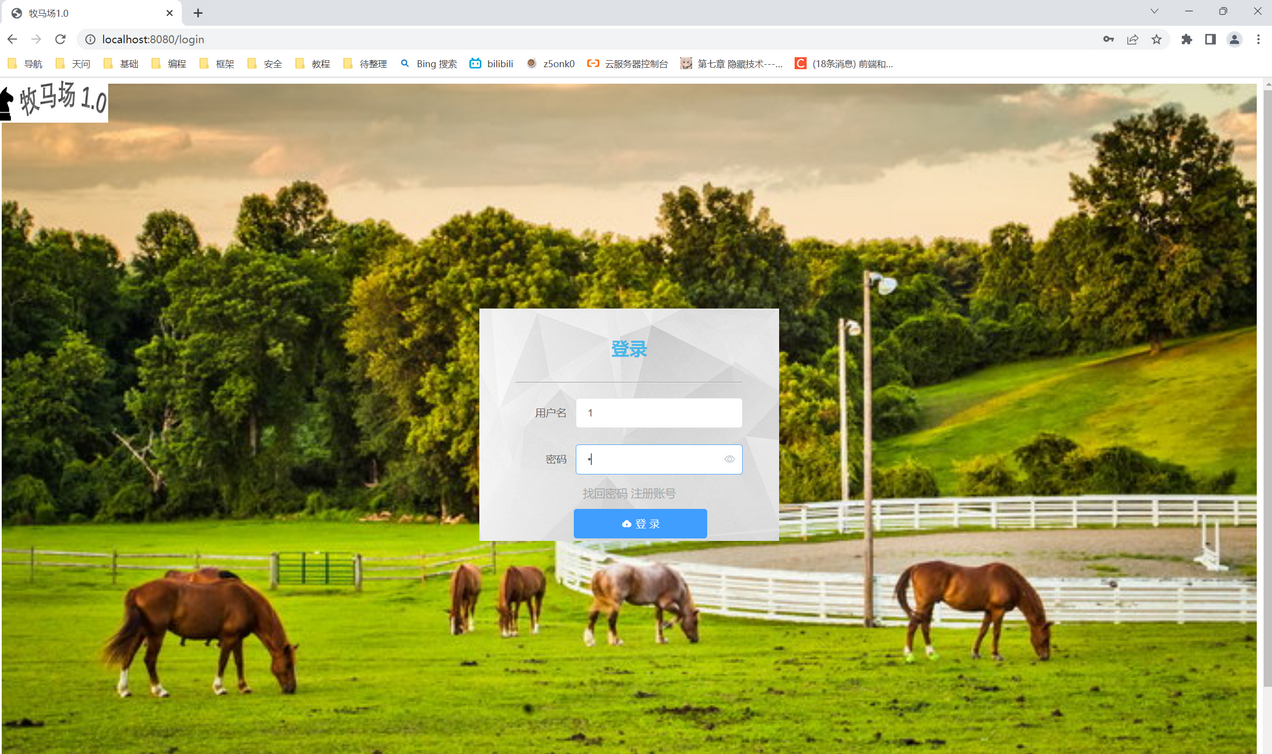
- 登录界面,logo自己画的,太丑了...
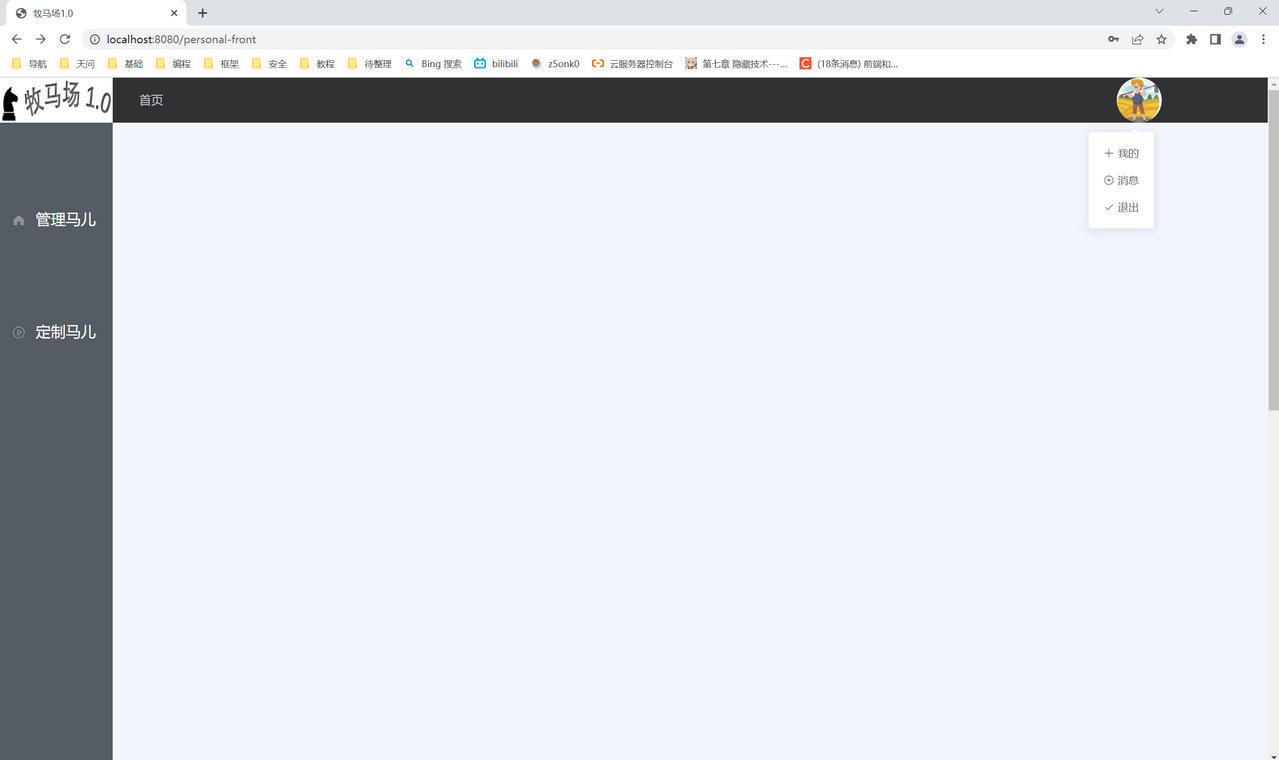
- 用户主页
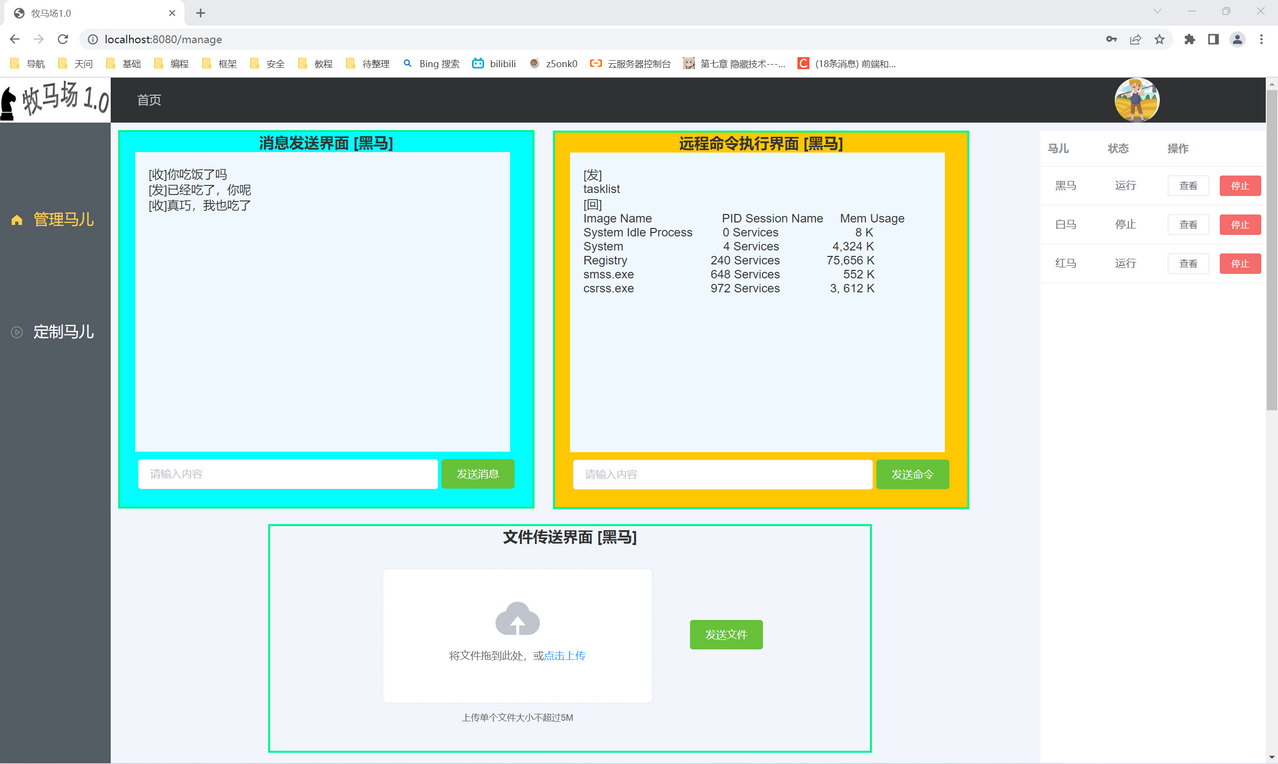
- 管理界面
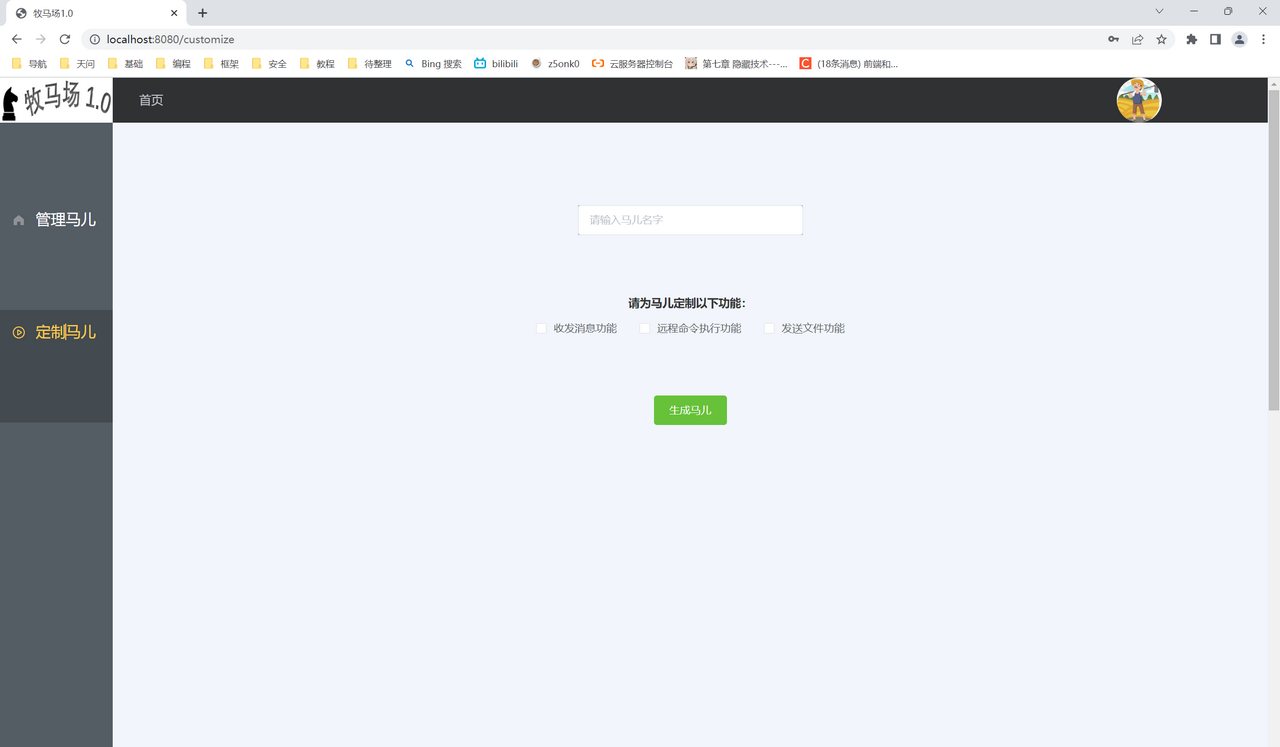
- 定制界面
登录功能
登录页面
- 没啥好说的,element-ui上拉两个输入框和按钮下来,写一下按钮事件,axois成功返回用户信息后将登录状态写入到session中保存,并自动跳转到主页
<template>
<div
class="login"
clearfix
>
<div class="login-wrap">
<el-row
type="flex"
justify="center"
>
<el-form
ref="loginForm"
:model="user"
:rules="rules"
status-icon
label-width="80px"
>
<h3>登录</h3>
<hr>
<el-form-item
prop="username"
label="用户名"
>
<el-input
v-model="user.username"
placeholder="请输入用户名"
prefix-icon
></el-input>
</el-form-item>
<el-form-item
id="password"
prop="password"
label="密码"
>
<el-input
v-model="user.password"
show-password
placeholder="请输入密码"
></el-input>
</el-form-item>
<router-link to="/">找回密码</router-link>
<router-link to="/register">注册账号</router-link>
<el-form-item>
<el-button
type="primary"
icon="el-icon-upload"
@click="doLogin()"
>登 录</el-button>
</el-form-item>
</el-form>
</el-row>
</div>
</div>
</template>
<script>
export default {
name: 'login',
data () {
return {
user: {
username: '',
password: ''
}
}
},
created () { },
methods: {
doLogin () {
if (!this.user.username) {
this.$message.error('请输入用户名!');
} else if (!this.user.password) {
this.$message.error('请输入密码!');
} else {
if (this.user.username == 1 && this.user.password == 1) {
this.$message.success('登陆成功!');
this.$router.push({ path: '/personal-front' });
sessionStorage.setItem('isLogin', 1);
sessionStorage.setItem('userName', this.user.username);
}
}
}
}
}
</script>
<style scoped>
.login {
width: 100%;
height: 1000px;
background: url("../assets/horse-ranch.jpg") no-repeat;
background-size: cover;
overflow: hidden;
}
.login-wrap {
background: url("../assets/login-white.jpg") no-repeat;
background-size: cover;
width: 400px;
height: 300px;
margin: 300px auto;
overflow: hidden;
padding-top: 10px;
line-height: 40px;
}
#password {
margin-bottom: 5px;
}
h3 {
color: #0babeab8;
font-size: 24px;
}
hr {
background-color: #444;
margin: 20px auto;
}
a {
text-decoration: none;
color: #aaa;
font-size: 15px;
}
a:hover {
color: coral;
}
.el-button {
width: 80%;
margin-left: -50px;
}
</style>
注册界面
登录拦截
- 写个router.beforeEach方法,判断下是否session中保存登陆状态,如果有即放行,特别要注意路由拦截的死循环问题:要在合适处使用不加任何参数的next放行
router.beforeEach((to, from, next) => {
  if (to.meta.requireAuth) {
    var num = sessionStorage.getItem('isLogin');
    if (num == 1) {
      next();
    } else {
      if (to.path == '/login') {
        next();
      } else {
        next({ path: '/login' });
      }
    }
  } else {
    next();
  }
用户主页
- 做了一个SPA单页面应用,将页面分为侧边栏,顶栏和主界面,利用组件重用的方法,实现在侧边栏中选取子页面,在主界面中显示对应子页面的功能
- 侧边栏做成了菜单样式,使用el-menu-item加载子页面的名字和路由
- 做成这种单页面应用,有两种方式
- 一是利用router-link,并配置子路由,可以在router-view处显示子页面
- 二是使用menu-item的index属性,给其赋值子路由地址,并配置子路由,也可以在router-view处显示子页面
代码
<template>
<div id="personal">
<el-container>
<el-aside width="150px">
<personal-aside></personal-aside>
</el-aside>
<el-container>
<el-header>
<personal-header></personal-header>
</el-header>
<el-main>
<router-view></router-view>
</el-main>
</el-container>
</el-container>
</div>
</template>
<script>
import PersonalAside from './PersonalAside.vue';
import PersonalHeader from './PersonalHeader.vue';
export default {
name: 'personal',
components: {
PersonalAside,
PersonalHeader
},
mounted () {
console.log(this)
}
}
</script>
<style>
html,
body {
margin: 0px;
padding: 0px;
}
.el-header {
background-color: #303133;
color: #333;
text-align: center;
line-height: 60px;
}
.el-aside {
background-color: #545c64;
color: #333;
text-align: center;
line-height: 200px;
height: 200vh;
margin-top: 60px;
}
.el-main {
background-color: #f2f6fc;
color: #333;
text-align: center;
padding: 10px;
}
body > .el-container {
margin-bottom: 40px;
}
.el-container:nth-child(5) .el-aside,
.el-container:nth-child(6) .el-aside {
line-height: 260px;
}
.el-container:nth-child(7) .el-aside {
line-height: 320px;
}
</style>
<template>
<el-menu
router
:default-active="$route.path"
class="el-menu-vertical-demo"
:collapse="isCollapse"
background-color="#545c64"
text-color="#fff"
active-text-color="#ffd04b"
>
<el-menu-item
v-for="item in noChildren"
:key="item.name"
:index="item.path"
>
<i :class="'el-icon-'+ item.icon"></i>
<span slot="title">{{item.label}}</span>
</el-menu-item>
<el-submenu
v-for="item in hasChildren"
:key="item.path"
:index="item.path"
>
<template slot="title">
<i :class="'el-icon-'+ item.icon"></i>
<span slot="title">{{item.label}}</span>
</template>
<el-menu-item-group
v-for="subItem in item.children"
:key="subItem.path"
>
<el-menu-item :index="subItem.path">{{subItem.label}}</el-menu-item>
</el-menu-item-group>
</el-submenu>
</el-menu>
</template>
<script>
export default {
name: 'personal-aside',
props: {
msg: String
},
data () {
return {
menu: [
{
path: '/manage',
name: 'manage',
label: '管理马儿',
icon: 's-home',
url: ''
},
{
path: '/customize',
name: 'customize',
label: '定制马儿',
icon: 'video-play',
url: ''
}
]
}
},
computed: {
noChildren () {
return this.menu.filter(item => !item.children)
},
hasChildren () {
return this.menu.filter(item => item.children)
}
}
}
</script>
<style lang="less" scoped>
.el-menu-vertical-demo:not(.el-menu--collapse) {
width: 200px;
min-height: 100vh;
border: none;
}
.el-menu {
margin-top: 100px;
margin-left: -30px;
border: none;
}
.el-menu-item-group__title {
padding: 0;
}
h3 {
color: aliceblue;
line-height: 30px;
}
span,
.el-menu-item {
font-size: 20px;
height: 150px;
}
</style>
<template>
<el-row>
<el-col :span="1">
<div class="table">首页</div>
</el-col>
<el-col :span="20">
<div class="table"> </div>
</el-col>
<el-col :span="1">
<el-dropdown trigger="click">
<div class="circle">
<el-avatar
:size="50"
:src="imgUrl"
></el-avatar>
</div>
<el-dropdown-menu slot="dropdown">
<el-dropdown-item icon="el-icon-plus">我的</el-dropdown-item>
<el-dropdown-item icon="el-icon-circle-plus-outline">消息</el-dropdown-item>
<el-dropdown-item icon="el-icon-check">退出</el-dropdown-item>
</el-dropdown-menu>
</el-dropdown>
</el-col>
</el-row>
</template>
<script>
export default {
name: 'personal-header',
data () {
return {
isCollapse: false,
imgUrl: require('../assets/farmer2.png')
}
}
}
</script>
<style lang="less" scoped>
.table {
color: #c0c4cc;
line-height: 60px;
}
.circle {
height: 60px;
}
.el-avatar {
margin: 5px 0 0 0;
}
</style>
定制马儿
- 拉了几个多选框和按钮下来,将马儿选中的功能和名字发到后端
<template>
<div>
<el-input
v-model="name"
placeholder="请输入马儿名字"
></el-input>
<h3>
请为马儿定制以下功能:
</h3>
<el-checkbox-group
v-model="checkedSelections"
@change="handleCheckedCitiesChange"
>
<el-checkbox
v-for="selection in selections"
:label="selection"
:key="selection"
>{{selection}}</el-checkbox>
</el-checkbox-group>
<el-button
type="success"
@click="genHorse"
>生成马儿</el-button>
</div>
</template>
<script>
const options = ['收发消息功能', '远程命令执行功能', '发送文件功能'];
export default {
data () {
return {
name: '',
selections: options,
checkedSelections: []
};
},
methods: {
genHorse () {
}
}
}
</script>
<style>
.el-input {
width: 300px;
background: rgba(0, 0, 0, 0.2);
margin-top: 100px;
}
h3 {
font-size: 15px;
margin-top: 80px;
}
.el-button {
margin-top: 80px;
}
</style>
管理马儿
- 用一个el-table来显示当前用户的所有马儿,并且提供选择和删除按钮,选中本行后,将该行马儿的名字发送给后端,返回马儿的其它信息以及马儿id
- 做了两个聊天界面,用带背景的div做了个聊天记录框,再加个输入框和发送按钮,点击按钮后将用户id、马儿id以及消息内容发到后端,并且在组件加载时建立websocket,接收后端发送的历史消息,用于更新聊天记录框
- 做了个文件传送界面,用el-upload上传文件,通过on-success钩子在上传完成后获取文件地址,点击发送按钮后将其发给后端
代码
<template>
  <div class='manage'>
    <div id='chat-div'>
      <chat :horseName="horseName">
        聊天室
      </chat>
    </div>
    <div id='cmd-div'>
      <cmd :horseName="horseName">
        命令执行
      </cmd>
    </div>
    <div id='file-div'>
      <file :horseName="horseName">
        发送文件
      </file>
    </div>
    <el-table :data="tableData">
      <el-table-column
        label="马儿"
        width="80"
      >
        <template slot-scope="scope">
          <span style="margin-left: 10px">{{ scope.row.name }}</span>
        </template>
      </el-table-column>
      <el-table-column
        label="状态"
        width="80"
      >
        <template slot-scope="scope">
          <span style="margin-left: 10px">{{ scope.row.status }}</span>
        </template>
      </el-table-column>
      <el-table-column label="操作">
        <template slot-scope="scope">
          <el-button
            size="mini"
            @click="observe(scope.row.name)"
          >查看</el-button>
          <el-button
            size="mini"
            type="danger"
            @click="stop(scope.row.name)"
          >停止</el-button>
        </template>
      </el-table-column>
    </el-table>
  </div>
</template>

<script>
import Chat from './Chat.vue';
import Cmd from './Cmd.vue';
import File from './File.vue';
import axios from 'axios'
export default {
  components: { Chat, Cmd, File },
  name: 'manage',
  data () {
    return {
      horseName: '',
      tableData: [{
        name: '黑马',
        status: '运行'
      }, {
        name: '白马',
        status: '停止'
      }, {
        name: '红马',
        status: '运行'
      }]
    }
  },
  methods: {
    observe (name) {
      this.horseName = name;
      axios
        .post('/monitor', {
          horseName: this.horseName,
          userId: sessionStorage.getItem('userId')
        })
        .then(res => {
          if (res.data.status === 200) {
            this.$message.success('成功获取马儿信息!');
            sessionStorage.setItem('horseId', res.data.horseId);
          } else {
            this.$message.error('获取马儿信息失败!');
          }
        })
    },
    stop (name) {
      alert(name);
    }
  }
}
</script>

<style>
.el-table {
  margin-left: 1230px;
  margin-top: -830px;
  width: 30%;
  height: 1000px;
}
#chat-div {
  margin-left: 0px;
  width: 550px;
  height: 500px;
  border-left: 3px solid rgb(2, 245, 144);
  border-right: 3px solid rgb(2, 245, 144);
  border-top: 3px solid rgb(2, 245, 144);
  border-bottom: 3px solid rgb(2, 245, 144);
}
#cmd-div {
  margin-left: 580px;
  margin-top: -505px;
  width: 550px;
  height: 500px;
  border-left: 3px solid rgb(2, 245, 144);
  border-right: 3px solid rgb(2, 245, 144);
  border-top: 3px solid rgb(2, 245, 144);
  border-bottom: 3px solid rgb(2, 245, 144);
}
#file-div {
  margin-left: 200px;
  margin-top: 20px;
  width: 800px;
  height: 300px;
  border-left: 3px solid rgb(2, 245, 144);
  border-right: 3px solid rgb(2, 245, 144);
  border-top: 3px solid rgb(2, 245, 144);
  border-bottom: 3px solid rgb(2, 245, 144);
}
</style>
<template>
<div class="chat">
<h1 class="title">
消息发送界面 [{{horseName}}]
</h1>
<div id='show-rec'>
{{show_content}}
</div>
<span id="input">
<el-input
placeholder="请输入内容"
v-model="input"
clearable
class="input"
>
</el-input>
<el-button
type="success"
@click="send_msg"
>发送消息</el-button>
</span>
</div>
</template>
<script>
import axios from 'axios'
export default ({
name: 'chat',
props: {
horseName: '111'
},
data () {
return {
webSocket: null,
url: 'ws://localhost:8000',
show_content: '[收]你吃饭了吗\n [发]已经吃了,你呢\n [收]真巧,我也吃了',
input: ''
}
},
methods: {
send_msg () {
axios
.post('/sendmsg', {
msg: this.input,
userId: sessionStorage.getItem('userId'),
horseId: sessionStorage.getItem('horseId')
})
.then(res => {
if (res.data.status === 200) {
this.$message.success('成功发送消息!')
} else {
this.$message.error('发送消息失败!');
}
})
},
getMessageActive () {
axios
.get('/getmsg', {
userId: sessionStorage.getItem('userId'),
horseId: sessionStorage.getItem('horseId')
})
.then(res => {
if (res.data.status === 200) {
this.$message.success('成功获取消息!')
this.show_content = res.data;
} else {
this.$message.error('获取消息失败!');
}
})
},
initSocket () {
let url = `ws://${this.url}/${this.types}`
this.webSocket = new WebSocket(url)
this.webSocket.onopen = this.webSocketOnOpen
this.webSocket.onclose = this.webSocketOnClose
this.webSocket.onmessage = this.webSocketOnMessage
this.webSocket.onerror = this.webSocketOnError
},
webSocketOnOpen () {
console.log('websocket连接成功');
},
webSocketOnMessage (res) {
this.show_content = res.data;
this.webSocket.send('发送数据');
},
webSocketOnClose () {
this.webSocket.close()
console.log('websocket连接已关闭');
},
webSocketOnError (res) {
console.log('websocket连接失败');
console.log(res);
}
},
created () {
this.initSocket()
this.getMessageActive()
},
destroyed () {
this.webSocket.close()
}
})
</script>
<style>
.chat {
background-color: aqua;
width: 550px;
height: 500px;
}
.title {
padding: 0;
margin: 0;
font-size: 20px;
}
#show-rec {
background-color: aliceblue;
width: 500px;
height: 400px;
margin-left: 20px;
text-align: left;
white-space: pre-wrap;
}
.input {
margin-top: 10px;
width: 400px;
}
</style>
<template>
<div>
<h1 class="title">
文件传送界面 [{{horseName}}]
</h1>
<div style="display: flex; align-items: center">
<el-upload
class="upload"
drag
action="localhost:8000/posts/"
:on-success="uploadSuccess"
>
<i class="el-icon-upload"></i>
<div class="el-upload__text">将文件拖到此处,或<em>点击上传</em></div>
<div
class="el-upload__tip"
slot="tip"
>上传单个文件大小不超过5M</div>
</el-upload>
<el-button
class='send'
type="success"
@click="sendFile"
>发送文件</el-button>
</div>
</div>
</template>
<script>
import axios from 'axios'
export default ({
name: 'file',
props: {
horseName: '111'
},
data () {
return {
webSocket: null,
url: 'ws://localhost:8000',
fileName: '',
fileUploaded: false
}
},
methods: {
uploadSuccess (response, file, fileList) {
this.fileName = file.name;
this.fileUploaded = true;
},
sendFile () {
if (!this.fileUploaded) {
this.$message.error('文件还未上传!');
return;
}
this.fileUploaded = false;
axios
.post('/sendfile', {
file: this.fileName,
userId: sessionStorage.getItem('userId')
})
.then(res => {
if (res.data.status === 200) {
this.$message.success('成功发给后端!')
} else {
this.$message.error('发给后端失败!');
}
})
},
initSocket () {
let url = `ws://${this.url}/${this.types}`
this.webSocket = new WebSocket(url)
this.webSocket.onopen = this.webSocketOnOpen
this.webSocket.onclose = this.webSocketOnClose
this.webSocket.onmessage = this.webSocketOnMessage
this.webSocket.onerror = this.webSocketOnError
},
webSocketOnOpen () {
console.log('websocket连接成功');
},
webSocketOnMessage (res) {
if (res.data == 'success') {
this.$message.success('目标成功接收文件');
}
this.webSocket.send('发送数据');
},
webSocketOnClose () {
this.webSocket.close()
console.log('websocket连接已关闭');
},
webSocketOnError (res) {
console.log('websocket连接失败');
console.log(res);
}
},
created () {
this.initSocket()
},
destroyed () {
this.webSocket.close()
}
})
</script>
<style scoped>
.title {
padding: 0;
margin: 0;
font-size: 20px;
}
.upload {
margin-top: 0px;
margin-left: 150px;
margin-top: 30px;
}
.send {
margin-left: 50px;
}
</style>
路由
- 注意需要将复用的子组件的路由写到父组件路由的children字段里
- 添加登录拦截router.beforeEach
import Vue from 'vue'
import Router from 'vue-router'
import Login from '@/components/Login'
import Personal from '@/components/Personal'
import Customize from '@/components/Customize'
import Manage from '@/components/Manage'
import Register from '@/components/Register'
Vue.use(Router)
const router = new Router({
mode: 'history',
routes: [
{
path: '/login',
name: 'Login',
component: Login
},
{
path: '/register',
name: 'Register',
component: Register
},
{
path: '/personal-front',
name: 'Personal',
component: Personal,
meta: {
requireAuth: true
},
children: [
{
path: '/manage',
name: 'Manage',
component: Manage,
meta: {
requireAuth: true
}
},
{
path: '/customize',
name: 'Customize',
component: Customize,
meta: {
requireAuth: true
}
}
]
},
{
path: '/',
redirect: '/manage'
}
]
});
router.beforeEach((to, from, next) => {
if (to.meta.requireAuth) {
var num = sessionStorage.getItem('isLogin');
if (num == 1) {
next();
} else {
if (to.path == '/login') {
next();
} else {
next({ path: '/login' });
}
}
} else {
next();
}
});
export default router;
遇到的问题
写在后头
- 用了一天Vue,刚开始磕磕碰碰到处报错,写到后面越来越顺手,它这个组件化开发和双向绑定真的很方便,获取数据然后丢给axios也很好使
- CSS真难调,大部分时间我都在挪动组件位置,以及调整样式,CSS完全没有qt那种拖拽式的布局好使
- 对于这个项目:我可能暂时就做到这了,已经达到了练习前端开发的目的。马上收假了,我已经没有时间去搞后端和qt网络编程了,后面应该重心也是放在爬虫js逆向和app逆向上。当然有时间的话,也会继续开发这个系统,后面应该没有前端这么麻烦了(主要就是这个CSS样式和布局很难调),后端主要是数据库交互、消息队列以及网络通信那部分内容,相对熟悉一些


【推荐】国内首个AI IDE,深度理解中文开发场景,立即下载体验Trae
【推荐】编程新体验,更懂你的AI,立即体验豆包MarsCode编程助手
【推荐】抖音旗下AI助手豆包,你的智能百科全书,全免费不限次数
【推荐】轻量又高性能的 SSH 工具 IShell:AI 加持,快人一步
· 物流快递公司核心技术能力-地址解析分单基础技术分享
· .NET 10首个预览版发布:重大改进与新特性概览!
· AI与.NET技术实操系列(二):开始使用ML.NET
· 单线程的Redis速度为什么快?
· Pantheons:用 TypeScript 打造主流大模型对话的一站式集成库