生成器-generator
您可能听说过,带有 yield 的函数在 Python 中被称之为 generator(生成器),何谓 generator ?
我们先抛开 generator,以一个常见的编程题目来展示 yield 的概念。
如何产生斐波拉契数列?
斐波那契数列(Fibonacci sequence),又称黄金分割数列、因数学家列昂纳多·斐波那契(Leonardoda Fibonacci)以兔子繁殖为例子而引入,故又称为“兔子数列”,指的是这样一个数列:1、1、2、3、5、8、13、21、34、……在数学上,斐波纳契数列以如下被以递归的方法定义:F(0)=1,F(1)=1, F(n)=F(n-1)+F(n-2)(n>=2,n∈N*)
许多初学者都可以写出下面的函数:
方法一:
1 # 生成斐波那契数列前n个元素
2 def fab(n):
3     i = 0
4     a, b = 0, 1
5     while i < n:
6         print(a)
7         a, b = b, a + b
8         i += 1
执行 fab(6) 得出前6个元素:
0
1
1
2
3
5
结果没有问题,但函数的返回值为None,别的函数无法获取结果,复用性很差,
要提高 fab 函数的可复用性,最好不要直接打印出数列,而是返回一个 List。以下是 fab 函数改写后的第二个版本:
方法二:
 1 # 生成斐波那契数列前n个元素,以list返回
 2 def fab(n):
 3     i = 0
 4     a, b = 0, 1
 5     list_fab = []
 6     while i < n:
 7         # print(a)
 8         list_fab.append(a)
 9         a, b = b, a + b
10         i += 1
11
12     return list_fab
可以使用如下方式打印出 fab 函数返回的 List:
1 for item in fab(6):
2     print(item)
改写后的 fab 函数通过返回 List 能满足复用性的要求,但是更有经验的开发者会指出,该函数在运行中占用的内存会随着参数 n的增大而增大,如果要控制内存占用,最好不要用 List,来保存中间结果,而该通过 iterable 对象来迭代,这时yield就派上用场了。
第三个版本的 fab 和第一版相比,仅仅把 print b 改为了 yield b,就在保持简洁性的同时获得了 iterable 的效果。
方法三:
1 # 使用 yield替代print
2 def fab(n):
3     i = 0
4     a, b = 0, 1
5     while i < n:
6         # print(a)
7         yield a
8         a, b = b, a + b
9         i += 1
简单地讲,yield 的作用就是把一个函数变成一个 generator,带有 yield 的函数不再是一个普通函数,Python 解释器会将其视为一个 generator,调用 fab(6) 不会执行 fab 函数,而是返回一个 iterable 对象!在 for 循环执行时,每次循环都会执行 fab 函数内部的代码,执行到 yield a 时,fab 函数就返回一个迭代值,下次迭代时,代码从 yield a 的下一条语句继续执行,而函数的本地变量看起来和上次中断执行前是完全一样的,于是函数继续执行,直到再次遇到 yield。
for item in fab(6):
    print(item)
也可以手动调用 fab(6) 的 next() 方法(因为 fab(6) 是一个 generator 对象,该对象具有 next() 方法),这样我们就可以更清楚地看到 fab 的执行流程:
1 f = fab(6)
2 print(next(f))
3 print(next(f))
4 print(next(f))
5 print(next(f))
6 print(next(f))
7 print(next(f))
8 print(next(f))
当函数执行结束时,generator 自动抛出 StopIteration 异常,表示迭代完成。在 for 循环里,无需处理 StopIteration 异常,循环会正常结束。
我们可以得出以下结论:
一个带有 yield 的函数就是一个 generator,它和普通函数不同,生成一个 generator 看起来像函数调用,但不会执行任何函数代码,直到对其调用 next()(在 for 循环中会自动调用 next())才开始执行。虽然执行流程仍按函数的流程执行,但每执行到一个 yield 语句就会中断,并返回一个迭代值,下次执行时从 yield 的下一个语句继续执行。看起来就好像一个函数在正常执行的过程中被 yield 中断了数次,每次中断都会通过 yield 返回当前的迭代值。
如果想实现一个自定义方法,与range()类似,我们可以用生成器来定义它,下面是一个生成范围内浮点数的生成器:
1 def f_range(start, stop, step):
2     f = start
3     while f < stop:
4         yield f
5         f += step
使用这个函数,我们可以用for循环迭代它:
1 for item in f_range(0, 4, 0.5):
2     print(item)
1 0
2 0.5
3 1.0
4 1.5
5 2.0
6 2.5
7 3.0
8 3.5
或者使用其他接受可迭代对象的方法(内置函数 def sum(iterable, start=None): , list(iterable) ):
1 print("sum:", sum(f_range(0, 4, 0.5)))
2 print("list:", list(f_range(0, 4, 0.5)))
探讨:
一个函数中需要有一个yield 语句即可将其转换为一个生成器。跟普通函数不同
的是,生成器只能用于迭代操作。
跟普通函数不同的是,生成器只能用于迭代操作。下面是一个实验,向你展示这样的函数底层工作机
制:
 1 >>> def countdown(n):
 2 ...     while n > 0 :
 3 ...         print("before yield")
 4 ...         yield n
 5 ...         print("after yield")
 6 ...         n -= 1
 7 ...
 8 >>> iter_c  = countdown(3)  # Create the generator, notice no output appears
 9 >>> print(iter_c, type(iter_c))
10 <generator object countdown at 0x033D0198> <class 'generator'>
11 >>> next(iter_c)  # Run to first yield and emit a value, but doesn't print "after yield"
12 before yield
13 3
14 >>> next(iter_c)  # Run to next yield
15 after yield
16 before yield
17 2
18 >>> next(iter_c)  # Run to next yield
19 after yield
20 before yield
21 1
22 >>> next(iter_c)  # Run to next yield (iteration stops)
23 after yield
24 Traceback (most recent call last):
25   File "<input>", line 1, in <module>
26 StopIteration
一个生成器函数主要特征是它只会回应在迭代中使用到的next 操作。一旦生成器
函数返回退出,迭代终止。我们在迭代中通常使用的for 语句会自动处理这些细节,所
以你无需担心。
反向迭代:
很多程序员并不知道可以通过在自定义类上实现reversed () 方法来实现反向迭代。比如:
 1 class CountDown(object):
 2     def __init__(self, start):
 3         self.__start = start
 4
 5     def __iter__(self):  # Forward iterator
 6         n = self.__start
 7         while n >= 0:
 8             yield n
 9             n -= 1
10
11     def __reversed__(self):  # Reverse iterator
12         n = 0
13         while n <= self.__start:
14             yield n
15             n += 1
16
17 c1 = CountDown(5)
18 for item in c1:
19     print(item)
20
21 for item in reversed(CountDown(5)):
22     print(item)
定义一个反向迭代器可以使得代码非常的高效,因为它不再需要将数据填充到一个
列表中然后再去反向迭代这个列表。
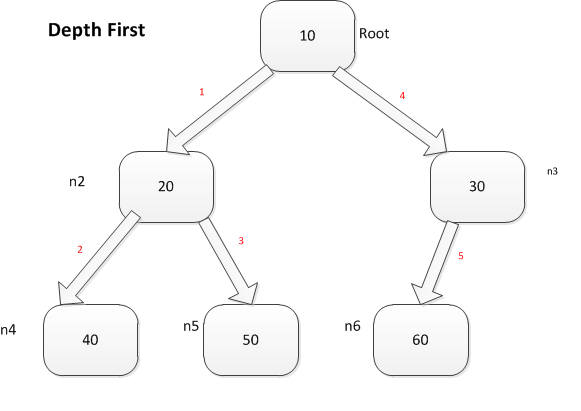
在迭代器一文中 我们使用Node类表示树形数据结构,我们要实现深度优先方式遍历树的节点的方法,下面是示例代码:
 1 class Node(object):
 2     def __init__(self, value):
 3         self.__value = value
 4         self.__children = []
 5
 6     def add_child(self, node):
 7         self.__children.append(node)
 8
 9     def set_value(self, value):
10         self.__value = value
11
12     def get_value(self):
13         return self.__value
14
15     def __repr__(self):
16         return 'Node({v})'.format(v = self.__value)
17
18     def __iter__(self):
19         return iter(self.__children)
20
21     def depth_first(self):
22         yield self
23         for child in self:  # Invokes self.__iter__()
24             yield from child.depth_first()  # 将yield from视为提供了一个调用者和子生成器之间的透明的双向通道。包括从子生成器获取数据以及向子生成器传送数据。
# Example
root = Node(10)
n2 = Node(20)
n3 = Node(30)

root.add_child(n2)
root.add_child(n3)
n2.add_child(Node(40))
n2.add_child((Node(50)))
n3.add_child((Node(60)))

for chi in root.depth_first():
    print(chi)
先序遍历过程:

所以最后的输出是:Node(10) Node(20) Node(40) Node(50) Node(30) Node(60)
迭代器切片:
函数itertools.islice() 正好适用于在迭代器和生成器上做切片操作
def count(n):
    while True:
        yield n
        n += 1

it_c = count(0)
it_c[10, 20]

#Output:
#it_c[10, 20]
#TypeError: 'generator' object is not subscriptable

#Use islice
from itertools import islice
for i in islice(count(1), 10, 20):
    print(i)
探讨:迭代器和生成器不能使用标准的切片操作,因为它们的长度事先我们并不知道(并且也没有实现索引)。函数islice() 返回一个可以生成指定元素的迭代器,它通过遍历并丢弃
直到切片开始索引位置的所有元素。然后才开始一个个的返回元素,并直到切片结束索引位置。这里要着重强调的一点是islice() 会消耗掉传入的迭代器中的数据。必须考虑到迭代器是不可逆的这个事实。所以如果你需要之后再次访问这个迭代器的话,那你就得先将它里面的数据放入一个列表中。
#Note:本文参考另外一篇博文
原文链接:http://www.ibm.com/developerworks/cn/opensource/os-cn-python-yield/


