Echarts制作时变数据可视化+2024 QQ群聊记录制作词云图
时变数据可视化
Echarts其实就是个js文件,在开头导入一下就好了
其实这部分我没有做太多时间,大部分代码都是gpt直接生成的(乐)
所以这里只分享一下我觉得代码里比较有意思的部分
先放效果图
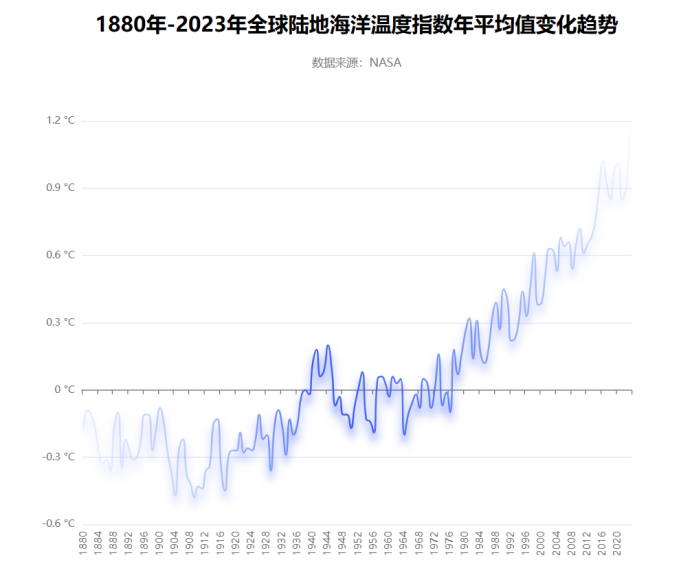
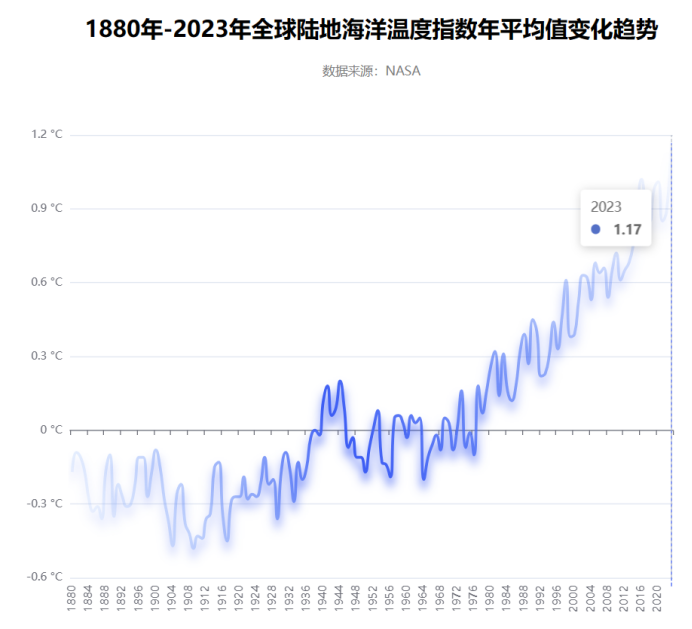
图中渐变效果的代码(来源CSDN某个博主)
            lineStyle: {
                shadowColor: "#3D5DF4",
                shadowOffsetX: 0,
                shadowOffsetY: 9,
                shadowBlur: 10,
                color: new echarts.graphic.LinearGradient(0, 1, 1, 0, [
                    { offset: 0, color: "#94C2FD00" },
                    { offset: 0.4, color: "#3D5DF4" },
                    { offset: 1, color: "#5B8FF900" },
                ]),
            },
            smooth: true,
            symbolSize: 0.01,
            emphasis: {
                scale: 1000,
                itemStyle: {
                    color: "#3D5DF4",
                    borderColor: "#FFFFFF",
                    borderWidth: 3,
                    borderType: "solid",
                }
            }
2024年了如何用QQ群聊记录制作词云图
其实跟之前大差不差,只不过现在的QQ加入了超级表情,然鹅超级表情在电脑端不显示,所以需要再数据处理一下
我的代码是分成了数据预处理+生成词云图两部分
数据预处理
目前能搜到的聊天记录词云图大部分是用的私聊记录,但是我想做群聊的
而且我和我的朋友们非常爱改群昵称,压根没有固定的(乐
所以在预处理阶段考虑把时间戳和群昵称那一行直接替换成空
import re

# 打开原始文件并读取内容
with open('./哈喽大家早生蚝.txt', 'r', encoding='utf-8') as f:
    file_content = f.read()

# 使用正则表达式替换匹配的内容
# 替换时间戳和群昵称
file_content = re.sub(r'(\d{4}-\d{2}-\d{2} \d{2}:\d{2}:\d{2}) (.*?)\n', "", file_content)
# QQ在早上十点前发的消息,小时部分只会显示一位数,所以特殊处理一下~
file_content = re.sub(r'(\d{4}-\d{2}-\d{2} \d{1}:\d{2}:\d{2}) (.*?)\n', "", file_content)
# 查看聊天记录的时候,发现我的朋友们经常会艾特其他人,所以把这个也处理下
file_content = re.sub(r'@[\S \S]+', "", file_content)
# 这里处理的是消息记录里不会显示的[图片][表情],还有超级表情。
# 由于超级表情会显示成 [仔细分析]请使用最新版手机QQ体验新功能,但是我们这里只替换了带框的部分,所以后续还会再次替换
file_content = re.sub(r'\[[\S \S]+\]', "", file_content)
# 把分享的链接也处理一下
file_content = re.sub(r'http\S+', "", file_content)


# 打开新文件并写入处理后的内容
with open('output_file.txt', 'w', encoding='utf-8') as new_file:
    new_file.write(file_content)
生成词云图
生成词云图部分也是改自CSDN上某位博主的,but博主写的是提取某一位群友的聊天记录制作词云,遂魔改
- 生成的词云图里有一些词我不想看到!可以在这里统统替换
lines = file.readlines()
datas = []
for line in lines:
    line = line.replace("请使用最新版手机QQ体验新功能", "")
    line = line.replace("\n", "")
    datas.append(line)
- 生成的词云图有很多像“然后”这样无意义的词,可以导入中文停用词库
库在这里下载中文常用停用词表
stopwords = set()
content = [line.strip() for line in open('./cn_stopwords.txt','r', encoding='utf-8').readlines()]
stopwords.update(content)
……
words = []
for s in datas:
    thelist = jieba.cut(s, cut_all=False)
    for word in thelist:
        if word not in stopwords:
            if len(word) > 1:
                words.append(word)
- 全代码
import jieba
import re
import collections
from wordcloud import WordCloud, STOPWORDS, ImageColorGenerator
from PIL import Image
import matplotlib.pyplot as plt

file = open("./output_file.txt", "r", encoding="utf-8")

stopwords = set()
content = [line.strip() for line in open('./cn_stopwords.txt','r', encoding='utf-8').readlines()]
stopwords.update(content)

## 分析群聊天记录,并通过jieba分词
lines = file.readlines()
datas = []
for line in lines:
    line = line.replace("请使用最新版手机QQ体验新功能", "")
    line = line.replace("\n", "")
    datas.append(line)

words = []
for s in datas:
    thelist = jieba.cut(s, cut_all=False)
    for word in thelist:
        if word not in stopwords:
            if len(word) > 1:
                words.append(word)

word_counts = collections.Counter(words)
words_top20 = word_counts.most_common(20)
print(words_top20)  # 打印前20词频

## 制作词云
backgroud_Image = plt.imread('./true.jpg')  # 选择背景图片,图片要与.py文件同一目录
print('加载图片成功!')

## 设置词云样式
wc = WordCloud(
    background_color='white',  # 设置背景颜色
    mask=backgroud_Image,  # 设置背景图片
    font_path='C:\Windows\Fonts\msyhl.ttc',  # 若是有中文的话,这句代码必须添加,不然会出现方框,不出现汉字
    max_words=2000,  # 设置最大现实的字数
    stopwords=STOPWORDS,  # 设置停用词
    max_font_size=150,  # 设置字体最大值
    random_state=30  # 设置有多少种随机生成状态,即有多少种配色方案
)

wc.generate_from_frequencies(word_counts)  # 通过频率生成词云
print('开始加载文本')

img_colors = ImageColorGenerator(backgroud_Image)  # 改变字体颜色
wc.recolor(color_func=img_colors)  # 字体颜色为背景图片的颜色

plt.imshow(wc)  # 显示词云图
plt.axis('off')  # 是否显示x轴、y轴下标
plt.show()
print('生成词云成功!')
最后放张结果图~