
pytorch学习笔记(9)--损失函数
1、损失函数的作用:
(1)计算实际输出和目标输出之间的差距;
(2)为我们更新输出提供一定的依据(也就是反向传播)
官网链接:https://pytorch.org/docs/1.8.1/nn.html
2、损失函数的使用
2.1、L1Loss
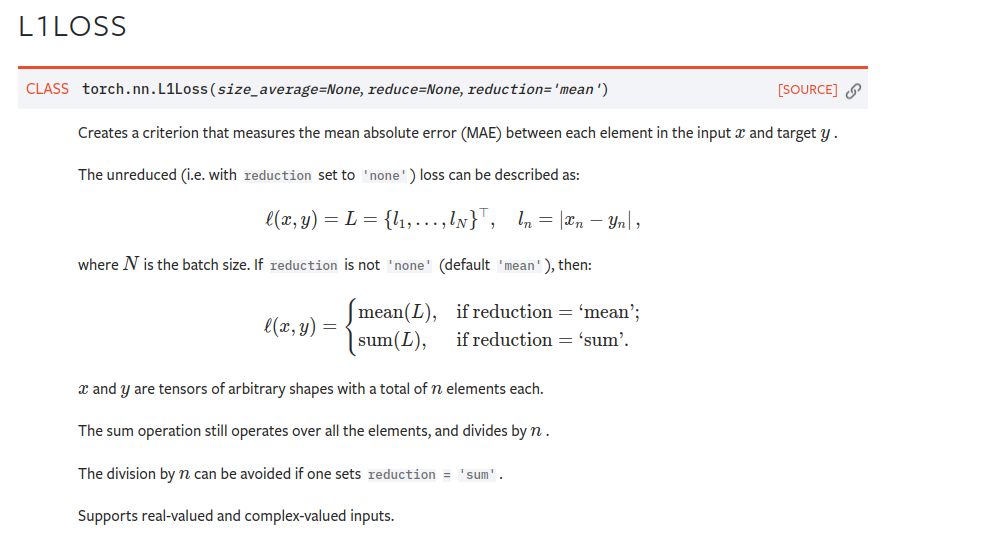
注:reduction = “sum” 表示求和 / reduction = "mean" 表示求平均值 默认求平均值
代码:
# file     : nn_lose.py
# time     : 2022/8/2 上午10:31
# function : L1Loss
import torch
from torch.nn import L1Loss
from torch import nn

inputs = torch.tensor([1, 2, 3], dtype=torch.float32)
targets = torch.tensor([1, 2, 5], dtype=torch.float32)

# reshape()添加维度,原来tensor是二维
inputs = torch.reshape(inputs, (1, 1, 1, 3))
targets = torch.reshape(targets, (1, 1, 1, 3))

loss = L1Loss()
result = loss(inputs, targets)
print(result)
上述代码计算了实际输出[1, 2, 3]和目标输出[1, 2, 5]之间的L1Loss,代码输出结果为:
tensor(0.6667)
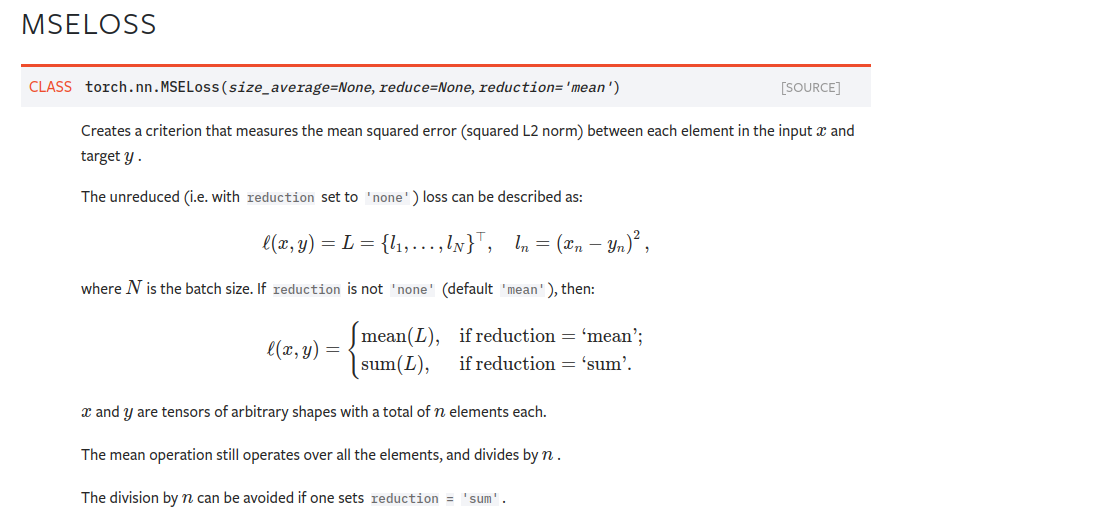
2.2MSELoss 均方损失函数:可以设置reduction参数来决定具体的计算方法
代码:
# file     : nn_lose.py
# time     : 2022/8/2 上午10:31
# function :
import torch
from torch.nn import L1Loss
from torch import nn

inputs = torch.tensor([1, 2, 3], dtype=torch.float32)
targets = torch.tensor([1, 2, 5], dtype=torch.float32)

# reshape
inputs = torch.reshape(inputs, (1, 1, 1, 3))
targets = torch.reshape(targets, (1, 1, 1, 3))

loss = L1Loss(reduction="sum")
result = loss(inputs, targets)
print(result)

# MSELoss 均方损失函数
loss_mse = nn.MSELoss(reduction="sum")
result_mse = loss_mse(inputs, targets)
print(result_mse)
结果:tensor(2.)
tensor(4.) #均方误差损失函数计算结果
2.3 CrossEntropyLoss交叉熵损失函数----没懂
交叉熵损失函数计算方法的细节可以参照这个博文:交叉熵损失函数。(看上去很牛)
代码:
# file     : nn_lose.py
# time     : 2022/8/2 上午10:31
# function :
import torch
from torch.nn import L1Loss
from torch import nn

inputs = torch.tensor([1, 2, 3], dtype=torch.float32)
targets = torch.tensor([1, 2, 5], dtype=torch.float32)

# reshape
inputs = torch.reshape(inputs, (1, 1, 1, 3))
targets = torch.reshape(targets, (1, 1, 1, 3))

loss = L1Loss(reduction="sum")
result = loss(inputs, targets)
print(result)

# MSELoss 均方损失函数
loss_mse = nn.MSELoss(reduction="sum")
result_mse = loss_mse(inputs, targets)
print(result_mse)

# CrossEntropyLoss
x = torch.tensor([0.1, 0.2, 0.3])
y = torch.tensor([1])
x = torch.reshape(x, (1, 3))
loss_cross = nn.CrossEntropyLoss()
result_cross = loss_cross(x, y)
print(result_cross)
结果:tensor(1.1019)
用了之前的一个简单神经网络,测试了损失函数及反向传播
# file     : nn_loss_network.py
# time     : 2022/8/2 下午2:39
# function :
import torch
import torchvision.datasets
from torch import nn
from torch.nn import Conv2d, MaxPool2d, Flatten, Linear, Sequential
from torch.utils.data import DataLoader


dataset = torchvision.datasets.CIFAR10("../dataset", train=False, transform=torchvision.transforms.ToTensor(), download=False)
dataloader = DataLoader(dataset, batch_size=1)

class Tudui(nn.Module):
    def __init__(self):
        super(Tudui, self).__init__()
        self.model1 = Sequential(
            Conv2d(3, 32, 5, padding=2),
            MaxPool2d(2),
            Conv2d(32, 32, 5, padding=2),
            MaxPool2d(2),
            Conv2d(32, 64, 5, padding=2),
            MaxPool2d(2),
            Flatten(),
            Linear(1024, 64),
            Linear(64, 64)
        )

    def forward(self, x):
        x = self.model1(x)
        return x


loss = nn.CrossEntropyLoss()
tudui = Tudui()
for data in dataloader:
    imgs, targets = data
    outputs = tudui(imgs)
    result_loss = loss(outputs, targets)
    result_loss.backward()
    print("ok")

 浙公网安备 33010602011771号