两台不同云服务器搭建hadoop
# 不同云服务器搭建Hadoop
**本文主要是想帮助和我一样的新手。因为网上内容比较多,不好寻找。凭自己经验整合了一些内容。参考文章在最后。**
**使用的是一个阿里云服务器(master)以及一个腾讯云服务器(cluster1)。**
**在以下代码中带有[root@master hadoop-3.3.1]的是自己直接在云主机运行的。在开始安装hadoop前推荐使用ssh进行连接,对于ssh是什么可以百度一下。电脑为mac m1 air。因为芯片太难找到适配的软件,所以使用云主机尝试。**
**厂商不同,集群中云主机间的通信也比较麻烦,因为hadoop一半设计的就是运行在同一个局域网中。主要体现在hadoop文件设置中**
**推荐读者打代码多使用tab自动补全,因为写这篇文章前,我已经设置好了,有些是靠记忆进行复现,所以有些代码是我自己手打的,步骤也是我记忆中的,可能会有一些错误。所以主要看内容理解,具体的可以百度。**
**如果发现哪有问题,或者我有错误和遗漏可以在评论区留言讨论。谢谢**
## 1. 设置不同主机间的映射

```bash
# 相互ping一下看是否连通
# master
ping cluster1
# cluster1
ping master
```
## 2. 设置SSH免密通信
目的:相互间通信时可以不用密码。(如果不设置,最后启动hadoop后就会出现连接不了的错误)
上网查一下,最后验证方法
```bash
# master
ssh cluster1 # 不需要密码就能进
```
## 3. 设置进行分发的脚本
目的:在一个主机上更改了文件后可以一键同步到其它的主机上。本来需要输入密码,但是因为ssh免密登陆后可以直接分发。
```bash
[root@master hadoop-3.3.1]# echo $PATH
.:/home/java/jdk1.8/bin:/home/hadoop/hadoop-3.3.1/bin:.:/home/java/jdk1.8/bin:/bin:/usr/bin:/usr/local/sbin:/usr/local/bin:/usr/sbin:/usr/bin:/root/bin
# 1. 在上面的目录中随便找一个比如/usr/bin中进行以下步骤
cd /home/atguigu
mkdir bin
cd bin
vim xsync
# 2. 在xsync中写入以下参数
#!/bin/bash
#1. 判断参数个数
if [ $# -lt 1 ]
then
echo Not Enough Arguement!
exit;
fi
#2. 遍历集群所有机器
for host in hadoop102 hadoop103 hadoop104
do
echo ==================== $host ====================
#3. 遍历所有目录,挨个发送
for file in $@
do
#4. 判断文件是否存在
if [ -e $file ]
then
#5. 获取父目录
pdir=$(cd -P $(dirname $file); pwd)
#6. 获取当前文件的名称
fname=$(basename $file)
ssh $host "mkdir -p $pdir"
rsync -av $pdir/$fname $host:$pdir
else
echo $file does not exists!
fi
done
done
# 保存退出
# 3. 更改权限
chmod 777 xsync
# 使用时直接
xsync 文件名 # 在文件或者文件夹所在的文件
# 比如 /home/hadoop
# 在 /home目录下
xsync hadoop
# 例子
[root@master hadoop-3.3.1]# xsync etc/
==================== master ====================
sending incremental file list
sent 1,029 bytes received 19 bytes 2,096.00 bytes/sec
total size is 113,986 speedup is 108.77
==================== cluster1 ====================
sending incremental file list
etc/hadoop/
etc/hadoop/core-site.xml
etc/hadoop/hdfs-site.xml
sent 1,392 bytes received 94 bytes 990.67 bytes/sec
total size is 113,986 speedup is 76.71
```
## 4. 下载jdk1.8以及hadoop3.3.1
### 1. 使用软件把文件上传到云服务器上。这里我使用terminus 中的ftsp传到/root目录下
JDK8下载链接:https://www.oracle.com/java/technologies/downloads/#java8
Hadoop3.3.1下载链接:https://dlcdn.apache.org/hadoop/common/hadoop-3.3.1/hadoop-3.3.1.tar.gz
### 2. 解压到/home/java 和/home/hadoop下
```bash
tar -zxvf jdk1.8.tar.gz -C /home/java
tar -zxvf hadoop-3.3.1-tar.gz -C /home/hadoop
```
### 3. 设置环境变量
```bash
# 新建/etc/profile.d/my_env.sh
vim /etc/profile.d/my_env.sh
# my_env.sh中写入如下内容
export PATH=/bin:/usr/bin:$PATH
#Java Configuration
export JAVA_HOME=/home/java/jdk1.8
export JRE_HOME=/home/java/jdk1.8/jre
export CLASSPATH=.:$JAVA_HOME/lib/dt.jar:$JAVA_HOME/lib/tools.jar:$JRE_HOME/lib
export PATH=.:${JAVA_HOME}/bin:$PATH
#Hadoop Configuration
export HADOOP_HOME=/home/hadoop/hadoop-3.3.1
export HADOOP_COMMON_LIB_NATIVE_DIR=$HADOOP_HOME/lib/native
export HADOOP_OPTS="-Djava.library.path=$HADOOP_HOME/lib"
export PATH=.:${JAVA_HOME}/bin:${HADOOP_HOME}/bin:$PATH
```
#### 检验
```bash
# java检验
[root@master hadoop-3.3.1]# java -version
java version "1.8.0_212"
Java(TM) SE Runtime Environment (build 1.8.0_212-b10)
Java HotSpot(TM) 64-Bit Server VM (build 25.212-b10, mixed mode)
# hadoop检验
# 输入hado 会自动补全
```
## 5. hadoop的文件设置
**在/home/hadoop/hadoop-3.3.1/etc/hadoop目录下**
```bash
[root@master hadoop]# vim core-site.xml
<?xml version="1.0" encoding="UTF-8"?>
<?xml-stylesheet type="text/xsl" href="configuration.xsl"?>
<!--
Licensed under the Apache License, Version 2.0 (the "License");
you may not use this file except in compliance with the License.
You may obtain a copy of the License at
http://www.apache.org/licenses/LICENSE-2.0
Unless required by applicable law or agreed to in writing, software
distributed under the License is distributed on an "AS IS" BASIS,
WITHOUT WARRANTIES OR CONDITIONS OF ANY KIND, either express or implied.
See the License for the specific language governing permissions and
limitations under the License. See accompanying LICENSE file.
-->
<!-- Put site-specific property overrides in this file. -->
<configuration>
<property>
<name>hadoop.tmp.dir</name>
<!-- 由于我的是root用户所以写成root,如果你创建的文件夹不在root下记得换掉 -->
<value>/root/hadoop/tmp</value>
<description>Abase for other temporary directories.</description>
</property>
<property>
<name>fs.default.name</name>
<value>hdfs://master:9000</value>
</property>
<property>
<name>hadoop.http.staticuser.user</name>
<!-- 指定静态角色,HDFS上传文件的时候需要 -->
<value>root</value>
</property>
</configuration>
```
```bash
[root@master hadoop]# vim hdfs-site.xml
<?xml version="1.0" encoding="UTF-8"?>
<?xml-stylesheet type="text/xsl" href="configuration.xsl"?>
<!--
Licensed under the Apache License, Version 2.0 (the "License");
you may not use this file except in compliance with the License.
You may obtain a copy of the License at
http://www.apache.org/licenses/LICENSE-2.0
Unless required by applicable law or agreed to in writing, software
distributed under the License is distributed on an "AS IS" BASIS,
WITHOUT WARRANTIES OR CONDITIONS OF ANY KIND, either express or implied.
See the License for the specific language governing permissions and
limitations under the License. See accompanying LICENSE file.
-->
<!-- Put site-specific property overrides in this file. -->
<configuration>
<property>
<name>dfs.name.dir</name>
<!-- 由于我的是root用户所以写成root,如果你创建的文件夹不在root下记得换掉 -->
<value>/root/hadoop/dfs/name</value>
<description>Path on the local filesystem where theNameNode stores the namespace and transactions logs persistently.</description>
</property>
<property>
<name>dfs.data.dir</name>
<value>/root/hadoop/dfs/data</value>
<description>Comma separated list of paths on the localfilesystem of a DataNode where it should store its blocks.</description>
</property>
<property>
<name>dfs.replication</name>
<value>2</value>
</property>
<property>
<!-- 如果不设置的话,则需要在host文件中配置好映射你的hostnamme -->
<name>dfs.http.address</name>
<value>0.0.0.0:50070</value>
</property>
</configuration>
```
```bash
[root@master hadoop]# vim yarn-site.xml
<?xml version="1.0"?>
<!--
Licensed under the Apache License, Version 2.0 (the "License");
you may not use this file except in compliance with the License.
You may obtain a copy of the License at
http://www.apache.org/licenses/LICENSE-2.0
Unless required by applicable law or agreed to in writing, software
distributed under the License is distributed on an "AS IS" BASIS,
WITHOUT WARRANTIES OR CONDITIONS OF ANY KIND, either express or implied.
See the License for the specific language governing permissions and
limitations under the License. See accompanying LICENSE file.
-->
<configuration>
<property>
<name>yarn.resourcemanager.hostname</name>
<value>master</value>
</property>
<property>
<name>yarn.resourcemanager.address</name>
<value>${yarn.resourcemanager.hostname}:8032</value>
</property>
<property>
<description>The address of the scheduler interface.</description>
<name>yarn.resourcemanager.scheduler.address</name>
<value>${yarn.resourcemanager.hostname}:8030</value>
</property>
<property>
<description>The http address of the RM web application.</description>
<name>yarn.resourcemanager.webapp.address</name>
<value>${yarn.resourcemanager.hostname}:8088</value>
</property>
<property>
<description>The https adddress of the RM web application.</description>
<name>yarn.resourcemanager.webapp.https.address</name>
<value>${yarn.resourcemanager.hostname}:8090</value>
</property>
<property>
<name>yarn.resourcemanager.resource-tracker.address</name>
<value>${yarn.resourcemanager.hostname}:8031</value>
</property>
<property>
<description>The address of the RM admin interface.</description>
<name>yarn.resourcemanager.admin.address</name>
<value>${yarn.resourcemanager.hostname}:8033</value>
</property>
<property>
<name>yarn.nodemanager.aux-services</name>
<value>mapreduce_shuffle</value>
</property>
<property>
<name>yarn.scheduler.maximum-allocation-mb</name>
<value>8182</value>
<discription>每个节点可用内存,单位MB,默认8182MB</discription>
</property>
<property>
<name>yarn.nodemanager.vmem-pmem-ratio</name>
<value>2.1</value>
</property>
<property>
<name>yarn.nodemanager.resource.memory-mb</name>
<value>2048</value>
</property>
<property>
<name>yarn.nodemanager.vmem-check-enabled</name>
<value>false</value>
</property>
</configuration>
```
```bash
[root@master hadoop]# vim mapred-site.xml
<?xml version="1.0"?>
<?xml-stylesheet type="text/xsl" href="configuration.xsl"?>
<!--
Licensed under the Apache License, Version 2.0 (the "License");
you may not use this file except in compliance with the License.
You may obtain a copy of the License at
http://www.apache.org/licenses/LICENSE-2.0
Unless required by applicable law or agreed to in writing, software
distributed under the License is distributed on an "AS IS" BASIS,
WITHOUT WARRANTIES OR CONDITIONS OF ANY KIND, either express or implied.
See the License for the specific language governing permissions and
limitations under the License. See accompanying LICENSE file.
-->
<!-- Put site-specific property overrides in this file. -->
<configuration>
<property>
<name>mapreduce.framework.name</name>
<value>yarn</value>
</property>
</configuration>
```
### **因为我使用的都是root用户,所以要添加以下参数,不然不能启动**
在/home/hadoop/hadoop-3.3.1/hadoop/sbin路径下:
将start-dfs.sh,stop-dfs.sh两个文件顶部添加以下参数
```bash
#!/usr/bin/env bash
HDFS_DATANODE_USER=root
HADOOP_SECURE_DN_USER=hdfs
HDFS_NAMENODE_USER=root
HDFS_SECONDARYNAMENODE_USER=root
```
还有,start-yarn.sh,stop-yarn.sh顶部也需添加以下:
```bash
#!/usr/bin/env bash
YARN_RESOURCEMANAGER_USER=root
HADOOP_SECURE_DN_USER=yarn
YARN_NODEMANAGER_USER=root
Licensed to the Apache Software Foundation (ASF) under one or more
```
## 5. 开启hadoop
#### 初始化
```bash
cd /home/hadoop/hadoop-3.3.1/bin
./hdfs namenode -format
./hdfs datanode -format
# 如果重新初始化,需要删除两个文件
/root/hadoop/tmp
/home/hadoop/hadoop-3.3.1/logs
```
```bash
[root@master hadoop-3.3.1]# sbin/start-all.sh
# 可以分步启动,start-hdfs.sh
# start-yarn.sh
```
### 命令行查看集群状态
```hadoop dfsadmin -report```
### web访问
公网ip加设置的端口(公网ip:50070)
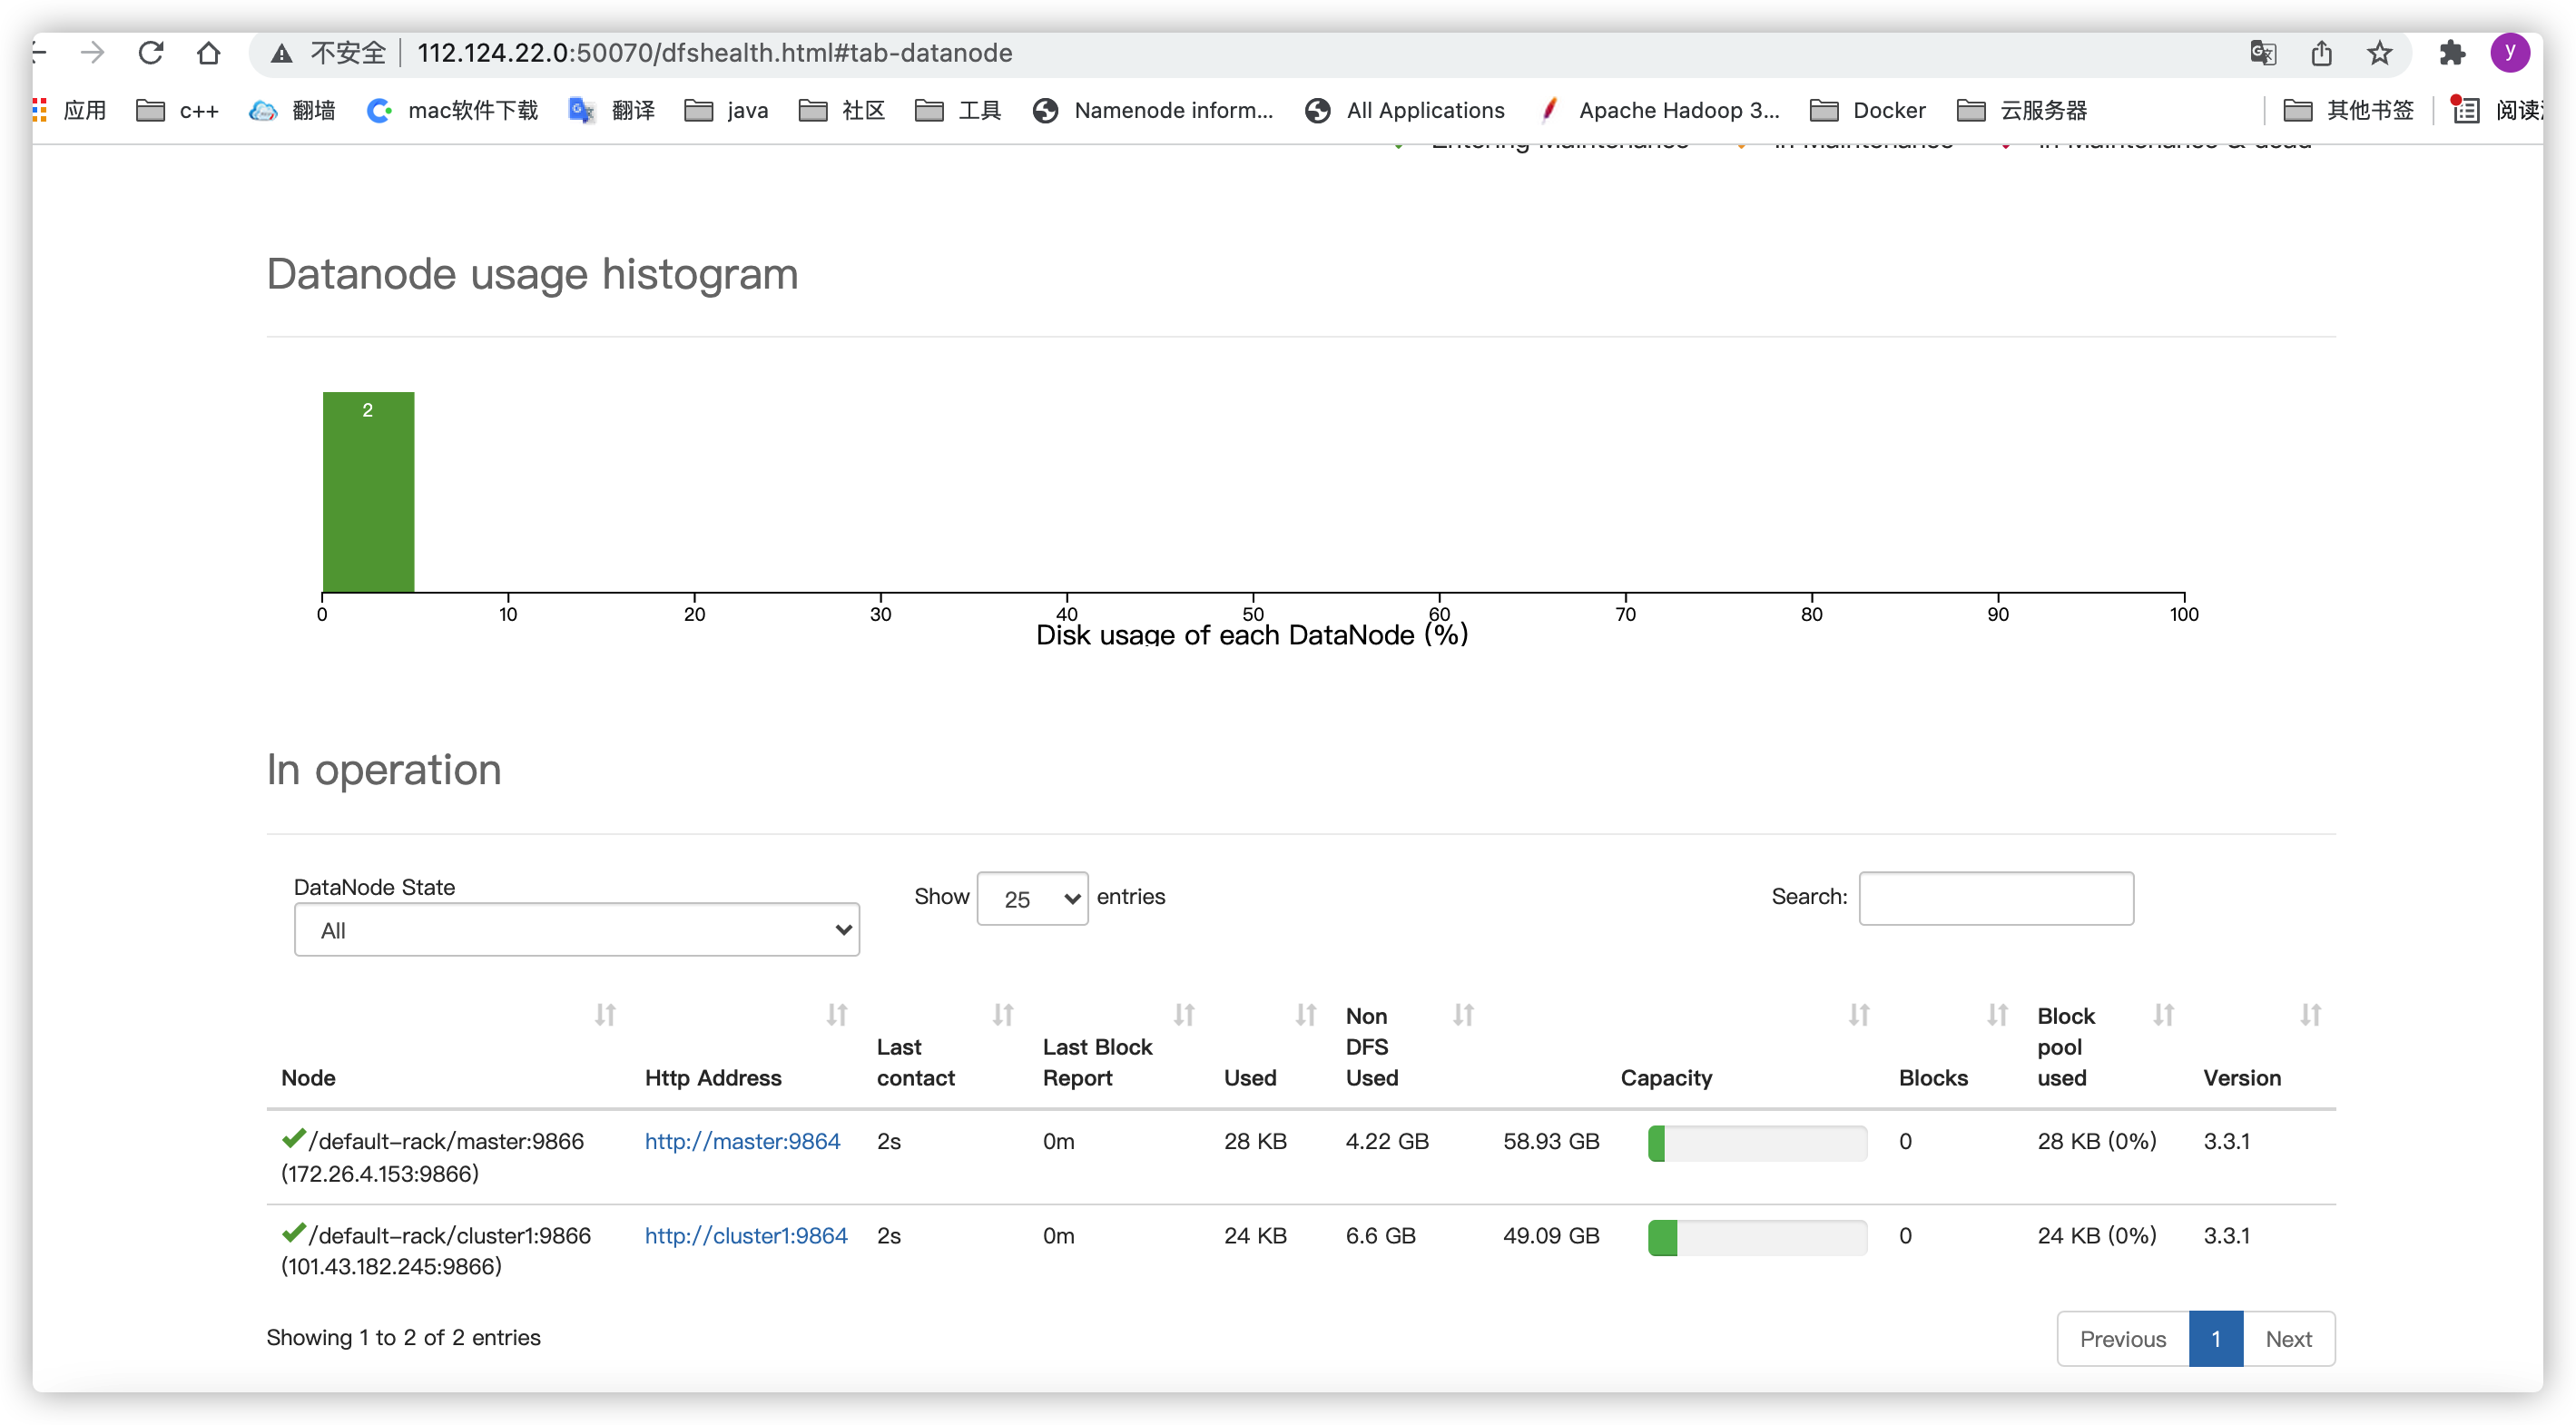
(公网ip:8088)
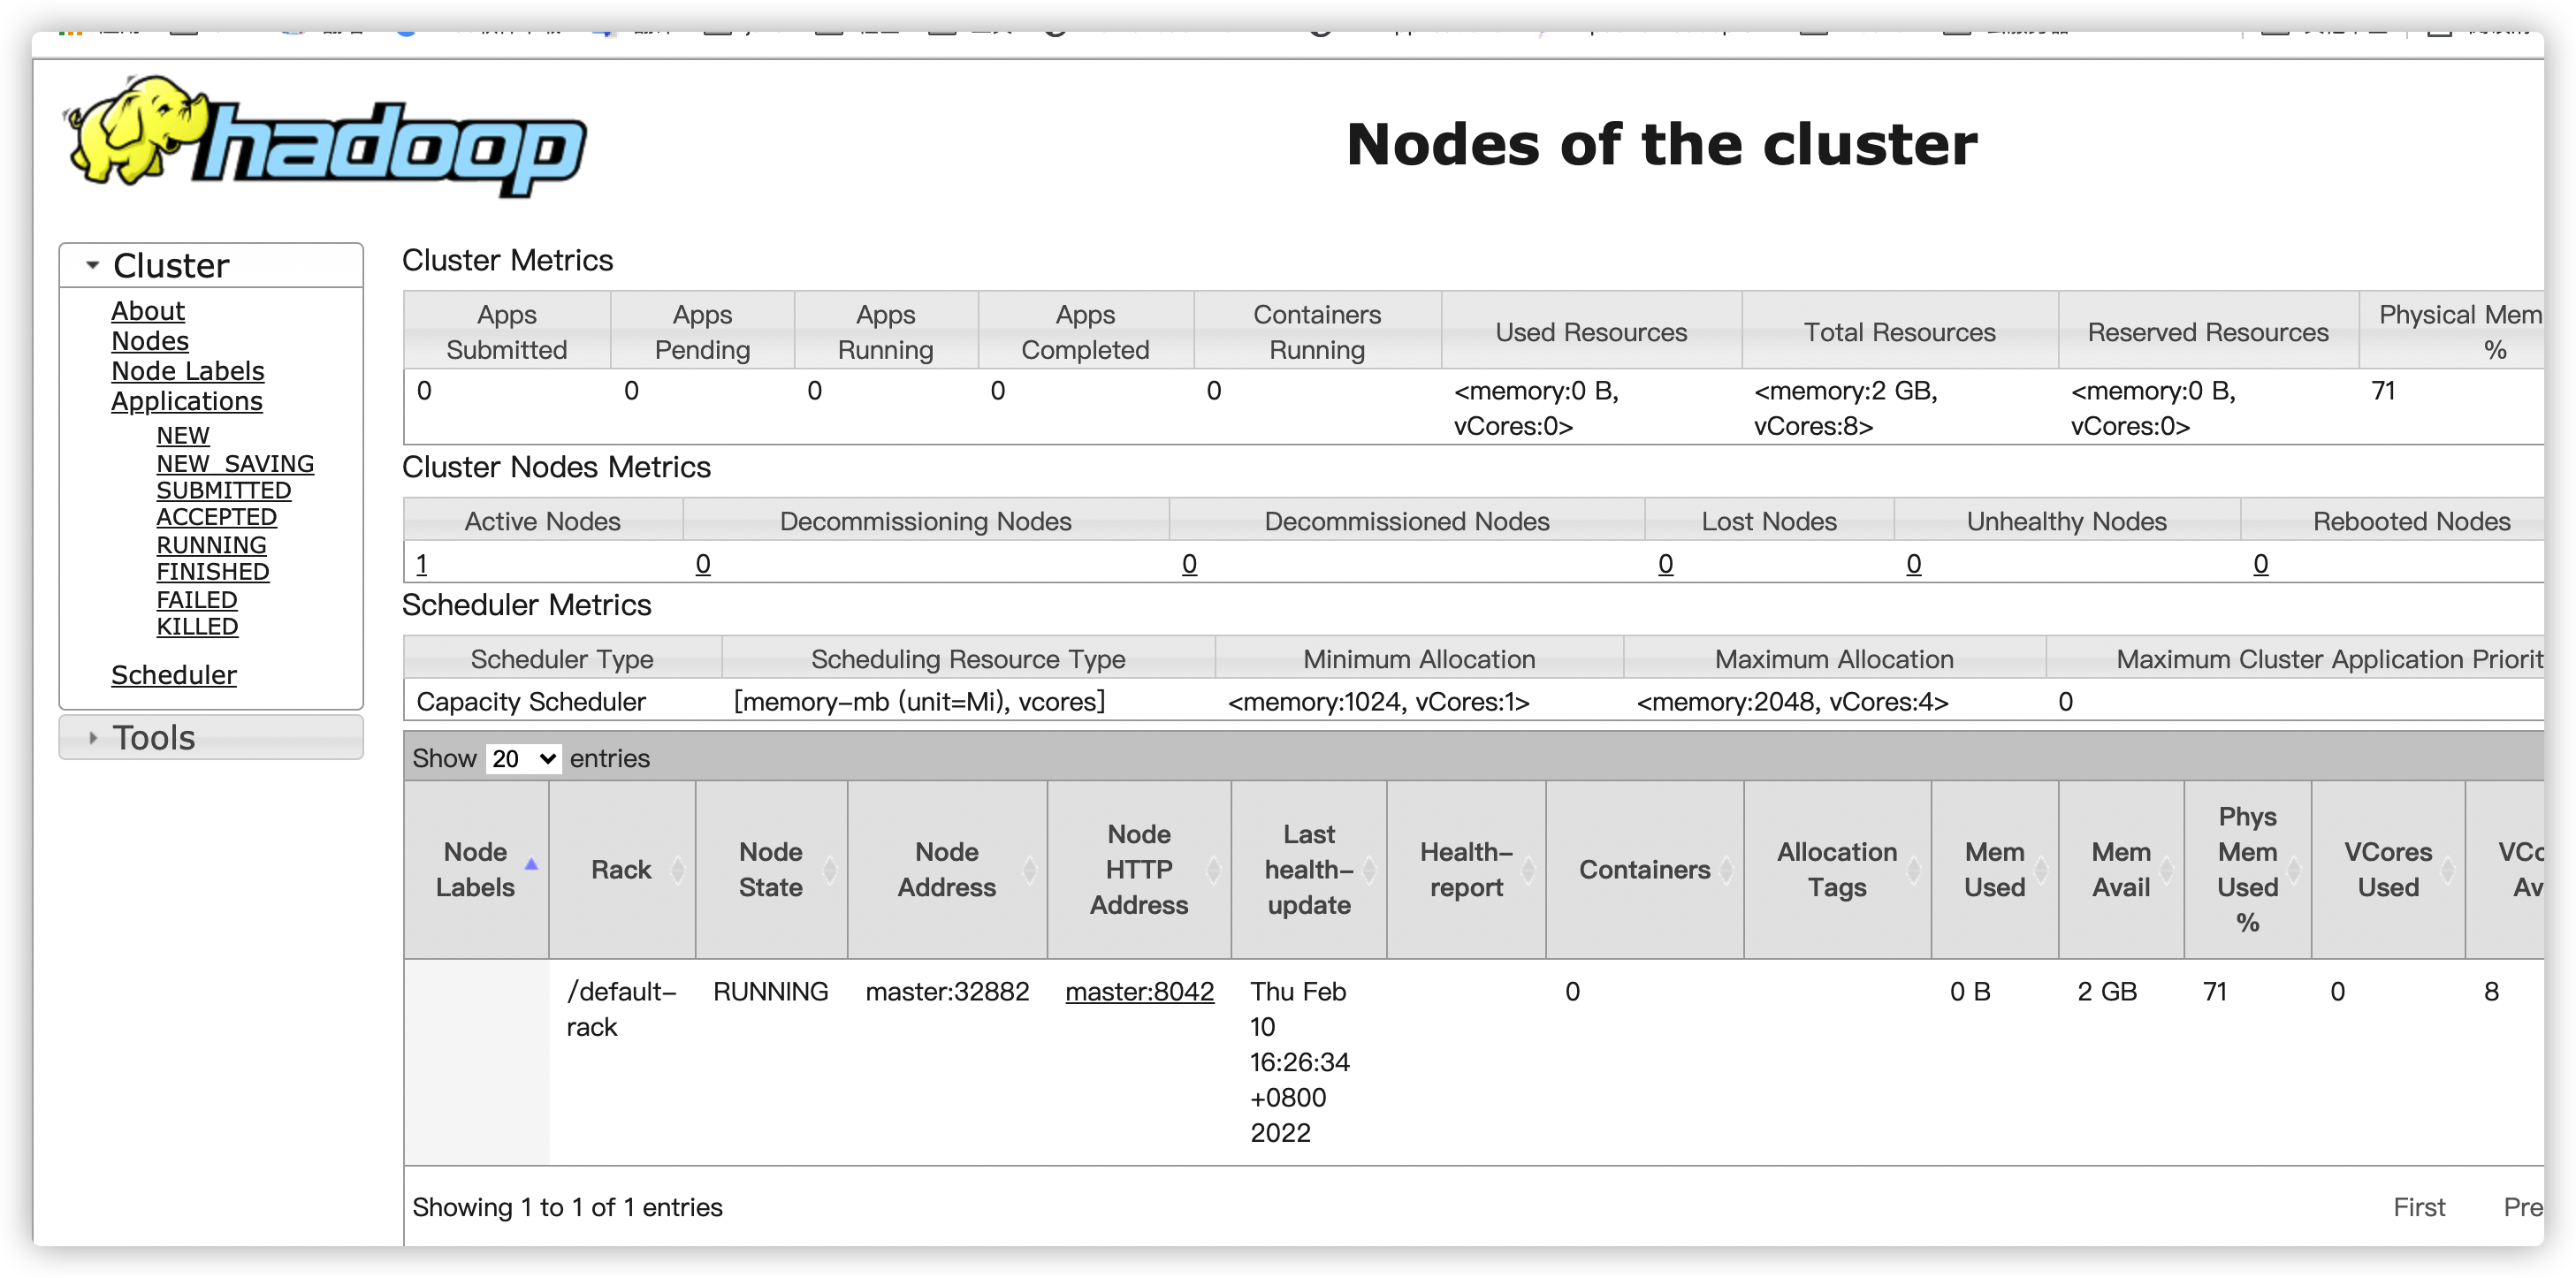
问题:Active Nodes 只有1 目前还不知道怎么解决,如果有大佬会,能不能麻烦告诉下。
参考:https://www.cnblogs.com/sandaman2019/p/15513391.html
参考:b站尚硅谷hadoop的视频:xsync脚本的设置 hadoop的启动和初始化

 浙公网安备 33010602011771号