elasticsearch数据基于snapshot的还原备份+版本升级
前言
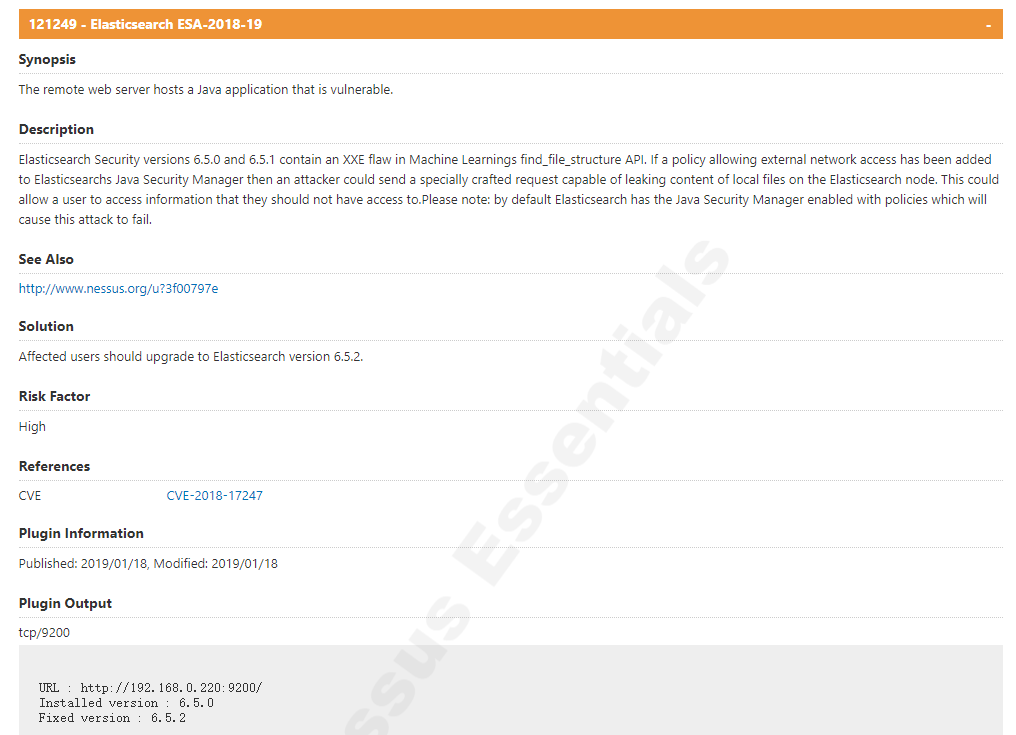
之前安装的是elasticsearch-6.5.0,漏洞扫描报The remote web server hosts a Java application that is vulnerable.,给出的解决方案是将版本升级到elasticsearch-6.5.2以上。
121249 - Elasticsearch ESA-2018-19-
Synopsis
The remote web server hosts a Java application that is vulnerable.
Description
Elasticsearch Security versions 6.5.0 and 6.5.1 contain an XXE flaw in Machine Learnings find_file_structure API. If a policy allowing external network access has been added to Elasticsearchs Java Security Manager then an attacker could send a specially crafted request capable of leaking content of local files on the Elasticsearch node. This could allow a user to access information that they should not have access to.Please note: by default Elasticsearch has the Java Security Manager enabled with policies which will cause this attack to fail.
See Also
http://www.nessus.org/u?3f00797e
Solution
Affected users should upgrade to Elasticsearch version 6.5.2.
Risk Factor
High
References
CVE    CVE-2018-17247
Plugin Information
Published: 2019/01/18, Modified: 2019/01/18
Plugin Output
tcp/9200

URL : http://192.168.0.220:9200/
Installed version : 6.5.0
Fixed version : 6.5.2
安装kibana
为了查看原来的数据,我先安装kibana
1、准备安装包
找安装包不做过多介绍

2、解压
tar -zxvf kibana-6.5.2-linux-x86_64.tar.gz

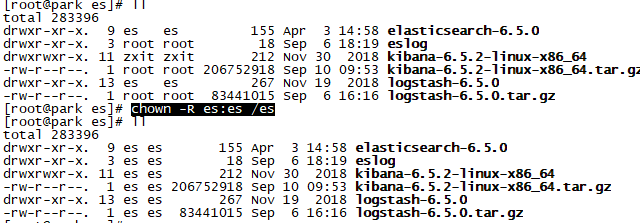
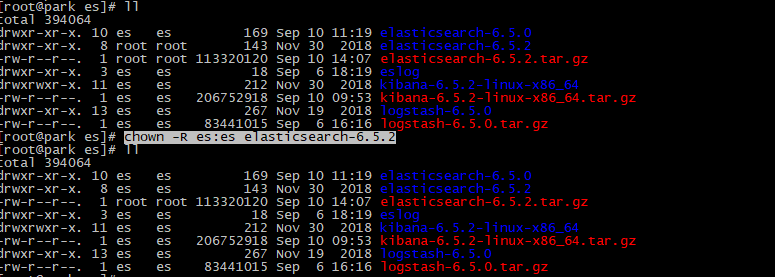
3、修改用户权限
chown -R es:es /es
4、修改配置文件
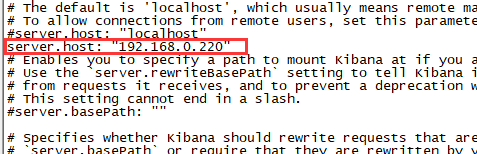
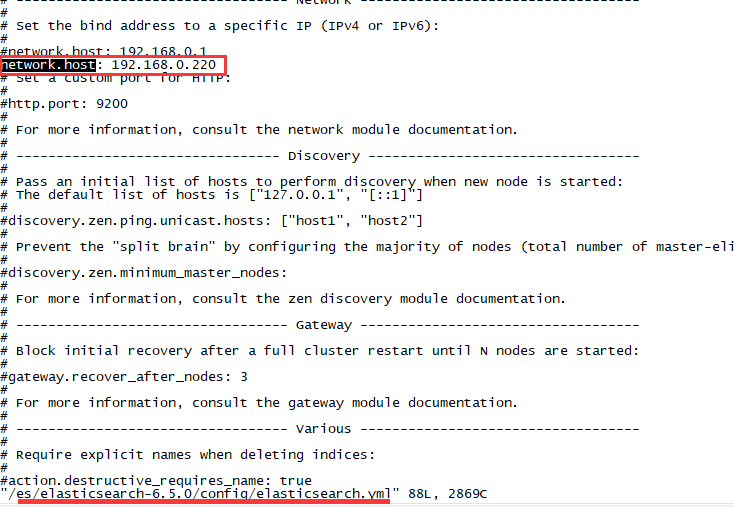
server.host默认是localhost,但我想在其他windows 上访问,所以需要改配置文件
vim /es/kibana-6.5.2-linux-x86_64/config/kibana.yml
#添加一行 server.host: "192.168.0.220"
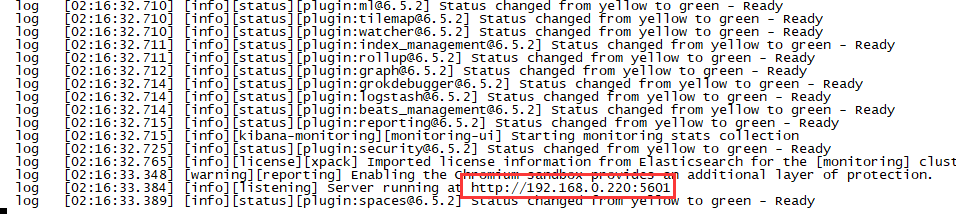
5、启动
su es
/es/kibana-6.5.2-linux-x86_64/bin/kibana &
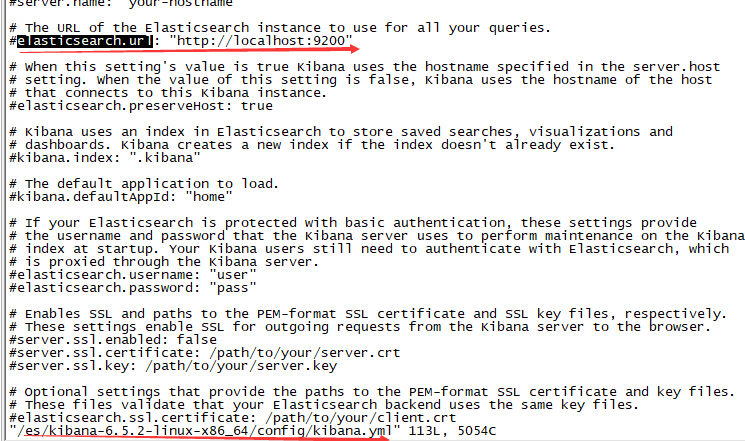
6、解决报错Unable to revive connection: http://localhost:9200/
【1】报错日志
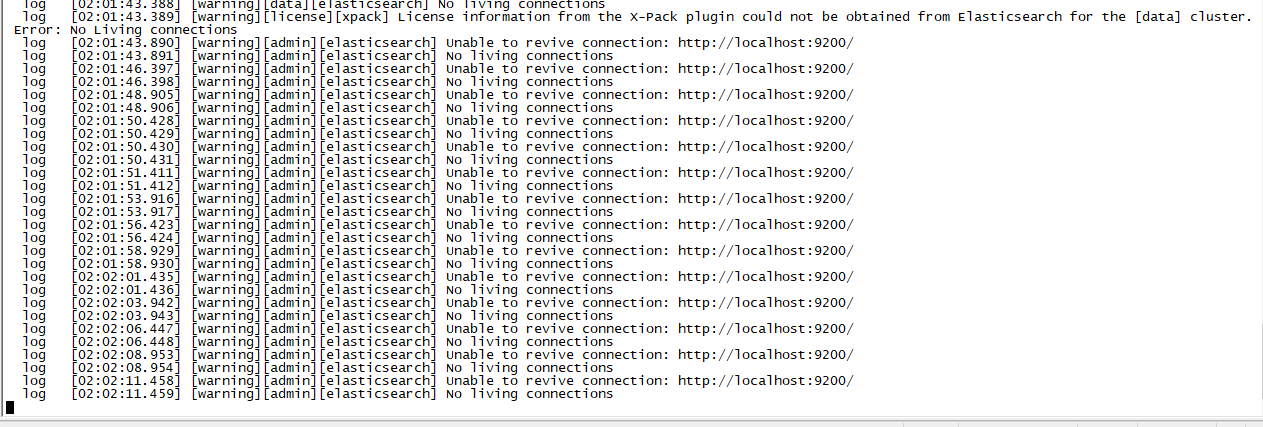
【2】原因分析
kibana配置文件kibana.yml指定的elasticsearch.url与network.host中指定的ip不匹配。
【3】解决方法
修改kibana.yml的elasticsearch.url
vim /es/kibana-6.5.2-linux-x86_64/config/kibana.yml
# 添加一行
elasticsearch.url: "http://192.168.0.220:9200"
# 重启
/es/kibana-6.5.2-linux-x86_64/bin/kibana &

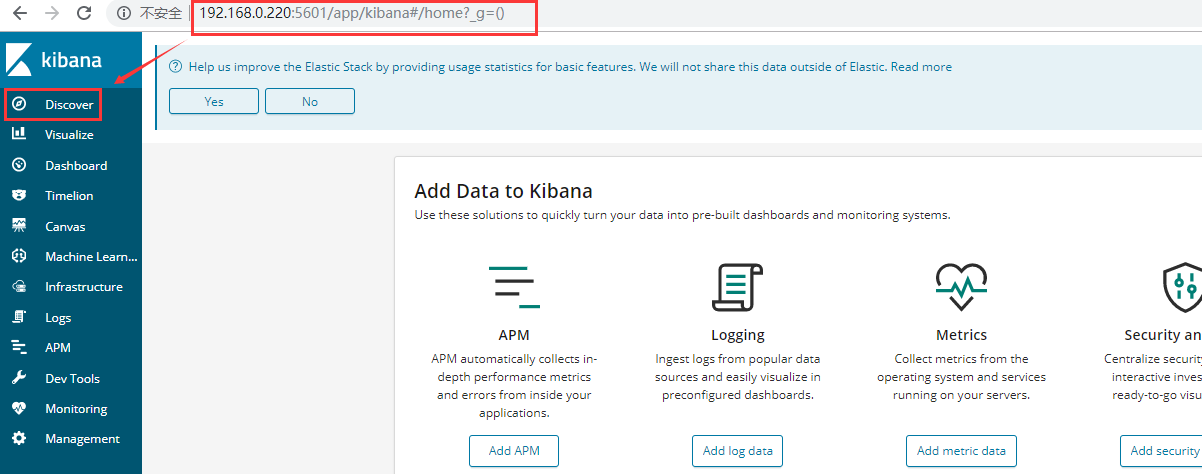
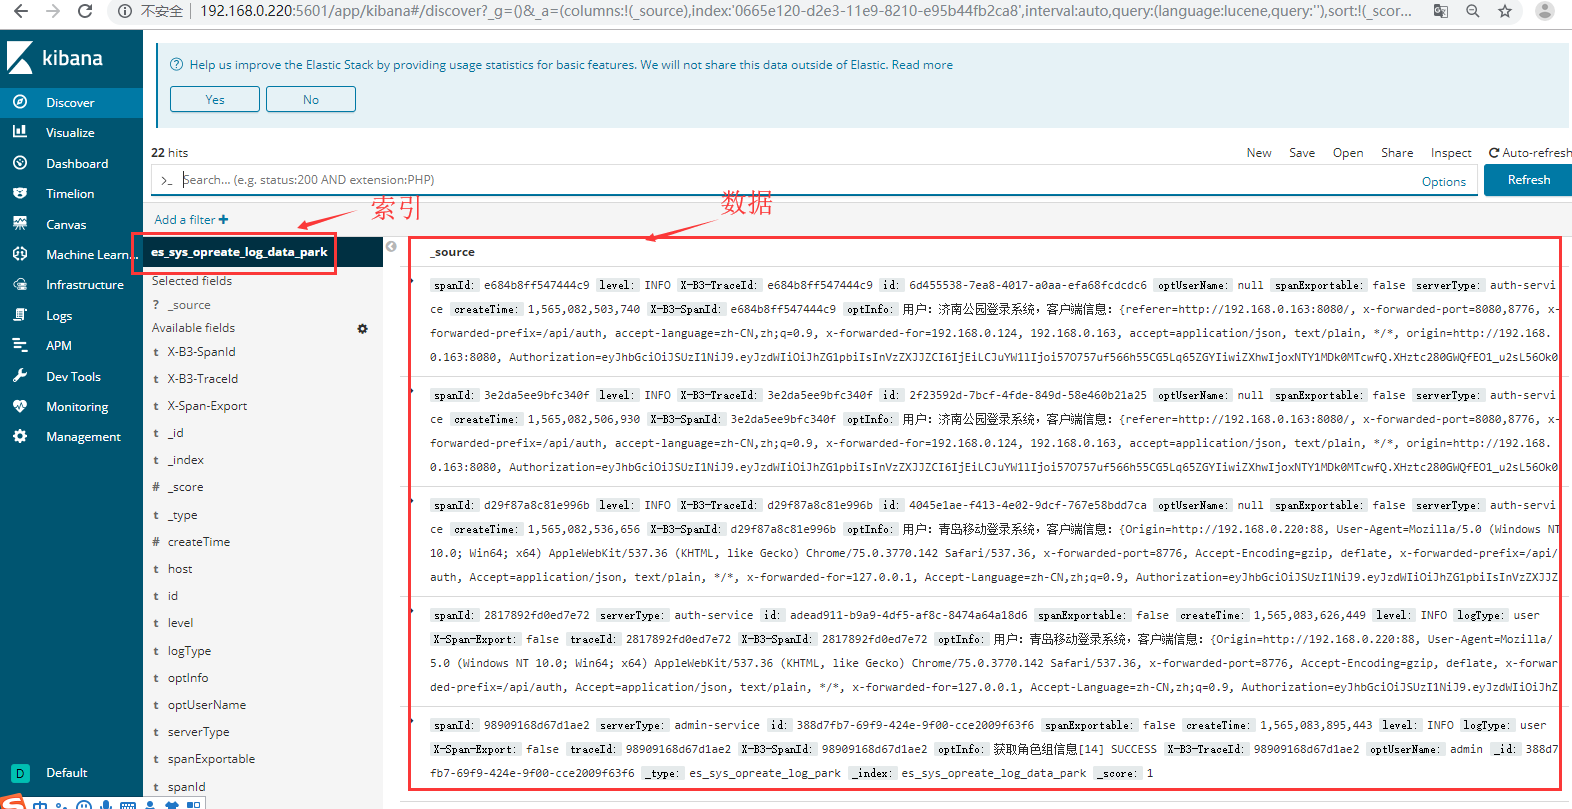
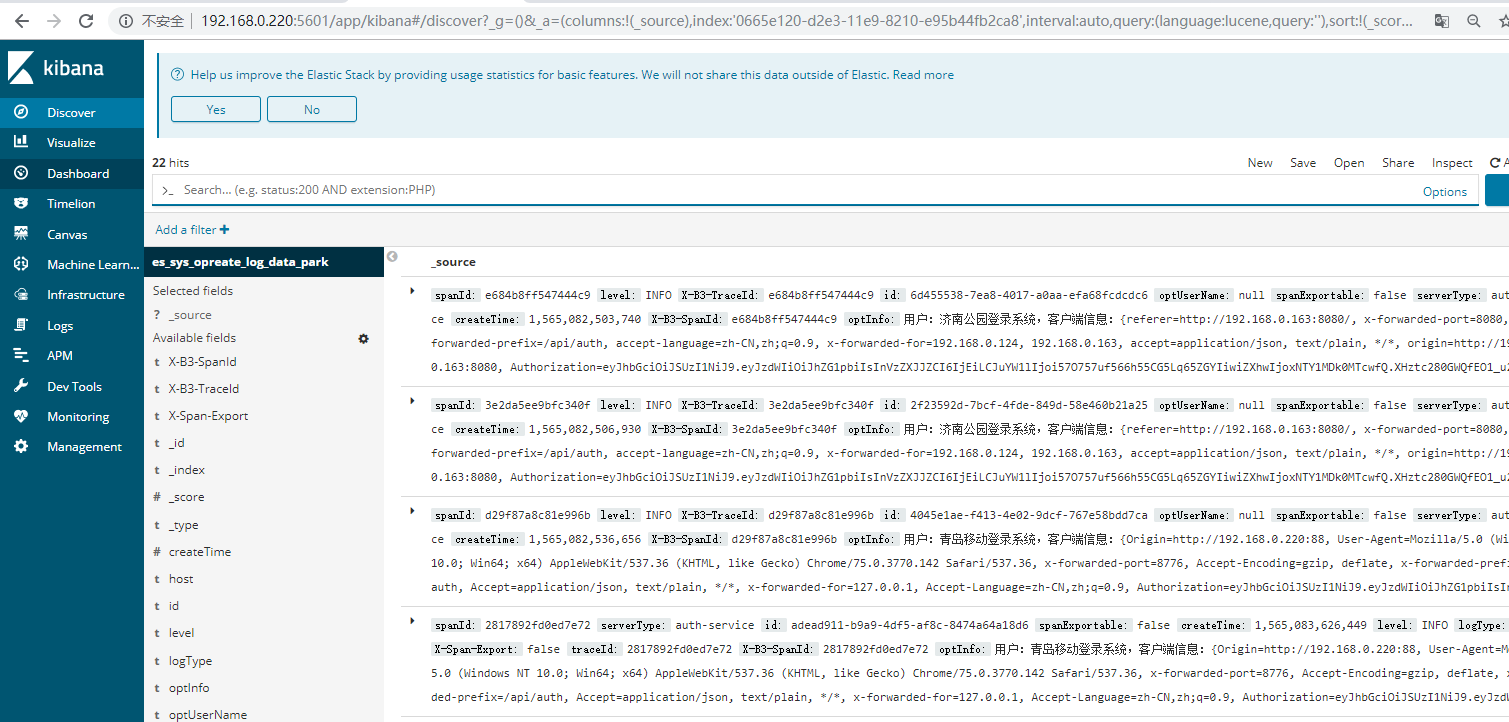
7、查看数据
启动提示访问网址:http://192.168.0.220:5601,则表示成功了,直接在浏览器输入该地址即可访问
备份
1、注册创建快照仓库
当前启动的版本是6.5.0,为当前版本建仓库
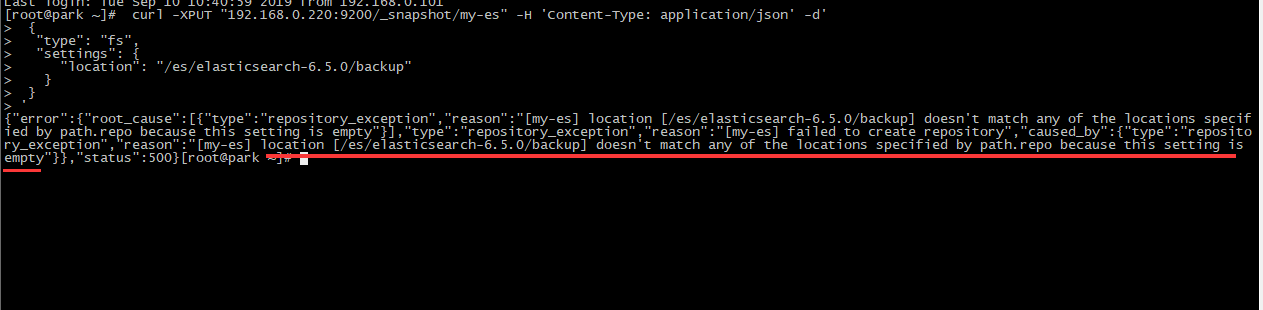
 curl -XPUT "192.168.0.220:9200/_snapshot/my-es" -H 'Content-Type: application/json' -d'
 {
  "type": "fs",
  "settings": {
     "location": "/es/elasticsearch-6.5.0/backup"
   }
 }
'
2、解决报错
【1】报错日志
{"error":{"root_cause":[{"type":"repository_exception",
"reason":"[my-es] location [/es/elasticsearch-6.5.0/backup] doesn't match any of the locations specified by path.repo because this setting is empty"}],、

"type":"repository_exception","reason":"[my-es] failed to create repository",

"caused_by":{"type":"repository_exception",

"reason":"[my-es] location [/es/elasticsearch-6.5.0/backup] doesn't match any of the locations specified by path.repo because this setting is empty"}},

"status":500}
【2】原因分析
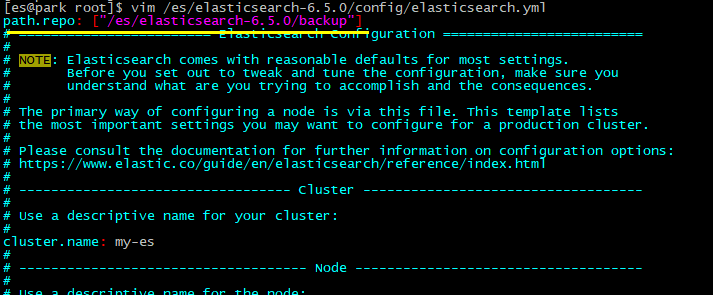
报错信息里面已经说明了,仓库位置不匹配,需要在配置文件里面配置仓库位置/es/elasticsearch-6.5.0/backup
【3】解决
vim /es/elasticsearch-6.5.0/config/elasticsearch.yml
#添加以下内容
path.repo: ["/es/elasticsearch-6.5.0/backup"]
【4】再次创建
#重启
su es
/es/elasticsearch-6.5.0/bin/elasticsearch -d
#创建仓库
curl -XPUT "192.168.0.220:9200/_snapshot/my-es" -H 'Content-Type: application/json' -d'
{
  "type": "fs",
  "settings": {
    "location": "/es/elasticsearch-6.5.0/backup"
  }
}
'

3、查看已注册快照仓库
curl -XGET "192.168.0.220:9200/_snapshot/my-es/"
curl -XPOST "192.168.0.220:9200/_snapshot/my-es/_verify"

4、备份
这里es_sys_opreate_log_data_park是刚刚在kibana上看到的索引
#备份
curl -XPUT '192.168.0.220:9200/_snapshot/my-es/es_sys_opreate_log_data_park?wait_for_completion=true'
#查看备份数据
cd /es/elasticsearch-6.5.0/backup/

升级
1、准备安装包 elasticsearch-6.5.2.tar.gz

2、解压
tar -zxvf elasticsearch-6.5.2.tar.gz
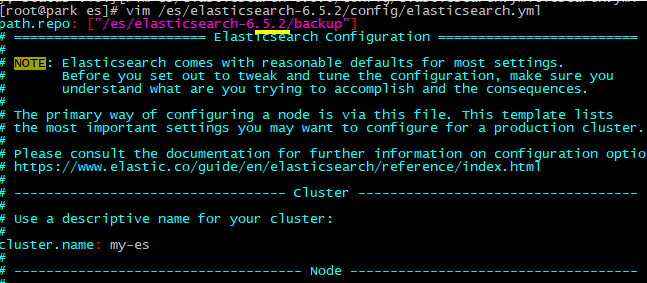
3、修改配置文件
#进入配置文件目录
cd /es/elasticsearch-6.5.2/config/
#备份配置文件
mv elasticsearch.yml elasticsearch.yml.bak
#将6.5.0的配置文件复制过来
cp /es/elasticsearch-6.5.0/config/elasticsearch.yml ./
#修改仓库位置
vim /es/elasticsearch-6.5.2/config/elasticsearch.yml
4、修改权限
chown -R es:es elasticsearch-6.5.2
5、启动新版本
启动之前,kill掉旧版本。
#重启
su es
/es/elasticsearch-6.5.2/bin/elasticsearch -d

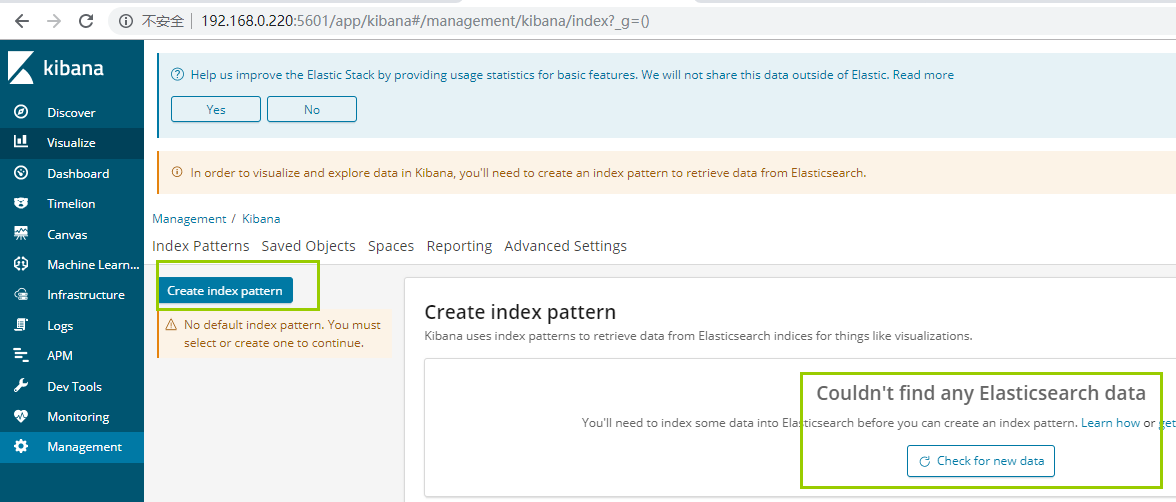
查看数据
用kibana查看数据,发现没有任何数据
还原数据
#新建6.5.2的仓库
curl -XPUT "192.168.0.220:9200/_snapshot/my-es" -H 'Content-Type: application/json' -d'
{
  "type": "fs",
  "settings": {
    "location": "/es/elasticsearch-6.5.2/backup"
  }
}
'
#将6.5.0的备份数据移动到6.5.2的仓库
cp -r /es/elasticsearch-6.5.0/backup/* /es/elasticsearch-6.5.2/backup/
#还原
curl -XPOST 192.168.0.220:9200/_snapshot/my-es/es_sys_opreate_log_data_park/_restore

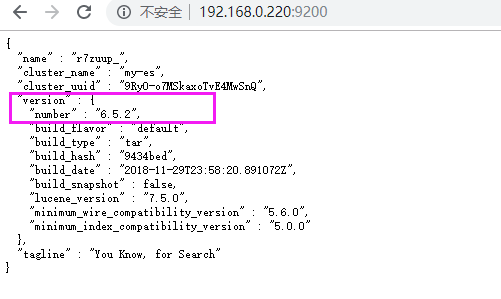
检查数据
查看版本
注:
后面经测试,将老版本中的data文件夹移动到新版本中,同样能完成版本升级及数据的迁移。
补充:
logstash的启动
#切换用户
su es
#进入安装目录
cd logstash-6.5.0/bin/
#启动
./logstash -f ../config/logstash-sample.conf &
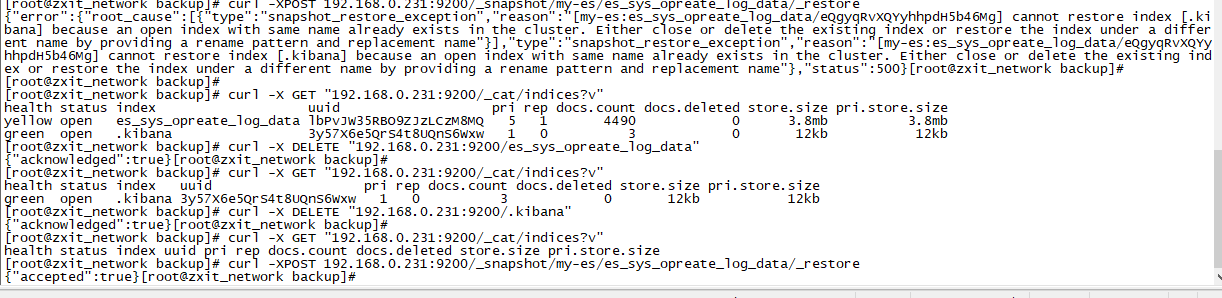
还原时,报index with same name already exists in the cluster
#还原
curl -XPOST 192.168.0.231:9200/_snapshot/my-es/es_sys_opreate_log_data/_restore

#报错信息
{"error":{"root_cause":[{"type":"snapshot_restore_exception","reason":"[my-es:es_sys_opreate_log_data/eQgyqRvXQYyhhpdH5b46Mg]
cannot restore index [.kibana] because an open index with same name already exists in the cluster.
 Either close or delete the existing index or restore the index under a different name by providing a rename pattern and replacement name"}],
"type":"snapshot_restore_exception","reason":"[my-es:es_sys_opreate_log_data/eQgyqRvXQYyhhpdH5b46Mg] cannot restore index [.kibana]
because an open index with same name already exists in the cluster. Either close or delete the existing index or restore the index under a different name
by providing a rename pattern and replacement name"},"status":500}

#查看当前所有索引
curl -X GET "192.168.0.231:9200/_cat/indices?v"
#删除索引
curl -X DELETE "192.168.0.231:9200/es_sys_opreate_log_data"
curl -X DELETE "192.168.0.231:9200/.kibana"
#再次还原
curl -XPOST 192.168.0.231:9200/_snapshot/my-es/es_sys_opreate_log_data/_restore

 浙公网安备 33010602011771号