
note-ansible
ansible
1.安装
使用 yum 安装
#安装epel-release包相当于添加了一个第三方源
yum install epel-release -y
yum install ansible –y
ansible 程序结构
安装目录如下(yum安装):
配置文件目录:/etc/ansible/
执行文件目录:/usr/bin/
Lib库依赖目录:/usr/lib/pythonX.X/site-packages/ansible/
Help文档目录:/usr/share/doc/ansible-X.X.X/
Man文档目录:/usr/share/man/man1/
ansible配置文件查找顺序
- 检查环境变量
ANSIBLE_CONFIG指向的路径文件(export ANSIBLE_CONFIG=/etc/ansible.cfg); ~/.ansible.cfg,检查当前目录下的ansible.cfg配置文件;/etc/ansible.cfg检查etc目录的配置文件。
ansible配置文件
ansible 的配置文件为/etc/ansible/ansible.cfg
inventory = /etc/ansible/hosts		#这个参数表示资源清单inventory文件的位置
library = /usr/share/ansible		#指向存放Ansible模块的目录,支持多个目录方式,只要用冒号(:)隔开就可以
forks = 5		#并发连接数,默认为5
sudo_user = root		#设置默认执行命令的用户
remote_port = 22		#指定连接被管节点的管理端口,默认为22端口,建议修改,能够更加安全
host_key_checking = False		#设置是否检查SSH主机的密钥,值为True/False。关闭后第一次连接不会提示配置实例
timeout = 60		#设置SSH连接的超时时间,单位为秒
log_path = /var/log/ansible.log		#指定一个存储ansible日志的文件(默认不记录日志)
ansuble主机清单
[root@server ~]# vim /etc/ansible/hosts
	[web]
	192.168.37.122
	192.168.37.133
常用参数配置:
ansible_ssh_host # 目标主机地址
ansible_ssh_port # 目标主机端口,默认22
ansible_ssh_user # 目标主机用户
ansible_ssh_pass # 目标主机ssh密码
ansible_sudo_pass # sudo密码
ansible_sudo_exe
ansible_connection # 与主机的连接类型,比如:local,ssh或者paramiko
ansible_ssh_private_key_file # 私钥地址
ansible_shell_type # 目标系统的shell类型
ansible_python_interpreter # python版本
ansible 常用命令
/usr/bin/ansible Ansibe AD-Hoc 临时命令执行工具,常用于临时命令的执行
/usr/bin/ansible-doc Ansible 模块功能查看工具
/usr/bin/ansible-galaxy 下载/上传优秀代码或Roles模块 的官网平台,基于网络的
/usr/bin/ansible-playbook Ansible 定制自动化的任务集编排工具
/usr/bin/ansible-vault Ansible 文件加密工具
ansible-doc
ansible-doc 命令常用于获取模块信息及其使用帮助,一般用法如下:
ansible-doc -l				#获取全部模块的信息
ansible-doc -s MOD_NAME		#获取指定模块的使用帮助
例子
[root@VM-20-7-centos ~]#
[root@VM-20-7-centos ~]# ansible-doc -l | grep copy
bigip_file_copy               Manage files in datastores on a BIG-IP
ec2_ami_copy                  copies AMI between AWS regions, return new image id
win_robocopy                  Synchronizes the contents of two directories using Robocopy
copy                          Copy files to remote locations
na_ontap_lun_copy             NetApp ONTAP copy LUNs
[root@VM-20-7-centos ~]# ansible-doc -s copy
ansible-doc的全部用法:
[root@server ~]# ansible-doc
Usage: ansible-doc [options] [module...]

Options:
  -h, --help            show this help message and exit  # 显示命令参数API文档
  -l, --list            List available modules  #列出可用的模块
  -M MODULE_PATH, --module-path=MODULE_PATH  #指定模块的路径
                        specify path(s) to module library (default=None)
  -s, --snippet         Show playbook snippet for specified module(s)  #显示playbook制定模块的用法
  -v, --verbose         verbose mode (-vvv for more, -vvvv to enable  # 显示ansible-doc的版本号查看模块列表:
                        connection debugging)
  --version             show program's version number and exit
ansible 命令详解
ansible <host-pattern> [-f forks] [-m module_name] [-a args]
-a MODULE_ARGS #模块的参数,如果执行默认COMMAND的模块,即是命令参数,如: “date”,“pwd”等等
-k,--ask-pass #ask for SSH password。登录密码,提示输入SSH密码而不是假设基于密钥的验证
--ask-su-pass #ask for su password。su切换密码
-K,--ask-sudo-pass #ask for sudo password。提示密码使用sudo,sudo表示提权操作
--ask-vault-pass #ask for vault password。假设我们设定了加密的密码,则用该选项进行访问
-B SECONDS #后台运行超时时间
-C #模拟运行环境并进行预运行,可以进行查错测试
-c CONNECTION #连接类型使用
-f FORKS #并行任务数,默认为5
-i INVENTORY #指定主机清单的路径,默认为/etc/ansible/hosts
--list-hosts #查看有哪些主机组
-m MODULE_NAME #执行模块的名字,默认使用 command 模块,所以如果是只执行单一命令可以不用 -m参数
-o #压缩输出,尝试将所有结果在一行输出,一般针对收集工具使用
-S #用 su 命令
-R SU_USER #指定 su 的用户,默认为 root 用户
-s #用 sudo 命令
-U SUDO_USER #指定 sudo 到哪个用户,默认为 root 用户
-T TIMEOUT #指定 ssh 默认超时时间,默认为10s,也可在配置文件中修改
-u REMOTE_USER #远程用户,默认为 root 用户
-v #查看详细信息,同时支持-vvv,-vvvv可查看更详细信息
SSH无密码登录
#在本地机器上使用ssh-keygen产生公钥私钥对
$ssh-keygen

#用ssh-copy-id将公钥复制到远程机器中
$ssh-copy-id user@host
ssh-copy-id仅仅支持SSH运行在22端口的情况,如果端口不是22,不修改config文件,按如下方式也可以:
ssh-copy-id -i ~/.ssh/id_rsa.pub "-p 10022 user@server"
#如果报错
	-bash: ssh-copy-id: command not found
#需要安装一个包
	yum -y install openssh-clientsansible
ansible 命令常用模块
主机连通性测试
[root@server ~]# ansible web -m ping
192.168.37.122 | SUCCESS => {
    "changed": false,
    "ping": "pong"
}
192.168.37.133 | SUCCESS => {
    "changed": false,
    "ping": "pong"
}
command 模块
[root@server ~]# ansible web -m command -a 'ss -ntl'
192.168.37.122 | SUCCESS | rc=0 >>
State      Recv-Q Send-Q Local Address:Port               Peer Address:Port
LISTEN     0      128          *:111                      *:*
LISTEN     0      5      192.168.122.1:53                       *:*
LISTEN     0      128          *:22                       *:*
LISTEN     0      128    127.0.0.1:631                      *:*
LISTEN     0      128          *:23000                    *:*
LISTEN     0      100    127.0.0.1:25                       *:*
LISTEN     0      128         :::111                     :::*
LISTEN     0      128         :::22                      :::*
LISTEN     0      128        ::1:631                     :::*
LISTEN     0      100        ::1:25                      :::*

192.168.37.133 | SUCCESS | rc=0 >>
State      Recv-Q Send-Q Local Address:Port               Peer Address:Port
LISTEN     0      128          *:111                      *:*
LISTEN     0      128          *:22                       *:*
LISTEN     0      128    127.0.0.1:631                      *:*
LISTEN     0      128          *:23000                    *:*
LISTEN     0      100    127.0.0.1:25                       *:*
LISTEN     0      128         :::111                     :::*
LISTEN     0      128         :::22                      :::*
LISTEN     0      128        ::1:631                     :::*
LISTEN     0      100        ::1:25                      :::*
它不会通过shell进行处理,比如$HOME和操作如"<",">","|",";","&" 工作(需要使用(shell)模块实现这些功能)。注意,该命令不支持| 管道命令。
该模块下常用的几个命令:
chdir # 在执行命令之前,先切换到该目录
executable # 切换shell来执行命令,需要使用命令的绝对路径
free_form # 要执行的Linux指令,一般使用Ansible的-a参数代替。
creates # 一个文件名,当这个文件存在,则该命令不执行,可以
用来做判断
removes # 一个文件名,这个文件不存在,则该命令不执行
[root@server ~]# ansible web -m command -a 'chdir=/data/ ls'	#先切换到/data/ 目录,再执行“ls”命令
192.168.37.122 | SUCCESS | rc=0 >>
aaa.jpg
fastdfs
mogdata
tmp
web
wKgleloeYoCAMLtZAAAWEekAtkc497.jpg

192.168.37.133 | SUCCESS | rc=0 >>
aaa.jpg
fastdfs
mogdata
tmp
web
wKgleloeYoCAMLtZAAAWEekAtkc497.jpg
[root@server ~]# ansible web -m command -a 'creates=/data/aaa.jpg ls'		#如果/data/aaa.jpg存在,则不执行“ls”命令
192.168.37.122 | SUCCESS | rc=0 >>
skipped, since /data/aaa.jpg exists

192.168.37.133 | SUCCESS | rc=0 >>
skipped, since /data/aaa.jpg exists
[root@server ~]# ansible web -m command -a 'removes=/data/aaa.jpg cat /data/a'		#如果/data/aaa.jpg存在,则执行“cat /data/a”命令
192.168.37.122 | SUCCESS | rc=0 >>
hello

192.168.37.133 | SUCCESS | rc=0 >>
hello
shell命令 模块
shell模块可以在远程主机上调用shell解释器运行命令,支持shell的各种功能,例如管道等。
[root@server ~]# ansible web -m shell -a 'cat /etc/passwd |grep "keer"'
192.168.37.122 | SUCCESS | rc=0 >>
keer:x:10001:1000:keer:/home/keer:/bin/sh

192.168.37.133 | SUCCESS | rc=0 >>
keer:x:10001:10001::/home/keer:/bin/sh
copy 模块
这个模块用于将文件复制到远程主机,同时支持给定内容生成文件和修改权限等。
其相关选项如下:
src#被复制到远程主机的本地文件。可以是绝对路径,也可以是相对路径。如果路径是一个目录,则会递归复制,用法类似于"rsync"
content#用于替换"src",可以直接指定文件的值
dest#必选项,将源文件复制到的远程主机的绝对路径
backup#当文件内容发生改变后,在覆盖之前把源文件备份,备份文件包含时间信息
directory_mode#递归设定目录的权限,默认为系统默认权限
force#当目标主机包含该文件,但内容不同时,设为"yes",表示强制覆盖;设为"no",表示目标主机的目标位置不存在该文件才复制。默认为"yes"
others#所有的 file 模块中的选项可以在这里使用
复制文件
[root@server ~]# ansible web -m copy -a 'src=~/hello dest=/data/hello'
192.168.37.122 | SUCCESS => {
    "changed": true,
    "checksum": "22596363b3de40b06f981fb85d82312e8c0ed511",
    "dest": "/data/hello",
    "gid": 0,
    "group": "root",
    "md5sum": "6f5902ac237024bdd0c176cb93063dc4",
    "mode": "0644",
    "owner": "root",
    "size": 12,
    "src": "/root/.ansible/tmp/ansible-tmp-1512437093.55-228281064292921/source",
    "state": "file",
    "uid": 0
}
192.168.37.133 | SUCCESS => {
    "changed": true,
    "checksum": "22596363b3de40b06f981fb85d82312e8c0ed511",
    "dest": "/data/hello",
    "gid": 0,
    "group": "root",
    "md5sum": "6f5902ac237024bdd0c176cb93063dc4",
    "mode": "0644",
    "owner": "root",
    "size": 12,
    "src": "/root/.ansible/tmp/ansible-tmp-1512437093.74-44694985235189/source",
    "state": "file",
    "uid": 0
}
给定内容生成文件,并制定权限
[root@server ~]# ansible web -m copy -a 'content="I am keer\n" dest=/data/name mode=666'
192.168.37.122 | SUCCESS => {
    "changed": true,
    "checksum": "0421570938940ea784f9d8598dab87f07685b968",
    "dest": "/data/name",
    "gid": 0,
    "group": "root",
    "md5sum": "497fa8386590a5fc89090725b07f175c",
    "mode": "0666",
    "owner": "root",
    "size": 10,
    "src": "/root/.ansible/tmp/ansible-tmp-1512437327.37-199512601767687/source",
    "state": "file",
    "uid": 0
}
192.168.37.133 | SUCCESS => {
    "changed": true,
    "checksum": "0421570938940ea784f9d8598dab87f07685b968",
    "dest": "/data/name",
    "gid": 0,
    "group": "root",
    "md5sum": "497fa8386590a5fc89090725b07f175c",
    "mode": "0666",
    "owner": "root",
    "size": 10,
	    "src": "/root/.ansible/tmp/ansible-tmp-1512437327.55-218104039503110/source",
    "state": "file",
    "uid": 0
}
关于覆盖
[root@server ~]# ansible web -m copy -a 'content="I am keerya\n" backup=yes dest=/data/name mode=666'
192.168.37.122 | SUCCESS => {
    "backup_file": "/data/name.4394.2017-12-06@09:46:25~",
    "changed": true,
    "checksum": "064a68908ab9971ee85dbc08ea038387598e3778",
    "dest": "/data/name",
    "gid": 0,
    "group": "root",
    "md5sum": "8ca7c11385856155af52e560f608891c",
    "mode": "0666",
    "owner": "root",
    "size": 12,
    "src": "/root/.ansible/tmp/ansible-tmp-1512438383.78-228128616784888/source",
    "state": "file",
    "uid": 0
}
192.168.37.133 | SUCCESS => {
    "backup_file": "/data/name.5962.2017-12-05@09:46:24~",
    "changed": true,
    "checksum": "064a68908ab9971ee85dbc08ea038387598e3778",
    "dest": "/data/name",
    "gid": 0,
    "group": "root",
    "md5sum": "8ca7c11385856155af52e560f608891c",
    "mode": "0666",
    "owner": "root",
    "size": 12,
    "src": "/root/.ansible/tmp/ansible-tmp-1512438384.0-170718946740009/source",
    "state": "file",
    "uid": 0
}
file 模块
该模块主要用于设置文件的属性,比如创建文件、创建链接文件、删除文件等。
下面是一些常见的命令:
force#需要在两种情况下强制创建软链接,一种是源文件不存在,但之后会建立的情况下;另一种是目标软链接已存在,需要先取消之前的软链,然后创建新的软链,有两个选项:yes|no
group#定义文件/目录的属组。后面可以加上mode:定义文件/目录的权限
owner#定义文件/目录的属主。后面必须跟上path:定义文件/目录的路径
recurse#递归设置文件的属性,只对目录有效,后面跟上src:被链接的源文件路径,只应用于state=link的情况
dest#被链接到的路径,只应用于state=link的情况
state#状态,有以下选项:
directory:如果目录不存在,就创建目录
file:即使文件不存在,也不会被创建
link:创建软链接
hard:创建硬链接
touch:如果文件不存在,则会创建一个新的文件,如果文件或目录已存在,则更新其最后修改时间
absent:删除目录、文件或者取消链接文件
创建目录
[root@server ~]# ansible web -m file -a 'path=/data/app state=directory'
192.168.37.122 | SUCCESS => {
    "changed": true,
    "gid": 0,
    "group": "root",
    "mode": "0755",
    "owner": "root",
    "path": "/data/app",
    "size": 6,
    "state": "directory",
    "uid": 0
}
192.168.37.133 | SUCCESS => {
    "changed": true,
    "gid": 0,
    "group": "root",
    "mode": "0755",
    "owner": "root",
    "path": "/data/app",
    "size": 4096,
    "state": "directory",
    "uid": 0
}
创建链接文件
[root@server ~]# ansible web -m file -a 'path=/data/bbb.jpg src=aaa.jpg state=link'
192.168.37.122 | SUCCESS => {
    "changed": true,
    "dest": "/data/bbb.jpg",
    "gid": 0,
    "group": "root",
    "mode": "0777",
    "owner": "root",
    "size": 7,
    "src": "aaa.jpg",
    "state": "link",
    "uid": 0
}
192.168.37.133 | SUCCESS => {
    "changed": true,
    "dest": "/data/bbb.jpg",
    "gid": 0,
    "group": "root",
    "mode": "0777",
    "owner": "root",
    "size": 7,
    "src": "aaa.jpg",
    "state": "link",
    "uid": 0
}
删除文件
[root@server ~]# ansible web -m file -a 'path=/data/a state=absent'
192.168.37.122 | SUCCESS => {
    "changed": true,
    "path": "/data/a",
    "state": "absent"
}
192.168.37.133 | SUCCESS => {
    "changed": true,
    "path": "/data/a",
    "state": "absent"
}
fetch 模块
该模块用于从远程某主机获取(复制)文件到本地。
有两个选项:
dest:用来存放文件的目录
src:在远程拉取的文件,并且必须是一个file,不能是目录
[root@server ~]# ansible web -m fetch -a 'src=/data/hello dest=/data'
192.168.37.122 | SUCCESS => {
    "changed": true,
    "checksum": "22596363b3de40b06f981fb85d82312e8c0ed511",
    "dest": "/data/192.168.37.122/data/hello",
    "md5sum": "6f5902ac237024bdd0c176cb93063dc4",
    "remote_checksum": "22596363b3de40b06f981fb85d82312e8c0ed511",
    "remote_md5sum": null
}
192.168.37.133 | SUCCESS => {
    "changed": true,
    "checksum": "22596363b3de40b06f981fb85d82312e8c0ed511",
    "dest": "/data/192.168.37.133/data/hello",
    "md5sum": "6f5902ac237024bdd0c176cb93063dc4",
    "remote_checksum": "22596363b3de40b06f981fb85d82312e8c0ed511",
    "remote_md5sum": null
}
cron 模块
该模块适用于管理cron计划任务的。
其使用的语法跟我们的crontab文件中的语法一致,同时,可以指定以下选项:
day=#日应该运行的工作( 1-31, *, */2, )
hour=# 小时 ( 0-23, *, */2, )
minute=#分钟( 0-59, *, */2, )
month=# 月( 1-12, *, /2, )
weekday=# 周 ( 0-6 for Sunday-Saturday,, )
job=#指明运行的命令是什么
name=#定时任务描述
reboot# 任务在重启时运行,不建议使用,建议使用special_time
special_time#特殊的时间范围,参数:reboot(重启时),annually(每年),monthly(每月),weekly(每周),daily(每天),hourly(每小时)
state#指定状态,present表示添加定时任务,也是默认设置,absent表示删除定时任务
user# 以哪个用户的身份执行
添加计划任务
[root@server ~]# ansible web -m cron -a 'name="ntp update every 5 min" minute=*/5 job="/sbin/ntpdate 172.17.0.1 &> /dev/null"'
192.168.37.122 | SUCCESS => {
    "changed": true,
    "envs": [],
    "jobs": [
        "ntp update every 5 min"
    ]
}
192.168.37.133 | SUCCESS => {
    "changed": true,
    "envs": [],
    "jobs": [
        "ntp update every 5 min"
    ]
}
删除计划任务
查看一下现有的计划任务
[root@server ~]# ansible web -m shell -a 'crontab -l'
192.168.37.122 | SUCCESS | rc=0 >>
#Ansible: ntp update every 5 min
*/5 * * * * /sbin/ntpdate 172.17.0.1 &> /dev/null
#Ansible: df everyday
* 15 * * * df -lh >> /tmp/disk_total &> /dev/null

192.168.37.133 | SUCCESS | rc=0 >>
#Ansible: ntp update every 5 min
*/5 * * * * /sbin/ntpdate 172.17.0.1 &> /dev/null
#Ansible: df everyday
* 15 * * * df -lh >> /tmp/disk_total &> /dev/null
执行删除操作
[root@server ~]# ansible web -m cron -a 'name="df everyday" hour=15 job="df -lh >> /tmp/disk_total &> /dev/null" state=absent'
192.168.37.122 | SUCCESS => {
    "changed": true,
    "envs": [],
    "jobs": [
        "ntp update every 5 min"
    ]
}
192.168.37.133 | SUCCESS => {
    "changed": true,
    "envs": [],
    "jobs": [
        "ntp update every 5 min"
    ]
}
yum 模块
顾名思义,该模块主要用于软件的安装。
其选项如下:
name=#所安装的包的名称
state=#present--->安装,latest--->安装最新的,absent---> 卸载软件。
update_cache#强制更新yum的缓存
conf_file#指定远程yum安装时所依赖的配置文件(安装本地已有的包)。
disable_pgp_check#是否禁止GPG checking,只用于presentorlatest。
disablerepo#临时禁止使用yum库。 只用于安装或更新时。
enablerepo#临时使用的yum库。只用于安装或更新时。
[root@server ~]# ansible web -m yum -a 'name=htop state=present'
192.168.37.122 | SUCCESS => {
    "changed": true,
    "msg": "",
    "rc": 0,
    "results": [
        "Loaded plugins: fastestmirror, langpacks\nLoading mirror speeds from cached hostfile\nResolving Dependencies\n--> Running transaction check\n---> Package htop.x86_64 0:2.0.2-1.el7 will be installed\n--> Finished Dependency Resolution\n\nDependencies Resolved\n\n================================================================================\n Package         Arch              Version                Repository       Size\n================================================================================\nInstalling:\n htop            x86_64            2.0.2-1.el7            epel             98 k\n\nTransaction Summary\n================================================================================\nInstall  1 Package\n\nTotal download size: 98 k\nInstalled size: 207 k\nDownloading packages:\nRunning transaction check\nRunning transaction test\nTransaction test succeeded\nRunning transaction\n  Installing : htop-2.0.2-1.el7.x86_64                                      1/1 \n  Verifying  : htop-2.0.2-1.el7.x86_64                                      1/1 \n\nInstalled:\n  htop.x86_64 0:2.0.2-1.el7                                                     \n\nComplete!\n"
    ]
}
192.168.37.133 | SUCCESS => {
    "changed": true,
    "msg": "Warning: RPMDB altered outside of yum.\n** Found 3 pre-existing rpmdb problem(s), 'yum check' output follows:\nipa-client-4.4.0-12.el7.centos.x86_64 has installed conflicts freeipa-client: ipa-client-4.4.0-12.el7.centos.x86_64\nipa-client-common-4.4.0-12.el7.centos.noarch has installed conflicts freeipa-client-common: ipa-client-common-4.4.0-12.el7.centos.noarch\nipa-common-4.4.0-12.el7.centos.noarch has installed conflicts freeipa-common: ipa-common-4.4.0-12.el7.centos.noarch\n",
    "rc": 0,
    "results": [
        "Loaded plugins: fastestmirror, langpacks\nLoading mirror speeds from cached hostfile\nResolving Dependencies\n--> Running transaction check\n---> Package htop.x86_64 0:2.0.2-1.el7 will be installed\n--> Finished Dependency Resolution\n\nDependencies Resolved\n\n================================================================================\n Package         Arch              Version                Repository       Size\n================================================================================\nInstalling:\n htop            x86_64            2.0.2-1.el7            epel             98 k\n\nTransaction Summary\n================================================================================\nInstall  1 Package\n\nTotal download size: 98 k\nInstalled size: 207 k\nDownloading packages:\nRunning transaction check\nRunning transaction test\nTransaction test succeeded\nRunning transaction\n  Installing : htop-2.0.2-1.el7.x86_64                                      1/1 \n  Verifying  : htop-2.0.2-1.el7.x86_64                                      1/1 \n\nInstalled:\n  htop.x86_64 0:2.0.2-1.el7                                                     \n\nComplete!\n"
    ]
}
service 模块
该模块用于服务程序的管理。
其主要选项如下:
arguments#命令行提供额外的参数
enabled#设置开机启动。
name=#服务名称
runlevel#开机启动的级别,一般不用指定。
sleep#在重启服务的过程中,是否等待。如在服务关闭以后等待2秒再启动。(定义在剧本中。)
state#有四种状态,分别为:started--->启动服务,stopped--->停止服务,restarted--->重启服务,reloaded--->重载配置
开启服务并设置自启动
[root@server ~]# ansible web -m service -a 'name=nginx state=started enabled=true'
192.168.37.122 | SUCCESS => {
    "changed": true,
    "enabled": true,
    "name": "nginx",
    "state": "started",
    ……
}
192.168.37.133 | SUCCESS => {
    "changed": true,
    "enabled": true,
    "name": "nginx",
    "state": "started",
    ……
}
关闭服务
[root@server ~]# ansible web -m service -a 'name=nginx state=stopped'
192.168.37.122 | SUCCESS => {
    "changed": true,
    "name": "nginx",
    "state": "stopped",
	……
}
192.168.37.133 | SUCCESS => {
    "changed": true,
    "name": "nginx",
    "state": "stopped",
	……
}
user 模块
该模块主要是用来管理用户账号。
其主要选项如下:
comment# 用户的描述信息
createhome# 是否创建家目录
force# 在使用state=absent时, 行为与userdel –force一致.
group# 指定基本组
groups# 指定附加组,如果指定为(groups=)表示删除所有组
home# 指定用户家目录
move_home# 如果设置为home=时, 试图将用户主目录移动到指定的目录
name# 指定用户名
non_unique# 该选项允许改变非唯一的用户ID值
password# 指定用户密码
remove# 在使用state=absent时, 行为是与userdel –remove一致
shell# 指定默认shell
state# 设置帐号状态,不指定为创建,指定值为absent表示删除
system# 当创建一个用户,设置这个用户是系统用户。这个设置不能更改现有用户
uid# 指定用户的uid
添加一个用户并指定其 uid
[root@server ~]# ansible web -m user -a 'name=keer uid=11111'
192.168.37.122 | SUCCESS => {
    "changed": true,
    "comment": "",
    "createhome": true,
    "group": 11111,
    "home": "/home/keer",
    "name": "keer",
    "shell": "/bin/bash",
    "state": "present",
    "stderr": "useradd: warning: the home directory already exists.\nNot copying any file from skel directory into it.\nCreating mailbox file: File exists\n",
    "system": false,
    "uid": 11111
}
192.168.37.133 | SUCCESS => {
    "changed": true,
    "comment": "",
    "createhome": true,
    "group": 11111,
    "home": "/home/keer",
    "name": "keer",
    "shell": "/bin/bash",
    "state": "present",
    "stderr": "useradd: warning: the home directory already exists.\nNot copying any file from skel directory into it.\nCreating mailbox file: File exists\n",
    "system": false,
    "uid": 11111
}
删除用户
[root@server ~]# ansible web -m user -a 'name=keer state=absent'
192.168.37.122 | SUCCESS => {
    "changed": true,
    "force": false,
    "name": "keer",
    "remove": false,
    "state": "absent"
}
192.168.37.133 | SUCCESS => {
    "changed": true,
    "force": false,
    "name": "keer",
    "remove": false,
    "state": "absent"
}
group 模块
该模块主要用于添加或删除组。
常用的选项如下:
gid=#设置组的GID号
name=#指定组的名称
state=#指定组的状态,默认为创建,设置值为absent为删除
system=#设置值为yes,表示创建为系统组
创建组
[root@server ~]# ansible web -m group -a 'name=sanguo gid=12222'
192.168.37.122 | SUCCESS => {
    "changed": true,
    "gid": 12222,
    "name": "sanguo",
    "state": "present",
    "system": false
}
192.168.37.133 | SUCCESS => {
    "changed": true,
    "gid": 12222,
    "name": "sanguo",
    "state": "present",
    "system": false
}
删除组
[root@server ~]# ansible web -m group -a 'name=sanguo state=absent'
192.168.37.122 | SUCCESS => {
    "changed": true,
    "name": "sanguo",
    "state": "absent"
}
192.168.37.133 | SUCCESS => {
    "changed": true,
    "name": "sanguo",
    "state": "absent"
}
script 模块
#此目录为server端目录
[root@server ~]# ansible web -m script -a '/tmp/df.sh'
192.168.37.122 | SUCCESS => {
    "changed": true,
    "rc": 0,
    "stderr": "Shared connection to 192.168.37.122 closed.\r\n",
    "stdout": "",
    "stdout_lines": []
}
192.168.37.133 | SUCCESS => {
    "changed": true,
    "rc": 0,
    "stderr": "Shared connection to 192.168.37.133 closed.\r\n",
    "stdout": "",
    "stdout_lines": []
}
setup 模块
该模块主要用于收集信息,是通过调用facts组件来实现的。
facts组件是Ansible用于采集被管机器设备信息的一个功能,我们可以使用setup模块查机器的所有facts信息,可以使用filter来查看指定信息。整个facts信息被包装在一个JSON格式的数据结构中,ansible_facts是最上层的值。
facts就是变量,内建变量 。每个主机的各种信息,cpu颗数、内存大小等。会存在facts中的某个变量中。调用后返回很多对应主机的信息,在后面的操作中可以根据不同的信息来做不同的操作。如redhat系列用yum安装,而debian系列用apt来安装软件。
查看信息
[root@server ~]# ansible web -m setup -a 'filter="*mem*"'	#查看内存
192.168.37.122 | SUCCESS => {
    "ansible_facts": {
        "ansible_memfree_mb": 1116,
        "ansible_memory_mb": {
            "nocache": {
                "free": 1397,
                "used": 587
            },
            "real": {
                "free": 1116,
                "total": 1984,
                "used": 868
            },
            "swap": {
                "cached": 0,
                "free": 3813,
                "total": 3813,
                "used": 0
            }
        },
        "ansible_memtotal_mb": 1984
    },
    "changed": false
}
192.168.37.133 | SUCCESS => {
    "ansible_facts": {
        "ansible_memfree_mb": 1203,
        "ansible_memory_mb": {
            "nocache": {
                "free": 1470,
                "used": 353
            },
            "real": {
                "free": 1203,
                "total": 1823,
                "used": 620
            },
            "swap": {
                "cached": 0,
                "free": 3813,
                "total": 3813,
                "used": 0
            }
        },
        "ansible_memtotal_mb": 1823
    },
    "changed": false
}
保存信息
[root@server tmp]# ansible web -m setup -a 'filter="*mem*"' --tree /tmp/facts
192.168.37.122 | SUCCESS => {
    "ansible_facts": {
        "ansible_memfree_mb": 1115,
        "ansible_memory_mb": {
            "nocache": {
                "free": 1396,
                "used": 588
            },
            "real": {
                "free": 1115,
                "total": 1984,
                "used": 869
            },
            "swap": {
                "cached": 0,
                "free": 3813,
                "total": 3813,
                "used": 0
            }
        },
        "ansible_memtotal_mb": 1984
    },
    "changed": false
}
192.168.37.133 | SUCCESS => {
    "ansible_facts": {
        "ansible_memfree_mb": 1199,
        "ansible_memory_mb": {
            "nocache": {
                "free": 1467,
                "used": 356
            },
            "real": {
                "free": 1199,
                "total": 1823,
                "used": 624
            },
            "swap": {
                "cached": 0,
                "free": 3813,
                "total": 3813,
                "used": 0
            }
        },
        "ansible_memtotal_mb": 1823
    },
    "changed": false
}
ansible-playbook
# ansible-playbook test.yml
  ---
  - name: test playbook        #:后面要加空格
    hosts: all                 #指定主机或主机组
    gather_facts: no           #用于收集信息
  	remote_user: root          #指定在被管理的主机上执行任务的用户
  	become: yes	               #以指定用户运行,默认为root
  	become_user: mysql         #指定sudo用户为mysql

    tasks:
      - name: shutdown
        command: /sbin/shutdown -h now
        when: ansible_distrbution == 'CentOS'   #条件判断
---                             #标记文件的开始
- hosts: webservers             #指定该playbook在哪个服务器上执行
  vars:                         #表示下面是定义的变量,
    http_port: 80               #变量的形式,key: value,这里http_port是变量名,80是值
    max_clients: 200
  vars_files:                #这里使用了vars_files来引入变量文件
    - vars.yml
  remote_user: root             #指定远程的用户名,这里缩进和vars保持了一致,说明变量的代码块已经结束。
  tasks:                        #下面构成playbook的tasks,每个task都有 - name: 开始,name指定该任务的名称。
  - name: ensure apache is at the latest version  #指定该任务的名称。
    yum: pkg=httpd state=latest                   #yum说明要是用的模板名称,后面指定对应的参数,这两行结合起来就相当于一个shell命令。
  - name: write the apache config file            #每个task之间可以使用空行来做区分。
    template: src=/srv/httpd.j2 dest=/etc/httpd.conf#需要说明的是缩进的意义和python中缩进的意义是一样,是来区分代码块的。
实例
[root@test2 playbook]# cat test.yml
---
 - hosts: all
   remote_user: root
   gather_facts: no             #不收集对应主机的信息,这样运行会快点。
   tasks:
     - name: check the mysql stauts
       service: name=mysqld state=running


[root@test2 playbook]# ansible-playbook test.yml

PLAY [all] ********************************************************************

TASK: [check the mysql stauts] ************************************************
ok: [10.0.102.200]
ok: [10.0.102.162]
ok: [10.0.102.212]

PLAY RECAP ********************************************************************
10.0.102.162               : ok=1    changed=0    unreachable=0    failed=0
10.0.102.200               : ok=1    changed=0    unreachable=0    failed=0
10.0.102.212               : ok=1    changed=0    unreachable=0    failed=0
[root@test2 playbook]# ansible-playbook test.yml "test_var=test" -v #加上-v选项,会显示详细的信息
限定主机范围执行
--limit后加执行hosts组
[root@test2 playbook]# ansible-playbook test.yml --limit dbservers

PLAY [all] ********************************************************************

TASK: [check the mysql stauts] ************************************************
ok: [10.0.102.162]

PLAY RECAP ********************************************************************
10.0.102.162               : ok=1    changed=0    unreachable=0    failed=0

[root@test2 playbook]#
查看当前playbook在哪些主机上执行
[root@test2 playbook]# ansible-playbook test.yml --list-hosts

playbook: test.yml

  play #1 (all): host count=3
    10.0.102.162
    10.0.102.212
    10.0.102.200
ansible-playbook的一些其他技巧
- --inventory=path,指定inventory文件,默认是在/etc/ansible/hosts下面。
- --verbose,显示详细的输出,使用-vvvv显示精确到每分钟的输出。
- --extra-vars=vars:定义在playbook使用的变量。
- --forks:指定并发的线程数,默认是5.
- --connection=type:指定远程连接主机的方式,默认是ssh,设置为local时,则只在本地执行playbook、
- --check:检测模式,playbook中定义的所有任务将在每台主机上检测,但是并不执行。
巧用主机变量和组变量
有时候在执行ansbile任务时,可能需要从一台远程主机上获取另一台远程主机的变量信息,这时候可以使用hostvars变量,这个变量包含了指定主机上所定义的所有变量。
譬如,若是想获取host1上变量admin_user的内容,在任意主机上直接上使用下面代码即可。
{{ hostvars['host1']['admin_user']}}
ansible提供了一些非常有用的内置变量,几个常用的如下:
- grorps:包含了所有hosts文件里的主机组的一个列表。
- group_names: 包含了当前主机所在的所有主机组名的一个列表。
- inventory_hostname: 通过hosts文件定义的主机名。(与ansible_home意义不同)
- inventory_hostname_short:变量inventory_hostname的第一部分。譬如inventory_hostname的值为books.ansible.com,那么inventory_hostname_short的值就是books。
- play_hosts: 将执行当前任务的所有主机
注册变量
注册变量,其实就是将操作结果,包括标准输出和标准错误输出,保存到变量中,然后再根据这个变量的内容来决定下一步的操作,在这个过程中用来保存操作结果的变量就叫注册变量。
[root@test2 playbook]# cat test.yml
---
 - hosts: all
   remote_user: root
   gather_facts: no
   tasks:
     - name: test the register variables
       shell: uptime
       register: results                              #使用关键字register声明注册变量,上面uptime命令产生的结果,存入到results中。结果是字典形式。

     - name: print the register result
       debug: msg="{{ results.stdout }}"              #使用debug模块,打印出上面命令的输出结果。

高阶变量
对于普通变量,在ansible命令行设定的,在hosts文件中定义的,或者在playbook中定义的等,这些都是普通变量,在引用时,可以使用使用{{ variable }}的形式。ansible是用python语言写的,因此也支持一种叫做列表的变量,形式如下:
[root@test2 playbook]# cat test.yml
---
 - hosts: all
   remote_user: root
   gather_facts: no
   vars:
      var_list:               #注意形式,定义了var_list列表,取值方法和列表取值一样,不推荐使用jinja2的方法取值。
          - one
          - two
          - three
   tasks:
     - name: test the list variables
       shell: echo {{ var_list[0] }}            #取列表中的第一个字,也就是one
       register: results

     - name: print the register result
       debug: msg="{{ results.stdout }}"
任务委托
我们有的时候有这种需求,在运行一个playbook的时候里面的task是分配到一组服务器中去分别执行的,但是如果我们想要在其中某一个task执行的时候是在另外一个不属于这个组里面的机器中去执行。这个时候就需要用到ansible的委派功能。 delegate_to
查看MySQL是否在运行状态,因此在检查之前首先关掉162上的mysql服务。【为了方便查看状态】
[root@test2 playbook]# cat test.yml
---
 - hosts: all
   remote_user: root
   tasks:
     - name: stop the db server
       service: name=mysqld state=stopped
       delegate_to: 10.0.102.162                  #这里使用了委托,仅关闭162这台服务器上,这个play仅在162这台服务器上执行。

     - name: check mysql status
       service: name=mysqld state=running
任务暂停
- name: wait for webserver to start
   local_action:
        module: wait_for
        host: webserver1
        port: 80
        delay: 10
        timeout: 300
        state: startted

#这个实例中,这个任务将会每10s检查一次主机webserver1上面的80端口是否开启,如果超过了300s,80端口仍未开启,将会返回失败信息。
交互式提示
在少数情况下,ansible任务运行的过程中需要用户输入一些数据,这些数据要么比较秘密不方便,或者数据是动态的,不同的用户有不同的需求,比如输入用户自己的账户和密码或者输入不同的版本号会触发不同的后续操作等。ansible的vars_prompt关键字就是用来处理上述这种与用户交互的情况的。下面是一个简单的实例。
[root@server4 ~]# cat prompt.yml
---
- hosts: testB
  remote_user: root
  vars_prompt:
    - name: "your_name"   # #存储数据的变量名
      prompt: "what is your name"   ##手工输入数据
    - name: "your_age"
      prompt: "how old are you"
  tasks:
  - name: output vars
    debug:
      msg: yourname is {{your_name}},you are {{your_age}} years old.

# 测试:
[root@server4 ~]# ansible-playbook prompt.yml   # 没有回显
what is your name:
how old are you:

PLAY [testB] *******************************************************************

TASK [Gathering Facts] *********************************************************
ok: [server3]

TASK [output vars] *************************************************************
ok: [server3] => {
    "msg": "yourname is zjy,you are 13 years old."
}

PLAY RECAP *********************************************************************
server3                    : ok=2    changed=0    unreachable=0    failed=0    skipped=0    rescued=0    ignored=0
手动输入的变量值,在后面的play中仍然可以用{{ var_name }}的形式调用。
关键字vars_prompt几个常用的选项总结如下:
- private: 默认值为yes,表示用户输入的值在命令行不可见;将值设为no时,用户输入可见。
- default:为变量设置默认值,以节省用户输入时间。
- confirm:特别适合输入密码的情况,如果将其设置为yes,则会要求用户输入两次,以增加输入的安全性。
block


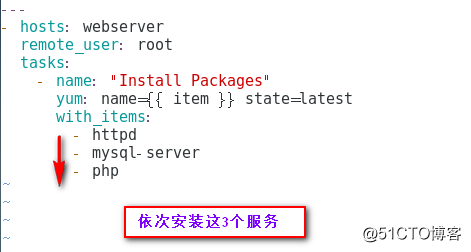
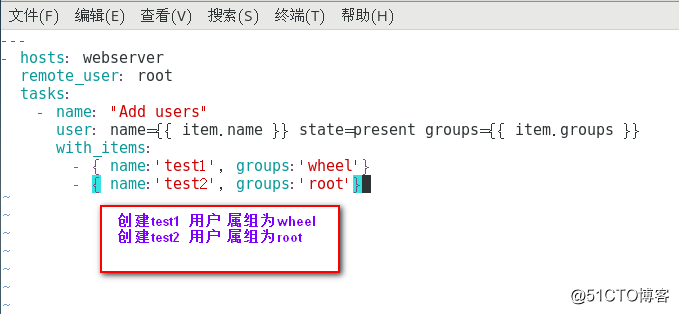
迭代 with_items
Templates (待补充)
(待补充)
handlers
在一个tasks真正被执行了以后,才会通过notify调用handlers
[root@server4 ~]# vim handlers_test.yml

---
- hosts: testB
  remote_user: root
  tasks:
  - name: Modify the configuration
    lineinfile:
      path=/etc/httpd/conf/httpd.conf
      regexp="Listen 80"
      line="Listen 8088"
      backrefs=yes
      backup=yes
    notify:
      restart nginx

  handlers:
  - name: restart httpd
    service:
      name=httpd
      state=restarted
meta模块
在执行完某些task以后立即执行对应的handler,则需要使用meta模块
[root@server4 ~]# vim mkdir2.yml
[root@server4 ~]# cat mkdir2.yml
---
- hosts: testB
  remote_user: root
  tasks:
  - name: task1
    file: path=/testdir/testfile
          state=touch
    notify: handler1
  - name: task2
    file: path=/testdir/testfile2
          state=touch
    notify: handler2

  - meta: flush_handlers

  - name: task3
    file: path=/testdir/testfile3
          state=touch
    notify: handler3

  handlers:
  - name: handler1
    file: path=/testdir/ht1
          state=touch
  - name: handler2
    file: path=/testdir/ht2
          state=touch
  - name: handler3
    file: path=/testdir/ht3
          state=touch
一个task中调用多个handler
如果想要一次notify多个handler,则需要借助另一个关键字,它就是’listen’,你可以把listen理解成”组名”,我们可以把多个handler分成”组”,当我们需要一次性notify多个handler时,只要将多个handler分为”一组”,使用相同的”组名”即可
[root@server4 ~]# vim mkdir3.yml
[root@server4 ~]# cat mkdir3.yml
---
- hosts: testB
  remote_user: root
  tasks:
  - name: task1
    file: path=/testdir/testfile
          state=touch
    notify: handler group1

  handlers:
  - name: handler1
    listen: handler group1
    file: path=/testdir/ht1
          state=touch
  - name: handler2
    listen: handler group1
    file: path=/testdir/ht2
          state=touch
ansible-vault
管理加密/解密yml(palybook)文件工具
ansible-vault [create(创建新)|
decrypt(解密)
edit(编辑加密文件
encrypt(加密)
rekey(修改口令)
view(查看)]
[options(选项)] [vaultfile.yml]
#加密
ansible-vault encrypt hello.yml
#解密
ansible-vault decrypt hello.yml
#查看加密文件
ansible-vault view hello.yml
#编辑加密文件
ansible-vault edit hello.yml
#更改旧密码
ansible-vault rekey hello.yml
#创建加密文件
ansible-vault create hello.yml
#执行加密文件
ansible-playbook hello.yml --ask-vault-pass
例子1 ping
ansible test -m ping

文件目录

hosts主机
[test]
host1  ansible_ssh_host=47.103.222.73
host2  ansible_ssh_host=124.223.188.39

[test:vars]
ansible_ssh_user:root
ansible.cfg配置文件
[defaults]
inventory= /home/ansible/test_run/inventory/hosts


【推荐】国内首个AI IDE,深度理解中文开发场景,立即下载体验Trae
【推荐】编程新体验,更懂你的AI,立即体验豆包MarsCode编程助手
【推荐】抖音旗下AI助手豆包,你的智能百科全书,全免费不限次数
【推荐】轻量又高性能的 SSH 工具 IShell:AI 加持,快人一步
· TypeScript + Deepseek 打造卜卦网站:技术与玄学的结合
· 阿里巴巴 QwQ-32B真的超越了 DeepSeek R-1吗?
· 【译】Visual Studio 中新的强大生产力特性
· 【设计模式】告别冗长if-else语句:使用策略模式优化代码结构
· AI与.NET技术实操系列(六):基于图像分类模型对图像进行分类