CA证书和TLS介绍
数字签名
用自己的私钥给数据加密就叫数字签名
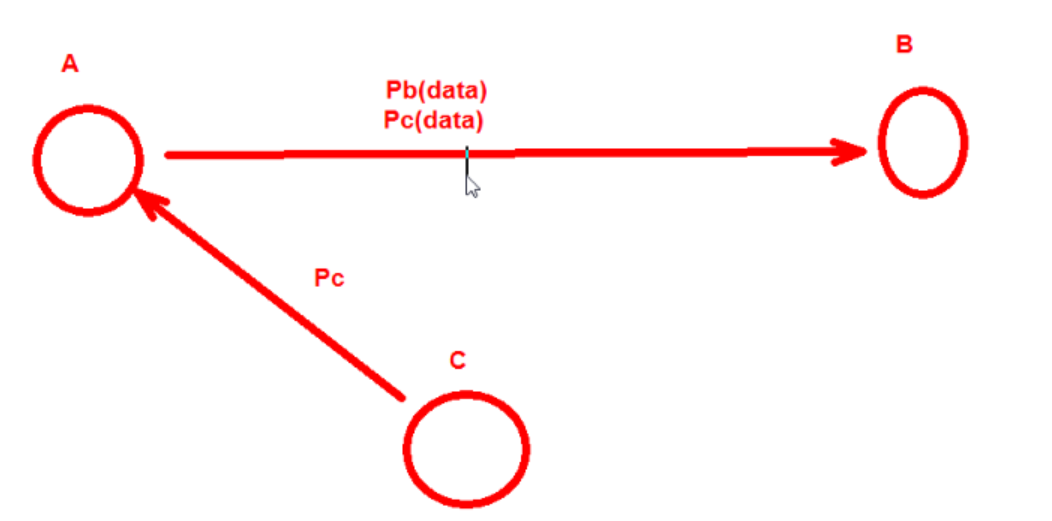
公钥传输威胁
在A和B的通信中,C可以把自己的公钥发给A,让A把C的公钥当成B的公钥,这样的话.B拿到加密数据反而无法解密,而C却可以解密出数据.从而实现C截获AB之间的数据
所以在两者的通信中必须要对公钥的来源进行确认

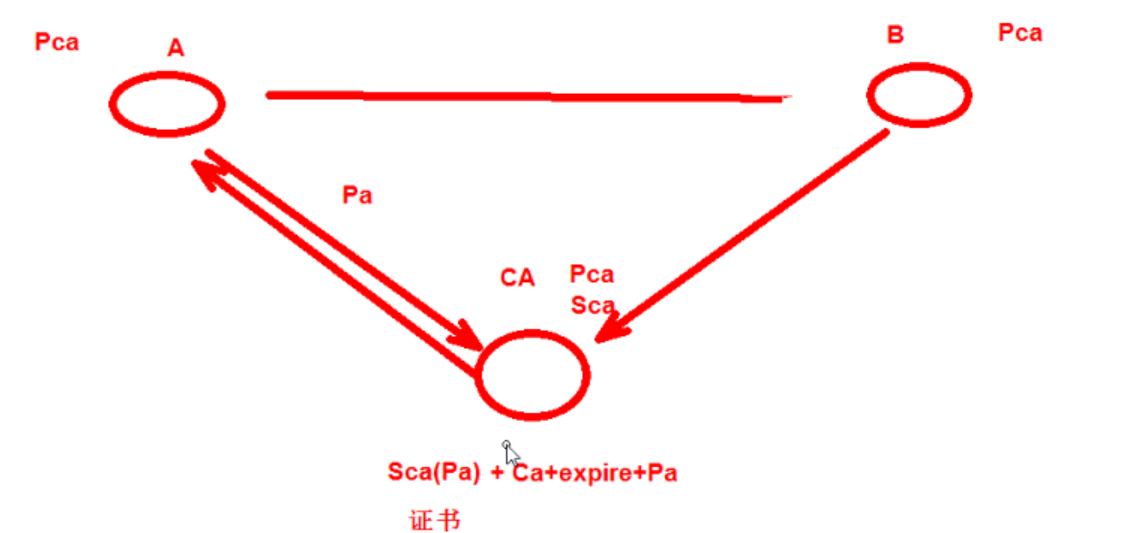
A和B如果想安全交换公钥,就必须通过CA(证书颁发机构) 证书的通信过程 A和B首先都内置了CA的公钥
根CA的证书是自己给自己签名的(自签名)

CA和证书
PKI: Public Key Infrastructure
签证机构:CA(Certificate Authority)
注册机构:RA
证书吊销列表:CRL
证书存取库: X.509:定义了证书的结构以及认证协议标准
版本号 序列号 签名算法 颁发者 有效期限 主体名称 主体公钥 CRL分发点 扩展信息 发行者签名
SSL
SSL(Secure Socket Layer)和TLS(Transport Layer Security )本身是一个东西
实现功能: 机密性 认证 完整性 重放保护(正确同样的数据不能重复发送)
两阶段协议,分为握手阶段和应用阶段
握手阶段(协商阶段):
客户端和服务器端认证对方身份(依赖于PKI体系,利用数字证书进行 身份认证),并协商通信中使用的安全参数、密码套件以及主密钥.
后续通信使用的所有密钥都是 通过MasterSecret生成。
应用阶段:
在握手阶段完成后进入,在应用阶段通信双方使用握手阶段协商好的密钥进行安全通信
taobao 证书 https的通信过程
taobao 证书内容包含 SCA(Ptaobao) CA密钥加密签名过的taobao公钥 + CA证书描述+过期时间+证书其它信息 taobao网站把证书发给客户端
客户端由于信任CA并且拿到了CA的公钥,就可以解密SCA(Ptaobao) 获得taobao的公钥 Ptaobao
客户端(浏览器)会在本地生成一个对称密钥(key)用taobao的公钥加密发送给taobao Ptaobao(key) sendto taobao
taobao通过自己的私钥解密得到客户端发送过来的key Staobao(Ptaobao(key)) = key 这样在客户端和服务端都存在相同的对称密钥key
客户端和服务端就可以通过key(data)对大量的网页数据进行对称加密,实现通信双方的安全通信
OpenSSL 开源实现证书申请和颁发
base64编码 是6bit编码 包含字符a-z,A-Z,/,+ 总共64个符号
生成私钥
openssl genrsa -out /PATH/TO/PRIVATEKEY.FILE NUM_BITS (umask 077; openssl genrsa –out test.key –des 2048) -des表示对密钥对称称加密
openssl rsa -in test.key –out test2.key 将加密key解密
从私钥中提取出公钥
openssl rsa -in PRIVATEKEYFILE –pubout –out PUBLICKEYFILE openssl rsa –in test.key –pubout –out test.key.pub
实验:向CA申请证书
建立Root CA
1. 创建CA重要的配置文件openssl的配置文件:/etc/pki/tls/openssl.cnf
2. 默认CA的工作目录在 /etc/pki/CA

  1 [root@centos7 ~]# cd /etc/pki/CA
  2 #创建CA服务器的私钥
  3 [root@centos7 CA]# (umask 077;openssl genrsa -out private/cakey.pem 4096)
  4 Generating RSA private key, 4096 bit long modulus
  5 ...................................................++
  6 ..............................................................................................................................................................................................................................................................................................++
  7 e is 65537 (0x10001)
  8 [root@centos7 CA]# ls private
  9 cakey.pem
 10
 11 #根CA给自己的私钥签名证书
 12 [root@centos7 CA]# openssl req -new -x509 -key private/cakey.pem -out cacert.pem -days 3650
 13 You are about to be asked to enter information that will be incorporated
 14 into your certificate request.
 15 What you are about to enter is what is called a Distinguished Name or a DN.
 16 There are quite a few fields but you can leave some blank
 17 For some fields there will be a default value,
 18 If you enter '.', the field will be left blank.
 19 -----
 20 Country Name (2 letter code) [XX]:CN
 21 State or Province Name (full name) []:beijing
 22 Locality Name (eg, city) [Default City]:beijing
 23 Organization Name (eg, company) [Default Company Ltd]:mage
 24 Organizational Unit Name (eg, section) []:M30
 25 Common Name (eg, your name or your server's hostname) []:www.yxh.com
 26 Email Address []:
 27 #以可读的文本格式显示证书内容
 28 [root@centos7 CA]# openssl x509 -in cacert.pem -noout -text
 29 Certificate:
 30     Data:
 31         Version: 3 (0x2)
 32         Serial Number:
 33             f9:72:0f:e1:6c:80:e3:aa
 34     Signature Algorithm: sha256WithRSAEncryption
 35         Issuer: C=CN, ST=beijing, L=beijing, O=mage, OU=M30, CN=www.yxh.com
 36         Validity
 37             Not Before: May 19 08:58:14 2018 GMT
 38             Not After : May 16 08:58:14 2028 GMT
 39         Subject: C=CN, ST=beijing, L=beijing, O=mage, OU=M30, CN=www.yxh.com
 40         Subject Public Key Info:
 41             Public Key Algorithm: rsaEncryption
 42                 Public-Key: (4096 bit)
 43                 Modulus:
 44                     00:e4:70:ef:fe:9a:43:87:41:ca:05:3d:a6:98:df:
 45                     89:19:64:ac:fb:24:04:42:be:bc:87:7a:e9:b5:be:
 46                     9d:21:40:cf:c7:08:a1:ab:8e:03:92:29:e9:50:ed:
 47                     dd:8d:06:3c:5f:fa:23:9f:96:04:76:b9:be:56:43:
 48                     58:f8:43:db:24:cf:79:87:be:cc:bd:c0:af:41:04:
 49                     d4:e1:6b:78:fb:b1:74:8e:25:93:22:9e:f1:22:98:
 50                     97:7e:dd:dc:af:45:97:93:16:93:8a:89:5c:b0:00:
 51                     62:a5:2f:72:ec:54:aa:3a:ec:0b:24:72:34:4a:c0:
 52                     70:ab:02:d8:36:53:93:d1:cc:98:43:a9:a8:f2:3b:
 53                     b7:fb:be:44:64:9d:c6:bb:7d:16:b5:39:d1:1f:6d:
 54                     e2:89:c7:9f:b7:e6:10:87:37:01:41:25:af:61:b5:
 55                     7c:93:3c:bd:75:cb:46:ff:0e:e2:58:92:aa:25:2b:
 56                     06:b1:25:27:e5:7d:76:02:d8:c5:63:db:d0:e6:ab:
 57                     ef:ce:69:37:7e:eb:b1:f3:59:05:e1:bf:47:b7:d1:
 58                     4c:59:45:c9:d6:f0:35:dd:95:b0:c2:69:5b:7e:83:
 59                     3e:64:8e:66:28:ba:06:f4:99:30:00:4d:76:72:a3:
 60                     16:d7:7e:f1:9e:9d:fe:15:88:d0:b8:e4:8f:cd:56:
 61                     c3:89:5c:cf:40:a5:2b:9d:38:56:e2:30:09:85:22:
 62                     b2:f6:58:20:c2:c0:65:b9:0e:61:f0:b3:a2:94:ea:
 63                     57:72:77:90:26:7d:90:11:98:18:52:ab:dc:a1:78:
 64                     68:0d:f0:d8:6b:01:c5:5d:e5:ca:a5:36:68:81:ba:
 65                     ca:4c:b9:98:fd:f4:54:e3:eb:7f:3d:30:50:34:a6:
 66                     5e:38:1c:82:93:9b:91:76:34:ab:df:e8:95:dd:2e:
 67                     d0:c6:98:c5:77:a6:67:13:aa:96:3f:7c:70:7e:54:
 68                     50:77:cc:5c:d0:70:34:93:90:4a:83:25:d8:1e:1d:
 69                     6c:17:3c:84:20:df:ee:78:28:e7:63:7f:d5:44:9c:
 70                     c3:cb:ec:78:a7:2f:05:dc:e7:e9:20:32:34:38:66:
 71                     fc:1f:54:79:64:bc:92:e9:59:c5:bf:35:4c:aa:1f:
 72                     93:7a:e7:8c:29:b2:58:03:bf:4f:19:36:da:2f:bd:
 73                     00:e0:0e:cd:32:09:0b:c7:1d:6c:12:19:b4:fa:4c:
 74                     a2:b0:24:be:d3:1e:47:55:17:c3:14:ce:cd:af:01:
 75                     ca:d8:48:44:12:40:99:f2:9f:87:1e:ea:2f:cb:0f:
 76                     a7:0d:b7:99:d5:e1:3b:68:50:00:80:6f:59:7c:19:
 77                     96:72:51:bb:9d:6b:02:01:c1:7b:88:d9:20:57:64:
 78                     1f:86:95
 79                 Exponent: 65537 (0x10001)
 80         X509v3 extensions:
 81             X509v3 Subject Key Identifier:
 82                 C6:80:BB:D0:7D:12:F4:EF:1A:69:CD:92:D3:F7:E1:3D:8A:27:CD:76
 83             X509v3 Authority Key Identifier:
 84                 keyid:C6:80:BB:D0:7D:12:F4:EF:1A:69:CD:92:D3:F7:E1:3D:8A:27:CD:76
 85
 86             X509v3 Basic Constraints:
 87                 CA:TRUE
 88     Signature Algorithm: sha256WithRSAEncryption
 89          a0:df:1a:b4:22:69:a7:8f:92:8b:c0:67:91:66:df:5f:0f:47:
 90          2d:2e:6a:fd:d7:21:48:29:46:e7:7e:9b:6a:46:32:04:39:c2:
 91          fb:06:2e:eb:d2:f5:25:16:f7:03:f9:d1:e5:d1:d8:1d:96:8e:
 92          22:fc:37:d7:22:97:36:4c:2c:f2:8f:09:24:5b:61:a2:29:13:
 93          48:21:c9:db:1e:1e:24:18:d0:02:2f:ff:35:fd:21:4c:b6:af:
 94          36:33:8a:d0:2f:22:75:f4:89:8b:99:4f:32:69:55:35:13:35:
 95          00:d4:f3:82:44:5f:25:a8:82:1c:51:01:31:e2:7b:c0:72:0a:
 96          5d:a8:a8:37:30:a7:64:e5:2b:86:e4:92:57:59:ae:0b:a9:7b:
 97          fa:be:64:be:7a:d4:f1:6a:1d:9e:07:d4:79:7d:9c:d9:c5:98:
 98          ec:fc:d0:0d:55:45:41:81:c9:5a:d1:0e:ba:f1:14:c1:43:ea:
 99          26:62:a3:c2:8f:fe:54:fe:03:9d:8c:ca:96:48:66:9f:83:88:
100          c3:e7:d8:6b:e9:43:34:3c:77:b6:2f:97:54:65:39:74:09:a5:
101          a3:c6:d1:aa:52:7b:d3:91:44:32:ee:1a:45:40:ff:1e:46:b9:
102          47:06:68:6e:91:a6:88:77:4a:df:07:bd:81:ae:6e:a0:2d:67:
103          39:15:b6:9b:28:e3:0a:34:bf:0d:f0:01:af:8a:f2:2b:8b:3f:
104          12:a7:8b:cf:c4:eb:c5:bc:58:58:10:6a:84:85:26:01:39:9a:
105          fa:aa:1a:dc:83:46:61:1b:12:90:ad:5a:d7:67:78:68:a9:8c:
106          72:71:f0:64:b7:bf:08:85:9b:71:4a:3f:00:94:43:a7:73:3b:
107          c3:95:da:07:1f:8b:ca:f4:d7:a4:af:34:95:42:a5:e0:46:e8:
108          18:22:29:c4:b7:b0:a0:9a:7b:e8:e5:b1:11:67:07:f3:7d:bd:
109          f7:2f:5f:65:5e:32:5d:0c:65:a1:70:ad:50:6c:02:5c:a5:e6:
110          0c:41:c9:26:9d:95:c4:1b:df:26:a2:43:4f:b6:e0:98:6f:ba:
111          cb:83:e6:1c:00:ba:d6:48:cc:a4:2e:8d:cc:6c:f4:9d:5a:ee:
112          62:0e:57:e2:2e:1f:8c:6c:cd:a3:2d:63:4b:0f:6b:11:bd:18:
113          47:23:0b:b7:7c:fc:d5:45:01:6e:72:a0:7c:43:29:6b:ef:dd:
114          33:d1:39:2a:14:cd:c3:2e:91:4f:78:3d:e2:08:a5:dd:bd:00:
115          aa:18:19:48:03:3a:a1:9d:1c:e7:c3:87:51:a4:42:7a:fd:7f:
116          90:40:c6:bb:ba:8e:22:be:63:5a:10:bb:a4:fd:ef:21:4f:d1:
117          84:a9:fb:2e:61:cc:b0:76
118
119 [root@centos7 CA]# openssl x509 -in cacert.pem -noout -issuer
120 issuer= /C=CN/ST=beijing/L=beijing/O=mage/OU=M30/CN=www.yxh.com
用户或者服务器申请证书

1.生成私钥文件
[root@yxh6 data]# (umask 077;openssl genrsa -out app.key 1024)
Generating RSA private key, 1024 bit long modulus
..............................++++++
.....................++++++
e is 65537 (0x10001)
[root@yxh6 data]# ls
app.key

2.利用私钥文件生成申请文件
[root@yxh6 data]# openssl req -new -key app.key -out app.csr
You are about to be asked to enter information that will be incorporated
into your certificate request.
What you are about to enter is what is called a Distinguished Name or a DN.
There are quite a few fields but you can leave some blank
For some fields there will be a default value,
If you enter '.', the field will be left blank.
-----
Country Name (2 letter code) [XX]:CN
State or Province Name (full name) []:beijing
Locality Name (eg, city) [Default City]:beijing
Organization Name (eg, company) [Default Company Ltd]:mage
Organizational Unit Name (eg, section) []:M30
Common Name (eg, your name or your server's hostname) []:www.yxh.com
Email Address []:

Please enter the following 'extra' attributes
to be sent with your certificate request
A challenge password []:
An optional company name []:
[root@yxh6 data]# ls
app.csr  app.key

3.将申请文件发送给CA
  scp app.csr 192.168.33.130:/etc/pki/CA

4.CA颁发证书
   回到CA服务器执行颁发证书
   touch index.txt
   echo 0F > serial
   [root@centos7 CA]# openssl ca -in app.csr -out certs/app.crt -days 100
Using configuration from /etc/pki/tls/openssl.cnf
Check that the request matches the signature
Signature ok
Certificate Details:
        Serial Number: 15 (0xf)
        Validity
            Not Before: May 19 09:35:37 2018 GMT
            Not After : Aug 27 09:35:37 2018 GMT
        Subject:
            countryName               = CN
            stateOrProvinceName       = beijing
            organizationName          = mage
            organizationalUnitName    = M30
            commonName                = www.yxh.com
        X509v3 extensions:
            X509v3 Basic Constraints:
                CA:FALSE
            Netscape Comment:
                OpenSSL Generated Certificate
            X509v3 Subject Key Identifier:
                71:DC:D4:AE:8A:5A:16:A4:13:62:D7:3A:C9:C7:DD:A7:9C:95:B0:4F
            X509v3 Authority Key Identifier:
                keyid:C6:80:BB:D0:7D:12:F4:EF:1A:69:CD:92:D3:F7:E1:3D:8A:27:CD:76

Certificate is to be certified until Aug 27 09:35:37 2018 GMT (100 days)
Sign the certificate? [y/n]:y


1 out of 1 certificate requests certified, commit? [y/n]y
Write out database with 1 new entries
Data Base Updated
[root@centos7 certs]# ls
app.crt

5.证书发送客户端
  scp app.csr 192.168.33.129:/data
  客户端可以拿着这个证书在应用程序中使用
windows下查看生成的证书信息和安装证书
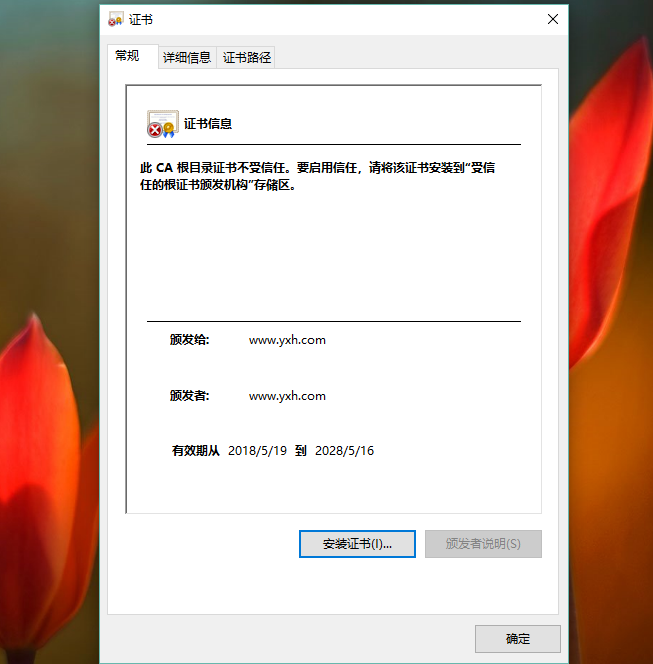
可以把证书cacert.pem下载到windows中进行可视化查看证书信息
需要.pem(cacert.pem)后缀名改成windows能识别的.cer(cacert.cer)或者.crt 点击安装证书可以把此证书安装到可信任的证书路径中

证书管理
查看证书中的信息:
openssl x509 -in /PATH/FROM/CERT_FILE -noout -text|issuer|subject|serial|dates
openssl ca -status SERIAL 查看指定编号的证书状态
吊销证书
在客户端获取要吊销的证书的serial
openssl x509 -in /PATH/FROM/CERT_FILE -noout -serial -subject
在CA上,根据客户提交的serial与subject信息,对比检验是否与index.txt文件中的信息一致,吊 销证书:
openssl ca -revoke /etc/pki/CA/newcerts/SERIAL.pem
指定第一个吊销证书的编号,注意:第一次更新证书吊销列表前,才需要执行 echo 01 > /etc/pki/CA/crlnumber
更新证书吊销列表 openssl ca -gencrl -out /etc/pki/CA/crl.pem
查看crl文件: openssl crl -in /etc/pki/CA/crl.pem -noout -text
SSH安全服务
ssh: secure shell, protocol, 22/tcp, 安全的远程登录
两种方式的用户登录认证:
1.基于password
1.客户端向服务端发送SSH请求
2.服务端收到请求,发送公钥给客户端
3.客户端输入用户名和密码通过公钥加密回传给服务端
4.服务端通过私钥解密得到用户名和密码和本地的用户名密码进行验证匹配
2.基于key
1.首先在客户端生成一对密钥对
2.客户端将公钥拷贝给服务端并重命名为 authorized_keys
3.客户端向服务端发送一个连接请求,信息包括ip,用户名
4.服务端得到客户端消息后,会到authorized_keys查找是否有对应信息并且随机生成一个字符串
5.服务端把随机生成的字符串用客户端公钥加密发送给客户端
6.客户端接收到加密字符串后用自己的私钥对字符串进行解密,并且把解密后的字符串发送给服务端
7.服务端会把接收到的字符串和原来自己生成的随机字符串进行验证匹配
ssh客户端:
1.客户端配置文件 /etc/ssh/ssh_config ssh服务端的配置文件 /etc/ssh/sshd_config
ssh客户端会在第一次连接的时候把远程主机的公钥下载到本机,如果需要冒充其它已经连接过的主机,需要把对方的私钥拷贝到本地来
实现基于ssh key的认证
实现指定用户无密码连接,默认是root用户 在ssh-copy-id命令中指定特定的用户名就会把公钥文件拷贝到指定用户的家目录下
ssh-copy-id yxh@192.168.33.130

1.在客户端生成密钥对
[root@yxh6 data]# ssh-keygen -t rsa
Generating public/private rsa key pair.
Enter file in which to save the key (/root/.ssh/id_rsa):
Enter passphrase (empty for no passphrase):
Enter same passphrase again:
Your identification has been saved in /root/.ssh/id_rsa.
Your public key has been saved in /root/.ssh/id_rsa.pub.
The key fingerprint is:
84:69:ce:6b:19:1d:09:c4:94:66:06:2e:76:57:8b:0b root@yxh6.localdomain
The key's randomart image is:
+--[ RSA 2048]----+
|    .=+..        |
|   .  ** o       |
|  o E+* =        |
| . o * + .       |
|      = S        |
|       +         |
|      +          |
|     .           |
|                 |
+-----------------+
[root@yxh6 data]# cd /root/.ssh
[root@yxh6 .ssh]# ls
id_rsa  id_rsa.pub  known_hosts

2.把公钥复制到服务端主机
[root@yxh6 .ssh]# ssh-copy-id 192.168.33.130
root@192.168.33.130's password:
Now try logging into the machine, with "ssh '192.168.33.130'", and check in:

  .ssh/authorized_keys

to make sure we haven't added extra keys that you weren't expecting.

3.直接连接远程主机
[root@yxh6 .ssh]# ssh 192.168.33.130
Last login: Sat May 19 17:31:50 2018 from 192.168.33.1
this is etc/motd,welcome....
[root@centos7 ~]#
多台主机之间实现相互key认证登录
1.在一台主机A上生成一对密钥对所有主机使用同一密钥
2.ssh-copy-id A
3.scp -rp /root/.ssh B:/root
4.scp -rp /root/.ssh C:/root
ssh key认证脚本自动化
expect匹配输出规则:
#Are you sure you want to continue connecting (yes/no)?
#root@192.168.33.129's password:

 1 生成ip列表文件
 2 [root@centos7 .ssh]# cat ip.txt
 3 192.168.33.129
 4 192.168.33.130
 5
 6 #!/bin/bash
 7 rpm -q expect &> /dev/null || yum install -y expect
 8 ssh-keygen -P "" -f "/root/.ssh/id_rsa"
 9 password=root
10 while read ipaddr;do
11  echo $ipaddr
12  expect <<EOF
13    spawn ssh-copy-id $ipaddr
14    expect {
15      "yes/no"   { send "yes\n";exp_continue }
16      "password:" { send "$password\n" }
17    }
18 expect eof
19 EOF
20 done < ip.txt
21
22 给脚本文件设置执行权限
23    chmod +x ssh_key.sh
24
25 执行脚本
26    ./ssh_key.sh
本文来自博客园,作者:不懂123,转载请注明原文链接:https://www.cnblogs.com/yxh168/p/9058043.html


