

mariadb切换成mysql5.7和mysql8集群
mariadb集群安装
yum list | grep galera
yum install galera mariadb-server-galera rsync
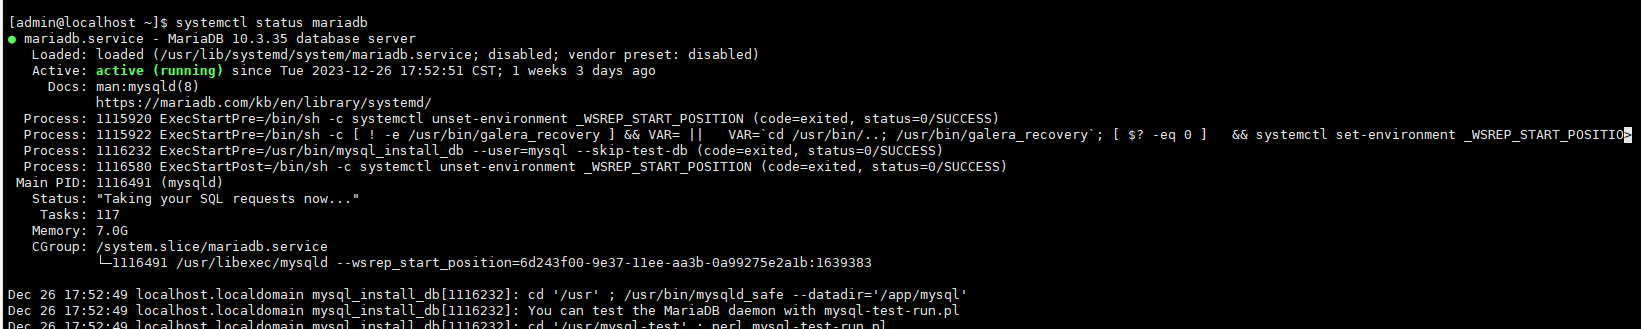
systemctl start mariadb
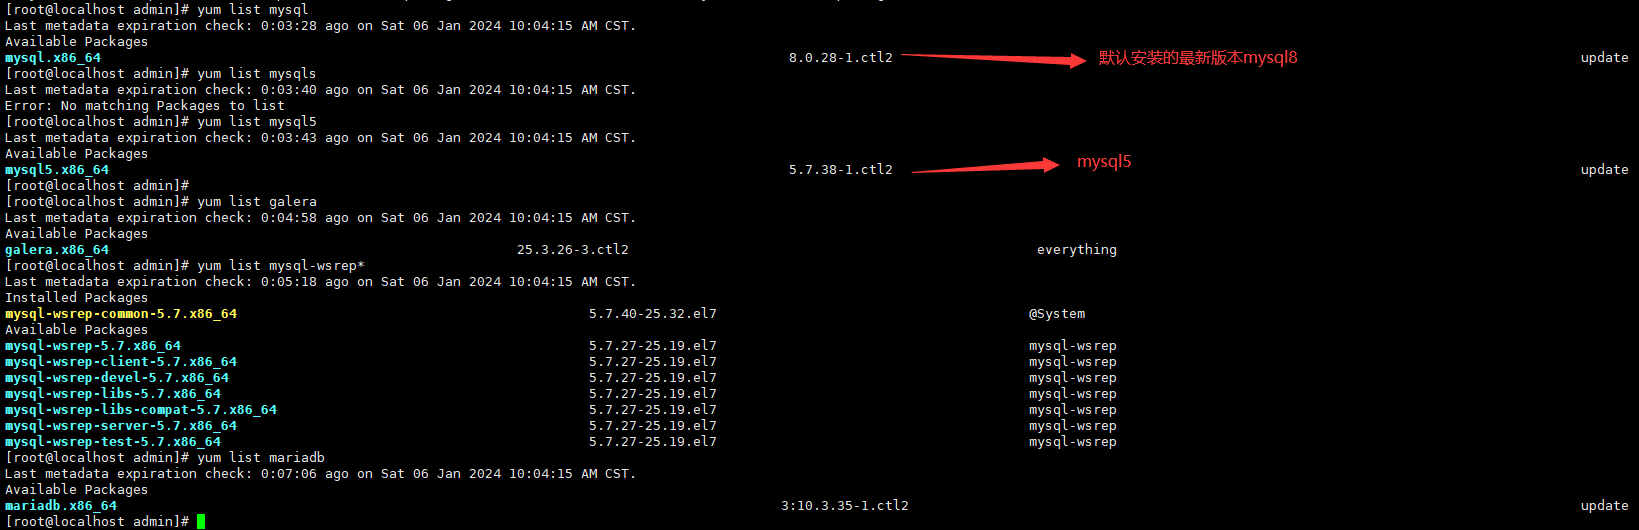
仓库源查看可以安装的包
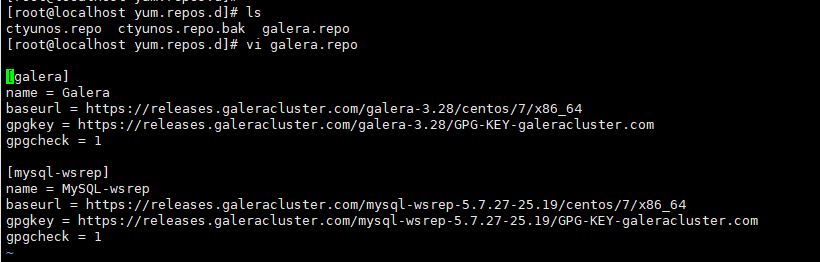
添加yum源


[galera]
name = Galera
baseurl = https://releases.galeracluster.com/galera-3.28/centos/7/x86_64
gpgkey = https://releases.galeracluster.com/galera-3.28/GPG-KEY-galeracluster.com
gpgcheck = 1

[mysql-wsrep]
name = MySQL-wsrep
baseurl = https://releases.galeracluster.com/mysql-wsrep-5.7.27-25.19/centos/7/x86_64
gpgkey = https://releases.galeracluster.com/mysql-wsrep-5.7.27-25.19/GPG-KEY-galeracluster.com
gpgcheck = 1

yum list galera
yum list mysql
yum list mysql5
yum list mysql-wsrep*
yum list mariadb
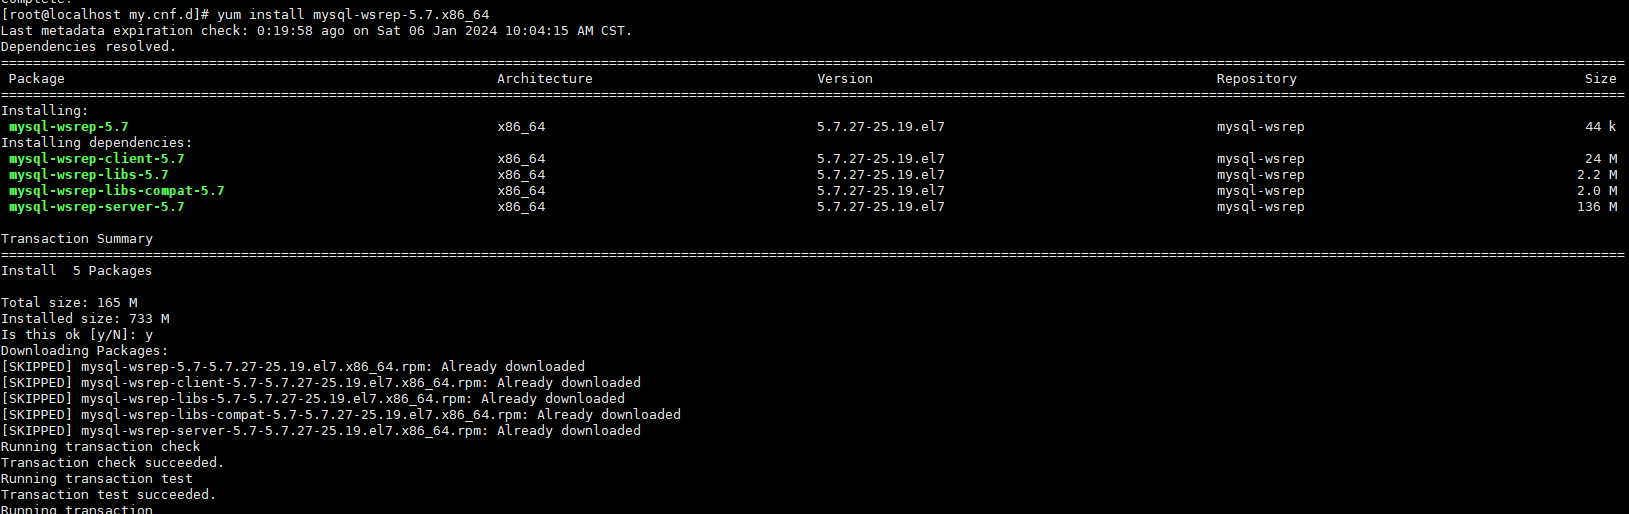
2.安装相应版本的mysql galera集群

yum install mysql-wsrep-5.7.x86_64
yum list galera
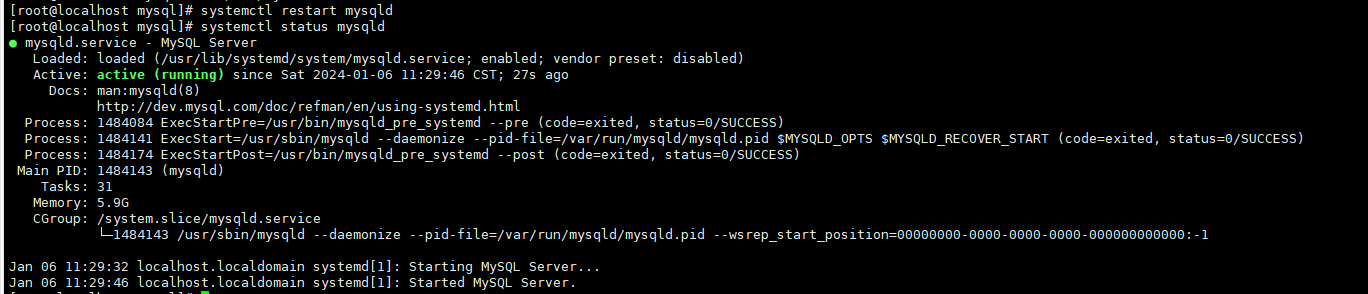
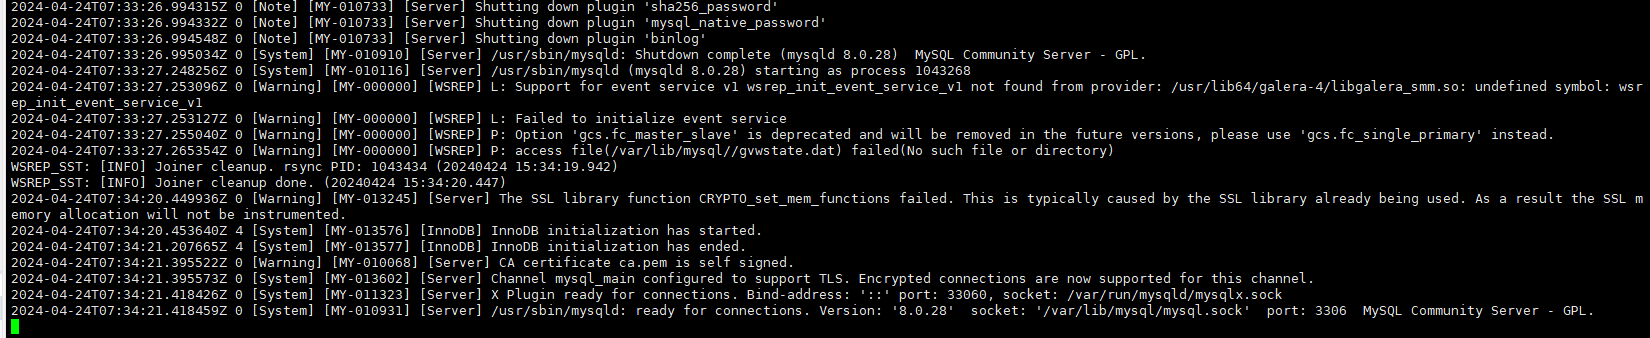
systemctl start mysqld

安装mysql5 galera完毕
启动mysql5集群
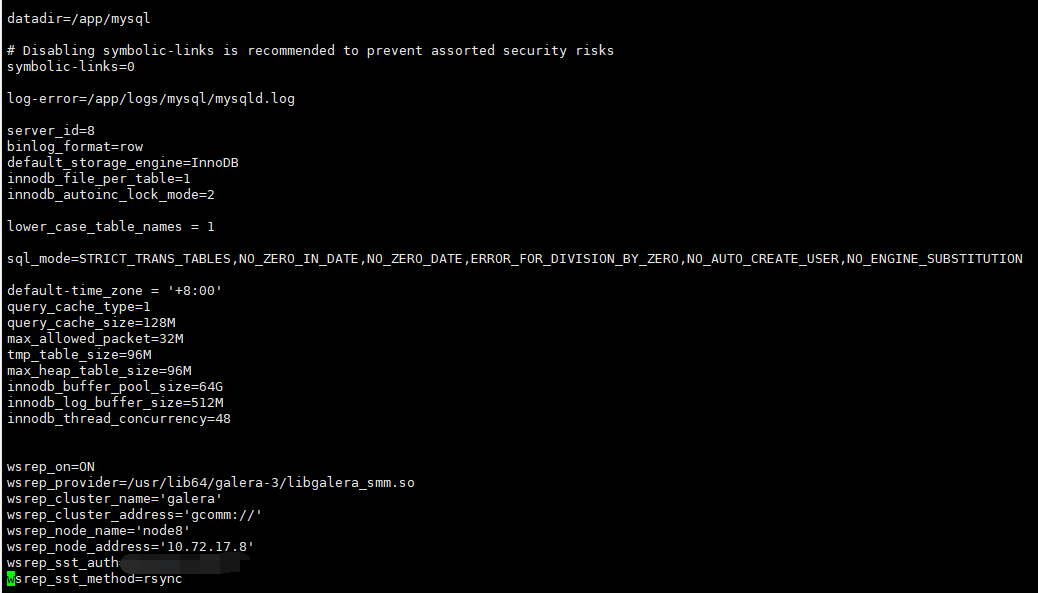
1.修改配置文件
2.启动服务
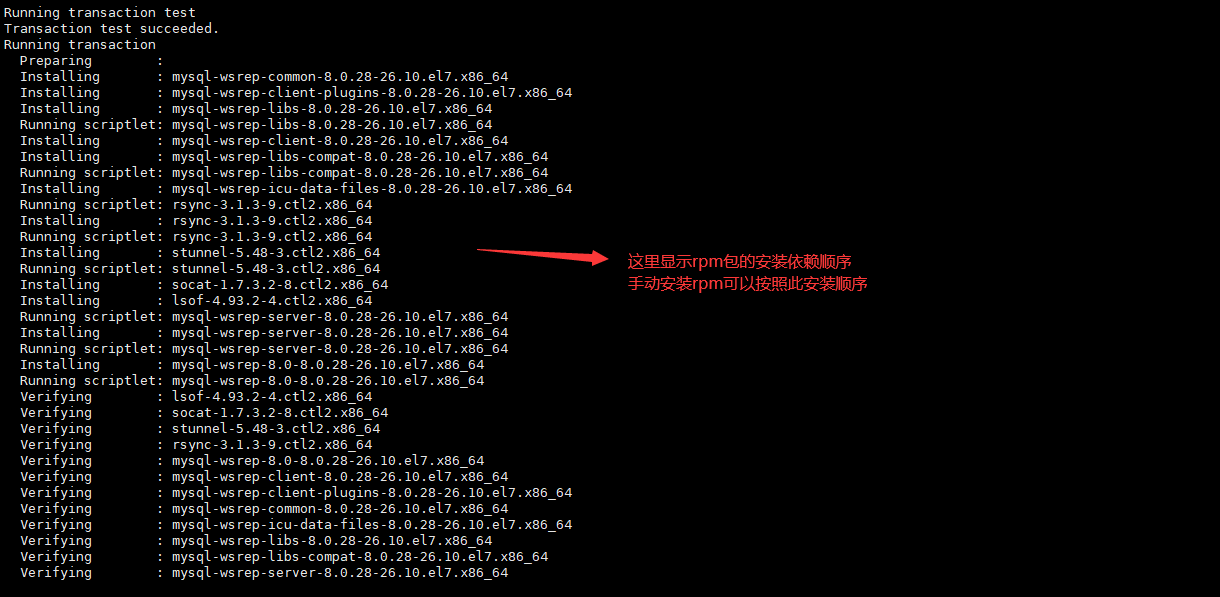
mysql-wsrep8集群安装
1.安装wsrep8服务
https://releases.galeracluster.com/
[root@localhost yum.repos.d]# pwd
/etc/yum.repos.d
[root@localhost yum.repos.d]# ls
ctyunos.repo  ctyunos.repo.bak  mysql.repo
[root@localhost yum.repos.d]# cat mysql.repo
[galera]
name = Galera
baseurl = https://releases.galeracluster.com/galera-4.9/centos/7/x86_64
gpgkey = https://releases.galeracluster.com/galera-4.9/GPG-KEY-galeracluster.com
gpgcheck = 1

[mysql-wsrep]
name = MySQL-wsrep
baseurl = https://releases.galeracluster.com/mysql-wsrep-8.0.28-26.10/centos/7/x86_64
gpgkey = https://releases.galeracluster.com/mysql-wsrep-8.0.28-26.10/GPG-KEY-galeracluster.com
gpgcheck = 1
yum clean all
yum list mysql-wsrep*
yum list galera*

安装命令
https://rpmfind.net/linux/rpm2html/search.php?query=libcrypto.so.10
wget https://rpmfind.net/linux/centos/8-stream/AppStream/x86_64/os/Packages/compat-openssl10-1.0.2o-4.el8.x86_64.rpm
rpm -ivh compat-openssl10-1.0.2o-4.el8.x86_64.rpm
yum install mysql(不再需要安装此包) 因为mysql-wsrep-8.0.x86_64包中包含了mysql包
yum install mysql-wsrep-8.0.x86_64
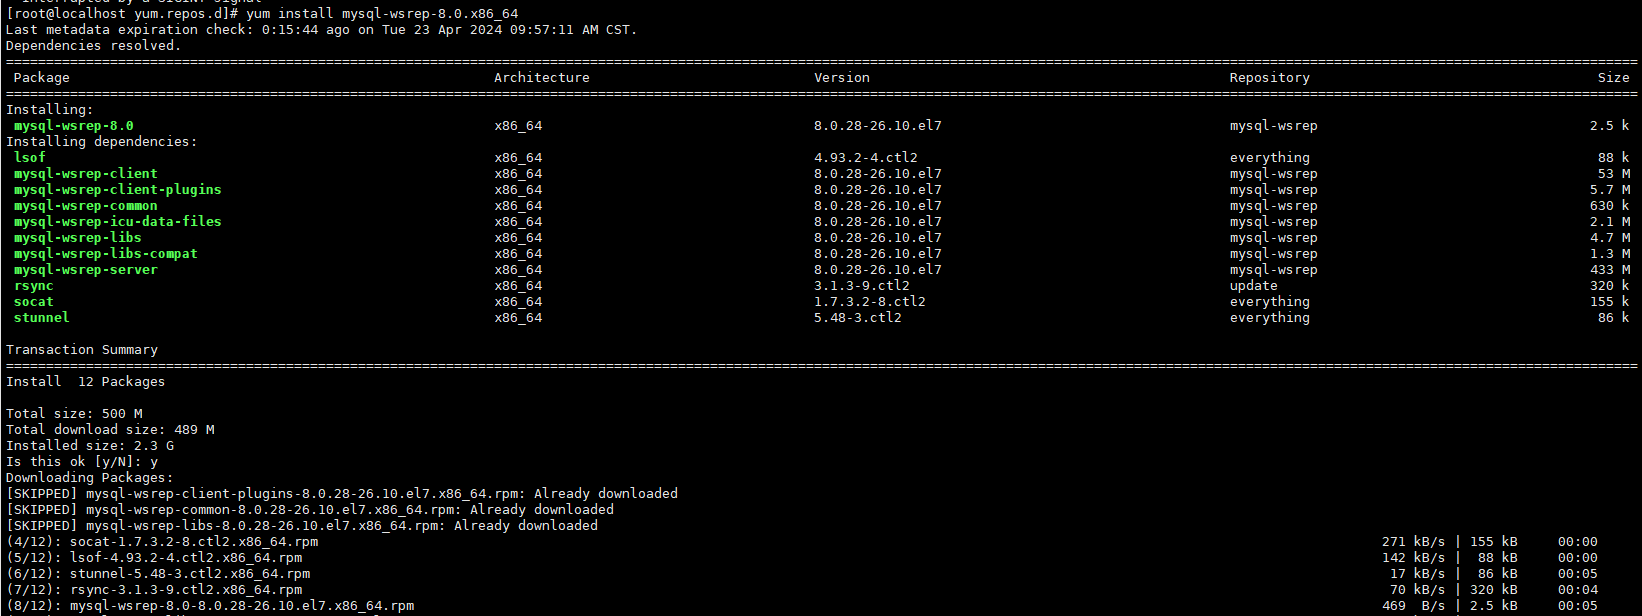
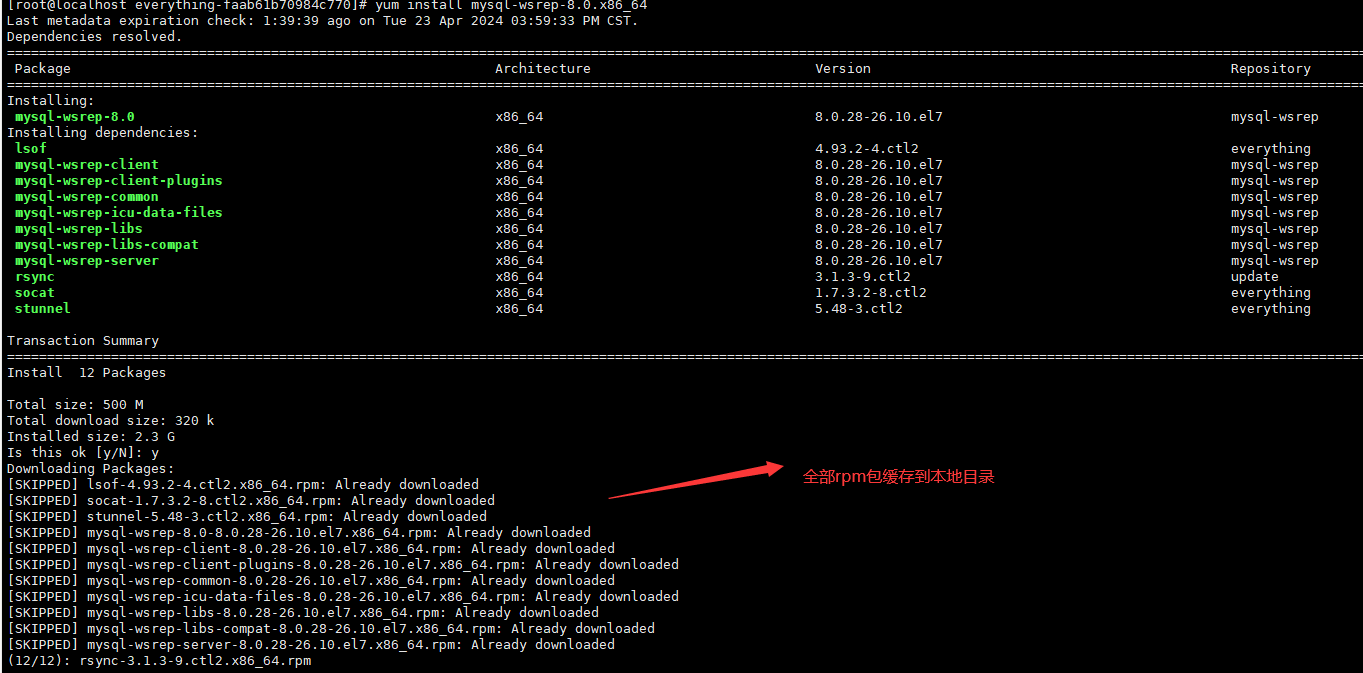
yum 利用缓存安装
cd /var/cache/dnf/mysql-wsrep-93b77c16bd4f865a/packages 可以把需要的rpm包拷贝到此目录下 这样yum安装的时候就不会再从远程仓库中下载
cache目录下的包会自动被定时删除 或者执行yum clean packages来手动删除缓存目录下的包
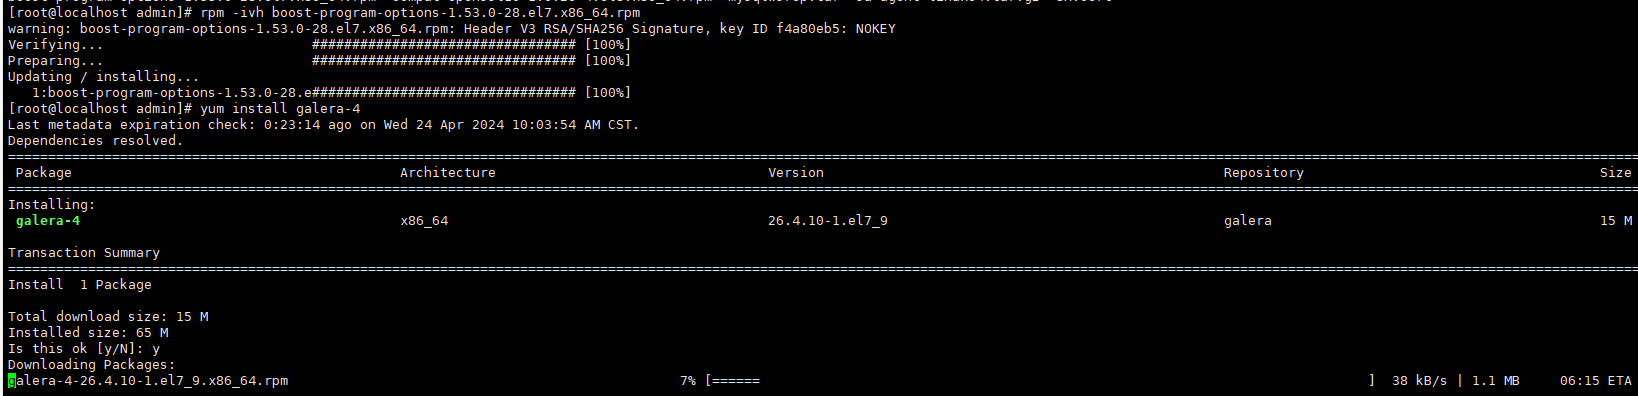
wget http://mirror.centos.org/centos/7/os/x86_64/Packages/boost-program-options-1.53.0-28.el7.x86_64.rpm
rpm -ivh boost-program-options-1.53.0-28.el7.x86_64.rpm
yum install galera-4
systemctl status mysqld

修改mysql的配置文件my.cnf
mysql5
GRANT ALL PRIVILEGES ON *.* TO 'root'@'%' IDENTIFIED BY 'Yanc@1111' WITH GRANT OPTION;
GRANT ALL PRIVILEGES ON *.* TO 'taishi'@'%' IDENTIFIED BY 'Transfar@1111' WITH GRANT OPTION;


mysql8
  use mysql;
  CREATE USER 'root'@'%' IDENTIFIED BY 'Yanc@1111';
  GRANT ALL PRIVILEGES ON *.* TO 'root'@'%' WITH GRANT OPTION;
  flush privileges;

  CREATE USER 'taishi'@'%' IDENTIFIED BY 'Transfar@11111';
  GRANT ALL PRIVILEGES ON *.* TO 'taishi'@'%' WITH GRANT OPTION;
  flush privileges;
# For advice on how to change settings please see
# http://dev.mysql.com/doc/refman/8.0/en/server-configuration-defaults.html

[mysqld]
#
# Remove leading # and set to the amount of RAM for the most important data
# cache in MySQL. Start at 70% of total RAM for dedicated server, else 10%.
# innodb_buffer_pool_size = 128M
#
# Remove the leading "# " to disable binary logging
# Binary logging captures changes between backups and is enabled by
# default. It's default setting is log_bin=binlog
# disable_log_bin
#
# Remove leading # to set options mainly useful for reporting servers.
# The server defaults are faster for transactions and fast SELECTs.
# Adjust sizes as needed, experiment to find the optimal values.
# join_buffer_size = 128M
# sort_buffer_size = 2M
# read_rnd_buffer_size = 2M
#
# Remove leading # to revert to previous value for default_authentication_plugin,
# this will increase compatibility with older clients. For background, see:
# https://dev.mysql.com/doc/refman/8.0/en/server-system-variables.html#sysvar_default_authentication_plugin
# default-authentication-plugin=mysql_native_password

datadir=/var/lib/mysql
socket=/var/lib/mysql/mysql.sock

log-error=/var/log/mysqld.log
pid-file=/var/run/mysqld/mysqld.pid


server_id=174
binlog_format=row
default_storage_engine=InnoDB
innodb_file_per_table=1
innodb_autoinc_lock_mode=2

wsrep_on=ON
wsrep_provider=/usr/lib64/galera-4/libgalera_smm.so
wsrep_cluster_name='galera4'
wsrep_cluster_address='gcomm://'
wsrep_node_name='node174'
wsrep_node_address='192.168.30.174'
wsrep_sst_auth=root:Yanc@11111
wsrep_sst_method=rsync

启动第二个节点
# For advice on how to change settings please see
# http://dev.mysql.com/doc/refman/8.0/en/server-configuration-defaults.html

[mysqld]
#
# Remove leading # and set to the amount of RAM for the most important data
# cache in MySQL. Start at 70% of total RAM for dedicated server, else 10%.
# innodb_buffer_pool_size = 128M
#
# Remove the leading "# " to disable binary logging
# Binary logging captures changes between backups and is enabled by
# default. It's default setting is log_bin=binlog
# disable_log_bin
#
# Remove leading # to set options mainly useful for reporting servers.
# The server defaults are faster for transactions and fast SELECTs.
# Adjust sizes as needed, experiment to find the optimal values.
# join_buffer_size = 128M
# sort_buffer_size = 2M
# read_rnd_buffer_size = 2M
#
# Remove leading # to revert to previous value for default_authentication_plugin,
# this will increase compatibility with older clients. For background, see:
# https://dev.mysql.com/doc/refman/8.0/en/server-system-variables.html#sysvar_default_authentication_plugin
# default-authentication-plugin=mysql_native_password


datadir=/var/lib/mysql
socket=/var/lib/mysql/mysql.sock

log-error=/var/log/mysqld.log
pid-file=/var/run/mysqld/mysqld.pid

server_id=176
binlog_format=row
default_storage_engine=InnoDB
innodb_file_per_table=1
innodb_autoinc_lock_mode=2

wsrep_on=ON
wsrep_provider=/usr/lib64/galera-4/libgalera_smm.so
wsrep_cluster_name='galera4'
wsrep_cluster_address='gcomm://192.168.30.174,192.168.30.175'
wsrep_node_name='node176'
wsrep_node_address='192.168.30.176'
wsrep_sst_auth=root:Yanc@11111
wsrep_sst_method=rsync
1.第二节点或者第三节点在启动的时候卡住的原因是节点开启了selinux
2.卡住现象

关闭selinux 必须采取永久关闭 临时关闭重启操作系统后 再去启动mysql集群服务就会出现各种异常
setenforce 0
sed -i 's/SELINUX=enforcing/SELINUX=disabled/g' /etc/selinux/config

搭建集群结束
本文来自博客园,作者:不懂123,转载请注明原文链接:https://www.cnblogs.com/yxh168/p/17948622


【推荐】国内首个AI IDE,深度理解中文开发场景,立即下载体验Trae
【推荐】编程新体验,更懂你的AI,立即体验豆包MarsCode编程助手
【推荐】抖音旗下AI助手豆包,你的智能百科全书,全免费不限次数
【推荐】轻量又高性能的 SSH 工具 IShell:AI 加持,快人一步
· TypeScript + Deepseek 打造卜卦网站:技术与玄学的结合
· 阿里巴巴 QwQ-32B真的超越了 DeepSeek R-1吗?
· 【译】Visual Studio 中新的强大生产力特性
· 10年+ .NET Coder 心语 ── 封装的思维:从隐藏、稳定开始理解其本质意义
· 【设计模式】告别冗长if-else语句:使用策略模式优化代码结构
2021-01-06 k8s的coreDNS解析组件调试